RSS
 

Posts Tagged ‘Newbie’

5 Common Camera Setting Mistakes Made by Newbie Photographers

01 Jun

Photography is a process of constant learning, so it’s only natural to make mistakes along the way. But with a little bit of advice from those who have been there already, fledgling photographers can avoid a few common camera setting mistakes and focus on bigger and better things. Here are a few tips and tricks I learned early on that will help you get stuck into quality image making.

1 – Leaving image stabilization on when using a tripod

Image stabilization is a handy device that can reduce camera shake and improve image quality when it’s used properly. When activated, image stabilization counteracts slight movements of the camera to help reduce blur in your photos. It can be so effective that cameras and lenses equipped with the system allow you to use a shutter speed of between three and five stops slower than cameras without the feature.

This makes for sharper images in lower light conditions. Sounds great right? Well yes, but not all the time. In fact, when image stabilization is used with a tripod, it can sometimes be more of a hindrance than a help.

If your camera is already set up on a tripod, it should be steady enough by itself. In this case, with the image stabilization left on, the system may try to compensate for minuscule vibrations that wouldn’t otherwise have an effect on the image, increasing blur rather than reducing it.

Check your camera or lens user manual to learn how to switch the system off while shooting with a tripod and you’ll get much sharper images. Just don’t forget to turn it on again when you are going to hand-hold the camera.

5 Common Camera Setting Mistakes Made by Newbie Photographers

In this example, you can see the difference in sharpness between the photograph taken with Image Stabilization on and the photograph taken with IS off. Notice that the photograph with IS off is sharper, with greater contrast.

2 – Using the wrong autofocus mode

When I started out in photography, I remember struggling to properly focus on a subject in my frame, often leaving the camera to select a point at random and hoping for the best. At the time, I didn’t realize the importance of different autofocus modes.

Autofocus offers several different modes which you can select. These are One-Shot AF (Canon)/AF-S (Nikon), AI Servo AF (Canon)/AF-C (Nikon), and final AI Focus (Canon) and AF-A (Nikon).

Probably the most commonly used focus mode is the One-Shot/Single-Servo option. It is the best choice for stationary subjects and serves as the standard setting on your camera. For this setting, the autofocus system achieves focus and then locks that setting in until the shutter is actuated. Once locked, you are assured that your subject will be sharply focused.

AI Servo/AF-C, on the other hand, focuses the lens continuously, which makes it ideal for tracking a moving subject. In this focus mode, the camera will let you take a picture at any time, even if the subject isn’t in focus. This mode is the best choice when you have a moving subject like children, animals, shooting sports, birds, etc.

5 Common Camera Setting Mistakes Made by Newbie Photographers

You can change your focus mode in the quick control panel (this shows the Canon options).

Many cameras also offer a third autofocus mode: AI Focus (Canon) or AF-A (Nikon). This mode attempts to automatically detect whether the subject is stationary or moving and sets the focus mode depending on the situation. However, AI Focus isn’t as reliable as the other two dedicated settings, so it’s best to deliberately select between One-Shot/AF-S or AI Servo/AF-C where possible.


5 Common Camera Setting Mistakes Made by Newbie Photographers

AI Servo/AF-C focus mode is ideal for photographing moving subjects.

3 – Not shooting in RAW format

For much of my early photography, I shot in jpeg. It was a familiar file format, so I just went with it. Only later did I discovered what I was missing out on. JPEG files are processed by the camera. That means that while settings like color temperature and exposure are set based on your camera settings, the camera will process the image to adjust blacks, contrast, brightness, noise reduction and sharpening. The file will then be compressed into a JPEG.

But because the image has been edited, compressed and then saved as a JPEG, information in the original photograph gets discarded and cannot be recovered. This limits how much editing you can do with the image in post-production.

Advantages of RAW format

RAW files, on the other hand, are uncompressed and unprocessed. Although they come out looking flatter and darker than JPEG images, they retain all the information recorded in the original image. This allows for a lot more flexibility in post-production, allowing you to take full control over adjustments that you want to apply to a photograph.

Shooting in JPEG can be useful for happy-snaps or circumstances where output doesn’t need to be as higher quality. Otherwise, for professional-grade imagery, you want to shoot in camera RAW. And if you aren’t sure, it is possible to shoot both at the same time – just make sure you have an extra CF card or two on hand.

5 Common Camera Setting Mistakes Made by Newbie Photographers

You can see that the unedited, uncompressed RAW image is a lot flatter than the JPEG because it retains all the information of the original shot. Only after processing will the RAW image match or surpass the look of the JPG.

4 – Always shooting in automatic mode

Automatic exposure mode means that the shutter speed, aperture and ISO are set automatically by the camera for a given situation, leaving you to depress the shutter button and move onto the next shot. But what if you want to take more control over your images?

The biggest advantage of shooting in manual mode (or shutter/aperture priority mode) over automatic is creative control. Plus, the camera doesn’t always get the algorithm for exposure right, so you can end up with underexposed or overexposed images.

Choose a semi-automatic mode instead

You don’t have to shoot fully manual to take better control of your images either. Aperture and Shutter Priority modes allow you to select and adjust either your aperture or shutter speed while the camera compensates to give you the right exposure.

5 Common Camera Setting Mistakes Made by Newbie Photographers

Auto shooting mode.

By using Aperture Priority, you have much more control over the depth of field in your image, dictating how much of the image is in sharp focus. This is helpful for many genres from portraiture to landscape photography, changing the dynamic of your images depending on the situation and how deep you want your photographs to look.

As for using Shutter Priority, being able to take control of the motion in an image allows for a lot more creative leeway. Motion blur has long been used to make images more dynamic. Think waterfalls with smooth flowing water and time-lapse cityscapes, as well as intentional camera movement.

While Automatic exposure mode is useful and often effective, relying only on Auto is allowing your creative photographic potential go to waste. Experimenting with shooting in full Manual or Shutter or Aperture Priority Mode means that you can truly get to know your camera and exploit its artistic possibilities.

5 – Not backing up files

We have a saying in Australia; “She’ll be right”. The term asserts that whatever is wrong will right itself with time. It’s both an optimistic and an apathetic outlook, and when it comes to photography, it can be the start of a spiral into digital file oblivion. I’m talking about backing up files.

Okay, so it isn’t technically an in-camera setting mistake, but photography has an enormous output of content that needs to be maintained so that it is as fresh as the day it was created.

From day one, “she’ll be right” just doesn’t cut it. If you only have one copy of your images stored on a hard drive, and that hard drive fails, (as they often do) then you’ll completely lose all your work. Forever! The easy solution is to have a second or even third copy of your images stored somewhere else, either on an external hard drive or cloud storage service.

Make the investment now and you’ll thank yourself later.

5 Common Camera Setting Mistakes Made by Newbie Photographers

An old favorite, this image is backed up on two separate hard drives!

Conclusion

Starting out in photography can sometimes seem like a daunting task – there’s so much to learn! But photographers, for the most part, are a friendly bunch. We’re happy to pass on the tips and tricks we’ve learned along the way.

By doing your research, there are plenty of ways to dig into photography, avoiding common mistakes, and delve into the world of photography with confidence!

The post 5 Common Camera Setting Mistakes Made by Newbie Photographers appeared first on Digital Photography School.


Digital Photography School

 
Comments Off on 5 Common Camera Setting Mistakes Made by Newbie Photographers

Posted in Photography


25 Things I Learned as a Photography Newbie

30 May

It seems photography should be easy, buy a camera and take photos, right? Except it’s not just a camera you need, there are other accessories and things you need to know as a photography newbie. Which lens do you buy and why? What do you shoot? How do you set the camera up correctly? What is the best way to process RAW files?

25 Things I Learned as a Photography Newbie

Walk into a good camera shop and there are walls covered in bags, cabinets full of lenses, banks of accessories, and tripods arranged in an artistic installation on the floor somewhere. It can be hard to know what extra things you really need versus what the salesperson tells you to buy. The internet offers lots of options for research in advance, but sometimes you just have to find things out the hard way.

Plus the salesperson can’t help you once you walk out the door, get your camera home, and you try to make sense of the camera’s user manual for the first time. Suddenly you are on your own with so much possibility and opportunity in front of you, but not really sure how to tackle it.

25 Things I Learned as a Photography Newbie

These are the top 25 things I learned as a photography newbie

Gear related things

  1. Buy at least one spare battery and memory card, two if you can afford it. Remember to keep those spares charged!
  2. Check your camera gear and settings before you leave the house – preferably the day before (so you can charge batteries). Realizing you left your memory card plugged into your computer, and your battery on the charger an hour into your trip is less than ideal.
  3. The perfect camera bag is like the Holy Grail. You will go through several bags trying to find the best compromise for your requirements.
  4. New gear doesn’t make you a better photographer. Many people are under the impression that buying a fancy expensive DSLR body somehow guarantees their images will be amazing. A new lens might enable you to shoot subjects in a better way (e.g. a macro lens lets you get close to small things, a long zoom makes it easier to photograph birds or animals) but these things are a tool that you, the photographer, has to make work.
  5. Buy a good tripod and get comfortable using it.

A tripod is an absolute necessity for shooting in the dark, especially when it’s a long exposure as well

Gear isn’t just about cameras and lenses

  1. Going out in the dark? Get a headlamp or torch, preferably one on a swivel mount so you can point it at the ground while walking in the dark. This is vital for not slipping and breaking an ankle on rocks or broken ground, and finding things in your bag.
  2. Invest in good footwear. Take a hat, sunscreen, water and insect repellent. Also, carry an extra layer of clothing just in case.
  3. Have proper cold weather gear. Nothing is worse than being outside with cold wet feet and numb fingers. If you live in areas that get properly cold, have good footwear suitable for the kind of terrain you will be out in. Clothing technology has advanced a lot in recent years, there are many options for the base, middle and shell layers, gloves, hats, and socks that are thin, light and easy to wear. Good quality gear can be expensive, but it usually lasts and is worth the investment.
  4. Get proper camera insurance. Camera gear is expensive and is often a target for thieves (don’t leave it in your car overnight). Accidents happen, a sudden large ocean wave can wipe you and your tripod out without warning. Tripod heads can fail and cause your camera and lens fall five feet straight onto a concrete floor. All sorts of mishaps can happen, so protect your investment with insurance, it is a lot cheaper than having to replace the gear yourself.

Making better images

I saw this scene in my rear view mirror, a quick handheld capture that was well worth the extra stop.

  1. Look behind you, above, and side to side. Sometimes the best view isn’t the obvious one directly in front of you. This applies especially if you are shooting a well-known and frequently photographed location. Put some effort into making your image something different. Exert yourself to break away from the crowd.
  2. It takes some time to get past the beginner stages of photography and to show improvement. It takes even longer to develop proficiency and “get good at it”.
  3. Composition is critical and will make or break any image. This is the one subject I personally recommend people invest time in researching and learning. There are loads of articles about composition online, take the time to read them and then practice, trying to see different composition options when shooting. Many people stand and shoot as their only option. Getting down at ground level or eye level can make for an entirely different image. Setting the camera in portrait or landscape mode can make a real difference. Learning composition is one of the most powerful tools you have as a photographer.
  4. The best sunrise or sunset is the one you stayed at home for. You can go out every morning for months and get nothing good, that one day you stay home and sleep in? Guaranteed to be a stunner.

My second sunset was well worth getting out of bed for.

  1. It’s all about the light that you have right at that very moment.  Sometimes you have the option to walk away and come back, sometimes you don’t. So it’s important to learn how to see the light you have and know your options for capturing the best image possible with the available light.
  2. Take your camera out as often as you can and practice as much as you can. However, there are times when you might prefer to be in the moment, enjoying the action (a concert or party or event) and that is okay too.
  3. Check the edges of your frame before you shoot. Run your eye around the edge of the image in the viewfinder. Are there any branches, grass or trees poking out in awkward ways? Does your portrait subject have a lamp post coming out of the top of their head? Is everyone fully within the frame – there are no chopped off hands or feet or tops of heads?

White clover shot with 100mm macro lens.

Camera settings

  1. Muscle memory – learn what the buttons on your camera do, and where they are. Learn it so well you can find them by feel, in the dark. When responding to changing situations, it’s important that you can adapt quickly and without thinking too long about it.
  2. Manual mode is just another setting on your camera. There are no rules that say you have to use it all the time, although there are plenty of opinions on the subject. If shooting in manual makes your heart sing, then good for you. If the thought makes you really nervous and uncertain, that is okay, there are other options available.
  3. Back Button Focus is the preferred option for many wildlife and bird photographers. It is faster to use once you get used to the change.

This guy stuck his head into the frame as I was composing, had to react quickly to get the shot, and it is not 100% sharp as a result. Knowing your camera inside and out will help you get shots when time is of the essence.

Workflow and image processing

  1. Develop your own process and workflow. There is no right or wrong way to do things and there might be more efficient or different ways to achieve an outcome. Find one that works for you.
  2. Printing your work is surprisingly complicated. There’s calibration of the monitor, color profiles of the printer and paper, soft proofing, and so many different paper options and finishes. Even getting the professionals to do it for you can be challenging. Be prepared to spend a bit of money experimenting and finding out a way that gets you quality prints.
  3. Data storage and backup are a priority. If you are not particularly interested in computer technology, this can be a bit challenging. If you shoot in RAW format which outputs large image files, eventually you will have to address the requirement to store your data. Usually, at the point your first hard drive fails, backing up your data also becomes a consideration.
  4. Learn to crop and don’t be afraid to use it. Creative use of a crop can be a powerful composition tool, either improving the shot or fixing it (maybe you chopped people’s feet off). Be aware that cropping your image removes pixels and data from the file size, and that can limit how big final prints can be.

The weather was dreadful, a friend stood over me with an umbrella while shooting this, but converted to BW makes all the difference. Shoot with the light you have and know what you can do with it.

Still life studio with reflector, lenses, still life props and a cat asleep in his favorite spot.

Advancing your work

  1. Share your work and invite discussion. Places like Facebook, Instagram, Twitter and various gallery sites online are easy avenues for sharing images. Start a blog and share your learning journey, the blogging community can be very supportive and friendly. Join your local camera club for some face-to-face interaction. Getting critiques can be valuable, but a thick skin is also necessary, as not everyone will be a fan. Some people will be nice and some people will not be and that can be difficult to hear.
  2. Push your boundaries. Some styles of photography will be easy for you, more enjoyable and fun. It’s good to spend time in that space and improve your craft. However, trying new styles can be a powerful learning tool as well. Don’t be afraid to try something new, remember it can take a while to get the hang of it, so don’t expect instant success.

Flat out on my stomach in the dirt was the only way to get this intimate composition.

The sky was heavily overcast and the light was dull, but the cygnets were adorable.

Sleeping ducklings, so fuzzy and cute. Taken flat out on my stomach with a long lens to keep my distance and not disturb them.

Summary

Like every new hobby, once you get started and scratch the surface, there is lots more to learn than you expected. Some lessons can only be learned the hard way, via personal experience.  Making mistakes is a powerful learning experience provided you and your camera gear survive the experience.

Since starting photography in 2007 there have been many mistakes made, and hopefully, lessons learned along the way. I offer up my experiences so you can hopefully save yourself some time, money and hardship and not do some of the silly things that were the reasons for the above list.

Good luck and happy shooting. Be safe and have fun.

The post 25 Things I Learned as a Photography Newbie by Stacey Hill appeared first on Digital Photography School.


Digital Photography School

 
Comments Off on 25 Things I Learned as a Photography Newbie

Posted in Photography


5 Things Every Newbie Photographer Must Learn and Practice

21 May

There are certain things as a photographer you should know regardless of if you are an expert or a novice. These simple yet powerful lessons not only differentiate you but also help you grow in your art and your photographic career. For every newbie photographer, these are essential lessons to learn and practice.

Note: For the purposes of this article, all the images used here are SOOC (Straight out of camera). This is done to demonstrate key concepts highlighted here. My camera of choice is Canon 5D MKIII with a few common Canon L-series lenses like the 50mm and 85mm.

#1 – Know your gear inside out

This almost seems like a no brainer but I am surprised by the number of people who say that they have a really fancy (and expensive) DSLR camera but still shoot in auto mode 100% of the time. Now before you get all upset and say that there is nothing wrong with shooting in auto, I will raise my hand and say that yes, I also shot in auto when I got my first DSLR camera. But very quickly I realized that my camera (a Canon 5D MKII at that time) was a fantastic and sophisticated piece of equipment that was capable of some incredible shots if I only knew how to operate it.

So take the time and really know the ins and outs of your gear. The user manual is a great place to start to not only familiarize yourself with what all the buttons do but also where they are located on the camera. You should be able to adjust settings without removing your eye from the eyepiece/viewfinder when you are composing your frame. Think about it this way, would you like to own a convertible and always drive with the top up (i.e. closed), even on the most gorgeous of summer days?

Here are some ways to learn the ins and outs of your gear.

ISO – Play around with various ISO settings to understand how it affects exposure and what is an acceptable ISO grain (for you). This will help you make photography decisions in low light situations. Some of these ISO decisions may be limited to the kind of camera you have. Regardless, you should know the upper limits of your gear.

5 Things Every Newbie Photographer Must Learn and Practice

The quality of light at the stables where my kids ride is terrible. Even though they have lots and lots of flood lights, there isn’t enough light just because of the sheer size of the barn. These images were shot handheld at ISO 3200 – the one on the left was at 1/60th shutter speed whereas the one on the right was at 1/400th. That was because of the natural light coming in closer to the wall that illuminated my son and gave me a higher shutter speed to capture the motion of the horse.

Sweet spot – Find the sweet spot for your lens. Every lens has an aperture setting where the image is sharper overall than others. This will help you analyze what is the widest aperture (smallest f-stop) you can shoot in and still have the image in focus. This is different than the depth of field (which is how much of the scene is in focus) in that the actual resolution of the image is sharper at the sweet spot.

Minimum shutter speed – Find out what is the lowest shutter speed you can handhold your camera and get a sharp image. This will also help in low light situations as well as in creative motion blur type shots when you don’t have a tripod handy. The general rule of thumb is to shoot at one over the focal length of your lens.

5 Things Every Newbie Photographer Must Learn and Practice

Here I was shooting in a dark canyon with dark stone walls. I was using a 35mm lens at f/1.4 (completely wide open aperture) because I wanted a very low ISO (100) to eliminate any noise. My shutter speed dropped to 1/30th – which I clearly could not hold steady…the image is completely blurry and out of focus!

Weight – Find out what is the maximum weight you can comfortably carry without hurting yourself or almost passing out because of discomfort from carrying excess weight (true story!)

#2 – Know and understand light

There are some photographers who only shoot in natural light while others only shoot using some form of artificial light. Then there are photographers who shoot in any type of light and do a fantastic job at that. There is no right or wrong answer here in terms of preference but it is important to know how to shoot in any form of light. That might be the only thing that stands between you and the shot of your dreams.

Knowing how to read, analyze, and play with light is one of the most basic and important skills every newbie photographer should know, in my opinion. Keep in mind that not all light is equal from a purely technical standpoint (tungsten versus fluorescent versus white-balanced light). Certain types of light are good and others are not so good. Experiment with many different kinds of light so you know how to read light, then learn how to shoot in each.

These three images were all shot within the hour just before sunrise.

Here my settings are as follows ISO1250, f/2.8, 1/60th shutter speed. I LOVE the blue in the sky falling on the snow covered Pike’s peak in Colorado.

5 Things Every Newbie Photographer Must Learn and Practice

The warm sunrise cast such a magical glow on the mountain and surrounding areas. My settings here were ISO 320, f/5.0, and 1/500th. The sky filled with so much light that I had to stop down my aperture to be perfectly exposed.

5 Things Every Newbie Photographer Must Learn and Practice

The overcast sky with little spots of blue took my breath away. My settings here were ISO 320, f/5.0, and 1/800th to get a perfectly exposed photo.

5 Things Every Newbie Photographer Must Learn and Practice

I do not like indoor yellow tungsten light…everything become so orange! (A custom white balance or correction in processing is necessary)

5 Things Every Newbie Photographer Must Learn and Practice

But neutral natural light is so much easier to work with and to get even natural-looking skin tones.

3 – Practice good ethics

Be respectful of the people, places, and things you photograph. I cannot tell you how much it pains me when I see photographers (both amateurs and professionals) disrespect their surroundings. Be it climbing where they are not supposed to, keeping heavy equipment on delicate surfaces, overcrowding and overstaying their welcome in public places and not giving other general tourists the opportunity to enjoy the scenery.

Pay special notice to other photographers. These are folks in your industry even if they are beginners. They are all in it for the same reasons you are – love for the art! Leave that sense of entitlement behind, just because you have more expensive gear does not make you a better photographer or a creative artist. Take the extra effort to find out what the photography rules are in the places that you intend to photograph and stick to them.

5 Things Every Newbie Photographer Must Learn and Practice

I belong to several groups of photographers and we regularly meet to shoot the breeze, photograph together and just generally geek out about all things photography. There is no pressure, no tension and everyone plays nice! Community over competition!

4 – Safety

Be safe when you are out and about. Always be aware of your surrounding especially if you are a female photographer who tends to travel alone. Check out this article  Safety Tips for Travel Photographers (Particularly Women) that addresses this issue. Remember safety always comes first, art next.

5 – Be your true self and be patient

Whether you choose to be in business or not, be true to your art. Get inspiration not just from other photographers but also from daily life. There are many amazing things around us at any given point in time. Just because no-one else photographs it does not make it boring. Similarly think outside the box, just because everyone photographs something a certain way does not mean you have to follow the pack.

When you are starting out, don’t obsess over clients, getting work, and making money. Yes, they are absolutely important, I will not disagree, but take the time to perfect your art (to the point where you are confident charging money for your photography) and then the money and fame will follow.

Also give out as much as you can, be helpful and uplift others who are on this journey with you. The more you put out there the more you will receive from the universe! I truly believe in that mantra across all walks of life.

5 Things Every Photographer Must Learn and Practice

I am always coming up with shoot concepts and ideas to keep experimenting. Some work and some fail miserably but that’s okay. I take everything as a learning experience and try to stay positive in my game. An editorial shoot with my daughter captured on film was a complete disaster as I got all the setting wrong and ended up with grainy, grudge frames! – but I learned a whole lot about film and light and how different it is to digital!

5 Things Every Photographer Must Learn and Practice

Leftover florals from Valentine’s day gave me a chance to practice some styling as well as a more moody, contrasty way of editing – which I sort of like and dislike at the same time! But no money was lost and I only used 10 digital frames and spent 30 minutes in editing experimentation.

Conclusion

Are there any other life lessons that photography has taught you? In the spirit of building this community of creatives, feel free to share it with others.

The post 5 Things Every Newbie Photographer Must Learn and Practice by Karthika Gupta appeared first on Digital Photography School.


Digital Photography School

 
Comments Off on 5 Things Every Newbie Photographer Must Learn and Practice

Posted in Photography


Solving the Biggest Newbie Confusions with Lightroom by Phil Steele

07 Aug

Photography educator Phil Steele has taught Lightroom to tens of thousands of people. In this video tutorial he helps clear up the biggest confusion around using Lightroom that most beginners have – understanding how Lightroom and the catalogue work.

Watch this video to get a better understanding of how Lightroom works behind the scenes. If you’ve been using it for a while you can either confirm that you’ve got it right, or clear up some things that you may still not be 100% clear on.

Learn about several common sources of confusion when using Lightroom including:

  • The Lightroom database or catalog, what it is and how the “mind” of Lightroom works
  • Where Lightroom stores your images
  • How to get the edited versions out of Lightroom

If you enjoyed that video, and want to learn even more about Lightroom you can check out Phil’s course: Lightroom Made Easy.

googletag.cmd.push(function() {
tablet_slots.push( googletag.defineSlot( “/1005424/_dPSv4_tab-all-article-bottom_(300×250)”, [300, 250], “pb-ad-78623” ).addService( googletag.pubads() ) ); } );

googletag.cmd.push(function() {
mobile_slots.push( googletag.defineSlot( “/1005424/_dPSv4_mob-all-article-bottom_(300×250)”, [300, 250], “pb-ad-78158” ).addService( googletag.pubads() ) ); } );

The post Solving the Biggest Newbie Confusions with Lightroom by Phil Steele by Darlene Hildebrandt appeared first on Digital Photography School.


Digital Photography School

 
Comments Off on Solving the Biggest Newbie Confusions with Lightroom by Phil Steele

Posted in Photography


7 Common Mistakes That Newbie Street Photographers Make

26 Feb

Over the last few years I have worked with enough budding new street photography enthusiasts, to notice a common thread of early mistakes that many of them make. A lot of these are very simple tendencies and changes, that can make a vast difference to the final output. It’s for this reason that I try to teach these 7 tips from the very start. Follow along so you can avoid the seven common mistakes that newbie street photographers make:

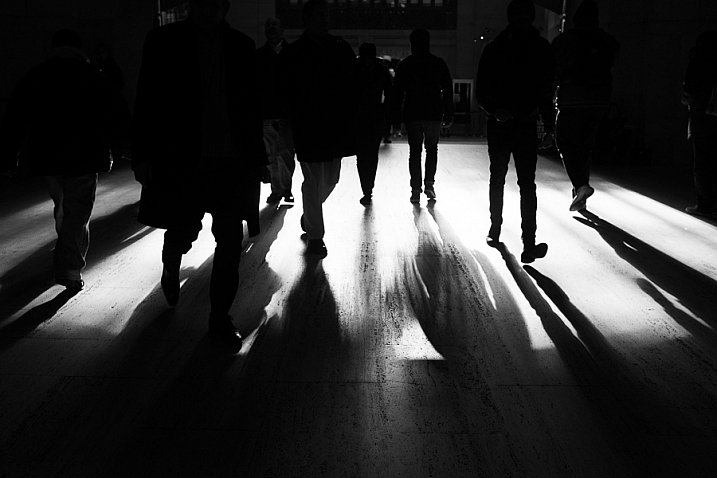
Grand Central, NYC Street Photography

Grand Central, NYC.

1. Thinking too much while shooting

If you are reading this article, you are on the right back. You should read about photography to teach yourself, and study the work of great photographers. However, when you are out there, in the process of shooting, try to not over-think things too much. There are so many tips and tricks, and you may worry a lot about capturing bad images, but that can all get in the way sometimes.

Instead of worrying about the results, get lost in the process. You can assess your results during the editing phase. When you are out there shooting, have fun. Explore, take your time, relax, and just watch everything go by. This is a type of photography that you really have to enjoy to do well, and the best part about it is that you can go out and do it nearly anywhere and at any time. You can do it in 10 minute spurts, or during your lunch hour. You can even do it with your iPhone if you don’t have your camera. The more fun you have with the process of being out there, getting lost, and exploring, the more dedicated you will become, and the better street photographer you will become.

2. Traveling too heavy

There are many great videos of the old masters shooting street photography. You know what is the one common thread between many of them? It’s that they had manageable sized cameras, that they could easily take anywhere, and they more often than not they used small prime lenses. You can certainly shoot street with an SLR, and do it very well. There are top photographers that do just that, but at the same time are you really going to want to carry that tank of a camera around on a daily basis? That’s the big advantage of a smaller camera, and the technology is catching up quickly with the large bodies. A small Fuji camera, or a Ricoh, will do wonders, and you can even get an older used version for much cheaper than the new ones. There are many iPhone street shooters as well.

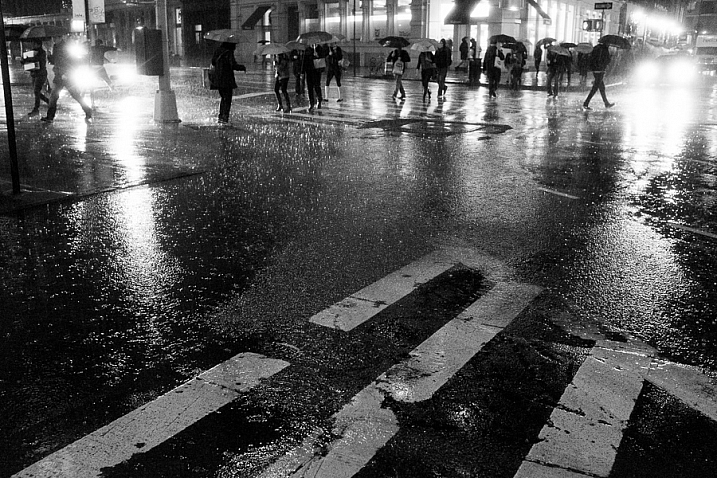
Astor Place, NYC Street Photography

Astor Place, NYC.

Likewise, you do not need a big bag of lenses and filters. If you haven’t tried it, I can’t stress enough, how freeing going out for a day with a single small camera body, and a single prime lens, can make you feel. Leave the rest behind. Yes, you will miss out on that 200mm zoomed shot of the water tower, but you will come back in the long run, with so many more good photos, and you will have a lot of fun doing it.

3. Trying to get somewhere too quickly

We’re all in a rush these days, running from place to place. Luckily, that is one of the worst ways to do street photography. To do street photography well, you need to slow down, and take your time. You can’t always be in a rush. Look around, and wait for things to happen. Wait with your camera, and let the subjects come to you. The slower you go, the more aware you will be of your surroundings, and the more able you will be to capture those extraordinary fleeting moments. Use photography as a way to break out of the rushed lifestyle, and to get lost and slow down for awhile.

4. Not standing in the middle of the action

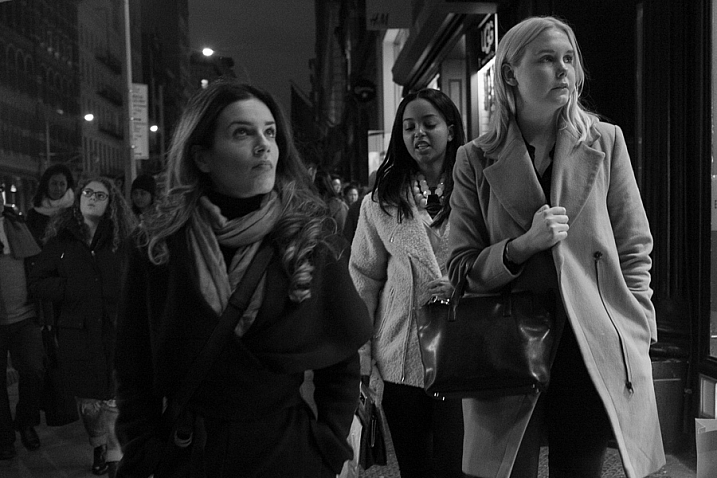
Broadway, SoHo, New York Street Photography

Broadway, SoHo, NYC.

It is so easy to get intimidated when you are first learning. Many people start by photographing from a distance, and they never really push themselves to get right in the middle of what’s happening. Carry your camera proudly, put a smile on your face, and get involved in the action. Get in the middle of the street.

You might notice that if you are standing too far away and shooting, then people will actually think you are up to no good. But, if you are directly in the middle of the action, people will walk right by thinking that you are doing nothing wrong. Sometimes you’ll even blend in more being in the middle. How could you possibly be doing something wrong if you are right there in the middle? Nobody that obvious would be doing anything bad, but that photographer creeping around over there in the corner, just has to be a stalker. Stop and wait right in the middle of an area where things are happening, and just let everything happen around you. Engulf yourself in the experience.

5. Not putting the camera to your eye enough

I hip shoot a decent portion of the time, particularly when things are happening incredibly fast, but I also try to look through the viewfinder as often as possible. A lot of new photographers only hip shoot, and it quickly becomes a crutch. After a while, they become even more afraid to put the camera to their eye, than when they started. Force yourself to get comfortable shooting through the viewfinder. Just stand in a busy place, with the camera to your eye for a while, until you feel comfortable. After that you can add in the hip shooting. There will be situations where a hip shot is beneficial, but you will get better shots, and better framing, when you look through the viewfinder. Take pride in seeing it all coming together, and capturing that split second moment where it does.

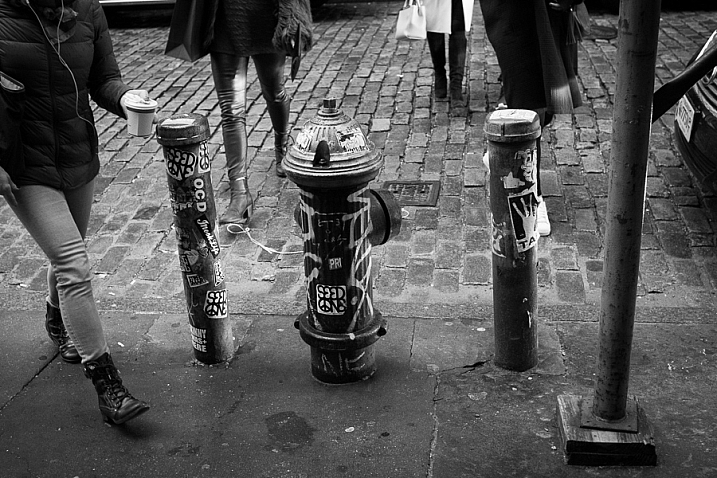
Fire Hydrant, SoHo, NYC

SoHo, NYC.

A tip that helps with this, is to not take the camera away from your eye right after you take a shot of someone. It’s a natural habit to remove the camera from your eye briefly when you take an image. Instead, get in position, and wait for a person to be in the right spot, Then, take the image, but continue to keep the camera to your eye as they walk through the scene and past you, as if they got in your way and you are trying to photograph what is behind them. This trick works incredibly well in areas with quite a few people walking around.

6. Rapid firing with the camera

Turn the machine gun setting on the camera off. A lot of people think that if they take 10 photos of the same scene, they will be guaranteed to get a good one. Where’s the art in that? I actually find that holding down the shutter button, and taking a stream of shots, is a way to guarantee that you will screw up the shot. You need to be able to visualize what you are getting. See the moment as it happens, then capture the elements as they all fall into place. That only takes one shot. Then, as a scene further develops, you can take more, but see the moment and grab it. If you miss it, and you will miss some, there’s always next time. Let go of the fear of missing a shot.

In addition, with rapid fire you will end up taking 10 times the number the photos, over the course of the day. How are you going to find the perfect moment in all of that? Nobody has the time, or the hard drive space. With less, and more purposeful photographs, comes a much more enjoyable editing session.

7. Under and over-editing

East Village, New York Street Photography

East Village, NYC.

A lot of new street photographers will both under, and over-edit their photos. What I mean is that they will show too many photos, and they will over-process them. Be ruthless with narrowing your photos down to the best ones. You want people to actually give your work attention, and if you show too many photographs at one time, they will tune out. By showing too many photos you are relying on the viewer to do the editing in their heads about what they like. That’s not fair to them, do that work yourself. Spend that extra time organizing. Use a starring system to give your photographs ratings and make sure that there are not too many five star images. Spend the time after each shoot to narrow it down to just the cream of the crop. If you don’t do this consistently, you will allow your archive to pile up into an unorganized mess.

When you do the actual editing to your photos, keep a light touch. You can, and should fix the exposure, blacks and whites, vignettes, color temperature or black and white tones, contrast, and all that other good stuff. However, a lot of new street photographers go way too far. Part of the extraordinary nature of street photography is that it was actually captured in the real world. It was not made up. If your photos are too edited, and lose that real feeling to them, it kills the thing that makes them special.

Are you guilty of any of these mistakes? How have you overcome them? Do you have any others you’d like to share? Please do so in the comments below.

googletag.cmd.push(function() {
tablet_slots.push( googletag.defineSlot( “/1005424/_dPSv4_tab-all-article-bottom_(300×250)”, [300, 250], “pb-ad-78623” ).addService( googletag.pubads() ) ); } );

googletag.cmd.push(function() {
mobile_slots.push( googletag.defineSlot( “/1005424/_dPSv4_mob-all-article-bottom_(300×250)”, [300, 250], “pb-ad-78158” ).addService( googletag.pubads() ) ); } );

The post 7 Common Mistakes That Newbie Street Photographers Make by James Maher appeared first on Digital Photography School.


Digital Photography School

 
Comments Off on 7 Common Mistakes That Newbie Street Photographers Make

Posted in Photography


12 Common Newbie Photography Mistakes to Avoid

14 Jan

None of us are perfect and we all make mistakes. While some photographers might be naturally gifted, and just do amazing work from the moment a camera is put into their hands, that is not the case for most of us. Chances are, if you are new to photography, you are going to muck things up. You shouldn’t feel bad however, as you can be sure that many newbies have done exactly the same things. Here are a number of very common mistakes that new photographers make. Learn to avoid them, and you will improve your images.

1 – Centering everything in your images

The horizon line is right in the middle, cutting the image in two.

The horizon line is right in the middle, cutting the image in two.

When most of us look back at our early images, we usually see the horizon line placed very much in the middle of the image (see photo above). This is one of the most common mistakes new photographers make when they start. Sometimes it’s a good thing to do, but not always. The problem is that it cuts the image in half, and leaves people looking at the image, unsure of which half to look at, which is the intended subject.

When you take photos of landscapes, or anything with a horizon line, it is best to put the horizon on one of the third lines.The Rule of Thirds is one of the compositional guides for photography. As you get more into photography you will hear more and more about it.

With the horizon in the top third most of the ground is showing, telling the viewer what to look at.

With the horizon in the top third, more ground is showing than sky, telling the viewer where to look

It’s the same idea for your subjects. If you are photographing a person, put them to one side of the image, on one of the vertical third lines. Which line you use is up to you. Sometimes it is better to do both and see which one looks better. Experimenting is the key to getting great photographs.

2 – Taking attention away from the main focus in the image

Without meaning to, you may include something in your frame, that takes the focus off the main subject in the image – things like bushes, or a light post that is just a line through the image. It goes back to the previous point about giving your subject so much attention, that you aren’t taking the time to look around it.

3 – Cutting things off at the edge of the frame

It is amazing how many times you can look at someone’s photo and ask, “Why have you cut off their feet?” They then look back at you blankly, saying they had never noticed it before.

LeanneCole-common-newbie-mistakes-0029

Be careful not to cut off parts of limbs, like feet, when you are taking photos.

It is a very typical thing that newbies do. It may not be the feet, but it could be someone’s hand or the top of their head. It can happen in architecture and landscapes as well; the tip of a church dome will be missing, or the top of a tree.

It is all about learning to look at your subject and making sure you concentrate on getting them all in the frame. If you can’t fit them in the image, then you need to make decisions about what you will include, and what to crop off. Often if you take more than two thirds of a leg away it looks deliberate. If you only take one third away it looks like you weren’t paying attention.

Missing toes or feet.

Missing toes or feet.

Make sure to include feet.

Make sure to include feet.

4 – Thinking that having a great camera is enough

“I bought this fantastic camera and I paid a lot of money for it, but my photos don’t look great.” There is an assumption that if you have a good camera, you will automatically take amazing photos. This is not the case.

Just because you have a great camera, doesn’t mean you don’t need to learn photography. It is the person behind the lens that is responsible. If you see amazing photos by other photographers, that it is because they have learned about composition, and how to use their camera properly. Scroll to the bottom for links to more beginner articles to help you with this one.

5 – Not looking behind your subject

“Look at the tree coming out of that person’s head.” This similar to the previous point. You need to consider everything in the frame. You can usuallt remove the tree from their head by taking one or two steps to either side.

LeanneCole-common-newbie-mistakes-0027

Look behind your subjects and make sure there aren’t things like trees coming out of their heads.

leannecole-newbiemistakes-portrait

Slight camera reposition and no tree coming out of her head any more.

6 – Taking only photo of a subject and from a common viewpoint

We all see people who want to take photos of a building, they walk straight up to it, take one photo from the middle position, and that’s it.

Think about other angles you can use as well. Try moving to the left, the right, or both. Take some from low camera angles and then some standing up. As you take more shots, you will learn what works and what doesn’t. Again, it is all about experimenting.

LeanneCole-common-newbie-mistakes-0031

Taking a photo of a place by standing right in front of it. 

7- Having a really good camera and never learning how to use it properly

If you get an amazing camera that is capable of so many things, and never take it off auto, you are missing out on a lot. Learning to use your camera is one of things you can never regret. While you may be able to get some great photos with it on automatic, if you learn about aperture, shutter speed, and ISO, you will have more control over your images. It is usually something that no one is ever sorry about doing.

Once you have the basics worked out, you can then learn more advanced things like long exposures and HDR. The world of photography really opens up to you when you know how to use your camera to its full potential.

8 – Not giving your camera enough time

I was at an event once and I handed my camera over to friend to grab a few shots for me. When I got home and looked at the photos he had taken, they were all out of focus. I realized that he was pressing the shutter release without giving the camera time to focus properly.

You have to learn how to let the camera focus for you and give it time to do that. They are fast, but not always fast enough. The same goes with exposure, you have to give it the time to get the correct exposure. It doesn’t ask for a lot, so just give it the time it needs.

9 – Forgetting to check the settings you used the last time

It’s common for newbies to go out to take photos, making adjustments on their camera for what they are shooting at the time. But, the next time they go out to shoot, they forget to look at how the camera was set up. Afterwards, when they put the images on the computer, they realize they have lots of photos that didn’t turn out, because the camera settings were wrong for that subject or situation.

I was photographing a four day event a few years ago, and I couldn’t work out why some photos were really overexposed, while some were really dark. It took nearly three days to realize it was because my camera was set on auto bracketing (AEB). It was around that time I had just started taking photos at different exposures (bracketing) and had forgotten about it. Now I pick it up straight away.

LeanneCole-common-newbie-mistakes-0028

Checking your camera setting when you take photos in case the last time you were out your were underexposing or bracketing your images.

Always look at the settings you have on the camera. Check what the aperture is set to. Work out if you have it on manual, shutter priority, aperture priority or auto. Be aware of what the ISO is at all times. It is a good habit to get into, to check them all every time you start.

Make sure you have a memory card in the camera too. I have gotten into the habit of leaving the card out of my camera, and when I pack my gear to go somewhere, I put the card in the camera. It is part of my routine now, I also pack an extra as well.

10 – Never turning the camera vertically

One thing you often notice with new photographers is that they only use their camera in landscape mode. They never seem to consider turning their cameras up on the side, to shoot vertically. It isn’t always necessary to do so, but some subjects would benefit more from that orientation. When you are taking photos, try turning the camera into the portrait mode (vertical) and see if you can get a better image.

leannecole-newbiemistakes-horizontal

Don’t always have your camera in landscape mode, like this image, turn the camera up into portrait mode as well.

Try vertical for a different perspective.

Try vertical for a different perspective.

11 – Not asking for help

You should never be afraid of asking for help. Generally, photographers are more than happy to help someone who wants to learn. Don’t badger people with too many questions, but asking a few questions isn’t going to hurt.

12 – Don’t panic

A friend was telling a story about how she was in a Cathedral taking photos and they were all turning out black. She started to panic and couldn’t work out why. Once she calmed down she realized it was because her ISO was too low.

If you get into a situation where your photos are not working, don’t panic. Think logically about it. In most cases it is going to be your aperture, shutter speed or ISO. Just take the time to think about them and check the settings. You will work it out.

Have fun

The best advice anyone can give you is to enjoy your time with your camera. Explore the world around you. Remember that the mistakes you make are being made by nearly everyone in your situation. You aren’t alone.

googletag.cmd.push(function() {
tablet_slots.push( googletag.defineSlot( “/1005424/_dPSv4_tab-all-article-bottom_(300×250)”, [300, 250], “pb-ad-78623” ).addService( googletag.pubads() ) ); } );

googletag.cmd.push(function() {
mobile_slots.push( googletag.defineSlot( “/1005424/_dPSv4_mob-all-article-bottom_(300×250)”, [300, 250], “pb-ad-78158” ).addService( googletag.pubads() ) ); } );

The post 12 Common Newbie Photography Mistakes to Avoid by Leanne Cole appeared first on Digital Photography School.


Digital Photography School

 
Comments Off on 12 Common Newbie Photography Mistakes to Avoid

Posted in Photography


6 Photoshop Tools Every Newbie Should Learn

13 Dec

In the days before digital imaging, if you truly wanted to elevate your photography to the level of art, you learned how to process your images in the darkroom. You learned dodging, burning, masking, sandwiching negatives, flashing and fogging – all designed to get the most out of your images, and deliver your artistic vision to your viewers.

Photoshop-tools

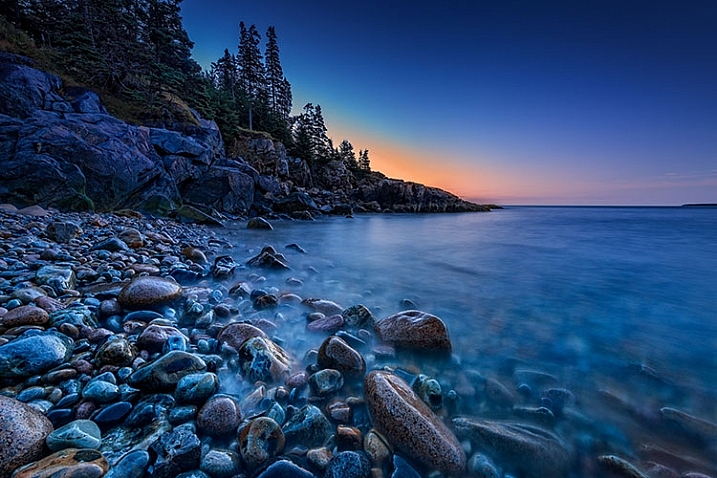
The finished image after Photoshop, using the tools discussed below.

With the advent of digital imaging, photographers have a new way to bring their artistic vision to life, known as the digital darkroom. While there are several different applications available for photographers, one has become synonymous with photo editing, and that is Adobe Photoshop.

Many of the tools in Photoshop can trace their origins to the wet darkroom of yesteryear. If you’re new to Photoshop, it can seem overwhelming the first time you open an image in the program. I’ve created this list of six must-know Photoshop tools to help you get started editing your images. These aren’t by any means the only tools needed, and there are of course tools within the tools to figure out, but this list should give you some idea of where to start. The great thing about most tools in Photoshop is that there are a lot of sliders, meaning you can experiment and see what each tool does, then undo it if you don’t like it.

1 – Adobe Camera Raw

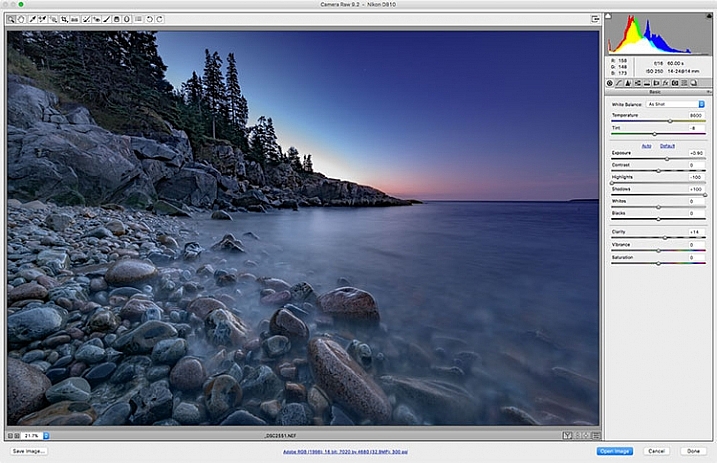
Adobe Camera Raw is a series of sliders and tabs used for processing RAW files. The beauty of the RAW file is you can make changes to the file non-destructively and change them again later if you choose.

Adobe Camera Raw is a series of sliders and tabs used for processing RAW files. The beauty of the RAW file is you can make changes to the file non-destructively and change them again later if you choose.

It is my personal belief that if you aren’t photographing RAW images, you are doing yourself a disservice as a photographer. When you allow your camera to process your image into a JPEG, you are throwing out potentially critical information from your image. You are trusting your camera to make creative decisions for you about the color, contrast, tone, and more, with regards to your image.

To get the most out of your image, you’ll want to set your camera to capture the image as a RAW file. A RAW file contains unprocessed, uncompressed, grayscale data from your camera’s image sensor, as well as metadata about how the image was captured. Adobe Camera RAW is the plugin for Adobe PhotoShop that can take this information and process a color image.

When you open a RAW image in Adobe Camera RAW, you’ll be presented with a toolbar across the top, and a tool palette on the right side. The tool palette is divided into 10 tabs: Basic, Tone Curve, Detail, HSL/Grayscale, Split Toning, Lens Corrections, Effects, Camera Calibration, Presets, and Snapshots.  The tabs I use most in my workflow are Basic, Lens Corrections, Effects, and Camera Calibration.

The beauty of a RAW file is that you can change the settings using the sliders, and other tools, as often as you like. If you don’t like what you’ve done, or you want to try something different, you can always revert the image back to the original settings, and the file is the same as it was when you downloaded it from your camera. Don’t be afraid to play with the sliders and see what they do. You can’t ruin the RAW file, so you might as well see what everything does. For more on using Adobe Camera Raw, check out Understanding the Basic Sliders In Adobe Camera Raw.

2 – Layers and Layer Masks

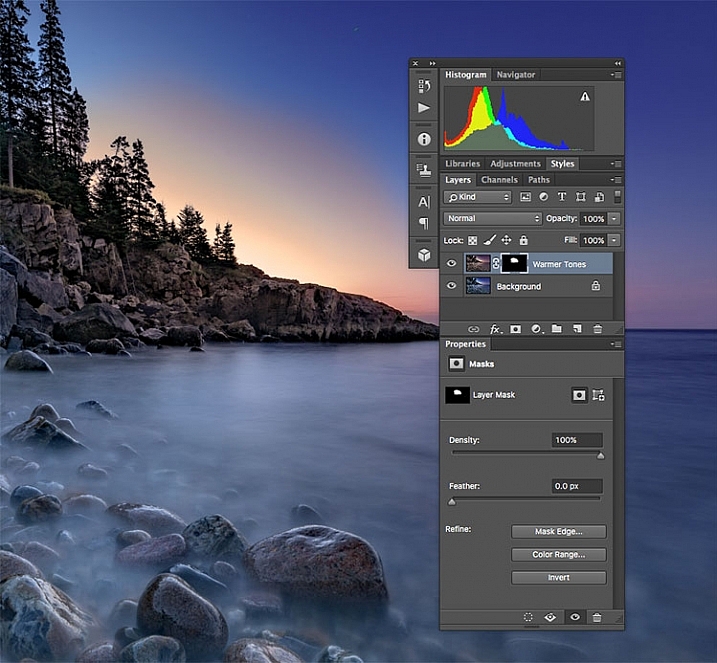
I created a duplicate layer to warm up the sunrise a bit and look more like it appeared when I was there. But since I still wanted the cooler tones on the rocks, water, and the rest of the sky, I used a layer mask to show only the warmer tones where I wanted them.

I created a duplicate layer to warm up the sunrise a bit and make it look more like it appeared when I was there. But since I still wanted the cooler tones on the rocks, water, and the rest of the sky, I used a layer mask to show only the warmer tones where I wanted them. The white area of the mask for the layer called, “Warmer Tones” shows the area of that layer that is showing through.

I consider this number 2a and 2b. If you’re going to learn layers, you’re going to have to learn layer masks as well. In Photoshop, one of the first things you’ll notice when you open an image is the Layers Palette on the right side of the screen. Initially, it will likely only have one layer called “Background” which contains your image.  You can add new layers as needed. You can also add empty layers which will allow you paint, draw, or copy portions of the image below onto them, and you can use layers to create a composite from multiple images. Layers can be adjusted to different opacities using the opacity slider at the top of the palette, so they can be made partially translucent which allows the layers underneath to show through.

In addition, you can create layer masks, which allow you show or hide portions of a layer, and allow you to see the layer or layers beneath. You do this simply by painting with black on the layer mask to hide that part of the layer, or painting white to show that part of the layer.

Layers give you room for quite a bit of creativity, allowing you to edit areas of an image non-destructively. If you don’t like what you did, simply delete the layer and start over. You can sandwich together two separate images, much the way you’d sandwich negatives in a wet darkroom, and create photo composites. For more on using layers, read A Beginner’s Introduction to Using Layers.

3 – Blend Modes

This image shows two different blend modes. On the left, Normal is selected, so the white box with the black text appear as I drew it. In the center, the blend mode is set to Multiply, so the white disappears and the black remains. On the right, Screen is selected, which shows the white area and shows the black.

This image shows three different blend modes. On the left, Normal is selected, so the white box with the black text appear as I drew it. In the center, the blend mode is set to Multiply, so the white disappears and the black remains. On the right, Screen is selected, which shows the white area and hides the black.

As mentioned above, the Opacity Slider allows you to blend the active layer with the layers beneath. The Blend Modes, found in a drop-down menu to the left of the Opacity Slider, work in a similar fashion, but use different mathematical calculations to change the appearance of the layer being blended for different things. For instance, if you simply duplicate the image on a new layer and set the Blend Mode to: Multiply it will darken the image by about a stop, and Screen Blend Mode will lighten the image by a stop. If you create a layer on top of your image with black text inside a white box, using Multiply will eliminate the white box, and allow the layer below to show through. Screen will do the opposite (see image above).

As of Adobe Photoshop CC 2015, there are 27 Blend Modes. The two modes I noted above are ones I use often, usually adjusting the opacity slider as well to get to my final look. Knowing what each mode does will help in choosing which one to use for your particular purpose. Darren Rowse put together a great tutorial, An Introduction To Blend Modes In Photoshop to give you a more in depth look at Blend Modes. You can also check out The First 3 Blend Modes You Need to Understand.

4 – Adjustment Layers

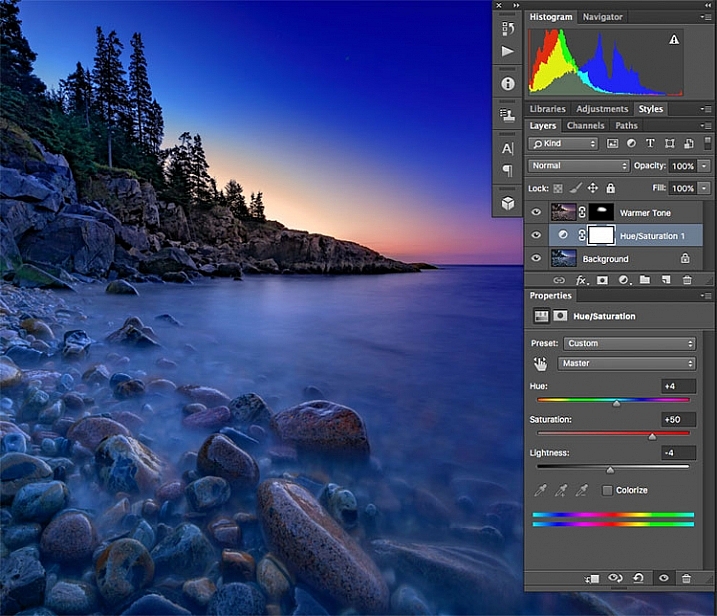
I used an Adjustment Layer on the cooler layer to bump up the color saturation a bit.

I used an Adjustment Layer on the cooler layer to bump up the color saturation a bit.

Photoshop Adjustment Layers are a great way make changes to an image, without actually changing the original file. It’s an easy way to try things, such as adjusting contrast or saturation, so that you can go back and change it again later – as long as you’ve kept the layers in tact by saving as a PSD or a TIFF file, formats that both support layers.

There are 19 different adjustment layers, which can be combined to create different effects on your image. Some basic uses are color adjustment, contrast adjustment, saturation, and black and white conversion. In addition, you can use Layer Masks to apply the effects in specific areas only, rather than the entire image, if you so choose.  You can also adjust the Opacity of an adjustment layer to reduce the effect of the adjustment on your image.

Adjustment layers provide a ton of flexibility when editing an image, without forcing you into a change that can’t be undone easily. For more on Adjustment Layers, check out Photoshop: Applying Fixes using Adjustment Layers and Masks and Burning and Dodging with Adjustment Layers and Layer Masks.

5 – The Spot Healing Brush

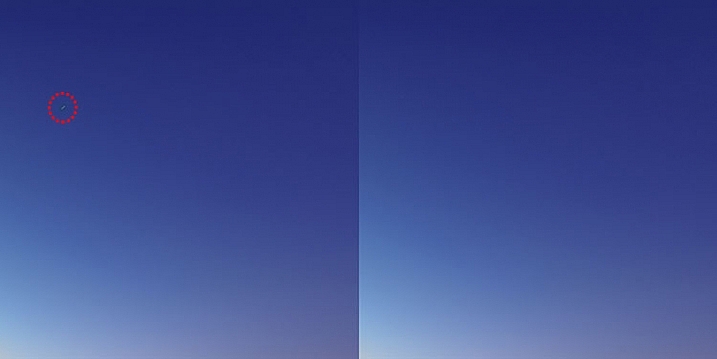
There were a few stray star streaks in the sky that I wanted to eliminate, so I used the Spot Healing Brush to quickly remove them.

There were a few stray star streaks in the sky that I wanted to eliminate, so I used the Spot Healing Brush to quickly remove them.

The Spot Healing Brush is one of the primary retouching tools in Photoshop, allowing you to remove blemishes and errors, or other parts of your photos. In the digital age, the bane of all photographers’ existence is dust on the imaging sensor, and the Spot Healing Brush provides a quick and easy way of removing those fromyour images.  The Spot Healing brush works similarly to the Cloning Stamp tool, in that it samples from one area of the image to correct other areas.

The Spot Healing Brush automatically detects the content or texture of the surrounding area, and attempts to replicate it wherever you click in the image. There are several options to work with which appear at the top of the screen. These include brush size and hardness, Blending Mode, and the type of fix you want to use, such as Content Aware, Create Texture, or Proximity Match. Each image will have different needs, depending on the content, so it’s best to experiment with the various settings if you find you’re not happy with the results you’re getting.

The Clone Stamp Tool

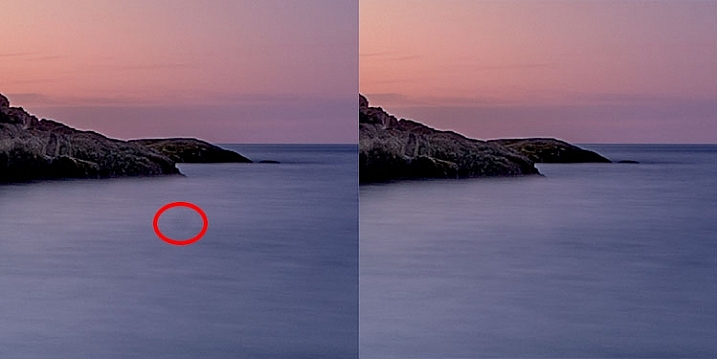
I had a few dust spots on my sensor. This one in the water, circled in red, did not respond well to the Spot Healing Brush, so I used the Cloning Stamp to sample and area of the water and stamp it over the dust spot.

I had a few dust spots on my sensor. This one in the water, circled in red, did not respond well to the Spot Healing Brush, so I used the Cloning Stamp to sample an area of the water and stamp it over the dust spot.

As I mentioned above, the Clone Stamp Tool and the Spot Healing Brush are similar in that they are both used for retouching images, and both use sampled areas of the existing image. The Clone Stamp, however, allows you to select the area from which to sample by holding the Command key and clicking (on Mac) or CTRL and click (on Windows), and creates an exact copy of the area you sample. Then you simply click on the area you want clone out and a copy of the area you sampled appears.

Again you have some options at the top of your screen, including Blend Modes, Opacity, and whether or not to sample a specific layer, or use all layers. You can also change the edge hardness and size of the stamp. The clone stamp works well when you have a well-defined edge to maintain, such as the wall of a building. The Healing Brush tries to blend edges, which can cause a blurred mess when you really need a clean edge. For more on using the Clone Stamp, head over to 12 Tips for Mastering the Clone Stamp Tool in Photoshop

These six tools in Photoshop are my go-to tools for editing my images. I would estimate that about 90% of my image editing is done using these tools. What are some of your tried and true Photoshop tools?

googletag.cmd.push(function() {
tablet_slots.push( googletag.defineSlot( “/1005424/_dPSv4_tab-all-article-bottom_(300×250)”, [300, 250], “pb-ad-78623” ).addService( googletag.pubads() ) ); } );

googletag.cmd.push(function() {
mobile_slots.push( googletag.defineSlot( “/1005424/_dPSv4_mob-all-article-bottom_(300×250)”, [300, 250], “pb-ad-78158” ).addService( googletag.pubads() ) ); } );

The post 6 Photoshop Tools Every Newbie Should Learn by Rick Berk appeared first on Digital Photography School.


Digital Photography School

 
Comments Off on 6 Photoshop Tools Every Newbie Should Learn

Posted in Photography


5 Tips for Newbie Landscape Photographers

10 Sep

2-for-1 special

As part of Landscape Photography Week here on dPS, we’re offering TWO for the price of ONE on our best-selling Living & Loving Landscape Photography ebooks!

Click here to take advantage of this offer.


I don’t specialize in Landscape photography but I wanted to go out and see what I could learn so that I could impart some useful tips for beginners who are new to shooting landscapes.

Gear for landscape photography

What gear did I bring with me? I brought two cameras, one lens and a tripod. A wide angle is generally the go-to lens for landscape shooting. I brought my 24-120mm f/4G.

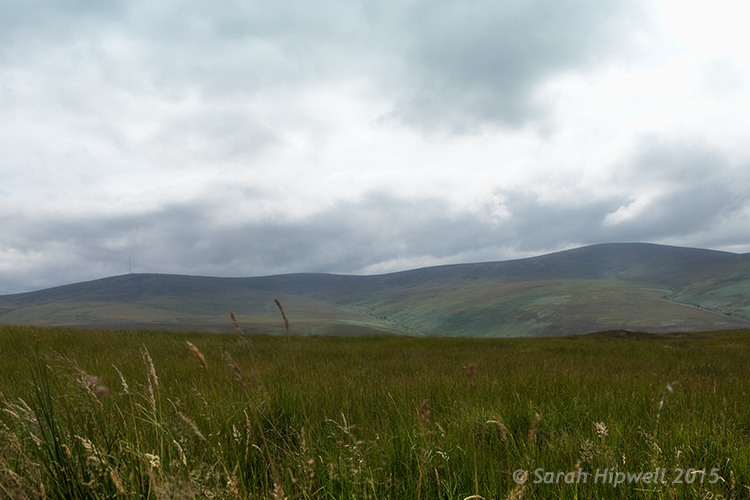
Landscape shot of the Dublin mountains

The Dublin mountains

A tripod is essential for landscape photography for two reasons. First, you will will want to shoot with a small aperture like f/16, that means also using a slower shutter speed. It is better to keep ISO down low to 100 or 200 for less noise. Secondly, by having your camera on a tripod also helps you frame your shot, I’ll cover this more below. If you are going to do long exposures, I would recommend a cable or remote trigger release too. You could also use the built-in self-timer.

Note: I didn’t mention any kind of filters as in Neutral Density (ND), polarizers and so forth. I don’t have any, but I also feel that they are best used when your skills are more advanced and you want to capture movement to produce soft, blurry clouds and misty waterfalls. Plus they are not cheap to buy.

1 – Where do you start?

Start in your own locality. I know for me, I can get so used to my surroundings, that I don’t bother to actually see what’s there. I suppose it’s just familiarity. But when you travel to a new country you have fresh eyes, and everything around you is new and exciting.

So as I live at the foot of some wonderful mountains, I knew where to begin. By car, it only takes me 20 minutes (approximately) to arrive at some breathtaking scenery. My first port of call was this spot, see photo above.

Scoping an area beforehand is an important aspect in landscape photography. This gives you a lay of the land, a chance to look for the best vantage points, see where the sun sets, and so on.

2 – Time of day

The time of day is crucial, as most landscape photographers shoot in the golden hour or at dawn. This doesn’t mean that you can’t shoot at any other time of the day.

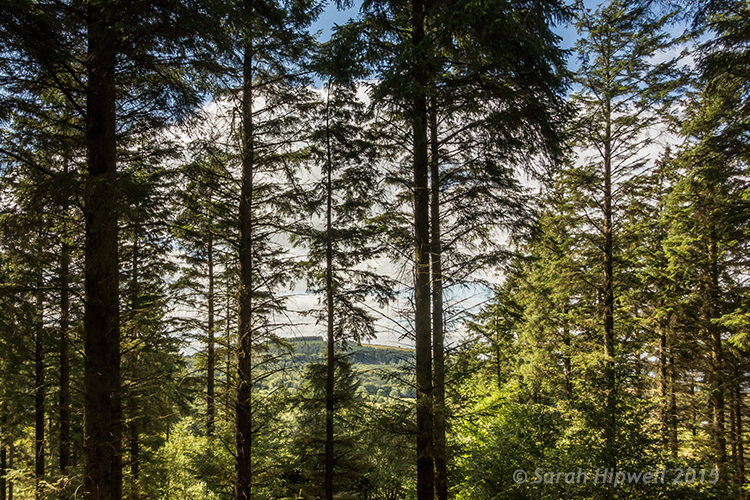
Trees-in-forest

Tibradden forest in the Dublin Mountains. I know it’s not taken at the golden hour but I do like the blue sky and white clouds peaking through the trees.

3 – Shoot Raw

I am not going to debate the merits of RAW versus jpeg here. Simply put, RAW offers the most detail, which is essential if you want to get the best out of your images for landscape photography. You can also use the graduated filter in Adobe Camera Raw (ACR) to retrieve details that may have been lost, such as blown out skies, or underexposed areas in mountain regions where shadow detail needs to be brought out. See more about using the Graduated filter in ACR.

The reason Graduated Neutral Density filters (not to be confused with regular Neutral Density filters) are used by landscape photographers is because the land and the sky need different exposure readings – so if you expose for the sky, the land can be too dark and if you expose for the land, the sky gets washed out. This is where a graduated filter comes in handy. The top part is dark, fading to transparent at the bottom.

4 – Where to focus?

For landscapes, you are usually aiming to have the foreground, as well as the background, in clear focus. So, you need a small aperture such as f/16. This means that the depth of field (DOF) is bigger, and more of the image is in sharp focus. As a general rule of thumb, you should focus roughly one-third up from the bottom of the frame.

Focus on an element in your scene using autofocus then switch back to manual focus on the lens to lock it. This ensures that you achieve maximum sharpness and depth of field throughout. If you have Live View, you can zoom the view in to full magnification to manually focus. For more in-depth knowledge on focusing for landscapes, especially how to use hyperfocal focusing, I’d recommend that you read Getting Landscapes Sharp: Hyperfocal Distances and Aperture Selection.

5 – Composition

Composition is essential when framing a landscape shot. I really had to change my style of shooting. I spent more time looking around before even pressing the shutter button. I needed to see what I was going to frame in my shot. The landscape around me was fantastic and expansive.

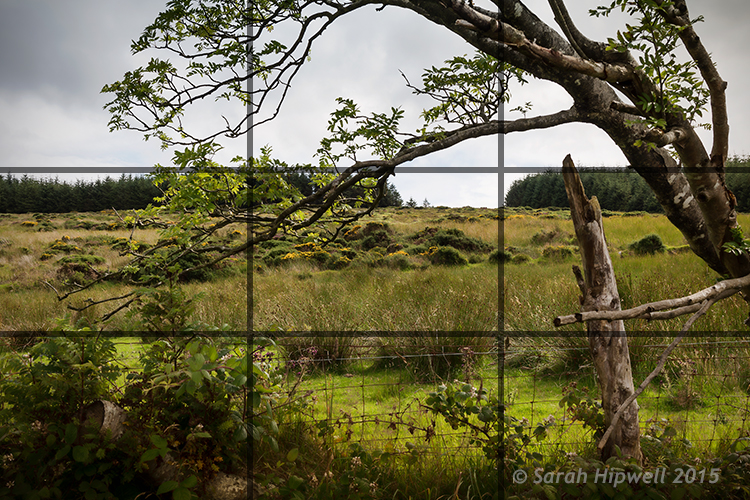
This is where the rule-of-thirds is a useful guide. Think of your photo with imaginary lines that are drawn dividing the image into thirds both horizontally and vertically. Place important elements of your composition where those lines intersect.

Rule-of-thirds for composition

I really like this tree and the way it’s branches were leaning in so far to the left of the photo. I thought one of the branches seemed to hover over the gap in trees in the background which seemed to say what-is-through-there? Maybe I have watched too many Hobbit movies!

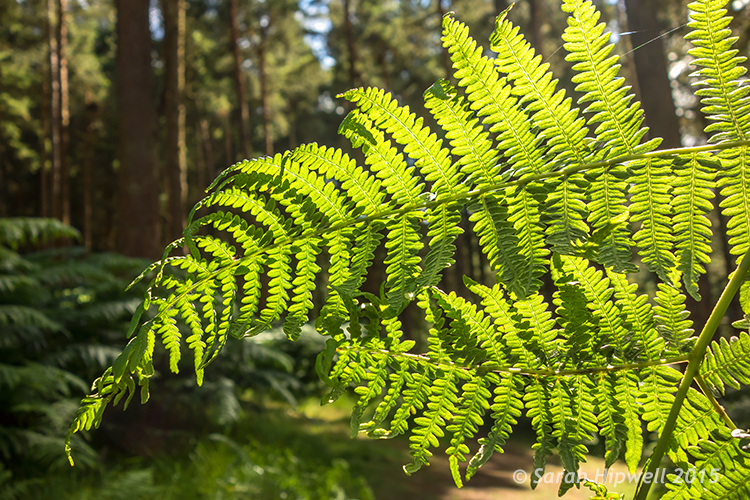
Don’t be afraid to experiment. The next shot maybe not classified as a typical landscape shot but I just loved the lighting on the ferns. I opened the aperture to f/4.5 because I wanted a shallower depth of field, so that the background was a little blurred, giving the ferns some separation from the background.

Close-up-ferns

Close-up of some ferns in Tibradden forest in the Dublin Mountains using a wider aperture of f/4.5

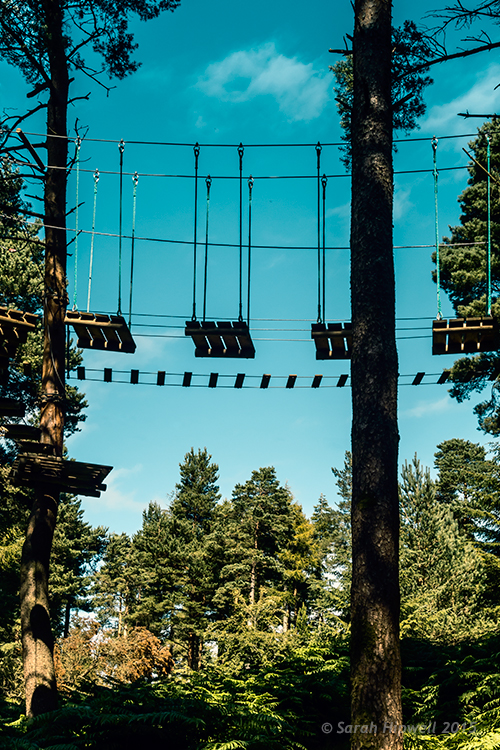
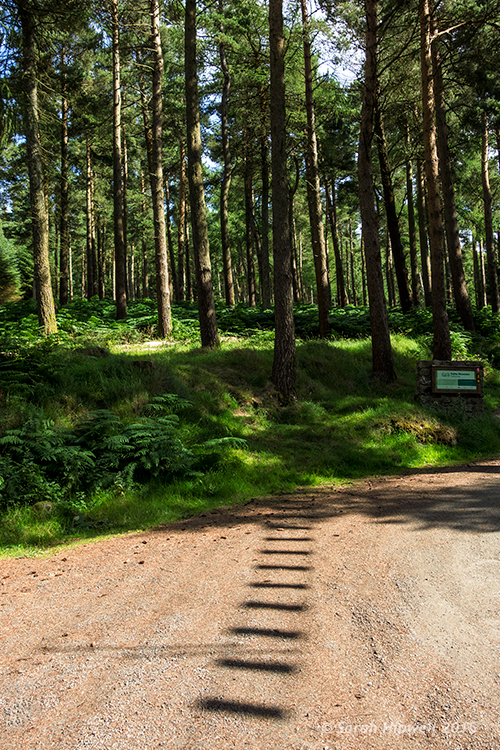
You don’t have to shoot just using landscape (horizontal) mode, try shooting in portrait mode (vertical) as well. I shot the next two images using the portrait style. I wanted the rope bridge to be the focus of attention amongst all the tall trees.

Activity-park-in-forest

A rope bridge forms part of an activity centre in Tribadden forest.

rope-bridge-shadow-in-forest

The shadow of the rope bridge suspended 13 metres up in the trees made an interesting viewpoint leading into the base of the tree.

Tip: Trees like buildings can converge when using wide angle lens. This can be corrected in post-processing, using the lens correction filter in Photoshop or Lightroom. Also try not to have the body of trees touching the side of your frame, crop them out. It will only make your shot close in on itself, give your image room to breathe.

Conclusion

All in all, this exercise was a great excuse to get outdoors and get fresh air. If you don’t shoot landscapes, I would certainly recommend going out and giving it a go. It makes for a great day out plus you are honing your photography skills, just don’t forget the sandwiches!

Are you a landscape photographer? What techniques did you use? If so please share in the comments below.


Here on dPS this is landscape week – here is list of what we’ve covered so far. Watch for a new article (or two) on landscape photography daily for the next day or so.

  • 6 Tips for Better Low-Light Landscape Photography
  • Landscape Photography and the Human Element
  • 5 Ways a Telephoto Lens Can Improve Your Landscape Photography
  • Landscape Photography from the Side of the Road
  • 32 Majestic Landscape Photos to Inspire Your Wanderlust
  • Weekly Photography Challenge – Landscape
  • Landscape Photography – Shooting the Same Location Through the Seasons
  • How to Solve 5 Composition Conundrums Faced by Landscape Photographers
  • 6 Tips for Creating More Captivating Landscape Photographs
  • Tips for Getting Started with Urban Landscape Photography
  • 3 Simple Steps to Make Your Skies Pop in Lightroom
  • Equipment Tips for Landscape Photography

googletag.cmd.push(function() {
tablet_slots.push( googletag.defineSlot( “/1005424/_dPSv4_tab-all-article-bottom_(300×250)”, [300, 250], “pb-ad-78623” ).addService( googletag.pubads() ) ); } );

googletag.cmd.push(function() {
mobile_slots.push( googletag.defineSlot( “/1005424/_dPSv4_mob-all-article-bottom_(300×250)”, [300, 250], “pb-ad-78158” ).addService( googletag.pubads() ) ); } );

The post 5 Tips for Newbie Landscape Photographers by Sarah Hipwell appeared first on Digital Photography School.


Digital Photography School

 
Comments Off on 5 Tips for Newbie Landscape Photographers

Posted in Photography


The 5 Biggest Mistakes Newbie Car Photographers Make

12 Jul

It’s true, we all make mistakes, that’s what makes us human, right? Well yes, but there are some mistakes that can, and should be avoided, when it comes to photography. In this article we will be talking about automotive photography in specific. You could be shooting cars for years but if you don’t fix your mistakes, how do you expect to get some great shots?

These are the 5 biggest mistakes that car photographers make when first starting out. Don’t worry, I will tell you how to fix those mistakes so other car photographers stop calling you a newbie, and they might actually ask “HOW?”

1. Not paying attention to the background

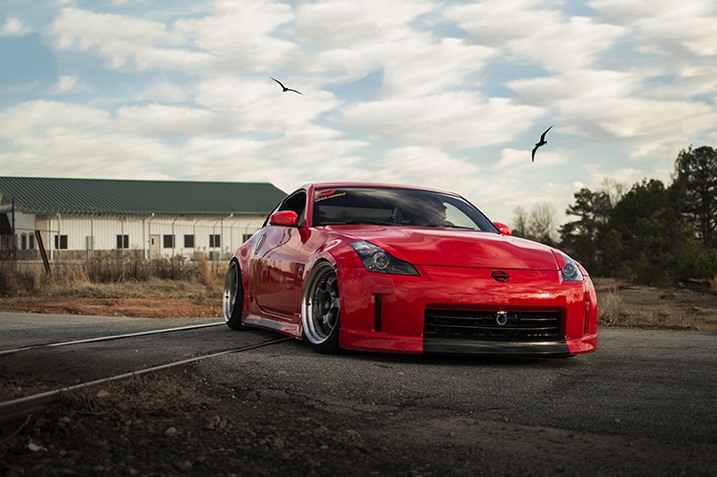
IMAGE1

This is a really big no no. If you are striving to be a professional photographer, or even if you’re just shooting for fun, you must pay attention to your surroundings. I have seen way too many pictures where a tree is growing out of a car, or there is trash on the ground, and other annoying little objects that take away from the focus of the car.

If there is a tree in your way, move around. Walk around the car and find a better angle or even move the car if you have to, just make sure there isn’t anything growing out of top of the car. If there is trash on the ground, pick it up and move it (I recommend carrying gloves with you in case you have to deal with some nasty trash).

If there is something that you just simply can’t avoid then don’t worry, you can still remove it in post-processing using the Clone Stamp Tool or Content-Aware fill, but use those as the last resort. You should try to get the best shot that you can in the camera so you don’t have to waste precious time cloning out all that stuff later.

2. Not making sure the car is spotless

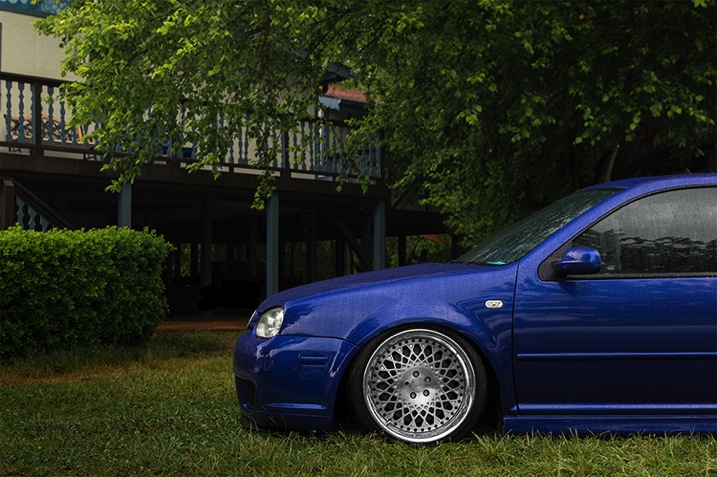
If you’re an avid car photographer then you MUST carry a rag of some sort (preferably lint-free) that you can use to wipe any dirt off the car. Yes, you can take out little dirt specks in post-processing, but it will make your life much easier to just take care of it on the spot. It’s not hard to just take the rag and wipe down any dirty areas. This will not only make the car look better/cleaner, thus making your shots look that much more professional, but it will also save you time in post-processing so you can worry about more important stuff.

IMAGE2

3. Not having a circular polarizer

When it comes to shooting cars, it’s like shooting into a mirror; EVERYTHING is reflected off the car. You don’t want that, especially if you have some annoying stuff going on back there like trees, other cars, etc.

That’s where the handy circular polarizing filter comes into play. This will probably be one of your most used pieces of equipment, and should be the very first investment you make if you’re thinking about shooting cars.

Everyone has mixed feelings about polarizers when doing other types of photography, but in car photography there’s no point in even talking or arguing about it, you NEED a circular polarizer. Just don’t buy a cheap one because they will only ruin your images, instead go for a well known B+W circular polarizer, that’s what I, and many other car photographers use, and I haven’t heard any complaints about it.

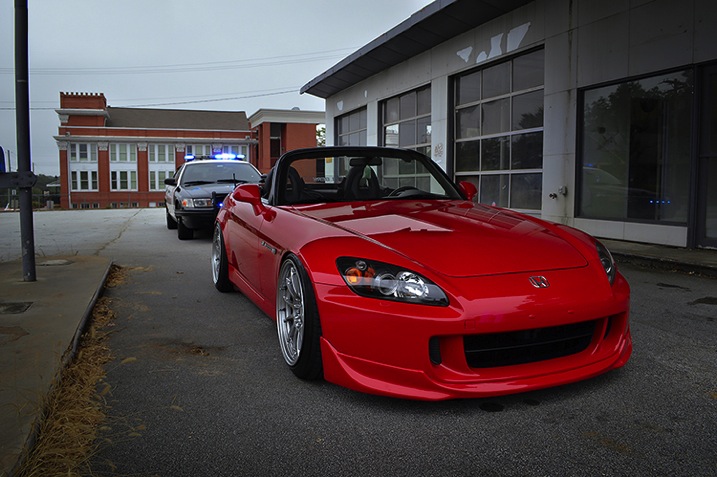
What is a circular polarizer? Well, it’s basically a little filter that you screw onto the end of your lens, which you can then turn to block off reflections in any part of the frame. What’s cool about it is that you can take multiple shots with different reflection points by using a tripod and then just combining all the images in post-processing to get the best results. Just make sure you don’t go too far, you still want to keep some reflections to show the lines and curves of the car.

IMAGE3

4. Not using a tripod

Speaking of tripods, you need one of those as well. Not just because of the reflections, but to get the cleanest and sharpest shots possible. If you’re like many beginner photographers you have a hard time keeping your hands steady, and it will take some time to master that. If you have a tripod, you can minimize camera shake, which in return, gives you the sharpest images.

Another awesome reason to use a tripod is to do light painting at night. Simply set your exposure to a few seconds, walk around the car with a light source, and in minutes you will have a pretty sick looking shot of the car. Everything you painted over will be visible, and everything else will probably be dark, creating a pretty cool effect that you can’t do without a tripod.

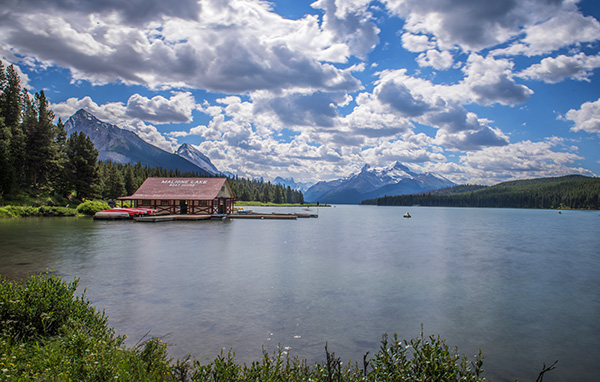
Taking multiple exposures can only be done with a tripod, unless you’re amazing at keeping your hands steady and in one position for multiple shots, which is pretty hard to do. Why would I take multiple exposures? Well, let’s say you take a picture and the car looks amazing, but your sky is blown out. Problem? No problem, if you have a tripod. Just take another shot but this time crank up the shutter speed so you can capture more detail in the sky (don’t worry about anything else for that shot). Now, since you have one image of the car perfectly lit, and another image of the sky looking beautiful you can combine those two in post-processing to get the best looking image, people will be curious how you did it so make sure you tell them. Share the knowledge.

IMAGE4

5. Not getting down low for the best angles

Have you ever seen an image where the car was shot at normal, eye level height? Can you say “boring”?! We all see cars from that point of view on a daily basis, so it gets pretty boring. If you want your shots to stand out, you must try different angles. Get down low, get up high, lay down, just make sure you move around and try different stances so you can get a better angle of the car.

This can get dirty, so make sure you don’t wear your brand new pants and shirt. Don’t be afraid to get down on the ground and capture the car from down there, it will give it a more aggressive look. Who cares if you get dirty, at least your shot will look great.

The best pictures I have seen are of those that are not taken at eye level, but are usually down lower than the normal person is willing to go. But you’re not normal, you’re a car photographer (we’re special).

IMAGE5

That’s all folks

So, there you have it fellow photogs. The five biggest mistakes beginner car photographers make, and how to avoid them. You have been given ways to make your shots look much better – but you will not improve just by reading this, you must go out and shoot, shoot, shoot! The best way to improve your photography skills is to go out, take the skills you learned here, and put them to the test in the real world. But don’t leave without your rag, circular polarizer, and tripod!

Do you have any other tips on shooting cars? Have any of these helped you get better at car photography? Please share in the comments below.

googletag.cmd.push(function() {
tablet_slots.push( googletag.defineSlot( “/1005424/_dPSv4_tab-all-article-bottom_(300×250)”, [300, 250], “pb-ad-78623” ).addService( googletag.pubads() ) ); } );

googletag.cmd.push(function() {
mobile_slots.push( googletag.defineSlot( “/1005424/_dPSv4_mob-all-article-bottom_(300×250)”, [300, 250], “pb-ad-78158” ).addService( googletag.pubads() ) ); } );

The post The 5 Biggest Mistakes Newbie Car Photographers Make by Elvis Pasic appeared first on Digital Photography School.


Digital Photography School

 
Comments Off on The 5 Biggest Mistakes Newbie Car Photographers Make

Posted in Photography


5 Tips for Newbie Landscape Photographers

07 Oct

It doesn’t matter if you are a seasoned photographer or a beginner, most photographers want to learn how to make great landscape images. Once you have shot a few hundred sunset shots and a few sunrise shots, you may think you know how it’s done. Then you get out into the wild on a crisp early morning, before sunrise, and try and get some dramatic mountain scene or amazing seascape. Suddenly it’s not that easy. Landscape photography requires more than simply setting up and waiting for the shot. Sometimes you have to go back to a scene four or five times to get the shot you want.

Canadian Rockies DL1_2975 LR

The majestic beauty of the Canadian Rockies

Landscape images can be seductive. When done properly, those viewing the image are transported to that place, they can feel the crisp mountain air or the warmth of the desert. So, you might be asking “How do I get those kinds of shots?” or “I think landscape photography is too difficult, am I good enough?” This article will answer these questions and a few more hopefully. The truth is, landscape photography is not difficult, but it does require dedication and passion. It will often require being up before sunrise, staying out late into the evening, or even early hours of the morning. It also requires good knowledge of your gear. Let’s take a look at how you can start getting better landscape images.

1. How to find good landscape photography locations?

Depending on where you live, you may have to drive somewhere to get some great landscape scenes. That may not be far, or you may need to get out of your city or suburb. What I often do before I visit a new place is google the area for dramatic landscapes. I will do a search like landscape scene canadian rockies and see what comes up. Sometimes you will see a vista that you didn’t know was in the area and you can start getting some ideas of what you will able to shoot.You can do the same on 500px or even Flickr; do a quick search for the name of the place you are visiting and see what comes up. From there you can narrow down what type of scene you want to shoot. Maybe you want to shoot from the mountain tops overlooking the city, a seascape, or even a forest scene.

Once you have some idea of what you want to shoot you then need to figure out the lighting. My go to tool is The Photographer’s Ephemeris. What I love about it is that I can simply drop a pin on a map and immediately see where sunrise and sunset will be, as well as moonrise. It gives me the direction of the sun and what time sunrise and sunset will happen. You can decide what time of day will work best for the shot you are planning.

2. What time of day is best for landscapes?

The Golden Hours are the best time for dramatic colours in landscape photography. You can also use blue hour to make some beautiful shots too; I prefer it for cityscapes, the city lights contrast beautifully off the blue sky. Golden Hour is your guide here. You will need to shoot at sunrise, sunset, or both, but plan beforehand though. There is nothing more frustrating than arriving at a scene, only to find out that as the sun is setting and your subject is in shade. If possible, visit the scene the day before at the time you anticipate shooting and watch where the light moves, that way you will know exactly where to set up your shot.

Moving water and a warm sunset make for a great landscape scene

Moving water and a warm sunset make for a great landscape scene

3. What camera gear do I need for landscape photography?

A Camera

Of course, this is a critical part of the whole formula, however, getting great landscape images does not require a 40 megapixel camera. You can shoot landscapes on any DSLR with 10 megapixels and more. The reason you don’t want to be shooting landscapes on a four megapixel camera is that you might shoot a great scene. Afterwards, you may want to print the shot nice and big and hang it on your wall, but if the resolution is too low, you may struggle to print a decent size image.

A Tripod

Yes, you will need a tripod. If you are shooting at sunrise or sunset, the amount of light will be minimal. You need to shoot at longer shutter speeds so you need to have your camera on some sort of support. A sturdy tripod will make all the difference. The beauty about a tripod is that once you have set up your composition, you can simply keep clicking away and not worry about composing your image each time, unless you move the tripod.

A Cable Release

I took a while to buy a cable release (remote trigger) when I first started photography, but once I had it, I wondered why I took so long to get one. A cable release allows you much more freedom. You can simply hold it in your hand, stand away from the camera and release the shutter whenever you want. Also, I like to observe the whole scene, rather than just looking through the viewfinder. I connect my cable release (I use a wired one), step away, and start shooting. Be sure that once you have locked focus to switch your camera to manual focus (or use back button focus),  especially if you are shooting at sunset. If you don’t, what can happen is that as night falls, the camera may struggle to lock focus and this could waste time. The best idea is to set your focus while the scene is still well lit, click it onto manual focus and then shoot away.

Filters

Graduated Neutral Density filters have long been the tool of choice for landscape photographers. This is still largely true, however, in recent years, many photographers have started to do more blended images. What that means is that you will expose for the bright part of the scene and take the shot, you will then expose for the dark part of the scene and take that shot. Very often, the bright part will be the sky and the dark part the foreground. Afterwards in Photoshop, you can then blend the two best exposed shots together. This is a very effective technique in tricky lighting conditions and sometimes can work better than a filter. I use a combination of both techniques. I will take some shots with a filter, then take some at different exposures and see what works best afterward.

The important thing is to make sure you get the best shots while you are out in the field. There is nothing worse than coming back from an early morning or late evening shoot to see that your images did not work out well because you exposed incorrectly. Getting the exposure right in the camera is key. It takes practice, so your first attempts may not be very dramatic. Keep working on it though, you will learn how to see the light, how to use the filters, and how to expose correctly if you practice enough.

A neutral density filter was used to make the exposure longer  and to soften the water

A neutral density filter was used to make the exposure longer and to soften the water

Lenses

For the most part, a wide angle lens will work best for landscapes. You want to capture as much of the scene as possible in your shot to make the image look majestic and sweeping, and a wide angle lens creates that effect. Be careful not to use a fisheye lens; the distortion may not work well in a landscape shot. When you use a wide angle lens, it is a good idea to have foreground interest, that means, have something in the foreground that anchors the image. If you don’t have foreground interest, thats okay, you can still get some good shots. You will find though, the images with foreground interest tend to work better. You may also want to shoot landscape images with a zoom lens. This can work well, but not on every scene. Try it out, but if it’s not working, switch back to a wider angle lens.

Stitched Panorama

This was not a wide angle shot, but it still works well

4. What settings should be used?

Exposure settings

There are no formulas for how to get the best landscape shot; there are a few guidelines though. First, you will generally want everything in your scene to be in focus. That means your aperture should be at f/8, f/11 or f/16. Once that is set, then you will need to set your shutter speed accordingly. You may have to take your shutter speed down to a few seconds to get a properly exposed shot. Thats okay, it adds to the image. Long exposures work really well when there is moving water or clouds in the scene; the water becomes soft and silky as do the clouds. Sometimes, the trees in your scene may wave in the breeze and the blur from that can work well too.

Another setting to look out for is your ISO. I recommend not to shoot in Auto ISO. This will create all kinds of problems especially at sunset. Your camera will see that the light is fading and it will simply bump up the ISO to compensate for the loss of light, this may result in digital noise, not very good for your landscape scene. Set your ISO to 100 (or as low as your camera goes) and keep it there. Only adjust your shutter speed to make sure you get the shot and of course, you will need to be on that trusty tripod!

White Balance

This is a creative choice. Start out shooting your scene in daylight white balance. Avoid using auto WB as this function will try and neutralize the colours in your scene. You want as much colour depth in your scene as possible, so start off with the daylight preset. You can then use the white balance creatively, for  example, using the Fluorescent preset will add magenta to your scene, Cloudy and Shade will add orange or red, and Tungsten will add blue. If you want to emphasize any of these colours in your scene, switch to the WB that will boost that. So, if you are shooting a sunset, use cloudy or shade to boost the reds and oranges. If these don’t work well for the scene, stick to daylight as it will render the colours in the scene correctly.

5. What’s next?

Once you return from your shoot, download your images and take a look through them. Normally, you will be doing this very late at night, so it is best to leave them until the next before you start editing them. Whatever your editing suite of choice is (Lightroom or Photoshop) you can get to work on them there. If you have shot some bracketed shots, you can do all that blending in Photoshop. The only guideline here is to take your time editing the images. Choose only the best images to be edited. You may find that you will shoot 100 images but only three or four are worth editing, thats okay. Edit only the best images and spend time making them look as dramatic as the scene you saw! For some quick tips on how to get your images to pop take a look at this article, you can also browse through this list of articles on Photoshop to get some in depth techniques.

A blended shot, the foreground was shot earlier in the evening and the stars much later. This was blended in Photoshop afterwards

A blended shot, the foreground was shot earlier in the evening and the stars much later. This was blended in Photoshop afterward.

So, to wrap it all up, landscape photography is a combination of skill and patience. Skill takes time to develop, and patience enables you to wait for the right scene to unfold. In this fast paced digital life, there is something calming about shooting landscapes. You have no control over the weather, you have no control over the light, you simply have to be there, and press the shutter release if the conditions are right. The beauty is that, if the conditions do work out, the reward will be unreal. You will have some great images and you will have spent some quiet time in nature, enjoying a beautiful sunrise or sunset. The most important tip is to take your time. Don’t rush the process, don’t pack up until you are certain you cannot get a better shot than the last one you just made. Always go out and have fun, even if the light doesn’t play along or the weather is not what you hoped for, use it as a practice session and pretty soon, you will be capturing those breathtaking scenes with ease!

The post 5 Tips for Newbie Landscape Photographers by Barry J Brady appeared first on Digital Photography School.


Digital Photography School

 
Comments Off on 5 Tips for Newbie Landscape Photographers

Posted in Photography