RSS
 

Posts Tagged ‘Neat’

Samyang’s new compact AF 75mm F1.8 FE lens has a neat little trick up its sleeve

22 Apr

Samyang (also branded as Rokinon and Bower in other markets), has released its new AF 75mm F1.8 FE lens for full-frame Sony camera systems.

Aside from the rather unusual focal length (I think we can all appreciate the decision not to add yet another 85mm FE lens to the market), the lens has another interesting feature. On the barrel of the lens, Samyang has included a ‘Custom’ switch that will turn the ring on the barrel from a focus ring (Mode 1) to an aperture ring (Mode 2). It’s not a dedicated aperture ring, but the ability to switch on-the-fly is a nice addition, especially for a lens from a budget manufacturer.

Onto the more standard specifications, the lens is constructed of ten elements in nine groups, including two high-refractive (HR) elements and three extra-low dispersion (ED) elements. It offers an aperture range between F1.8 and F22, has a minimum focusing distance of 69cm (27″), features a nine-blade aperture diaphragm and uses a 58mm front filter thread. The lens weighs just 230g (8oz) and measures in at 65mm in diameter (2.56in) and 69mm (2.72″) long, making it an incredibly compact and lightweight lens for its focal length.

Below are a few sample photos, provided by Samyang:

$ (document).ready(function() { SampleGalleryV2({“containerId”:”embeddedSampleGallery_8520968293″,”galleryId”:”8520968293″,”isEmbeddedWidget”:true,”selectedImageIndex”:0,”isMobile”:false}) });

Samyang hasn’t shared pricing or availability information yet, but we have contacted the manufacturer and will update the article accordingly when we receive a response.

Articles: Digital Photography Review (dpreview.com)

 
Comments Off on Samyang’s new compact AF 75mm F1.8 FE lens has a neat little trick up its sleeve

Posted in Uncategorized


How to Use Plastic Wrap to Create Neat Color Special Effects

26 Sep

In this article I’ll show you how to use a common household item, plastic wrap, to make creative images with colored filter special effects.

Plastic wrap (a blanket term for Saran Wrap, Glad Wrap and Cling Wrap) is a clear plastic film typically sold in rolls or boxes with a serrated edge. Usually used for sealing food items like sandwiches to keep them fresh for longer, plastic wrap is an incredibly versatile material. Great for a picnic or practical jokes, it’s also a useful tool for creative photography.

If you’re looking to add something a little different to your portfolio, plastic wrap is a simple, low-cost option. Using a rubber band, a camera, and some markers, you can easily create a colored filter out of plastic wrap – adding an experimental edge to your photographic repertoire.

How to Use Plastic Wrap to Create Neat Color Special Effects

The science

Like many great scientific discoveries, plastic wrap was discovered by accident. Ralph Wiley, a lab worker at The DOW Chemical Company was having trouble washing out a beaker which contained a substance he couldn’t scrub clean. He called the substance “Eonite” named after an indestructible substance created by chemist Eli Eon in the Little Orphan Annie comic book strip. DOW researchers adopted the substance, using it to create a greasy, dark green film they called “Saran” and shared it with the military to spray on fighter jets as a guard against sea spray.

How to Use Plastic Wrap to Create Neat Color special Effects

A very subtle red and blue colored filter adds a little color to this image of a Ferris wheel.

Saran works by polymerizing vinylidene chloride with acrylic esters and unsaturated carboxyl groups to create chains of vinylidene chloride. What does that mean? Simply put, the process results in a film with molecules bound so tightly that very little can penetrate it. The chemists at DOW eventually removed Saran’s green color. They also removed an unpleasant odor the Saran emitted when exposed to oxygen. It was first sold for household use in 1953.

How to Use Plastic Wrap to Create Neat Color special Effects

A surreal green shade created with a plastic wrap filter colored with green marker.

Plastic wrap in art

While handy in the lunchbox or fridge, plastic wrap is also a great material to experiment with creatively. Artists have used plastic wrap in sculpture, painting and as a prop for photography. Many well-known fashion designers have created clothing from layers of plastic cling film for the runway.

Because of its relatively clear composition, plastic wrap is great for forming a barrier between your camera lens and foreign materials. Recently, I applied a layer of Vaseline to plastic wrap stretched over the front of my camera lens. The result was a fine, misty effect without the agony of a greasy camera.

How to Use Plastic Wrap to Create Neat Color special Effects

This image was captured using plastic wrap over the lens with a red section on the upper half and a green colored portion below.

Creating a colored special effects filter

You will need:

  • A piece of plastic wrap at least 30cm in length and width.
  • Camera and lens.
  • Permanent markers.
  • A few rubber bands.

Adding color

To create a colored filter for your camera, first you will need to add some color to your plastic wrap! The easiest way to do this is to stretch the plastic wrap over your lens and color in the plastic within the circle. However, this method is a little risky. If the plastic wrap is pierced, you will end up drawing on your lens or lens protector (cap).

Instead, take your lens cap or lens and place it on the plastic wrap. Trace a circle around the outside. Now you’ll know where you should color your plastic wrap to get full coverage of the lens. To minimize the use of plastic here, you can trace multiple outlines of your lens on the same sheet of plastic wrap as I’ve done below.

How to Use Plastic Wrap to Create Neat Color special Effects

Use the same sheet of plastic wrap to create different effects, making it easier to keep for later and minimizing waste.

Finally, add color to the sectioned-off portion of plastic wrap, make sure you use quality permanent markers. Low-quality texters won’t leave any visible color on the plastic wrap and the ink from non-permanent markers simply slides off the plastic (onto your hands or something worse).

You can color in your circles any way you would like. For a full effect, color in the whole interior of the marked out circle with one or two colors. For a softer gradient, draw a light squiggle. You can color in the center of the circle and leave the perimeter clear, or vice versa. Don’t be afraid to experiment here!

How to Use Plastic Wrap to Create Neat Color special Effects

The effect of a portion of plastic wrap colored entirely green and placed over the front of the lens.

How to Use Plastic Wrap to Create Neat Color Effects

Coloring only the outer perimeter of the plastic wrap filter produces a fish-eye effect.

How to Use Plastic Wrap to Create Neat Color special Effects

Create an eerie atmosphere with a thick layer of red permanent marker.

Time to photograph

When you are happy with the colors of your circles, select one and lay it carefully over the front of your lens. Fix the filter in place with a rubber band, but don’t pull the plastic wrap too tightly or it will split.

When the filter is fixed properly to the lens, it’s time to get photographing. Because your camera will have difficulty focusing with the layer of colored plastic wrap in the frame, you should use manual focus over automatic. Because the filter will cut down the light reaching your sensor, you may also need to increase your exposure time or adjust your aperture accordingly.

Also, be sure to check the rubber band is fitted snugly around your lens. You don’t want it to come flying off, especially when photographing portraits!

How to Use Plastic Wrap to Create Neat Color special Effects

How to Use Plastic Wrap to Create Neat Color Effects

Using colored plastic wrap can add an effect imitating the light leaks produced with partially exposed film.

Finishing up

Once you are happy with your photos, take them back to have a look on your computer. As I mentioned before, the filer may cut down the amount of light reaching your sensor. This could result in photographs that lack contrast. Photoshop is your friend here.

Open your images in Photoshop and adjust the Curves layer to increase contrast. For more intense colors you may also want to adjust the Vibrance and Saturation of the image with the Vibrance and Saturation tool.

How to Use Plastic Wrap to Create Neat Color Effects

Adjust the Curves tool for more contrast in your images.

How to Use Plastic Wrap to Create Neat Color Effects

Adjust the Vibrance and Saturation tool for more intense colors.

Your Turn

Once you’ve got some quirky plastic wrap photos, please share them in the comments below. And remember to keep your filters for later. You never know when you might need them. Fold them down or scrunch them into a loose ball, they last for ages. Have fun.

How to Use Plastic Wrap to Create Neat Color Effects

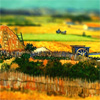
An apocalyptic scene created with red ink that completely covers the plastic wrap filter.

How to Use Plastic Wrap to Create Neat Color Effects

How to Use Plastic Wrap to Create Neat Color Effects

Loosely fixing colored plastic wrap to the lens, mirrors the view through a window on a rainy day.

Pulling the plastic wrap taut reduces glare.

An image with a slower shutter speed creates light trails as if looking through a window with raindrops on the outside.

The post How to Use Plastic Wrap to Create Neat Color Special Effects by Megan Kennedy appeared first on Digital Photography School.


Digital Photography School

 
Comments Off on How to Use Plastic Wrap to Create Neat Color Special Effects

Posted in Photography


Review: Neat Image 8 Noise Reduction Software

07 Nov

In the early days of digital cameras, noise was a much bigger problem than it is these days. DSLRs routinely top out at high ISO ratings that film shooters and early DSLR users could only dream of. In those early days (the early 2000s), when ISO 800 was typically the upper usable limit of high ISO, noise reduction software became a must-have for those of us who were post-processing our files and wanted them to look less like sandpaper and more like something we’d be willing to display. Neat Image was one of the first noise reduction applications I used at that time.

Neat Image 8 Review

While it did a nice job, at that time, all noise reduction software was problematic in that it tended to give images an overly smooth, almost plastic or painted look that did a lot of damage in the fine details of an image. Neat Image was no exception in this regard, so I used it sparingly. Over the years, I found myself gravitating to other noise reduction plugins and applications, such as Nik DFine, Topaz DeNoise, and more recently, Macphun’s Noiseless. When I saw that Neat Image had recently been updated to version 8, I was excited to give it a try and see how it stacked up against the others. While Neat Image 8 is available as a standalone app or a Photoshop and Lightroom plugin, I will be focusing on the plugin version, as that suits my workflow better.

Overview of Neat Image 8

Neat Image Profile Screen

Upon opening Neat Image 8, the Device Noise Profile screen is the first thing you see.

Neat Image 8 is a fairly simple software to use, although upon first opening the plugin it can appear a bit confusing. You will be presented with multiple views of the image you are working on; a full-color preview, and the R, G, and B components of the image. There are four buttons at the top left of the screen; Auto Profile, Load Profile, Auto Match, and Auto Fine Tune. In the center are two tabs, Device Noise Profile, which is the tab the plugin starts in, and Noise Filter Settings.

Analyze image

Once the plugin is open, you’ll see the four different versions of your image. The easiest way to get started is to simply click “Auto Profile” and let Neat Image analyze the image. Once complete, a box will highlight the area that Neat Image has selected to use for noise analysis. Neat Image looks for an area with minimal detail for best results. If you select your own area to analyze, make sure it’s an area that contains minimal detail.

Neat Image 8 Adjustment Sliders

These sliders allow you to tweak the noise reduction to your liking after Neat Image has applied the noise profile to the image.

Filter settings in Neat Image

Now that you’ve analyzed the noise levels in the image, you’ll want to click on the Noise Filter Settings Tab. The preview will switch to the full-color image in the center and the R, G, and B channels will disappear. At the bottom left is a zoom toggle to zoom in or out of the image as desired. You’ll also have the ability to change the preview to various other options, including the RGB preview, a Luminance and Chrominance preview, as well as individual channels. Neat Image will then apply the noise filter settings based on the analysis as done above.

You can tweak the settings using the sliders at the right side of the app window. You’ll have the ability to adjust quality, the noise reduction amount, recover detail, smooth edges, sharpen, and fine tune the filter itself. In addition to the sliders, Neat Image comes with some presets, such as Recover Fine Details, Apply Less Noise Reduction, Apply More Noise Reduction, Reduce Noise and Sharpen, and more. You can also create your own presets for future use. These settings put Neat Image among the most customizable noise reduction applications I’ve used.

oaks-neat-image

Pros

For me, noise reduction has always been a love-hate relationship, always battling with a balance between preserving detail and reducing unsightly noise. One of my favorite things about Neat Image is the software’s auto profiling ability, customizing the noise reduction to each image as needed. While Nik Collection’s Dfine 2 also does its own image analysis, it doesn’t offer the customizability that Neat Image does. And Neither Topaz’s Denoise 5, nor Macphun’s Noiseless offer any kind of image profiling, with both requiring you to simply select a preset on your own and go from there.

Neat Image 8 does an excellent job of maintaining detail while reducing noise in an area with little or no fine detail, such as skies.

night-sky-neat-image

Cons

With all the customizability, of course, comes a bit of a learning curve in terms of use. Neat Image does offer tutorial videos on their website to help get you started, but for those of us who are less patient and just want to dive in, it can be frustrating. I had one or two false starts when I first downloaded Neat Image 8, before finally going to their video tutorial to give me a jumpstart.

Neat Image 8 side-by-side comparison.

Side by side comparison of an image shot at ISO 2500, before and after Neat Image 8.

Conclusion

Ultimately, the ability to auto profile an image, adjust settings to personal taste, and use presets for repeatability of noise reduction, makes Neat Image an excellent choice for photographers who battle noisy images for any reason, including shooting long exposures, low light photography, or high iso photography such as indoor sports, events, or weddings. Neat Image is available starting at $ 39.90 per license.

lighthouse-neat-image-v8

neat-image-comparison

leaf-neat-image

leaf-neat-image-comparison

googletag.cmd.push(function() {
tablet_slots.push( googletag.defineSlot( “/1005424/_dPSv4_tab-all-article-bottom_(300×250)”, [300, 250], “pb-ad-78623” ).addService( googletag.pubads() ) ); } );

googletag.cmd.push(function() {
mobile_slots.push( googletag.defineSlot( “/1005424/_dPSv4_mob-all-article-bottom_(300×250)”, [300, 250], “pb-ad-78158” ).addService( googletag.pubads() ) ); } );

The post Review: Neat Image 8 Noise Reduction Software by Rick Berk appeared first on Digital Photography School.


Digital Photography School

 
Comments Off on Review: Neat Image 8 Noise Reduction Software

Posted in Photography


Neat Seats: 14 Crazy Creative Modern Chair Designs

29 Dec

[ By Steph in Design & Furniture & Decor. ]

chair painting 2

More than just a surface to sit on, these modern chair designs are (sometimes literally) works of art, sculptural yet functional, from a flat-looking canvas you can actually sit on to a series of chairs that slide inside each other, inception-style. Customize a chair’s look with removable graphic panels, hook two high-backed seats together to make a room-within-a-room, or scare your guests with hanging chairs that mimic beasts of the deep sea.

Monster Chairs Might Eat You
monster chair 2

monster chair 1

monster chair 3

Rest inside the mouth of a sea beast, real or mythical, in this series of fun and frightening handmade chairs by Cape Town artist Porky Hefer.

A Painting You Can Sit In
chair painting 1

chair painting 2

chair painting 4

Hung flat on a wall, these canvases look like nothing more than two-dimensional paintings. But pull them down, lean them against the wall and take a seat, and you’ll find that they are surprisingly up to the task. These lightweight furniture pieces by YOY design studio are made of wood, aluminum and stretched elastic canvas.

Home Office in a Chair
chairs office

If you’re the type who works from home but isn’t into sitting at a conventional desk, the Four Works Armchair can meet all of your needs. A seat is embedded within a bookcase-like base that also offers a light, cupholder, power outlets, storage and a laptop platform.

Inception Chair

chairs inception 1 chairs inception 2 chairs inception 3

Ten interlocking chairs ranging from adult to child size fit within a single frame in this chair by Vivian Chiu, inspired by the dream-within-a-dream concept of the movie Inception.

Rhinoceros Beetle Chair
Adobe Photoshop PDF

Adobe Photoshop PDF

Adding to a collection of realistic animal-shaped chairs rendered in matte black, Maximo Riera presents The Beetle Chair, which is only recognizable as furniture when viewed from the back.

Next Page – Click Below to Read More:
Neat Seats 14 Crazy Creative Modern Chair Designs

Share on Facebook


[ By Steph in Design & Furniture & Decor. ]

[ WebUrbanist | Archives | Galleries | Privacy | TOS ]


WebUrbanist

 
Comments Off on Neat Seats: 14 Crazy Creative Modern Chair Designs

Posted in Creativity


Tidying Up Art: Messy Masterpieces Made Neat & Clean

03 Jan

[ By WebUrbanist in Art & Installation & Sound. ]

The Swiss are known for leading an orderly existence, so you can imagine their frustration at grandiose works of German art and the excesses of their French neighbors as well.

Ursus Wehrli is fighting back, organizing everything from parking lots and pine branches to alphabet soup and classic artworks of masters present and past, collected in a series of (humorous but thought-provoking) books about cleaning up all aspects of life.

No one is safe from his exacting eye, precise brushstrokes and poignant photography as he sweeps a Van Gogh bedroom scene out of sight in one stroke and crushes a Postmodern Campbell’s soup can in the next. Jackson Pollock, beware!


Not even childrens’ sandboxes or Chinese signs are safe from this process of global reorganization – but while some things gain order from the process, others (like letters) lose meaning and devolve into absurdity. Even the stars themselves are in reach.

Share on Facebook


[ By WebUrbanist in Art & Installation & Sound. ]

[ WebUrbanist | Archives | Galleries | Privacy | TOS ]


WebUrbanist

 
Comments Off on Tidying Up Art: Messy Masterpieces Made Neat & Clean

Posted in Creativity