RSS
 

Posts Tagged ‘Mood’

Setting The Mood By Adjusting Your White Balance

04 Sep
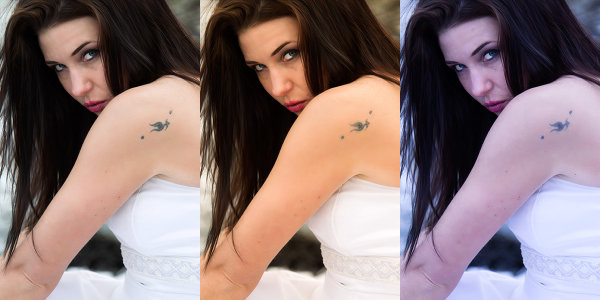
This set of images was taken from a RAW file, with the white balance adjusted using Kelvin white balance in Adobe Camera Raw. The first image was set to Auto in camera. The middle shot was warmed up by setting the white balance to 7500°K, and the third shot was cooled off by setting the white balance to 4000°K. EOS-1D Mark IV with EF 24-105 f/4L IS. 1/200, ISO 100, f/4.

This set of images was taken from a RAW file, with the white balance adjusted using Kelvin white balance in Adobe Camera Raw. The first image was set to Auto in camera. The middle shot was warmed up by setting the white balance to 7500°K, and the third shot was cooled off by setting the white balance to 4000°K. EOS-1D Mark IV with EF 24-105 f/4L IS. 1/200, ISO 100, f/4.

Photographers often deal with a variety of light sources, each of which has it’s own color cast.  When compared to daylight in the middle of the day, tungsten lighting, like that which comes from traditional incandescent bulbs, looks yellow.  Standard fluorescent lighting looks green.  Light in shade, or on a cloudy day will have a bluish cast compared to midday sun.  These color casts are referred to as the color temperature of the light.  Color temperature is measured in degrees Kelvin.  To beginners, color temperature will appear to be a bit backwards.  From 2000°K to about 3000°K are warm tones, and above 5000°K are cooler tones, getting progressively more bluish as the color temperature goes higher.  Midday sun tends to be at around 5500°K – 6000°K, while the sun at the horizon is warmer, at about 5000°K. Overcast daylight will be around 6500°K, and shaded daylight will be around 7000°K.

In this landscape shot, The first shot was processed using the Auto white balance setting, which chose 7500°K.  The second shot was processed to a much cooler tone at 4500°K, and the last shot was processed setting the Kelvin white balance at 11250°K.  EOS-1D X, EF 14mm f/2.8L II. Exposure: 0.5", f/16, ISO 200.

In this landscape shot, The first shot was processed using the Auto white balance setting, which chose 7500°K. The second shot was processed to a much cooler tone at 4500°K, and the last shot was processed setting the Kelvin white balance at 11250°K. EOS-1D X, EF 14mm f/2.8L II. Exposure: 0.5″, f/16, ISO 200.

Thankfully, today’s digital cameras have a tool to correct for the different color casts created by the various light sources we encounter.  For beginners, using the Auto White Balance setting is an excellent start. The camera will try to neutralize the color cast caused by different light sources and give the image a pleasing balance. However, while a neutral color balance is often desirable, there are times when as artists, we may want to use the white balance tool to creative effect.

You can choose what kind of mood you want to set before shooting if you like, by choosing a preset white balance. Most cameras offer Auto, Daylight, Cloudy, Shade, Fluorescent, Tungsten, Flash, Custom, and Kelvin temperature white balance settings.  These settings will neutralize the color cast from the light source they are designed for. For instance, Fluorescent neutralizes the greenish cast given off by fluorescent light.  Custom white balance is a user defined setting where you tell the camera what in the scene should be white, and the camera corrects to make it so. Finally, the Kelvin white balance setting allows you to choose the color temperature of the light source you are shooting in.  If you choose to use the presets in lighting other than what they are designed for, your image will be warmer or cooler, depending on your setting and the available light.

For all of those settings, the camera is simply looking to make white look white.  While that may be what you want, by intentionally setting a different white balance, you can add to the mood.  Choosing  Shady or Cloudy white balance will warm up your image, and choosing tungsten will cool your image. This type of thing is done constantly in movies and television shows to help set the mood.  Photographers as well choose their white balance to set the mood.  A cooler color cast gives the image a colder, harsher feel, while a warm color cast is generally seen as inviting.

If you shoot only JPEG, you’ll be stuck with whatever white balance you had selected at the time of shooting, so if you want to change the mood by adjusting your white balance, you’ll have to choose to do this beforehand.  However, if you shoot RAW, the white balance can be adjusted after the fact, using whichever RAW converter you choose.  You’ll be able to choose from the presets that are loaded in the camera, click in the image to determine what color should actually be white, or you can simply select Kelvin white balance, and using a slider, adjust the white balance in degrees Kelvin and see what the different color temperatures look like.

By taking control of the white balance, you give yourself another tool that can alter the mood of your images and allow you to better communicate what you want to say with your image.  Not every image will benefit by shifting the white balance setting, and there will be some photographers who will be adamant that you should always shoot to the “correct” white balance.  As the artist, this is your time to exercise your creative license and do what feels right to you.

Post originally from: Digital Photography Tips.

Check out our more Photography Tips at Photography Tips for Beginners, Portrait Photography Tips and Wedding Photography Tips.

Setting The Mood By Adjusting Your White Balance


Digital Photography School

 
Comments Off on Setting The Mood By Adjusting Your White Balance
Posted in Photography


Setting The Mood With Low Key Lighting

29 Jul
This image was made using a flash on camera, bounced into an uncoated muslin reflector.  The uncoated muslin warms the light up about 400 degrees Kelvin.  The reflector was positioned above and to the left of the camera, with the flash aimed into it.  EOS-1D Mark IV, EF 100mm f/2.8L Macro. ISO 100, 1/250, f/4.

This image was made using a flash on camera, bounced into an uncoated muslin reflector. The uncoated muslin warms the light up about 400 degrees Kelvin. The reflector was positioned above and to the left of the camera, with the flash aimed into it. EOS-1D Mark IV, EF 100mm f/2.8L Macro. ISO 100, 1/250, f/4.

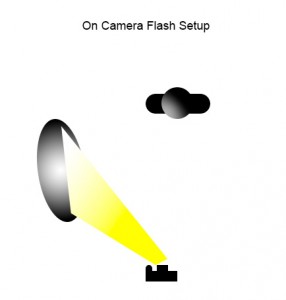
This diagram shows the lighting for the image above.  The uncoated muslin reflector is positioned above and to the left of the camera, with the flash bounced into it. Play with the angle of the reflector to get the lighting just right.

This diagram shows the lighting for the image above. The uncoated muslin reflector is positioned above and to the left of the camera, with the flash bounced into it. Play with the angle of the reflector to get the lighting just right.

Last week I wrote about high key portrait lighting and how it creates a very upbeat feel in images lit that way.  The opposite end of the spectrum is low key lighting, which creates a more moody feeling in images.  Low key lighting tends to be lit with one light on the subject, using reflectors or fill light if necessary to fill in shadows. Because only one light is required, it can be a bit easier to light a subject in the low key style, and certainly less costly indoors.

Light reveals your subject, and shadows define your subject.  The shadows you create are equally as important as the light you use to expose your subject.  Low key lighting will have a high lighting ration from main to fill, typically as high as 8:1.  High key, by comparison, will approach 1:1.

Indoors, the simplest way to achieve low key lighting is to use a speedlite on camera, bounced off a wall, or into a reflector angled to catch your subject in the face. Adjusting the flash output will help you get the softness in light, as well as using a larger reflector. Another reflector on the opposite side of your subject can be used to throw reflected light back where it came from for fill if desired.  Using a silver or gold reflector will create a harsher light, while using uncoated muslin or soft white will create a softer light.

If you’re able, and want to get the flash off camera, using a wireless trigger on your speedlite, while placing it in a softbox gives you another option to light your subject.  A softbox gives you soft, directional light, without spilling the light into the background.  Softboxes work by enlarging your light source.  The larger the light source, the softer the light will be.   I use several softboxes depending on what I need.  The first is a Westcott Bruce Dorn 18×42 assymetrical strip box.  This is great for

lighting a full length figure, with a natural falloff at the feet.  The rest I use are Westcott Apollo softboxes. I have the 16″,  28″ and 50″ softboxes, depending on what the situation calls for.  The 50″ creates light very similar to window light, with a nice soft wraparound effect.  The 28″ is a bit harsher, and the 16″ harsher still.

For this image, I used a Westcott 28" Apollo softbox, with a speedlite off camera. I turned down the flash output slightly to give a more moody feel. EOS 5D Mark II, EF 24-70 f/2.8L. ISO 100, 1/200, f/8.

For this image, I used a Westcott 28″ Apollo softbox, with a speedlite off camera. I turned down the flash output slightly to give a more moody feel. EOS 5D Mark II, EF 24-70 f/2.8L. ISO 100, 1/200, f/8.

The softbox is positioned to the left of the camera and aimed at the subject as the subject is turned toward the light. The camera shoots from the shadow side of the subject, allowing the light to just kiss the contour of the subject from the side.

The softbox is positioned to the left of the camera and aimed at the subject as the subject is turned toward the light. The camera shoots from the shadow side of the subject, allowing the light to just kiss the contour of the subject from the side.

Outdoors, to get a low key lighting effect, you’ll need to catch the sun when it’s low in the sky, just as it’s setting, or in the morning as the sun rises. Alternatively, standing at the edge of deep shade can help create a low key effect as well.  If needed, a scrim can help soften the light hitting your subject, but generally a sun low in the sky creates a soft warm lighting on your subject.

Low key lighting is great for setting a mood. Add it as another option in your lighting toolbox and see what happens.  Share your favorite low key images in the comments too!


This shot was taken using only late afternoon sun, just before sunset. When the sun sets it becomes directional, and all I had to do was instruct my model to face the light, watching the soft shadows it created. EOS-1D X with EF 85mm f/1.2L II. 1/320, f/4, ISO 320.

This shot was taken using only late afternoon sun, just before sunset. When the sun sets it becomes directional, and all I had to do was instruct my model to face the light, watching the soft shadows it created. EOS-1D X with EF 85mm f/1.2L II. 1/320, f/4, ISO 320.

Post originally from: Digital Photography Tips.

Check out our more Photography Tips at Photography Tips for Beginners, Portrait Photography Tips and Wedding Photography Tips.

Setting The Mood With Low Key Lighting


Digital Photography School

 
Comments Off on Setting The Mood With Low Key Lighting

Posted in Photography


101 Romantic Photos to Set Your Valentine’s Day Mood

13 Feb

All you need is love. But a little chocolate now and then doesn’t hurt. Charles M. Schulz Valentine’s Day is a great reason to take a set of fantastic “love story” photos. Also, it could be a gift for the occasion. Your sweetheart took part in this session and the gift would not be a surprise. However, these photos will Continue Reading

The post 101 Romantic Photos to Set Your Valentine’s Day Mood appeared first on Photodoto.


Photodoto

 
Comments Off on 101 Romantic Photos to Set Your Valentine’s Day Mood

Posted in Photography


Create a Warm, Sunset Mood Image in Lightroom 4

22 Jan

Introduction

This tutorial is a demonstration of the SLR Lounge Lightroom 4 Preset System. With over 200 presets, the LR4 Preset System has been critically acclaimed as the most powerful and intuitive preset system available for Lightroom 4. DPS users can get 10% off by using the DPS10 coupon code upon checkout. Click the link above to learn more/purchase.

Overview

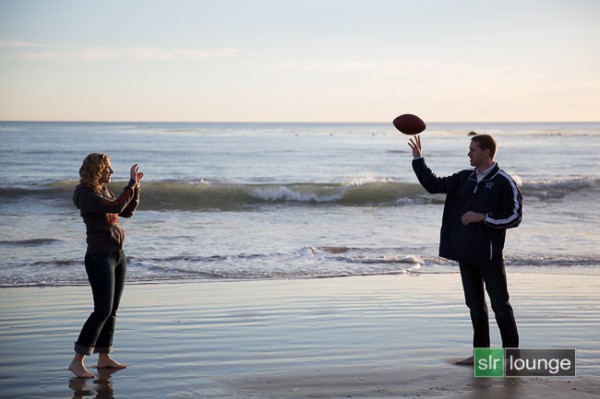
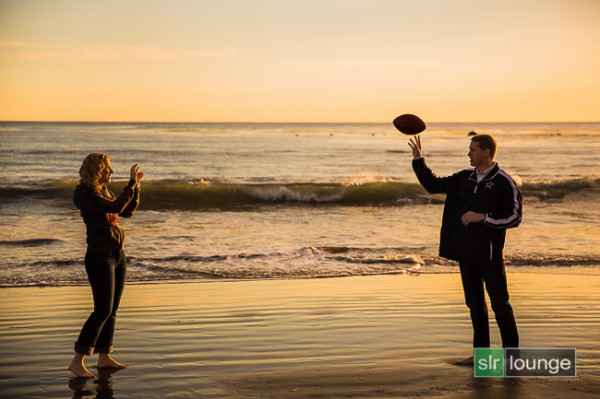
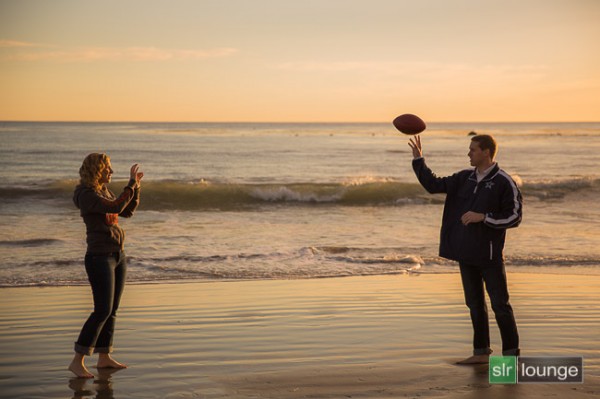
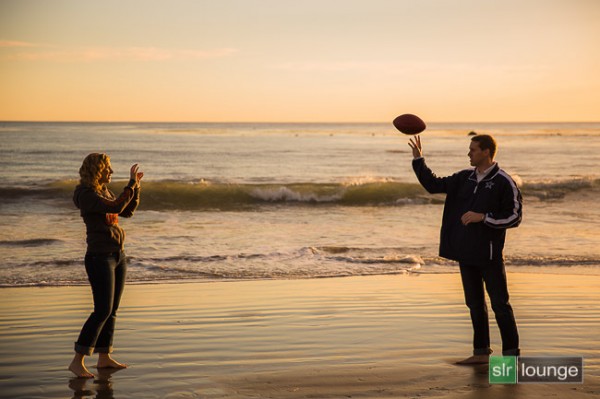
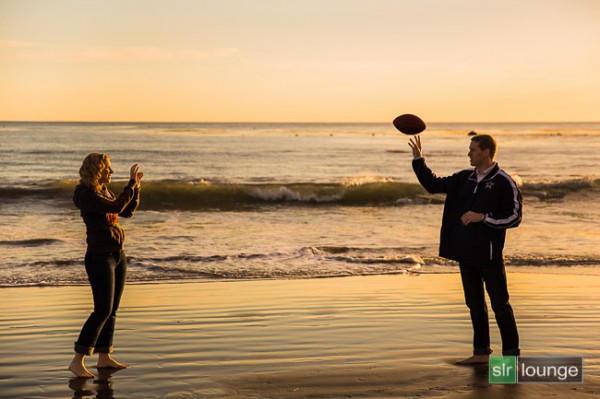
In this Lightroom 4 tutorial, we will show you how to create a warm, sunset-toned look in Lightroom 4. It is a great look that can be applied to a late afternoon outdoor images. I particularly dig this look on shots like this one at the beach. We will also correct for uneven exposure across the image that is caused by the directional lighting of the sun.

Before and After Image

Before

After

Lightroom 4 Preset System Mixology

If you own the SLR Lounge Lightroom 4 Preset System, this effect can be achieved in 3 clicks as shown below. If you don’t own the preset system, please skip to Step 1 to learn how to do it manually.

Lightroom 4 Presets

00 MY MIXOLOGY – 10 SOFT PORTRAITS > 16 SP HDR Light
01 BASE ADJUST – 00 EXPOSURE > 04 Darken -0.5
01 BASE ADJUST – 40 SHADOWS BLACKS > 42 Heavy Brighten (+30, +60)

Warm up Temperature and increase the Magenta in Tint to your liking. To see all the tweaks and adjustments applied, please continue on.

Step 1. Applying our Basic Adjustments

This image from a recent engagement session was shot around 4pm late in December on one of our many SoCal beaches ;) . Although it was late afternoon, there were not a lot warm tones in the atmosphere, and the photo lacked dynamic range.

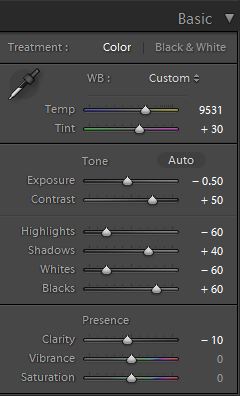
So in the Basic Adjustment Panel, let’s warm up the image by raising the Temperature to between 8000K to 10,000K. Additionally, we want to add some Magenta Tint in order to keep the image from looking too green. Without the pink/red tones that will be added from boosting Magenta tones, we end up with an image lacking the rich warmth we desire. This is the one of the advantages of shooting in RAW, you can change the color temperature of the image at will.

The background environment is also a little too bright and flat, and since we want a moodier shot, let’s lower the exposure by -0.50 stop and increase contrast by +50.

Next, let’s expand the dynamic range of the image by decreasing the Highlights and Whites by -60 while lifting the Shadows and Blacks by +40 and +60 respectively.

Finally, bring down the Clarity by -10. We will reintroduce Clarity with an adjustment brush to everything but the couple’s face, hair, hand, and feet.

The Basic Adjustment Panel and the image should look similar to below.

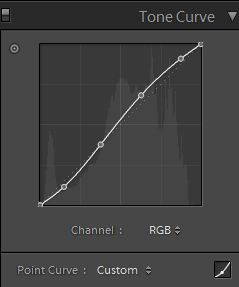
Step 2. Adding Additional Contrast via Curves

In addition to adding Contrast in the Basic Panel, let’s add a slight contrast-boosting “S” curve that pulls down the shadows a bit and boosts the highlights up a bit.

Step 3. Sharpening and Noise Reduction

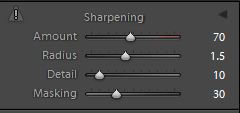
Normally, if you are using the SLR Lounge Preset System, standard Sharpening amounts are automatically applied. Here is what we typically apply to our image:

03b Sharpening

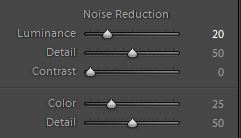
Because we boosted the dynamic range and pulled up the shadows, we do need to apply some Noise Reduction. We use this setting for Noise Reduction:

03c Noise Reduction

03 Sharpening and Noise Reduction

Step 4. Opening up the Borders with Vignetting

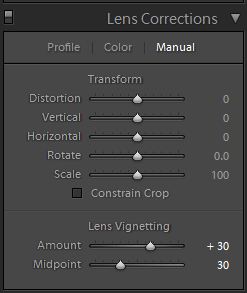
Finally, the brightness is not that even along the edges of the frame, so let’s add some Lens Vignetting at +30 Amount and +30 Midpoint to even out edge-to-edge brightness.

04b Lens Correction

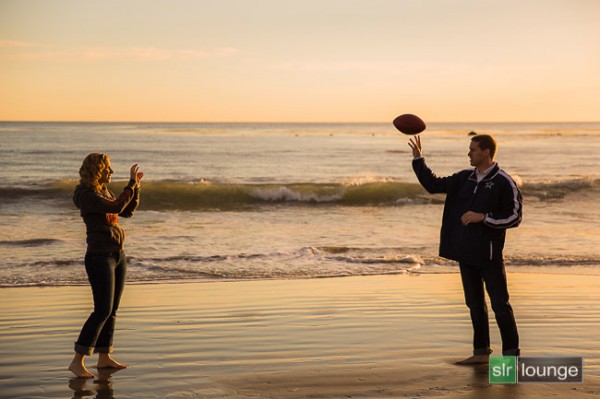
Here is how your image should look like after applying all of these adjustments.

04 Lens Correction

That is it for the global adjustments, we are now going to use the adjustment brushes and graduated filter to add more clarity and contrast to the environment, as well as work on evening out the overall exposure.

Step 5. Using Adjustment Brushes for the Sky and the Ground

In the Lightroom 4 Preset System, there is an adjustment brush called the “Sky | Cloud | Ocean” that we apply to the sky, cloud, and ocean. The purpose of this brush is to increase the contrast and clarity. Additionally, this adjustment brush also increases saturation.

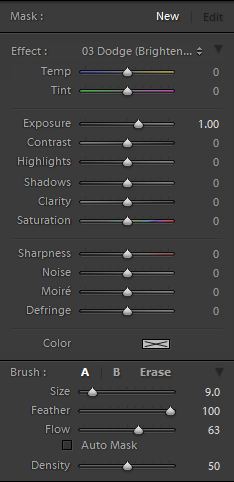
Here are the settings for this adjustment brush:

05b Sky Cloud Ocean from SLR Lounge Lightroom 4 Preset System

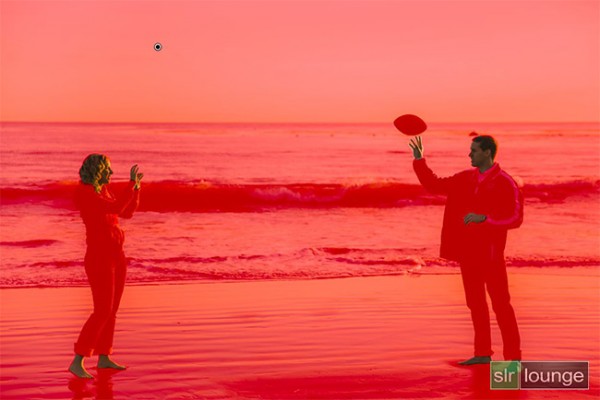
We want to apply this brush to the entire scene except for the couple’s exposed skin. The quickest way to accomplish this is to fill the entire scene with the brush, then use Erase brush at the bottom of the Brush Panel to remove the effect from their face, hair, hands, and feet.

Hold Alt (Opt on OSX) while in the active brush to switch to the Erase brush.

Because there is a lot of contrast between the subjects and their surroundings, you can use the Auto Mask to allow Lightroom to mask around the individuals.

To make it easier to see what part of the image is being affected by the adjustment brush, press “O” on the keyboard to toggle the Mask Overlay. The adjustment brush is applied on any part of the image that is overlaid in red.

05c Adjustment-Brush

Once you are finished applying this adjustment brush, press “O” again to hide the overlay. Your image should have a punchier look that similar to the deep shadows of the setting sun.

05 Adjustment Brush

Step 6. Using an Graduated Filter to Even Out Exposure on Left Side

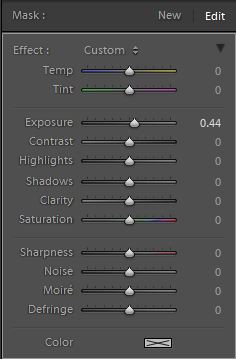
At 4pm, the winter sun had already started its decent to the horizon, which meant that light was beginning to fade quickly. Because the sun is lighting the scene from the far right, the left side of the image was a tad underexposed in comparison to the right side. We want to correct for this subtly, so we will be using a Graduated Filter to slightly brighten the left side of the frame.

One final adjustment I would like to make to this image is just to remove the rock in the water that is just behind and above the male subjects head. But, given the size and position of the rock, this will best be done in Photoshop.

06b Graduated Filter

Final Before and After Images

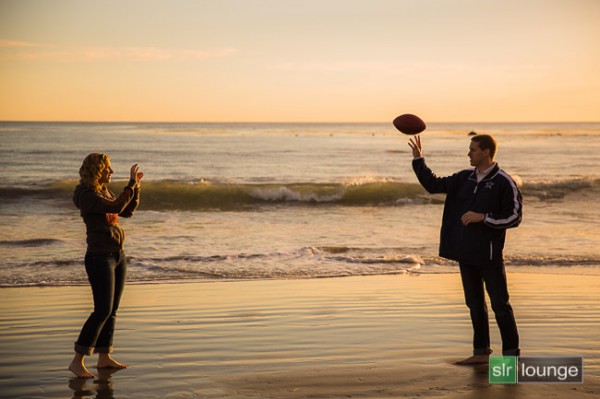
Finally, here are the before and after images comparing the original image to the new image with the warm, sunset mood look.

Original

Warm, Sunset Mood Image

The Lightroom 4 Preset System

The SLR Lounge Lightroom 4 Preset System is designed to enable users to achieve virtually any look and effect within 3-5 simple clicks. From basic color correction, vintage fades, black & white effects, tilt-shift effects, faux HDR, retouching, detail enhancing, and so much more. The sky is the limit with what has been dubbed the most powerful and intuitive preset system available. Click the link above to learn more/purchase.

You can also purchase the LR4 Preset System as part of the 30 hour 3 DVD Lightroom 4 Workshop Collection set, containing every bit of education and tools needed to run a Lightroom 4 based photography studio.

Post originally from: Digital Photography Tips.

Check out our more Photography Tips at Photography Tips for Beginners, Portrait Photography Tips and Wedding Photography Tips.

Create a Warm, Sunset Mood Image in Lightroom 4


Digital Photography School

 
Comments Off on Create a Warm, Sunset Mood Image in Lightroom 4

Posted in Photography


? Skyrim Mods Series – #66 – Mood Magic, Puppeteer Master, Short Stories

16 Oct

Like, Subscribe, Favourite! 🙂 ? Follow me on Twitter: www.twitter.com ? Like me on Facebook: www.facebook.com ? Watch my livestream: www.twitch.tv Puppeteer Master by JohnB 00:18 skyrim.nexusmods.com PUPPETEER MASTER – PICTORIAL REFERENCE GUIDE by Reimar67 by Reimar67 skyrim.nexusmods.com Skyrim Photography Toolkit – Weather Control and Lenses by MIND BULL3TS skyrim.nexusmods.com Mood Magic by Dragon Slayer Mod team dl.3dmgame.com Profile of 83Willow skyrim.nexusmods.com
Video Rating: 4 / 5

 
Comments Off on ? Skyrim Mods Series – #66 – Mood Magic, Puppeteer Master, Short Stories

Posted in Photography Videos