RSS
 

Posts Tagged ‘Monsters’

Creative Water Photography – A Step-by-Step Guide to Making Water Monsters

22 Jan

The post Creative Water Photography – A Step-by-Step Guide to Making Water Monsters appeared first on Digital Photography School. It was authored by Ramakant Sharda.

creative-water-photography-making-water-monsters

Have you ever watched an alien movie and wondered how they created those monsters? You’d need a very powerful computer, animation software, and some special skills to create an animated or moving monster. However, you can easily create a series of still monsters by using water. I’ll show you how some creative water photography can enable you to create your own water monsters. It’s simple to do, with great effect!

So let’s get started!

creative-water-photography-making-water-monsters

1. What you need to make water monsters:

To do your creative water photography, you will (obviously) need a camera. You can use any DSLR or Mirrorless camera. In fact, you can use a point-and-shoot camera if it is capable of firing an external flash.

A standard lens, like a 24-70 mm, is good, as you don’t want your splash to go out of the frame. You also don’t want water splashes on your camera.

In addition to a camera, you will need an external flash and a cable or wireless trigger to fire the flash. Then you’ll need a large diffuser. You can use the translucent part of a five-in-one reflector, or you can use a butter paper sheet and paste it on a wooden frame. A reflector is a better choice here, as you don’t need to make a wooden frame, and it also won’t get damaged if some water spills on it.

You’ll need a light stand to affix the flash and a tripod for the camera.

If you have a portable water tub, you can do this shoot in a room. However, if you don’t have one, you’ll have to do it outside.

Also, you’ll need to wait until night, as you can’t do this shoot in daylight.

You’ll also need an assistant to throw the water so you can click the beautiful water monsters.

Creative Water Photography – A Step-by-Step Guide to Making Water Monsters

2. Setup:

The setup is pretty simple.

If you are shooting your water monsters indoors, place your water tub in the room and hang the diffuser behind it.

Set the flash a little bit farther away from the diffuser. If you have a round studio light reflector, use it. It’ll give you a nice, round light effect. If you don’t have one, that’s okay. You can just use the flash.

Fix your camera on the tripod and place it far from the water tub. You don’t want water splashes on your expensive camera, so you’re going to use it on full zoom. If you don’t have a 24-70mm lens, you can use a 100mm lens and place the camera farther.

See the image below to view the setup.

creative-water-photography-making-water-monsters


3. Camera and other settings:

Now you have done that, let’s talk about settings.

Place a stick at the center of the water tub and manually focus on it. Don’t forget to set your camera on manual focus after that.

Now you need to finish your camera settings and flash settings. First, we’ll do flash settings.

Change your flash to manual mode and set the power to 1/32. We’re doing this because when the flash is on lower power, it produces the shortest burst of light, which helps to freeze the subject. You can’t go above 1/32 power, as then you’ll start getting motion blur.

Now set the camera to manual mode.

Set your ISO to 100, aperture to f/16, and shutter speed to 1/200 sec or whatever your camera sync speed is. These are the settings I used in all my shots, and they’ll work for you, too.

An aperture of f/16 will give you enough depth of field, and the entire splash will be in focus. Make sure you’re shooting in RAW, too, as this will help in post-processing later.

If you are firing your flash using a radio trigger, set it up. Or if you are using a cable to fire it, attach the cable.

Now your setup is ready, so let’s talk about the workflow and start creating these beautiful water monsters.

creative-water-photography-making-water-monsters

Workflow:

Earlier, you placed a stick in the tub of water. Now remove it and replace it with something like a glass so that your assistant knows where the focus point is and throws the water accordingly. Also, tell your assistant about the area where your frame is so they won’t throw the water outside the frame.

Now all you need to do is press the shutter when your assistant throws the water.

They can throw the water in different ways. For example, they can fill both hands with water and throw it upside. Just make sure their hands don’t enter the frame.

Your assistant can use a mug or glass to throw the water, or they can throw it using two or three cups together.

Different methods of throwing water will give you different results.

Even if you use the same method of throwing, you’ll get different pictures every time.

Take at least 100 photos – the more, the better.

creative-water-photography-making-water-monsters

Post-processing:

Post-processing is quite simple.

First, select good photos from the pictures you’ve taken. If you have clicked 100 pictures, you’ll get 10-12 good photos.

Now open the RAW files in “Camera Raw” and change the white balance to 3000. It’ll convert your gray picture to a blue tone.

If you’re an advanced photographer and you can set custom white balance settings in your camera, set it to 3000 kelvin before the shoot. Then you won’t need to do it in post-processing.

Creative Water Photography – A Step-by-Step Guide to Making Water Monsters

Now you just need to clean up some extra water droplets, crop if needed, and sharpen it. Your water monsters will be ready.

When you’ve finished editing the photos, check out the other images one more time. You’ll find some images that you can merge and use to make something unique. For example, I made this butterfly using three images.

creative-water-photography-making-water-monsters


So, let’s do some creative water photography and make these amazing water monsters!

We’d love to see your results, too, so please sharing them in the comments.

Also, if you run into any problems, just comment on this post, and I’ll help you solve them.

Creative Water Photography – A Step-by-Step Guide to Making Water Monsters

The post Creative Water Photography – A Step-by-Step Guide to Making Water Monsters appeared first on Digital Photography School. It was authored by Ramakant Sharda.


Digital Photography School

 
Comments Off on Creative Water Photography – A Step-by-Step Guide to Making Water Monsters

Posted in Photography


Sea Monsters: Massive Crocheted Sea Urchins Float Over Singapore

14 Jun

[ By SA Rogers in Art & Installation & Sound. ]

Mutant sea urchins seem to have evolved into monstrous, buoyant creatures capable of rising above the surface of the sea, glowing softly against the skyline in Singapore. Made from crocheted lace, these three oversized urchin installations by Choi + Shine invite passersby to pause within them and take in the city through their patterned shells.

Created for this year’s i Light Marina Bay Festival, which focuses on sustainability, The Urchins are hand-crafted and interactive, each one hanging high enough to dwarf even the tallest visitors. Made from UV- and weather-resistant polyester cord stretched on an aluminum frame, the urchins hang from ultra thin cables.

“At night, the mysteriously hovering and glowing large Urchins create a sense of magic as if time has stopped,” says Choi + Shine. “When viewers enter into the Urchins, they will be surrounded by a single layer of glowing, lacy surface, where they can enjoy the detail and texture of the Urchins and see the city, water and the sky through this visual filter.”

“When other viewers see the occupants in the Urchins, the occupants will glow within the lacy room, creating an illusion of ethereal levitation of the occupants, while the occupants become a part of the artwork.”

Share on Facebook


[ By SA Rogers in Art & Installation & Sound. ]

[ WebUrbanist | Archives | Galleries | Privacy | TOS ]


WebUrbanist

 
Comments Off on Sea Monsters: Massive Crocheted Sea Urchins Float Over Singapore

Posted in Creativity


Monsters of New York: Creepy Critters Cuddle Strangers on City Subways

04 Nov

[ By WebUrbanist in Art & Drawing & Digital. ]

subway-snuggle-monster

NYC subways are strange, dark and oft-overcrowded places where many people retreat into themselves and avoiding engagement, at least until these unusual (and invisible) creatures come along.

monsters-of-nyc

happy-snuggler

Artist Ben Rubin uses candid everyday photos of passengers as a canvass for an exotic cast of fictional characters that seem right at home in the public transit system of America’s largest city. His work is complex and detailed, but all rendered on a portable iPad device using the Procreate app.

creepy-subway-clown

sideways-glance

One could easily imagine that the off-putting noises and smells found on subway trains would be tied to such a strange set of monsters and aliens.

sitting-and-waiting

alien-maps

In some cases, they seem to intrude on those seated next to them. In others, they unobtrusively wait in stations for a ride or look at maps, apparently puzzled about getting from Manhattan to Brooklyn.

subway-tablet-game-player

too-big-for-transit

For the artist, these works started as a way to pass the time on the commute but have become a method of engaging and layering ideas onto photographs outside of the subway as well.

lonely-monster

spooky-eye

face-melting

creeper

Passengers engrossed in a book, listening to a podcast or zoned into a mobile phone game may not notice them, but these Subway Doodle creatures are there, at least in one man’s imagination. One has to wonder: if any of these really appeared, would the zombie humans around them even notice?

Share on Facebook


[ By WebUrbanist in Art & Drawing & Digital. ]

[ WebUrbanist | Archives | Galleries | Privacy | TOS ]


WebUrbanist

 
Comments Off on Monsters of New York: Creepy Critters Cuddle Strangers on City Subways

Posted in Creativity


Magical Monsters & Kid-Size Castles: 12 Epically Imaginative Playgrounds

10 Aug

[ By SA Rogers in Destinations & Sights & Travel. ]

playgrounds bounce below
It’s true that as we get older, we lose most of the rich imagination that had us drawing monsters and telling strange stories as kids, the world seeming less magical with each year that passes. But sometimes, we grown-ups still manage to cling to some of that creativity, allowing us to design and build stuff that’s just as cool through the eyes of adults as it is to kids. These epic playgrounds around the world are a tribute to that wonder, curiosity and adventurous spirit, whether they’re exclusively for little ones or open for us to enjoy, too.

The City Museum Outdoor Playground, St. Louis, Missouri

playgrounds city museum

playgrounds city museum 2

playgrounds city museum 3

playgrounds city museum 4

Mesh tunnels arch into the sky, airplanes are elevated on bright blue steel beams, and other metal parts criss-cross each other across a large open courtyard at what was once the 10-story International Shoe company in St. Louis. The 600,000-square-foot City Museum, designed by artist Bob Cassilly in 1997 and has been continually updated and improved by a group of 20 artists known as the Cassilly Crew since his death in 2011. Those two repurposed planes are just the beginning of a chaotic arrangement of play equipment including slides, caves, tunnels, ball pits, a rooftop Ferris wheel and a school bus that juts out from a ledge. It’s delightfully weird, and there’s nothing else quite like it in the world.

The Crooked Houses by Monstrum, Denmark

playgrounds brumbleby 1

playgrounds brumbleby 2

playgrounds brumbleby 3

There’s a lot more to this weird little collection of crooked houses than meets the eye, as the design is actually inspired by local slaughterhouses. According to Monstrum, a creative firm building playgrounds all over the world, the area was once home to dairies and slaughterhouses before it became urbanized, and their design reflects that history. Use climbing grips to scale the sides of the houses, or attempt to balance on beams leading from one window to the next.

Crocheted Alligator Playground by Olek, Sao Paulo
playgrounds olek alligator

playgrounds olek alligator 2

playgrounds olek alligator 3

This gigantic alligator-shaped playground in Brazil was already cool enough before crochet-bombing artist Olek brought her signature colorful encasing to give it a new look in 2012. It took the artist several weeks to cover the alligator in Brazilian ribbons and acrylic yarn. The internet is so enamored with Olek’s embellishment that it’s hard to find a photo of what the playground usually looks like.

Woods of Net at the Hakone Open Air Museum, Japan

playgrounds woods of the net 1

playgroudns woods of the net 2

playgrounds woods of the net 3

Another artist integrates woven fibers to playgrounds in a different way, making her hand-knitted creations interactive elements for kids to play on. “Woods of Net” at the Hakone Open Air Museum in Japan is a beautiful example of Toshiko Horiuchi MacAdam’s work, and took her an entire year to finish. The playground features trampoline-like knitted nets with pendulous growths on the underside functioning as swings.

Next Page – Click Below to Read More:
Magical Monsters Kid Size Castles 12 Epically Imaginative Playgrounds

Share on Facebook


[ By SA Rogers in Destinations & Sights & Travel. ]

[ WebUrbanist | Archives | Galleries | Privacy | TOS ]


WebUrbanist

 
Comments Off on Magical Monsters & Kid-Size Castles: 12 Epically Imaginative Playgrounds

Posted in Creativity


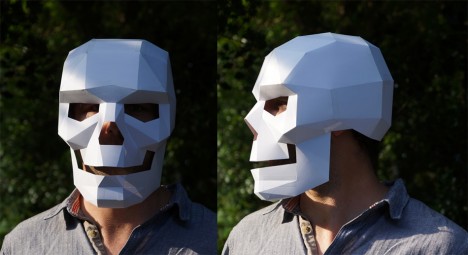
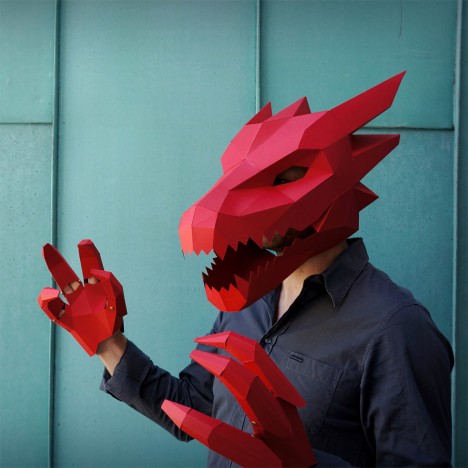
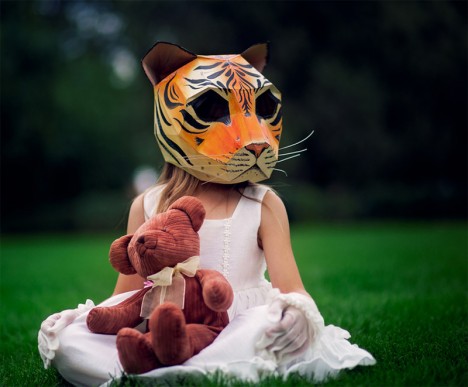
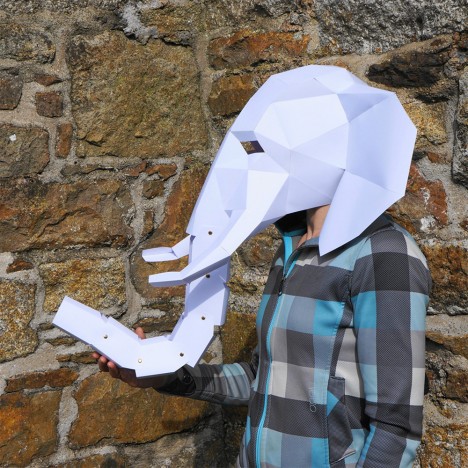
Geometric Monsters: Download, Print & Make DIY Halloween Masks

12 Oct

[ By WebUrbanist in Design & Products & Packaging. ]

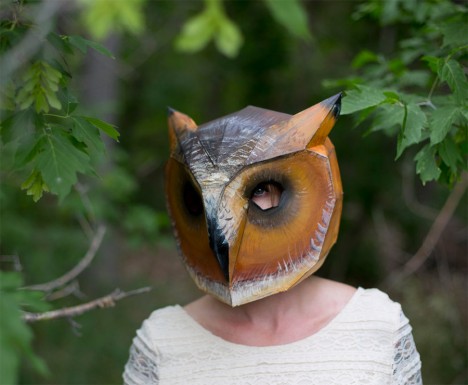
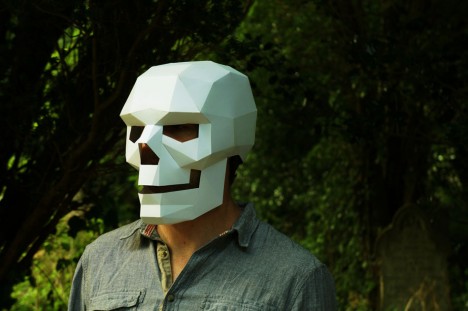
diy skull mask

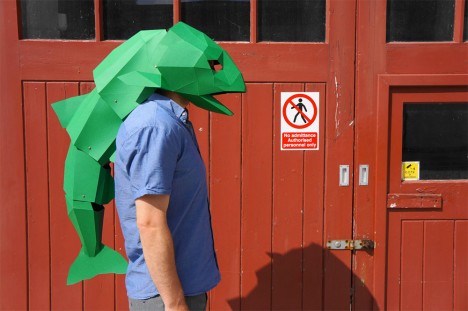
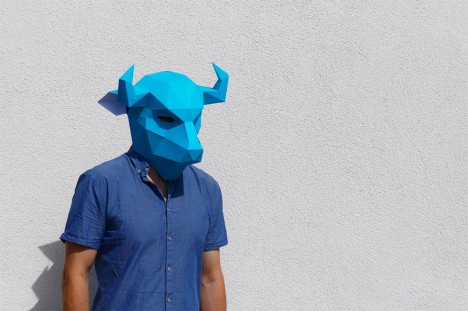
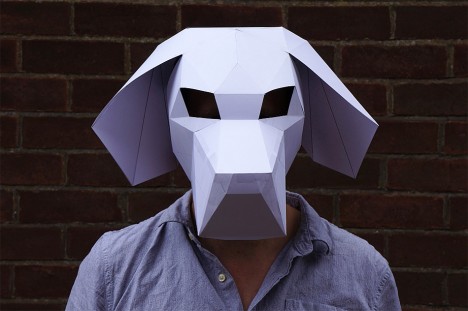
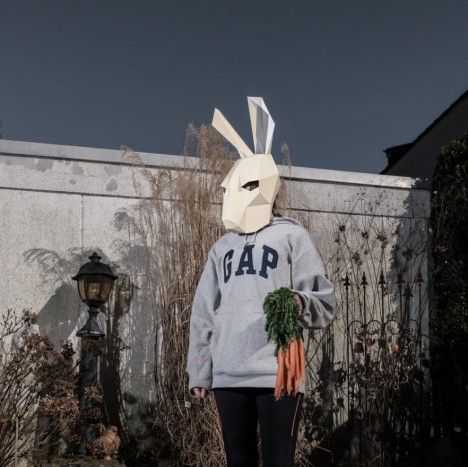
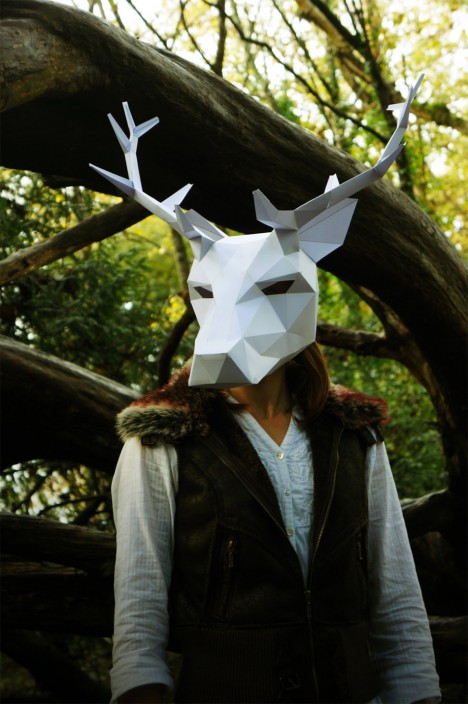
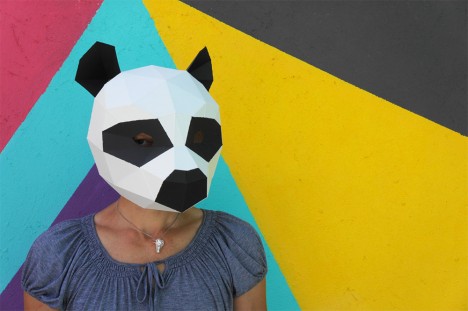
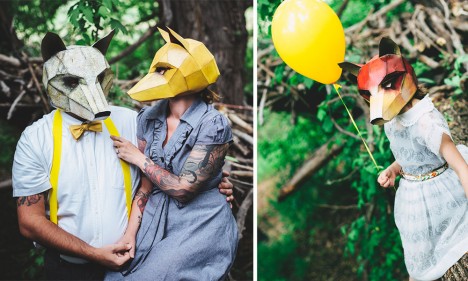
This holiday season brings fresh printer-compatible designs of low-poly skeletons, monsters, animals and more for the do-it-yourself costumer, all scaled to fit an adult or resizable for children.

diy skeleton paper cardboard

diy articulated dragon

diy tiger head

Like a polygon mesh in 3D computer graphics (that has a relatively small number of polygons), these masks are leant a haunting effect unique to the digital age, looking otherworldly and surreal like low-resolution computer renderings.

diy elephant trunk

diy tailed fish

Some models are more complex than others, involving sets of articulated parts that rotate on simple hinges or pivots, like the tail of a fish, trunk of an elephant or the hands of a dragon.

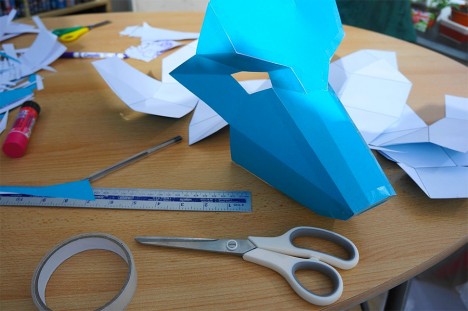
diy maskmaking process

diy bull horns

The key ingredients: a printer, some paper of applicable color, glue sticks, craft knife, tape, cardboard and an elastic headband. If you have more time than money, or simply enjoy the process, these models provide a great balance of personal work and creativity within a ready-made outline.

diy dog face

diy bunny rabbit

diy antler antelope

From their maker, Wintercroft on Etsy, who sells the plans online:  “The instructions and templates are designed to be quick and easy to follow. The finished masks are pretty robust due the their polygon construction and will survive the wildest of parties.

diy panda bear

diy fox people

diy owl mask

More on Steven Wintercroft: “By nature I am obsessively creative and starting making things as a kid with my granddad. I studied Art and design, then furniture studies and have been designing and building custom surfboards since I was a teenager. I’ve worked as a cabinet maker but have spent most of my time as a full time surfboard shaper. I believe that the urge to create is a fundamental part of being human and these masks provide an excuse to sit down, get out the scissors, tape and paint and make something” (via Colossal).

Share on Facebook


[ By WebUrbanist in Design & Products & Packaging. ]

[ WebUrbanist | Archives | Galleries | Privacy | TOS ]


WebUrbanist

 
Comments Off on Geometric Monsters: Download, Print & Make DIY Halloween Masks

Posted in Creativity


Just Add Monsters: Chris McMahon’s Modified Thrift Store Art

27 Jul

[ By Steve in Art & Drawing & Digital. ]

Chris McMahaon Empty Swing monster thrift store painting
Artist Chris McMahon looks at cheap thrift store landscape paintings and sees something missing. Then he paints in the hidden monsters for all to enjoy.

Chris McMahon Empty Swing monster thrift store painting original

Artist Chris McMahon first began buying thrift store landscape paintings for economic reasons: often costing a mere dollar apiece, the paintings were far cheaper than new, unused canvases and McMahon saved plenty by covering the dime-a-dozen scenes with gesso and starting anew. That all changed one day when McMahon bought a landscape scene that caught his attention – not for what it showed but for what appeared to be missing. Check out the original “The Empty Swing” painting above and you’ll probably agree, though McMahon’s “completion” of the scene might not sit well with overly imaginative squeamish types.

The Mountain Monster

Chris McMahon Mountain Monster painting

“I’ve always liked giant monsters,” admits McMahon at his website, Involuntary Collaborations, “from rubber-suit Godzilla to Cloverfield.” We think The Mountain Monster, above, is a worthy addition to the pantheon. Stalking ominously through a backlit landscape of stunted conifers and fetid mist, the crazed creature appears to fit the scene perfectly. One wonder if the original artist would agree should they be presented with McMahon’s respectful augmentation.

The Swamp Monster

Swamp Monster thrift shop painting Chris McMahon

Somehow the swamp monster in the eponymously titled painting above, McMahon’s third such dip in the Involuntary Collaboration pool, doesn’t seem all that monstrous given he (or she) is giving the viewer a friendly wave. Even so, the scene is disconcerting to say the least. “This is the first one that I added my signature below the original artist’s,” states McMahon. “I feel better if the original artist has signed his or her landscape – that way it doesn’t look (as much) like I’m taking credit for another person’s work.”

Next Page – Click Below to Read More:
Just Add Monsters Chris Mcmahons Modified Thrift Store Art

Share on Facebook


[ By Steve in Art & Drawing & Digital. ]

[ WebUrbanist | Archives | Galleries | Privacy | TOS ]


WebUrbanist

 
Comments Off on Just Add Monsters: Chris McMahon’s Modified Thrift Store Art

Posted in Creativity


RuneScape BOSS Monsters Solo Version 2 (Part 2)

14 Jan

Music: — Fairy Tail – Salamander Fairy Tail – Hyoujin Mau [Dance of Ice Blade] Fairy Tail – Natsu’s Theme Fairy Tail – Erza’s Theme (Original upload date: May 17, 2010) This is Part 2 of my High-Level Boss Monsters Solo series featuring RS2 combat system before EoC, featuring the following bosses: Phoenix, Wild Jade Vine, Bork, Skeletal Horror, Giant Mole, Kree’arra, Commander Zilyana, General Graardor and K’ril Tsutsaroth Like mentioned in Part 1, this video was made in 2010 and did not include the following updates: Damage Soaking Damage Splat Calculation Ancient Prison in God Wars Dungeon Nex armour The reappealing of the Unbalanced Trade Removal Capes of Distinction Polypore staff Left-clicking Attack boss feature New Combat Sound Effects Commander Zilyana’s redesign K’ril Tsutsaroth’s redesign Items/Abilities related to the Loyalty Programme Several Armour revisions Evolution of Combat RuneScape is a trademark to Jagex Ltd. I do not own any of the contents used for this video, but used for the sole purpose of entertainment without profit. All music used in this video is copyrighted to the respective owners.
Video Rating: 4 / 5


RuneScape BOSS Monsters Solo Version 3 (Part 5)

04 Jan

Music: — To Aru Kagaku no Railgun – Imminent Crisis The Sacred Blacksmith – Nigemadou Hitobito The World God Only Knows – Sentakushi Souatari Umineko no Naku Koro ni (Game) – The Dark and Crazed Requiem of Purgatory To Aru Majutsu no Index II – Queen’s Fleet This is Part 5 of the solo series (Non-EoC 2012 Edition), featuring the hard version of Sunfreet in the special challenge “The Fire! It Burns!” in Dominion Tower. All damage dealt to Sunfreet are capped at 500. Defeating the hard version of Sunfreet is required for the Completionist Cape. Defeating the hard version of Sunfreet is not a required achievement to obtain a Stage 4 Dominion Marker. RuneScape is a trademark to Jagex Ltd. I do not own any of the contents used for this video, but used for the sole purpose of entertainment without profit. All music used in this video is copyrighted to the respective owners.

Video Rating: 0 / 5


RuneScape BOSS Monsters Solo Version 3 (Part 6)

21 Dec

Music: — To Aru Kagaku no Railgun – AIM Burst Umineko no Naku Koro ni (TV-Anime) – Kudasareru Shinpan Black?Rock Shooter TV-Anime – La Storia ~ il destino Shakugan no Shana III – Dans le tourbillon d’une lutte The final piece to the solo series non-EoC 2012 edition featuring the Corporeal Beast. I’m sorry to say that Nex will not be introduced to the series but will appear on the EoC edition when I’m prepared for it. Corporeal Beast is easy based on many other updates since it was released, as the only thing that a player needs to worry about is magic level and defence bonus which determines the damage output from the corp’s mage attacks since meleers only need to pray melee or flash-Soul split if using Ancient curses. RuneScape is a trademark to Jagex Ltd. I do not own any of the contents used for this video, but used for the sole purpose of entertainment without profit. All music used in this video is copyrighted to the respective owners.
Video Rating: 5 / 5


RuneScape BOSS Monsters Solo Version 2 (Part 3A)

18 Dec

Music: — To Aru Kagaku no Railgun – battle area To Aru Majutsu no Index – Breakthrough (Original upload date: June 11, 2010) Third video of four featuring the TzTok-Jad before the TzHaar City update. In this video, I choose to use magic against him and it is fun back then. RuneScape is a trademark to Jagex Ltd. I do not own any of the contents used for this video, but used for the sole purpose of entertainment without profit. All music used in this video is copyrighted to the respective owners.
Video Rating: 5 / 5

An understandable description of how to use the manual mode on your DSLR or advanced point and shoot camera. This is the second of three videos in the basic manual photography series.
Video Rating: 0 / 5