RSS
 

Posts Tagged ‘Modify’

This app can modify Aperture and iPhoto so they will continue to work with macOS Catalina

30 Oct

Apple’s new macOS Catalina operating system added plenty of new features, functionality and performance improvements, but in streamlining the experience, Apple also killed off a number of apps. While plenty more apps (including all 32-bit apps) were killed off, two photo-specific apps macOS Catalina can no longer run include Aperture and iPhoto.

Thankfully, there are determined developers and programmers who are always looking for the next problem to solve. Tyshawn Cormier is one of those programmers who has created an app called Retroactive that modifies both Aperture and iPhoto so the apps are usable on Apple computers running macOS Catalina.

Aperture was effectively neutered back in 2014 when Apple announced it was ceasing development of the pro-oriented photo management and editing application. Despite this, many clung on to the last update, which worked until macOS Catalina. If you’re one of those photographers who has loyally clung to Aperture, Retroactive should ensure you can continue to use the app without having to avoid the latest macOS update.

Likewise, Apple’s iPhoto app can also be modified to run in macOS Catalina with Retroactive. The app has since been replaced with Apple’s Photos app, but whether for nostalgia purposes or something else, you can now run iPhoto.

In order to use Retroactive, you’ll need to make sure you still have a copy of Aperture or iPhoto still on your computer. If you do, it’s simply a matter of downloading Retroactive from GitHub, giving it the required permissions to alter the apps and letting it do its thing.

Not all functionality is salvaged, but by and large the apps still run without much issue. Specifically, neither Aperture nor iPhoto are able to play videos or export slideshows, but aside from that all former functionality remains.

You can download Retroactive from GitHub and read through a wonderfully detailed guide on how to install and run Retroactive on macOS Catalina.

Articles: Digital Photography Review (dpreview.com)

 
Comments Off on This app can modify Aperture and iPhoto so they will continue to work with macOS Catalina

Posted in Uncategorized


Ways to Modify Your Flash for More Controlled Lighting

13 Aug

The post Ways to Modify Your Flash for More Controlled Lighting appeared first on Digital Photography School. It was authored by Kevin Landwer-Johan.

Flash can be a confusing addition for many new photographers. But there’s really only one way to gain experience. Learning to use your flash well takes practice.

Using your flash without modifying its output often produces unsatisfactory results. These can be very discouraging. With little modification, you can achieve more acceptable results pretty easily. Controlling the output of your flash based on the style of light you want for your photos is not hard to do.

Ways to Modify Your Flash for More Controlled Lighting Northern Thai Sausage

© Kevin Landwer-Johan

Your unmodified flash is a small light source

The smaller your light source is in relation to your subject, the harder the light will be. An unmodified flash produces strong light and high contrast for most subjects. This creates a hard-edged shadow which is often undesirable. The only difference is with macro photography because the light source will be larger than the subject.

Modifying the output of your flash by using a diffuser softens the light which falls on your subject.

Using a diffuser does a couple of things. It subdues the output, so less light hits your subject. It also spreads the light, effectively making the active light source larger. The light falling on your subject will be softer. So will the shadows they create.

Ways to Modify Your Flash for More Controlled Lighting Young Woman in the Park

© Kevin Landwer-Johan

The benefits of using modified flash

Diffusing the light from your flash will produce more flattering results when taking portraits. Soft light falling on the skin reduces the appearance of texture and gives it a more even tone. There are a number of techniques and accessories you can employ to diffuse the light from your flash. I will discuss some of these in the next section.

Hard light from an unmodified flash is more likely to show up skin blemishes. It also produces unsightly hot spots.

These bright patches occur with all but the most light absorbent surfaces when using an undiffused light. The more reflective the surface, the more light from a small light source will reflect.

Using some method of scattering the light from your flash will help end these problems.

Another option to modify your flash is to do the opposite of spreading the light. Narrowing the dispersion of the light produces a completely different look. You can better control what area of your composition the light from your flash will affect. This is usually achieved by the use of a snoot or honeycomb grid.

Ways to Modify Your Flash for More Controlled Lighting Rabbit Time Costume

© Kevin Landwer-Johan

How to control your flash using modifiers

The most simple way to alter the light from your flash is to turn your flash head so it’s not pointing where your lens is focused. Indoors you can point it up to the ceiling. The light will reflect off the ceiling and scatter. You can alternatively point your flash towards a wall beside or behind you.

Ceilings are often white or light neutral colors, so your photo is not likely to be affected by an odd toning. Bouncing your flash off a colored wall or other surfaces can cause that color to affect the light.

Depending on how close your flash is to the surface you’re bouncing it off will determine how much it is diffused. The closer you are to the surface, the less diffusion there will be.

When you turn your flash head to bounce it off another surface, the light and shadows it creates will be softer. Shadows may still be evident. You need to be careful of shadows under people’s chins and around their eyes when you bounce your flash off a ceiling.

Using a piece of whiteboard, plastic or a fold-out reflector to bounce your flash off will give you more control. You can move your reflector further away or closer and determine the best position for it.

Ways to Modify Your Flash for More Controlled Lighting Young Woman in Red

© Kevin Landwer-Johan

Clip-on hard diffuser

Most flash units come with a clip-on hard plastic diffuser. This is a small attachment that fits over the front of the flash head. It scatters and softens the light when the flash is fired.

Because this attachment is small, about the same size as your flash lens, it will not do a lot to soften the light. It is often better than nothing if you have not other option and it is small and convenient.

ways-to-modify-your-flash-for-more-controlled-lighting-Clip-on-Diffuser

Flash with a clip-on diffuser © Kevin Landwer-Johan

Bounce cards and other compact modifiers

A white piece of cardboard about 20cm (8 in) square with a tab on one edge and a couple of good strong elastic bands. This was a standard kit for photographers when I worked in newspapers. It was back before the proliferation of flash modifiers were available to buy.

Adding a bounce card to a flash pointed at a ceiling or wall spreads and softens the light even more. This will help further reduce the strength of the shadows.

Nowadays there are so many types of bounce cards and other diffusers available. They’re all designed to modify your flash in slightly different ways. Kits of modifiers can include:

  • Softboxes,
  • Barn doors,
  • Snoots,
  • Honeycomb grids and all manner of variations.
ways-to-modify-your-flash-for-more-controlled-lighting-Bounce-Card

Flash with a bounce card © Kevin Landwer-Johan

Snoots and grids

Most accessories which modify flash output are designed to soften the light. Snoots and honeycomb grids are two pieces of kit which can help you control the direction of the light.

Each works to narrow the spread of light from your flash. This allows you to control which part of your composition is most affected.

Ways to Modify Your Flash for More Controlled Lighting Snoot Lighting

© Kevin Landwer-Johan

Gobos and colored gels

Two more accessories which modify flash output are gobos and gels.

A gobo is a stencil or template placed in front of your flash head to create a shadow of a shape or pattern.

Any color gel can be used to affect the color of light which emits from your flash. This can be used for creative effect or to balance your flash with the ambient light.

Electric light sources often emit a colored light that is not as white as the light from your flash. Tungsten light is a warm tone. Fluorescent is often quite cool. Using the correct color gel can produce the right color to balance with an existing light source.

Small flash softbox

ways-to-modify-your-flash-for-more-controlled-lighting

Small Softbox © Kevin Landwer-Johan

My favorite flash modifier is a small softbox. It’s not the smallest or most convenient, but it produces a soft, pleasant light.

Mine’s about 60cm (2 ft) square and has a bracket to mount the flash at the back. The biggest drawback in using it is that you need to place it on a stand or have someone hold it for you.

I find I like the results best when using it as a fill light.

Ways to Modify Your Flash for More Controlled Lighting Temple Tourist Sunset

© Kevin Landwer-Johan

Controlling the amount of light

Whichever method you use to you modify the light from your flash there will always be a reduced output. You must compensate for this.

Using the TTL setting your camera and flash should calculate the correct amount of light. This should also be true with the auto settings.

In some circumstances, you may notice not enough light from your flash is illuminating your subject. At these times, you must adjust your compensation. This can be done by opening your aperture more or increasing your ISO.

Ways to Modify Your Flash for More Controlled Lighting Rag Doll Girl

© Kevin Landwer-Johan

Conclusion

Unmodified flash is not often the best light source. Modification allows you to control its output to suit the style of photograph you are making.

Experimentation and practice are required to master the type of lighting you want.

A practical exercise to help you understand and see what you can achieve is worth spending some time with. Set up a still life composition or find a willing model to work with. In the same setting, take a series of photos using various modifiers so you can compare the way the light looks with each one.


ways-to-modify-your-flash-for-more-controlled-lighting

The post Ways to Modify Your Flash for More Controlled Lighting appeared first on Digital Photography School. It was authored by Kevin Landwer-Johan.


Digital Photography School

 
Comments Off on Ways to Modify Your Flash for More Controlled Lighting

Posted in Photography


How to Control and Modify Your Lighting With Flags

02 Aug

Lighting can be a complicated subject. From light sources, to modifiers, and color temperature, there are so many things to take into consideration. You probably know of many ways to alter your light with reflectors and diffusers.

However, what do you do when you have too much light, or the light isn’t behaving the way you need to produce your final image? You could start from scratch and choose a different light source and modifier, or you could opt for a different setup altogether. There is another way – flags.

how-to-modify-light-with-flags-5218final

Like diffusers and reflectors, flags are a tool that are used to control light. While diffusers control the shape and softness of light, and reflectors control the shape, intensity and direction (often acting as an additional light source), flags give you the ability to remove, or block light from your scene.

Another use of flags is to alter the size and shape of your modifier. For example you can block off a portion of a softbox to turn it into a striplight. They are also useful when working with reflective surfaces to control or block unwanted reflections.

This article will break down the basic use of flags to control where light falls in a scene. To do this, we’ll go through the step by step process of creating an image which employs the careful manipulation of a single light source.

The purpose of using a small, tabletop subject is so you can repeat the exact steps at home, in your own time.

What are flags?

At the most basic, flags are anything that can used to block or cut light from anywhere it isn’t wanted. Have you ever closed a blind or a curtain to block glare from a television screen? That blind is acting as a flag. Another example would be the sun visor in your car. What other examples can you think of? These instances from day to day life can help you figure out the use of flags much quicker.

Although you can use almost anything dark as a flag, the most common items are black paper and foamcore. Also, most 5-in-1 reflectors come with a black side that’s intended as a flag (see links above for some options).

Foamcore is one of the more useful things you can use, as it comes in a variety of thicknesses making it rigid, and it’s easy to cut to any shape and size you might need. It is also easily obtainable (visit any art supply store) and quite cheap.

Helpful things to have

As you will see in this demonstration, it can be very precarious to get your bits of foamcore to stay in place. An easy solution is to get a bunch of clamps to hold your flags. I cannot recommend this enough.

Other things that will help you position your flags include Blue-Tac, toothpicks, Popsicle sticks and tape.

Building an image

When you are working on an image that has many steps as part of the setup process, it’s important to take your time and build up your image one step at a time. Start with putting your subject in place and choosing your composition. From there, you can pick how you want to light it. Once those three things are in place, you can add or take away from the scene one step at a time, ensuring things are perfect before you move on to the next step.

Fun with flags

Step 1 – Set-up

As mentioned, this process will start with a wide crop to better illustrate how the light changes. The first task is to arrange the subject and light in the desired position, and calculate the exposure. For this shot, I intend to push the highlights of the subject to just below their limit, so the flags can be used to darken the background and achieve a very high contrast look in the final image.
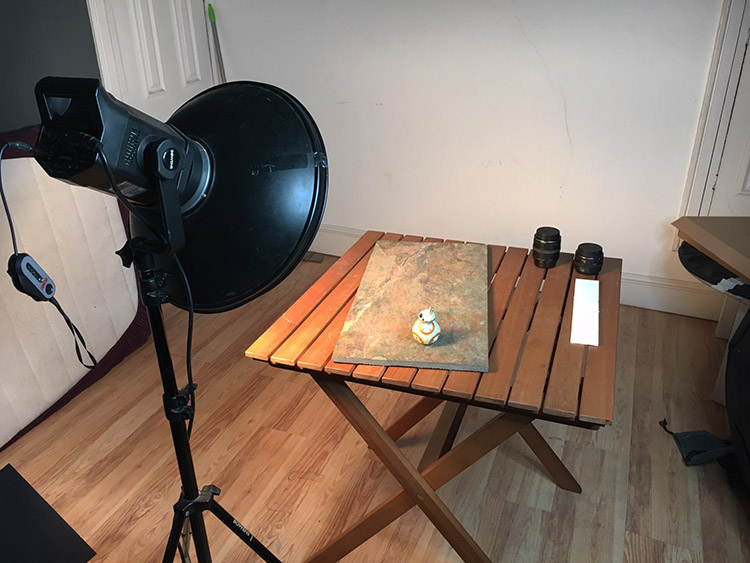
how-to-modify-light-with-flags-setup

Original setup, no flags used.

how-to-modify-light-with-flags-5212

Step 2 – first flag for background control

Even though that is a good start, there are some things that can be done to improve this image. The first thing that needs to be tackled is the large negative space in the left hand side of the image. The background matches the subject in tone and color, so bringing down the exposure on the background will help to separate the two.

This is achieved by bringing in a large piece of black foamcore and holding it in front of the light. By watching where the shadows fall, you can figure out exactly where your flag needs to be to reduce the exposure on the background, without affecting your subject. Once that place is found, the flag can be mounted in place and another test shot taken.
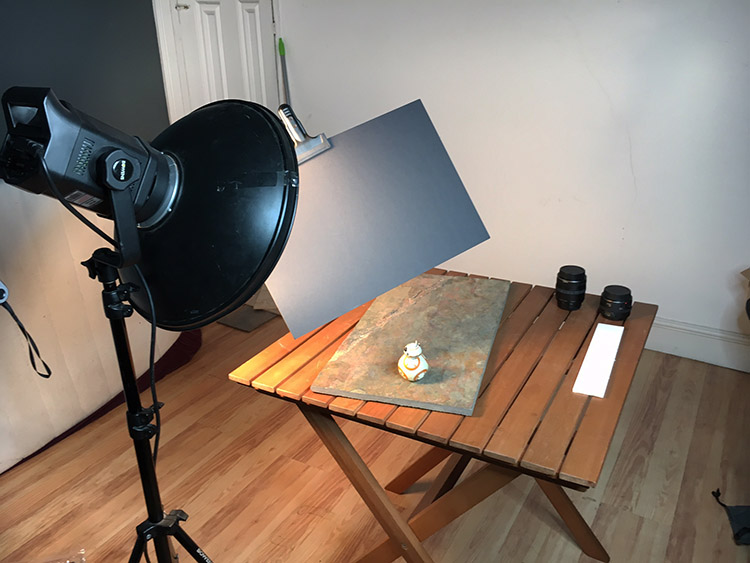
how-to-modify-light-with-flags-first-flag

First flag placed to strategically block light from falling on the background.

how-to-modify-light-with-flags-5213

Notice how much darker the left side of the image is, but the exposure on the subject has not changed.

Step 3 – place second flag for further light control

With the left side darkened, the next bit of concern is the area of background to the right of and behind, the subject. Again, it’s a matter of bringing in a piece of foam core and moving it around while watching the shadows and making sure the subject is still lit. Once that’s achieved, clamp or hold the flag in place and take another test shot.
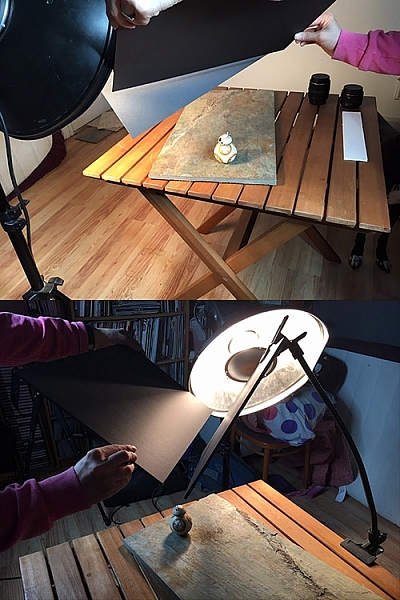
how-to-modify-light-with-flags-second-flag

how-to-modify-light-with-flags-5214

Step 4

With all the flags in place, this image isn’t quite finished. Because the background has been darkened so much, the shadow side of the subject now doesn’t stand out as much as it did in the initial setup. You can fix this with a reflector. In this case, I used a strip of white foamcore, just out of the frame to camera right. This fills in the shadows, creating an extra amount of separation between the subject and the background.
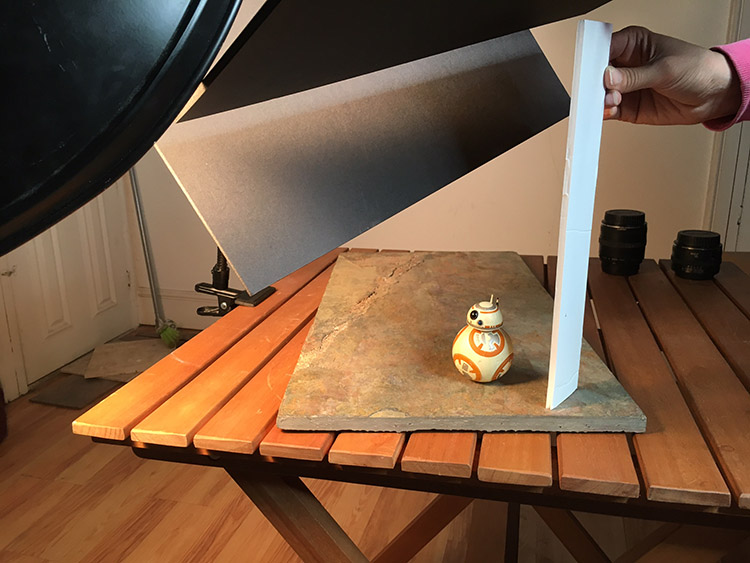
how-to-modify-light-with-flags-reflector

how-to-modify-light-with-flags-5218

Final image

With these techniques, you are taking your time to build up a scene, and controlling every bit of light that your camera records. This control, when done right, should result in well crafted images that need very little attention in post-production. In this example, this image needed a small crop, a couple small local contrast adjustments, and a high pass filter. That took all of a minute to achieve, thanks to the amount of time spent working in camera.

Before

Before flags and lighting control

how-to-modify-light-with-flags-5218final

Final image with the use of flags and a reflector to control the light, and minimal post-processing.

Moving on

Once you try this for yourself, you should quickly see how flags can be a huge help when trying to control lighting in your photography. Although this tutorial focuses on a small subject, flags can be used to great effect in all manner of genres where you have the opportunity to control light. This is especially true with portraiture. So, when you have the hang of it with a small subject, don’t be afraid to think bigger.

Please feel free to have a go at this technique yourself and share your questions and your results below.

googletag.cmd.push(function() {
tablet_slots.push( googletag.defineSlot( “/1005424/_dPSv4_tab-all-article-bottom_(300×250)”, [300, 250], “pb-ad-78623” ).addService( googletag.pubads() ) ); } );

googletag.cmd.push(function() {
mobile_slots.push( googletag.defineSlot( “/1005424/_dPSv4_mob-all-article-bottom_(300×250)”, [300, 250], “pb-ad-78158” ).addService( googletag.pubads() ) ); } );

The post How to Control and Modify Your Lighting With Flags by John McIntire appeared first on Digital Photography School.


Digital Photography School

 
Comments Off on How to Control and Modify Your Lighting With Flags

Posted in Photography


Sun Too Harsh? Modify It!

19 Feb
For guys, a little harshness in the light can be a good thing.  So for this shot, I positioned the sun over his left shoulder, and a reflector to the right and in front of him. EOS-1D X, EF 85mm f/1.2L II. 1/320, f4, ISO 100.

For guys, a little harshness in the light can be a good thing. So for this shot, I positioned the sun over his left shoulder, and a reflector to the right and in front of him. EOS-1D X, EF 85mm f/1.2L II. 1/320, f4, ISO 100.

I’m big on shooting portraits outdoors.  I love the natural light, the variety of locations available, and the more natural feel.  I think for the average subject, a studio can be an intimidating place.  The problem with shooting outdoors is that you are at the mercy of Mother Nature, for the most part, when it comes to light.  But not to worry.  Just as a simple speedlite can be modified, so can the sun.

When the sun is harsh, there are a few things I can do to soften it. I will use fill-flash outdoors when I have to, but I’m not a fan of straight, on camera flash of any kind if I can help it.  And some situations it’s just not possible to move the flash off camera to act as fill.  I these situations, I go with one of two options. First, I can use a reflector kick light back into the subject’s face.  I will place the sun behind my subject, at an angle so I’m not shooting straight into it. The reflector, I will position the reflector to the exact opposite of the sun, in front of my subject, and to the side. The beauty of using a reflector with the sun is that you can see the effect immediately, unlike with flash.  Have someone hold the reflector and move it around so you can see the effect with it as it moves.  If I have no one available to hold the reflector, I will use a light stand with a reflector holder.  Additionally, a weight of some kind may be helpful if it’s breezy since the reflector will act as a sail.  Your camera back can work for this, or sandbags are ideal. The drawback with a reflector will also be an equally bright object in the eyes of your subject, and could cause him to squint.

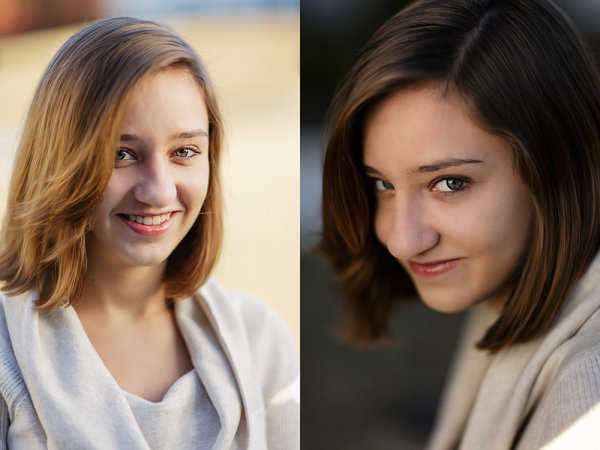
Here you can see the difference with and without a scrim. On the left is straight sunlight with no modifiers.  It's not terrible, but harsher than I wanted on her face. I turned her around to face the sun, and used a scrim to soften the light on her. The result, in my eyes, was much more pleasing. EOS-1D X, EF 85mm f/1.2L II. Exposure for the image without the scrim was 1/1000, f/1.2, ISO 100 with +1 exposure compensation.  For the image on the right, 1/3200, ISO 100, f/1.2.

Here you can see the difference with and without a scrim. On the left is straight sunlight with no modifiers. It’s not terrible, but harsher than I wanted on her face. I turned her around to face the sun, and used a scrim to soften the light on her. The result, in my eyes, was much more pleasing. EOS-1D X, EF 85mm f/1.2L II. Exposure for the image without the scrim was 1/1000, f/1.2, ISO 100 with +1 exposure compensation. For the image on the right, 1/3200, ISO 100, f/1.2.

Sometimes, even with a reflctor, the light is much too harsh for what I’m looking for. In cases like this, I will use a scrim. In my case, my reflector and scrim are part of the same tool.  I currently use a Westcott 5-in-1 40-inch reflector.  It has a gold side, silver side, black side, white side, and a translucent disc as the center when the outer casing (which makes up the other four sides) is removed.  Using a tool like this means I always have both the reflector and the scrim with me, so I’m able to use whichever best suits the lighting conditions.

When using a scrim, I will position my subject so they are looking into the sun, and place the scrim between them and the sun. The scrim is the translucent part of reflector, and will allow the light to come through, although more diffuse than unmodified sunlight.   It’s easy to make a homemade scrim as well, using PVC piping or a wood frame, with nylon from a fabric store.  When making your own, it’s important to get neutral fabric, or else it will create a color cast on your subject.

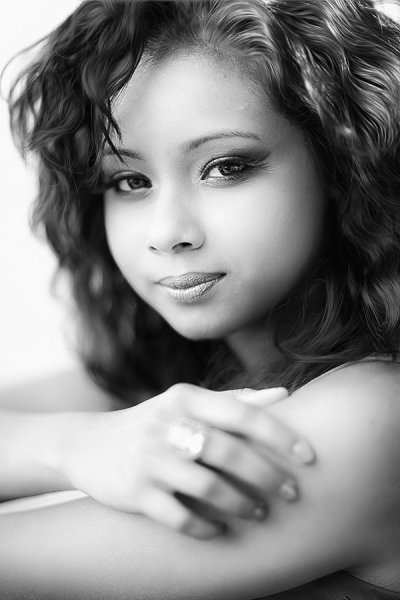
The sunlight on her face was far too harsh for the effect I wanted.  I had her friend hold a scrim up to soften the light on her face, which gave me just what I was looking for.  EOS-1D X, EF 85mm f/1.2L II. ISO 100, 1/1000, f/1.2.

The sunlight on her face was far too harsh for the effect I wanted. I had her friend hold a scrim up to soften the light on her face, which gave me just what I was looking for. EOS-1D X, EF 85mm f/1.2L II. ISO 100, 1/1000, f/1.2.


Post originally from: Digital Photography Tips.

Check out our more Photography Tips at Photography Tips for Beginners, Portrait Photography Tips and Wedding Photography Tips.

Sun Too Harsh? Modify It!


Digital Photography School

 
Comments Off on Sun Too Harsh? Modify It!

Posted in Photography