RSS
 

Posts Tagged ‘Minutes’

Master Lightroom in Under 20 Minutes With This Video

04 Apr

The post Master Lightroom in Under 20 Minutes With This Video appeared first on Digital Photography School. It was authored by Jaymes Dempsey.

Do you want to master Lightroom, but you never really have the time?

Then you’re going to love this video from photographer and editing-expert Sawyer Hartman. In just 18 minutes, Sawyer takes you through everything you need to know to start creating gorgeous Lightroom edits, from the absolute basics (such as importing and adjusting exposure) all the way down to Lightroom’s powerful Graduated Filter and Adjustment Brush.

He even includes a downloadable photo (the link is in the video description) so that you can follow along on your own computer.

Watch the video here:

And when you’re done, leave a comment letting us know your favorite Lightroom feature!

The post Master Lightroom in Under 20 Minutes With This Video appeared first on Digital Photography School. It was authored by Jaymes Dempsey.


Digital Photography School

 
Comments Off on Master Lightroom in Under 20 Minutes With This Video

Posted in Photography


Video: 20 couples poses in under 10 minutes

28 Jan

Adorama has published a new video featuring photographer Pye Jirsa as he teaches photographers more than 20 couples poses in less than 10 minutes. This is the second part of Jirsa’s Couples Crash Course; the first part introduced five foundational couples poses that ‘every photographer should know.’

This is part of the ‘Master Your Craft’ photography tutorial video series published on the Adorama YouTube channel.

Articles: Digital Photography Review (dpreview.com)

 
Comments Off on Video: 20 couples poses in under 10 minutes

Posted in Uncategorized


Video: 37 different camera shutter sounds in 3 minutes

06 Oct

Similar to how no two fingerprints are identical, no two camera shutter sounds are exactly the same. As a fun little project, photographer and YouTuber Scott Graham has captured the shutter sound of 37 different camera models to show off the diversity of shutter sounds and to memorialize a number of cameras he’s selling.

In the video, which comes in just shy of four minutes, Graham succinctly captures the unique shutter sounds of all 37 cameras, ranging from analog SLR cameras to digital Fujifilm cameras. Each shutter sound was captured as close to 1/60th of a second as possible for consistency’s sake.

Graham didn’t elaborate on whether or not he will continue to do this with future cameras he acquires, but we think it’d be incredible to build an archive of shutter sounds from various cameras. What camera has the most pleasing sound to your ears, both from Graham’s collection and your own?

Articles: Digital Photography Review (dpreview.com)

 
Comments Off on Video: 37 different camera shutter sounds in 3 minutes

Posted in Uncategorized


Video: Google’s Super Resolution algorithm explained in three minutes

30 May

Space constraints in the thin bodies of modern smartphones mean camera engineers are limited in terms of the size of image sensors they can use in their designs. Manufacturers have therefore been pushing computational imaging methods in order to improve the quality of their devices’ image output.

Google’s Super Resolution algorithm is one such method. It involves shooting a burst of raw photos every time the shutter is pressed and takes advantage of the user’s natural hand-shake, even if it is ever so slight. The pixel-level differences between each of the frames in the burst can be used to merge several images of the burst into an output file with optimized detail at each pixel location.

An illustration that shows how multiple frames are aligned to create the final image.

Google uses the Super Resolution in the Night Sight feature and Super-Res zoom of the Pixel 3 devices and has previously published an in-depth article about it on its blog . Our own Rishi Sanyal has also had a close look at the technology and the features it has been implemented in.

A visual representation of the steps used to create the final image from a burst of Raw input images.

Now Google has published the above video that provides a great overview of the the technology in just over three minutes.

‘This approach, which includes no explicit demosaicing step, serves to both increase image resolution and boost signal to noise ratio,’ write the Google researchers in the paper the video is based on. ‘Our algorithm is robust to challenging scene conditions: local motion, occlusion, or scene changes. It runs at 100 milliseconds per 12-megapixel RAW input burst frame on mass-produced mobile phones.’

Articles: Digital Photography Review (dpreview.com)

 
Comments Off on Video: Google’s Super Resolution algorithm explained in three minutes

Posted in Uncategorized


How to do Wedding Day Portraits of the Bride and Groom in Under 20 Minutes

01 Mar

Wedding days are super hectic, there’s no doubt about it. My couples and I agree on a wedding day photography timeline so we know exactly what is expected at every hour of the wedding day. Yes, we are flexible but having the order of the day written down is a must for things to go smoothly. This timeline is discussed well before the day and all the key people in the bridal party and key suppliers are made aware of the plan so we are all on the same page.

How to do Wedding Day Portraits of the Bride and Groom in Under 20 Minutes

Plan it out

When I sit down with the couple to plan the day, I paint a picture of what a “normal” wedding day looks like and the expected timings allocated to each portion of the day. But I always explain to the couple that it is their wedding day and ultimately, they can do what they want and decide on the duration of each part.

This includes the portrait session of just the bride and groom, nobody else, which usually happens after all the other formals are done. Ideally, the portraits are done somewhere away from the guests so the couple doesn’t get distracted or pulled in different directions which only delays or extends the portrait session. Some couples opt for a “first look” which happens before the ceremony.

How to do Wedding Day Portraits of the Bride and Groom in Under 20 Minutes

How much time will the couple allow for portraits?

From experience, depending on their priorities, the time couples allow for their own portraits vary widely, some allow for an hour and a half, but many slot in only 15-20 minutes. A reason for the latter is usually because they wish to spend time saying hello to friends and family especially those who have come a long way to be at their wedding. This is completely understandable and even expected.

I do, however, encourage my couples to always spare some time for bride and groom portraits no matter how little. That is the only time during the day they can be alone and have photos done of just the two of them without anyone else in the vicinity, or worse, in the background.

This doesn’t have to be done at a grand venue or separate location. This could be anywhere that is private, semi-private, quiet, or at the very least away from the guests. It can even be done at the very same location as everyone else, you just need to separate them from the crowd for a few minutes.

Work efficiently by having a plan

On average, my couples allow 15-20 minutes for this portrait session so over the years, I have learned how to get things done very quickly. In this article, I will share with you my secret – have a formula.

Having a formula is not a bad thing. If you worry that all your weddings might end up looking exactly the same, don’t! Each couple is unique and their wedding is unique to them. Besides, if they have booked you after having looked at your portfolio, that probably means they like your style and your work and they expect their photos to have the same look and feel as your other weddings.

Here is my 5 step formula for wedding day portraits

#1 – The couple together

How to do Wedding Day Portraits of the Bride and Groom in Under 20 Minutes

I usually start the portrait session by taking photos of the couple together either holding hands, embracing, posed together for a natural look, or posed for a formal portrait. Being photographed with someone else is less daunting than solo and they have each other to hold on to or lean against in case they feel awkward especially at the start.

This part doesn’t have to be all posed either. It’s better if you can do some laughing and fun shots; just give them clear instructions or make them laugh if you are able.

#2 Just the bride

How to do Wedding Day Portraits of the Bride and Groom in Under 20 Minutes

How to do Wedding Day Portraits of the Bride and Groom in Under 20 Minutes

I then separate them and do portraits of just the bride. Usually, I ask the groom to help throw the veil or stand next to me so he can help make the bride laugh, have a natural smile, or look in his direction instead of straight at the camera.

Make sure you get close-ups of the bride as well as wide-angle shots showing the context or location (and her whole dress!) and a variety of angles if possible.

#3 Artistic shots

How to do Wedding Day Portraits of the Bride and Groom in Under 20 Minutes

Use the opportunity of having the bride in front of you to take artistic shots like close-ups of the bouquet or veil, shoes, details, or some creative compositions. I try to minimize moving the couple from place to place too much. Instead, I do the moving myself and walk around them, finding various angles from which to shoot and adjusting to the light that is available.

# Just the groom

How to do Wedding Day Portraits of the Bride and Groom in Under 20 Minutes

Now it’s the groom’s turn and this is simply a case of replicating what you have just done with the bride. Grooms are usually so much quicker to photograph and do not require a lot of posing. Just get them to stand naturally, lean on something, look at the bride, look at the camera, laugh, look sideways… done.

I find grooms tend to follow instructions quickly without worrying about how they look as they generally just want to get the portraits over and done with. Don’t forget to give them some indicators of time, letting them know you are nearly finished so they don’t worry about longer than they have allowed. This is important and reduces any worries about the timing of the day.

#5 Walking or do some action shots

I end the session with some walking or action photos. Be aware of your background for this as walking photos usually require being slightly further away. Be on the lookout for some nice light in the background and a suitable path they could walk on.

Ask them to walk slowly hand in hand for these photos. Position yourself behind them so you are photographing their backs. Then ask them both to stop in their tracks and look back at you, then again with just the bride looking, and finally just the groom looking.

How to do Wedding Day Portraits of the Bride and Groom in Under 20 Minutes

Ask them to turn around in the same spot so they are now looking at you and walking towards you. Always instruct them to walk slowly. Again ask them to stop in their tracks and hold hands but stand further apart. Then say to take a step closer to each other until they are holding each other close or kissing if they wish. Depending on the background, this is when I try to do a silhouette, especially if there is sky or an open expanse in the background.

Sometimes, I ask them to practice their first dance a bit or pull each other in for a quick kiss for some movement and natural laughter.

Conclusion

On a small patch of ground, you will be able to cover several poses, include a variety of angles, do some formal portraits, some casual looks, and lastly some walking and action shots. And that is it! Wedding day portraits done in 15-20 minutes!

How to do Wedding Day Portraits of the Bride and Groom in Under 20 Minutes

Don’t forget, just get on with it. Don’t stop to check your LCD for long or fuss about too many imperfections. You are under time pressure so have a formula and stick to it while allowing yourself wiggle room for some creative opportunities that may arise – as long as you are within the agreed upon timeframe.

As a side note, I always find that couples who have had an engagement shoot with me beforehand end up having a much easier and breezier portrait session. They know what to expect and what to do that they just do it without the need for a warm-up. They are quick to relax and be at ease in front of the camera and the best bit, they genuinely enjoy it!

The post How to do Wedding Day Portraits of the Bride and Groom in Under 20 Minutes by Lily Sawyer appeared first on Digital Photography School.


Digital Photography School

 
Comments Off on How to do Wedding Day Portraits of the Bride and Groom in Under 20 Minutes

Posted in Photography


Tutorial: Master the Photoshop Pen Tool in under 8 minutes

02 Feb

Ahh, the Pen Tool! When it comes to making complex selections and cutting objects out of an image, there is no better tool for the job. And while the Lasso Tool or Magic Wand Tool might make selections faster and easier (and are still quite useful depending on the situation), the Pen Tool reigns supreme when it comes to accuracy and precision.

So, what’s the drawback? Well, it’s pretty tricky to get the hang of it. Even with all of the helpful videos and guides out there (including a handful of our own), we still get questions all the time on how to master this extremely versatile tool within Photoshop. In our most recent tutorial on the Pen tool, we focused on the absolute need-to-know fundamentals so that you can follow along and start practicing immediately.

Not only does the Pen Tool provide unparalleled accuracy and control, but it’s extremely flexible as well. Photoshop will store any Paths you create under the Paths tab. If you ever need to adjust a selection as you work, you can simply select the Path you wish to edit, make the changes that you need, and then convert that Path into a new selection.

Before editing a Path, be sure to check Auto Add/Delete in the Pen Tool options bar. This will tell Photoshop to automatically swap to the Add Anchor Point Tool (when you’re hovering over a line segment) or the Delete Anchor Point Tool (when you’re hovering over an Anchor Point). This setting makes the process of making changes to a Path much easier.

Avoid using the Delete or Backspace keys to remove Anchor Points! These shortcuts will delete the selected point as well as the line segments that connect to it!

Another key to mastering the Pen Tool is making sure that your precision selections look realistic within the context of an image. I know that we use the Pen Tool for its clean lines and curves, but rarely in the real world will you find a completely hard edge. To maintain realism in your selections, be sure to add a bit of feathering to account for the naturally occurring softness in photographs. It’s a subtle change that will help avoid that “Photoshopped” look.

And if you ever feel lost, just remember your “home base” keyboard shortcuts:

  • Use CTRL or CMD to toggle the Direct Selection Tool which will allow to move a Point or a Curve at any time.
  • Use ALT or OPTN to convert a Point into a Curve or vice versa.

For an even smoother workflow, toggle the Hand Tool by using the Spacebar. The Hand Tool allows you to navigate around your image by clicking and dragging, eliminating any need for you to have to zoom out, scroll, and zoom back in to continue a Path.

And most the most important tip of all: practice, practice, practice! The Pen Tool completely changed how I work within Photoshop and if you put in the time, I’m confident that you’ll see a considerable improvement in your own work as well.


About the Author: For over seven years, Aaron Nace has been teaching photography and photo manipulation on PHLEARN.com to millions of users across the world at every skill level. You can subscribe for his professional videos or view the free tutorials as well.

Articles: Digital Photography Review (dpreview.com)

 
Comments Off on Tutorial: Master the Photoshop Pen Tool in under 8 minutes

Posted in Uncategorized


Learn about Photoshop blending modes in just 8 minutes

21 Jan

Confused about what all those layer blending modes do in Photoshop? Well, you don’t need to be any more. Jesus Ramirez of the Photoshop Training Channel has made an excellent short video tutorial that explains each mode in simple and easily-understood terms, so even beginners will get the picture.

His 8-minute Crash Course uses a gray tone chart over a normal photograph to show how each blending mode alters the way the chart appears. Jesus also demonstrates how different brightness values blend together, and how to use layer blending to control color density and saturation. Finally, he also explains why the modes are grouped into six sections on the drop-down menu, so you can quickly find the mode you need depending on the situation.

Check out the full video above. It’ll only cost you eight minutes of your life, and you’ll almost certainly learn something new unless you’re already a Photoshop expert.

Articles: Digital Photography Review (dpreview.com)

 
Comments Off on Learn about Photoshop blending modes in just 8 minutes

Posted in Uncategorized


4 Incredible Photoshop Shortcuts in Six Minutes

18 Jan

I’m a bit of a post-processing shortcut addict. I’m always looking for more efficient ways of getting through my workflow in programs like Adobe Lightroom, Adobe Photoshop, ON1 Photo RAW, etc. When I find a new shortcut, even if requires a bit of practice, I feel like I just leveled up. It’s weird, I know, but it’s true.

Four Photoshop Shortcuts in Six Minutes

I’ve been using Photoshop on a near daily basis for the better part of a decade now. Over the years, I’ve picked up a ton of shortcuts but I wanted to share some of my all-time favorites with you. These are the ones that rocked my world when I learned them, and if they’re new to you, I’m confident they’ll have the same effect!

?

  1. Make a stamp layer
  2. Brush opacity
  3. Brush resize trick
  4. Zoom trick

Correction from the video: For the brush resizing trick, the PC instructions I gave didn’t seem to be working for most users. The correct translation (this is for PC users only) is to hold down the ALT key, then click and drag using the right mouse key. If you’re on a pen tablet, use whatever button you have set for right click.

Conclusion

Well? Is your mind blown!? The brush resize and zoom shortcuts seriously changed my life when I learned them! I can’t tell you how many years I spent right clicking to change brush hardness and fumbling with bracket keys to resize the brush. Let me know what you think in the comments and if you have any incredible shortcuts to share, I’m all ears!

The post 4 Incredible Photoshop Shortcuts in Six Minutes by James Brandon appeared first on Digital Photography School.


Digital Photography School

 
Comments Off on 4 Incredible Photoshop Shortcuts in Six Minutes

Posted in Photography


How to Create a Beautiful Online Gallery with Lightroom Classic CC and Adobe Portfolio in 15 Minutes

04 Nov

One of the common questions I hear from photographers is regarding a way to link Lightroom to a photography portfolio website. It usually comes from photographers who don’t like the design options in the LR Web module. The perfect solution doesn’t exist, perhaps the closest (until recently) is Koken, a free plugin that I wrote about some time ago that uses Lightroom’s Publish Collections to update your online portfolio.

But, the good news is that Adobe has just made creating a portfolio website a whole lot easier with its latest update to Adobe Portfolio.
Adobe Portfolio Lightroom

What is Adobe Portfolio?

Adobe Portfolio is exactly what it sounds like – an online gallery of photos. The benefit of using Adobe Portfolio is that it’s very easy (no web design or coding skills required). It also integrates with your Lightroom Collections (this is the update I just referenced).

That means all you have to do is set up some Collections containing the photos you want to include in your gallery and synchronize them with Adobe Portfolio. Then it’s just a matter of choosing a layout, tweaking the design, and making the website live. You can do all of this in less than 15 minutes.

The only caveat is that you need to be an Adobe Creative Cloud Photography Plan subscriber. Just like Lightroom mobile and Lightroom web, it isn’t available to photographers who use a standalone (purchased) version of Lightroom.

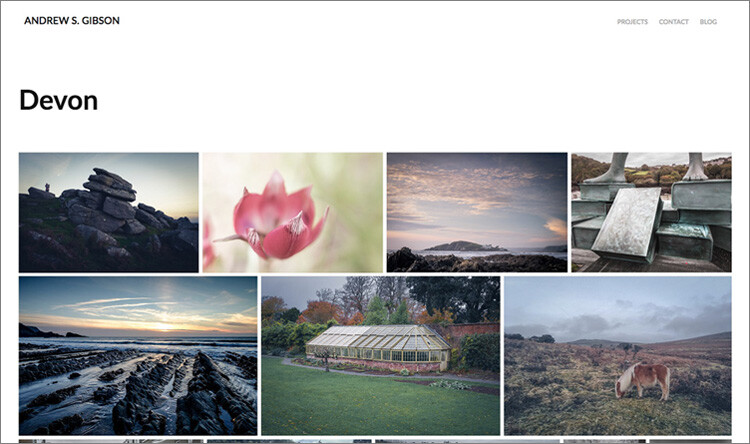
Curious? You can check out a portfolio website I created for myself using Adobe Portfolio here to see what it’s capable of.

Adobe Portfolio Lightroom

Step-by-Step Guide to Adobe Portfolio

The first step – and probably the hardest – is to decide what photos you want to include in your portfolio. Once you’ve made your mind up about that, the rest is easy.

  1. Create a Collection Set in the Library module called Portfolio.
  2. Create several Collections inside this Collection Set, one for each gallery you want to include on your portfolio website.
  3. Add photos to the Collections.
  4. Arrange the photos in the order in which they are to be displayed online.
  5. Synchronize the photos in the Collections by ticking the boxes to the left of the Collection name (marked below).

My portfolio website (link above) has four galleries; Black & White, Portraits, Spain, and Devon. Each gallery corresponds to a Collection in Lightroom with the same name (seen below).

Adobe Portfolio Lightroom

Register

Go to www.myportfolio.com and sign in with your Adobe ID. If you haven’t created a portfolio yet click the button that says Get Started Free. Otherwise, click the button that says Edit Your Portfolio.

Adobe Portfolio Lightroom

Choose a design for your gallery

Now it’s time to choose a layout. Start by clicking the Switch layouts icon (marked below).

Adobe Portfolio Lightroom

Adobe Portfolio gives you eight layouts from which to choose. All the layouts are fully mobile responsive, which means they work and look professional on mobile phones and tablets as well as desktop computers. Decide which one you want to use and click the Use this layout button.

Adobe Portfolio Lightroom

It may be difficult to visualize which one works best when populated with your photos. Don’t worry about that at this stage – you can change the layout afterward if you want to.

Settings

Next, click the Edit your settings icon (marked below).

Adobe Portfolio Lightroom

Go to Site Options and click the Lightbox for Images tab. Tick the “Enable lightbox for images on my pages” box and click Done (see below). This is important as it lets people view the photos on your portfolio website. If you don’t tick it all they will be able to see are thumbnails.

Adobe Portfolio Lightroom

Add images to your gallery

Click the Manage content icon (marked below).

Adobe Portfolio Lightroom

Go to the Integrations tab and Click the Add Collections button. The website opens a window that displays all your synchronized Lightroom Collections. Pick the ones you want to include in your portfolio and click the Import Selected button (see button below lower-right).

Adobe Portfolio Lightroom

Go to Adobe Portfolio, click on the Manage content icon again and go to the Website Pages tab. Make sure the switch is set to the On position for each Collection you want to display on your portfolio website.

Adobe Portfolio Lightroom

Choose cover photos

Now it’s time to tidy up the gallery cover photos. You’ll need to do this once for each gallery. Start by clicking the pencil icon next to the gallery cover photo (see below).

Adobe Portfolio Lightroom

Pick Edit Cover Image from the menu to edit the cover photo. At the moment this feature is a little limited – the website automatically picks the photo that appears on the cover and it’s not easy to change it.

The only way currently is to click Upload a new image and upload a photo you’ve exported from Lightroom – there’s no way to select another photo from the Collection. But you can zoom the photo and adjust the crop. Click Done when you’re finished and repeat for the other gallery cover photos.

Adobe Portfolio Lightroom

Setup the domain name

Click the Edit your settings icon again and click Domain Name. You can select a URL for your portfolio in the form yourname.portfolio.com. This is the easiest option. Alternatively, if you have a domain or a subdomain you can follow the instructions to use that.

Adobe Portfolio Lightroom

Preview your portfolio gallery

Click the gray Preview button to see a preview of your portfolio website. Happy with what you see? Click Update Live Site to publish your portfolio to your chosen URL. Congratulations – your brand new portfolio website is now live!

Adobe Portfolio Lightroom

Customizing the design

So far I’ve shown you how to get your portfolio website online as quickly as possible. The hardest part, as I said, is deciding which photos to include in your gallery. That can take hours, days, or even weeks. But, once the decision is made, you can get your portfolio online in under 15 minutes. It really is that quick.

If you’re happy with the default settings of your layout you can stop there, your job is done. But it’s worth spending some time looking at both the page and global settings. You can customize things such as fonts, colors and the number of columns on your front page. There is an option to add pages (for instance an About page) and links to other websites. You have a lot of options and it’s worth exploring them to see how you can individualize your portfolio website.

You can even change the layout by clicking on the Switch layouts icon. Adobe portfolio remembers your customizations, which gives you peace of mind as it means you won’t lose your customizations when you switch from one layout to another.

When you are finished, remember to click the green Update Live Site button. None of your customizations are published until you click that button.

How to update the photos

Portfolios are fluid and as time goes by you will add and remove photos from the Collections you created. You may also add more Collections as your photo collection grows. There are two steps to updating your portfolio website.

1. Update your Lightroom Collections and make sure Lightroom has had time to synchronize the changes.

2. Go to Adobe Portfolio, click on the Manage content icon and go to the Website Pages tab. Click on the Cog icon next to the Collection that you want to update and select Reset from Lightroom to update your portfolio gallery.

Adobe Portfolio Lightroom

3. Finish by clicking the green Update Live Site button to publish the updates to your portfolio website.

Next steps

With the recent update that lets you integrate Lightroom Collections, Adobe Portfolio has become the easiest way to create a portfolio website using Lightroom Collections. The only downside, as mentioned earlier, is that you need to be a Creative Photography Plan subscriber to use this feature.

If you are not, then look at Koken as an alternative. Don’t dismiss the Web module out of hand either, it has some very useful features and doesn’t require a CC subscription to use.


You can learn more about all aspects of Lightroom with my bestselling Mastering Lightroom ebooks.

The post How to Create a Beautiful Online Gallery with Lightroom Classic CC and Adobe Portfolio in 15 Minutes by Andrew S. Gibson appeared first on Digital Photography School.


Digital Photography School

 
Comments Off on How to Create a Beautiful Online Gallery with Lightroom Classic CC and Adobe Portfolio in 15 Minutes

Posted in Photography


6 Sunset Pictures from 10 Minutes of Paddling on Boyd Lake

23 Oct

Here is another composition exercise from the old blog posted originally in June 2007. It is good to use a waterproof camera, especially, when you are paddling a tippy boat. And, always keep that camera on a leash. Usually, I […]
paddling with a camera

 
Comments Off on 6 Sunset Pictures from 10 Minutes of Paddling on Boyd Lake

Posted in Photography