RSS
 

Posts Tagged ‘Middle’

4 Ways to Shoot Portraits in the Middle of the Day

19 Sep

The post 4 Ways to Shoot Portraits in the Middle of the Day appeared first on Digital Photography School. It was authored by John McIntire.

One of the first things you learn when starting out in portrait photography is that the midday sun does not provide great lighting conditions.

As with all things in photography, there are plenty of exceptions. But, for the most part, this is sound advice. Because of the harsh, contrasty light, and the deep shadows that such light produces, shooting portraits in the middle of the day can be a real challenge. 

Getting better portraits in the middle of the day can be as simple as getting used to a few techniques.
Creating portraits on location in the middle of the day can prove a real challenge, thanks to unflattering light from the high sun. Fortunately, there are loads of ways to get around this and take back all those wasted shooting hours.

Canon 5D Mark III | Canon EF 50mm f/2.5 Macro | 50mm | 1/800 sec | f/5.6 | ISO 200

Of course, you can always go and find a bit of open shade for more flattering light, but what do you do when isn’t an option? And what do you do when you have a location that you love, but the light isn’t perfect at the moment?

You could always wait. But with portraits, you can’t necessarily count on another person’s enthusiasm for waiting around for the right light. Fortunately, there are a lot of tools that will help you modify the midday sun so that the light is more flattering for portraiture. 

Overcast conditions are great for shooting portraits in the middle of the day.
By far, the easiest way to shoot in the middle of the day is to do so on an overcast day with heavy cloud cover. Of course, just like waiting around for the golden hour, you can’t always wait around for clouds.

Canon 5D Mark III | Canon EF 85mm f/1.8 | 85mm | 1/2000 sec | f/2.8 | ISO 200

This article will give you an overview, along with the basics, of four techniques for manipulating, or completely altering, the light from the midday sun to help you get better portraits. 

1) Reflector as key

The first of these techniques only requires a reflector. Either white or silver will do, but if you opt for a 5-in-1 reflector, you will have both at your beck and call.

In strong sunlight, the white reflector should work most of the time. If the light is a bit dimmer, you may need to opt for the silver reflector. 

Harsh shadows and fast shadow-to-highlight transitions make it hard when shooting portraits in the middle of the day.
In direct sunlight, the shadows are heavy and unflattering. An easy and cheap method of countering this is through the use of a silver reflector.

Canon 5D Mark III | Canon EF 85mm f/1.8 | 85mm | 1/1600 sec | f/4.5 | ISO 400

To get started with using a reflector as your key light, place your subject so that the sun is behind (or at least to the side of) them.

Now, raise the reflector up and point it back towards your subject. It should be placed opposite the sun. You should be able to see and watch what the light bouncing off the reflector is doing. Adjust the reflector’s position until you are getting the effect that you are after. 

Using a silver reflector as a key light is a great method for shooting portraits in the middle of the day.
When using a reflector like this, make sure it’s above and pointed at your subject. You will be able to watch what the light is doing.

While using a reflector in this way, there are a few things to keep in mind. Because the reflector is your main light source (or key light), it is usually best to make sure that it is above your subject. Lighting from above in this way will help to ensure more natural and flattering results. Lighting from below will result in unnatural-looking shadows that won’t be flattering to your subject. 

portraits in the middle of the day
The silver reflector has killed most of the shadows from the sun and brought up the exposure of the subject’s eyes for a much more flattering light.

Canon 5D Mark III | Canon EF 85mm f/1.8 | 85mm | 1/800 sec | f/4.5 | ISO 400

Another thing to keep an eye on is your exposure. Because you are working with natural light, you will be able to rely on your camera’s meter. Where you might find a problem is when the light reflecting off of the reflector isn’t as strong as any sunlight in the scene.

portraits in the middle of the day
Do watch what the light is doing very carefully. Here, the reflector has come down too low and the light is hitting the subject’s arm and the lower side of her face first. This is not flattering.

To ensure a good exposure on your subject, meter from their skin. An easy way to do this is to use your camera’s spot metering mode and meter a place on your subject’s skin that is being lit by the reflector.

Just remember that your camera’s meter is measuring for 18% grey and a lot of skin tones do not fall anywhere near that range. Subjects with lighter skin may require a bit of overexposure, while subjects with darker skin will need you to compensate with underexposure. In most cases, 1/3 to 2/3 of a stop will be good enough.
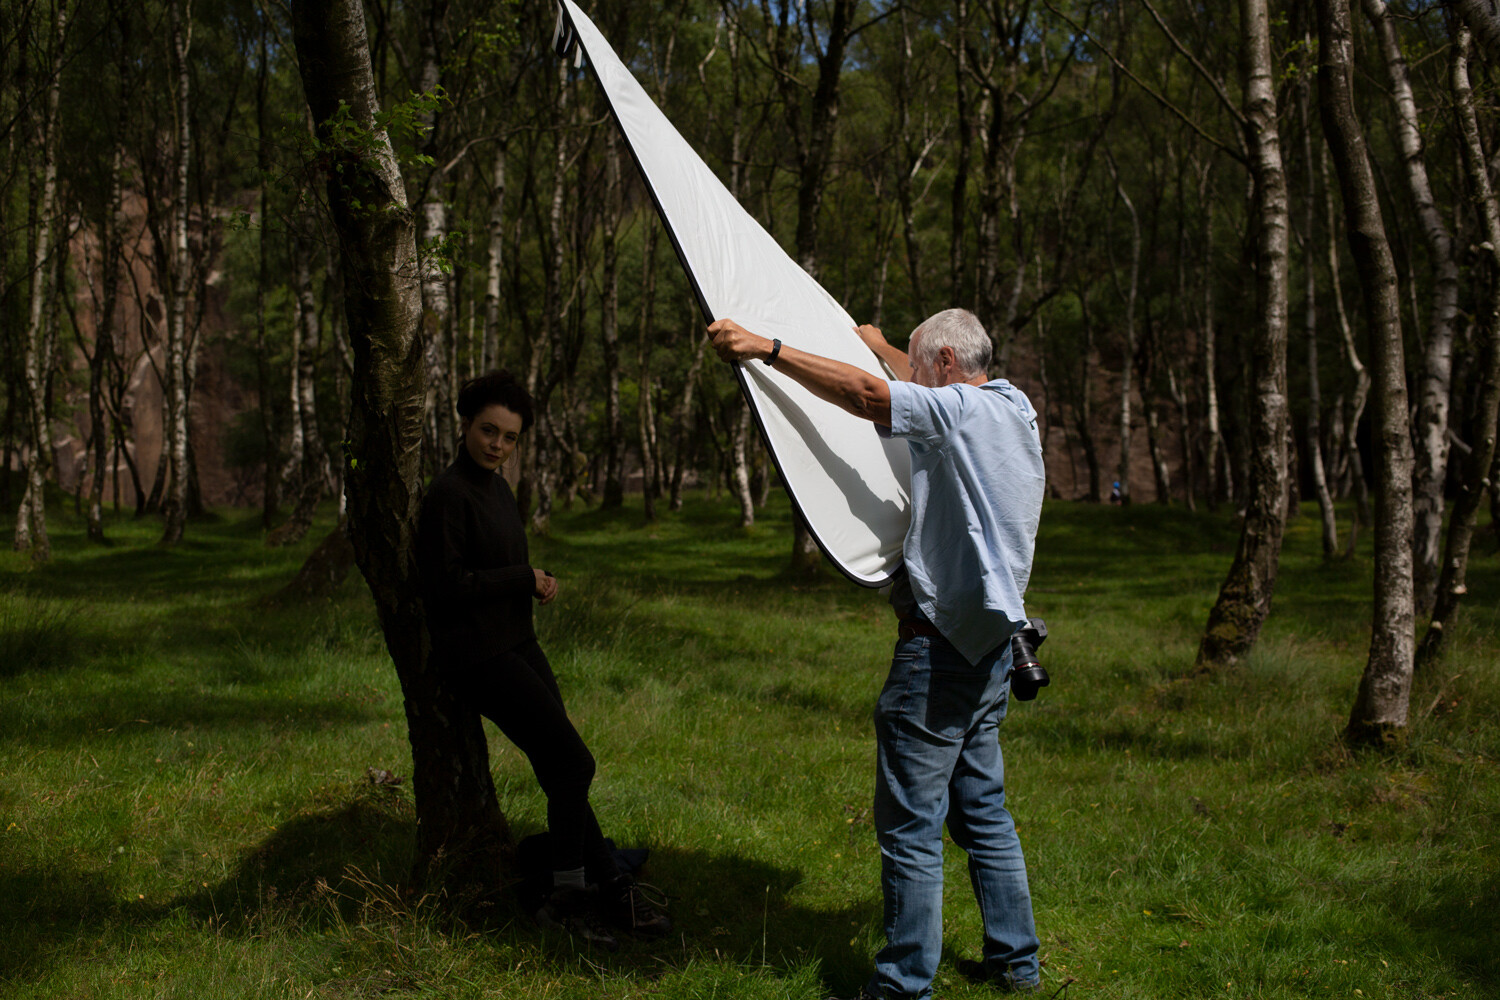
2) Diffusion 

Direct sunlight is a major deterrent for making portraits in the middle of the day.
You might not be surprised to see that direct overhead sunlight doesn’t make for a very good portrait.

Canon 5D Mark III | Canon EF 50mm f/2.5 Macro | 50mm | 1/3200 sec | f/5.6 | ISO 400

A diffusion panel is a great option for manipulating the harsh midday sun and achieving better portraits in the middle of the day.

Diffusion panels are sheets of material that you place between the light source and the subject. The material spreads out the light, making it softer and more suitable to portraiture. If you have a 5-in-1 reflector, you probably already have one of these.

Alternatively, there are a lot of options on the market, including massive diffusion panels that cover a large area. 

portraits in the middle of the day
Using a diffuser (or a diffusion panel) is a great and affordable way to soften the light from the sun.

Canon 5D Mark III | Canon EF 50mm f/2.5 Macro | 50mm | 1/500 sec | f/5.6 | ISO 400

To use a diffusion panel for these purposes, simply place it between the sun and your subject. Because we are talking about the middle of the day, depending on where you are in the world, the sun should be pretty close to straight above your subject. In this case, the diffusion panel would go above your subject. This will have the effect of softening the light; once you’ve done this, you should be able to meter and start taking images. 

A diffusion panel will help you make better portraits in the middle of the day.
All that you have to do is place the diffusion panel between your subject and the sun. Because this diffuser cuts out two stops of light, you can clearly see how much darker the area in shade is compared to the rest of the scene.

There are a few things to watch out for while using a diffuser. A lot of diffusion panels are made to reduce the exposure of the light in your scene by a certain number of stops. This is important to take into account because the diffuser will only be altering the exposure of the light falling within its area of effect. If your subject is a fair distance from the background, the background will appear two stops brighter than it did in any shots you may have taken without the diffuser.

portraits in the middle of the day
Here, you can clearly see the effect the diffuser has on the subject and the ground that it covers. You can also see how much brighter the background becomes when you expose for the subject.

This may result in overexposed backgrounds. To minimise this, you can make sure that the diffuser is covering everything in your frame by choosing a background closer to your subject, or by using a background that’s very dark in the first place. 

portraits in the middle of the day
This diffusion panel catches even the slightest breeze very easily. Without a dedicated stand, it required two people to hold it in place and, even then, it had its moments.

Also, large diffusion panels like the one I have used in this example are very light. If there’s even a slight breeze, they pretty much act like a sail. You may need a dedicated stand or extra bodies to hold them in place.

3) Flash as fill

Flash can help to alleviate unflattering light when shooting portraits in the middle of the day.
More direct sunlight, more unflattering light. Using flash to fill in the shadows is another useful technique for portraits in the middle of the day.

Canon 5D Mark III | Canon EF 50mm f/2.5 Macro | 50mm | 1/1600 sec | f/5.6 | ISO 400

If you have the equipment, using off-camera flash as fill light to the sun’s key light is a great way to help you take portraits in the middle of the day. The job of the fill light is to bring up the exposure of the shadows created by your key light (the sun, in this case). This will reduce the contrast in your scene and even out the exposure. 

Using flash for portraits in the middle of the day is a great way to deal with contrast.
Here, you can see that the shadows from the sun still exist, but they are much brighter. This reduction in contrast makes for a much more suitable portrait.

Canon 5D Mark III | Canon EF 85mm f/1.8 | 85mm | 1/640 sec | f/4 | ISO 100

There are a lot of ways to do this, but I’ll go over a basic method that requires the least amount of extra equipment. 

It doesn’t matter if you are using a speedlight or a full-powered strobe; the principles remain the same. 

The first thing you need to do is obtain an exposure for the ambient light. Do this by using your camera’s meter and taking a test shot as if you weren’t going to be using flash at all. The one exception here is that you need to ensure that your final shutter speed is slower than the max sync speed on your camera. This is often around 1/250 seconds, but do check your manual just in case.  Once you’ve ensured that all of the highlight tones are present in your frame and not overexposed, you should have your working settings. 

Note: If the sunlight is very bright and you cannot get the shutter speed to go slower than your max sync speed, you may want to consider using High-Speed Sync.

Now, turn on (and connect) your flash. While you are getting started with fill, I suggest placing your flash in an on-axis position. This means the flash is on the same line as the lens of the camera from the subject’s position. Although if you are using a speedlight on top of the camera, I recommend getting it off for more flattering results. 

portraits in the middle of the day
Getting the flash off-camera will always provide a more flattering light. (Please forgive my visitor. He just wanted to see what was going on.)

You can use Manual mode of E-TTL mode on your flash. Either will work fine, but E-TTL might help to get you closer to the desired exposure in less time. 

Once your flash is set up, take a test shot. Look at the shadows in your image. Are they too bright? Turn down the power on your flash and take another test shot. Repeat this until the shadows appear how you want them. Do your shadows seem unchanged, or are they still too dark? In the latter case, turn up the power.

One thing that I suggest you take into account immediately is modifiers. For fill lighting, you will generally want as soft a light source as possible. The light from a bare speedlight will never be soft. A modifier like a translucent umbrella is dirt cheap and as portable as an actual umbrella, and they work well with both small and large flashes. 

portraits in the middle of the day
Use as big of a modifier as you can for softer light. Portable softboxes like this one work well. So do translucent umbrellas if you want a cheaper, even more portable option.

Another thing to look out for with fill lighting is how much you are filling in the shadows. Remember, the goal in using a fill light is to bring up the shadows so that they aren’t as dark in high contrast situations. You want to avoid having the exposure of your fill light as bright as the exposure from your key light. Try to aim for at least one stop between the exposure for your key and fill, but don’t be afraid to extend it more. Oftentimes two, three or even four stops of difference is the right choice. 

4) Flash as key

portraits in the middle of the day
Yet more unflattering light, this time with a more extreme solution. Here you will learn how to overpower the sun and use your own light.

Canon 5D Mark III | Canon EF 50mm f/2.5 Macro | 50mm | 1/800 sec | f/5.6 | ISO 200

Another way to use flash for portraits in the middle of the day is to use your flash as the key light. This will require a fairly powerful flash, as you will need it to appear brighter than the sun in your exposure, as you will now effectively be using the sun as a fill light. There are two main ways to go about this. These are using your flash in Manual mode and using your flash in E-TTL mode with High-Speed Sync (HSS). 

Because it is fairly easy to get started with your flash in E-TTL mode with HSS (provided that you have the right equipment), that is what this article will discuss.

Using HSS to balance your exposure will help you when creating portraits in the middle of the day.
Using High-Speed Sync on a high-powered strobe allows you to overpower the sun and light the scene with your flash. The sunlight will still be present, but it will be a few stops darker than your key light.

Canon 5D Mark III | Canon EF 50mm f/2.5 Macro | 50mm | 1/800 sec | f/5.6 | ISO 200

High-Speed Sync allows you to use flash at shutter speeds far faster than your maximum sync speed. Since shutter speed is what governs the exposure of ambient light while using flash, this means that you can use a shutter speed that underexposes the light from the sun.

Adding the flash as key at this point will shape the main light on your subject with whatever modifier you are using, while the shadow areas will be filled in by the ambient light. This is a great technique that works in a huge variety of situations, but it does require a bit of specialist equipment. 

Most speedlights have HSS functionality and more and more full-sized strobes are coming to market that have it, as well. 

portraits in the middle of the day

To get started using this technique for portraits in the middle of the day, select the aperture that you want to work with. Using the meter in your camera, meter the scene and underexpose it by the desired amount. You can evaluate the histogram to decide whether it is dark enough, or too dark.

portraits in the middle of the day
Underexposing the ambient light by three stops was too much in this case. Evaluate based on taste and your desired output, then adjust as required.

Canon 5D Mark III | Canon EF 50mm f/2.5 Macro | 50mm | 1/2500 sec | f/5.6 | ISO 200

Now, set up your flash with your chosen modifier for the lighting pattern of your choice. Rembrandt and Butterfly are two basic patterns that work great most of the time. Now, connect your flash to the camera and turn it on, making sure that it is set to both E-TTL mode and HSS mode.

Take a test shot. 

Adjust the exposure compensation of your flash as required to get a good exposure of your subject. Referring to the histogram will help you figure out how much exposure compensation you need to use at a glance. If your image is too bright, dial in -1/3 to -2/3 of a stop at a time until you have the desired effect. The same applies for too dark images. Just dial in +1/3 to +2/3 of a stop instead. 

portraits in the middle of the day
The test shot in this instance was way too overexposed. Simply dial in exposure compensation on your flash unit or trigger and keep evaluating until it is right.

Canon 5D Mark III | Canon EF 50mm f/2.5 Macro | 50mm | 1/800 sec | f/5.6 | ISO 200

Once you have a decent exposure, you should find that you have a nicely-lit portrait with all of the shadow and highlight details present in your image. 

This is a very basic overview of High-Speed Sync and doesn’t even come close to covering what’s possible with the technique, but it should get you started with the basics. 

Outro

Balancing flash with midday sun is another great technique when shooting portraits in the middle of the day.
Learning how to use just one of these techniques can open up hours worth of time that you would normally avoid shooting portraits in.

Canon 5D Mark III | Canon EF 50mm f/2.5 Macro | 50mm | 1/640 sec | f/4 | ISO 100

While there are plenty more methods for shooting portraits in the middle of the day, the ones listed here should go a long way to get you started.

There is no reason that you should feel limited by the time of day (and the lighting it brings) when you are photographing people.

Even with a few basic tools and techniques, you can stop being at the mercy of the light and, instead, take control of it and manipulate it to your needs. If nothing else, doing so will open up countless hours in the day that you can use for your portrait photography that you would normally be advised to avoid. 

The post 4 Ways to Shoot Portraits in the Middle of the Day appeared first on Digital Photography School. It was authored by John McIntire.


Digital Photography School

 
Comments Off on 4 Ways to Shoot Portraits in the Middle of the Day

Posted in Photography


Improve Your Middle of the Day Photos By Doing Black and White

16 May

Crystal-Palace

Sometimes beginning photographers ask me to look at their photos and tell them how they can make the photos better. Nearly every time this happens I end up saying the same thing, “You need to stop taking your pictures in the middle of the day.”

I have previously written about how and why photos taken at dawn and dusk are vastly superior to those taken at midday, so I won’t do so again here. I have also talked about a few things you can do to mitigate the damage of the midday sun. But that’s all you are doing – mitigating the problem – not solving it.

At the same time, I understand that you cannot always photograph at dusk or dawn. Family and work commitments limit us all. We cannot always get up so early or stay out so late.  Some places aren’t even open or accessible at dawn. Is there anything else that can be done if you have to shoot in the middle of the day?

There is one way that you can still take great photos in the middle of the day. That way is to convert them to black and white. Black and white photos frequently work much better than color photos in this regard.

Dallas-1

Look to the old masters

If you don’t believe me, just to check out the work of photography masters. I initially noticed this when looking at the work of Ansel Adams, who many – myself included – consider the greatest photographer ever. A large number of his photos are obviously taken at midday. For example, check out Monolith, the Face of Half Dome (1927). Yosemite Winter Valley (1940), Canyon de Chelly National Monument (1942), Mount Williamson (1944). and Half Moon and Clouds (1968).

All of these photos were obviously taken at midday. You can tell by the bright light and shadows. But they are all still great pictures. In fact, some of them are among his best. Why is that?

Reason #1: High contrast works well in black and white

Why does the same picture taken at midday look horrible in color, but pretty good as a black and white? One reason is that black and white pictures handle high contrast really well. That is not to say their dynamic range is any different, but that these pictures look great when there is high contrast within them. In fact, black and white pictures crave high contrast. Color pictures, on the other hand, don’t always do well with stark contrasts. Therefore photographing at midday – with all of its bright areas and dark shadows creating high contrast – can look really nice as a black and white photo.

Mountain-1

Reason #2: Pushing the processing

The other reason why black and white photos taken at midday can still look great, is that they seem to handle processing better than color photos. In other words, you can push the processing further with a black and white photo and get away with it. This was true in the darkroom, and it is also true today with digital tools.

Why is that? I think it is because black and white photos are already unnatural; obviously, the world is not black and white. When you look at a black and white photo, your mind knows that it is not an accurate representation of reality. If the processing is pushed a little further, your mind accepts it more readily.

That is not to say that you cannot over do processing in black and white, you can. But it does offer you a little more flexibility.

Longhorn

A reason for HDR?

Perhaps, for this reason, this is one area where HDR can still be a really useful technique. There is much discussion these days about HDR being dead. To be sure, almost no one in photography likes the HDR look (oddly, 100% of non-photographers do like that look). In addition, there are a lot of great tools these days for dealing with dynamic range problems without resorting to HDR. Nevertheless, black and white photos are one area where HDR is still very useful. Since there is no color, part of the surreal nature of HDR is avoided. In addition, the same phenomena mentioned above about being able to push the processing further in black and white is at work.

Barn-2

Break out the Neutral Density filter

Another way to improve your black-and-white photos taken at midday is to break out your 10-stop neutral density filter. If there are clouds in the picture, it will give them a sense of movement. If there is water in the picture, it will smooth it out. You can see and example of this in the top picture in this article, which has both clouds and water. Of course, this works for color pictures as well, but it seems to work particularly well with black and white images.

Conclusion

I still maintain that the number one thing you can do to improve your photographs is to start shooting at dawn or dusk. It costs nothing, and you don’t even have to increase your skills to make vast improvements. You just have to get up earlier, or stay out a little later. But for those occasions when that is just not possible, try converting some of your photos to black and white. The high contrast might look good on your photo. In any case, you’ll be able to push the processing a little further. It might prove an easy way to make your photos better.

Please share your black and white midday photos in the comment below.

googletag.cmd.push(function() {
tablet_slots.push( googletag.defineSlot( “/1005424/_dPSv4_tab-all-article-bottom_(300×250)”, [300, 250], “pb-ad-78623” ).addService( googletag.pubads() ) ); } );

googletag.cmd.push(function() {
mobile_slots.push( googletag.defineSlot( “/1005424/_dPSv4_mob-all-article-bottom_(300×250)”, [300, 250], “pb-ad-78158” ).addService( googletag.pubads() ) ); } );

The post Improve Your Middle of the Day Photos By Doing Black and White by Jim Hamel appeared first on Digital Photography School.


Digital Photography School

 
Comments Off on Improve Your Middle of the Day Photos By Doing Black and White

Posted in Photography


Halfway House: Townhouse Duplex Split Straight Down the Middle

23 Jan

[ By WebUrbanist in Architecture & Houses & Residential. ]

halfway house real

It looks more like an optical illusion or photo edit than a real dwelling, but this hundred-year-old halved townhouse really stands (out) on the streets of Toronto.

half house side view

half house toronto

54 1/2 St. Patrick was built in the early 1890s as part of a set of six homes with shared walls. Starting in the 1950s, owners of the neighboring units started to crumble under pressure from a developer, slowly selling their domiciles one at a time.

half rowhouse remaining plan

As a result, each of the other structures was torn down with surgical precision. When the occupant of the final house in the row refused to sell at any price, they cleaved off the other half of the building and the shared structural wall running down the middle was reinforced and covered in concrete.

halfway house up

halfway house front

The neighboring Village by the Grange opened in the mid-1970s. According to author and photographer Chris Bateman, “54 1/2 St. Patrick is currently vacant. No-one answered when I knocked at the door and the front room has been stripped to the floorboards. Perhaps it’s being spruced up, it would surely be worth it. The current assessment on file with the city lists the value at $ 648,000.”

Share on Facebook


[ By WebUrbanist in Architecture & Houses & Residential. ]

[ WebUrbanist | Archives | Galleries | Privacy | TOS ]


WebUrbanist

 
Comments Off on Halfway House: Townhouse Duplex Split Straight Down the Middle

Posted in Creativity


Desert Cities: Modular Nodal Network Idea for the Middle East

30 Jan

[ By WebUrbanist in Architecture & Cities & Urbanism. ]

desert city social organization

A combination of contemporary regionalism and sustainable urbanism, this design strategy proposed by an Italian architecture firm involves a series of modules for living, working and interacting at different scales. Notably different from most models of urban design is the intentional lack of density, raising the question: is the premise that good urban strategies revolve around dense centers a universally valid one?

desert city expanse

desert city different scales

desert cities node network

Connected by lines that serve as both dividers and connectors, the smallest modules are family-sized units, the mid-sized variants working as cultural, research and service centers and the largest operating as micro-cities with more complex communities.

desert city concept rendering

desert city individual community

By spreading these out, maximum use can be made of minimal rainfall (water capture) as well as sun exposure (solar power), rendering each unit relatively or entirely self-sufficient. Internally, composing, recycling and other sustainable strategies would be employed as well.

desert city design urban

desert city layout strategy

desert city streets connectors

desert city angled view

Luca Curci Architects describes the approach as follows: “The project-plane is made by a series of identity-places with symbiotic interconnections among them which create an organic and articulated system. The identity-places can be divided in 3 macro architectural types, different for dimension, function and inhabitants. Each identity-place is developed following residential and architectural solutions which respect the environment’s tradition, climatic condition and resources.”

Share on Facebook


[ By WebUrbanist in Architecture & Cities & Urbanism. ]

[ WebUrbanist | Archives | Galleries | Privacy | TOS ]


WebUrbanist

 
Comments Off on Desert Cities: Modular Nodal Network Idea for the Middle East

Posted in Creativity


World’s Smallest Park: 2-Foot Circle in the Middle of a Street

30 Nov

[ By WebUrbanist in Global & Travel & Places. ]

micro park street median

Originally designed to house a lamp post, this unassuming spot in Portland, Oregon, was left empty until a local journalist took it upon himself to declare it a park, naming it Mill Ends after his column in the regional paper.

micro one tree park

The earthen concrete-enclosed spot, outside the Oregon Journal office of writer Dick Fagan and situated between lanes and medians, had began to sprout weeds until one night in the 1940s he declared it a park. In a fit of fancy, he claimed it was occupied by leprechaun Patrick O’Toole and began printing stories about the space and its resident.

micro park crosswalk

Though only Fagan seemed to see its miniature occupant, his editorials claimed the area should be subject to the city’s park rules, including curfews. Soon enough, it was a local, then national, then international legend (though some outsiders mistakenly know it as ‘Mill’s End’).

micro park history placard

Today, the beloved micro-park even sports a sign explaining its history and origins, also showing its original location in the context of surrounding structures.

micro tree portland oregon

Although frequently occupied by a single tree today, the circular anomaly has featured everything from a swimming pool and diving board (for butterflies and, presumably, leprechauns) and a miniature Ferris wheel (also clearly for small occupants of the park). It was even relocated at one point to accommodate building construction in the area. (Images by Dukbrx0, Piutus, Craig Dietrich)

Share on Facebook


[ By WebUrbanist in Global & Travel & Places. ]

[ WebUrbanist | Archives | Galleries | Privacy | TOS ]


WebUrbanist

 
Comments Off on World’s Smallest Park: 2-Foot Circle in the Middle of a Street

Posted in Creativity


7 Abandoned Wonders of the Middle East

17 Jul

[ By Steph in Abandoned Places & Architecture. ]

Abandoned Middle East Main

Eerie ghost towns, villages abandoned after shocking massacres, the palaces of deposed dictators and mansions so well preserved they’re like 1950s time capsules are among the Middle East’s abandoned treasures. The Cradle of Civilization and the areas that lie just outside of it contain some of humanity’s oldest structures, and a great many ruins.

The Abandoned Palaces of Egypt

Abandoned Middle East Egypt Palaces 1

Abandoned Middle East Egypt Palaces 2

(images via: wikimedia commons, dalbera, eusuperfunhappytime)

In 1869, construction of the Suez Canal brought foreign money flooding into Egypt, and ambitious foreign businessmen got to work on ornate castles in Western European style, which stood as stark symbols of colonialism. But when Gamal Abdel Nasser became president in 1956, he put an end to that, kicking out the wealthy foreigners to reclaim the nation for the people. Unfortunately, economic instability hasn’t allowed for the palaces to be redeveloped, so today they range from shuttered time capsules of the 1950s to crumbling ruins.

The Baron Empain Palace  (top), built by Eduoard Louis Joseph of Belgium in the late nineteenth to early 20th centuries, is one such place. Modeled on Hindu and Cambodian temples, the palace sits in a dirt lot in the Cairo suburb of Heliopolis, surrounded by barbed wire. It’s closed to the public, but like many such places, it’s the subject of many rumors of ghost stories and Satanic rituals.

Another is Prince Said Halim’s palace, also known as Champollion House, in Cairo. This palace was converted to a secondary school after its abandonment, but it has been empty since 2004.

Maasser el Chouf, Lebanon

Abandoned Middle East Maasser el Chouf 1

Abandoned Middle East Maasser el Chouf 2

(images via: samer noun)

Located in lush woods just outside the peaceful Al-Shouf Cedar Reserve of Lebanon’s Maasser Cedar Forest, this idyllic village was utterly devastated by the massacre of September 9th, 1983. The houses that remain empty belonged to those who perished or fled to safer places when 63 Catholics were killed by their Druze neighbors in a brutal daytime assault. Years later, in 1990, a son left orphaned by the attack returned and killed five Druze villagers and three soldiers in revenge. Some of the homes are still occupied by those who survived.

Photographer Samer Noun gained access to the abandoned homes in 2011, capturing these eerie images of the architectural remains.

Saddam Hussein’s Abandoned Palaces, Iraq

Abandoned Middle East Iraq Palace 1 Abandoned Middle East Iraq Palace 2 Abandoned Middle East Iraq Palace 3 Abandoned Middle East Iraq Palace 4

The Babylonian palaces of Saddam Hussein once stood as ostentatious symbols of the Iraqi dictator’s power, hastily constructed all over the country. Once he was forced from power, these ornate palaces full of treasures were either taken over by US Army forces or looted by locals. These photos by Richard Mosse document the period in which American soldiers stalked the marble halls, strung up American flags in what were once exclusive chambers and parked their massive military vehicles right in front of the faux-grand entrances. Many of the palaces are deteriorating, and not just because of war damage; they were so cheaply made that they simply haven’t stood up to the test of time.

Next Page:
Cradle To Graveyard 7 Abandoned Wonders Of The Middle East

Share on Facebook


[ By Steph in Abandoned Places & Architecture. ]

[ WebUrbanist | Archives | Galleries | Privacy | TOS ]


WebUrbanist

 
Comments Off on 7 Abandoned Wonders of the Middle East

Posted in Creativity


Everett Middle School

07 Nov

A few nice visual art images I found:

Everett Middle School
visual art
Image by TheeErin
From the Columbus Public Schools website: "AIMS arts specialists in Dance, Drama, Vocal Music, Instrumental Music and Visual Art teach in both arts classes as regular teachers and in traditional academic classes as arts impact teachers. Teachers of the traditional academic disciplines participate in the arts classes. Eighth grade students "major" and "minor" in their favorite arts."

Everett Middle School was built in 1898 and was the original North High School for Columbus Ohio until 1925.

MIT+150: FAST (Festival of Art + Science + Technology): FAST LIGHT — Night of Numbers: 3.14 Pi under a crescent moon (portrait)
visual art
Image by Chris Devers
Quoting from the official pamphlet:

FAST LIGHT • May 7 + 8, 2011, 7 pm – 10 pm

Contemporary pioneers in art, science, and technology have come together at MIT to create one of the most exhilarating and inventive spectacles metro Boston has ever seen. On May 7 and 8, 2011, visitors can interact with 20+ art and architectural installations illuminating the campus and the Charles River along Memorial Drive at MIT.

arts.mit.edu / fast

Installations scattered around campus (we didn’t quite see all of them), again pasting from the official flyer:

• aFloat
MIT Chapel • Saturday, May 7th ONLY
Inspired by water in the Saarinen Chapel’s moat, a touch releases flickers of light before serenity returns as a calm ripple.
By Otto Ng, Ben Regnier, Dena Molnar, and Arseni Zaitsev.

• Inflatables
Lobby 7, Infinite Corridor
A dodecahedron sculpture made of silver nylon resonates with gusts of air, heat from light bulbs, and the motions of passersby.
By Kyle Barker, Juan Jofre, Nick Polansky, Jorge Amaya.

• (now(now(now)))
Building 7, 4th Floor
This installation nests layers of the past into an image of the present, recursively intertwining slices of time.
By Eric Rosenbaum and Charles DeTar.

• Dis(Course)4
Building 3 Stair, Infinite Corridor
A stairwell transformed by a shummering aluminum conduit inspired by the discourse between floors and academic disciplines.
By Craig Boney, Jams Coleman and Andrew Manto.

• Maxwell’s Dream
Building 10 Community Lounge, Infinite Corridor
An interactive mural created by magnetic fields that drive patterns of light, Maxwell’s Dream is a visually expressive cybernetic loop.
By Kaustuv De Biswas and Daniel Rosenberg.

• Mood Meter
Student Center & Building 8, Infinite Corridor
Is the smile a barometer of happiness? Mood Meter playfully assesses and displays the mood of the MIT community onsite and at moodmeter.media.mit.edu
By Javier Hernandez and Ehsan Hoque.

• SOFT Rockers
Killian Court
Repose and charge your electronic devices using green solar powered technology
By Shiela Kennedy, P. Seaton, S. Rockcastle, W. Inam, A. Aolij, J. Nam, K. Bogenshutz, J. Bayless, M. Trimble.

• LightBridge
The Mass. Ave Bridge
A dynamic interactive LED array responds to pedestrians on the bridge, illustrating MIT’s ties to both sides of the river. Thanks to Philips ColorKinetics, CISCO, SparkFun Electronics.
By Sysanne Seitinger.

• Sky Event
Killian Court, Saturday, May 7th ONLY
Immense inflatable stars soar over MIT in celebration of the distinctive symbiosis among artists, scientists and engineers.
By Otto Piene.

• Liquid Archive
Charles River
A floating inflatable screen provides a backdrop for projections that highlight MIT’s history in science, technology, and art.
By Nader Tehrani and Gediminas Urbonas.

• Light Drift
Charles River
Ninety brightly glowing orbs in the river change color as they react to the presence of people along the shore.
By Meejin Yoon.

• Unflat Pavilion
Building 14 Lawn
This freestanding pavilion illuminated with LEDs flexes two dimensions into three. Flat sheets are bent and unfurl into skylights, columns, and windows.
By Nick Gelpi

• Gradated Field
Walker Memorial Lawn
A field of enticing mounts create a landscape that encourages passersby to meander through, or lounge upon the smooth plaster shapes.
By Kyle Coburn, Karina Silvester and Yihyun Lim.

• Bibliodoptera
Building 14, Hayden Library Corridor
Newly emerged from the chrysalis of MIT’s diverse library pages, a cloud of butterflies flutters above, reacting to the movement of passersby.
By Elena Jessop and Peter Torpey.

• Wind Screen
Green Building Facade, Bldg 54
A shimmering curtain of light created by micro-turbines displays a visual register of the replenishable source of wind energy.
By Meejin Yoon.

• String Tunnel
Building 18 Bridge
A diaphonous tunnel creates a sense of entry to and from the Infinite Corridor and frames the surrounding landscape.
By Yuna Kim, Kelly Shaw, and Travis Williams.

• voltaDom
Building 56-66 Connector
A vaulted passageway utilizes an innovative fabrication technique that creates complex double curved vaults through the simple rolling of a sheet of material.
By Skylar Tibbits.

• Night of Numbers
Building 66 Facade & E15 Walkway
A lighting installation enlivens MIT architectre with numbers that hold special or historical significance to the Institute. Can you decode them all?
By Praveen Subramani and Anna Kotova.

• Overliner
Building E-25 Stairwell
Taking cues from a stairwell’s spiraling geometry, Overliner transforms a familiar and busy passageway into a moment of surprise and repose.
By Joel Lamere and Cynthia Gunadi.

• Chroma District
Corner of Ames and Main Streets.
Lanterns react to visitors by passing sound and color from one to another, increasing in intensity along the way and illuminating the path to MIT’s campus.
By Eyal Shahar, Akito van Troyer, and Seung Jin Ham.

From the Salon to the Moshpit: Creating Spaces of Assembly
visual art
Image by Steve Rhodes

In 2008, the Bay Area will be activated with a wealth of exhibitions and events examining the impact of feminist art and ideology on contemporary art.

The panel took place last November, but two of the exhibits are opening this week

Make You Notice opens tonight at SFAC Gallery & continues through May 24th

sfacgallery.org/exhibitions_detail.fsp?id=382289

And The Way That We Rhyme (from the Le Tigre song Hot Topic) opens Friday (with a bunch of events on Saturday) at YBCA and continues through June 29th

www.ybca.org/tickets/production.aspx?performanceNumber=4024

a selection of women artists, musicians and curators to discuss the legacy of feminist art and critique, especially as it affects the work of a younger generation of artists working locally and internationally.

Panelists JD Samson, of the band Le Tigre, Emily Roysdon, an artist, writer and member of the collective LTTR, and San Francisco-based curator and educator Jill Dawsey will discuss the process of building collaborative networks of support that feed their own individual creative practices as well as those of their friends and peers.

The panel will be moderated by YBCA’s Associate Visual Arts Curator Berin Golonu.

www.lttr.org

www.letigreworld.com

www.indyweek.com/gyrobase/Content?oid=oid:161002

en.wikipedia.org/wiki/JD_Samson

 
Comments Off on Everett Middle School

Posted in Photographs


Paris in the middle ages Stereoscopy Anaglyph

15 Mar

Extract from a 3D reconstitution film representing Paris in the Middle ages. The Film was calculated also in Stereoscopy Anaglyph. More on www.Grezprod.com
Video Rating: 5 / 5

Lets experience the game in 3D! Put your glasses on and enjoy! Part 1: www.youtube.com Part 2: www.youtube.com Part 3: www.youtube.com
Video Rating: 5 / 5

 
2 Comments

Posted in 3D Videos


Unesco Middle Rhine Valley 3D Stereo HD 720p Video Trailer (yt3d:enable=true)

11 Feb

Middle Rhine Valley in 3D HD Stereo (720p Trailer). Oberes Mittelrheintal in 3D HD Stereo (720p Trailer). Taken from 3DSession.com

Computer animated movie of a rotating four-dimensional hypercube, perspectively projected into 3D as stereoscopic left and right images, to be viewed cross-eyed. The computer animation was performed at Bell Labs in the mid 1960s. This is one the first stereoscopic digital computer animations. The image quality became degraded during the process in which the original 16-mm film was digitized.
Video Rating: 4 / 5