RSS
 

Posts Tagged ‘MidDay’

How to do Portrait Photography in Bright Midday Sun

01 Oct

In photography, learning and knowing how to use and manipulate light will always be an advantage. Especially when it comes to portrait photography because you aren’t always going to photograph your clients in the most ideal light.

wedding couple by the pool - How to do Portrait Photography in Bright Midday Sun

Sometimes you don’t have a choice but to put your clients in direct sunlight.

Backlight your subjects

You might think that backlighting can only apply during sunset hours, however, it can be used any time the sun has passed its peak. Once the sun angles a bit, you are able to backlight your subject.

This technique is best to keep direct sun off your client’s face and avoid those weird shadows that happen under the eyebrows, nose, and chin.

How to do Portrait Photography in Bright Midday Sun - family on the beach

Backlighting your clients can help minimize shadows.

It also helps to keep people from squinting. Keeping your subject’s face away from direct sunlight will also help keep them comfortable during the session. Beware of backgrounds as well because sometimes, to keep the light of your client’s face, it may mean having them in front of ab undesirable background.

couple by a river - How to do Portrait Photography in Bright Midday Sun

Backlighting can also add lens flare to your photos in an artistic way.

Try your best to position your subjects away from direct sunlight while still keeping the background that you desire.

Use reflectors

Luckily, because the sun is high in the sky, and most likely really bright, you’ll have big natural light reflectors at your disposal.

Natural reflectors are great to bounce light back onto your subject without having to spend tons on expensive photographic gear. They are found at the location and can fill in the shadows nicely.

family on the beach under a palm umbrella - How to do Portrait Photography in Bright Midday Sun

Use a shaded area to help with bright sunlight. The sand also acts as a natural reflector and bounces light back onto people’s faces.

Natural reflectors include big parking lots, sidewalks, windows, big light-colored walls, silver or white cars, buildings with silver or reflective paneling/architectural designs, light-colored cement walls/floors, sand at the beach, and any found natural reflective surface.

wedding couple on the beach - How to do Portrait Photography in Bright Midday Sun

Use the sand as a natural reflector. Use trees to create a frame within a frame.

Backlight your subject when the sun has passed its peak and position them in front of a large natural reflector to bounce light back onto their face.

Professional photographic reflectors are also great to use if you have one already. Position your subject with their back to the sun. Use the silver side of the reflector to bounce light back onto them.

Be careful not to aim the reflected light directly into your subject’s eyes as it can be really bright, almost as strong as direct sunlight. Angle it a bit until you find enough fill on their face.

family outdoors - How to do Portrait Photography in Bright Midday Sun

Backlighting your clients can help with shadows.

Make sure you do not place your reflector on the floor pointing upward at your client. This will cause the light to bounce upward which will give you odd unflattering shadows on the face. Rather, have a stand or a friend hold the reflector up so that the light bounced back is around torso height.

Be careful when using the white side of the reflector during midday sun as this can cause your client’s face to wash out and look opaque.

Use a scrim to diffuse light

Some reflectors, especially the 5-in-1 kind, come with a translucent side. This translucent reflector helps to diffuse sunlight without completely blocking it out. You can also make your own using translucent fabric and a PVC/hula-hoop.

How to do Portrait Photography in Bright Midday Sun

Hold the scrim over your client’s face or body to diffuse the light. Be careful of your backgrounds. If your background is brighter than your client, the background will be overexposed. If possible, try and match the light on the background to the light on your client.

Scrims are especially effective if you are going for close-up photos of your client.

Slightly underexpose

Underexposing while photographing in bright midday sun can help you get less washed out backgrounds. Underexposing your photo can also help retain details that otherwise get lost if they are too bright.

bride and groom kissing by a pool - How to do Portrait Photography in Bright Midday Sun

Put your clients in direct sunlight to get a different look.

After the session, you can bring up the shadows in your editing program of choice without losing detail in the rest of the image. Underexposing 1/2 – 1 stop can also help to keep the background details intact.

family photo - How to do Portrait Photography in Bright Midday Sun

You can also expose for both your clients in one photo and in the next expose for the background. Later you can merge both photos so that your final photo is exposed for both the people and the scene.

This will also look a bit like HDR which gives your photo a more artistic and dynamic look. Make sure that both photos are taken using the same lens, at the same distance, with the same framing so that both images line up. Otherwise, it will be more difficult to merge the photos in an editing program.

couple in black - How to do Portrait Photography in Bright Midday Sun

Try to avoid photograph clients in really bright backgrounds otherwise, you’ll get this washed out background and lens flare.

Use flash

Flash is a great resource to use during the midday sun. Especially when you are in a location where natural reflectors are scarce or you need an extra pop of light. Flash is also handy during midday sessions so that you can properly expose for your clients while keeping the background from washing out.

smiling boy in a field - How to do Portrait Photography in Bright Midday Sun

Use flash to fill in shadows and compete with the bright sunlight behind.

Since you’ll be competing with the bright midday sun, point your flash directly at your clients to make sure the light reaches them. Using a diffuser can help to disperse the light. If you’re using your flash in manual mode, aim to use it at 1/8th power or more. This will give you enough power to light your clients.

couple on the beach - How to do Portrait Photography in Bright Midday Sun

Experiment with your flash in the high-speed sync mode where you can use shutter speeds higher than 1/200th of a second. You’ll get more fashion styled photos as the pop of light will be more directional and your background will be darker.

Pointing the flash at a big white wall can also help to bounce light back onto your clients meanwhile diffusing the light so that it isn’t so harsh creating a nice blended fill.

2 portraits of a man - How to do Portrait Photography in Bright Midday Sun

Two different portraits created in midday sun during the same session.

If your flash is attached to your camera, you can slightly bend the flash down to direct it towards your clients rather than having it all the way up. It can add more light to the scene and direct it where you want it to be.

Shoot in Shade White Balance

It might seem a little weird to photograph your entire session in the Shade White Balance and your eyes might take some time getting used to the sepia tones. However, photographing people in shade mode helps to keep skin tones even.

This is very important, especially while photographing during midday sun since it can be really bright and hard to keep the skin tone consistent.

How to do Portrait Photography in Bright Midday Sun - girl with balloons

Have fun photographing in the midday sun.

Shade White Balance allows you to then edit your photos so that you can get the exact skin tones that you desire.

Let creativity flow

Photographing during midday sun may not be ideal yet it can offer many different ways for your creativity to flow. Use shadows to create interesting effects. Try to face your client toward the direct sunlight and focus on the details.

couple with shadows - How to do Portrait Photography in Bright Midday Sun

Use midday sunlight to create different effects.

You can also use hats, palm leaves, water, and other interesting elements to create different styled photographs. Experiment with your flash in different positions. Use the sun as a subject within the photo.

How to do Portrait Photography in Bright Midday Sun

Use the sun to create repeating patterns and shadows.

Allow your backgrounds to grow dark or wash out. Use the midday sun to highlight details that you want and put into shadow the details that you want to eliminate. There are many different ideas and letting the sun guide you can often give you the best results!

Put your clients in the shade

Just because you have to photograph during the harsh hours of midday sun, it doesn’t mean that you can’t use shaded areas to your benefit!

You don’t need a much shade, just enough for your clients to fit in. Tall buildings, large tall trees, and tall walls work to help shade your client from harsh light during the middle of the day. Position them close to a big natural reflector, keeping them in the shade while taking advantage of the light being bounced back.

couple with car - How to do Portrait Photography in Bright Midday Sun

Put your clients in the shade if you can.

Make sure you expose for your client’s face and not the background, this will help keep your skin tones even if the background washes out a bit.

In conclusion

While photographing in midday sunlight isn’t necessarily ideal, it can always offer some great ways to create different and interesting photographs of your clients. Practicing during these hours is also helpful in case you do have to photograph in midday sun such as a wedding day, for example.

How to do Portrait Photography in Bright Midday Sun

Photograph your client in direct sunlight.

If you find yourself photographing during these peak hours of the day, just know that these tips will help you to get the best out of your session, no matter what the light is like.

The post How to do Portrait Photography in Bright Midday Sun appeared first on Digital Photography School.


Digital Photography School

 
Comments Off on How to do Portrait Photography in Bright Midday Sun

Posted in Photography


Tips for What to Shoot at Midday

03 Apr

“Don’t shoot at midday!” How many times have you heard that advice? And that you should only shoot during the Golden Hour?

Tips for What to Shoot at Midday

While it is true the grandest landscape vistas prefer the sun lower on the horizon, there is no reason to pack up your camera and take a nap just because the sun is high. Midday may not be ideal for some types of landscape photography, but there are plenty of high-quality photos to be shot.

NOTE: All photos in this article were taken between 10 am and 3 pm.

Details

Details, details, details. Getting in close and ignoring the wide panoramas during midday will open a new world of possibilities.

Tips for What to Shoot at Midday

Close-up prayer wheels – Nepal – shot at midday under cover so the light was coming from the side.

It’s a great time for macro photography as there is ample light for the smaller subjects (and the lenses used to capture them). Beyond macro, look for snippets of a scene that will help describe your subject alongside the Golden Hour shots.

Tips for What to Shoot at Midday

Detail of mosaic tiles with metal door close-up – Morocco.

Tips for What to Shoot at Midday

Close-up of sailing yacht rope and winch – USA – Washington – Bellingham

Tips for What to Shoot at Midday

Plumeria flowers shot outdoors.

Tips for What to Shoot at Midday

Skimmer and strainer – India.

Tips for What to Shoot at Midday

Patterns

Barring the grand vista, looks for patterns in your landscapes. Or in any subject, for that matter.

In my opinion, looking for patterns changes something in your mind. While patterns are certainly artistic in nature, for me they switch on my analytical side and help me to see a scene differently.

Tips for What to Shoot at Midday

Rippled sand in desert – Oman.

Tips for What to Shoot at Midday

Bridge railing – Bhutan.

Tips for What to Shoot at Midday

Kayaks kept in a row – USA – Colorado.

Use a Diffuser

A diffuser will work wonders for those harsh shadows found at midday. You don’t have to drop a fortune on the coolest model as even tracing paper can be used to defuse the light falling on small objects.

The best diffuser is one I like to call, “passing clouds”. I love to have some light clouds in the middle of the day as it brings an even light to subjects.

Tips for What to Shoot at Midday

Close-up of a whale swimming in the sea – USA – Alaska

Tips for What to Shoot at Midday

View of people visiting Harmandir Sahib temple – India.

Here’s an example of some rather large diffusers (used for the next image, with the help of some flash).

Tips for What to Shoot at Midday

Use Your Flash

Whether it is the flash that is built into your camera or an external unit (on the hotshoe or off), adding even more light to a scene might seem counterintuitive at first. Yet adding that light can balance the existing light and remove shadows.

Tips for What to Shoot at Midday

For one thing, the extra light your strobe puts out is probably not going to outshine the sun, I hope. This means the highlights in a scene will hold steady while that extra light gets up under hat brims, eye sockets or any other areas with shadows.

You may need to play around with your strobe’s power (either directly in manual mode or by using your camera’s flash exposure compensation) to get the balance just right.

Star Bursts with a Small Aperture

Have you ever seen those shots with the sun high in the sky and half a dozen (or more) rays emitting from the center of it? Have you wondered how to get such a shot?

It’s really quite easy. Switch to Aperture Priority mode and close down your aperture. That’s it! The more closed the aperture, the more those rays are accentuated, Now all you have to do is frame an interesting composition.

Tips for What to Shoot at Midday

Here are a few more tips on starbursts and sun flares.

Watch Your Angle

Some people believe that once the sun is high in the sky, directly overhead, the light is all the same. This is not true.

While there may be a 15-minute span of time when the light really is the same from any angle, the rest of the time you can find better light by slightly changing your camera angle or position.

Take a look at these sun-dried peppers from Bhutan. Coming upon the peppers I noticed their vibrant red color, giving a clear warning about the spices within. But the first shot was not the best.

Tips for What to Shoot at Midday

When I moved around to the other side of the peppers, that slight change in the sun’s angle (or, more accurately, my relation to the sun’s angle) made all the difference in a capturing the essence of the peppers.

Tips for What to Shoot at Midday

Look for Unique Angles

If the sun is coming in from high overhead, why not get up higher and shoot with it at your back? All these shots are from a third story hotel window looking down on street life in Kathmandu, Nepal.

Tips for What to Shoot at Midday

Some Landscapes Still Work

Photography is certainly not a one-size-fits-all endeavor. While many landscape photographers will tell you there is nothing good to shoot in the middle of the day, there are areas of the planet which lend themselves nicely to wide landscapes in bright light.

I am thinking specifically of the higher places, like Nepal, Bhutan and the Andes, to name a few. The same applies to landscapes as to those peppers mentioned above. Sometimes all it takes is turning around to notice the sun is slightly better in one direction than another. Here are some examples of midday light from around the world.

Tips for What to Shoot at Midday

Yellowstone National Park

Seljalandfoss, Iceland

Mission Ridge Ski Area, Washington, USA

Boudhanath Stupa, Nepal

Washington State Ferry, USA

Mani stones and the Himalayas – Nepal

The time of year can also help. In places like Iceland in the winter, the midday sun is still very low in the sky as compared to the summer.

Conclusion

I agree that grand landscapes with amazing light are usually not found at midday. The Golden Hour holds its name for good reason. But that doesn’t mean you need to hide inside and stop shooting when the clock approaches noon!

Get out there and look for the type of subjects you like, but in midday light. Experiment and see what you can make come alive while other photographers wait for sunset.

The post Tips for What to Shoot at Midday appeared first on Digital Photography School.


Digital Photography School

 
Comments Off on Tips for What to Shoot at Midday

Posted in Photography


How to Photograph in the Harsh Midday Sun

05 May

It’s all about the light! The golden hour when the sun is just above the horizon shining its low angle golden rays on the scene; sunrise and sunset when the clouds light up pink, orange, and red; and the blue hour when the sun is below the horizon but it is not yet totally dark. Those are the best times to photograph.

But midday? That’s when tourists make snap-shots, right?

Well, yes, but that doesn’t mean there aren’t options for you too. You just have to know what to do when the sun is high in the sky shining its harshest light on a day with no clouds to soften the rays.

How to Make the Most of Harsh Midday Sun

We don’t always have the option to shoot on the edges of the day when the conditions are best. On a recent trip, I was in between two destinations and had a few spare hours to visit a small village on route. It turned out to be an amazing location, but the light was harsh and the buildings were white. I could barely look at them let alone photograph them. I had to put my harsh light tactics to the test.

Here are some midday photography tips to help you:

1. Look for shade

The first thing I did was look for shady spots under trees and on the opposite side of the bright white buildings I was facing. Shade provides a nice soft, even, light, which is perfect for colorful subjects and ones with interesting shapes. I especially like to photograph flowers under soft light because the delicate nature of the subject lends itself to soft light.

How to Make the Most of Harsh Midday Sun - lotus flower

2. Look for shadows

Subjects with really distinct shapes will also have very distinct shadows in the harsh lighting conditions of midday. So you can make your photograph all about the shadows. Look for patterns in shadows, leading lines made by shadows, and shadows that create interesting shapes in your frame. Remember, you don’t necessarily have to include the object itself, sometimes just the shadow makes your photo a bit more mysterious.

Shadow Patterns - How to Make the Most of Harsh Midday Sun

3. Look for reflections in water

Whenever there is a body of water near a subject that has harsh light on it, you’ll get a bright reflection. This works best when the subject being reflected has a lot of color. Ideally, the subject will be in direct light and the water will be in the shade. Again you don’t have to include the object with the direct light on it. Sometimes photographing just a reflection can make an interesting abstract image.

Half Dome reflects in the Merced River in Yosemite National Park - How to Make the Most of Harsh Midday Sun

4. Use the time for scouting

When all else fails, rather than photographing, you can use the time to scout out locations for the future. Walk around, find a great subject and play with different compositions. Make “sketch” images by trying different compositions and choosing which one has the most impact. Then, when you find it, make a note of the exact location and make an image so you remember your camera angle.

It’s also a good idea to take note of how long it takes you to walk to that location, what the trail or route is like, and anything you may want to make note of should you need to return in the dark, like before sunrise for example. You’ll thank yourself later when you don’t have to guess at a location and composition before you can really see what is in your frame.

Mono Lake Tufa State Natural Reserve, California - How to Make the Most of Harsh Midday Sun

5. Rest up

When you’re on a long trip, sometimes it’s best not to wear yourself out by doing three photo shoots a day. Of course, you’re going to go out for sunrise and sunset. During the day you might want to clean your gear, get out some maps and do some planning, research stuff on the internet, or even take a nap.

Sometimes the best thing you can do for your photography is simply to have a rest so you have lots of energy for your next outing.

Conclusion

What tips to you have for working with the midday sun in your photography? Please share them in the comments below.

The post How to Photograph in the Harsh Midday Sun by Anne McKinnell appeared first on Digital Photography School.


Digital Photography School

 
Comments Off on How to Photograph in the Harsh Midday Sun

Posted in Photography


3 Quick Tips for Photographing in the Harsh Midday Sun

15 Jun

One of the most important elements of photography is light. So it’s only natural that as photographers, one of the most important skills to have under your belt is the understanding of different kinds of light, and how to SEE it before taking a single shot. Every photographic frame needs some sort of light but the intensity, direction, and quality is always in question.

3 Quick Tips for Photographing in Harsh Midday Sun(1)

For natural light or outdoor photographs, early morning sunlight (when the sun is low in the horizon and has a soft quality), or beautiful golden light of the setting sun is ideal. However this is not always practical, especially when dealing with clients. Firstly, not all clients are open to early morning or sunset photoshoots. Secondly, particularly in wedding photography, timing is not something the photographer has much control over. Many wedding ceremonies are scheduled outdoors at noon, when the sun is the highest in the sky, and the light is the harshest.

As photographers we know that good quality light does wonders to an image, almost giving it an ethereal, magical look, but we cringe when we have to deal with harsh midday sun. Luckily there are a few tips and tricks to deal with this harsh light source, while still achieving beautiful images. In this article, my aim is to help explain some of these simple tips, using my newly purchased rose bushes that are waiting to be planted, and also prove that they will work for any subject, not just people!

Memorable Jaunts Tips for photographing in the harsh midday sun-2-2

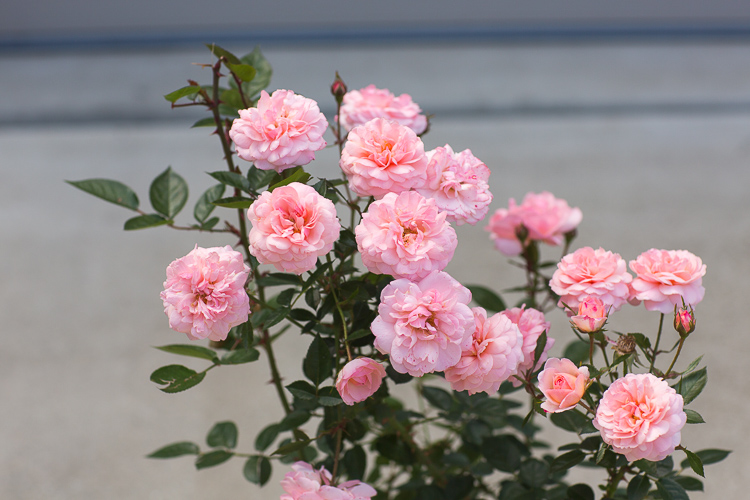
Beautiful roses photographed at noon, under the shade cast by the front of my home.

Please note – most of the images used in this article are SOOC (straight out of camera). I have applied minimal to no processing, because I want to show the direct results of shooting in harsh light, similar to what a photographer would experience, so as to fix as much as possible in camera, not via post-processing later.

#1 Put the subject’s back to the sun – backlighting

If there is no shade is available, and your only choice is to position your subject in full sun, an easy tip to follow is to position your subject with their back to the sun. This will help block most of the direct light from falling on their face, which causes them to squint their eyes. Instead, their face or the main part of the subject will be evenly shaded. This technique is called back lighting.

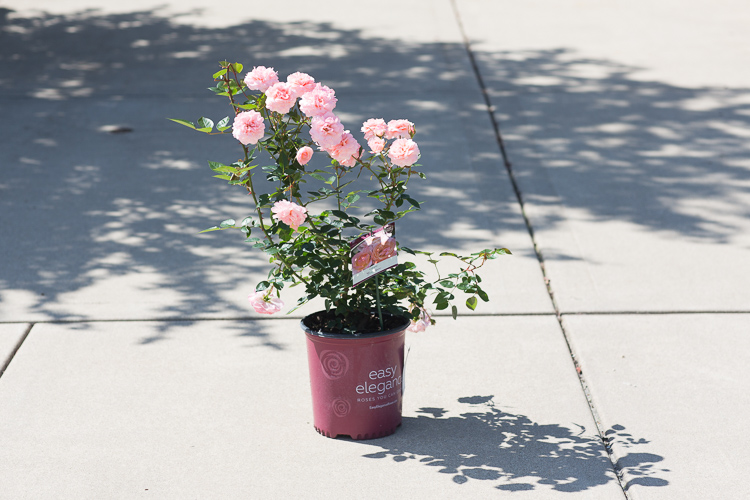
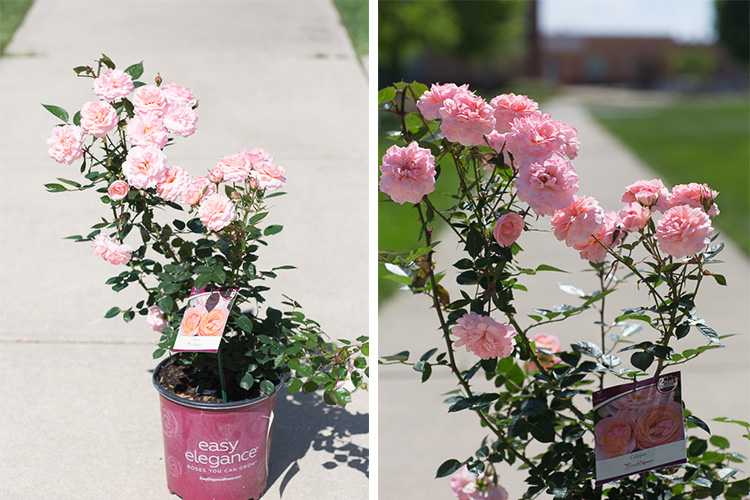
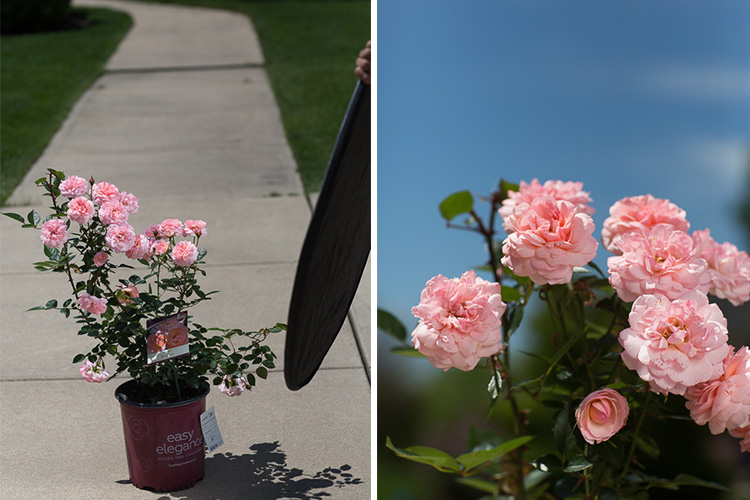
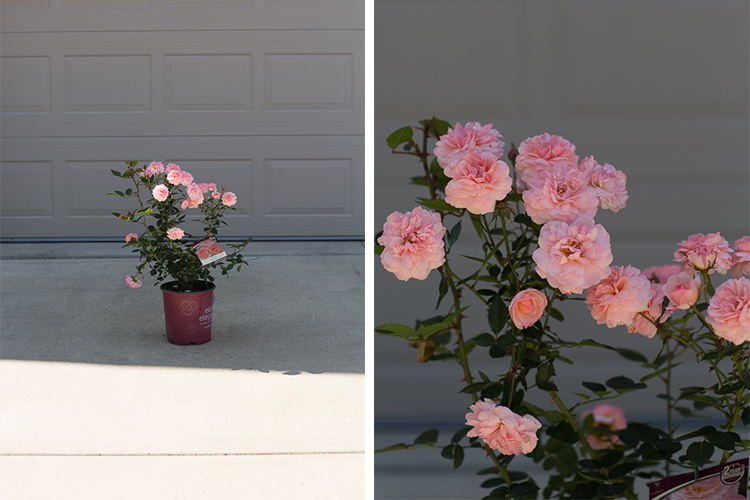
As you can see, in the first image below, the roses are in full sun. To backlight them, I simply moved the plant so that the roses I wanted to photograph, had their backs to the sun. This is sometimes easier to do with one subject because you can position them perfectly, to make sure no sunspots are making their way onto their face. If you are dealing with two or more subjects, particularly people, then have their faces closer together or even have them turn their bodies slightly inward towards each other. This helps eliminate any harsh light spots on their face.

Make sure to expose for the subjects’ faces or they will be too dark to see any detail. Something to note, is that when metering for the face in a situation like this, your background may be overexposed and may lose all the details, that’s okay.

Memorable Jaunts Tips for photographing in the harsh midday sun-1

Roses in full sun. You can see from the shadows that the sun was high in the sky, almost overhead at the time of these pictures.

Memorable Jaunts Tips for photographing in the harsh midday sun-5

Image on the left – Roses are facing the bright sun and almost appear washed out. Image on the right – Roses are in shadow and are darker when backlit.

If you want to maintain detail in the background or sky in a backlighting situation, you should use a reflector to bounce some light back into the subject’s face. This eliminates the need to overexpose the background especially when metering for the face (or part of the subject in the shade). Depending on the strength of the reflector, and the position of the sun, you can even underexpose the image to retain more highlights in the background while evenly lighting the subject by way of the reflector.

Memorable Jaunts Tips for photographing in the harsh midday sun-7

Left: A reflector with the silver side facing the roses is used to add more directional light on the flowers. Right: A close-up picture of the roses, slightly underexposed to maintain the clear blue in the sky, the light from the reflector is adding the pop of light on the flowers.

#2 Open shade or even lighting

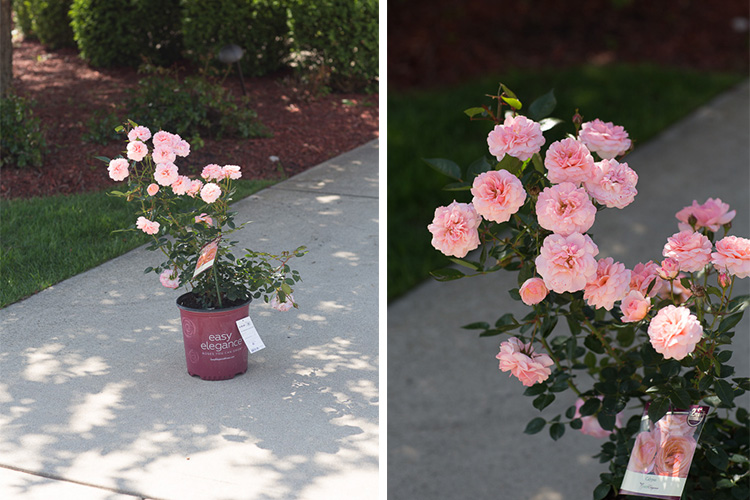
The best way to avoid distracting facial shadows from midday lighting, is to bring your subjects into a shaded area. Shade can be provided by a large tree, an open garage, a building, an awning, or anything that casts a big enough shadow to cover your subject. The benefit of shade is that it creates even lighting where no direct sun is hitting the face or body, allowing the subject to be evenly lit. The key is to place your subject at the very edge of the shade, so that while they are evenly lit there is still enough light to illuminate them. If you place your subject in the darkest part of the shade, the light hitting them may be lost. Also make sure you are not using patchy shade, especially when subject is placed under a tree. This can cast what is called dappled light on your subject, causing uneven spots of light on their face and body.

Memorable Jaunts Tips for photographing in the harsh midday sun-8

Left: Rose bush under the shade of a tree. Right: An example of dappled lighting on the roses. Notice how some roses are in the sun, while other are in the shade. This type of uneven lighting can cause undesired hot spots, especially on skin and hair.

Memorable Jaunts Tips for photographing in the harsh midday sun-10

Left: Rose bush at the edge of the shadow cast by the front of the house. This type of open shade is more even and uniform. Right: Close-up of the roses in the shade.

Memorable Jaunts Tips for photographing in the harsh midday sun-11

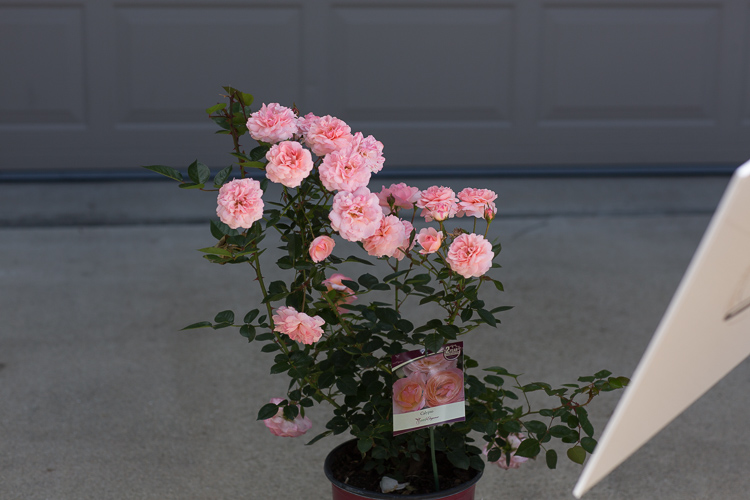
A simple white foam core board was used to add a little pop of reflected, directional light, onto the roses in the shade.

#3 Full sun with a diffuser

If all else fails, and you have no other alternative but to place your subject in the full, harsh sunlight, either because of location restrictions, or time of day limitations, then using a diffuser (translucent panel of your reflector) might be the next best option.

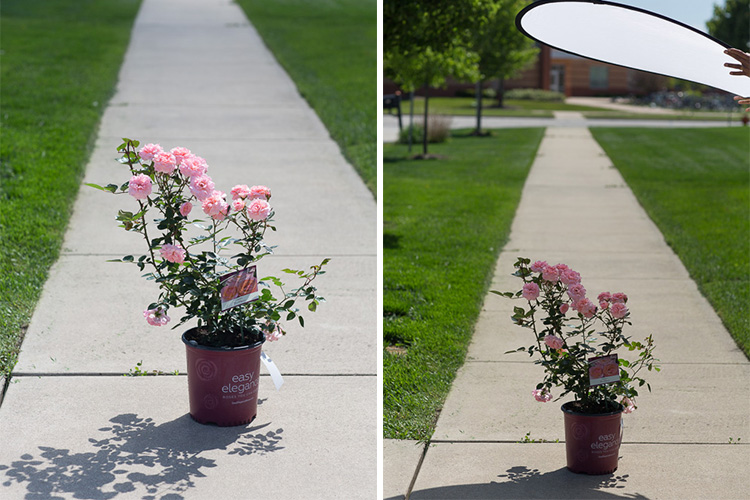
A diffuser takes in the harsh sunlight and spreads it evenly over your subjects. This also gives your subject some respite from the harsh sun, and casts a shadow on them so they are not squinting into the sun. In the simplest form a diffuser can be a piece of translucent white fabric (like a bedsheet). Of course, this does assume that you have an extra pair of helping hands to hold up the diffuser, when you’re shooting on location. I have been known to solicit the help of strangers, to help hold the diffuser for a quick minute or so while I take the shot – be resourceful!

Memorable Jaunts Tips for photographing in the harsh midday sun-16

Left: Roses in full sun. Right: A simple diffuser panel that casts even, soft light onto the flowers

Memorable Jaunts Tips for photographing in the harsh midday sun-15

Close-up of the roses with diffused lighting for a more even tone and color under harsh midday sun.

So the next time you have a client wanting to shoot in the middle of the day, don’t hyperventilate and come up with excuses to avoid the situation. Instead take up the challenge and try these techniques. If nothing else, it will make you more confident as a photographer, and also help you understand light a bit better.

For more reading check out: Portrait Photography: How to Photograph People in the Harsh Midday Sun or 5 Ways to Create Dramatic Landscape Photos at Midday.

What other tips do you have for photographing in the harsh midday sun? Please share in the comments below.

googletag.cmd.push(function() {
tablet_slots.push( googletag.defineSlot( “/1005424/_dPSv4_tab-all-article-bottom_(300×250)”, [300, 250], “pb-ad-78623” ).addService( googletag.pubads() ) ); } );

googletag.cmd.push(function() {
mobile_slots.push( googletag.defineSlot( “/1005424/_dPSv4_mob-all-article-bottom_(300×250)”, [300, 250], “pb-ad-78158” ).addService( googletag.pubads() ) ); } );

The post 3 Quick Tips for Photographing in the Harsh Midday Sun by Karthika Gupta appeared first on Digital Photography School.


Digital Photography School

 
Comments Off on 3 Quick Tips for Photographing in the Harsh Midday Sun

Posted in Photography


5 Ways to Create Dramatic Landscape Photos at Midday

03 Jul

Outdoor photographers are repeatedly taught to plan their scenic photography excursions early in the morning or late in the day. These magic hours we’re told, is the only light worth shooting in. Yet, what about those situations when being on location at sunrise or sunset isn’t possible? You can pack up your bags and go home with an empty memory card, or make the most out of every opportunity. Allow me to let you in on a little secret not found in most photo magazines. Some of the best landscape opportunities can be found at midday when the sun is high over head.

Here are five tips to help you create dramatic landscape photos at midday:

1) Work with the sun

Rather than avoiding the sun, use it to add visual interest in your composition. This technique is not overly complicated but does take a bit of trial and error to master. Start by setting a very small aperture opening such as f/22. Then, while looking through the viewfinder, position yourself so an object partially blocks the sun. It should not be entirely obscured, so you may have to rock back and forth ever so slightly to find the optimal point. When you see the beams of light spilling through the obstruction, take the shot. The results can be quite dramatic and potentially aided by subtle hints of colorful flare.

2) Give your wide angle lens a rest

The contrast found midday makes it difficult to hold the detail in the sky while properly exposing a foreground. Rather than resorting to an HDR shot, use the occasion to simplify your composition. Does that bright sky really add to the overall scene? If not, give your wide angle lens a break and switch to a medium telephoto lens.

Before pressing the shutter, check all four corners of the frame for any unwanted bright areas. The human eye tends to focus on these areas first. As you eliminate these distractions, the design of the photo will become more evident. Just remember, if you are hand holding the camera with a telephoto lens, opt for a slightly faster shutter speed to prevent camera shake. At these greater magnifications, even the slightest imperfections become more noticeable.

3) Find more people

Sunny days can also be useful for creating salable prints and stock photos. Images of people enjoying the outdoors are popular with a wide variety of clients; from those looking for home decor, or pharmaceutical companies, clothing lines, the parks department, etc. In the afternoon, you’ll find infinitely more people than you would at sunrise or sunset. This is a good thing, as it opens the door to a whole new series of photographic possibility. By including a human element, the image will have greater reach as viewers can relate to it personally.

4) Slow the shutter speed down with black glass

Believe it or not, you can shoot long exposures even on a bright sunny day. The trick is add a round neutral density filter to your bag. Sometimes dubbed “black glass”, these dark screw-on options block a great deal of light from entering the lens.

For example, if the proper exposure gave you 1/125, f/22, ISO 100, the water motion (below) would be largely frozen. By adding a nine stop ND filter, you can keep the aperture and ISO the same, but drop the shutter speed all the way down to four seconds. This will create that dreamy effect previously limited to low light situations.

5) Go easy on the polarizer

If you have a short layover in a distant location, you can use the opportunity to capture some of the sites mid-afternoon. Perhaps the most important tool will be the circular polarizer. Some may disagree here, but it does not need to be a multi-coated, super high-end filter. A basic model from Hoya or Tiffen will be just as effective. With it, you can take a pale blue sky and make it pop. This is especially true when the sky is dappled with clouds.

Be warned however, the technique is so powerful it’s easy to go overboard. As a tip, I’d recommend that you find the maximum strength of the filter, and then cut the intensity slightly. This will provide you with more natural results.

Do you have any additional tips for shooting at midday? Please share in the comments below.

googletag.cmd.push(function() {
tablet_slots.push( googletag.defineSlot( “/1005424/_dPSv4_tab-all-article-bottom_(300×250)”, [300, 250], “pb-ad-78623” ).addService( googletag.pubads() ) ); } );

googletag.cmd.push(function() {
mobile_slots.push( googletag.defineSlot( “/1005424/_dPSv4_mob-all-article-bottom_(300×250)”, [300, 250], “pb-ad-78158” ).addService( googletag.pubads() ) ); } );

The post 5 Ways to Create Dramatic Landscape Photos at Midday by Chris Corradino appeared first on Digital Photography School.


Digital Photography School

 
Comments Off on 5 Ways to Create Dramatic Landscape Photos at Midday

Posted in Photography


Portrait Photography: How to Photograph People in the Harsh Midday Sun

13 Aug

By: Oded Wagenstein

Great tips and tricks on overcoming the harsh mid-day sun to create beautiful portraits on either side of the “golden hours”

The Golden Time

The best time to take almost any kind of  picture, is in the “golden hours”: around one hour before sun down and one hour after sunrise, because that’s when the light is at its softest, lacking hard shadows, rich in colors, bathing your subject in even light, which entering from the side and that gives your subjects face definition.
-Uzbekistan-  Canon EFS 17-55mm f/2.8  Fstop of 3.5, shutter speed@10 ISO 160

-Uzbekistan-
Canon EFS 17-55mm f/2.8
Fstop of 3.5, shutter speed@10 ISO 160

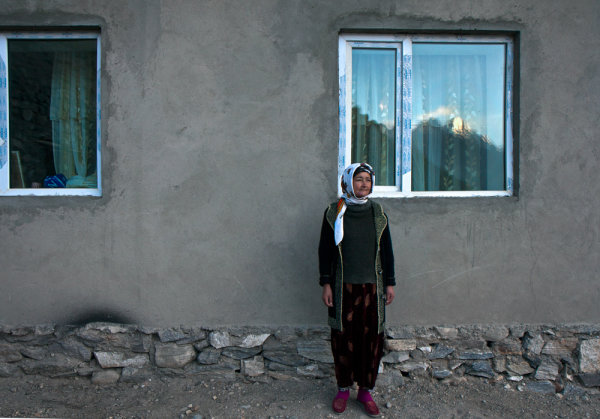
-Tajikistan- Canon EFS 17-55mm f/2.8 Fstop of 5.6, shutter speed@15, ISO 200.

-Tajikistan-
Canon EFS 17-55mm f/2.8
Fstop of 5.6, shutter speed@15, ISO 200.

-China - Canon EFS 17-55mm f/2.8 Fstop of 2.8, shutter speed@10 and ISO 400 Natural light (sunrise) entering the frame from the right

-China –
Canon EFS 17-55mm f/2.8
Fstop of 2.8, shutter speed@10 and ISO 400
Natural light (sunrise) entering the frame from the right

-Tajikistan- Canon EFS 17-55mm f/2.8 Fstop of 5.6, shutter speed@10 and ISO 100 Natural light (sunrise) reflecting from the mountains, which are about 45 degrees to the woman (you can see it in the window).

-Tajikistan-
Canon EFS 17-55mm f/2.8
Fstop of 5.6, shutter speed@10 and ISO 100
Natural light (sunrise) reflecting from the mountains, which are about 45 degrees to the woman (you can see it in the window).

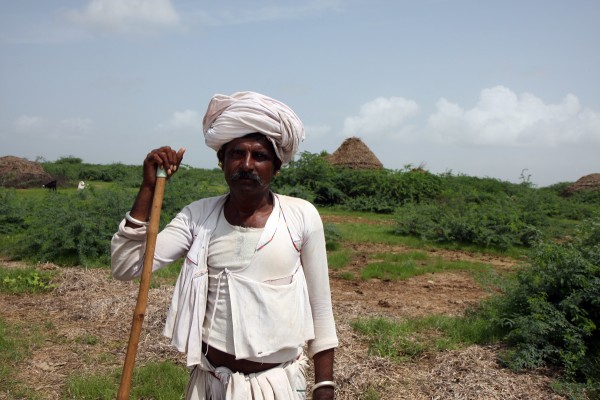
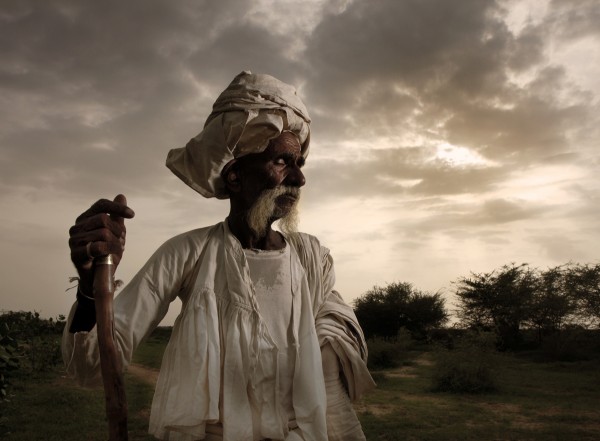
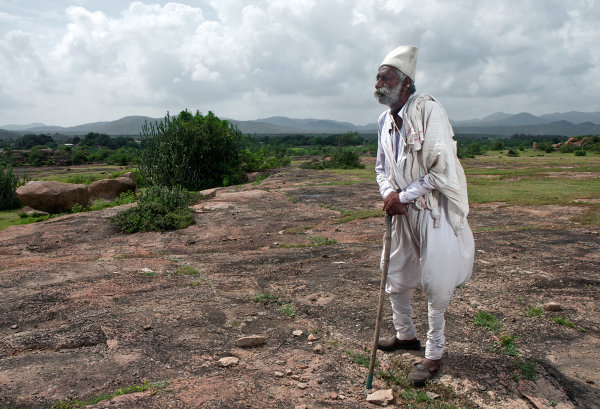
Once this time (golden time) has passed, we are left with harsh, unflattering light that is low in saturation and makes the images look dull and flat as you can see in this photo:

-India- Canon EFS 17-55mm f/2.8 Fstop of 8, shutter speed@10 and ISO 100 The harsh mid-day sun is just above him.

-India-
Canon EFS 17-55mm f/2.8
Fstop of 8, shutter speed@10 and ISO 100
The harsh mid-day sun is just above him.

The Problem

In order to provide solutions, first let’s understand the “problem”: Your camera doesn’t see as well as your eyes.  The “problem” is the camera’s dynamic range.  In plain English, the dynamic range is the distance between the brightest and darkest points in the frame.  Let’s say you take a shot of a man wearing a hat in the middle of the day, when the sun is at its highest and harshest. Your eyes will be able to make out his eyes even under the shadow of his hat, as well as his chin in the strong daylight. That’s because your eyes have the ability to see a large dynamic range.

Your camera however has a far more limited ability to see the dynamic range .If you we go back to our man in the hat, your camera will see his eyes, which are in shadow under his hat as black, while his chin which is in strong sunlight will be blown out and very white.

You might try to “fix it” by changing your aperture/shutter or ISO parameters but, this would only make your image lighter or darker as these actions have no bearing on the dynamic range. Even if we try to use an ND filter, again, this would only make your image darker and would not solve the problem or alter the range.

The Solutions

Move to the shade
Try moving the subject to the shade, or perhaps indoors. When I asked Steve McCurry, the creator of the “Afghan Girl” image, how he works in the mid day sun, he told me that he prefers to work indoors with the harsh light coming in through a window so that it turns to soft even light, and that’s really change my way of “seeing” the harsh light as an opportunity of creating great images by moving to the shade or indoors.

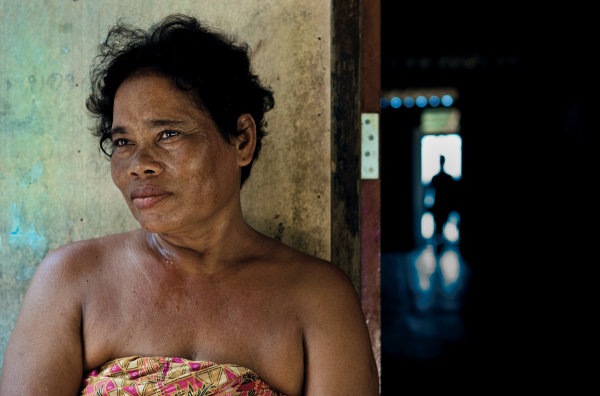
-Thailand- Canon EF 24-70 mm f/2.8L Fstop of 3.5, shutter speed@10 and ISO 160 This woman is sitting in the shade with strong light coming from the street (to her left). A small piece of paper was held above her head to block the light (flag).

-Thailand-
Canon EF 24-70 mm f/2.8L
Fstop of 3.5, shutter speed@10 and ISO 160
This woman is sitting in the shade with strong light coming from the street (to her left). A small piece of paper was held above her head to block the light (flag).

Try turning your subject 45 degrees to the light source (exp: window) by doing so you will be able to create a nice 3D effect.

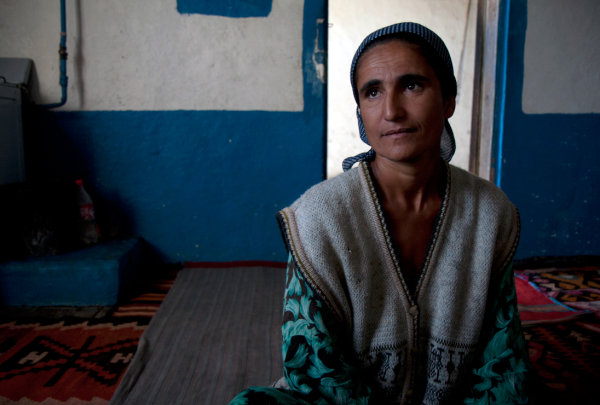
-Uzbekistan- Canon EFS 17-55mm f/2.8 Fstop of 2.8, shutter speed@10 and ISO 500 Natural light (only) coming from the window on the left side of the frame (about 45 degrees)

-Uzbekistan-
Canon EFS 17-55mm f/2.8
Fstop of 2.8, shutter speed@10 and ISO 500
Natural light (only) coming from the window on the left side of the frame (about 45 degrees)

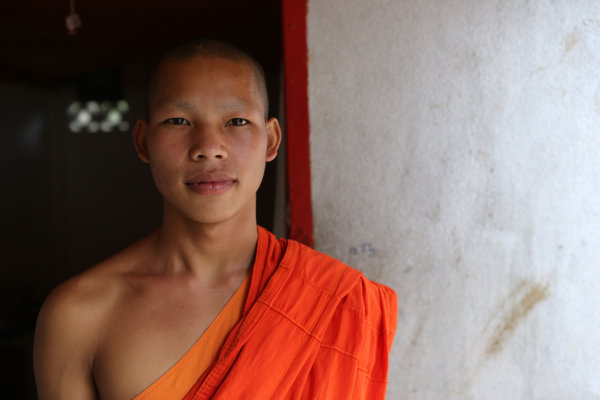
-Laos- Canon EF 24-70 mm f/2.8L Fstop of 3.5, shutter speed@100 and ISO 1000 I used the soft light coming through a red robe which was on the right side of the frame, in order to "sculpture" the light on his face. It also gave the whole image some sort of orange glow.

-Laos-
Canon EF 24-70 mm f/2.8L
Fstop of 3.5, shutter speed@100 and ISO 1000
I used the soft light coming through a red robe which was on the right side of the frame, in order to “sculpture” the light on his face. It also gave the whole image some sort of orange glow.

Create a Silhouette

Expose your image from the background, so your subject becomes a silhouette in some cases it makes for a wonderful image.

You can do so by using the manual exposure (M mode) or by changing the metering mode to spot and measure from the background.

-Thailand- Canon EF 24-70 mm f/2.8L Fstop of 5, shutter speed@10 and ISO 100 (on spot metering) Natural light only

-Thailand-
Canon EF 24-70 mm f/2.8L
Fstop of 5, shutter speed@10 and ISO 100 (on spot metering)
Natural light only

Burn it Down

Burning the background is not always a bad thing. On the contrary it creates a unique portrait that’s different and interesting

-India- Assistant: Hardik Pandya Canon EFS 17-55mm f/2.8 Fstop of 4.5, shutter speed@10 and ISO 200 Natural light only

-India-
Assistant: Hardik Pandya
Canon EFS 17-55mm f/2.8
Fstop of 4.5, shutter speed@10 and ISO 200
Natural light only

Reflector

By using a reflector, you can minimize the light range by bouncing light back onto your subject, which will add light to the dark areas. Like this image below.  I used a small folding reflector, which I held in my hand while taking the photo.

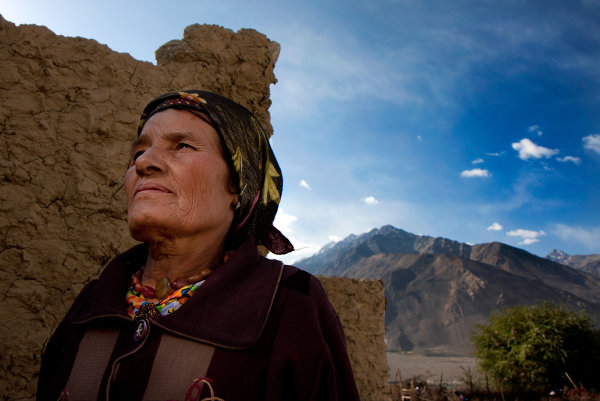
-Tajikistan- Canon EFS 17-55mm f/2.8 Fstop of 8, shutter speed@10and ISO 100 Natural light+ Reflector (gold color) I held in my hand on the lower left side of the frame + warm natural light bouncing off the mud wall

-Tajikistan-
Canon EFS 17-55mm f/2.8
Fstop of 8, shutter speed@10and ISO 100
Natural light+ Reflector (gold color) I held in my hand on the lower left side of the frame + warm natural light bouncing off the mud wall

-India- Assistant: Hardik Pandya Canon EFS 17-55mm f/2.8 Fstop of 2.8, shutter speed@10 and ISO 100 This nice lady was sitting in the shade of her house + silver color reflector, coming from the right upper side of the frame.

-India-
Assistant: Hardik Pandya
Canon EFS 17-55mm f/2.8
Fstop of 2.8, shutter speed@10 and ISO 100
This nice lady was sitting in the shade of her house + silver color reflector, coming from the right upper side of the frame.

External Flash

Like the reflector, the flash will add more light to the dark areas in turn creating a smaller dynamic range.

-India- Canon EFS 17-55mm f/2.8 Assistant: Hardik Pandya Fstop of 9, shutter speed@10 and ISO 100 Natural light of the background sky + fill light flash (off camera and inside a small soft box) coming from the right side of the frame, about 1 meter in front of the man's face.

-India-
Canon EFS 17-55mm f/2.8
Assistant: Hardik Pandya
Fstop of 9, shutter speed@10 and ISO 100
Natural light of the background sky + fill light flash (off camera and inside a small soft box) coming from the right side of the frame, about 1 meter in front of the man’s face.

HDR

Taking 3 (or more) exposures of your subject and using this technique in post processing could come in very handy.

-India- Canon EFS 17-55mm f/2.8 Assistant: Hardik Pandya Fstop of 11, shutter speed@10 and ISO 100 Natural light of the background sky + fill light flash (off camera and inside a small soft box, coming from the left side of the frame) + HDR effect in Photoshop.

-India-
Canon EFS 17-55mm f/2.8
Assistant: Hardik Pandya
Fstop of 11, shutter speed@10 and ISO 100
Natural light of the background sky + fill light flash (off camera and inside a small soft box, coming from the left side of the frame) + HDR effect in Photoshop.

I would like to thank Hardik Pandya and Linda Burnette for their help on making this article.

Do you have any interesting techniques or methods to overcome the harsh light? Please share in the comments.

Oded Wagenstein is a Travel photographer and writer. He is a regular contributor to the National Geographic Traveler magazine (Israeli Edition) and he is known for his intimate culture portraits. You can join his Portrait & Travel Photography blog and continue to discuss on travel and people photography and get more amazing tips!

Post originally from: Digital Photography Tips.

Check out our more Photography Tips at Photography Tips for Beginners, Portrait Photography Tips and Wedding Photography Tips.

Portrait Photography: How to Photograph People in the Harsh Midday Sun


Digital Photography School

 
Comments Off on Portrait Photography: How to Photograph People in the Harsh Midday Sun

Posted in Photography


Dog Days of Summer: Tips for Shooting in the Midday Sun

26 Jul

Extra photos for bloggers: 1, 2, 3

Whoever said “If you can’t take the heat, get out of the kitchen” probably wasn’t aware we would be making such a liberal interpretation of the saying.

Heat comes from sun. Summer sun is bright. Bright light is tricky to photograph.

It’s no secret that bright midday sun is one of the more challenging types of light to expose properly. We’re talking blown out highlights, harsh shadows, squinty subjects… oh my!

Don’t sweat it, friends. This guide will show you how to get the best shots in the midday sun.

We can wrangle those top-down rays with quick easy fixes to soften harsh light, resolving your bright light issues before you even have time to hashtag them.

How else are you going to document that tan you’ve been working on all summer?

Pro Tips for Midday Shooting 

p.s. We’re hiring for an amazing opening at Photojojo. We’re looking to re-invent what/how/where we publish online, and we’re seeking one amazing somebody to lead the charge. Learn more and apply for our Editorial & Community Lead.

p.p.s. Tell friends!

Why It’s Cool

Summer is a great season for shutterbugs… between the golden mornings and evenings we’ve got, like, 2 extra hours of daylight to bask and snap in. And nothing says summer like bright, colorful, high-contrast photos! So why are you spending this extra shooting time inside?

Light is everything to photographers, so take the camera outside and stop actin’ like it’s not. It’s always high noon somewhere, so you might as well turn down those ISO settings and learn how to beat the heat.

Use these tips and tools to improve your lighting skills by shaping, bouncing, blocking, and even adding it back afterwards. You’ll perfect your sharp shootin’ so you can keep exposing when bright light is unavoidable, anytime of year.

Ingredients:

  • Any kind of camera
  • Lens filters – polarized, neutral density (ND), or your own DIY
  • Fill light – a reflector, foam board, or flash
  • Shade
  • Photo editing software or app
  • A friend or model

SLAP A FILTER ON IT

before

Think of lens filters like a sweet pair of shades for your camera. They come in all shapes and sizes (including phone sized), so no man or machine will be left squinting in the sun.

Generally – exposing for bright daylight requires some combination of small aperture setting and high shutter speed. Your camera’s sunnies… or, er… filters are one of the easiest ways to reduce the amount of light entering the lens and re-gain creative control in harsh lighting conditions.

Yep. That means shallow depth of field and slow shutter speeds are no longer out of the question! Since they’ll reduce your exposure by a few stops – neutral density (ND), polarized, or DIY filters will be your best bets for softening a case of the midday brights.

Need a FILTER hack? Try using your own sunglasses as a filter on your phone, point & shoot, or DSLR (depending on the size of your lens). Play with the composition a little and use your glasses as a frame within your photos.

ARE YOU FILL-IN’ THE HEAT YET?

before

There are two great ways to fill in and break up harsh shadows caused by overhead light: Bouncing light and flashing it.

Yeah… we said “flash”.  Sure, the concept of fighting light with more light may sound like an idea from another galaxy, but it’s actually necessary to get the right exposure on a backlit subject. Oh, and diffusing said flash will help to produce a more flattering end result!

Similarly, a reflector or white foam board will bounce the light, filling in shadows caused by an overhead light source (like that giant one we call “the sun”.) Pretty much any flat, white object can bounce light. You could even use a pocket-sized version in your phoneography.

Need a FILL hack? Look down! Lightly colored surfaces (like sand or concrete) will bounce a nice glow on your subjects. Scout out a spot near one of these bright patches when you’re lacking the extra arms to hold a reflector in place.

SHADY BUSINESS

before

When you’re getting scorched or just plain fed up, scour the area for a patch of shade. It can be manmade or au naturale, just watch out for spotty light! Buildings and trees are a good place to start your quest.

When there’s no shade to be sought, there are a couple easy ways to create your own. Keep an umbrella or a sheet on hand for such occasions. Not only will you soften that pesky light, you may even earn yourself a cool nickname like “MacGyver of the Shadows”.

Once your shade is in check, position your subject in front of an equally shaded background (near the edge of the shadow they’re under). Now when you shoot you’re getting the best of the shade AND the light. Like a boss.

Need a SHADE hack? Try using a bed sheet as a scrim. Throw it over something tall and place your subject beneath it. Or have a photoshoot while your beach towel is hanging out to dry!

EDITABLE INSURANCE

beforeKinda like a bad sunburn – there’s not much you can do after the fact to fix it an overexposed picture. No… not even with aloe vera.

It’s much easier to recover underexposed areas of a picture using photo editing software. That’s like photography SPF, dude.

To underexpose photos on your phone, tap the screen to focus on a bright area of your shot before hitting the shutter. Snapseed and VSCOcam are great apps that will help you edit your photo. You can change your exposure, adjust fill, and fix your photo’s highlights all from the comfort of your palm.

When shooting from your camera, play it safe by bracketing for exposure, underexposing back-lit subjects, and shooting RAW.

Two great ways editing software can help recover a photo taken in tricky bright light are:

1) Adjusting the levels to take back the shadows in the foreground of your photo, and

2) Using layers and masking tools to combine 2 images of a correctly exposed foreground (with an overexposed background), and vice versa.

Taking It Further

  • When you salvage important details (like eyes), deliberate overexposure can give your photos a surreal, dreamy look.
  • When your background is interesting and noteworthy, silhouettes are a great way to add drama and tell a story.
  • Some filters can reduce your exposure enough stops to create a really long exposures… wait for it… in the DAYTIME. Check it these out and give it a go!

Jenny Sathngam is a tutorial writer/photographer for Photojojo. She is based in Austin, TX – where cloudless, triple-digit summers last most of the year and shooting in the midday sun is more practice than theory. (Model: Sanetra Stewart)

Related posts:

  1. Pro-Tips for Shooting Better Instagram Videos Extra vids for bloggers: 1, 2, 3 “Well that’s weird,”…
  2. Summer Guide: Keep in Touch with Friends via Photo Apps! Extra photos for bloggers: 1, 2, 3 Prom, graduation, senior…
  3. Halloween Photo Tips — Our Ghoulish Guide to Scary Snaps How can you not love a holiday that encourages you…


Photojojo

 
Comments Off on Dog Days of Summer: Tips for Shooting in the Midday Sun

Posted in Equipment


Gary Fong Powersnoot Midday Sun Darling Harbour, Sydney Australia

01 Dec

Gary Fong demonstrates how to use an off-camera flash setup dramatic lighting effects outdoor in midday sun.. On camera is an SB900 being utilized as a flash trigger only (in Master mode). Flash two is a Nikon SB700 with a Gary Fong Powersnoot. It is on half power and on a light stand with a pivoting head (this can also be held easily by an assistant). The camera is a Nikon D3S shot on Manual mode, and the settings are clearly presented. www.garyfongestore.com

 
Comments Off on Gary Fong Powersnoot Midday Sun Darling Harbour, Sydney Australia

Posted in Nikon Videos


Photography Tutorial: Photographing Mid-Day (landscape photography)

03 Aug

SSe my photos at www.momentsofnaturephotography.com This video is about the types of shots I take and the techniques I use during mid-day photography shoots. This video was filmed out in the field. I used a Nikon d3x in the video, a nikon d300 and nikon 12-24mm lens were used to get some of the shots in the video.
Video Rating: 4 / 5