RSS
 

Posts Tagged ‘Method’

Kickstarter: Compact Reveni Labs Spot Meter uses unique two-eye aiming method

08 Feb

While digital photography is popular, film photography still has a dedicated following and beginner film photographers are popping up regularly. New products for analog photographers are popping up regularly to meet experienced and novice film photographers’ needs. Reveni Labs has launched a new Kickstarter campaign, which was funded within two hours, to deliver an extremely compact spot meter to film photographers.

A spot meter is a light meter designed to precisely measure only a small portion of the image area. Photographers can use a spot meter to check metering in different areas of the frame, especially one with a wide range of brightness, and make an informed decision about the exposure.

The Reveni Labs Spot Meter being used by creator Matt Bechberger. An electronics engineer, inventor and self-professed film camera nerd, Bechberger started Reveni Labs in March 2020 when launching the Reveni Labs Light Meter on Kickstarter. A few months later, he quit his job to run Reveni Labs full time.

Vintage spot meters can be challenging to find, and new spot meters can be expensive. Reveni Labs hopes to ‘find the middle ground with its spot meter to provide a spot meter that meets the needs of modern film camera users, with a lower price point and relevant feature set.’ To Reveni Labs, there are three major issues with the currently-available spot meters: They’re large and heavy, they’re complex, and they are expensive.

To help solve these issues, the Reveni Labs Spot Meter is very small and lightweight. It weighs 1.25 oz. (about 35g). The Spot Meter is 2.8″ (71mm) long, 1.2″ (30.5mm) wide, and 1.5″ (38mm) in height.

The Reveni Labs Spot Meter is also designed to be easy to use. It has a two-eye aiming method, features simple controls and an easy-to-use menu, and offers straightforward modes, including aperture or shutter priority modes. Further, the Spot Meter includes a bright internal OLED display.

The external design (left) of the Reveni Labs Spot Meter. On the right, you can see the internal display. Image credit: Reveni Labs on Kickstarter

The Spot Meter has a shutter speed range of 1 hour to 1/8,000s in one-stop increments. The aperture range is F0.7 to F1024, also in one-stop increments. The ISO range is 1-12,800. Reveni Labs states that the EV range is 2-20 in 0.1EV increments (at ISO 100). The spot meter is about a 1.5° (6″/15cm) circle at 20′ (6m).

On the top of the Reveni Labs Spot Meter are four buttons: right and left directional buttons, a menu/compare button, and the power/sample button. Beneath the sensing lens on the front of the spot meter is the battery compartment, which holds a pair of LR44 alkaline batteries to power the device. Through the viewing lens at the back, you see the OLED display, which shows shutter speed, current state, EV value, ISO, rounding remainder, aperture, and driving value arrow surrounding the central aiming reticle.

Reveni Labs Spot Meter optical design. Image credit: Reveni Labs on Kickstarter

The Reveni Labs Spot Meter utilizes a two-eye aiming method. One eye views the data in the spot meter while the other eye surveys the subject area. There is a close-focus rear lens in front of the OLED display inside the meter to allow the user to focus on the scene and display simultaneously. The internal components are aligned on a central axis.

This design is significantly different from a more typical spot meter. A traditional spot meter uses a viewing lens and requires the user to view the scene solely through the spot meter, closing their second eye. The Reveni Labs Spot Meter doesn’t have a viewing lens; the inside is just a dark screen, which is why it’s a binocular vision spot meter and why it’s possible for it to be so compact. You can see how the Reveni Labs Spot Meter varies from a typical spot meter in the hands-on video below, published by Mat Marrash.

You can see another review of the device from Todd Korol in his video below.

The Reveni Labs Spot Meter looks like an exciting product for film photographers. If you would like to back the project, you can do so for $ 225 CAD, which is a little under $ 180 USD at current currency conversion rates. The Reveni Labs Spot Meter comes with the meter, a neck lanyard, storage pouch and four LR44 batteries. Shipping is expected to commence in August. For more information and to back the project, visit Kickstarter.


Disclaimer: Remember to do your research with any crowdfunding project. DPReview does its best to share only the projects that look legitimate and come from reliable creators. Still, as with any crowdfunded campaign, there’s always the risk of the product or service never coming to fruition.

Articles: Digital Photography Review (dpreview.com)

 
Comments Off on Kickstarter: Compact Reveni Labs Spot Meter uses unique two-eye aiming method

Posted in Uncategorized


Fujifilm pulls controversial X100V promo video due to the featured photographer’s method

07 Feb

Days after it launched its new X100V compact digital camera, Fujifilm has pulled one of the promotional videos it published to showcase the new model. Some viewers have criticized the intrusive shooting style used by Tatsuo Suzuki, the photographer featured in this particular video. Others have praised his work, saying his habit of jumping directly in front of subjects is a legitimate part of his art.

Fuji’s promotional video includes several scenes of Suzuki has he captures images on the street, a process that, at times, involves stepping into someone’s path and putting his camera directly in their face. Some subjects are seen being forced to quickly sidestep to avoid the photographer; some look surprised or distressed about the encounter.

Though Fujifilm pulled the promotional video, FujiRumors managed to acquire and publish a copy of it. The action starts around the 0:45 mark.

Articles: Digital Photography Review (dpreview.com)

 
Comments Off on Fujifilm pulls controversial X100V promo video due to the featured photographer’s method

Posted in Uncategorized


Researchers develop new anti-face-distortion method for wide-angle lenses

16 Jun

Ultra-wide-angle lenses are becoming increasingly popular on smartphones in both rear and front cameras. Especially the latter are frequently used for portraiture in the shape of selfie images of both single subjects and groups.

Unfortunately when capturing people pictures with a wide-angle lens a problem becomes apparent: faces that are located close to the edges of the frame are distorted, showing signs of unnatural stretching, squishing, and/or skewing, an effect that is also known as anamorphosis.

A group of researchers at Google and MIT led by YiChang Shih has now found an efficient way of dealing with the issue. In their paper titled “Distortion-Free Wide-Angle Portraits on Camera Phones,” they describe an algorithm that is capable of correcting the effect, making for more natural selfies and wide-angle portraits.

Previous solutions were capable of correcting distortion on faces but in turn introduced other artifacts to the background and other elements of the image. The new method works around this by creating a content-aware warping mesh and applying corrections only to the part of the frame where faces are detected and maintaining smooth transitions between faces and the rest of the image.

The researchers say good results were achieved on photos with a wide field-of-view ranging from 70° to 120° and the algorithm is fast enough to work “at an interactive rate”. More information is available on the project website.

Articles: Digital Photography Review (dpreview.com)

 
Comments Off on Researchers develop new anti-face-distortion method for wide-angle lenses

Posted in Uncategorized


Researchers develop method for revealing images on degraded daguerreotypes

28 Jun

Researchers at Western University in Canada have developed a method for restoring damaged daguerreotypes, including plates so degraded that no portion of the original image remains discernible to the eye. The method, the university explains, involves using rapid-scanning micro-X-ray fluorescence imaging to analyze the silver-coated plate and identify the mercury element used to develop it.

“Mercury is the major element that contributes to the imagery captured in these photographs. Even though the surface is tarnished, those image particles remain intact,” explained study co-author Tsun-Kong (TK) Sham. “By looking at the mercury, we can retrieve the image in great detail.”

Whereas a human hair is around 75 microns thick, the X-ray beam used in this method is as small as 10 x 10 microns, resulting in about 8 hours of scanning time per daguerreotype plate. This method can be used by art conservators to reveal a daguerreotype’s image when cleaning the degraded plate is not possible.

Via: TechCrunch

Articles: Digital Photography Review (dpreview.com)

 
Comments Off on Researchers develop method for revealing images on degraded daguerreotypes

Posted in Uncategorized


Quick and Dirty Method of Using the Photoshop Spot Healing Brush Tool

21 Jul

Let’s say you use Lightroom and you’ve tried and tried to get rid of those distracting spots using Lightroom’s Spot Removal Tool but no matter how you set it – using Clone or Heal or changing the Opacity or increasing the Feather – you have a giant, obvious repair on your image. Not good!

Photoshop Spot Healing Brush Tool - wild horses

This is my final, processed image but I had to dive into Photoshop to get there.

You’re a good photographer

For kicks, let’s agree that in addition to knowing your way around Lightroom, you’re a skilled photographer. You also subscribe to Adobe CC, but honestly, you don’t use Photoshop much. Perhaps you’re even a little bit afraid of it. You loaded the software and update it whenever Adobe tells you to but other than the PS icon looking cool and professional in your dock, you don’t actually use it.

You just don’t use Photoshop

I mean, Layers, Masks, Blending? Ugh. I know. I do 90% of my work in Lightroom. No one has ever called me out on that so I keep on keepin’ on with Lightroom. I love Lightroom but – and it’s a great big but – LR’s Spot Removal Tool is no match for Photoshop’s Spot Healing Brush Tool.

Because I know this issue affects so many of us, I’m going to teach you the quick and dirty method for how to Spot Heal in Photoshop. No layers. No tricky stuff. Just easy, quick simple repairs for the problem areas in your images.

Practice as you read this

Grab an image that has a problem area that you can’t seem to fix in Lightroom and follow along with me. Practice is the best way to learn so repeat these steps a few times today. After you Spot Heal a few images in PS, it will naturally become part of your image processing tool kit.

Step #1 – Process the image in Lightroom

In Lightroom, process your image as normal. Here’s my RAW  image before I’ve made any adjustments.

Photoshop Spot Healing Brush Tool - raw image

Canon 7D Mark II, 70-200 plus 1.4x @ 280mm, f/6/3, 1/1600, ISO 400.

Below is a screenshot of all the adjustments I’ve made on my image. I started with a pretty aggressive crop. You can see the White Balance and Basic adjustments but I also dropped in several Radial Filters to add clarity and brightness to key elements like the horses’ eyes. However, I struggled to get rid of the flecks of mud around the black horse’s eye.

Photoshop Spot Healing Brush Tool - Lightroom adjustments

Step #2 – Edit in > Photoshop

Right-click on your image. Select Edit in Adobe Photoshop CC.

Photoshop Spot Healing Brush Tool - Edit in Photoshop

It is very important that you don’t skip this step. Do not open your image directly in Photoshop. For the down and dirty method to be most effective, you must start this process in Lightroom.

NOTE: If you haven’t updated to PS CC 2017 or if you use an older version of PS, you might need to modify these steps. Instead of Edit in Adobe Photoshop CC 2017, you might see Edit a Copy in PS.

Step #3 – Select the Spot Healing Brush

It takes a minute, but eventually, your image will appear in the Photoshop window. Here’s the image I’m working on. Check and make sure your screen looks pretty similar to mine.

Photoshop Spot Healing Brush Tool - PS interface

Click on the Spot Healing Brush Tool. It looks like a band-aid except that it has a little semi-circle handle over it.

Photoshop Spot Healing Brush Tool - band-aid icon

If you can’t find this tool, count seven icons down on the tools pallet and right-click on that. Once you right-click, you should see the rest of the tools. Hover your cursor over the band-aid icon that says Spot Healing Brush Tool. Click to select it. It will now show as the active tool.

Step #4 – Setup the Spot Healing Brush

Review the settings for the tool bar that runs across the top of your Photoshop window.

Photoshop Spot Healing Brush Tool - mode and type

If your Spot Healing Brush Tool doesn’t default to these settings, change them to:

  • Mode = Normal
  • Type = Content Aware

Step #5 – Zoom in

Zoom in and increase the size of your image so you can see the problem area more clearly. Click the Command/Alt key and the + (plus) key simultaneously. Click again to zoom in more. If you’ve zoomed in too far, click the Command/Alt Key and the – (minus) key simultaneously to zoom back out. Grab the drag bars on the bottom and right side of the image to reposition the problem area so that it’s in the middle of the screen and easy to see and repair.

Photoshop Spot Healing Brush Tool - zoom in

Zoomed into 200%, I can see the problem area clearly.

Step #6 – Size the Brush Tool

Hover the Spot Healing Brush Tool over the problem area. You may need to change the size of the brush. The easiest way to do that is to use the square bracket keys on your keyboard.

  • Click the Left Bracket Key [ to decrease the size of the brush.
  • Click the Right Bracket Key ] to increase the size.

Notice that as you click on the bracket keys, the Size number in the bar that runs across the top of your image increases or decreases. (If you click on that number, you’ll get more tool options. Don’t worry about those for now.)

Photoshop Spot Healing Brush Tool - 20px brush

Using the Left Bracket Key, I adjusted my Spot Healing Brush Tool to 20 pixels and started making small repairs around the eye.

Step #7 – Brush over the bad area

After you’ve adjusted the size of your brush, start clicking on the area of your image that you want to repair. You can also drag the brush to make short strokes.

Photoshop is smart and should fill in the area with an appropriate selection but if it doesn’t, click Edit > Undo Spot Healing Brush in the top menu (or Cmd/Ctrl+Z will also undo). That will undo the last thing that you did.

If you want to undo multiple things, go to Edit and click Step Backward repeatedly till you’re at the last point that you liked. Step Backward does have limitations so work slowly and check your repair work often. Note: you can aslo open the History panel and go back to any previous step.

Photoshop Spot Healing Brush Tool - undo

Step #8 – Save

Evaluate your work. Do you like the repairs? If Yes, go to File > Save in the top menu. Photoshop defaults to saving images as a TIFF file. If it doesn’t, select the TIFF option if/when the menu pops up. This will also import the newly edited image into Lightroom.

Photoshop Spot Healing Brush Tool - save

If you don’t like the repairs you made, quit Photoshop without doing anything. Photoshop will ask if you want to save your work. Just say No. Go sip some coffee and try again another day when you’re fresh.

Step #9 – Head back to Lightroom

Almost done!

Go back to Lightroom. You’ll still be in the Develop Module with the original RAW image that you were working on still open. Press G for Grid which will take you to the Library Module. Check to make sure that next to your original RAW file is a new TIFF file. Select the two images and view them in Survey Mode so that you can look at them side by side (N on your keyboard).

If the two files don’t show up right next to each other in Lightroom resort your images by Capture Time (or file name), or drag and drop so that they do.

Photoshop Spot Healing Brush Tool - compare

Side by side of RAW file adjusted in LR (on the left) and TIFF with the addition of spot healing (on the right).

Wait, don’t you have to use layers in Photoshop?

That’s the down and dirty part. When you’re doing simple fixes like this, you don’t need to worry about layers. Why? Well, layers are excellent if you’re doing quite a few things to your image and you want to be able to turn different effects on and off. They’re also important so that you preserve your original image in a background layer (non-destructive editing).

But with this method, you still have your original RAW file. That’s why you want to start in Lightroom and then open your image from there into Photoshop. Lightroom sends a copy of your image to Photoshop. When you save your work in Photoshop in step #8, Photoshop generates a totally separate image file. That new TIFF file shows up in your Lightroom catalog next to your original RAW file.

NOTE: If you haven’t updated to PS CC 2017 or if you use an older version of PS, you might need to modify these steps. You might need to select “Edit a copy” and not “Edit Original.”

Photoshop Spot Healing Brush Tool - final image

This is a wild horse so I didn’t go too crazy fixing every little thing, but the distracting mud around the eye and on the neck is cleaned away nicely, don’t you think?

What if the down and dirty method doesn’t work?

This might not work for your image. Some repairs are finicky and this is definitely a hack method that won’t work for everything. My advice is to experiment. Remember the other tools that were grouped with the Spot Healing Brush Tool? Try one of those. Or, keep using the Spot Healing Brush Tool but change the Mode from Normal to Replace or even Multiply.

Remember when we clicked the Size number? Click that again and adjust the Hardness of the brush or the Roundness. Make only one change at a time and make notes on what each change does. If something works, click File, then Save and remember what you did. If nothing works, exit out of Photoshop without saving (and go have more coffee).

You can always experiment again another day because you still have your RAW image. It’s cataloged in Lightroom right next to the TIFF file. As long as you always start in Lightroom, you’ll be able to try again later.

Photoshop Spot Healing Brush Tool - Essaouira cafe

In this image of an outdoor seafood market in Essaouira, I experimented with a variety of tools to zip out the distracting bit of tree on the left, the construction equipment and the light posts. The RAW image, with Lightroom only adjustments, is on the left. The spot-healed TIFF is on the right.

Share with the dPS community: What hack or down and dirty methods do you use when you process your images?

The post Quick and Dirty Method of Using the Photoshop Spot Healing Brush Tool by Lara Joy Brynildssen appeared first on Digital Photography School.


Digital Photography School

 
Comments Off on Quick and Dirty Method of Using the Photoshop Spot Healing Brush Tool

Posted in Photography


Video: a grayscale method for matching colors in Photoshop

01 Jun

Adobe Senior Creative Director Russell Brown recently posted this neat demo showing a technique for matching colors in Photoshop without touching a hue or saturation slider. His method uses adjustments in grayscale to individual color channels, comparing a swatch of the color he’s attempting to change directly to the color he’s trying to match. See how he does it in the video above.

Articles: Digital Photography Review (dpreview.com)

 
Comments Off on Video: a grayscale method for matching colors in Photoshop

Posted in Uncategorized


Researchers create method for photorealistic Prisma-style effects

28 Mar

Popular app Prisma applies painting styles to photographs using neural networks, turning a snapshot into an artwork in the style of ‘The Scream,’ for example. But what if you could transfer photorealistic effects from one photo to another? Researchers at Cornell and Adobe have successfully demonstrated a method that will translate a variety of styles from a reference photo to another image, including things like lighting, time of day and weather.

Input image on the left, reference style image in the center, output image on the right. It’s not incredibly realistic-looking, but more realistic than your average Prisma treatment.

Images via Fujun Luan

This could open up a whole new world of possibilities for ‘lazy’ photo editing. Say you snapped a photo of a rock formation in the middle of the day, but you’d rather it had the orange glow of golden hour. With this method, you could apply the textures and colors of a reference style image, i.e. some other rock formation at sunset, to your own image.

This photo-style-transfer method augments the neural-style approach Prisma takes by constraining the colorspace of the transformation applied to the source image. Taking a content-aware approach and classifying features like sky and water in each image helps to avoid mismatched textures and distortions.

Advanced photographers would likely be wary of making such drastic edits to their photos. However, the technology might appeal to someone who wants to apply the effects of professional lighting to a badly lit photo of an interior, for example.

What do you think? Could this technology be useful to you? Let us know in the comments.

Articles: Digital Photography Review (dpreview.com)

 
Comments Off on Researchers create method for photorealistic Prisma-style effects

Posted in Uncategorized


Google and MIT team up on clever method to remove reflections and obstructions from photos

06 Aug

Researchers at MIT and Google have developed a technique for removing unwanted reflections and obstructions from photos. Taking advantage of the parallax effect, this method could prove quite useful in locations where shooting behind glass or a fence is the only option. Read more

Articles: Digital Photography Review (dpreview.com)

 
Comments Off on Google and MIT team up on clever method to remove reflections and obstructions from photos

Posted in Uncategorized


How to Shoot and Process a Time Lapse Movie – Quick Method

27 Jun

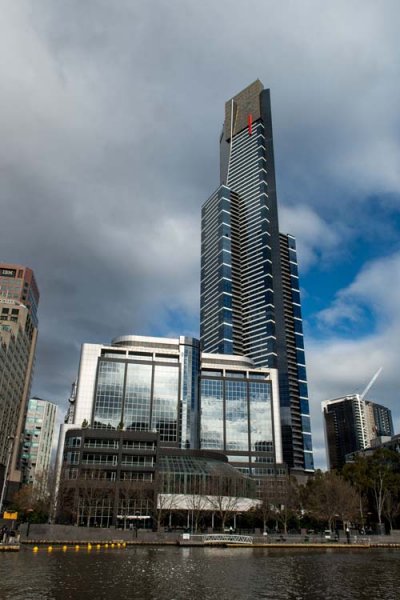
The other day I was in the city and I was watching the clouds because they were moving so fast. It was a sign that bad weather was on the way, but I also knew the clouds would be a good opportunity to try some time lapse photography.

Eureka Tower image for time lapse

There are many ways of taking a series of images to use for time lapse photography. My camera was setup on a tripod and set to take a photo every five seconds over 10 minutes. In total 120 images were taken, however that number is up to you. The other day I took 300 images to use for one.

You can do this in various ways and it is best to check your camera manual to see if you can take photos at intervals. If you can’t then you may have to use something like an intervalometer or just manually take a photo every five seconds or whatever interval you choose.

When I got home I did some research and found a fairly easy way of putting the images together to get a quick time lapse. Follow along a I show you how you can do this as well.

Lightroom

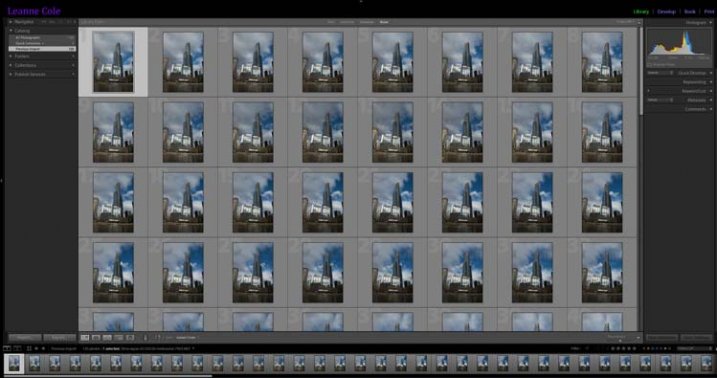
The 120 images were imported into Lightroom. If you are unsure of how to Import photos then look at this article: Quick Tip: Importing to Lightroom Made Easier.

The images for the time lapse in Lightroom

The images for the time lapse in Lightroom

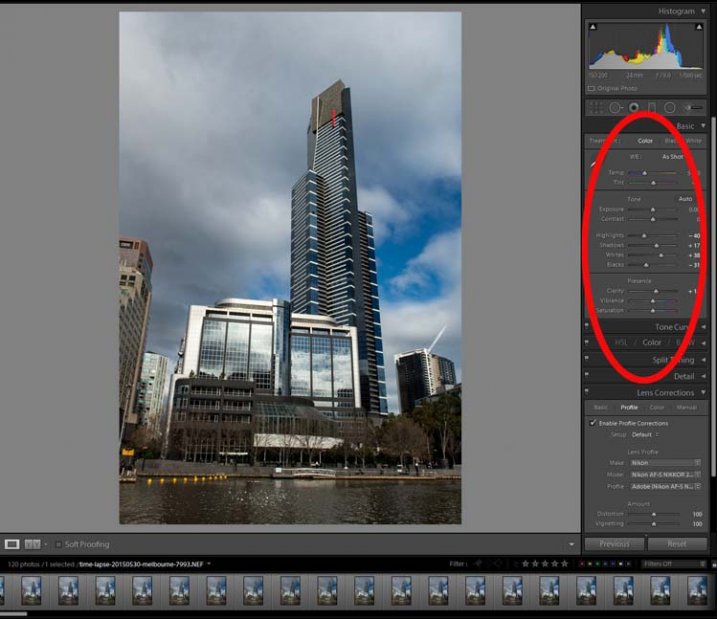
Choose the first image and you do some basic processing to it in the develop module. I straightened, then cropped, a bit of a building out of the side of it, brought out the shadows and highlights.

Processing done to the image.

Processing done to the first image.

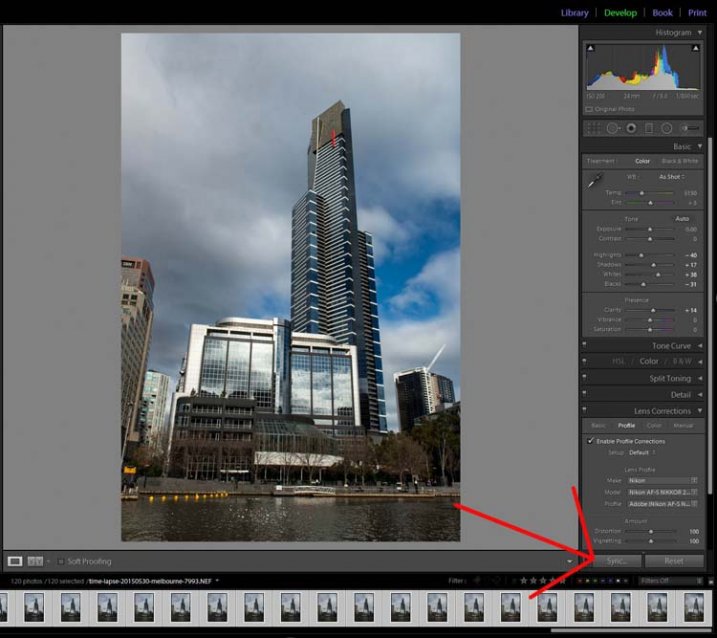
Select all images for the time lapse and click Sync, in the bottom right of the Develop module.

The Sync Button

The Sync Button

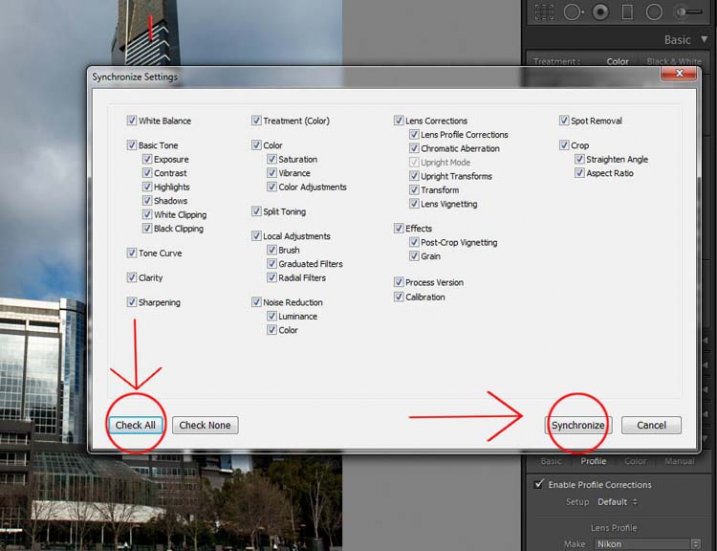
When the window to Synchronize Settings comes up, tick the box at the bottom to Check All. You want all the changes that you made to the first image to be applied to all of them. They are basically all the same image except for the changes that you want to use for the time lapse.

Press Synchronize in the bottom right of the window. You will see that all the images change and are now ready to be exported.

Synchronizing the images.

Synchronizing the images.

Exporting the Sequence

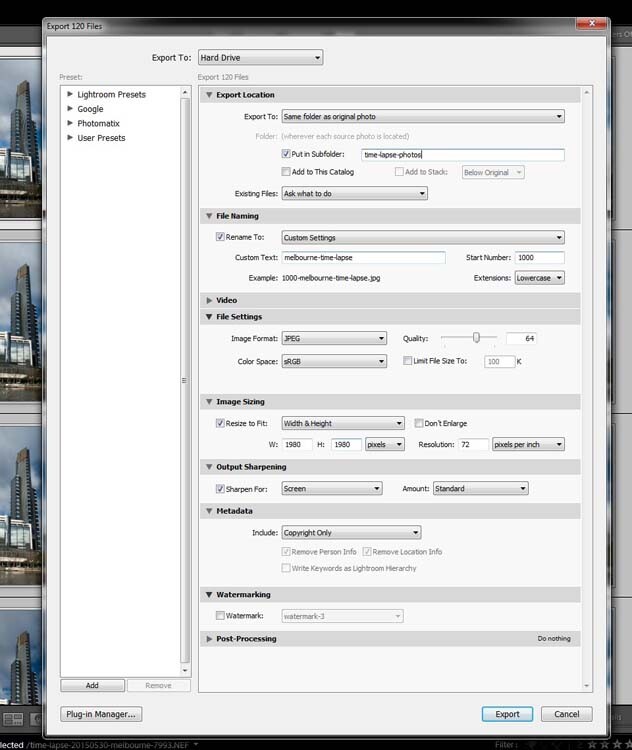
There are a few things to consider when you export them, one is the way you rename them. If the number or sequence isn’t at the front of the file name then there may be software problems to put them in the right sequence. It doesn’t make a difference with Photoshop CC.

The images should be changed to jpeg. It is only for the internet so you can use a low resolution, 72 dpi is okay. The size of the image was changed to 1980 pixels for the longest side, which is a good size for videos and for HD.

In the following image you can see which export settings I used for the Time Lapse sequence images.

Exporting the images.

Exporting the images.

Press Export. Then, to put the images together to make the time lapse you will need to move into Photoshop.

Photoshop CC

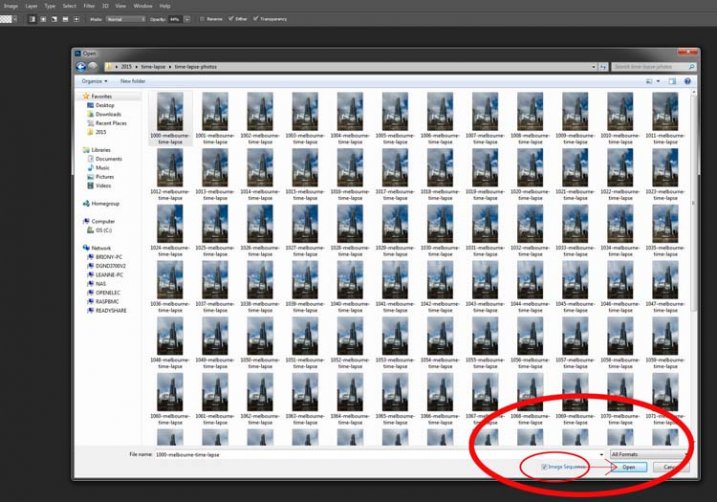
In Photoshop you need to go to File and Open. (File > Open) Go to the folder with the exported images and select the first one in the sequence. In the same window, before you press Open, make sure you check the box that says Image Sequence which is down near the bottom.

Getting the images ready for the time lapse.

Getting the images ready for the time lapse.

Once you have checked it, select Open.

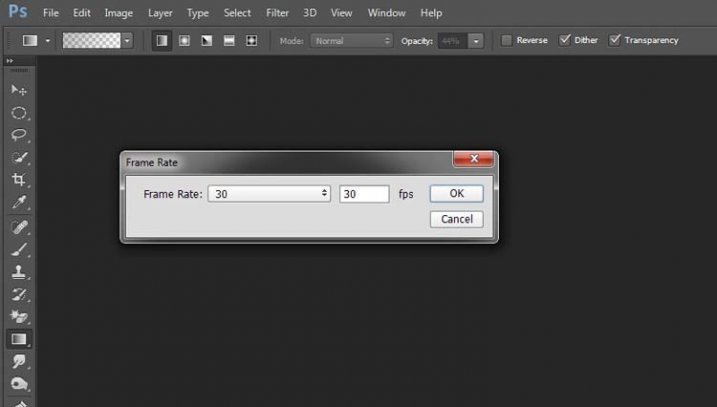
Before Photoshop opens them a new window will come up asking you how many frames per second you want to use.

Setting the frame rate.

Setting the frame rate.

At this stage you can just click OK; you will have a chance to change it later on if you want to make it slower or faster.

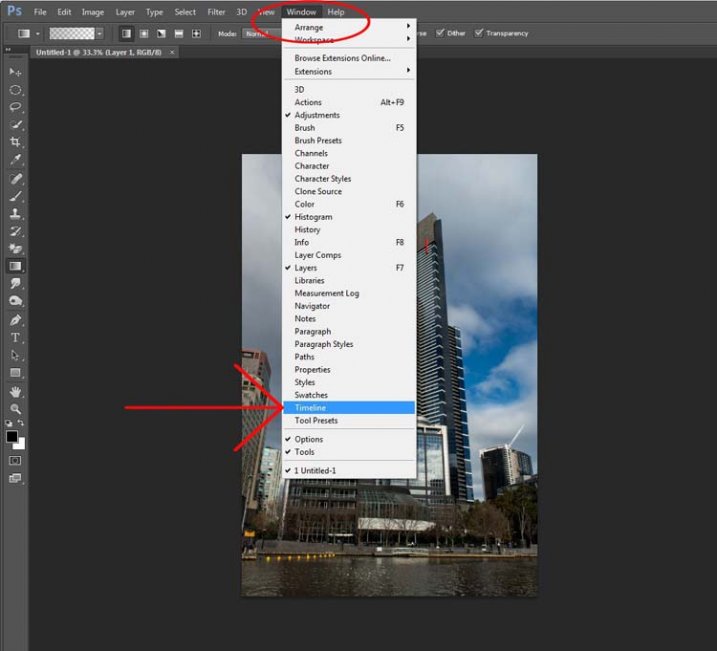
To make it a time lapse you need to open another window in the Photoshop main window. Go up to Window in the main menu at the top, and then down to Timeline and select it. (Window > Timeline)

Opening the Timeline.

Opening the Timeline.

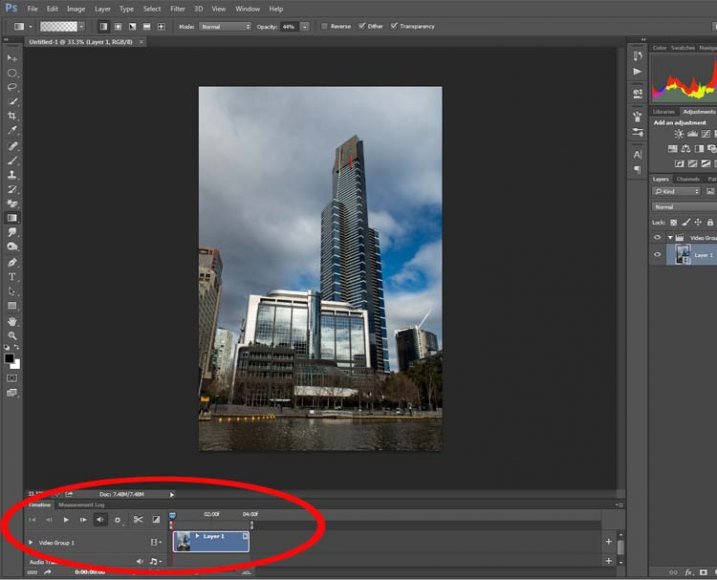
You will see a new window appear down the bottom. Look at the following image:

Looking at the Timeline.

Looking at the Timeline.

If you press the play button you will see your time lapse run.

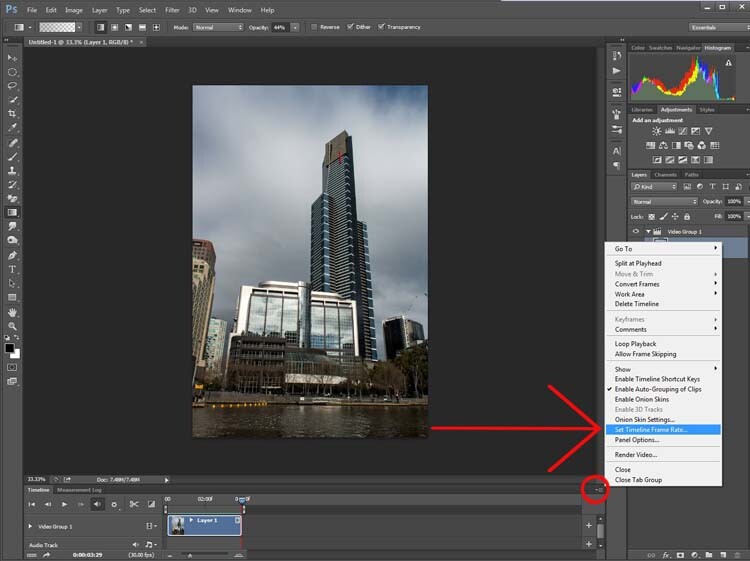
If you want to change the Frame Rate this is the time to do it. In the Timeline Window, up in the top right corner, you should be able to see a down arrow with lines next to it, click on that and a drop-down menu will appear. Go down and select Select Timeline Frame Rate…

Changing the frame rate.

Changing the frame rate.

You can change this as many times as you like. Keep doing it until you get a frame rate you like. Once you are happy with how long it runs for, you can render the video.

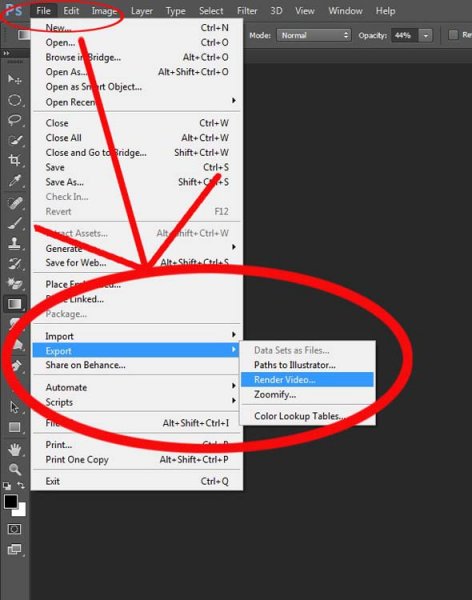
Go up to File, then select Export. In the drop down menu choose Render Video. (File > Export > Render Video)

Exporting the video.

Exporting the video.

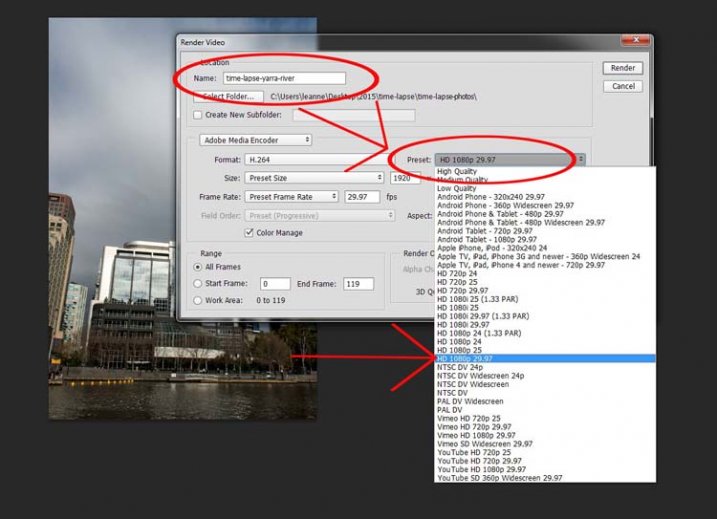
After initializing, the Render Video window will come up. In this Window you can name your video and decide in what format you want it saved.

Working out the video type.

Working out the video type.

Set it on one of the HD settings and you will get an MP4 video. It gives you quite a good video.

If you decide you really like doing them there are lots of other methods, this is just a quick way to do time lapse movies using Lightroom and Photoshop CC.

googletag.cmd.push(function() {
tablet_slots.push( googletag.defineSlot( “/1005424/_dPSv4_tab-all-article-bottom_(300×250)”, [300, 250], “pb-ad-78623” ).addService( googletag.pubads() ) ); } );

googletag.cmd.push(function() {
mobile_slots.push( googletag.defineSlot( “/1005424/_dPSv4_mob-all-article-bottom_(300×250)”, [300, 250], “pb-ad-78158” ).addService( googletag.pubads() ) ); } );

The post How to Shoot and Process a Time Lapse Movie – Quick Method by Leanne Cole appeared first on Digital Photography School.


Digital Photography School

 
Comments Off on How to Shoot and Process a Time Lapse Movie – Quick Method

Posted in Photography


5 Steps to Rock the Brenizer Method

07 Jun

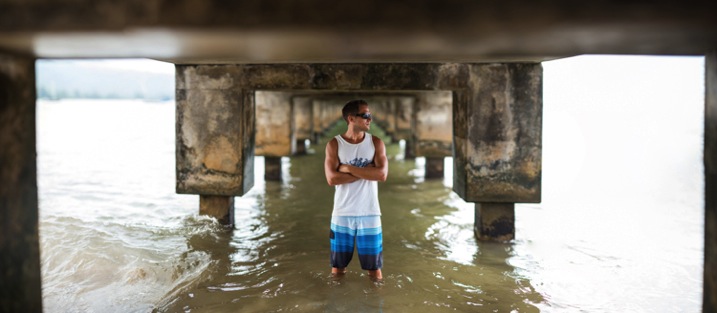
Pier brenizer

What is the Brenizer Method?

The Brenizer Method is named after wedding photographer, Ryan Brenizer. He didn’t invent the method but instead made it popular by using it with his wedding clients, and teaching others how to do it as well. For those who have been around photography for a while, you will recognize the process. Photographers have been stitching images together to create panoramas for decades. However, Photoshop and similar software have now made this method extremely simple for you.

Advantages of using the Brenizer Method

Creating an image using the Brenizer method takes more time than just capturing a single image, but the results are well worth it. When using this method, you will create an image with:

  • Very high resolution
  • Very shallow depth of field (it equates to using a lens that has an f-stop less than 1)
  • Great bokeh
Mermaid brenizer

This image was created using 32 different shots and merged together in Photoshop to give it an extremely shallow depth of field.

PREPARING FOR THE SHOT

Once you’ve decided you want to try the Brenizer Method, you will need to decide where and what to photograph. Look for layers that will be interesting with a shallow depth of field. If you are shooting a subject, make sure the subject chooses a comfortable pose they can hold for up to 30 seconds.

Step 1 – Prepare Your Settings

Aperture – Shoot as wide as your aperture will allow. For some lenses that might be f/1.2 for others it may be f/3.5, and for the rest, it will probably be somewhere in between. The wider you can go, the more amazing effect you will achieve.

White Balance – You will want to choose any white balance other than auto. As you position your camera, auto white balance might change the color temperature as you move from shade to a brighter area or vice versa. Manually setting the Kelvin temperature is my preferred method. If you aren’t familiar with manipulating your white balance, here’s a great article to help you learn.

Focal Length – As you take these shots, you want your focal length to stay exactly the same. Shooting with a prime lens makes this easy, otherwise make sure to hold your lens carefully if it tends to zoom in and out easily.

Focus – Once you’ve set your focus on your subject, change it to manual and don’t touch it again until you’re done shooting your series.

SHOOTING YOUR SERIES OF IMAGES

Step 2 – Shoot Your Images Using an Organized Layout

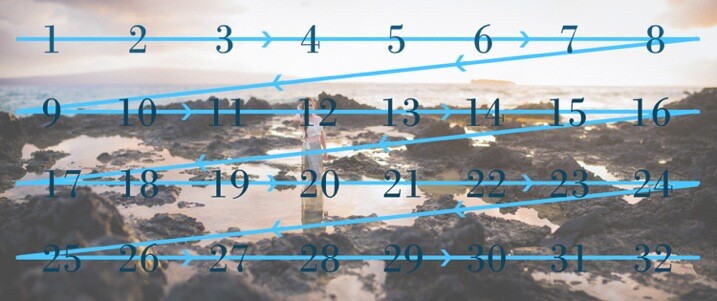
Layout shooting

Capturing your images in rows from left to right (like reading a book) will give you greater chances of not having holes (gaps) in your images.

Shooting your series of images in an organized layout will help the images stitch together better in your editing software. When you first try this method, you might be tempted go out of order and continue adding as many images as you think you might need. When you do that, Photoshop might give you an image with some holes and extra pieces at the bottom of your picture.

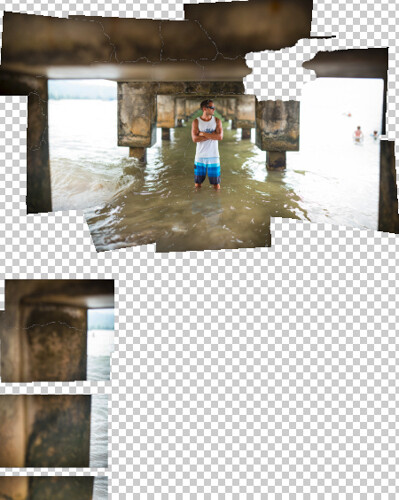
Image with holes

I shot this image in a circular motion, instead of the row method shown above. Photoshop had a hard time properly merging the image. There were many extra shots it didn’t know what to do with, so I had to go in and manually piece some of the images together. Save yourself time and learn from my mistake.

Before you start shooting, think about your final image. Will it look best as a vertical, horizontal, square, or a panorama? Make sure to shoot enough shots to be able to crop it in your preferred orientation.

Step 3 – Overlap Your Shots

While you are shooting your series of images, make sure to overlap each shot by at least 1/3. That will give the software enough information to see where each image belongs when it does the stitching. Most people take between 20-50 shots in their series that will be compiled into one final image. Take as many as you need and overlap by more than 1/3 if you feel more comfortable with that. As you gain experience with the Brenizer method, you will probably find a way to get the same result with less shots.

PROCESSING

Step 4 – Batch Edit All the Images

When you are ready to process the images, load them into a batch editing software, like Lightroom or Adobe Camera Raw. Edit the first image (exposure, contrast, saturation, etc.), then sync the entire batch of images so the exact same editing has been applied to each image in the series.

Next, you are ready to export your images. Since you’re going to be merging so many images together, there is no reason to export these as high resolution files. Doing so, would only slow down the process in Photoshop. Export your images as JPGs, with the long edge between 700-1000 pixels, depending on how many images you’re going to be merging.

Step 5 – Merge the Images

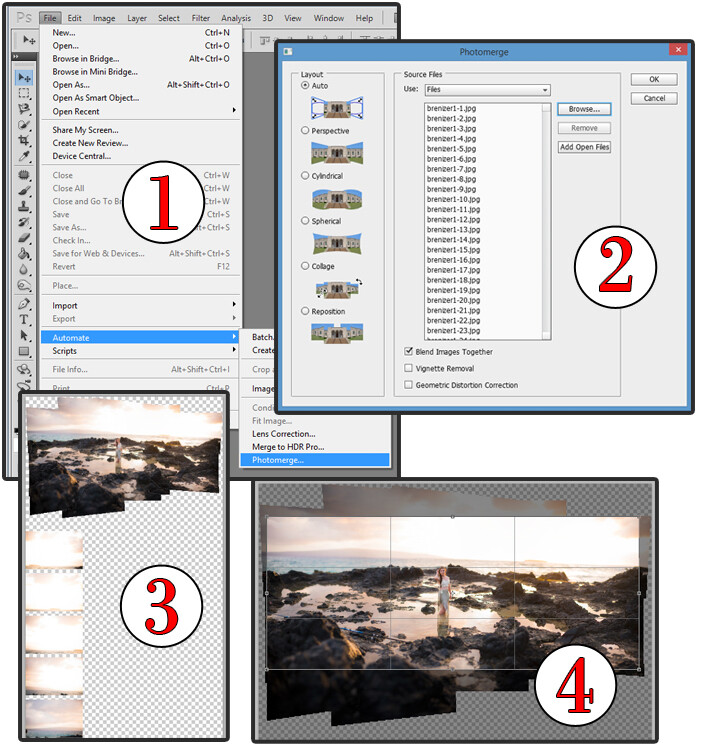
Photoshop steps

1 – In Photoshop, click on File, Automate, and Photomerge. 2 – Leave the default settings selected and browse for your series of images. 3 – After the image merges, there are often extra images below the merged image. Sometimes they are extra and not needed because of the amount of overlapping, or sometimes the software doesn’t know where they belong and you’ll have to manually put them in their place. 4 – I decided that my image was fine without the extra images, so next I cropped out the excess to create the final image.

Finally, open Photoshop. Go to File > Automate > Photomerge… When the window pops up, keep the default settings of “Layout: Auto and Blend Images Together” checked. Browse for your images and hit “OK”. Then it’s a waiting game. Depending on your file sizes, and the number of images your computer is processing, this could take 1-10 minutes.

Note: Similar results can be created using other software. To save time, I’m just mentioning the process I use with Photoshop.

If you shot your series in an organized layout, your software should have been able to piece your image together well. All that’s left to do is crop your image to the orientation you were hoping to use (vertical, horizontal, square, or panorama) and save it as a JPG. Voila!

It may seem like a lot of steps your first time through, but with more practice it becomes second nature.

Your Turn

Have you tried creating an image using the Brenizer Method? What was your experience? Do you have any additional tips that would help those getting started? Let us know in the comments. Also, feel free to share your Brenizer Method images as well. We’d love to see what you create!

googletag.cmd.push(function() {
tablet_slots.push( googletag.defineSlot( “/1005424/_dPSv4_tab-all-article-bottom_(300×250)”, [300, 250], “pb-ad-78623” ).addService( googletag.pubads() ) ); } );

googletag.cmd.push(function() {
mobile_slots.push( googletag.defineSlot( “/1005424/_dPSv4_mob-all-article-bottom_(300×250)”, [300, 250], “pb-ad-78158” ).addService( googletag.pubads() ) ); } );

The post 5 Steps to Rock the Brenizer Method by Danielle Ness appeared first on Digital Photography School.


Digital Photography School

 
Comments Off on 5 Steps to Rock the Brenizer Method

Posted in Photography