RSS
 

Posts Tagged ‘Metering’

Your Camera’s Metering System Explained

09 Jan

The post Your Camera’s Metering System Explained appeared first on Digital Photography School. It was authored by Herb Paynter.

your-cameras-metering-system-explained

Your camera’s metering system “reads” the light reflecting from surfaces in front of the lens and reports its findings both in the viewfinder and on the LCD display.

This information serves as a guideline for accurately setting your camera’s exposure controls. It’s quite important that you know what information your camera is providing, and how to best make use of that data if you wish to achieve accurate color.

Image: f/3.2, 1/60, ISO 3200, Lumix Vario G 12-35/2.8, 17mm, Pattern Metering

f/3.2, 1/60, ISO 3200, Lumix Vario G 12-35/2.8, 17mm, Pattern Metering

Your camera’s metering system suggests the amount of light that will be needed to expose middle gray, or typical skin tone in a scene, as measured in the techie term of luminosity. Luminosity is a geeky word that describes light as visual volume.

That means that the reading taken by the meter reflects (pun intended) the correct exposure setting needed to render either a specific spot, or the average lighting range within an entire scene, with the correct amount of light to deliver a proper exposure.

The exposure your camera is looking for is referred to as the 18% gray balance. This particular tone is approximately the reflective density of middle gray to human sight. That is the reason why professional photographers usually pack an 18% gray card as a reference in their camera bag.

Image: f/2.8, 1/3200, ISO 400, Lumix Vario G 12-35/2.8, 32mm, Pattern Metering

f/2.8, 1/3200, ISO 400, Lumix Vario G 12-35/2.8, 32mm, Pattern Metering

Colors are seriously influenced by tonality, which is the balance between dark and light tones. The same colors seen in ample light as bright and colorful tend to appear dark and muted in dim lighting. This is quite a natural occurrence that happens with your eye just as it does with your camera.

Remember, your eye uses the color-insensitive rods to see images in dimly-lit areas because the color-sensitive cones don’t see well in the dark.

Setting your camera to capture specific lighting conditions requires accurate feedback from your camera’s light metering system.

Metering systems

Your camera provides at least two types of reflected light analysis: matrix and spot.

Some cameras offer several variations of these two systems. The one you choose will make a significant difference in your photo.

Matrix metering involves light that is averaged or integrated from the entire scene. Spot Metering measures light in a specific part of the scene.

You should understand the fundamental difference between the way your eyes register light and the way your camera’s metering system measures light.

your-cameras-metering-system-explained

First, your eyes…

When viewing a subject in a dimly-lit area of a scene, your mind tells your eyes where the subject is, and your eyes then focus on that particular area.

This allows the iris (your eye’s equivalent to your camera’s aperture) to dilate, or open. Then adjusting to the dim light and admitting a sufficient volume of light into your eyes it allows you to see the dimly-lit subject in all its detail.

In this way, your eyes actually use a “spot metering” system.

Your camera, on the other hand, must be specifically set to read distinct areas of an image. If your camera is set to Matrix metering, reading a specific spot requires some nimble fingers and quick thinking.

Some of the trickiest pictures to capture involve extreme lighting contrast, that is, scenes that contain both bright sunlit areas and important detail in the dark shade.

Spot Metering

Capturing accurate color when the subject is located in the shadow areas of a scene generally requires setting your camera to Spot Metering and centering the viewfinder on the subject.

your-cameras-metering-system-explained

f/4.5, 1/80, ISO 200, Lumix Vario G 12-35/2.8, 26mm, Spot Metering

Spot Metering concentrates on a small “spot” area in the middle of the viewfinder to evaluate light. You can usually set the size of this “spot” in your camera’s Preferences.

Spot metering requires your camera to register the light reflecting from a specific area, assuring you that that particular element will be perfectly exposed.

Matrix Metering

Matrix metering considers all lighting in the scene as equally important, with greater importance directed toward the center of the frame. Matrix lighting is usually a digital camera’s default metering mode.

When a scene contains several different areas of light intensity, your camera has to decide on how important that light is to the overall exposure. It delivers a reading that will attempt to capture the full range of light in the scene.

When a bright light appears in the corner of a scene, that light only proportionately influences the overall exposure in the image. When the center of the frame (as seen in the LCD preview window) is darker, and the outside edge of the frame is lighter, the center portion of the scene (usually being the center of focus), heavily influences the overall exposure, allowing more light to enter the lens.

The opposite lighting scenario influences the exposure in the other direction, reducing the overall exposure to favor the lighting in the center portion of the frame. DSLR cameras allow this lighting “favoritism” to be overridden, or redirected, by the photographer.

Matrix metering looks at a scene in segments and makes calculated decisions based on the mix of lighting in the various segments.

While each camera manufacturer has its own patented (and quite secret) metering configurations, most cameras employ some form of matrix metering as their standard exposure system.

Image: f/3.5, 1/160, ISO 200, Lumix Vario G 12-35/2.8, 26mm, Matrix Metering

f/3.5, 1/160, ISO 200, Lumix Vario G 12-35/2.8, 26mm, Matrix Metering

Cameras cannot expose individual segments of the picture separately, but by keeping stray light from entering your camera’s lens and using your camera’s matrix metering system, the tonal curve (the determination of the middle tone of the scene) can be shifted in such a way as to place more light on the subject.

Matrix and Spot metering modes allow your camera to measure the color and set the proper exposure even in challenging lighting conditions. Most cameras provide this dual-metering capability and provide very specific controls over exposure even though some camera owners are not aware of it.

But remember, relying too much on any of your camera’s Auto functions can compromise an otherwise spectacular color picture. If your camera has both Spot and Matrix metering capabilities, it’s better to choose whether the scene, the subject, or a small portion of the subject should determine your camera’s exposure.

Image: f/5, 1/800, ISO 800, Lumix Vario G 35-100/2.8, 93mm, Center weight-Average Metering

f/5, 1/800, ISO 800, Lumix Vario G 35-100/2.8, 93mm, Center weight-Average Metering

Centre-Weighted Metering

Somewhere between Spot and Matrix Metering is a light metering system called Center-Weighted Metering. This system reads lighting from several points around the frame but gives more preference to an enlarged area in the center of the frame. This form of metering was very prevalent before the more advanced development of Matrix-Metering Systems, and still offers a very viable method of addressing scene lighting.

Regardless of which system you use, the composite (averaged) light value actually measured by your camera will indicate the equivalent tonal value typically assigned to skin tones.

Professional photographers use a handheld meter to read the light reflecting from a subject’s face because human skin color is the general tonal value on which all camera exposures are determined.

Image: f/1.8, 1/2000, ISO 25, iPhone XR,1.8, 4.25mm, Centre-Weighted Metering

f/1.8, 1/2000, ISO 25, iPhone XR,1.8, 4.25mm, Centre-Weighted Metering

Pattern Metering

Always remember that the area which your camera ultimately reads will be captured as a middle-tonal-value. Setting your reading on extremely dark tones will produce those tones as a medium tonal value and thus render lighter tones as very light.

Extremely light areas will, in turn, be exposed as if they were significantly darker than they actually were. They could completely lose detail in the darker areas of the image. So, be very careful about where you take your readings.

Conclusion

Most cameras offer exposure compensation controls that allow the photographer to adjust the overall exposure to override your camera’s metering system. This feature usually provides adjustments, in both increasing and decreasing values, in one-third stop increments. They can be helpful if, and when, the metering system provides consistently under or over-exposed images.

Learning to control your camera’s metering system and apply the correct mode will deliver more attractive and dynamic results. Take control, and you’ll be very pleased with the outcome.

The post Your Camera’s Metering System Explained appeared first on Digital Photography School. It was authored by Herb Paynter.


Digital Photography School

 
Comments Off on Your Camera’s Metering System Explained

Posted in Photography


Understanding Exposure Metering Modes

23 Jul

The post Understanding Exposure Metering Modes appeared first on Digital Photography School. It was authored by Kevin Landwer-Johan.

Your camera’s metering modes vary the way it measures the light. This affects the way exposure information is provided. Every modern camera has a built-in exposure meter. Sometimes it’s also referred to as a light meter.

Understanding Exposure Metering Modes Woman Photographer at the Shopping Mall

© Kevin Landwer-Johan

Understanding how to control the exposure metering modes on your camera allows you to take better photos. If what you are photographing contains very little contrast, your camera will make a good exposure in the default mode. When you compose an image with contrast, your camera may not make the exposure you want it to.

Selecting the best metering mode allows you to take more pleasing photographs.

There are three basic exposure metering modes on most cameras. These are:

  1. Averaged
  2. Spot
  3. Center-Weighted

Choosing the most appropriate mode is a matter of choosing your main subject and making the right settings accordingly.

Understanding Exposure Metering Modes Thai Model and Elephant

© Kevin Landwer-Johan

How do different exposure metering modes work?

1. Averaged

This mode is named differently depending on the brand of camera you use. Nikon calls it Matrix Metering. On Canon cameras, it’s called Evaluative Metering. Sony and Pentax use the term Multi-Segment Metering. Olympus calls it Digital ESP Metering. Each manufacturer has different algorithms to determine the outcome. Essentially they all do the same thing.

The camera partitions the viewfinder into zones and measures the light in each. It compares these light readings. Then it averages all the information to provide what it decides is the best exposure setting.

Most cameras have this mode as the default. This is how my camera is set most of the time. Using this mode will give you an overall idea of what your exposure settings need to be. When the light is fairly even, using this exposure meter mode works well.

Understanding Exposure Metering Modes Buddha Statue Even Lighting

© Kevin Landwer-Johan

2. Spot

Using this mode, your exposure meter will measure the light from a small area – usually about 3.5% of the frame. You need to place the spot exactly where you want to take your reading from. This will most often be your main subject.

The position of the spot within your frame varies from camera to camera. In some cameras, the spot moves with the point of focus. On other cameras, it remains fixed in the center of the frame. It’s important you know where your spot is, otherwise your exposure can be incorrect. Consult your camera manual or do an online search to find how your camera’s spot meter is positioned.

3. Center-Weighted

This mode reads the light from an area in the center of your frame. The percentage of the area varies from camera to camera. It is typically around 60%. Some camera models allow you to vary the area it covers. This mode is good if you compose with your subject in the center. I rarely compose that way, so never use this mode.
Understanding Exposure Metering Modes Iron Bridge at Night, Chiang Mai, Thailand

© Kevin Landwer-Johan

How to use the Exposure Meter

Half-pressing the shutter release button activates the exposure meter. It will turn off automatically after a time. So if you are not seeing the information it provides, it may have switched itself off.
In your viewfinder or on the monitor you’ll see the information displayed like this on most cameras.

Understanding Exposure Metering Modes Exposure Meter Graphic

Sony cameras use numbers and the + and – symbols to display the exposure information.

If you set your camera to manual exposure, you will see the information displayed when the meter is on. When in an auto mode this information may not be displayed. This is because the camera determines the exposure.

Using manual mode a ‘0’ in the display indicates when the exposure is correct. When the display shows a row of dots stretching towards the – symbol, your image will be underexposed. When the display shows a row of dots stretching towards the + symbol, your image will be overexposed.

Using this information, you can make the required adjustments to your aperture, shutter speed, and/or ISO.

Karen Woman Cooking

© Kevin Landwer-Johan

Why are there different Exposure Meter Modes?

Photographs are captured by digital cameras recording reflected light. Light and the tone of your subjects is variable. You need to set your exposure according to how bright or dark your subject appears.

Making a composition with very little tonal variation when the light is flat, your camera will easily make a correct exposure. When there’s high contrast, particularly when the light is harsh, it can be more difficult to get a correct exposure.

In high contrast situations, it’s important to manage your exposure meter. You must read the light from the most important area of your composition. Choosing Averaged or Center-Weighted Metering can often result in poorly-exposed photographs.

Spot metering is most useful when you’re photographing a composition where there’s a lot of contrast. Taking a spot meter reading from the main part of your composition will allow you to expose it well.

Portrait photography is one example of when it’s helpful to switch your metering mode to spot. The face of the person is normally the most important part of your composition. You want the person’s skin tone to be exposed well.

By placing the spot meter on your subject’s face and taking a meter reading, you can adjust the exposure accordingly. If you are using an Auto Mode, your camera will make the setting adjustments for you.

Understanding Exposure Metering Modes Buddhist Monk Candle Lighting Ceremony in Chiang Mai, Thailand

© Kevin Landwer-Johan

Using spot metering on a camera when the spot is fixed in the center of the frame, you need to point it where you want to take the reading from. Using an Auto Mode when you recompose to frame your subject, you’ll need to hold the exposure lock button.  If you don’t lock the exposure, your camera will readjust the settings. In Manual Mode, the settings remain constant until you change them again.

Illustrative examples

Photographing a person against a dark or light background requires careful metering so their skin tone looks natural.

Understanding Exposure Metering Modes Masu Dark Background

© Kevin Landwer-Johan

Here’s a portrait of Masu. She is a Kayan woman living with her family in Thailand. I positioned my spot meter to take a reading from her face. In this case, my exposure setting was 1/640th of a second at f/4 and my ISO was set to 400.

If I had used Averaged or Center-Weighted metering, my exposure would have been incorrect. The camera would have accounted for a large portion of the black background.

Placing the spot meter on her face was important. If I’d left the spot in the center of the frame my reading would have been incorrect. It would have read the light reflecting off the black. This would give a reading which would have led to an overexposed skin tone.

Masu Light Background

© Kevin Landwer-Johan

With Masu standing against the white background, I made my exposure metering the same way. The settings are identical to the settings I used for the black background. This is because the light had not changed, only the background.

Conclusion

Choosing the right exposure metering mode helps you better control your exposures. It’s important to look at the light and tone in your composition. Then determine the most important area to expose for. The more contrast there is, the more important it is to meter well.
 

exposure-metering-modes


The post Understanding Exposure Metering Modes appeared first on Digital Photography School. It was authored by Kevin Landwer-Johan.


Digital Photography School

 
Comments Off on Understanding Exposure Metering Modes

Posted in Photography


Beginner’s Guide to Metering Modes on Your Camera

26 Nov

Should you bother to learn about metering modes? I’m confident I can sell you on it. Your camera’s automatic metering will only carry you so far. As your digital photography ability grows, you’ll start to feel frustrated in scenes with mixed light. Learning metering modes is the key to making tricky light conditions seem much less intimidating.

Let’s jump right into this beginner’s guide to metering modes.

Beginner's Guide to Metering Modes on Your Camera

Giant dragon lantern in honor of the Mid-Summer Ghost Festival – Keelung, Taiwan. Metering mode: Spot.

What is metering?

This is vital to understand before you learn about your camera’s individual metering modes. “Metering” means taking a light reading. A properly exposed image is made up of three tones of light: the shadows, mid-tones, and highlights.

The image below demonstrates these three tones well. The forested hills in the foreground and dark cloud represent the shadows, the temple roof and figure represent the mid-tones, and the bright clouds represent the highlights.

Beginner's Guide to Metering Modes on Your Camera

A figure on the roof of a temple looks out across forested hills – Jiufen, Taiwan. Through the use of my camera’s light meter, I had more creative control to slightly underexpose the image giving viewers the same sense of foreboding that I felt from those dark, rumbling clouds overhead.

Your camera has an ingenious tool called a light meter that enables it to determine a correct exposure with a balance of shadows, mid-tones, and highlights. You’ll see it at the bottom of the frame when you put your eye to the viewfinder.

Taking light readings from the scene

Your camera’s metering modes control which part (s) of the scene your light meter uses to take a reading. Consider the example below. If you were to meter only off the dragon and take the photo, the dragon would be correctly exposed. However, the sky would probably be too bright.

Alternatively, if I was to meter only off the sky, the sky would be correctly exposed but the dragon would be a bit too dark. However, if I metered from a wider section of the scene, I would get a more balanced exposure.

Beginner's Guide to Metering Modes on Your Camera

Detail from the Land God Temple at Badouzi Harbor – Taiwan. Metered off the dragon the exposure is a bit too light.

The four main metering modes

Now, let’s get down to the crux of the article. Here, I’m going to explain what each of your camera’s four metering modes does and how this affects your images.

But before we begin, a note about how your camera meter works. Very bright and dark tones can trick your light meter. Why? Because it is designed to bring every tone to something called “18% gray.” Imagine a snow-covered mountain or a jet black car. Would you want your camera to correct these tones to appear 18% gray? Or would you want their tones to be rendered as truly as your eye sees them? The answer is obvious, but not to your light meter.

So it is your job to review your image on the histogram and decide if it is correct for your scene or not. If it’s not you can use Exposure Compensation to adjust it (when shooting in Aperture or Shutter Priority modes).

Evaluative (or Matrix) Metering Mode

Evaluative metering is the natural mode to explain first because it’s the one your camera uses as standard or default. Your light meter takes a reading from across the whole scene. With that information, your camera’s onboard computer makes multiple calculations to determine a correct exposure with balanced highlights, mid-tones, and shadows.

Beginner's Guide to Metering Modes on Your Camera

A scene from Mother’s Market in Imphal – Manipur, India. I wanted to read the light from across the whole scene here and so used Evaluative Metering Mode.

Beginner's Guide to Metering Modes on Your Camera

On Asahidake, Hokkaido’s highest mountain – Japan. Shot in the Evaluative Metering mode the camera attempts to make an exposure that is an average of all the light tones of the scene. This is particularly useful when you’re learning to shoot landscapes.

Center-Weighted Metering Mode

Imagine that you’re now zooming into the frame slightly. Whereas Evaluative Metering mode reads the light from across the entire scene, Center-Weighted Metering mode reads light with a preference towards the middle. It still reads from a large proportion of the frame, just not the whole thing. This varies between camera manufacturers, but it’s usually between 60 % and 80 % of the frame.

Beginner's Guide to Metering Modes on Your Camera

An accordion player in Central Vienna – Austria. Center-Weighted mode would have been a solid choice for this portrait because there is nothing much of interest in the four corners or along the edges; it’s all within the central 60 %–80 % of the frame.

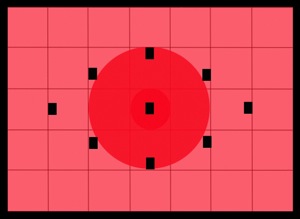
The area inside the red circle is roughly what will be metered with Center-Weighted mode.

Beginner's Guide to Metering Modes on Your Camera

Fuyou Temple in Tamsui, a riverside town in New Taipei – Taiwan. I would not have used Evaluative Metering mode for this scene because my camera would have tried to brighten the image – seeing it is mostly dark. Whereas, I intentionally wanted more of a silhouette-like feel.

The area inside the circle is roughly the percentage of the frame that will be metered when using Center-Weighted mode.

Partial Metering Mode

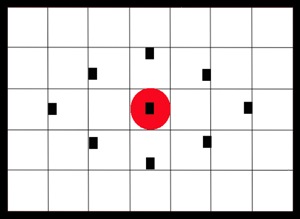
If Center-Weighted metering meant zooming in a little, Partial Metering is a huge jump inwards again. This time, your light meter will read the light from an area the size of 6-15 % of the center of the scene, depending on your camera manufacturer.

Beginner's Guide to Metering Modes on Your Camera

Boatman on the Ganges – Varanasi, India. Partial Metering mode is where things start to get really interesting. You begin taking more control than ever before of where you meter from in the scene. As you can see, this man’s face is just on the limits of a central point of approximately 10 % of the frame. It’s exposed exactly the way I wanted, but I didn’t just get lucky.

With the Varanasi boatman above, I was shooting in Aperture Priority mode. I aimed my center focus point at his face before composing the shot. This allowed my camera to read the light from 10 % of the frame around his head.

Then, I used the exposure lock button (read that article if it’s the first time you’ve heard about it). Note that this is for use mainly with Aperture or Shutter Priority mode. With this button held down, you lock in the exposure and can recompose the shot without the settings changing.

Beginner's Guide to Metering Modes on Your Camera

On the same boat ride, the sun sets over the ghats – Varanasi, India. Again, I aimed my center focus point at the flowers to meter. Because there was just a pinprick of sunlight still peeking over the tops of the buildings, the sky wasn’t overpoweringly bright in the final image; however, I did dim the highlights slightly in Lightroom later.

Spot Metering Mode

The final push inward; Spot Metering mode reads light from between 1-5 % of your scene. I personally use Spot Metering mode more than any other, but it may be more challenging for you if you are just learning about your camera and metering.

It is particularly useful to use spot metering in conjunction with the exposure lock button and the center AF point selected. Aim the center point of your viewfinder at the subject or light source to meter from it. Lock in the exposure and recompose, then focus and shoot.

I find that spot metering mode is goodfor portraits and getting the correct skin tones. Also, I use it for specific light sources, such as a beam of light through a window, but only when I’m also happy for other regions of the photo to be underexposed. I do not recommend using it for landscapes unless you are looking to experiment with silhouettes.

Spot metered off the sky to get a silhouette sunset and deeper tones in the sky.

Beginner's Guide to Metering Modes on Your Camera

Silhouetted figure toasting marshmallows at a community bonfire – Matsumoto, Japan. Of all its many versatile uses, Spot Metering is the mode you should select if you want to create silhouettes. Meter off the brightest part of the scene and select your settings. Lock in the exposure and then compose the shot. The brightest part of the scene will be well exposed and your subject will be cast in dramatic black shadows.

Inside a 500-year-old tomb at Lodi Gardens – New Delhi, India. Spot Metering mode is gloriously precise. You can meter off a light source as specific as a single sunbeam coming through a window. In this image, I crouched down so that the artificial light source was directly behind the sign and spot metered off the bright area of the floor.

Conclusion

The next step on from here is full manual mode, in which the exposure lock button is not required. But first, master metering modes using Shutter and Aperture priority modes.

Now that you’ve learned about each metering mode, get out your camera and go practice. Don’t forget to share your thoughts and images in the comments.

The post Beginner’s Guide to Metering Modes on Your Camera by Ben McKechnie appeared first on Digital Photography School.


Digital Photography School

 
Comments Off on Beginner’s Guide to Metering Modes on Your Camera

Posted in Photography


How to Supercharge Your Photography with Highlight-Weighted Metering

17 Oct

Modern digital cameras have a variety of metering modes that they use to evaluate the light coming through the lens and help you choose your exposure settings. Each one is different and designed to fit a specific need. As you gain experience with them you will start to know which metering mode to use for any given scene you are shooting.

If you’re shooting portraits you might want to use Spot or Center-weighted metering, while landscape shooters may prefer the versatility of matrix or evaluative mode. Knowing which mode to use often comes with time and practice. But what if I told you there was a metering mode built-in to some cameras that could basically guarantee your shots would come out properly exposed every single time? Well, if you believe that then I’ve got a bridge in New York I’d like to sell you.

Highlight-Weighted Metering Mode

However, if your camera has Highlight-Weighted metering it will certainly help you get better results from your photos. While I can’t guarantee your pics will be perfect every single time, it can really come in handy if you’re not sure how to meter your scene and want a solution that you know you can rely on.

How to Supercharge Your Photography with Highlight-Weighted Metering

Different metering modes for different situations

The reason photographers use specific metering modes when shooting various scenes is that they want to make sure the right thing is properly exposed. For example, if you’re shooting a portrait it’s important to make sure your subject’s face is neither too bright nor too dark, even is it means some background elements will end up bright white or pitch black.

Center-weighted metering can solve this problem by helping you arrive at an exposure setting such that whatever is in the middle of the frame (i.e. your subject’s face) is exposed just right. Other metering modes such as Spot, Matrix/Evaluative, and Partial Metering all perform similar functions in that they help you make sure you have just the right camera settings to get precisely the important part of your composition properly exposed.

Highlight-weighted metering tosses all that out the window. In the process, it could also dramatically alter your approach not only to metering a scene but to photography as a whole.

How to Supercharge Your Photography with Highlight-Weighted Metering

I used Center-weighted metering here to make sure this couple was exposed just right, even though the background is a bit too bright. I cared more about the couple looking good than the tree leaves behind them.

Enter Highlight-Weighted Metering for Select Nikon Cameras

Available on only a few Nikon cameras, (D5, D850, D810, D750, D500, and D7500 as of the time of this writing) Highlight-weighted metering utilizes the incredible dynamic range of modern image sensors to give you a massive degree of control over your photos. Provided you don’t mind doing a bit of legwork in Lightroom, Photoshop, Luminar, or other post-processing software.

It works by looking at the brightest elements of a scene (instead of specific areas like the center or the focus point) and using those as the basis for taking an exposure reading. On the surface, this might seem like a terrible idea because doing so would obviously mean a great deal of your photo could, as a result, be much too dark and underexposed to be usable.

Accessing Highlight-Weighted Metering

I’ve talked to some photographers who own cameras that can do Highlight-Weighted metering, and some of them aren’t even aware that their cameras have this capability. It’s not that surprising since Nikon doesn’t seem to go out of its way to advertise the feature, and even if you know about it you still may not know how to enable it.

To access this feature, press the metering button on your camera and then turn the control dial until you see an icon that looks the same as spot metering, with the exception of an asterisk in the top-right corner.

How to Supercharge Your Photography with Highlight-Weighted Metering

You will see the same icon if you look at the rear LCD screen of your camera, and as soon as it appears you’re good to go. However, figuring out how to enable Highlight-Weighted metering is one thing but understanding how it works, when to use it, and how to get the most out of it is another matter entirely.

Exposing for the Highlights

Before I get too deep into what this all means, it’s important to understand that Highlight-Weighted metering isn’t really the best solution to use for everyday shooting. It’s designed to make sure the brightest portions of your composition are not overexposed, which means a great deal of the photo is going to be shrouded in darkness.

You also won’t really see the advantages of using it unless you shoot RAW because it’s designed to give you an image that is extremely flexible due to the amount of data you have to work with during the post-production phase. Since JPEG files toss out such a huge amount of image data, they’re not much use with Highlight-Weighted metering because you simply don’t have much room to edit your photos when developing them in Lightroom.

Metering Mode Comparison

As an illustration of how Highlight-Weighted metering works, consider this series of three images. I took the following shot using Matrix metering mode, which tries to get a good overall balance between highlights and shadows. It’s a mode that many people use by default since it helps you get properly-exposed images in most shooting situations.

How to Supercharge Your Photography with Highlight-Weighted Metering

Matrix metering resulted in a good overall exposure but the sky is so bright that it can’t be fixed in post-production.

You can see that the camera tried its best to balance out the highlights and shadows, and the resulting image is decent but there is a massive portion of the sky that is simply too bright and can’t be recovered in Lightroom, Photoshop, or any other post-processing software.

Using Highlight-Weighted metering meant that my camera helped me adjust the exposure settings such that the brightest parts (i.e. the sky) were not overexposed, which resulted in an image that seems unusable at first.

How to Supercharge Your Photography with Highlight-Weighted Metering

Highlight-weighted metering preserved the brightest portions of the image but left the rest vastly underexposed. This is the image as it came right out of the camera.

Fortunately, due to the incredible dynamic range in modern camera sensors, an image like this is perfectly usable. The key is that the highlights haven’t been lost or clipped, so the sky is exposed just fine while the dark portions of the image still contain so much data (because I shot in RAW) that it can still be transformed into a print-worthy photo with just a few clicks.

How to Supercharge Your Photography with Highlight-Weighted Metering

The sky was exposed properly, with plenty of shadow details still available for editing. This is the same image as above, after processing to pull detail out of the shadow areas.

Some Caveats

As you might expect, there are some caveats to using this approach as well as a few questions.

First of all, experienced photographers might wonder what the big deal is with this approach since similar results can be had by simply using exposure compensation. That is if you take a shot and see that the image is overexposed, just compensate by underexposing it a few stops. The problem with this approach is that it’s a multi-step solution which means a critical moment can sometimes pass you by while you are adjusting the exposure. However, using Highlight-Weighted metering ensures that the brightest parts of your image will never be clipped and therefore have plenty of data to use when editing.

It’s also worth pointing out that in order to get the benefits of Highlight-Weighted metering you need to be willing to edit your photos afterward in order to bring up the shadows and adjust your images accordingly. If you’re used to shooting JPG or doing minimal editing, it might not be worth the additional time that this solution adds to your workflow.

Finally, to get the most benefits you need to use low ISO values since the data from the sensor will be more usable. Sensor dynamic range drops off at higher ISO values so if you find yourself shooting at ISO 6400, 3200, or even 1600 you won’t be able to bring up the shadows nearly as well as you could with images shot at ISO 100 or 200.

Another example

For one more example, here’s a series of photos of a goose that illustrate this concept in action. This first image was taken using standard Matrix metering which did its job pretty well. Overall the scene is properly exposed, except for one glaring exception: the overexposed part right at the base of the bird’s neck.

How to Supercharge Your Photography with Highlight-Weighted Metering

Matrix metering, unedited RAW file.

After seeing my results I quickly switched to the Highlight-weighted metering mode. In doing so, my camera made sure that the brightest part of the image was properly exposed, which left the rest extraordinarily dark.

How to Supercharge Your Photography with Highlight-Weighted Metering

Highlight-weighted metering, unedited RAW file

Fortunately, there was plenty of color data to extract from the shadows, so a little finessing in Lightroom resulted in an image that I’d be happy to post to my Instagram feed.

How to Supercharge Your Photography with Highlight-Weighted Metering

Highlight-weighted metering, edited in Lightroom to pull out the shadow detail.

What if you don’t have a Highlight-weighted metering mode?

If you don’t have Highlight-weighted metering built into your camera you can approximate its effects by using Spot metering and the exposure lock button on your camera. This would allow you to set exposure values based on what you deem to be the brightest part of the composition, lock in your settings, and then recompose your shot before snapping the shutter. It’s not as simple or elegant as having the camera automatically meter the scene based on the brightest part of the composition, but it’s worth trying if your camera doesn’t have this function.

Conclusion

I like to think of Highlight-weighted metering as another useful arrow to have in my photography quiver, but not something I use all the time for every one of my shots. For most images, I tend to default to Matrix metering since it will usually give me a properly-exposed shot that I can tweak if I need to.

However, when I find myself in situations with extreme contrast between the lightest and darkest portions I will often switch over to Highlight-weighted metering so I can stop worrying about checking my settings and dialing in exposure compensation. That way I know that I’ll end up with images that I can edit however I need to in Lightroom because nothing will be overexposed.

The post How to Supercharge Your Photography with Highlight-Weighted Metering by Simon Ringsmuth appeared first on Digital Photography School.


Digital Photography School

 
Comments Off on How to Supercharge Your Photography with Highlight-Weighted Metering

Posted in Photography


How to Use the Zone System to Learn about Metering and Exposure Compensation

16 Jun

When you first move off auto, you realize how much control you have over your camera. You get to choose the aperture, shutter speed, ISO, and be able to manually select the autofocus point, among many other things. In short you get control over everything!

You also get full control over the exposure, or brightness, of the image. You decide you where to set the exposure for each image – something that the camera does not always get correct. The reason the camera doesn’t get it right all the time is because the in-camera light meter doesn’t always know how the brightness level of the subject. What tricks the light meter is bright or dark tones.

So how do you take back control of the exposure, and compensate for the camera’s errors? The process of correcting your exposure is referred to as Exposure Compensation. For more on that read: How to Use Exposure Compensation to Take Control of Your Exposure. However, before you add any exposure compensation, you first need to know how much to compensate, and understand exactly what your camera’s light meter is doing. This is why learning how to meter is important. If you are unfamiliar with the term metering, it is the process of measuring light values.

The first thing to grasp when is how your camera’s light meter sees the world. Put simply, it sees everything in grayscale. This means that all your camera sees is a world of tones; a colourless world. It cannot differentiate trees from people, people from snow, etc. (Although more modern in-camera light meters will now also recognize colour, the same basic principles apply.)

The other critical element to know is that your meter wants to make everything middle-gray, commonly referred to as 18% gray. Remember that! Right it down! Keep it with you in your camera bag until it’s firm in your memory! It’s very important!

Everything you need to know about doing exposure compensation correctly hinges off 18% gray. If your scene has a lot of bright areas in it, such as snow or sand for example, your camera will want that to be 18% gray. If you’re photographing a person in dark clothing, your camera will also want to make that 18% gray. Your camera doesn’t know your subject is actually meant to be black, nor does it know that all of that white in the viewfinder is actually snow. Leaving your camera’s meter at zero, or Meter as Read (MAR), can cause your photo to be over or under exposed.

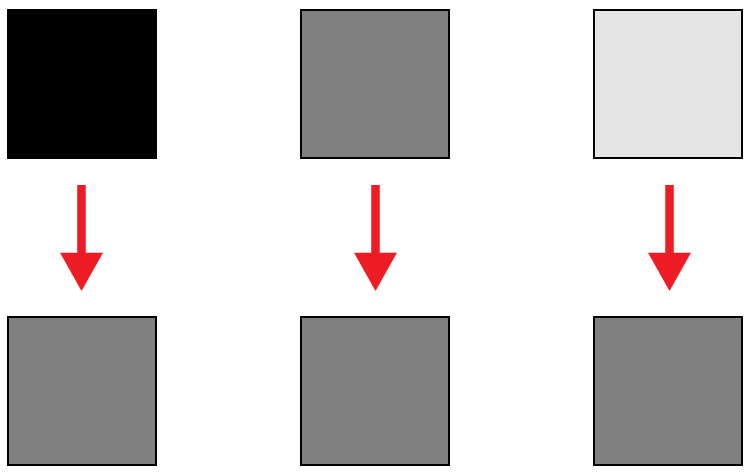
Here is an illustration of what your camera meter will do. Tones will end up 50% grey.

Here is an illustration of what your camera meter will do. All tones will end up 18% or middle gray.

So how does knowing how your camera will meter, help you to decide how much exposure compensation to apply? This is where knowing a little about the Zone System can come in handy.

What is the Zone System?

The Zone System was developed by the late Ansel Adams and Fred Archer. In essence, it was a system used to meter and continue on in the dark room when developing images. I’m not going to discuss the Zone System in its entirety – that could be something for a future article – but at its core, the Zone System will greatly help you decide how much exposure compensation to add or subtract.

The Zone System

The Zone System

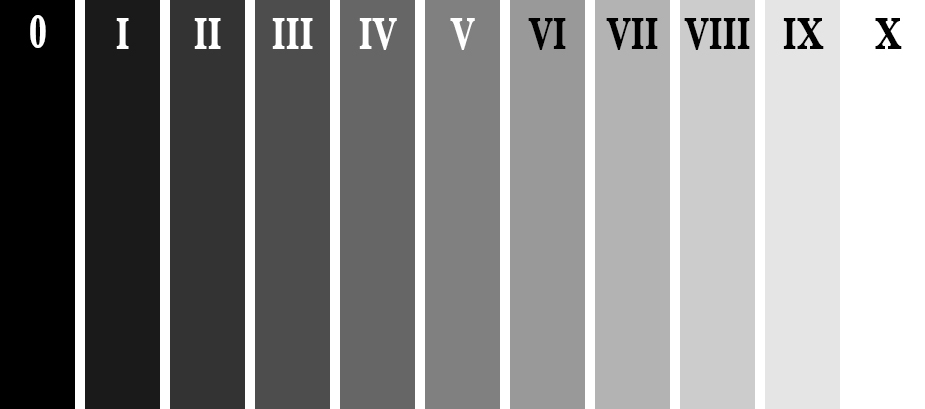
Above is an illustration of the Zone System. In it are 11 zones, denoted by Roman numerals. Here is a quick rundown of examples for each Zone:

  • Zone 0: Pure black, no detail. This is would be the edge of a negative film.
  • Zone I: Near pure black with slight tonality, but no detail.
  • Zone II: This is the first Zone where detail starts to show; the darkest part of the image where detail is recorded.
  • Zone III: Average dark materials.
  • Zone IV: Landscape shadows, dark foliage.
  • Zone V: Middle-gray, what your light meter sets to.
  • Zone VI: Average Caucasian skin tone.
  • Zone VII: Very light skin; shadows in snow.
  • Zone VIII: Lightest tone with texture.
  • Zone IX: Slight tone without texture, (e.g., glaring snow).
  • Zone X: Pure white with no detail. This would be light sources, or reflections of light sources.

This next piece of information is the other piece to the exposure compensation puzzle:

Each Zone is separated by exactly one stop of exposure.

Now that you have the information, how do you use it?! You know that you camera is metering for Zone V, or middle-gray, now consider your subject. How light or dark is it? If you were photographing a bride’s white dress, that would be very bright with texture; so going by the chart that would fall into Zone VII or VIII, which makes the exposure compensation required for correct exposure PLUS two or three stops (the difference between Zone V and where your subject should fall).

RV-02383-slideshow

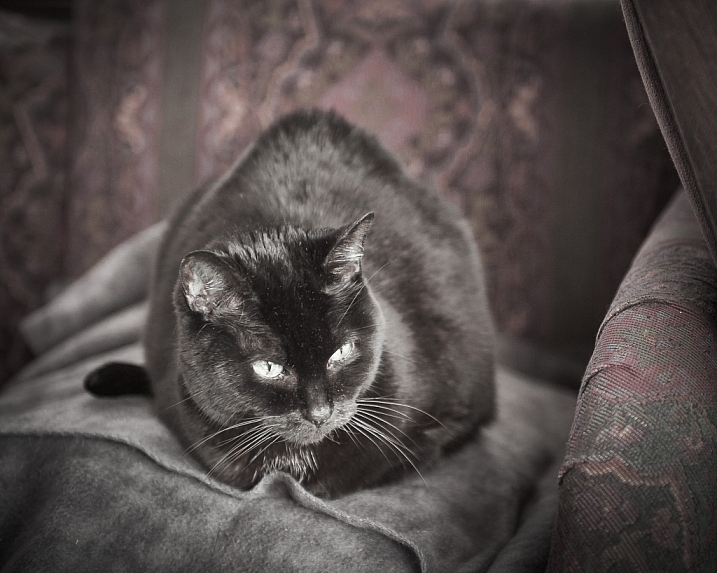
Shot at zero exposure compensation. Black cat is gray or Zone V.

RV-02383-slideshow (1)

Shot at -2 stops black cat is now black or Zone III.

As an experiment, try photographing a piece of plain white paper. First, make sure that there is no exposure compensation added – your meter should be in the middle. Take a photo. Next, add +2-stops of exposure compensation. This will bring your exposure to Zone VII. Then, take another photo. Notice the difference? The first image should be very close to middle-gray, or Zone V, where the last image should be bright white, but still show detail in the paper.

External Light Meters

Another tool that may be helpful to you, is an external handheld light meter. They work the same way as your camera’s light meter in that they meter for middle-gray, but they have the added advantage of being to reading what’s known as Incident Light: that which is falling on the subject, not reflected from it. Your camera’s meter is a reflected light meter; it reads the light that has been reflected or bounced off your subject. This may seem obvious, but there is a big difference between incident light and reflected light. Reflected light is greatly affected by tone – the darker your subject is, the less light that will be reflected, whereas the brighter your subject is the more light that will be reflected. However, the incident light – or light coming from the light source – will remain the same no matter what the tones are in your subject. By using an external light meter, you are reading the light directly from the source; unaffected by the tone of the subject.

However, do be careful when you are using an external light meter that you read the incident light from the subject’s position. You may be in the shade, for example, and your subject in the sun. If you were to read the incident light for your position,you would be getting a reading for the shade area, and not the sun, which is the light that’s falling on your subject!

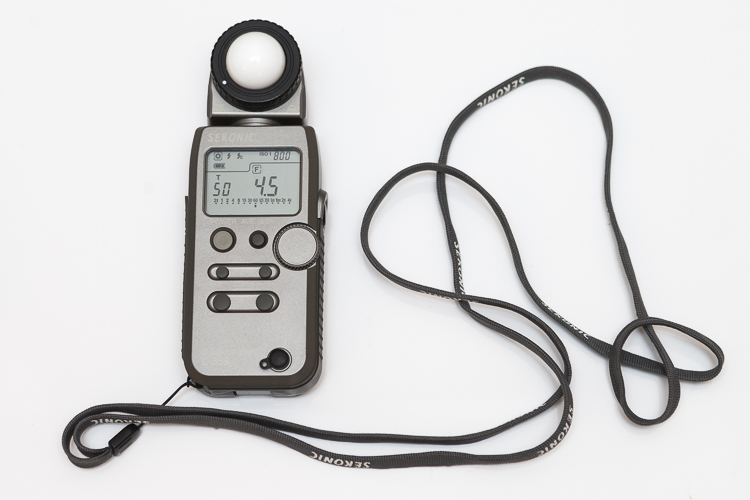
This is an external light meter. It's a Sekonic L-358, and is able to meter ambient light but also meter flash.

This is an external light meter. It’s a Sekonic L-358, and is able to meter ambient or natural light as well as flash.

Summary and application

Now that you know what your light meter is doing, and how to correct it with exposure compensation, you are on your way to getting more consistent and correct exposures.

Before you press the shutter button next time, do consider what the tones in your scene are like. Are there lots of brighter tones, or more darker tones? If your frame has more brighter tones, the exposure compensation will need to be more on the plus side to render them correctly. However, if there are more darker tones, your exposure compensation will be more toward the minus side of your meter. If you feel there are equal amounts of bright and dark tones, you may find that you don’t need to add any compensation at all.

teaching-eg-028-slideshow

Snow shot at zero exposure compensation is gray, or Zone V.

teaching-eg-028-blog1100

Snow shot at +2 is now white with detail or Zone VII.

If you’re ever unsure of how much exposure compensation to add or subtract, take a test shot at zero, or in the middle. This will help you decide the direction in which you need to go.

googletag.cmd.push(function() {
tablet_slots.push( googletag.defineSlot( “/1005424/_dPSv4_tab-all-article-bottom_(300×250)”, [300, 250], “pb-ad-78623” ).addService( googletag.pubads() ) ); } );

googletag.cmd.push(function() {
mobile_slots.push( googletag.defineSlot( “/1005424/_dPSv4_mob-all-article-bottom_(300×250)”, [300, 250], “pb-ad-78158” ).addService( googletag.pubads() ) ); } );

The post How to Use the Zone System to Learn about Metering and Exposure Compensation by Daniel Smith appeared first on Digital Photography School.


Digital Photography School

 
Comments Off on How to Use the Zone System to Learn about Metering and Exposure Compensation

Posted in Photography


Understanding Flash Metering Modes

19 Mar

flash-metering-modes

Flash Metering Systems TTL, A-TTL,  E-TTL and E-TTL II

Terms used in this article are Canon specific but there are the same or similar terms for Nikon, Sony, Olympus and other camera manufacturers. _J6L0002-Edit-Edit

When you use your camera’s metering system, the meter will measure the reflected light from your subject (see Metering Modes and How Your Camera Meter Works).  This is not the case when you use your camera with a flash, either a pop-up or mounted on your camera’s hot shoe and set to one of the TTL modes. (TTL is an acronym for Through The Lens) Irrespective of which TTL flash mode you choose, the exposure is not based on reading the ambient light,  (see: Balancing Flash and Ambient Light with a Light Meter)  it is based on the flash output. Measuring flash output can be achieved by either measuring a fixed output pre-flash and evaluating the exposure, or by measuring the flash output as it is fired. This data is then used to calculate the flash output required to expose the scene correctly.

So on to understanding flash metering modes . . .

There are three flash metering modes

TTL or through the lens metering

This is the standard metering mode, typically used when your camera has a pop-up flash or a dedicated external flash heads. The exposure is based on the flash firing. The quantity of the flash output is monitored through the lens by a flash sensor that is mounted below the mirror.

Keep in mind, that when you use a flash the maximum (fastest) shutter speed is the sync speed of your camera (check your manual to check what your camera sync speed is, most are 1/200 or 1/250th). You must never attempt to use faster shutter speeds unless your flash supports “High Speed Sync”.  Since the shutter speed is fixed at the sync speed or slower (in Aperture priority mode: Av on Canon, A on Nikon) the camera will automatically set it at the sync speed.  In Manual (M) mode you must set the shutter speed to the sync speed or slower otherwise you will get black bands in your image.  This is because the shutter starts closing before the flash has had a chance to fully expose the sensor.

In TTL mode the flash will read the exposure from the light bouncing off your subject and the flash sensor will turn off the flash when it believes the image has been exposed correctly. In this TTL mode changes to the aperture setting will typically affect the exposure of the areas of your image that is lit with just the ambient light.

TTL Flash in modes other than Aperture Priority or Manual:

flash-metering-modes

P – is the Program mode  or Program auto mode.  In this mode the camera manages all the settings. Some cameras have an “A” or full Auto mode. Canon cameras may also have a “CA” setting for Creative Auto mode. In these modes the camera sets shutter speed at the sync speed, and the aperture based on the ambient light. When using TTL the flash fires and turns off when the auxiliary sensor tells it to based on the evaluated exposure of the flash.

For TTL the flash power and duration is based on the ISO and the aperture setting. In most cameras the ”through the lens“ flash exposure reading is taken from the same area as your focus point. For TTL flash metering there is no pre flash.

A-TTL (Advanced through the lens)

This metering mode performs in the same basic manner as TTL. It will read the exposure through the lens, from the area of focus and trigger the flash to turn off when the appropriate exposure is achieved. The main difference is that this method uses a pre-flash. This pre-flash is used to determine f-stop based on the distance to the subject that reflects the flash output. The pre-flash is fired when the camera’s shutter is half depressed, the camera evaluates the readings and sets the aperture. Now when the shutter is fully depressed the flash fires to correctly expose for the subject. Based on the model of your flash, the pre-flash can be an actual white light flash or an infrared flash.

nikon-flash

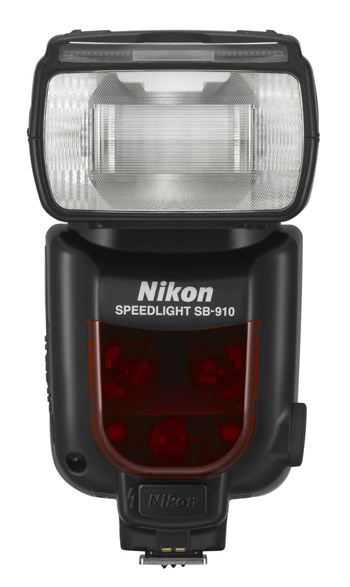
Nikon’s latest, the SB910

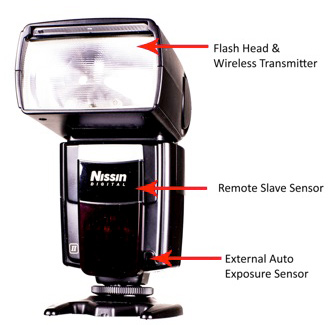
In all cases the main flash is fired as a pre-flash if the flash head is oriented in any position other than directly at the subject. This pre-flash can be an annoyance. The pre-flash is measured by the flash unit and the evaluated data is communicated back to the camera. If you use your camera in Program or Automatic mode with A-TTL, ambient light exposure and flash based exposure are collectively evaluated and the camera attempts to resolve the lighting to establish the f/stop (aperture) for the best exposure. Since the sensor that evaluates the pre-flash is located on the flash unit instead of the camera’s sensor, using a filter on the camera lens will cause inaccurate readings.  This is because the sensor on the flash is not covered with an equivalent filter.

E-TTL (evaluative through the lens)

As with A-TTL, E-TTL also uses a pre-flash. However, the flash exposure is not measured by the dedicated flash sensor but the main sensor that is used for ambient light exposure readings. This is similar to the exposure calculations and focus locking that occurs before the shutter opens.  This is true for images captured in ambient light when your camera is in Aperture, Shutter Priority or Program mode. E-TTL has far greater exposure accuracy than TTL or A-TTL modes. The pre-flash in E-TTL mode is not triggered when the shutter is half depressed but when the shutter is fully depressed. Since flash durations are very short the pre-flash is not visible to the naked eye. The pre-flash measures the distance and reflectivity, and calculates the appropriate flash output. All this is accomplished just before the shutter actually opens.  The pre-flash is fired immediately before the main flash except when your camera is set for 2nd curtain sync. In addition, if FEL (flash exposure lock) is used, the pre-flash is fired only when FEL is established.

41Dl+k0z0pL

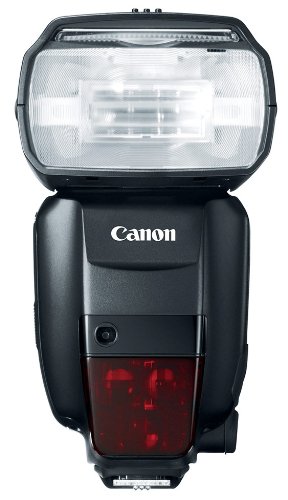
Canon’s newest speedlite the Canon 600EX-RT

E-TTL II

This is the new standard in Canon EOS systems.  It is a firmware enhancement that uses the camera and not the flash to do all the evaluation. Fortunately it is compatible with older E-TTL flash units.  E-TTL II uses the camera’s evaluative metering zones before and after the pre-flash. In this process, areas with small changes in brightness are then averaged for flash metering. This method prevents the issue where highly reflective materials result in specular highlights. With ETT-L II the  flash metering system is not linked to the selected focus area. This allows focus and recomposition without affecting correct flash exposure. Overall the E-TTL II system allows for much more natural exposures with out the harsh appearance typical of direct flash photography.

The post Understanding Flash Metering Modes by Shiv Verma appeared first on Digital Photography School.


Digital Photography School

 
Comments Off on Understanding Flash Metering Modes

Posted in Photography


Metering Modes and How Your Camera Meter Works

20 Jan
Proper Exposure vs. How the Camera Exposes

Proper Exposure vs. How the Camera Exposes

Exposure is a complex beast. Mastering it is of the utmost importance. Exposure and composition are the two most critical components towards making a great image. Exposure is based on three components:

  1. The ISO or sensitivity to light
  2. Aperture or the size of the opening that will let in light, and
  3. Shutter Speed which defines the duration the light will have to pass through the aperture

Whether you shoot in Manual, Aperture Priority or Shutter Priority; there is no difference in how the meter evaluates the scene.

Measuring the light, or brightness of the scene you are trying to capture, is a critical component in determining the perfect exposure. To establish this you need a meter that can read the levels of brightness.

Exposure is measured using light meters.  There are two types: one measures the light falling on the subject or scene, called an incident light meter; the other measures the light reflected off the scene or your subject, and is called a reflected light meter. All meters that are built into digital cameras are reflected light meters, and we will be addressing that type in this article. The more you understand these meters and how they work, the better you will be at understanding and interpreting what they are telling you. Keep in mind that incident light meters are far more accurate than reflected light meters.

How does your camera determine exposure?

Reflected light meters attempt to read the amount of light in the scene you are trying to capture. Unfortunately, those readings are guesses. You may have had the misfortune of photographing a very dark or black subject and have it come out looking over exposed, or a snow scene where the snow looks grey or under exposed. The reason for this behavior is that the camera’s light meter believes that most scenes should average to a mid-grey, also referred to as 18% grey. This middle grey is a mid-point between the darkest shadows and the brightest highlight. Since the camera meter has no idea about white or black, you need to help it using some form of exposure compensation based on the tonality of your subject or scene.

Metering Modes

To help with exposure, and determining how much to compensate, cameras have various metering modes. Typically, the three basic modes are Matrix (also called Evaluative), Center-weighted and Spot metering. Each of these is applicable in particular situations, but do not rely on just one of these modes to do it all for you.

Evaluative Metering

Evaluative Metering

Evaluative Metering

In this metering mode, the meter divides the scene up into a grid and analyzes each segment for highlight and shadow (bright and dark) information. Once that data is collected, it calculates the average value and bases the exposure on that average. Keep in mind that all cameras do not have the same number of areas within the frame. Also, they don’t all calculate the average value for exposure the same way. Manufacturers use complex formulas to arrive at exposure values.  Therefore, it is important that you understand how your camera behaves in various situations and learn when to trust it, and when not to trust it.

Many of the newer DSLR’s not only average the grid, but place additional emphasis on the focusing points that are in use during that particular image capture.

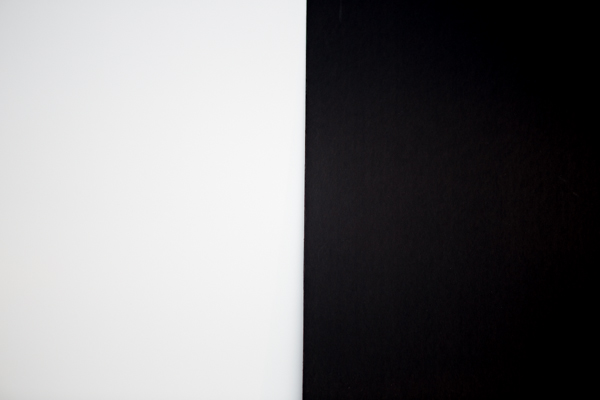
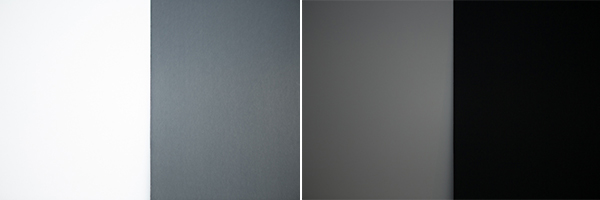
In the next series of images, matrix metering was used to set the exposure. Two foam-core boards, one white and the other black, were placed side by side in the same light.

For the first image, the camera read the exposure while it was pointed in the middle of the white and black boards.  The camera read all the white and the black and came to a reasonable conclusion by averaging the exposure.

S5A9661.jpg

Evaluative Metering – centered between the white and black boards

S5A9658.jpg

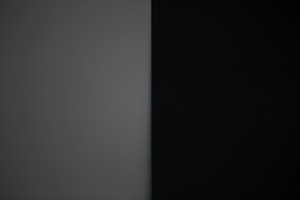
Metered off of the white board


The next image was shot with the camera meter reading taken from the white board.  The white was captured as grey and the black a darker grey.  This is because the camera tries to make everything neutral grey or 18%.


Metered on the Black Board

Metered off of the black board


In the third image, the camera read the exposure from the black board.  The resulting image is overexposed making the whites too bright, and a dark grey where it should have been black.


Center-Weighted Metering

center-weighted.jpg

Center-Weighted metering

This method of metering lays the most importance on the central portion of the frame, which can be as much as 75% or more, while little or no importance is given to the corners of the frame. Many pro DSLR’s will allow you to adjust the diameter of the center weight area.

This mode of metering is preferred by many photographers and has a reasonable level of accuracy. Also keep in mind that most subjects tend to be centrally placed when framing. You then obtain the exposure and recompose before capturing the image.

Spot Metering

spot.jpg

Spot metering

This mode measures the light from a very small part of the scene only.  The area measured is typically the center of the image, using approximately a 3 to 7 degree range of measurement.  It is usually less than 5% of the area of the frame. With most of the mid to upper end DSLR’s, you can arrange the placement of the spot within the frame so as to identify where you want the reading captured (usually it follows where you focus).

This is a very accurate metering mode. It will provide precise readings from small areas of your scene and is most effective in high contrast situations.

The same white and blackboards were photographed once again using spot metering. As you can see in the images below, the same problem exists. Even the spot meter was fooled.

_S5A9659A

Spot metered on the black (left image) and then Spot metered on the white board (right image)

To obtain a correct exposure so the camera is not fooled, a spot meter reading was taken using a grey card placed in the same light as the black and white boards.  This exposure setting based on the grey card was used to photograph the two boards.  The image below shows good exposure.

S5A9661.jpg

Exposure reading using a grey card

How do you switch metering modes?

The Metering icon is represented by an eye-shaped graphic within a rectangle. Your camera’s metering system may have three or more metering modes and the display will change based on which mode is selected.

Which Metering Mode should you use and when?

Matrix metering

Matrix metering works well for scenes that are evenly lit.  It can be used as a go-to method for grab shots. Even though the camera meter may fail you, these meters are highly sophisticated, computer controlled devices and can be relied upon for general photography. You can leave your camera on this mode and use it as a means of exposure education.

Center-Weighted metering

Use this for any scene where you want the primary subject to be correctly exposed while the rest of the image can be generally ignored for proper exposure. This is ideal for people and pet portrait photography, Still life and some product photography.

Center-Weighted is much more consistent and predictable compared to matrix metering. Use it wisely to control where the camera will be measuring the scene and those areas where the lighting does not play a key role in your composition.

Use this mode for outdoor portraits, high contrast scenes, product and food photography to name a few.

Spot metering

Spot metering gives the maximum accuracy and exposure control. This is ideal for back-lit subjects, close-up and macro photography. It can be used to read the brightest and darkest zones for landscapes. You could not do lunar photography without this mode.  Remember to use this mode any time it is important to correctly expose for a subject that does not fill the frame.

Spot metering mode works exceptionally well in situations where your primary subject is much lighter or much darker than its surroundings.

Exposure compensation

In a number of situations, you will need exposure compensation to get the right exposure, irrespective of the metering mode you select. Scenics with a lot of snow cover will be under exposed and will require an increment of +1 or more stops of exposure to make the snow look white.

Conversely, a black furry bear or a person wearing very dark clothing will be overexposed and will require negative exposure compensation of -1 or more stops.

So which mode should you use?

The answer is – it depends on the subject, the light direction, etc. Choose matrix or evaluative metering for evenly lit scenes. Use Center-weighted for scenes that have high contrast and where you want the primary subject to be properly exposed. Use Spot metering for back-lit subjects until you get very familiar with metering, use the spot meter for back lit subjects.

In conclusion, for exposure accuracy an incident light meter can be helpful as your camera’s light meter is easily fooled. But learning how your camera meter works will help you get better, more accurate exposures as well.

The post Metering Modes and How Your Camera Meter Works by Shiv Verma appeared first on Digital Photography School.


Digital Photography School

 
Comments Off on Metering Modes and How Your Camera Meter Works

Posted in Photography


Understanding Evaluative Metering on Your EOS Camera

14 Jun

01

Photo by Flickr user MiNe

By Andrew S. Gibson – the author of Understanding Exposure: Perfect Exposure on Your EOS Camera (currently 36% off at SnapnDeals).

Imagine that it is early 1959. Alaska has just been admitted as the 49th state in the USA. Fidel Castro has become premier of Cuba. Elvis Presley and Buddy Holly are in the charts. And Canon releases the Flex – its first SLR camera in a time when only eight other SLR camera models were in existence.

The Flex (pictured above) was so basic by today’s standards that it didn’t even have a built-in light meter. Instead, it used an external selenium photocell coupled to the shutter speed dial for metering. Most photographers back then used external light meters and dialled the exposure settings into their cameras, so I guess to some folk even this primitive system seemed like magic.

The first Canon camera with through-the-lens (TTL) metering came in 1965. The Pellix had just one way of reading light levels – a 12% spot meter in the centre of the viewfinder.

Centre-weighted averaging came along later and served photographers well until the evaluative metering system we are familiar with today was invented in the late eighties.

Evaluative metering arrives

The first Canon camera to feature evaluative metering was the EOS 650, released in March 1987. It was also the first Canon camera to use the newly designed EOS mount.

The EOS 650 had a six zone evaluative metering mode. Evaluative metering has come a long way since then, and now most EOS cameras use a 63 zone metering system and advanced micro-processors to analyse the information gathered.

02

The auto exposure sensor from the EOS 60D. Note the grid of seven by nine black squares in the centre. These are the 63 metering zones of the EOS 60D’s iFCL evaluative metering system.

Understanding evaluative metering

Evaluative metering is the most sophisticated metering mode on your EOS camera. As it is the one you are most likely to use at any time, it’s useful to know how it works. Indeed, if you use your EOS camera in any fully automatic mode, it is the only metering mode the camera lets you use. You can only switch to one of the others in Program, Shutter Priority, Aperture Priority or Manual modes.

Other metering modes

Most EOS cameras have four metering modes: evaluative, partial, spot and centre-weighted metering (One series cameras also have multi-spot metering).

Partial, spot and centre-weighted metering all have a single characteristic in common – they take an exposure reading from the centre of the viewfinder.

03

This is fine if, as in the photo above, that’s where your main subject is.

04

But if your subject is off-centre, like in this portrait, you have to point the centre of the viewfinder at your subject, press the shutter button half-way to lock in the exposure setting, then recompose. This is bit of a pain to say the least and wastes time.

Evaluative metering was developed as a way of accurately metering off-centre subjects. It works by dividing the viewfinder into zones, each giving a separate reading that the camera analyses to calculate exposure. It also co-operates with your camera’s autofocus system. The reading is weighted towards the active autofocus point on the basis that it is most likely to be covering the main subject.

05

This is the 35 zone evaluative metering pattern used on the EOS 300D, 350D, 400D, 450D, 500D, 1000D, 10D, 20D, 30D, 40D, 50D, 5D and 5D Mark II. Note how each AF point occupies a different square.

iFCL evaluative metering

Canon introduced Intelligent Focus, Colour and Luminance (iFCL) evaluative metering on the EOS 7D. It has been included on every new EOS camera since then (excluding One series models).

The premise behind this new system is that exposure meters that react to the brightness of the subject only are more sensitive to the red light than the human eye. They may think that a red coloured subject is brighter than it really is and return a false reading that underexposes the subject.

06

To counter this, the exposure meter used by iFCL evaluative metering has two layers. The top one is sensitive to green and blue light and the bottom one to green and red. Each layer measures the colours that it is sensitive to and the camera combines the readings to calculate exposure settings.

In addition, iFCL metering uses information from multiple autofocus points. It knows which AF points have achieved focus, and which ones have nearly achieved focus, and weights the exposure reading towards the zones those AF points are in on the basis they are likely to be covering the subject.

07

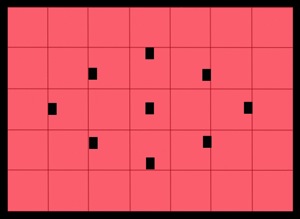
The 63 zone evaluative metering pattern used by the EOS 100D, 550D, 600D, 650D, 700D, 750D, 1100D, 60D, 7D and 6D. All but the last two models use the 9 point AF pattern in the diagram.

Evaluative metering and Speedlites

Evaluative metering really comes into it’s own when used in conjunction with a portable Speedlite flash unit. It is important that the camera meters the light reflected from the subject in order to accurately calculate the exposure required from the flash. Centre-weighted, spot or partial metering can only do this if the subject is in the centre of the frame. Evaluative metering can cope regardless of which part of the frame the subject occupies.

Understanding Exposure

08

That’s a brief overview of how evaluative metering works on your EOS camera. Hopefully it helps you understand how your camera’s metering system works and will help you take better exposed photos.

If you’d like to learn more about how exposure works on your EOS camera my ebook Understanding Exposure is available on special now over at Snapndeals.

Post originally from: Digital Photography Tips.

Check out our more Photography Tips at Photography Tips for Beginners, Portrait Photography Tips and Wedding Photography Tips.

Understanding Evaluative Metering on Your EOS Camera


Digital Photography School

 
Comments Off on Understanding Evaluative Metering on Your EOS Camera

Posted in Photography


Fine Tune Your Exposures With Spot Metering

09 Apr

The metering systems of today’s digital cameras are light years beyond cameras of just 10 to 15 years ago. What this means is that in many situations, the camera’s meter, left to its own devices, is going to do an excellent job at getting a good exposure. While evaluative (or matrix) metering and center-weighted average metering take into account the entire scene, albeit in different ways, spot metering mode provides a tool for metering only the part of the scene you as the photographer consider most important.

I used spot metering on this image  due to the sun setting over her shoulder, making the sun and sand exceptionally bright behind her. By metering on the model's shoulder, I was able to maintain detail in the shadow areas, without hurting the drama of the lighting.

I used spot metering on this image due to the sun setting over her shoulder, making the sun and sand exceptionally bright behind her. By metering on the model’s shoulder, I was able to maintain detail in the shadow areas, without hurting the drama of the lighting.

Spot metering is especially helpful when the subject is much brighter or darker than the background, and the subject does not make up a majority of the image.   Most cameras, when set to spot metering, are set to measure an area of the image as small as 1.5% of the total image area.  This varies from camera to camera, so check your manual for the exact specification.  In addition, while most consumer cameras use the center of the image for spot metering, usually defined by a circle in the viewfinder, others allow for tying spot metering to the active AF point, which then ties your choice of focus point to the meter.

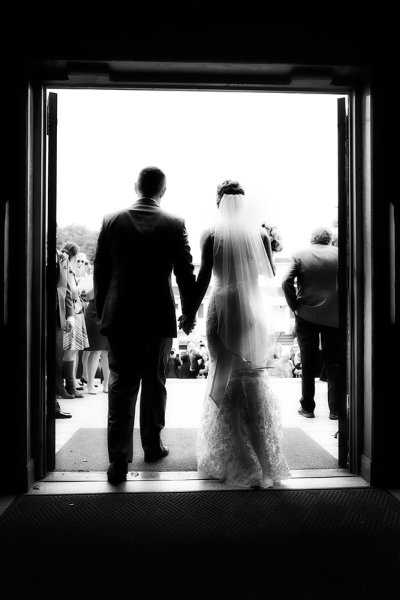
When I saw this shot I immediately knew what I wanted.  I did not want to completely lose the detail in the dress, but I did want a near-silhouette effect to add to the mood of the image.  Using the spot meter, I metered off the sky, and then dialed in +1/3 of exposure compensation to bring back some dress detail.

When I saw this shot I immediately knew what I wanted. I did not want to completely lose the detail in the dress, but I did want a near-silhouette effect to add to the mood of the image. Using the spot meter, I metered off the sky, and then dialed in +1/3 of exposure compensation to bring back some dress detail.

Generally, if you’re spot metering, and your camera’s spot meter is at the center of the image area, you will have to use Exposure Lock as well. This is because if the meter only works at the center of the image, and the area you’re metering is NOT the center of the image, you will need to recompose after metering.  Exposure Lock ensures that your exposure is locked in once you have metered the scene, before you recompose the shot. Exposure lock is generally activated by pressing a button on your camera while metering.  It will then hold the exposure you locked in, at least until you release the shutter button.  Some cameras will hold the metered reading until you deactivate Exposure Lock. On Canon cameras, Exposure Lock is achieved by pressing the (*) button.  On Nikons, exposure can be locked by pressing AE-L.

When you’re dealing with a high contrast situation, such as a bright background with a dimly lit subject, or a dark background with a brightly lit subject, switching your metering mode to Spot Metering can be an easy way of ensuring that your exposure is exactly where you want it.

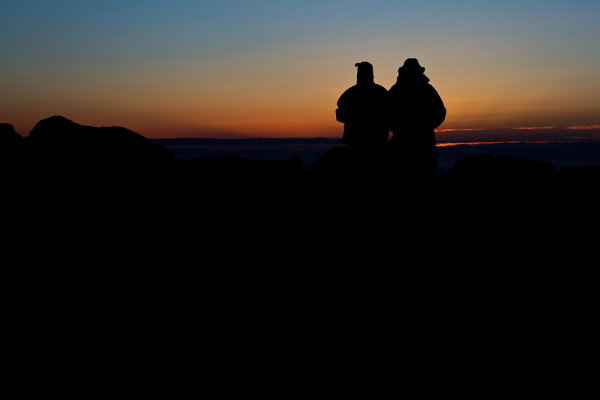
I was shooting the sunrise on Cadillac Mountain in Acadia National Park when I spied this couple sitting on a rock.  I moved around behind them, and spot-metered on the sky. Because the meter tries to make the metered area a mid-tone, I knew it would silhouette my subjects perfectly.

I was shooting the sunrise on Cadillac Mountain in Acadia National Park when I spied this couple sitting on a rock. I moved around behind them, and spot-metered on the sky. Because the meter tries to make the metered area a mid-tone, I knew it would silhouette my subjects perfectly.

Post originally from: Digital Photography Tips.

Check out our more Photography Tips at Photography Tips for Beginners, Portrait Photography Tips and Wedding Photography Tips.

Fine Tune Your Exposures With Spot Metering


Digital Photography School

 
Comments Off on Fine Tune Your Exposures With Spot Metering

Posted in Photography


How To End Exposure Problems and Master Metering Modes in 5 Minutes

27 Mar

You pull out an impressive piece of equipment. Her eyes widen. Did she lick her lips? The pressure’s on now. Yes, she definitely licked her lips. When you declare with total confidence, to a beautiful woman, that you’re a  photographer, there are potential benefits and downsides. Suddenly she wants you to take photos of her in the night sky, with Continue Reading

The post How To End Exposure Problems and Master Metering Modes in 5 Minutes appeared first on Photodoto.


Photodoto

 
Comments Off on How To End Exposure Problems and Master Metering Modes in 5 Minutes

Posted in Photography