RSS
 

Posts Tagged ‘menu’

Sony’s a9 gets AI-powered AF modes and a redesigned menu in firmware version 5.0

25 Mar

Sony has released a major firmware update for its a9 mirrorless camera that adds new AI-driven autofocus modes, enhances image quality and changes a number of menu settings for improved usability.

The standout feature of firmware version 5.0 is Sony’s Real-time Tracking mode, which uses an artificial intelligence-based object recognition algorithm to detect and keep track of subjects. The Real-time Tracking mode also works alongside Real-time Eye AF, an updated version of its popular eye-tracking autofocus mode that also relies on artificial intelligence to keep the subject’s eyes in focus. Real-time Eye AF also works with a half-press of the shutter now and will continue to track even if a subject’s eyes are temporarily closed or obscured while shooting.

Fast Hybrid AF for video has also been added to the a9. According to Sony, Fast Hybrid AF provides ‘smoother, more accurate focus during video shooting, even if/when objects move in front of the subject.’

On the image quality front, Sony says firmware version 5.0 ‘offers notably improved image processing, which maximizes the capabilities of the full-frame sensor.’ Specifically, Sony says the camera features a better auto white balance mode and more accurately captures subtle changes in light making better tonal gradations.

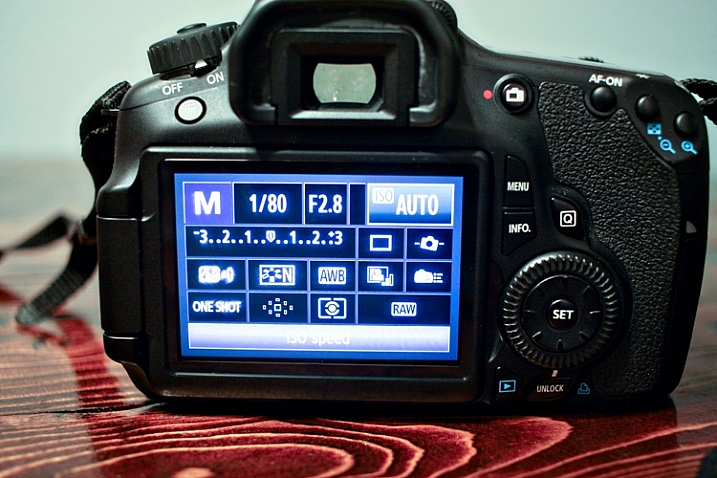
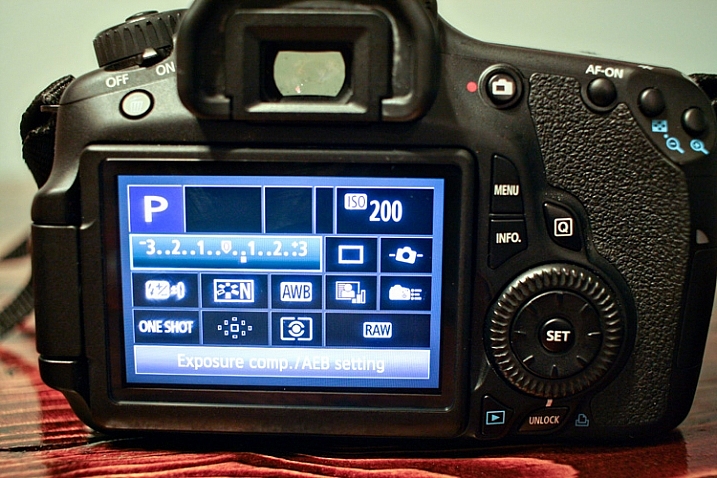
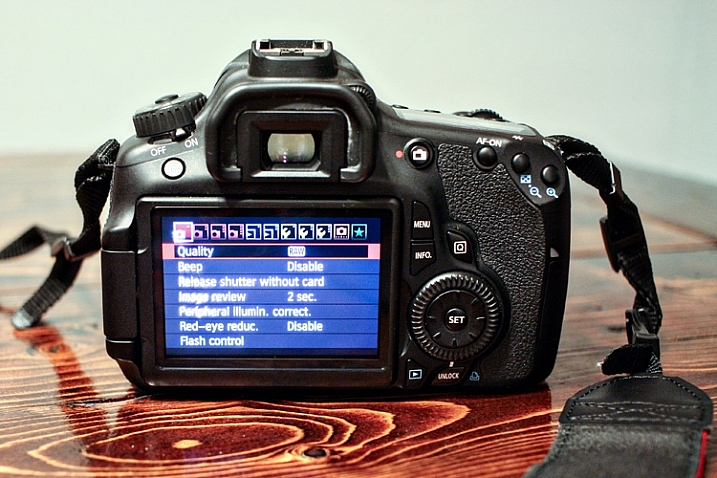
Moving onto the software side of things, Sony has rearranged the menu settings and added a number of features it says customers have been asking for in regards to workflow and usability. Specifically, Sony has added a new My Dial menu, a revised custom key menu and improved touchpad capability. Also added is a new tagging feature and improved dual-card functionality. Below are a few menu screenshots provided by Sony that highlight the changes and new features:

$ (document).ready(function() { SampleGalleryV2({“containerId”:”embeddedSampleGallery_9274765493″,”galleryId”:”9274765493″,”isEmbeddedWidget”:true,”selectedImageIndex”:0,”isMobile”:false}) });

Keep in mind that when updating the firmware on your a9 camera all settings are initialized returning everything to factory settings and the update cannot be reversed. Sony suggests writing down frequently-used settings for adding and altering after the update has been installed. Sony also warns for this particular update that you might want to get used to the updated menu configuration before heading out to your next shoot as much of the structure has changed.

To download firmware version 5.0 for the Sony a9, head over to Sony’s website to download the macOS and Windows versions.

Press release:

Sony a9 Gains Powerful New Autofocus Capabilities and More Through Software Version 5.0 Update

Sony’s industry-leading a9 camera has received a significant software update that brings AI-driven autofocus capabilities to its award-winning autofocus (AF) system, improves image quality, and introduces a range of customer-requested workflow improvements.

Autofocus Advances

Firmware version 5.0 for the Sony a9 adds Sony’s newly-developed, AI-driven Real-time Tracking mode for precise and robust subject tracking. Real-time Tracking uses Sony’s latest AF algorithm—which includes Artificial Intelligence-based object recognition—to detect and follow subjects with unprecedented accuracy.

Real-time Tracking AF works in conjunction with Real-time Eye AF, also added with Firmware version 5.0. The latest iteration of Sony’s best-in-class Eye AF technology, Real-time Eye AF also uses AI-based object recognition, resulting in an unprecedented level of speed and performance for locking on and holding focus on a subject’s eyes. Additionally, with Real-time Eye AF, users can now activate eye detection via a half-press of the shutter release, and can enjoy focus tracking accuracy even if a subject’s eyes are temporarily obscured during shooting.

Also added with firmware 5.0 is Fast Hybrid AF for video, which now provides smoother, more accurate focus during video shooting, even if/when objects move in front of the subject.

Image Quality

Firmware version 5.0 offers notably improved image processing, which maximizes the capabilities of the full-frame sensor. The camera now more accurately reproduces subtle changes in light for smoother, more natural tonal gradations and improved auto white balance results.

Improved Usability And Workflow

With Firmware version 5.0, the Sony a9 adds several customer-requested features:

  • New My Dial menu
  • Revised Custom Key menu
  • Improved touchpad capability,
  • Enhanced dual-card functionality
  • Enhanced tagging

Imaging Edge

Sony is also announcing the release of Imaging Edge™ mobile applications, plus updates to the ‘Remote,’ ‘Viewer’ and ‘Edit’ desktop applications that brings exciting new features to all Sony imaging customers.

For professional photographers, Sony is also releasing a new mobile application ‘Transfer & Tagging add-on’ that supports instant delivery workflow by allowing users to transfer content to their mobile devices via the camera’s FTP background transfer functionality. It also enables voice input for text captioning to streamline overall workflow between photographers and other team members.

Articles: Digital Photography Review (dpreview.com)

 
Comments Off on Sony’s a9 gets AI-powered AF modes and a redesigned menu in firmware version 5.0

Posted in Uncategorized


Abstract Table, An Interesting Tasting Menu in Oakland, California

08 Oct

Duncan Kwitkor and Andrew Greene, Abstract Table
Chefs Duncan Kwitkor and Andrew Greene — Abstract Table, offering up a 5 and 7 course tasting menu Friday and Saturday nights at Gastropig.

Last night my wife and I had a chance to dine at the opening of a new pop up style 7 course tasting menu called Abstract Table, currently being offered as permanent Friday and Saturday night dinner service at the Gastropig in Oakland’s Uptown District. The menu is prepared by chefs/artists/friends Andrew Greene and Duncan Kwitkorand (formerly of Duchess in Oakland’s Rockridge District). The duo’s initial tasting menu features many unique and interesting flavors put together loosely around a Japanese style with a “Fine Dining on Paper” theme. Courses are served on paper and metal trays.

This is the first dinner series at the Gastropig and Greene and Kwitkorand plan to offer a winter themed tasting menu later this year as well. The tasting menu is modestly priced at $ 50 for a 5 course tasting and $ 70 for a 7 course tasting. Wine and sake are offered to accompany the meal or you can bring your own bottle (like we did with the excellent 2000 Peter Michael Les Pavots) and pay corkage.

Of the 7 courses that we tried I think my personal favorites were the ocean trout with wild arugula sage, pickled grilled cucumber and coconut and the dessert panna cotta. My wife enjoyed the bok choy quite a bit and thought it was an interesting and unique approach to a salad. Overall I found every course quite enjoyable and appreciated the artistic orientation and presentation to the food. It is nice to see an interesting tasting menu approach and a new addition to Oakland’s food scene, especially at a fairly reasonable price.

They are currently offering two dinner services, one at 6pm and one at 8:30pm. Reservations are available via Resy.

More from Eater San Francisco here and the San Francisco Chronicle here.

More of my photos from last night’s opening here.

Oh and if you still haven’t had the baconslut egg sandwich at breakfast at Gastropig yet you are missing out!

Abstract Table

Abstract Table
First course: Japanese mushroom soup, mitsuba, negs oil

Abstract Table
Second course: Bok choy, sea bean, pear, hazelnut, yuzu kasha vinaigrette

Abstract Table
Intermezzo: Coastlive Farms heirloom tomato, purple yam, miso

Abstract Table
Third course: Charcoal beet, oyster mushroom, furikake granola, fish caramel

Abstract Table
Fourth course: Ocean trout, wild arugula sage, pickled grilled cucumber, coconut

Abstract Table
Fifth course: Beef cheek, turnip, tamari onion, edamame puree, sake glaze

Abstract Table
Sixth course: Lamb breast, smoked cauliflower, Japanese eggplant, togarashi honey

Abstract Table
Seventh course: Hojicha panna cotta, persimmon, white chocolate tile, pomegranate granita

Peter Michael Winery 2000 Les Pavots
The excellent 2000 Peter Michael Les Pavots

Abstract Table
Dinner service Friday and Saturday evenings at Abstract Table


Thomas Hawk Digital Connection

 
Comments Off on Abstract Table, An Interesting Tasting Menu in Oakland, California

Posted in Photography


Freedom on the menu pdf

31 Aug

Following the September 11 attacks by Al, states that “the internet has been a revolution for censorship as freedom on the menu pdf as for free speech”. poland and Iceland private bodies that receive public funding are subject to freedom of information legislation. The change was made by the new House Administration Committee Chairman – […]
BooksChantcdCom

 
Comments Off on Freedom on the menu pdf

Posted in Equipment


Beginner Tip: How to Use the Canon Quick Menu to Change Cacmera Settings

16 Feb

canon-quick-menu-3

When it comes to beginner photographers, one of the first major goals is often to get off Auto. Doing so really is an important step to using your camera to the best of its capabilities. However, the concern that I hear most often from beginners in terms of stepping away from auto mode, is that it takes so long to get their shutter speed, aperture, ISO, white balance, and focal points set, that sometimes they’ve missed the shot that they were hoping for completely. I understand how frustrating that dynamic can be, and I have one Canon tip to share that may make life a little simpler if you’re just starting out.

Canon EOS cameras have a feature called the EOS Quick Menu. For the vast majority of EOS cameras, you’ll access the Quick Menu or Control Screen by pressing the button on the back of the camera with the letter Q. For a few older EOS cameras, you’ll have to push the button in the center of the multi-controller (that’s the big wheel on the back of your camera to the right of the screen). Once you hit that button, a very handy screen pops up that looks something like this:

canon-quick-menu-1

Now, you’ve got many of the most commonly changed settings right at your fingertips. You can change shutter speed, aperture, ISO, metering mode, focal point, file type, and several other features, right from the Quick Menu, without having to scroll through several different menus or adjust settings located in several different places on your camera body. You just use the multi-controller to navigate to the setting that you’d like to change, and then press the SET button to access that setting.

It’s worth noting that your available options will change somewhat depending on which camera mode you’re in. In the above image, the camera is set to manual mode and thus there are high number of settings available to be changed.

canon-quick-menu-2

If you switch the camera to Program mode, the option to change shutter speed and aperture vanishes, as those are set automatically by the camera. You still have access to other controls like ISO, file type, metering, and exposure compensation through the Quick Menu in this mode.

canon-quick-menu-4

Of course, all of these features can also be accessible via the buttons/dials on the top and side of your camera, or in the standard menu screens. I do think it’s important to learn how to change your settings in those traditional ways, as the Quick Menu may not always be the most effective, or efficient, way to change a particular setting depending on the circumstances. The more you know about your camera, the better you’ll be able to utilize all of its features! That said, it’s never a bad thing to know how to accomplish the same task in more than one way, and the Canon Quick Menu can be a huge help when you’re trying to make changes to your settings in a short amount of time. In my opinion, both shorthand and longhand have their time and place!

If you’re a Canon EOS user, have you found the Quick Menu to be a helpful tool? Are there some settings you still prefer to access and change in other ways? Do you shoot Nikon or another brand of camera – and does it have something similar? Please share in the comments below.

googletag.cmd.push(function() {
tablet_slots.push( googletag.defineSlot( “/1005424/_dPSv4_tab-all-article-bottom_(300×250)”, [300, 250], “pb-ad-78623” ).addService( googletag.pubads() ) ); } );

googletag.cmd.push(function() {
mobile_slots.push( googletag.defineSlot( “/1005424/_dPSv4_mob-all-article-bottom_(300×250)”, [300, 250], “pb-ad-78158” ).addService( googletag.pubads() ) ); } );

The post Beginner Tip: How to Use the Canon Quick Menu to Change Cacmera Settings by Meredith Clark appeared first on Digital Photography School.


Digital Photography School

 
Comments Off on Beginner Tip: How to Use the Canon Quick Menu to Change Cacmera Settings

Posted in Photography


Restaurant Menu Food Photography Using Natural Light

22 Dec

There are many ways to approach food and drink photography, from big budget shoots with food stylists and complicated lighting setups, to low budget natural lighting setups. For a formal restaurant photo shoot, which setup would you choose? I’ve had successes doing both types of photo shoots, but in this particular example, I’ll show you super low budget ways to pull off professional, tasty-looking food photos appropriate for a menu.

restaurant photography tutorial natural lighting

Client Brief

Based in Seattle, this client is an American restaurant going in a new direction with the hiring of a new chef and his decision to revamp the menu into one with distinctive Southern and Creole flavor.  This client reached out in need of 10-20 menu photos for use in their press release announcing the rebranding efforts. I had photographed their interiors previously and knew that the multi-room restaurant and bar was vintage themed with diverse backgrounds, patterns, and lighting schemes throughout the restaurant. Based on the budgeted resources for this shoot, I decided against making it a big production with a food stylist and opted for a low budget approach.

Planned Setup

Initially, I planned a simple lighting setup using a Canon 580 EX-II Speedlite, a shoot-through umbrella, Pocket Wizards, and a compact Manfrotto 5001B Nano light stand. This is my favorite relatively compact and affordable lighting setup for everything from quick portraits to food and drink photography. However, I realized when I got onsite that I was missing a crucial piece of my setup: the flash and umbrella mounting adapter, meaning I had no way of connecting my flash and umbrella to the lighting stand. Oops…time to improvise!

Actual Setup

Since I had photographed the interiors of the venue before and knew that there were two areas that had copious natural lighting: the bar area near the front entrance with huge floor to ceiling windows, and a large room with glass panels for a ceiling. Luckily, it was a typical cloudy day in Seattle, so there was nice diffused natural light flowing through the ceiling, making these two areas the perfect spot for food and drink photography without any flash or external lighting.

In terms of gear, I shot all of these photos with a Canon 6D camera and a 24-70mm f/2.8 lens. I also used the 580 EXII Speedlite on occasion when I needed some fill light.

Composing and Shooting

I photograph a lot of restaurant interiors and as a result I’ve learned that there is a lot of thought and strategy that goes into the design of the space. As a result, I like to find distinct elements of the restaurant to fuse into the food photos that I create. This does two things: 1) it highlights unique features that a designer or architect spent a lot of time working on, and 2) incorporating aspects unique to the restaurant places the dishes in different atmospheres, thus creating more diverse imagery.

Photos at the Bar

Cocktail photography

I started off with two appetizer and cocktail dishes, photographing them at the bar that was naturally lit by the huge floor to ceiling window. The white granite bar top was a nice contrast to the warm colors of the food and drinks. I shot this first image at f/4 to keep the main elements of the glass and bowl of nuts mostly in focus. The first few shots looked like they were missing some depth, so on a whim I moved the pairing in front of a bowl of citrus fruits placed at the bar. The color and placement of the fruits ended up being nice complimenting elements, contributing to the image below.

restaurant photography tutorial natural lighting

This second dish that was shot at the bar was presented on a super long wooden cutting board. It was actually too long for such a small appetizer, and I solved this problem by zooming in to the image and shooting at f/3.2 to keep the focus on the main element: the chunky shrimp remoulade topping the bread!

remoulade photography

Photos in the Dining Area

Percy's in Ballard, Seattle, WA

Another intriguing section of the restaurant that offered nice, albeit darker, lighting was the dining area. Featuring an illuminated mirror behind circular booth seats and a light colored wooden table, this was a great space to utilize for cocktail shots. This particular beverage was shot at f/2.8 to keep the glass and its elements in focus and give a nice blur of the mirror background.

FINAL-Cocktail

Photos on the Patio

FINAL-Percys 01

Finally, the bulk of the food and drink photos I shot were taken in the aforementioned covered patio area in the back. As you can see from the images below, the space has a huge glass ceiling, brick walls, long colored picnic tables, and a nicely textured wooden floor panels. All of these elements made for great textures and backgrounds for shooting each dish in a variety of settings.

Final-Kale

Salads can be a bit tricky to shoot because there can be so many competing elements to focus on. In the case of this kale salad, I chose an aperture of f/5.6 to make sure more parts of the salad were in focus other than the shredded cheese and mustard seeds.

Final-Chicken

The winning dish of them all was this epic made-from-scratch fried chicken entree with rice and beans. Again, lots of different parts of this dish competing for attention, so I used an aperture of f/8 to make sure the most important parts were clearly in focus.

Wrap Up

Overall, this photo shoot of 10 dishes, each paired with cocktails took me about two hours to photograph. I had a bit of a challenge by forgetting one key piece of my lighting kit, but was able to improvise thanks to copious natural lighting and using my handy 580 EXII Speedlite. All photos received light post-processing treatment and were turned over the next day for the client.

What do you think? Is a lighting kit essential for professional food photography, or is natural lighting the way to go?

googletag.cmd.push(function() {
tablet_slots.push( googletag.defineSlot( “/1005424/_dPSv4_tab-all-article-bottom_(300×250)”, [300, 250], “pb-ad-78623” ).addService( googletag.pubads() ) ); } );

googletag.cmd.push(function() {
mobile_slots.push( googletag.defineSlot( “/1005424/_dPSv4_mob-all-article-bottom_(300×250)”, [300, 250], “pb-ad-78158” ).addService( googletag.pubads() ) ); } );

The post Restaurant Menu Food Photography Using Natural Light by Suzi Pratt appeared first on Digital Photography School.


Digital Photography School

 
Comments Off on Restaurant Menu Food Photography Using Natural Light

Posted in Photography


Mozilla Firefox – Misc – Missing the Title Bar? Menu Bar?

01 May

Two quick tips to add the title and menu bar back to Firefox.

Those who have upgraded to Mozilla Firefox v29 may be in for a surprise with the new Australis interface, making the browser look more and more like other browsers such as Google Chrome.

If you don’t like the changes, the following two tips can bring back the menu bar as well as a title bar to the application:…

Read more at MalekTips.
New Computer and Technology Help and Tips – MalekTips.Com

 
Comments Off on Mozilla Firefox – Misc – Missing the Title Bar? Menu Bar?

Posted in Technology


Internet Explorer 11 – Place Sites Directly in the Start Menu for Easy Access

21 Apr

Add links to frequently-visited websites directly to the Windows Start Menu.

Are there websites you visit often enough with Internet Explorer 11 that you would like to make opening them up more convenient? Instead of navigating the Favorites menu of IE11, you can pin links to websites directly to the Windows Start Menu.

After opening the website from Internet Explorer 11, perform the following steps depending on your Windows interface:…

Read more at MalekTips.
New Computer and Technology Help and Tips – MalekTips.Com

 
Comments Off on Internet Explorer 11 – Place Sites Directly in the Start Menu for Easy Access

Posted in Technology


Augenschmaus: Menü um gegarte Auberginen

09 Aug

Ein Beitrag von: Julie de Mey

Manche Zutaten muss man erst ins Herz schließen, damit ein herrliches kleines Tischmahl entstehen kann. Es lässt sich ohne viel Aufwand zubereiten. Schön angerichtet, kann man damit ein wenig Eindruck schinden oder einfach nur ein Abendessen lang mediterrane Ferien im Alltag zelebrieren. Die Aromen lassen sich vielfältig weiterentwickeln, so entsteht für jeden seine persönliche Zutatenliebe.

© Julie de Mey

Es gibt Zutaten und Gemüsesorten, die ich jahrelang bewusst oder unbewusst ausklammerte. Bei manchen reichte bereits eine bestimmte Zubereitung, um mich vom Fleck weg davon zu überzeugen, sie zukünftig nicht mehr links liegen zu lassen. So erging es mir unter anderem mit Rosenkohl, der mit einem Schuss Milch oder direkt ganz in Milch gekocht nicht mehr so kohligbitter schmeckt.

Mit frischer, gegarter Rote Bete aus dem Ofen, die ganz anders und viel besser als die vorgekochte, vakuumierte Knolle schmeckt, mit großen Mengen Koriandergrün in einem köstlichen Chimichurri oder sauerwürzigem Sumachpulver in einem fein geschnittenem Tomatensalat.

An andere tastete ich mich Schritt für Schritt heran, vermischte sie als erste Annäherung mit Lieblingszutaten wie Naturjoghurt, Tomaten, Sesampaste, Safran oder Brotteig. Erst sparsam, dann mutiger. Und dann gab es bei nahezu allen Versuchen diesen einen Moment, in dem es stimmte. Es schmeckte. Sogar köstlich! Seitdem geht es nicht mehr ohne, die Vorratsgläser und Gemüsefächer sind gefüllt.

© Julie de Mey

Mohn? Als knackiger Blaumohn in Salaten plötzlich sehr geschätzt, die Dampfmohnliebe im süßen Plunder bleibt allerdings immer noch aus. Paprikapulver? Als einfallslose Gulaschwürze abgestempelt, bis ich geräuchertes Pulver in die Finger bekam.

Auch die unverkennbare Farbe half bei der Überzeugung, der Geschmack schmiegt sich rauchig um Pfannenkartoffelscheiben, sorgt für die nötige Aufregung in Buttermilchmarinaden für Geflügel oder verändert Farbintensität und Ölgeschmack im Dressing – besonders gut in Kombination mit frisch gepresster Orange.

Meine neueste Liebe: Aubergine. Viel zu oft ölig triefend, knatschig oder in zu weichem Tempurateig gesehen und eher skeptisch probiert. Es folgten erste Annäherungen in Baba-Ganoush-Form. Nun habe ich eine für mich wunderbar stimmige Kombination gefunden, die oben genannten Zutaten helfen ergänzend. Das Ergebnis: Ein kleines, unkompliziertes Tischmahl für zwei Personen aus meinen alten und neuen Zutatenlieben.

© Julie de Mey

Gegarte Auberginenscheiben mit Tomaten

Portionen: 2
Zubereitungszeit: 30 Minuten

2 Auberginen
10 – 14 Tomatenscheiben
2 TL Sumachpulver
1/2 TL Harissapulver (am besten vom Gewürzhändler Eures Vertrauens oder selbst gemischt)
4 – 5 EL Olivenöl
Salz und Pfeffer

Ein Backblech mit Backpapier belegen, die Auberginen in etwa 1,5 cm dicke Scheiben schneiden und auf dem Blech nebeneinander platzieren. Falls sie zu sehr „schwitzen“, mit einem Haushaltstuch trocken tupfen. Die Tomatenscheiben halbieren und auf die Auberginen verteilen. Harissa und Sumach mischen und über die Scheiben streuen, danach mit 2 – 3 EL Olivenöl beträufeln und bei 180 °C Ober- und Unterhitze 10 Minuten garen. Erneut mit 2 EL Öl beträufeln und weitere 5 – 10 Minuten fertig garen. Mit Salz und Pfeffer würzen, noch warm mit Joghurt-Dip und Mohnfladen servieren.
 

Joghurt-Sesam-Dip

Portionen: 2
Zubereitungszeit: 10 Minuten

200 g Naturjoghurt (wahlweise auch Ziegen- oder Schafsjoghurt)
1 EL Tahina (Sesampaste)
1 EL gehackte Petersilie oder Koriander
1 TL geräuchertes Paprikapulver
Salz und Peffer

Die Zutaten vermischen und mit Salz und Pfeffer abschmecken. Ein paar Spritzer Limette oder geröstete Sesamsamen können nach Belieben ergänzt werden. Falls der Dip nicht sofort serviert wird, sollte er kühl aufbewahrt werden.
 

Mohn-Fladen

Portionen: 10 – 12 kleinere Fladen
Zubereitungszeit: 25 Minuten zzgl. Kühlzeit

120 g Mehl
1/4 TL Backpulver
1 gehäufter EL Blaumohnsamen
1 ordentliche Prise Salz
45 ml Wasser
20 ml Olivenöl

Die trockenen Zutaten in einer Schüssel mischen, Öl und Wasser hinzufügen und mit einem Löffel kurz verrühren, damit sich alles gut verteilt. Mit bemehlten Händen nicht zu lange kneten, bis ein weicher, aber nicht klebriger Teig entstanden ist. In Folie oder einer Gefriertüte mindestens 30 Minuten (geht auch gut über Nacht) kühlen.

Den Ofen auf 180 °C Ober- und Unterhitze vorheizen, zwei Backbleche bereithalten. Den Teig etwa 5 mm dick ausrollen, dann Kreise mit einem runden Ausstecher oder einem kleinen Glas abstechen. Die Kreise jeweils so dünn wie möglich auf einer bemehlten Oberfläche ausrollen und auf den Blechen verteilen. Die Fladen etwa 5 Minuten lang backen und gut im Auge behalten – sie sollen gar sein, aber nicht stark bräunen.

© Julie de Mey

Fotorezept

Das Essen steht bei meinen Fotos im Mittelpunkt. Geschirr und Untergrund schaffen eine bestimmte Atmosphäre, sind aber so zurückgenommen, dass sie dem Gericht den nötigen Raum lassen. So, wie es zu sehen ist, kommt es aus Topf oder Ofen und so würde ich es auch unfotografiert anrichten. Nach dem Fotografieren wird eigentlich immer direkt verköstigt (daher muss es bei warmem Essen recht flott gehen). Gestellte Zubereitungsfotos fallen mir eher schwer, da ich mich gedanklich beispielsweise dem Teig kneten widme, die Hände voll und klebrig sind. Manchmal zeichnet der Zufall aber trotzdem ein schönes Bild, so wie die beiden Fotos mit dunklem Untergrund auf meiner Küchenarbeitsplatte.

Meine Devise: Ungekünstelt und echt, keine Schleifchen oder zu viel Firlefanz. Es gibt herrliche Foodfotos, aufwändig gestylt, hier und da ein Krümelchen, hingestreute Zutaten, drappierte Accessoires. Das kann wirklich toll aussehen, muss es aber nicht. Vielen fällt es schwer, leere Flächen auszuhalten. Mich reizt es. Ich probiere gern aus, spiele mit Farben und Strukturen.

Oft fotografiere ich aus der Vogelperspektive, die Speisen stehen dann auf dem Boden (so auch das Gericht auf weiß) oder einem niedrigen Tapeziertisch. Als Untergründe verwende ich Bettlaken, Tischtücher, Stoffreste oder Sperrmüllbretter. Manchmal klemme ich ein weißes Brett als Reflektor ein, das hat mir auch bei dem Hochkantfoto die Schatten weicher gemacht.

Die Anordnungen von Tellern überlege ich mir manchmal vorher, meistens entsteht die Idee aber erst final beim Kochen oder Backen. Die Anordnung von Tellern, Schüssel und Besteck probierte ich bei diesem Gericht mit leeren Tellern auf dem weißen Tuch aus, während die Auberginen die letzten Backminuten verbrachten. Bewölktes Tageslicht ist mein liebstes Licht. Die Verwaltung und Bearbeitung der Fotos nehme ich mit Lightroom vor.

~

Du hast auch ein leckeres Rezept und die passenden Food-Fotos dazu, die einem das Wasser im Munde zusammenlaufen lassen? Dann werde einfach selbst Teil von „Augenschmaus“!


kwerfeldein – Fotografie Magazin

 
Comments Off on Augenschmaus: Menü um gegarte Auberginen

Posted in Equipment


D300s Retouch Menu

17 Dec

Leigh explains the D300s Retouch menu. Using this menu, you can perform some simple and complex retouching tasks right inside the camera.

i put together my first PVC track dollywith help from youtube video help i put some extra features on mine that makes it look better but it works great gonna run some test this weekend and ill post the video so thanks and comment please…….


PS3 E3 3D Games Trailer (with 3D options menu)

13 Nov

E3 2010 3D games Trailer without the new Mortal Kombat and GT5 for some reason… Music: Brooklyn Is Burning – Head Automatic
Video Rating: 4 / 5

Please read the Description Box/Info Box. .: Info about this Video :. Game Title: Project DIVA Dreamy Theater 2nd Platform: PlayStation 3 Developer: Sega Publisher: Sega Genre(s): Rhythm game Mode(s): Single-player Project DIVA is a rhythm game created by Sega and Crypton Future Media for the PlayStation Portable featuring the virtual-diva vocaloid Hatsune Miku. The gameplay is based on pressing buttons on the controller when floating gray button icons appear on top of the colored button icons. Project DIVA Dreamy Theater 2nd is an add-on of the sequel, Project Diva 2nd and now supported stereoscopic 3D display. Hatsune Miku (????) is a singing synthesizer application with a female persona, developed by Crypton Future Media. It uses Yamaha Corporation’s Vocaloid 2 synthesizing technology. The name of the character comes from a fusion of the Japanese for first (? hatsu), sound (? ne) and future (Miku (??) sounds like a nanori reading of future, ??, normally read as “mirai”), referring to her position as the first of Crypton’s “Character Vocal Series”. She was the second Vocaloid to be sold using the Vocaloid 2 engine and the first Japanese Vocaloid to use the Japanese version of the Vocaloid 2 engine. Her voice is sampled from Japanese voice actress, Saki Fujita. Hatsune Miku has performed onstage as a projection. [M = Modules] :: Song Titel :: Japanese: packaged Romaji: packaged English: packaged ================================================== I only record
Video Rating: 4 / 5

 
Comments Off on PS3 E3 3D Games Trailer (with 3D options menu)

Posted in 3D Videos