RSS
 

Posts Tagged ‘Maximizing’

Maximizing Depth of Field Without Diffraction

14 Sep

So you are out shooting and you want to capture the full scene in front of you – all the way from what is directly in front of you to the background way off in the distance. You know you need a really large depth of field, and you know what you need to do to get it.

You reach for the camera’s aperture control and crank it down all the way to f/22 (or f/32 if your lens allows). That will maximize your depth of field and have your picture looking sharp from front to back.

Or will it?

What is Diffraction?

There is a phenomena in photography called diffraction that has an adverse effect on your pictures, and sets in when you use smaller apertures. What is diffraction? Let me explain.

As you are probably aware, the aperture of a lens is the opening in the rear part of the lens that lets light into the camera. The body of the lens consists of optical elements that direct light toward the rear of the lens. When you use a large aperture, light freely moves through the optical elements and then through the aperture. When the aperture is very small, however, essentially the light has to bend to make its way through the aperture. That bending of light causes the waves to interfere with each other. The following graphic illustrates how this works:
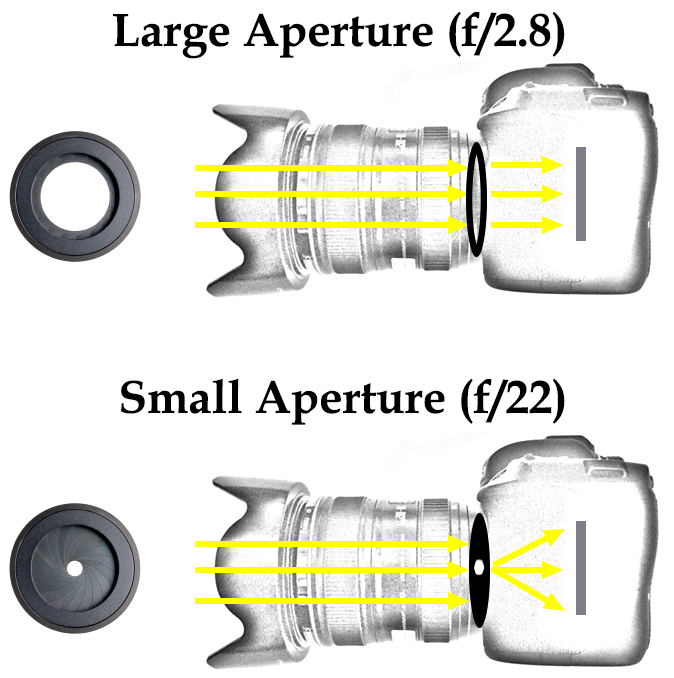
Diagram showing how light enters the camera through the lens and results in diffraction at small aperture settings

What’s the result of this to your photography? In a word: softness.

A picture shot at f/22 will not be quite as sharp as one shot with an aperture that is a bit larger. Here is an example of detail from two photos, which are identical except that one was shot at f/8 and the other at f/22:
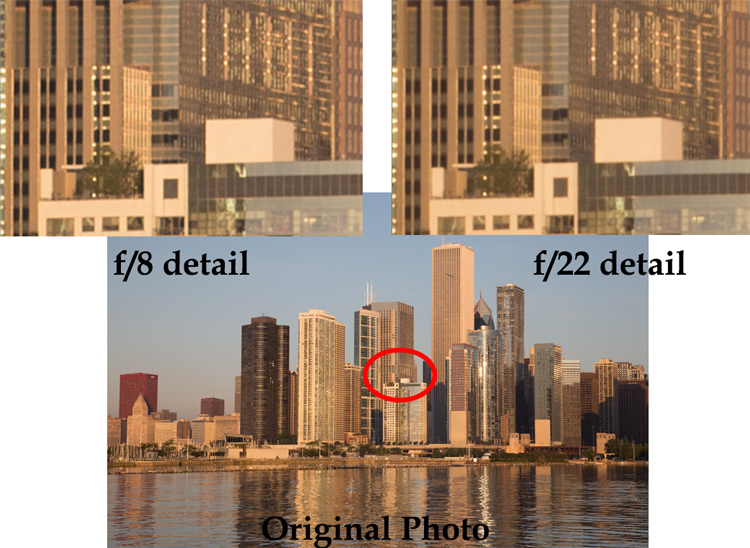
Example of photos taken with large and small apertures to show the effect of diffraction when using a small aperture on your lens

You can probably see that the f/8 detail is sharper than the f/22 detail.

The example above was shot outdoors with a 24-105 mm f/4 lens (my favorite). To see this application in other contexts, I also created another example, this time shooting indoors with a 70-200 mm f/2.8 lens with a minimum aperture of f/32.
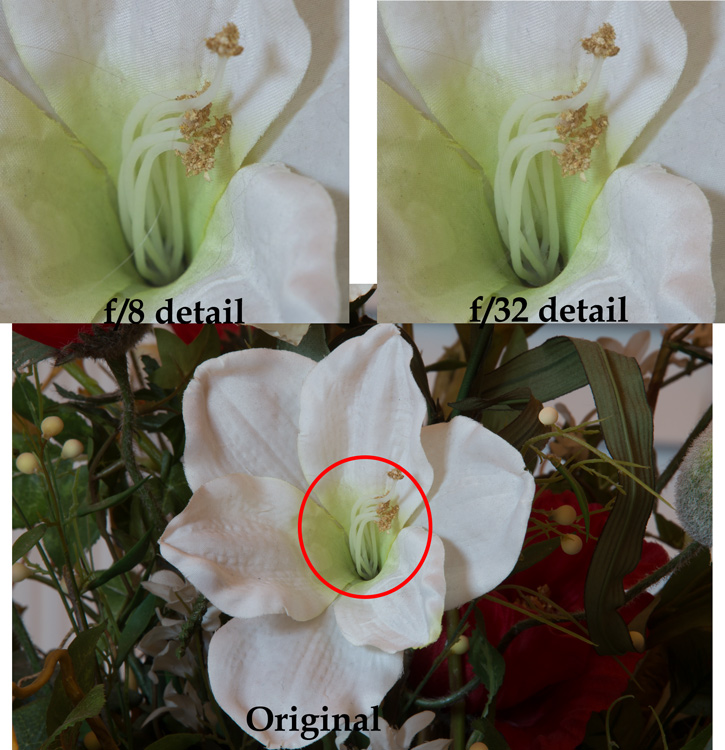
Example of photos taken with large and small apertures to show the effect of diffraction when using a small aperture on your lens

Again, the f/8 detail is sharper than that shot with the smallest aperture.

By looking at these examples, you can see that diffraction is not just theory, it has real affect on your photos.

Using the Sharpest Aperture

Okay, so now you see that diffraction is a real phenomenon, and you want to avoid it. What is the smallest aperture you should use? And what is the best aperture setting? Unfortunately, there is no one perfect answer. It depends on the lens. As a result, you should test your lens(es) to determine the aperture (or range of apertures) at which they work best (also known as the lens’ sweet spot).

To do so, just take the exact same picture at each aperture setting (in 1-stop increments). Be sure to use a tripod so your picture is exactly the same. In addition, make sure you are increasing (making longer) your shutter speed by an equal amount every time you change your aperture so that your exposure stays the same. After you have taken the pictures, load them onto your computer, zoom-in on each, and compare.

If you don’t want to test your lens and just want a quick rule of thumb for avoiding the effects of diffraction, generally avoid using an aperture smaller than f/11 or f/16. Most experts consider this range something of a maximum. In addition, the sharpest aperture on most lenses will be about f/5.6 – f/8, or about 1-2 stops smaller than its wide open aperture setting. When possible, default to using an aperture in this range.

Maximizing Depth of Field with Larger Apertures

You may find yourself wondering how to get a large depth of field without using a very small aperture. Keep in mind that you don’t always need to use the smallest aperture that your lens offers, to get a sufficient depth of field. If you are shooting outdoors, which is generally where you will want a small aperture and maximum depth of field, you should become acquainted with the subject of hyperfocal distance.

Despite its complex-sounding name, hyperfocal distance is just a measure of how close you can focus and still keep the background of your image acceptably sharp. You don’t necessarily need to use the smallest aperture possible, particularly when you are shooting wide-angle. For example, if you are using a full-frame camera with a 20mm lens, even using an aperture of f/8 will keep everything sharp from 5.5 feet in front of you, all the way to infinity!

This shows that you don’t always need to use an aperture like f/22. Get acquainted with hyperfocal distance (or keep a hyperfocal distance chart handy) to see how large you can make your aperture, yet still maximize depth of field.

Focus Stacking

Sometimes, however, you need to break out the heavy artillery and make sure everything – from what is right in front of you all the way to infinity – is in focus. To do that, use a technique called focus stacking.

To focus stack what you do is, take multiple pictures of the exact same thing at your lens’s sharpest aperture setting. Again, you should test your lenses to see what the sharpest setting is for each lens, but if you don’t know it will usually be in the range of f/5.6 – f/8.0. Set your lens to manual focus, and set the focus point on the closest part of the image (nearest part you want in sharp focus). Take the first shot, then repeat the process, gradually setting the focus point further and further away with each shot, until you are focused at infinity. Usually 3-5 shots will cover the entire range of the scene.

When you get your photos in your computer, you will combine the photos in Photoshop to create one file using the sharpest parts of each picture. There are a few different ways to do this:

  • Automatic: Use the Photomerge function to load your photos into Photoshop (File > Automate > Photomerge) and combine the images, making sure that the box to “blend images together” is checked. Photoshop will combine the images into one file and (usually) use the sharpest portions of each image.
  • Partial: You can also load the images as separate layers to one file in Photoshop, align your layers (Edit > Auto-Align Layers), and then have Photoshop automatically blend the layers (Edit > Auto-Blend).
  • Manually: Finally, you can do the process manually if you want complete control over it. Load the images as layers to the same file align the layers. To blend the photos, add a layer mask to the top layer (Layer > Layer Mask > Reveal All) and use a black brush to mask away everything except the sharpest point of that picture. Then merge down that layer (Layer > Merge Down) and repeat the process for each layer. This method will obviously take more time than the first two options above.

At the end of this process, you will have combined the layers such that the sharpest portion of each one is showing. The photo will be 100% sharp from front to back – with no effects of diffraction.

Application to Your Photography

You should be aware of diffraction, but don’t let it scare you away from using the aperture that you need. In particular, there is still a place for shooting with very small apertures. The effects of diffraction – while real – are not that great, and keep in mind that the examples set forth above showing the effects of diffraction were zoomed way in. If we look at the original pictures, can you tell which one was shot at the smaller aperture?

Full photos showing limited effect of diffraction

Can you see any diffraction here? In the top row, the picture to the left was shot at f/22 and the one to the right was shot at f/8. In the bottom row, the picture to the left was shot at f/8 and the one to the right was shot at f/32.

Can you see the diffraction in the images above? I can’t.

Worrying about diffraction should be reserved for those times you are dead set on absolute maximum image quality, or you know you are going to display a large version of the picture. Otherwise, you can still shoot with small apertures and you will likely not notice the difference. In other words, there is still a place for f/22 in this world.

However, on those occasions where it does matter, use a slightly larger aperture. Know your lens’ sweet spot and use that setting. Be familiar with the hyperfocal distance involved and see if you can keep the entire picture sharp at the larger aperture. Where you cannot, use focus stacking, this will ensure the sharpest pictures possible.

googletag.cmd.push(function() {
tablet_slots.push( googletag.defineSlot( “/1005424/_dPSv4_tab-all-article-bottom_(300×250)”, [300, 250], “pb-ad-78623” ).addService( googletag.pubads() ) ); } );

googletag.cmd.push(function() {
mobile_slots.push( googletag.defineSlot( “/1005424/_dPSv4_mob-all-article-bottom_(300×250)”, [300, 250], “pb-ad-78158” ).addService( googletag.pubads() ) ); } );

The post Maximizing Depth of Field Without Diffraction by Jim Hamel appeared first on Digital Photography School.
Digital Photography School

 
Comments Off on Maximizing Depth of Field Without Diffraction

Posted in Photography


Maximizing Sharpness with a Telephoto Lens

11 Dec

Telephoto lenses are perhaps one of the first people buy to add to their kit, as they are useful in many genres of photography.  The reach that a telephoto lens can offer is crucial for a lot of sports, wildlife or other ‘action’ photography. However, it is that same reach that can introduce the problems that prevent people getting sharp results.  Here are six tips to help you perfect the technique of maximizing sharpness with a telephoto lens.Maximising Sharpness when shooting with a telephoto lens

1. Shutter Speed Selection

One of the biggest hurdles to overcome when shooting with a telephoto lens is camera shake – softness introduced by not being able to hold the camera steady for the duration of the exposure.  One of the easiest ways to overcome this is to make sure that the shutter speed you select is faster than the reciprocal of the focal length. For example, in order to minimize the effect of camera shake with a 300 mm lens, a shutter speed faster than 1/300th second is recommended.

To take this one step further, it is best to consider the “effective focal length” (EFL) of the lens by taking the crop factor of your sensor into account.  If you are not shooting with a full frame camera, you are most likely shooting with a crop sensor (or APS-C) camera.  The sensors within these cameras are smaller than full frame sensors and, as such, give the result of multiplying the focal length of any lens put on the camera (see Crop Factor Explained for further explanation).  The result is, when you are using a 300 mm lens, on a camera with a 1.5x crop factor, the effective focal length is 450 mm. Thus meaning you need to be looking to use a shutter speed quicker than 1/450th second.

So just make sure you are aware of the crop factor of your camera, so that you can quickly approximate the required shutter speed, if shooting handheld.

Maximising sharpness when shooting with a telephoto lens

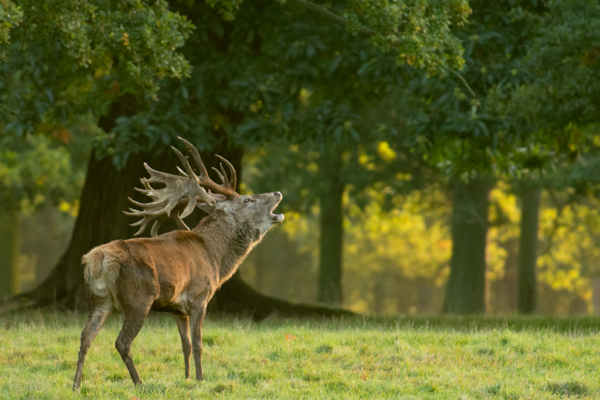
Shot at 340 mm (510 mm EFL), f/5.6, ISO2500 using 1/320th second shutter speed. Use of a tripod here meant that I could be confident that the resulting images of this Red Deer stag would be sharp, even though shot only at 1/320th second.

2. Use a Tripod

Another very simple way to overcome image softness due to camera shake is to use a tripod.  Not everyone enjoys carrying or using a tripod at all times. However, it is a really quick and simple way to help minimize camera shake and to give you more flexibility in using slower shutter speeds, compared to shooting handheld (i.e. not a necessity to stay at “1/EFL”, though still recommended where possible).

There a numerous tripod heads available that have the freedom of movement that is often needed when shooting sports or wildlife. You can also be safe in the knowledge that even at the end of a long day of shooting, when your arms would usually be tired, the tripod will continue to hold the camera steady.

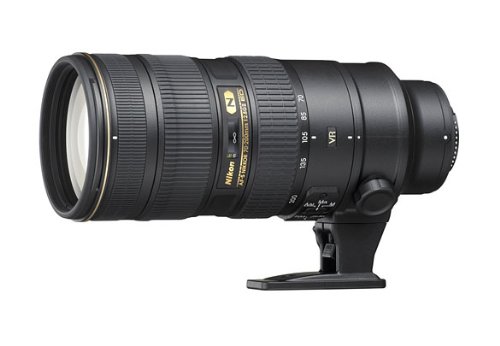
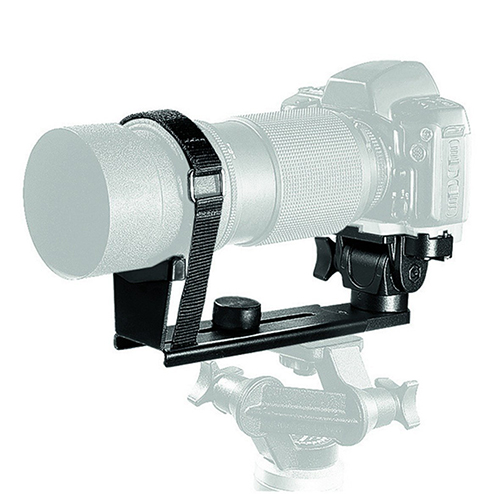
A lot of larger lenses come with a tripod collar which mounts the lens to the tripod, rather than the camera. Most of the smaller, lower budget (but still very long, in terms of focal length) telephoto zoom lenses do not have one, meaning that the camera is mounted to the tripod and the lenses are left dangling off of the camera, susceptible for small vibrations.  Some tripod manufacturers make special brackets to overcome such situations, allowing smaller telephoto zoom lenses to be tripod mounted and become more stable (see image below).

Maximising sharpness using a telephoto lens

Consider tripod mounting your telephoto lens to improve stability when shooting at extreme focal lengths.  Pictured: a Manfrotto 293 telephoto lens support.

3. Image Stabilization

Obviously if shooting handheld, image stabilization (IS or VR) can again help overcome camera shake.  Though you will want to avoid this if you are opting to shoot on a tripod, as image stabilization will actually introduce movement in that situation.

4. Aperture Selection

Shutter speed selection, as mentioned above, was all about considering shutter speed in relation to freezing motion. Aperture selection, however, is two-fold:

a) Diffraction – this is generally a rule for all, but the top of the range telephoto lenses, but shooting at the widest aperture (smallest f/ number) your lens allows will often result in image softness due to diffraction.  This is where light entering the camera is diffracted before hitting the sensor, resulting in the appearance of soft focus throughout the frame (though generally far more noticeable in the corners).  Therefore, if you choose a slightly smaller aperture, e.g. from f/5.6 to 6.3 or 7.1 (known as stopping down) you will minimize the diffraction and see an increase in the sharpness of the resulting images.

b) Ensuring you have enough depth of field – a key component of wildlife and action photography is depth of field.  Often, you shoot as wide an aperture (small f/ number) as possible, to try and isolate the subject and give a soft diffuse background.  However, at long focal lengths, with a close subject, the depth of field (i.e. the region of the image which will be captured in sharp focus) can be as small as a few millimetres, meaning that tiny errors in focusing accuracy will mean that the crucial part of your wildlife shot that needed to be in focus, will be soft.  There are plenty of mobile apps or websites that help you calculate the depth of field for your given camera, aperture and focal length, so make sure you have an awareness how small an aperture you actually need in order have enough depth of field.

Maximising sharpness using a telephoto lens

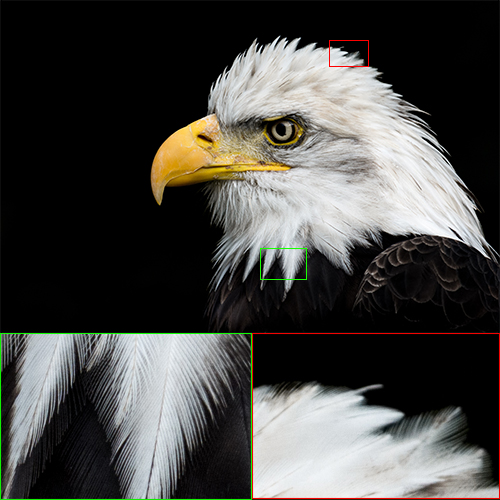
Here, even though shot at f/9.0, you can see that there was not sufficient depth of field to render all of the head feathers of this bald eagle, completely sharp.

5. Bump the ISO

Don’t be afraid to boost the ISO on your camera.  Wildlife and sports photography is a constant compromise between shutter speed and aperture to ensure that you are using a quick enough shutter speed to freeze motion and overcome camera shake, and a suitable aperture to give you enough depth of field and avoid diffraction.  To alleviate this, you can increase the sensitivity of your sensor by increasing the ISO.  This will let you use quicker shutter speeds for the same given aperture and exposure.  Increasing the ISO will introduce more noise into the final image, but it’s better to have a sharp, yet noisy photo, than to have missed whatever fleeting moment you were trying to capture by not being able to use a fast enough shutter speed.

6. Teleconverters

Often available in 1.4x or 2x magnifications, teleconverters are great for extending the focal length of your lenses on a budget.  The increase in focal length does come at a cost however, as they increase the maximum aperture of your lens by one or two stops respectively.  Most consumer DSLRs do not allow autofocus with lenses with a smaller aperture than f/8.0 (i.e. f/5.6 + one stop) so you are limited in what teleconverter/lens combinations you can use. You need a fairly fast lens to begin with, i.e. a wide maximum aperture of f/2.8 or f/4.0, to make the most of a teleconverter.  Once the teleconverter is attached, autofocus will generally be slower (less light to play with) and any flaws of your current lens will be magnified – so stopping down, as per in point #4 above, becomes even more important.

Maximising sharpness when shooting with telephoto lenses

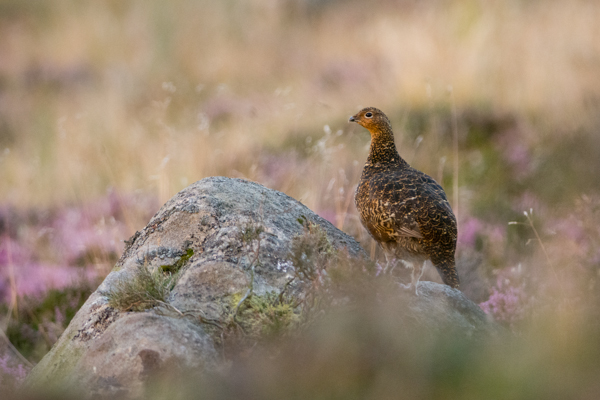
Red grouse at sunset. This is a shot of compromises: 300mm (450mm EFL), f/5, ISO4000, 1/125th second, tripod mounted. Even at ISO4000, the shutter speed was still only 1/125th of a second, but mounted on a tripod the results were nice and sharp.

Summary

Overall, the above tips are just a few considerations for maximizing performance of your telephoto lenses. It’s easy to get carried away thinking that you need more focal length, just to get that little bit closer to your subject. However, it is important to understand the complications of working with such lenses and learn the techniques you can use to overcome the difficulties introduced by such long focal lengths.

Do you have any other techniques that you frequently use to help ensure sharp images when shooting with your telephoto lenses?  Please share them in the comments below.

Post originally from: Digital Photography Tips.

Check out our more Photography Tips at Photography Tips for Beginners, Portrait Photography Tips and Wedding Photography Tips.

Maximizing Sharpness with a Telephoto Lens

The post Maximizing Sharpness with a Telephoto Lens by Elliot Hook appeared first on Digital Photography School.

Digital Photography School

 
Comments Off on Maximizing Sharpness with a Telephoto Lens

Posted in Photography


[MODIFIED] Windows 7 – Disable Automatic Docking, Resizing, and Maximizing of Windows

01 Aug

Prevent Windows 7 from automatically docking, resizing, and maximizing windows when you drag them to the screen edges.

Windows 7 comes with a window management feature that is supposed to make it easier to lay out multiple windows on your Desktop. It does this by automatically maximizing or docking windows when you move them to the top or sides of the screen. Plus, as you resize windows and move your mouse pointer towards the screen edges, Windows 7 will resize the windows for you. You’ll notice these things happening by the appearance of an outlined rectangle during the move or resize operations.

While some people like this new feature, others would rather not have windows growing by themselves and want more precise control over window sizes. Thus it can be disabled:…

Read more at MalekTips.
New Computer and Technology Help and Tips – MalekTips.Com

 
Comments Off on [MODIFIED] Windows 7 – Disable Automatic Docking, Resizing, and Maximizing of Windows

Posted in Technology