Since the introduction of Photoshop CS2, Adobe’s image editing software has shipped with the ability to easily merge a series of photographs into a panorama. Often, it is incredibly simple: once you have the images you want to stitch together, it only takes a few clicks to produce the blended panorama. However, whilst Photoshop may be able to seamlessly merge your images 90% of the time, on occasion it may struggle to perfectly match the exposures across the input images resulting in a final panorama with obvious joins between the individual photographs.
To see what I mean, have a look at the image below. This is a 7 shot panorama, straight out of Photomerge, and you can see obvious banding in the water of the lake, as the exposure/colour tone subtly change between images.
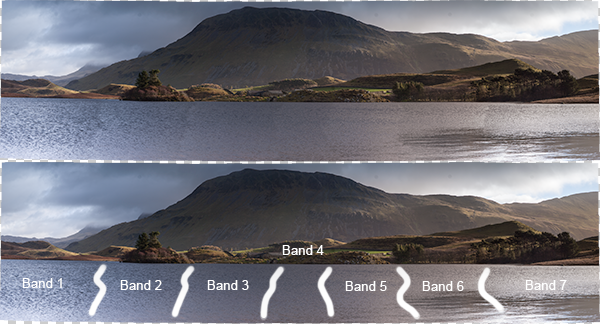
Top: The panorama fresh out of Photomerge. Bottom: I've highlighted the joins between the individual input images where the blending of exposures was not sufficient
This article walks through a series of fairly simple steps to edit the above panorama to remove the obvious joins and give a perfectly blended panoramic image (note: I am only going to discuss processing the panorama once it has been stitched by Photomerge. For tips on how to take the images, prepare them for stitching and on use of Photoshop to stitch them, see this recent article by Jason Weddington).
It is worth mentioning that the images I started with were a challenge to shoot for a panorama as the exposure differed greatly between the far left of the image, where I was shooting away from the sun, and to the far right, where I was shooting towards the sun. Therefore, before blending the images into the panorama, the individual images were processed in Adobe Lightroom to try and match the exposures as closely as possible first. Once complete, the selected images were exported to Photoshop to ‘merge as a panorama’, using the ‘auto’ setting.
On to the steps…
1. Once the images have been merged, the output image will consist of several layers (one for each input image, in this case 7) with a mask applied to each layer. In many cases, these layers can be flattened at this point to give the final panorama, however, we’re going to make a few edits first.
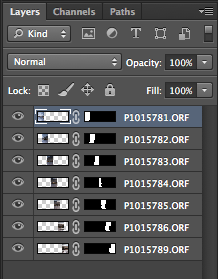
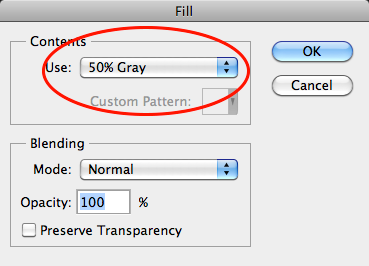
2. Create a new layer, on top of all other layers. Fill the layer (Edit > Fill) with 50% grey:
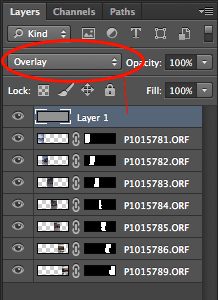
3. Set the blending mode of the ‘grey layer’ to ‘overlay’. When set to overlay, a 50% grey layer will appear transparent, so initially this layer will make no difference:
4. Find one of the joins where the exposure needs to be tweaked, for example, below, there is an obvious join between the two images. The left hand image needs to be a little lighter and the right hand image needs to be a little darker. Let’s address the left hand image first.
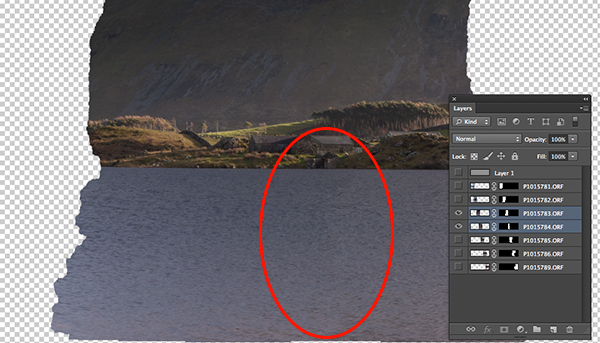
Only the two layers of interest are selected here. The left hand image needs to be lightened, whilst the right hand image needs to be darkened
5. If we ctrl+click/cmd+click the mask of the appropriate layer (i.e. click on the black/white rectangle in the layer bar), we will bring the portion of the image to be edited into an active selection (we only want to edit inside of that selection for the time being).
6. Ensure the ‘grey layer’ is highlighted
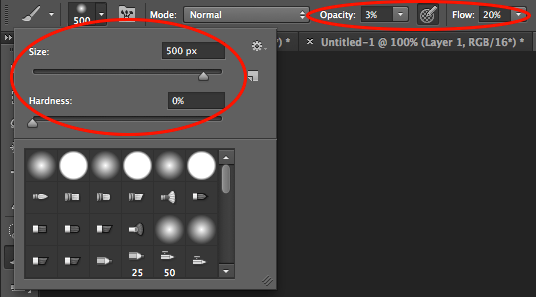
7. Select the brush tool. You will want a large, soft brush so set the size to be a few hundred pixels (I used 500 px in this instance, but the size is relative to the size of your panorama) and set the hardness to 0%. Set the opacity to 3% and the flow to 20%:
8. To lighten the layer we want to select the colour white (if we wanted to darken the layer, we would select black).
9. Using the brush, liberally brush over the join and back towards the centre of the image. This will paint white onto the grey layer, but only within the current selection. As the brush is very soft the edits should be subtle, but as you brush you should be able to see the area under where you have painted white gradually begin to get lighter.
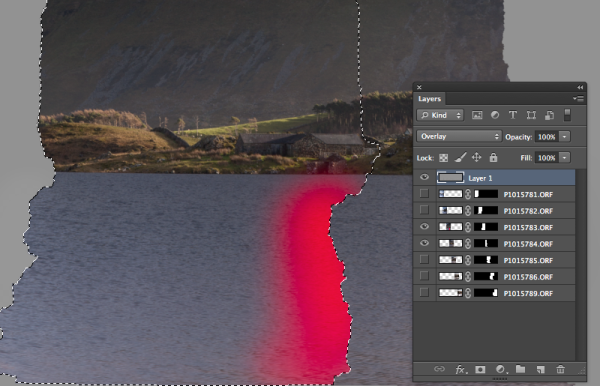
An active selection of the mask of the left hand image is required so that any edits are only applied within that selection. The idea is to paint white onto the 'grey layer' in the region highlighted by red in the above image.
10. In order to get seamless joins, I find that is is a compromise between lightening one image and darkening the other in order to maintain a smooth transition of tone/exposure across each image. Therefore to edit the right hand image, you repeat steps 5 to 9, but ensure that the right hand image is within your active selection, and that the colour black has been selected for your brush.
Initially it is a slow process that involves carefully modifying each image at the join in order to match the exposure, however once you get a feeling for the brush it can become quite quick.
If we change the blend mode of our ‘grey layer’ back to ‘normal’ you will be left with something similar to the middle image below, where you can see the result of the white/black brush strokes on the grey layer and the difference it makes to the actual join.
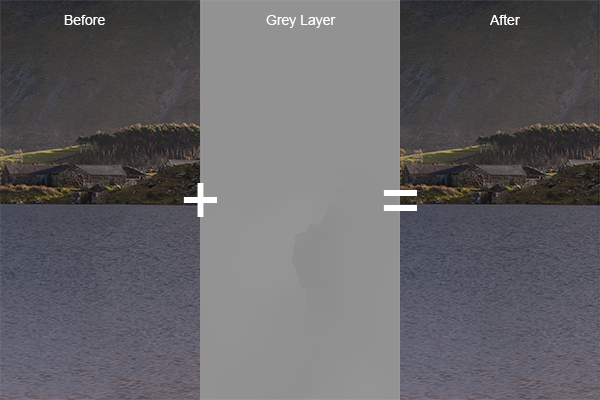
A composite showing the starting image, the modified 'grey layer' and the final image, when the 'grey layer' is set to 'overlay'.
If you repeat that for each join across the panorama, you will end up with grey layer that looks like the image below (with the blend mode set to ‘normal’).

The 'grey layer' for the entire panorama showing the white/black brush strokes around each join
Once you set the blending mode back to ‘overlay’, all of the joins should disappear, and you should be left with a perfectly blended panorama with no tell tale signs of the joins:

The entire panorama when the 'grey layer' is set to 'overlay'. The joins between the images are no longer visible in the water of the lake
As the edits have been made to the ‘grey layer’ no permanent edits have yet been made to the actual images, so any mistakes are easily rectified or any further modifications can easily be made. Once you are happy with the blending of the individual images, you can flatten the layers to produce your final panorama and make any further finishing touches:

The final panorama: Llyn Cregennen, North Wales, UK
I hope those steps were easy enough to follow. Ultimately, this is just one application of a the use of a 50% grey layer, set to ‘overlay’, in order to modify the exposure of an image in a non-destructive manner (until the layers are flattened, that is). So if you try to blend a panorama in Photoshop but didn’t quite get the results you were after, you dont have to jump for the clone brush straight away or send the image to the trash. Give these steps a try and see if you can manually match your exposures where Photoshop can’t.
Please let me know if you have any feedback, I welcome any comments and, as always, I’ll try to respond when I can.
Post originally from: Digital Photography Tips.
Check out our more Photography Tips at Photography Tips for Beginners, Portrait Photography Tips and Wedding Photography Tips.
How to Match Exposures when Stitching Panoramas in Photoshop
You must be logged in to post a comment.