RSS
 

Posts Tagged ‘Mask’

Photoshop Sharpening for Beginners – Unsharp Mask, High Pass and Smart Sharpen Explained

02 Jan

The post Photoshop Sharpening for Beginners – Unsharp Mask, High Pass and Smart Sharpen Explained appeared first on Digital Photography School. It was authored by Nisha Ramroop.

photoshop-sharpening-for-beginners

With the constant improvement of technology, it is realistic to expect tack sharp images straight out of your camera. Many times, though, the image appears sharper on your camera than when uploaded to your computer. This is because images need to be sharpened for their specified output. In Photoshop sharpening for beginners, we look at why and how to sharpen your images. Also, you will review some of the sharpening filters and techniques that help make a huge difference to the overall quality of your final edit.

Image: F/5.6 1/200/ ISO800 @420mm

F/5.6 1/200/ ISO800 @420mm

Why sharpen?

Before we delve into the photoshop sharpening tools, it is important to know why and when you need to sharpen your images. The premise of sharpening is that it increases the contrasts around the edges in your image.

As previously mentioned, you need to sharpen images for their specific output types. This means you sharpen an image displayed on the internet differently than one meant for print.

Sharpening is also very useful when it comes to correcting smaller focus issues. For example, if you are shooting a portrait and the focus is on the ear instead of the eyes.

Sharpening the subject’s eyes brings the attention back where you intended. In other genres of photography, use sharpening in pretty much this same way. Sharpen the areas you want to draw the viewer’s eyes to and decrease the sharpness in areas you want to “fall away”.

Photoshop-Sharpening-for-Beginners

Sharpen for your respective output: web vs print. Details make a difference F/11 1/250 ISO200 @10mm

Keep in mind that while sharpening takes your image to the next level, there are times when it is not needed. While sharpening a person’s eyes and lips can take their portrait to the next level, you want to avoid sharpening their skin!

How to sharpen

As with other editing techniques, Photoshop sharpening filters are destructive (when applied directly to your image). Use layers and smart objects, to maximize the following sharpening tools and avoid permanently changing it.

Bonus Tip: When post-processing, save the application of your sharpening technique for last.

Unsharp Masks

While the name “unsharp” sounds like a tool that would make your images less sharp, this counter-intuitively named filter is, in fact, a sharpening tool. Interestingly enough, it was regarded as the best tool to sharpen images in earlier iterations of Photoshop.

While it is still useful, some of the other tools afford you a greater amount of control.

Photoshop-Sharpening-for-Beginners

Photoshop sharpening for beginners notes: When you sharpen an image too much, it starts to look a little noisy.

To use Unsharp Mask:

  • Duplicate your original/background layer
  • Right-click on your new layer and choose “Convert to Smart Object”
  • Go to Filter -> Sharpen -> Unsharp Mask. This brings up a dialog box with the options: Amount, Radius and Threshold


Remember, we said that sharpening basically increases the contrasts around the edges in your image? Well, building on that will make these sliders easier to understand.

Use the Amount slider to increase or decrease the amount of contrast in the edges of your image.

Radius manages the level of detail. So a smaller radius will manage the smaller details, while a large radius affects a bigger area.

The last slider, Threshold, affects the areas of higher contrast.

Photoshop Sharpening for Beginners – Unsharp Mask, High Pass and Smart Sharpen Explained

When using these sliders, a good starting place is to figure out your radius first. Do you want to sharpen the smaller details or the larger ones? If you are still unsure how to work with Photoshop sharpening for beginners, experiment!

In this example, push your radius up and then work back down until you affect the areas that you want. From here, you can start moving around the other two sliders until you get your desired results.

One of the downsides of using Unsharp Mask is that it is Layer specific. This is because it affects your entire image, so you need Layer Masking to discard areas that you don’t want sharpening.

Smart Sharpen

The Smart Sharpen tool is like a child of Unsharp Masks, as it gives you some more options. One of the cool things with Smart Sharpening is that it ignores skin detail and focuses on areas with higher contrasts e.g. eyes, eyebrows, lips.

Use the same workflow as above to access the Smart Sharpen filter. The dialog box gives you more advanced options than the previous Unsharp Mask. Amount and Radius work the same way as previously described.

Image: F/5.6 1/1600 ISO100 @420mm

F/5.6 1/1600 ISO100 @420mm

A drop-down menu allows you to remove different types of blurs such as Gaussian, Lens and Motion blur. Lens blur is the most common removal used in this menu.

Image: In Photoshop CC, your menu looks a little differently but has all the same options. Additiona...

In Photoshop CC, your menu looks a little differently but has all the same options. Additionally, it includes a useful option to reduce noise.

Smart Sharpen also allows you to create presets. This is helpful if you are sharpening a batch of images at similar focal lengths. Remember, when you apply your filters/filter preset to a Smart Object, you can further adjust/refine it.

High Pass Sharpening

Another photoshop sharpening for beginners is the High Pass Sharpening technique. While it is a little more advanced than the other tools, you can still easily apply it. It is not a filter found in the Sharpen Menu like the Unsharp Mask and Smart Sharpen filters. What it is, however, is a combination of steps that sharpens your image.

To process with High Pass Sharpening:

  • Duplicate your layer
  • Desaturate your new layer. It seems like a strange step, but since sharpening increases saturation around your edges, your image may start to look surreal.
  • Right-click on your desaturated layer and choose “Convert to Smart Object”
  • Go to Filter -> Other- > High Pass. Your entire image now turns to gray, and when you move the radius slider, you will see the targeted detail areas affected.
Photoshop-Sharpening-for-Beginners

Left: Using High-Pass in the default normal mode, see how your edges are defined. Right: Using High-Pass in Overlay Blend Mode allows you to see your changes in real-time

There is, of course, an alternate way to this gray image where you see your edit in real-time.

Prior to the last step above:

  • Select your desaturated layer and go to Blend Modes
  • Select Overlay
  • Then go to Filter -> Other -> High Pass and adjust


Photoshop-Sharpening-for-Beginners

At full size, you don’t always see that the eyes are not as sharp as they can be. Like Smart Sharpen, the eyes and lips are sharpened, but the skin is unaffected. F/7.1 1/125 ISO100 @70mm

Note: This sharpening technique is the only one that lets you apply sharpening with different blend modes.

Conclusion

Remember, sharpening should be the last step in your post-processing workflow. These filters and techniques in Photoshop Sharpening for Beginners will take your image to that next level. It helps to know when and why to sharpen an image and as with all processing, applying correctly makes a huge difference to your final image.

Do you have any other photoshop sharpening for beginners tips you’d like to share? Please do so in the comments!

The post Photoshop Sharpening for Beginners – Unsharp Mask, High Pass and Smart Sharpen Explained appeared first on Digital Photography School. It was authored by Nisha Ramroop.


Digital Photography School

 
Comments Off on Photoshop Sharpening for Beginners – Unsharp Mask, High Pass and Smart Sharpen Explained

Posted in Photography


How to Edit Landscape and Nature Photos with the Lightroom Gradient Tool and Range Mask Features

05 Jan

The post How to Edit Landscape and Nature Photos with the Lightroom Gradient Tool and Range Mask Features appeared first on Digital Photography School. It was authored by Simon Ringsmuth.

Lightroom has always had a rich set of tools to allow photographers to get the most out of their images. However, until recently the ability to edit landscape and nature photos was a bit lacking.

While, global adjustments, like changing white balance and exposure have always worked great in Lightroom, fine-tuning edits can be problematic. Recent updates have seen incredible improvements to the Filter tools in Lightroom. An added tweak called Range Mask makes all the difference for photographers who need complete control over the precise implementation of their edits.

Lightroom Gradient Tool and Range Mask

The three most common ways to edit specific parts of an image in Lightroom are through the use of the Graduated Filter, Radial Filter, and Adjustment Brush. If you want to smooth the skin on your portraits, increase the saturation of your skies, or change the color cast of your clouds these tools can be just the ticket. But what if you have a tree that sticks up into the sky or an uneven horizon dotted with buildings and power lines?

The usefulness of the filter tools is somewhat restricting when you want to limit your edits to particular sub-parts of a picture. Until recently the Auto-Mask option was the best way to confine your edits to certain colors or locations within an image. Landscape and nature photos are especially tricky because of the uneven edges and jagged borders that exist between sections of the photo that need editing. However, the Range Mask option solves almost all of these issues with ease.

How it works

To illustrate this, I’m going to walk you through the editing process of the following image. My brother Andy took it while he was on a tour of the swamps in Louisiana, USA, with his family last summer. The initial image has a nice composition but feels dull and uninteresting, which is a far cry from the real experience.

Adjusting White Balance with a Graduated Filter

One change to punch things up is altering the white balance of the sky to bring out the bright blues and make the image more vibrant.

The first step is to click over to the Graduated Filter panel. Dial in a white balance that skews more towards the cooler end of the spectrum and reduce the exposure just a bit. Next, click and drag from top to bottom on the image to put the filter in place.

The sky is now a rich blue, however, a big problem becomes evident: the color cast of the trees has changed too. This result is not what I want. Clicking the Show Selected Mask Overlay button in the bottom left corner under your image reveals that the graduated filter has been applied to everything including the trees as well as the sky.

Fine-tuning the Graduated Filter using the Range Mask

Fine-tuning a tool such as the Graduated Filter, used to involve a series of steps. These steps included brushing out the mask in places you didn’t want it in combination with the auto-mask feature. It worked, but results were often a little sketchy. They also required a great deal of tweaking and fine-tuning. That’s not to say the brush option is useless-far from it! I have an example later in this article that shows how useful it can be.

However, all this has changed in recent versions of Lightroom. You can now use the Range Mask to apply any of the three filter tools to specific parts of an image based on lightness or color similarity.

The default value for Range Mask is Off, but with one of your Filter adjustments selected you can then choose to enable Range Mask for Color, Luminance or Depth.

  • Color applies the filter to specific parts of the image based on how similar they are to color values that you select.
  • Luminance applies the filter to specific parts of the image based on how light or dark those parts are.
  • Depth works only with cameras that record depth information and applies the filter to specific parts of the image based on how close or how far away they are. Some mobile phones have this feature but most traditional cameras do not, so Depth will often be disabled unless you are editing images taken with certain mobile phones.

Range Mask – Color

For this image, I’m going to use the Color option, though Luminance works great in many nature and landscape photos as well.

With Color selected, you can either click and drag on your image to select a range of colors or can click multiple points by shift+clicking. This selection is where the mask gets applied. I find that shift+clicking generally works better, although your mileage may vary depending on your editing goals and the type of picture you are working with.

You can click up to five spots on the image to refine your color selection. Use the slider in the Range Mask panel to fine-tune things further. This slider hones the edges of your Range Mask. If you find that the border between the edited and unedited portions of your image is a bit stark, adjusting the Amount slider will help mitigate this issue.

The result of this one Gradient Filter, along with the Range Mask, is an image that is already much improved from the original.

Looking at a 100% crop of a portion of the image reveals just how precisely the Gradient Filter has been applied thanks to the Range Mask. Here is a portion from the top-right of the original unedited image.

Here is the same portion with the Gradient Filter applied, using the Range Mask to apply the Filter to only selected color ranges. In this case, the color of the sky.

Notice how precisely the edits were applied, and how intricate the edges around the tree leaves are. This illustrates why the Range Mask option is so useful for landscape and nature photos. There are many tricky edges and small parts of the image that can take a very long time to fix without it.

Range Mask – Luminance

Another way to use the Range Mask is with the Luminance option. This option only applies the mask to the brightest or the darkest portions of the Gradient, or other Filter, that’s applied.

The overall idea here is the same, but the implementation is a tad different. Instead of selecting colors where you want the Range Mask applied, you use the Range sliders to concentrate the mask on the lightest, darkest or mid-range parts. One of the most useful things here is the Show Luminance Mask box which gives you a real-time preview of where your mask application. This helps you as you are adjusting the sliders.

Here’s an image I shot while hiking in the mountains near Seattle. It’s not bad, but a few edits would help improve the picture. Edits may help it look a little closer to how it appeared when my wife and I were tromping around in the wilderness that day with my cousin.

I want to bring out the color in the foreground trees in this image. A Graduated Filter with Luminance Range Mask is perfect in this scenario because the edits can be applied just to the darker portions of the image. With the filter in place and the mask tweaked to be applied only to the darker parts, I can ensure my edits are going to show up just where I want them to by checking the Show Luminance Mask option.

Fine-tuning using Brush

As demonstrated above, the Range Mask is extremely useful for nature and landscape photographers. It applies the Graduated Filter to just the right portions of the image and not the entire picture evenly. If you want to customize your Graduated Filter further, click the Brush option (not the Brush Adjustment Tool) and proceed to add to, or erase, the Filter wherever you want.

In this case, I’d like to remove the Graduated Filter from the lake in the foreground. Even though I can tell from my Luminance Mask overlay that it’s not being applied too heavily to that area, removing all traces of it with the brush will help me get the exact picture I want.

The end result is a photo with much warmer green tones in the trees and a lake that reflects the blue sky above, which is just the look I was aiming for.

Conclusion

Hopefully, these examples give you an idea of how powerful the combination of Graduated Filters and Range Masks are for nature and landscape photographers. I’m always eager to hear from the DPS community. Have you found this particular tool useful? Are there any other tips you’d like to share about using the Lightroom Gradient Tool and Range Mask? Leave your thoughts in the comment section below.

The post How to Edit Landscape and Nature Photos with the Lightroom Gradient Tool and Range Mask Features appeared first on Digital Photography School. It was authored by Simon Ringsmuth.


Digital Photography School

 
Comments Off on How to Edit Landscape and Nature Photos with the Lightroom Gradient Tool and Range Mask Features

Posted in Photography


An In-Depth Look at the Range Mask in Lightroom Classic CC

22 Jul

Lightroom is an ever-changing ever-morphing evolution of the cutting edge of digital image processing. Quite literally, it seems like Adobe releases new features and updates for their upper tier consumer photo editing software extremely frequently. Now, some of these updates and new features are loved by the photographic community and others…well, not so much.

One of these brand new features, called the “Range Mask”, came along with the v7.2 release of Lightroom Classic CC back in February (2018) and it caused quite a stir. It allows you to incorporate masking with the local adjustment tools right inside of Lightroom V7.2 and later.

An In-Depth Look at the Range Mask in Lightroom Classic CC - Death Valley

As with most fresh features in Lightroom, some photographers were a little bit skeptical about its actual usefulness in their editing workflow. It’s an interesting tool to be sure and after this, you’ll know everything there is to know about the brand new range mask feature in Lightroom Classic CC.

What is the Range Mask?

Before we get too far into the conversation let’s take a moment and briefly talk about masks as they pertain to editing photographs. A mask is simply a way for you to control what areas of a photo receive the edits you want to apply. There is a huge range of mask types and they vary quite infinitely in their applications.

Usually, masks are routinely used in Photoshop. The old adage “black conceals and white reveals” was born directly from the usage of layer masking inside Photoshop. For the purposes of understanding the range mask in Lightroom, just know that masks allow selective control over edits within a photo.

The new range masking feature provides you with two different methods for applying masks: luminance and color.

Luminance Range Masking

If you’re a Photoshop user, think of luminance masking as a boiled down version of luminosity masks. Don’t sweat it if you’ve never used luminosity masking in Photoshop. Just know that the luminance mask applies local adjustments based on the brightness range you select.

luminance slider - An In-Depth Look at the Range Mask in Lightroom Classic CC

This means that you can apply any edit from a local adjustment tool to only the shadows, highlights, or mid-tone luminance ranges that you choose. The luminance masking function also features a “smoothing” slider. This controls the intensity of the masking effect from hard to soft.

Color Range Masking

Conceptually, the color range mask works just as the luminance range mask except instead of basing its masking on brightness it relies on the color ranges you select with the dropper tool.

color range mask - An In-Depth Look at the Range Mask in Lightroom Classic CC

The dropper tool lets you select a large color palette by clicking and dragging the eye-dropper over an area of your photo.

An In-Depth Look at the Range Mask in Lightroom Classic CC

Using the eye-dropper tool to select the color range.

Alternatively, you can also select up to four (five without the large area selected) highly specific color areas by shift+clicking each desired point.

An In-Depth Look at the Range Mask in Lightroom Classic CC

Using the dropper to select up to 5 target colors for the mask range.

It’s important to note that you can not use both the luminance and color range masks within the same local adjustment tool at the same time. However, you can create a new local adjustment (or duplicate one) and “layer” the masks as many times as you see fit.

How to use the Range Mask in Lightroom Classic CC

Alright, let’s get down to business and look at an example of how the luminance and color range masks work. It’s extremely easy and can yield some impressive results once you get the hang of things.

Using the Luminance Range Mask

Here’s an image from an awesome night I spent in Death Valley a couple months ago.

death valley no-edit An In-Depth Look at the Range Mask in Lightroom Classic CC

Let’s say I want to use the Gradient Filter tool to brighten up that foreground and bring out a little more detail around the two people crouched by the fire.

An In-Depth Look at the Range Mask in Lightroom Classic CC

That looks okay, but it definitely caused the highlight portions of the sky to be a little too bright for my taste. To solve this, I’ll apply a luminance range mask.

Simply select “Luminance” from the mask selection drop-down. Next, adjust the slider so that most of the highlights are excluded from the gradient filter adjustments and voila! The sky is no longer overexposed yet the foreground is now much more visible.

And since you can use the range mask with any edit in the local adjustment tool kit I went ahead and added in a little clarity and highlight boost to really make the foreground pop.

To truly demonstrate the effect of the luminance range mask I’ll tick the “show selected mask overlay” box at the bottom of the view window (the keyboard shortcut to show the overlay is O). The areas in red are the portions of the image where the gradient filter has applied its edits.

An In-Depth Look at the Range Mask in Lightroom Classic CC

Gradient Filter applied without a mask. See how it is affecting parts of the sky as well.

Next, let’s have a look at the effect of the luminance range mask.

An In-Depth Look at the Range Mask in Lightroom Classic CC

Gradient Filter with the Luminance Mask applied. Notice how the sky is now less affected in the bright areas.

Notice how the red masking recedes from the highlights in the skyline? It’s not overly obvious in this example but it will be incredibly apparent when we take a look at the effects of the color range mask.

Using the Color Range Mask

We’ll stick with the same photo from earlier for this example. But this time I’m going to use a Radial Filter to brighten up the fire and add some saturation to make the orange glow of the flames stand out more from that gorgeous purple of the desert night.

First, let’s see how a normal Radial Filter looks when applied to the area in question.

An In-Depth Look at the Range Mask in Lightroom Classic CC

Radial Filter applied in Lightroom Classic CC.

Sure, it definitely brightens and adds saturation to the fire but it also added the adjustments to the entire filter area.

To remedy this, I’ll use the color range mask. I begin by using the‘shift+click and drag method to select the majority of the fire area color. Next, I set the Amount slider for the color range mask virtually to zero so that the mask really targets just those oranges and reds. This is the result:

An In-Depth Look at the Range Mask in Lightroom Classic CC

And remember how I said you could immediately discern the effects of the color range mask? Well, look at the mask overly before the color masking was applied….

An In-Depth Look at the Range Mask in Lightroom Classic CC

Radial Filter without masking.

…and now check out the incredible selectivity of the color mask.

An In-Depth Look at the Range Mask in Lightroom Classic CC

Radial Filter with color range mask applied.

Final Thoughts on the Range Mask in Lightroom Classic CC

The new range mask feature borrows the power of Photoshop layer masks and brings it home to the warm safety and comfort of Lightroom. While the range mask is admittedly nowhere near as versatile and customizable as say a luminosity mask in Photoshop, it does have its own excellent merits when it comes to taking more control of your local edits.

With the luminance range mask, you can fine-tune where your edits are applied based on the brightness levels within the photo. This is hugely beneficial when working with highly contrasted scenes and works great for black and white images.

The color range mask harnesses the power of color to let you creatively select exactly which tones will receive your adjustments. As you saw in the examples above, the color range mask is an excellent way to really bring out the contrast when working with complementary colors.

If you haven’t updated to the Lightroom Classic CC v7.2 or later then I urge you to do so now. Take the new range mask feature for a spin and let us know what you think in the comments below.

The post An In-Depth Look at the Range Mask in Lightroom Classic CC appeared first on Digital Photography School.


Digital Photography School

 
Comments Off on An In-Depth Look at the Range Mask in Lightroom Classic CC

Posted in Photography


How to Use Auto Mask in Lightroom to Make Your Photos Shine

04 Aug

Lightroom is a fantastic tool for organizing, editing, sharing, and even printing photos and is an essential tool in the workflow of many photographers today. Unfortunately, it sometimes gets a bad rap when compared to its big brother Photoshop since the latter can do far more in terms of altering, enhancing, changing, or otherwise editing pictures and images. That’s not to say it is a slouch by any means, and you might be surprised at what it can do when you start to learn to use more of its powerful, yet sometimes hidden, features like Auto Mask in Lightroom.

How to Use Auto Mask in Lightroom to Make Your Photos Shine - rabbit photo

You mean Lightroom has advanced image editing capabilities I don’t know about? Go on, tell me more…

What is Auto Mask and how to find it?

The best way to get started with the Auto Mask feature is to navigate to the Develop module in Lightroom and then click on the Adjustment Brush tool. This lets you change all sorts of parameters like exposure, contrast, clarity, sharpness, and more, but only on specific parts of a photo instead of altering the entire image at once. You can select from various brush presets or move the sliders to create your own adjustments, then click and drag on the image itself to implement those adjustments.

You can even use multiple brush adjustments on the same photo and selectively erase your adjustments in case you want to undo anything. When you look at all the features the adjustment brush tool offers, you can start to see just how powerful and useful it really is. What’s more, at the very bottom of the adjustment brush panel is a little check box called Auto Mask that can dramatically increase both the usefulness and effectiveness of this tool in general.

How does Auto Mask work?

In a nutshell, the Auto Mask option constrains the edits of the Adjustment Brush to a narrow band of colors that are very close to where you originally started brushing in your adjustments. Because the Adjustment Brush is circular in nature it can be tricky to confine your adjustments to specific areas, especially when working with angles or hard edges.

To show you just what the Auto Mask does, I’m going to make a few changes to this image of a water valve. It’s not the most stunning picture and won’t win any awards, but thanks to the Auto Mask feature it can at least be made to look a little more interesting.

How to Use Auto Mask in Lightroom to Make Your Photos Shine - before photo

Editing this is going to be tricky. Or, rather, it would be tricky without the Auto Mask feature.

Using the Auto Mask

In this picture I want the reds and greens to really stand out, and while this could be accomplished with the Color sliders and adjusting the overall saturation of the red and green color values, I want a little more granular control of exactly what parts of the image I’m going to edit. By using the Adjustment Brush Auto Mask feature, I can do exactly that.

To do this process on your own, navigate to the Adjustment Brush panel, select a preset or move the sliders to your own liking, adjust the size of the brush, and then tick Auto Mask. Then click the “Show selected mask overlay” option at the bottom of the Develop window (or press O on your keyboard) so you can actually see where your adjustments are being applied. In the example below, I used this process to apply extra saturation to just the yellow circle. I only brushed on the top-left quadrant and left the Mask Overlay turned on so you can see how the adjustment brush was confined to just within the yellow circle.

How to Use Auto Mask in Lightroom to Make Your Photos Shine

The red portion is just an overlay showing where the adjustment brush was applied. Auto Mask is a great way to make sure you always color inside the lines, just like your kindergarten teacher told you to do.

Auto Mask helps you work fast!

To finish off this particular edit, I filled in the rest of the yellow circle with the same method and within about seven seconds I had a picture that was much improved over the original.

How to Use Auto Mask in Lightroom to Make Your Photos Shine

To finish off the image I applied an adjustment brush to the red portions of the water control valve, and because I used Auto Mask I was able to do it in 34 seconds. Literally. I even used a stopwatch to time it.

How to Use Auto Mask in Lightroom to Make Your Photos Shine

The finished picture has adjustments applied only to the red and yellow areas, without anything creeping over into the green background.

The process can be even faster if you increase the size of your Adjustment Brush as far as it can go, making it easy to instantly apply an adjustment to virtually the whole picture at one time. As long as you have Auto Mask enabled, the brush adjustments will be limited to only the parts of the picture that are similar in color to where you actually click your pointer.

Auto Mask with the Radial and Graduated Filters

There’s another way to use the Auto Mask setting in combination with the Radial or Graduated filters, which can be extremely useful if you shoot landscapes, architecture, or other scenarios which often are enhanced by those two types of filters. Frequently there are objects in landscape or architecture shots that don’t necessarily benefit from having a radial filter applied, and yet unless you use the Brush tool with Auto Mask it can be very difficult to work around them.

To illustrate how this works, here is a shot of a building that would be an ideal candidate for using the Graduated Filter as a way of enhancing the sky, except for the columns rising upwards from the structure.

How to Use Auto Mask in Lightroom to Make Your Photos Shine

This kind of image is ideal for a Graduated Filter, but the columns make it a little tricky unless you kick it up a notch with Auto Mask.

Here’s the same shot, but edited with a Graduated Filter applied that increases saturation and slightly adjusts white balance.

How to Use Auto Mask in Lightroom to Make Your Photos Shine

Adding a Graduated Filter made the sky significantly improved, but also altered the color of the columns.

The issue

The image is much better, but when Show Selected Mask Overlay is selected, it’s clear that a few problems have cropped up.

How to Use Auto Mask in Lightroom to Make Your Photos Shine

Showing the Overlay lets you see exactly where the Graduated Filter has been applied. The same thing works for the Radial Filter as well.

At issue here is the fact that applying the gradient to the sky has also changed the saturation and white balance of the building itself, particularly the columns. Normally, the solution to this would involve painstaking work in Photoshop to create and edit separate layers, but Lightroom has an easy solution thanks to the Adjustment Brush tool and Auto Mask.

Auto Mask with the Graduated Filter

With the Graduated Filter option still selected, click the “Brush” option at the top of the panel. Not the icon, but the text option that shows up just to the right of “Edit” (shown below).

How to Use Auto Mask in Lightroom to Make Your Photos Shine

You can now use the brush to apply the same edits in the Graduated Filter tool. But rather than applying more edits using this method I like to remove the effect from unwanted areas, especially with Auto Mask enabled. To fix the image of the building and sky so that the gradient is not applied to the columns or to any part of the building, press the [alt] (or [option] on a Mac) key which causes the brush tool to change from a plus (+) with a circle around it to a minus (-) with a circle around it. Then while still holding down your modifier key double-check that Auto Mask is enabled, and brush the parts of the image from where you wish to remove the gradient (see below).

How to Use Auto Mask in Lightroom to Make Your Photos Shine

You don’t have to worry about staying inside the lines. Auto Mask takes care of that for you.

A few clicks of the mouse later and the image now has the Graduated Filter applied only to the parts where you want it, without altering the areas of the photo where it is not needed. All thanks to the power of Auto Mask.

How to Use Auto Mask in Lightroom to Make Your Photos Shine

The finished image, with only the sky affected by the Gradient Filter. I also brushed away any traces of the filter from the roof and side of the building.

Notes:

This particular example involved the Graduated Filter, but the same process can be used to modify any edits you make with the Radial Filter as well.

Note: I also want to note that this is only available in current versions of Lightroom, so if you aren’t on Version 6 or the Creative Cloud plan you may not be able to use the Brush tool to edit the Graduated or Radial filters. But the Auto Mask will still work with your Adjustment Brush tool.

Conclusion

While this is clearly a long way from Photoshop’s powerful and meticulous editing capabilities, hopefully, it illustrates that Lightroom is not exactly a slacker in the editing department. I’m curious to hear your thoughts on this as well and also know if there is anything I might have missed. Please leave your responses in the comments section below.

The post How to Use Auto Mask in Lightroom to Make Your Photos Shine by Simon Ringsmuth appeared first on Digital Photography School.


Digital Photography School

 
Comments Off on How to Use Auto Mask in Lightroom to Make Your Photos Shine

Posted in Photography


FlatCam prototype eliminates lens using pinhole-like sensor mask

17 Feb
 

A team of researchers at Rice University are developing a thin, lensless camera called FlatCam, which replaces the traditional lens with a grid-like coded mask essentially made of multiple pinholes positioned directly over the sensor. From there, raw data from the camera – which looks nothing like an actual image – is sent to a computer where an algorithm demultiplexes the raw sensor measurements to reconstruct a photo.

FlatCam was developed by Richard Baraniuk and Ashok Veeraraghavan, and while it isn’t likely to replace traditional cameras, FlatCam could find use in a variety of applications where present imaging technology isn’t suitable. Due to its lensless design, FlatCam is thinner than a dime and can be ‘fabricated like microchips,’ decreasing costs.

Offering an example of possible future applications, Baraniuk explained, ‘We can make curved cameras, or wallpaper that’s actually a camera. You can have a camera on your credit card or a camera in an ultrathin tablet computer.’ The team’s paper details more potential applications, including surveillance, foldable cameras and wearable devices. They’ve even created a couple of video clips using the prototype camera.

In its present form, FlatCam produces 512 x 512 pixel images; however, the team expects better algorithms and improved manufacturing will one day result in higher resolutions. One of the salient issues mentioned in the paper surrounds noise: a linear demultiplexing system invariably adds noise from all the mathematical operations, with higher spatial frequencies experiencing even more ‘noise amplification’ that ultimately limits resolving ability. These are issues the researchers are actively working on.

The researchers recently talked about FlatCam on NPR’s All Things Considered; the episode can be streamed here.

Via: Rice University

Articles: Digital Photography Review (dpreview.com)

 
Comments Off on FlatCam prototype eliminates lens using pinhole-like sensor mask

Posted in Uncategorized


5 Photoshop Layer Mask Tricks – Video Tutorial

26 Apr

Photoshop has many features that can make photo editing both non-destructive and creative. Using Layer masks is one such feature. Masks can also be confusing to understand and they have many ways to apply and use them.

In this video tutorial Joshua Cripps goes over five layer mask tricks – I even learned a couple things I hadn’t seen before, so thanks for that! See if you can pick up some things you can use for post-processing your images:

Menu > Image > Apply image = brilliant!

Try and see for yourself. Do you have any other Photoshop layer masking tips or tricks? Please share with us in the comments below. There are a million ways to do things in Photoshop, no one can know them all so show me something else I haven’t seen!

googletag.cmd.push(function() {
tablet_slots.push( googletag.defineSlot( “/1005424/_dPSv4_tab-all-article-bottom_(300×250)”, [300, 250], “pb-ad-78623” ).addService( googletag.pubads() ) ); } );

googletag.cmd.push(function() {
mobile_slots.push( googletag.defineSlot( “/1005424/_dPSv4_mob-all-article-bottom_(300×250)”, [300, 250], “pb-ad-78158” ).addService( googletag.pubads() ) ); } );

The post 5 Photoshop Layer Mask Tricks – Video Tutorial by Darlene Hildebrandt appeared first on Digital Photography School.


Digital Photography School

 
Comments Off on 5 Photoshop Layer Mask Tricks – Video Tutorial

Posted in Photography


Wearable Tech: Mask Gives Users Superhuman Senses

16 May

[ By Steph in Gadgets & Geekery & Technology. ]

Superhuman Senses Mask 1

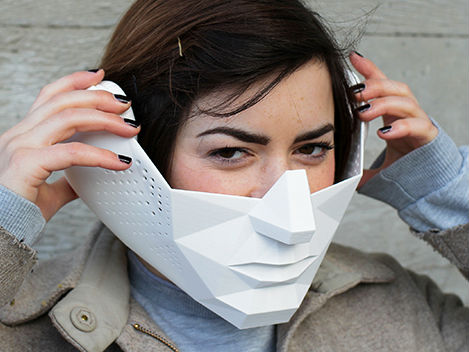
Put on a futuristic-looking, geometric white mask and you’ll suddenly have superhuman senses, hearing targeted sounds from long distances or applying effects to images in real-time. The ‘Eidos’ masks were developed by a group of students from the Royal College of Art in London, fitting over the mouth or ears to enhance sensory perception.

Superhuman Senses Mask 2

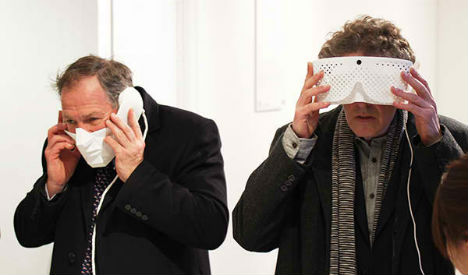
The mask that fits over the mouth and ears features a directional microphone to capture audio, which is processed by software to eliminate background noise. The sound is transmitted directly to the inner ear through bone vibrations to make it seem as if someone else’s speech is coming from inside your own head.

Superhuman Senses Mask 3

Superhuman Senses Mask 4

The second mask, which fits over the eyes, adds visual effects to the wearer’s range of vision, and can also analyze visual data. That data is sent to a computer, where software processes it and picks out patterns and movements that are invisible to the naked eye.

Superhuman Senses Mask 5

“Eidos has broad application in areas where live audio and video analysis is valuable. For example, sportspeople can visualise and improve technique in real time. Eidos also has healthcare benefits where it can be used to boost or refine sensory signals weakened by ageing or disability. In the arts, Eidos can augment live performance such as ballet, fashion or music concerts. It allows us to highlight previously invisible or inaudible details, opening up new and customisable experiences.”

Share on Facebook


[ By Steph in Gadgets & Geekery & Technology. ]

[ WebUrbanist | Archives | Galleries | Privacy | TOS ]


WebUrbanist

 
Comments Off on Wearable Tech: Mask Gives Users Superhuman Senses

Posted in Creativity


Kollodium-Nassplatten-Projekt: The Mask Series

23 Feb

Das Titelbild „Lungs“ stammt von Gerald Figal.

Dass sich aus einem kleinen Projekt namens „The Mask Series“, das von Shane Balkowitsch, einem Liebhaber der Kollodium-Nassplattenfotografie gestartet wurde, schnell eine internationale Kollaboration von über 100 Fotografen dieser alten Fototechnik entwickeln würde, hatte niemand geahnt.

Doch es ging alles ganz schnell: Nachdem kurz vor Weihnachten die ersten Bilder für das Projekt entstanden, entwickelte sich eine Eigendynamik. Nicht zuletzt deshalb, weil einige der besten Wetplater der Welt inzwischen an der Serie mitarbeiten, was weitere Interessenten anzieht. Bis heute haben sich 112 Teilnehmer eingeschrieben und jeden Tag werden es mehr.

Julia
„Free At Last“ von Julia Bailey

Im Mittelpunkt steht diese seltsame Requisite: Eine tschechische M10-Gasmaske, die jedem Bild etwas sehr Gespenstisches und Beunruhigendes gibt. Teilweise entsteht durch sie auch eine Komik, oft jedoch lässt sich in die Fotos eine Mahnung der Vergänglichkeit dieser Welt interpretieren.

Auf Grund des großen Erfolges ist nun auch ein Bildband geplant. Zudem sollen die Original-Exponate, die zentral in Nord-Dakota/USA archiviert werden, auch auf Welttournee gehen. Aber das ist Zukunftsmusik. Noch reist die Gasmaske von Fotograf zu Fotograf und von Land zu Land.

Andreas
„Breathless“ von Andreas Reh

Wenn Ihr nun auf den Geschmack gekommen seid und mitmachen wollt, könnt Ihr Euch an dem Projekt beteiligen. Mit etwas Geduld und dem nötigen Wissen und Können, um Kollodium-Nassplatten zu erstellen, habt Ihr alle Bedingungen für die Serie erfüllt.

Das Projekt versteht sich nicht als Wettbewerb, sondern möchte eine Zusammenarbeit ohne Grenzen und Beschränkungen von vielen Wetplatern fördern. Die Liebe und Leidenschaft zu dieser alten Technik steht im Vordergrund.

Bill
„Life after the Bomb“ von Bill Vaughn

Inspiration könnt Ihr Euch bei den ersten Ergebnissen holen. Sie sind online zu bewundern und auf Facebook gibt es den fiktiven Charakter Mark Mask, der über die aktuellen Entwicklungen zur Serie auf dem Laufenden hält. Es ist auf jeden Fall sehr spannend zu sehen, was die einzelnen Teilnehmer aus der Maske machen und mit welchem Ideenreichtum sie an der Serie arbeiten.


kwerfeldein – Fotografie Magazin

 
Comments Off on Kollodium-Nassplatten-Projekt: The Mask Series

Posted in Equipment


Building a mask based on color: Photoshop CS5 for Photographers from lynda.com

26 Sep

Watch the entire course at www.lynda.com PhotoshopCS5 for Photographers provides comprehensive Photoshop training targeting the needs of photographers. In this course, author Chris Orwig demonstrates the fundamental skills used to enhance digital photos, including managing and correcting color, sharpening, making selections and adjustments, retouching, and printing from Photoshop. In addition to teaching the techniques that enable photographers to refine and publish their photos, the course includes live-action segments that encourage thinking photographically, and shoot with Photoshops capabilities in mind.


lynda.com Tutorial | Photoshop CS5 One-on-One: Advanced—Introducing Unsharp Mask

27 Aug

Watch the course at www.lynda.com Photoshop is one of theworld’s most powerful image editors, and it can be daunting to try to use skillfully. Photoshop CS5 One-on-One: Advanced, the second part of the popular and comprehensive series, updated for CS5, follows internationally renowned Photoshop guru Deke McClelland as he dives into the workings of Photoshop. He explores such digital-age wonders as the Levels and Curves commands, edge-detection filters, advanced compositing techniques, vector-based text, the Liquify filter, and Camera Raw. Deke also teaches tried-and-true methods for sharpening details, smoothing over wrinkles and imperfections, and enhancing colors without harming the original image.
Video Rating: 0 / 5

 
Comments Off on lynda.com Tutorial | Photoshop CS5 One-on-One: Advanced—Introducing Unsharp Mask

Posted in Retouching in Photoshop