RSS
 

Posts Tagged ‘Magnets’

Sony’s Mavica FD71 likes floppy disks, hates magnets

29 Jun

In the earliest days of consumer digital photography, back when the ‘smart’ in ‘smart phone’ was the same as the ‘smart’ in ‘a smart pair of pants’, almost every aspect of capturing, transferring, storing, sharing and printing digital images was so fraught with technical challenges and costly disappointments that it still amazes me that it ever took off at all. The secret to the eventual, inevitable, triumph over film were those most compelling of all disruptive drivers of change: convenience and immediacy.

No matter that back in the late 1990’s the pioneering digital photographer had to lay out thousands of dollars on a camera, a computer, a (color) monitor and the seemingly endless cables, cards and connectors needed to make it all work (and, it must be said, the time, expertise and patience required to tame all that technology).

We didn’t care that you could go get yourself a coffee between shots thanks to the painfully slow write speeds, or that we’d be lucky to get 20 minutes of shooting from a set of batteries or that transferring the images via serial cable took longer than the average Super Bowl, or that for the most part the end results looked like a VHS tape on pause and had the resolution of a watercolor painting.

The FD71 had an amazing (for the time) 1cm macro mode. Here, in all it’s VGA glory is the best you could hope to capture with 300,000 pixels and a decent subject.

We early adopters didn’t care about any of that, because the magic of taking a picture and seeing it appear (almost) immediately on the rear screen, and the freedom to shoot to our heart’s content without having to pay for film or processing (and without the need to scan images) was the most exciting thing to happen to photography since the Box Brownie.

And given that most early adopters of digital cameras were also early adopters of the home computer, our pain tolerance was higher to begin with. After all, we were used to spending hours fixing SCSI conflicts and trying to get onto bulletin boards using our screeching, temperamental modems.

For me, as a Mac user in the 1990’s, the biggest pain point by far was the supposedly simple process of getting the images off the camera and onto my hard drive, thanks to the lack of removal media (and the lack of card readers where there was removable media) and the horribly slow and Mac-unfriendly serial transfer process most cameras used for transfer.

And then, in late 1997, along comes Sony with the first Mavica digital stills cameras, the FD5 and FD7 (which added a rare 10x zoom), offering sophisticated feature sets and – critically – storage on the ubiquitous and universally available 3.5” floppy disk.

It may seem painfully archaic today, but back in 1996 when I first started seriously reviewing digital cameras I used to dream of a camera that shot directly onto floppies, which could be picked up for under a dollar each at any office supplier, and – critically – could be read without any additional equipment by almost every home and office PC on the planet.

The first DSC Mavicas sold incredibly well for this reason alone (and they continued to be used by schools and government agencies for years after they were discontinued). It didn’t matter that the results from the 320 x 240-pixel interlaced CCD looked like video stills or that the fixed-power flash was only usable if your subject was half a mile away (otherwise everything got washed out) or that it was agonizingly slow – it was immeasurably more convenient and made sharing (in a pre-internet era) as easy as handing over a floppy disk.

Above: it may seem run of the mill now, but in-camera effects like this were quite the novelty back in 1998.

Showing the wisdom of never buying version one of anything, it was only six months or so after the FD5 and FD7 were released that Sony launched replacements, in the shape of the FD51 and (yes, I finally got round to the subject of this week’s TBT) the 10x zoom FD71.

The FD71 brought a wealth of enhancements and fixes over its predecessor, including a faster floppy drive, faster processing, a new ‘true VGA’ progressive scan 640 x 480-pixel sensor, an improved LCD, a disk copy mode (making sharing even easier) and a new slimmer design. Even by 1998 standards though, it was still a monster, weighing in at around 1.3 lbs (590g) and roughly sharing the size and ergonomics of a full size hard disk drive.

Multi mode – 9 QVGA frames in 2.5 seconds. Great for catching the action (or in this case, inaction). A zoom lens and a sepia mode and I was an accomplished portraitist…

The FD71’s innovative feature set didn’t just solve the annoyance of slow serial transfer, it also sported a huge (for the time) 2.5” LCD screen (you could disable the back light and use reflectance to illuminate the image, meaning it could be – more or less – used in bright sunlight) and an InfoLithium battery that was capable of keeping the camera – and the power-hungry floppy drive inside – going for up to 2.5 hours or 2000 shots. (Sony even offered three different ‘strengths’ of battery.)

The FD71 also boasted a 10x zoom (this was at a time when a 3x zoom was still a big selling point), fast autofocus, a vari-power flash, full photographic controls and a selection of in-camera special effects including a ‘multi’ mode that captured 9 small images in about 2.5 seconds and combined them into a single collage. It’s hard to imagine today, but almost all of these features were unheard of on consumer level digital cameras.

At the wide end the image quality was pretty much what you’d expect for a VGA (0.3MP) camera in 1998… … but how about that zoom! 10x was pretty rare when the FD71 was launched.

All of this, including the fact that – despite having to save its images to a floppy disk – the FD71 was actually faster and more responsive than many of its competitors, made the FD71 a lot of fun to use, and despite the low resolution (most competitors were moving to 1 or 1.3 megapixels) it was a huge hit and a firm favorite in my office at the time.

Writing about the FD71 I said “I may not have much use for the small images, and I sure can’t fit it in my pocket, but… the FD71 is the most enjoyable digital camera I have ever used, and proves Sony can still teach the traditional camera manufacturers.”

A few more pictures for your, ahem, pleasure…

Articles: Digital Photography Review (dpreview.com)

 
Comments Off on Sony’s Mavica FD71 likes floppy disks, hates magnets

Posted in Uncategorized


Photo Magnetism: Super Simple Photo Magnets

04 Oct

Extra photos for bloggers: 1, 2, 3

Simple is the name of the game with these photo magnets.

Using only a few ingredients you can turn small photos into awesome pieces of refrigerator art.

They are fun to make, easy on the brain and cute as all get out. Once you make the first one you’ll want to start an assembly line of relaxation. A very productive assembly line of relaxation.

Simple, short and sweet. Score!

Make Super Simple Photo Magnets

Why It’s Cool

Sometimes it’s nice to have a project to do that doesn’t take much set up or clean up… AND that makes a super cute finished product!

These photo magnets fit the easy bill and dazzle like special little gems showcasing your memories.

Ingredients:

  • Photos
  • Scissors
  • A Quarter
  • A Pen
  • Glue that will adhere to glass and metal (we used “Liquid Fusion”)
  • Small circular magnets (.75 inch in size)
  • Clear glass circles – they look like large squished down marbles and are usually labelled “decorative fillers” at the craft store

STEP 1: Ring Around the George Washington

before

Use a quarter to trace a circle around the part of your photo that you want to turn into a magnet.


STEP 2: Cut a circle

before

Cut out the circle you just traced.

Make sure you cut off the pen marks because those will be magnified if ya don’t get rid of them.

STEP 3: A light layer of glue

before

Place glue on the flat side of a glass circle.

Get a nice thin even layer on the entire back of the circle. A little goes a long way.

STEP 4: Make it permanent

before

Place your circular photo face down in the glue.

Hold the image down in the glue for 30 seconds to make sure the photo doesn’t drift around.

STEP 5: Glue the magnet

before

Place a light layer of glue on one side of the magnet.

Adhere the magnet to the back of the the photo you just glued down.

Let the glue dry for a couple of hours, and you’re all set (cuz so is the glue)!

Taking It Further

  • Place a set of the photo magnets in a mint tin for a sweet and simple little photo gift.
  • Words and phrases look cool under the glass circles…take photos of text you’d like to have magnified up on your fridge.
  • Cut all of your circles from the same photo. When they’re on the fridge they’ll be a tiny photo puzzle.

Related posts:

  1. DIY Speech Bubble Photo Fridge Magnets Sticking your photos under refrigerator magnets is old hat. Making…
  2. The DIY CanFrame: Transform a Tin Can into a Simple Photo Frame in 15 Minutes Beautiful! Simple! Cylindrical! All the qualities you look for in…
  3. Magnetic Photo Rope: The Perfectly Simple Photo Frame That Isn’t a Photo Frame We’ll admit it: when we first saw this thing, we…


Photojojo

 
Comments Off on Photo Magnetism: Super Simple Photo Magnets

Posted in Equipment


Tensile Table: Floating Wood Furniture Levitates via Magnets

26 Sep

[ By WebUrbanist in Design & Furniture & Decor. ]

looping-levitating-table

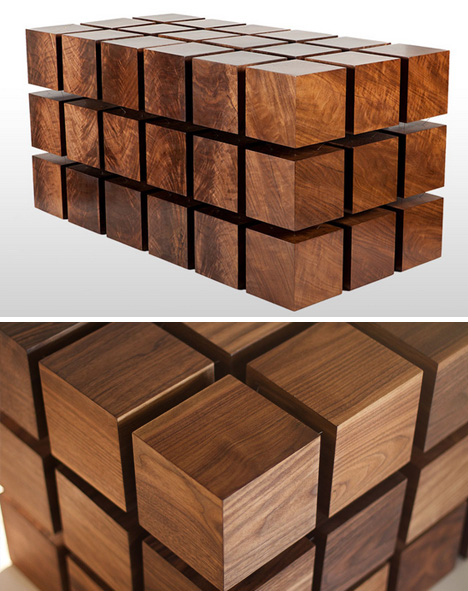
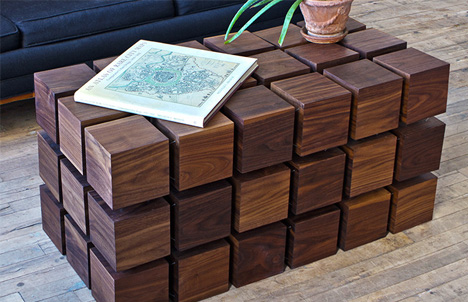
Science meets luxury in this levitating coffee table composed of hovering blocks that seem to magically shift back into formation when applied pressure is removed.

floating magnetic coffee table

Like an over-sized Rubik’s Cube, the basic design is composed of a three-by-three grid of smaller wooden cubes, inexplicably (at least at a glance) separated in space. Also like its little cousin, the object is … puzzling.

floating table craft detail

The solution to the puzzle hides partly in the voids – thin wires keep each cube from flying away from the others, while powerful magnets hold the constituent pieces apart.  Effectively, The Float Table, is a matrix of “magnetized” wooden cubes that levitate with respect to one another. The repelling cubes are held in equilibrium by a system of tensile steel cables.”

floating hover table magents

The co-founders of Rocket Paper Robot, creators of The Float Table, have backgrounds in robotics, electrical engineering and artificial intelligence, on the one hand, and design, film and advertising on the other. The company itself “is an engineering boutique specializing in the innovation and fabrication of high-end kinetic furniture, lighting, and installations.”

floating table wood wires

Of their work, RPR writes: ”It’s classical physics applied to modern design. Each handcrafted table is precisely tuned to seem rigid and stable, yet a touch reveals the secret to Float’s dynamic character.”

floating furniture design room

And about their firm: “We relish in defying expectations through artful execution with a staunch allegiance to utility,(apparent) simplicity and technical excellence. We also work with clients to customize aesthetic yet functional products that enhance the versatility of residential/commercial spaces and celebrate the expression of unabashed style.”

Share on Facebook


[ By WebUrbanist in Design & Furniture & Decor. ]

[ WebUrbanist | Archives | Galleries | Privacy | TOS ]


WebUrbanist

 
Comments Off on Tensile Table: Floating Wood Furniture Levitates via Magnets

Posted in Creativity


Recycled Film Roll Magnets

16 Oct

Extra photos for bloggers: 1, 2, 3

Just when you thought it was safe to turn away, those empty film rolls are back. Back from the dead!

You can put your shotgun away, though: these Recycled Film Roll Magnets don’t want to eat your brains, they want to hang your prints!

Handmade right here in America, these upcycled empty film canisters conceal powerful neodymium magnets that’ll stick with determination. Put those prints up with pride, you green genius, you.

Recycled Film Roll Magnets
Three for $ 15 at the Photojojo Store

 Tweet it!      Share

Related posts:

  1. The USB Film Roll — A Film Roll That Holds 1,000 Photos! Your typical film roll will hold 12, 24, or a…
  2. How to Make a Gigantic Roll of Film Extra photos for bloggers: 1, 2, 3 Film lovers unite!…
  3. How to Turn Film Roll Canisters Into Rad Invites! Extra photos for bloggers: 1, 2, 3 Film roll canisters:…


Photojojo

 
Comments Off on Recycled Film Roll Magnets

Posted in Equipment


Never Let Go of Childhood Wonder (3D Zen Magnets)

01 Aug

Surprise, our original award winning Zen Magnet video was filmed in 3D the whole time. Watch it in yt3d 720p or above. You can get free red/cyan anaglyph 3D Glasses at 3d.zenmagnets.com If using red/cyan glasses, use “optimized debois” mode, or grayscale to strengthen the 3D effect. If watching on a 3D screen, you should be 3-5 times the screen diagonal measurement away from the display. For example, be at least 10 feet away from a 42 inch screen. If you’re watching on an Evo 3D, hold it a foot and a half away. The original video: “Never Let Go Of Childhood Wonder” Which was Best of Youtube #531, can be found here: www.youtube.com Zen Magnets can be found at ZenMagnets.com If you’re having trouble watching 3D. Make sure your screen is not the problem www.youtube.com Music: Kilowatts – Old Twisted Trees DLID – Color in your Hands (Leonizer/Metroplastique) YT3D