RSS
 

Posts Tagged ‘looks’

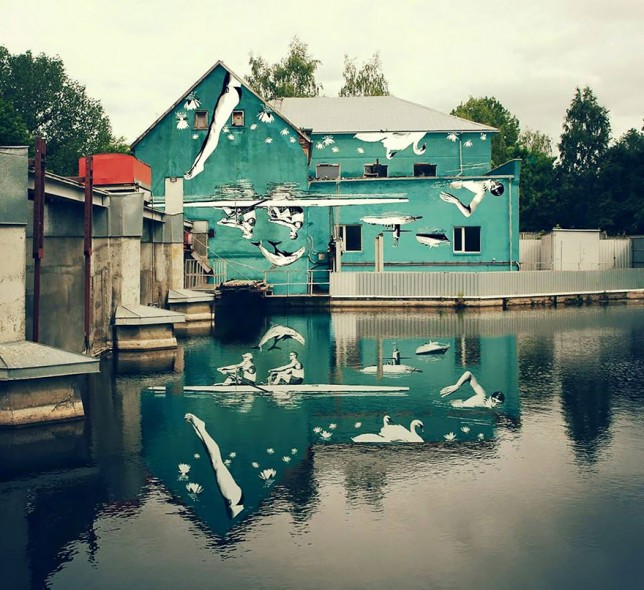
Just a Reflector: Upside-Down Mural Looks Right in the Water Below

18 Oct

[ By WebUrbanist in Art & Drawing & Digital. ]

mural painting actual

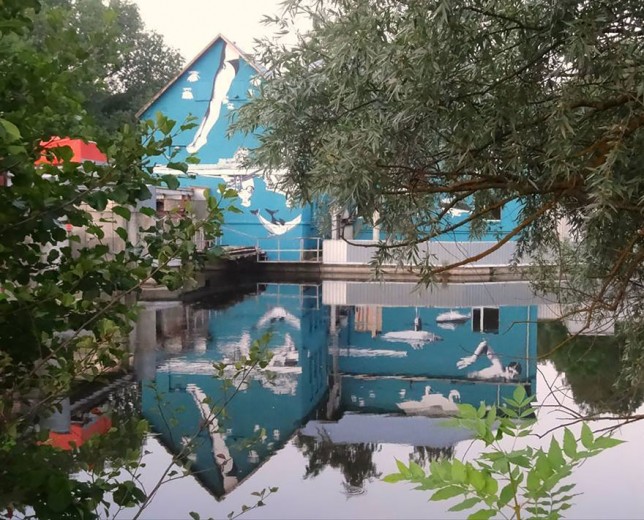
Designed to look right-side-up when reflected off the water below, this series wall murals features a series of nautical themes, including depictions of swimmers, rowers and swans. While the image above is accurate and untouched, a modified photo (shown below) shows a more idealized version that does not really reflect reality.

photoshopped reflective water mural

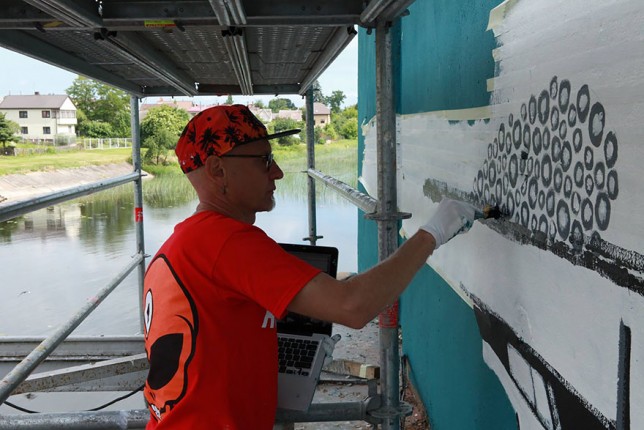
New York-based Ray Bartkus made this mural for the Lithuanian city of Marijampole, set alongside the river Šešupe, which flows through the city’s center. The artist is known for other works that rely on mirrors and reflections as well.

mural artists work

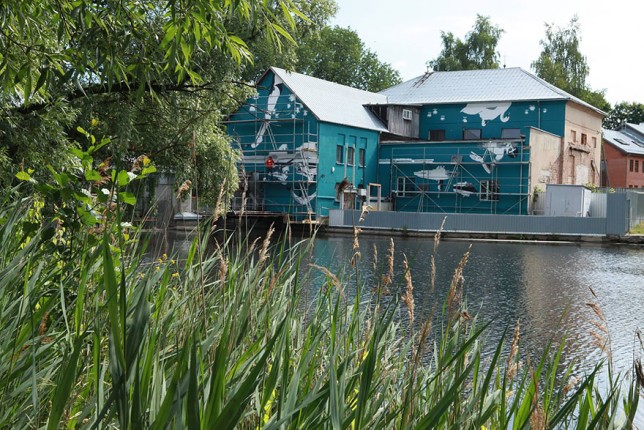
mural under construction

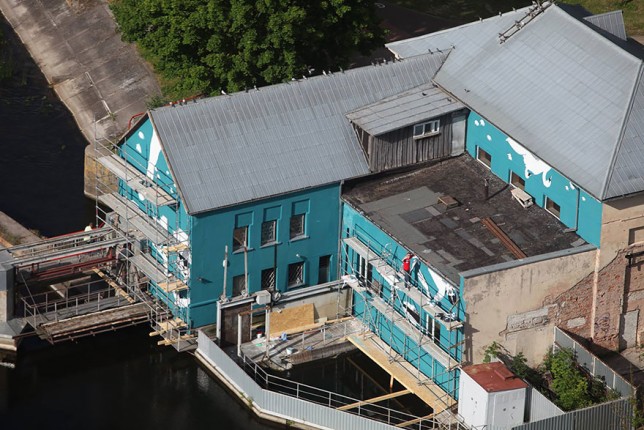
mural painting process

A bit like a trompe l’oeil illusion, the viewer’s position changes the composition, and their is an ideal spot for the optical effect in relation to the various vertical planes onto which the murals were painted.

Share on Facebook


[ By WebUrbanist in Art & Drawing & Digital. ]

[ WebUrbanist | Archives | Galleries | Privacy | TOS ]


WebUrbanist

 
Comments Off on Just a Reflector: Upside-Down Mural Looks Right in the Water Below

Posted in Creativity


How to Use 1 Natural Light Setup to Create 3 Different Portrait Looks

22 Sep

As a portrait photographer, the majority of my work is shot on location. This can be outdoors or in my clients’ homes or places of business. I mostly shoot using natural light and have become adept at finding the best light source in any location as well as creating backgrounds that won’t interfere with the subjects. In this tutorial, I want to show you an easy, natural light portrait setup you can recreate in your own home. Simply by repositioning yourself and your model, you can create three distinctly different portraits from this one setup.

one natural light setup - 3 looks

No special lighting or fancy equipment is needed, and the techniques are straightforward and easy to master. Experiment to create different looks using various backdrops such as plain walls or sheets, or different outfits for your subject. You can also get different effects by changing your lens, distance to the subject, and experimenting with different apertures.

Equipment

Below is a list of the items I have used for this setup and suggested substitutes:

  • SHEER CURTAIN or FABRIC: You can buy a sheer curtain or length of fabric from any fabric or haberdashery store. I picked this one up from the clearance table at my local Spotlight store (Australia) for under $ 20.

Image showing basic natural light portrait setup using a white cloth

A white sheer curtain or large sheet of sheer fabric will filter the window light.

  • REFLECTOR: I have a circular, five-way reflector that follows me everywhere. Each side has a different colour; white, silver, gold, and black, plus a diffuser. It folds into a neat little disc, is lightweight, and can be thrown into the back of my car. You will get endless use out of a portable reflector, and at around $ 30 from Amazon, it’s a worthwhile investment. However, if you don’t want to rush out and buy a reflector (or wait for your order to arrive before you start shooting) a large piece of white card, polystyrene, or foam board, will work equally well.
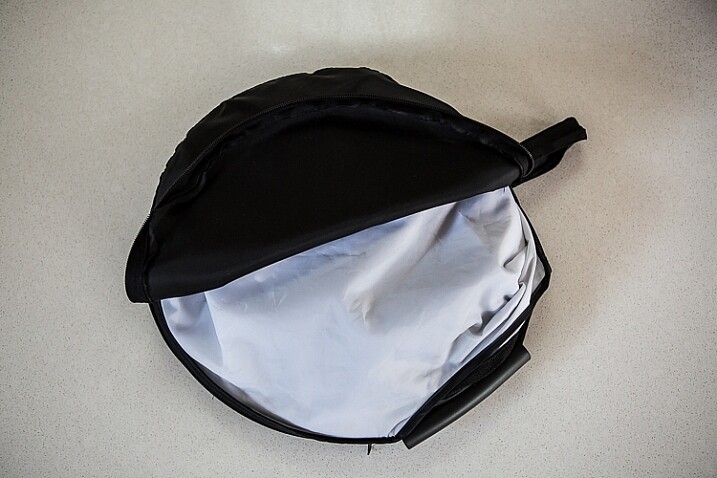
Image showing basic natural light portrait set-up with a reflector

This reflector was a great investment at around $ 30. It is lightweight and folds up compact to the size of a dinner plate.

  • BACKDROP CLAMPS: another Ebay or Amazon purchase, my backdrop clamps come in packs of 12 for under $ 20. These are infinitely useful for creating makeshift studios. In this instance, I used them to attach the sheer curtain to the rolled-up window blind. You can also use masking tape to stick the curtain directly onto the window, or use heavy-duty stationery clips.
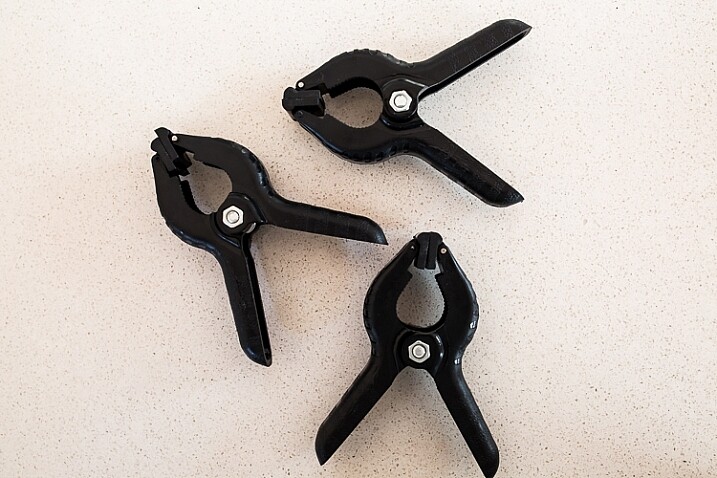
clamps can be helpful for a natural light portrait setup

Backdrop clamps can be purchased inexpensively from Ebay or Amazon and similar.

Lens

My favourite portraiture lens is the Canon EF 85mm f/1.8, but you can use a 50mm, a 100mm – whatever works in the space you have. A tighter space will require a shorter focal length.

Basic portrait setup

Look for a window or glass door with a good strong light source coming through, so that you can shoot at the lowest possible ISO. If the window has a sheer curtain, pull it across to filter the light. If there is no curtain, you can attach a piece of sheer fabric to the window using the backdrop clamps or masking tape.

As you can see, the setup couldn’t be simpler. This is the corner of my living room, with sliding glass doors to the left of the shot. The strong afternoon light is filtered with a sheer curtain clipped to the bottom of the roller blinds. I have closed the curtains in the adjoining room to create a dark background for my subject. If your room layout doesn’t allow this, you can hang a sheet or large piece of coloured fabric behind your subject, or just use a plain wall.
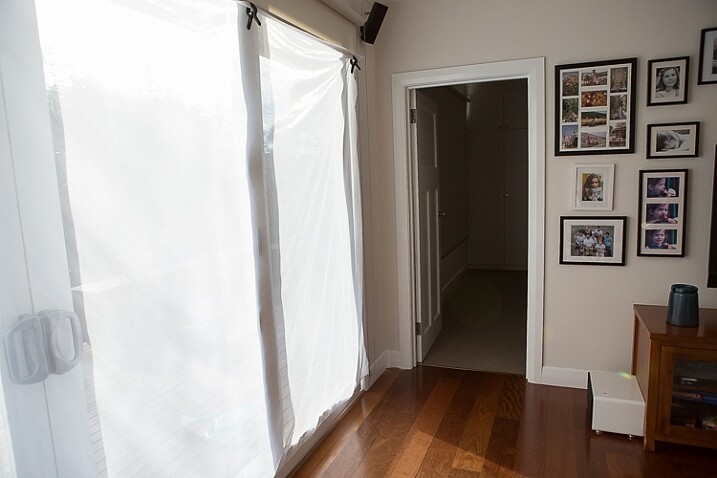
natural light portrait setup background

The setup couldn’t be simpler.

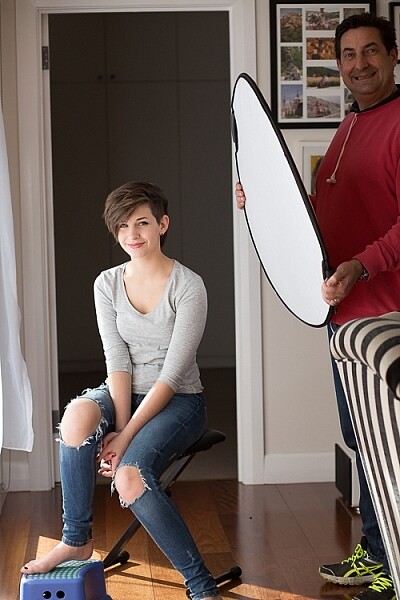
As you can see in the setup below, I brought my model forward (away from the open door behind her). This is to ensure she has good light on her face, and that there is sufficient distance between her and the room behind her to make sure it is completely out of focus. In this pull-back shot, you can see some detail in the room behind her. However, in the first pair of portraits, further along, you can see no background detail. The room behind looks like a studio backdrop.

Add a reflector

If you are going to use a reflector, you’ll need someone to hold it for you. If there is no-one to help, try propping it on a chair. Let your creative photographer’s brain get to work and figure out a creative solution.
natural light portrait setup reflector and assistant

You’ll need an extra person to hold the reflector – in this case, my husband!

Portrait #1: side lighting and a reflector

This is my most-used natural light setup. Side lighting contours and shapes the face, and is flattering for most subjects. If your subject is male, or if you want to create a moodier portrait, you can try moving the reflector further away from your model or removing it altogether. This creates more contrast by increasing shadow on one side of the face.

Your model can sit, stand, or even lie on the floor if the window is low enough. How you position your model’s face and body is up to you. To recreate the look below, your model’s face needs to be at a 90° angle to the main light source (the window). Her body turns 45º away from you. The door behind my model is opened and I darkened the background room to minimize distracting elements. Position the reflector on the shadowed side of her face, to bounce the light back and fill in the shadows

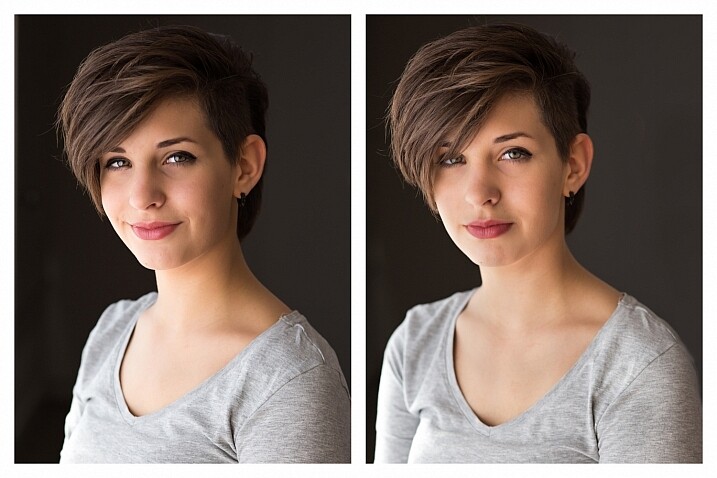
In the photos below, the image on the left is shot without a reflector. The one on the right is shot with a reflector. The effect in this example is subtle because the light in this room is already balanced somewhat by small, high windows on the opposite wall to the main window. In the photo on the right, you can see how the reflector brightens the face and fills in the shadows, particularly the under-eye shadow of her left eye. It also brings out more detail and highlights in her hair and improves separation from the background.
natural light portrait setup with and without reflector

Left (no reflector): ISO 320, f/4, 1/200th. Right (with reflector): ISO 320, f/4, 1/320th.

Portrait #2: shooting into the backlight

I love this technique for photographing women and girls. It creates soft, non-directional  lighting on the face, so is flattering to every age group. And the backlighting creates a gorgeous halo around the hair. This works especially well if the model wears her hair out, or wears a dress with some sheer elements – think darling little girls in fairy costumes and tutus!

Technique for backlighting

Using the same window setup as before, your model sits or stands with her back to the window. Position the reflector in front of her, bouncing the light back into her face. Your light meter will try to read the light coming from the window, and will underexpose your model’s face. You can obtain the correct exposure by getting in close to her face to set your exposure. You might also bracket your exposures and check the back of the camera until you’re happy with the result (review the histogram but note that the background area may show clipping – that’s okay). To get the exposure right on the face, you will lose detail in the background, which is the idea!

natural light portrait setup backlighting

ISO 320, f/4, 1/160th

The photo below is a yoga instructor posing in front of a window on the floor of her studio. The backlighting is beautiful through her hair, and the warm tones of the timber floor reflect back on her skin to give her a golden hue. The lighting technique is identical to the previous photo. But in this photo, I have allowed the curtain and window to be visible as I think it adds something to the scene.

natural light portrait setup backlighting

ISO 500, f/5, 1/80th.

Portrait #3: shooting with front-on light

For this set-up, the sheer curtain remains in place. Your model faces the window, and you position yourself between your model and the window. If you are taking a wider shot than the example below, you may be able to bounce light into the back of her hair with a reflector.

Frontal lighting removes virtually every shadow on the face. It brings out detail and colour in the eyes, and can be quite striking with the right subject. However, this technique is not for everyone. It can give the face a flat, two-dimensional appearance, and if the light source is too strong, your subject will squint. This lighting tends to highlight every imperfection, which is fine if your subject happens to be young and gorgeous. But, it can be too harsh for a mature model, or someone with a lot of blemishes.

Examples of front lighting

The photo below of a young girl snuggled into a faux-fur hood has been enduringly popular on my social media sites. It was shot using this lighting technique in warm, late-afternoon light.

natural light portrait setup front lighting

ISO 400, f/4.5, 1/200th.

The photo below of my daughter, sun-kissed after a day at the beach, was photographed with front-on lighting. As we were  on vacation and I didn’t have my usual bag of tricks at hand, I didn’t use a sheer curtain to filter the light. As you can see, the highlights are more pronounced than those in the first photo, but the effect is similar.

natural light portrait setup front lighting

ISO 250, f/3.5, 1/125th.

Now it’s your turn

I’d love to hear how you get on trying this setup at home. Please post any questions, comments or examples of your portraits in the comments section below.

Don’t forget, there is also our dPS Facebook Group, which you can join to share your photos and get a critique from other dPS readers.

googletag.cmd.push(function() {
tablet_slots.push( googletag.defineSlot( “/1005424/_dPSv4_tab-all-article-bottom_(300×250)”, [300, 250], “pb-ad-78623” ).addService( googletag.pubads() ) ); } );

googletag.cmd.push(function() {
mobile_slots.push( googletag.defineSlot( “/1005424/_dPSv4_mob-all-article-bottom_(300×250)”, [300, 250], “pb-ad-78158” ).addService( googletag.pubads() ) ); } );

The post How to Use 1 Natural Light Setup to Create 3 Different Portrait Looks by Karen Quist appeared first on Digital Photography School.


Digital Photography School
 
Comments Off on How to Use 1 Natural Light Setup to Create 3 Different Portrait Looks

Posted in Photography


Harder than it looks: LensRentals gets inside the Canon EOS 5D IV

10 Sep

LensRentals gets inside the Canon EOS 5D IV

Canon’s new EOS 5D IV is a formidable bit of hardware, boasting a 30MP full-frame sensor and 4K video. Our friend Roger Cicala over at LensRentals.com has taken one apart to see how it works. His verdict? It’s harder to disassemble than you might expect…

LensRentals gets inside the Canon EOS 5D IV

Lensrentals.com, 2016

We love it when LensRentals takes cameras to bits for two reasons. First, we’ve always wanted to see what these things look like on the inside, and second, it’s not the kind of thing that our friends at the major camera manufacturers would ever let us do. 

The screwdrive-happy nerds at LensRentals enjoy opening up Canon cameras particularly, it seems, because in Roger’s words ‘the engineering is always nicely laid out and usually pretty’. Ok then. 

LensRentals gets inside the Canon EOS 5D IV

Lensrentals.com, 2016

The 5D IV, however, seems not to be a typical Canon camera in that it proved very difficult to get into. According to the crew at LensRentals, ‘Until now Canon cameras have all been pretty straightforward in their disassembly: you take out screws, that part of the case comes off, repeat for another part of the case’. 

With the 5D IV, on the other hand… ‘to take off any part of the shell, other than the back assembly, you have to take off most of the shell because Canon has added lots of plastic pegs and latches to the various parts of the shell, making it much more interlocking than in previous cameras’. 

LensRentals gets inside the Canon EOS 5D IV

Lensrentals.com, 2016

Part of the reason for the additional latches could be to improve the durability and weather-sealing of the camera, which as you’d hope features ‘lots of foamed seals along doors and joints’

This view shows the inside of the 5D IV’s rear shell. According to Roger, ‘Inside it looks very much like other Canon back covers. There are aluminum shields over the button panel and LCD. The flexes running to and fro over the LCD are more complex than other Canons because of the extra processing for the touch screen.’

LensRentals gets inside the Canon EOS 5D IV

Lensrentals.com, 2016

This is the main LCD flex, which is unusually large. In Roger’s words ‘almost a circuit board’. 

LensRentals gets inside the Canon EOS 5D IV

Lensrentals.com, 2016

From the back, Roger found a couple of interesting things, looking at the EOS 5D IV: ‘First, there are more flexes connecting to the main PCB than most other models. Second, we were very pleased to see a thick, stiff, sheet of rubber covering the back of the PCB’.

LensRentals gets inside the Canon EOS 5D IV

Lensrentals.com, 2016

The EOS 5D IV benefits from the redesigned mirror assembly we first saw in the EOS 5DS/R, and here’s the mirror motor, tucked away to the left of the lensmount.

LensRentals gets inside the Canon EOS 5D IV

Lensrentals.com, 2016

Here’s the EOS 5D IV’s top assembly. And this is as far as Roger is prepared to go, because ‘we’ve learned from long, painful experience not to take these apart unless we absolutely need to. In general, if something is wrong with the top assembly, you just replace the top assembly’. 

LensRentals gets inside the Canon EOS 5D IV

Lensrentals.com, 2016

This is the EOS 5D IV’s main PCB. Unusual, because ‘there are a lot, a whole lot, of flexes connected to the board from every direction. They are thicker and more complex than previous cameras and a lot end up in thick ‘press in’ connectors instead of simple flex cables.’

LensRentals gets inside the Canon EOS 5D IV

Lensrentals.com, 2016

‘Underneath where the PCB was we now see the circuit board of the image sensor, and to the right of that the CF card assembly’.

LensRentals gets inside the Canon EOS 5D IV

Lensrentals.com, 2016

What did Roger and his team learn from taking the EOS 5D IV apart? 

  • ‘The weather sealing on the Canon 5d Mark IV appears pretty robust’
  • The multiple pins, clips and screws that hold the camera together might improve weather-resistance but make it ‘kind of a pain to get into’.
  • The extra technology inside the EOS 5D IV mean that ‘there are more chips, and more and heavier connectors moving electrons from board to board than even the Canon 5Ds cameras have’.
  • ‘there’s more air inside this camera than we’re used to seeing. […] In other words, this camera probably could have been a bit smaller but Canon wanted to keep the form factor the same.’
  • ‘Construction is at least as robust as the recent 5 series releases and better than the Canon 5D III’.

You can read the full tear-down, with Roger’s usual detailed analysis and plenty of additional images at LensRentals.com.

Articles: Digital Photography Review (dpreview.com)

 
Comments Off on Harder than it looks: LensRentals gets inside the Canon EOS 5D IV

Posted in Uncategorized


This is what it looks like when Getty prepares for the Olympics

26 Jul

Michael Heiman, Getty’s Director of Global Event Operations, has his work cut out for him in Rio. He’s been posting photos to his Instagram account showing the work going on behind the scenes as his team prepares to cover the Summer Olympics. From the not-so-glamorous task of installing cables, to the confusion caused when he wore a green shirt to a local hardware store, his posts have offered a fascinating look at what it takes to cover a colossal event like the Olympics.

And of course, there’s the gear. Observe:


It takes a lot gear to cover the Olympics. This is just some of our lens…. #mygettyriooffice #rio2016 #cps #thankscanon #lotsofglass

A photo posted by Michael Heiman (@heiman225) on

But what about the camera bodies? Glad you asked.


You obviously need some camera bodies to go with all that glass. #rio2016 #mygettyriooffice #gearporn #lotsofcameras #eos1dxmarkii #cps #canon #thankscanon #gettysport

A photo posted by Michael Heiman (@heiman225) on

Not surprisingly, the table is loaded with Canon EOS-1D X Mark I and II bodies, with a couple of 5DSR bodies for good measure, and L-series glass as far as the eye can see. Just another day at the office, right?

Articles: Digital Photography Review (dpreview.com)

 
Comments Off on This is what it looks like when Getty prepares for the Olympics

Posted in Uncategorized


X-ray: iFixit looks inside the Fujifilm X-M1

22 May

iFixit looks inside the Fujifilm X-M1

We’re curious people at heart, and we like to know what’s going on inside of our prized electronic possessions. But taking screwdriver to camera isn’t a wise idea if you want to keep you gear functioning with a valid warranty. Thankfully, the folks at iFixit help satisfy our curiosity with their disassembly guides. So let’s enjoy a look under the hood of the Fujifilm X-M1 – from a safe distance, shall we?

iFixit looks inside the Fujifilm X-M1

With the lens and battery removed, the project may begin by pulling back the faux-leather covering on the camera body to access some screws.

Image courtesy of iFixit

iFixit looks inside the Fujifilm X-M1

More screws await under the lens mount…

Image courtesy of iFixit

iFixit looks inside the Fujifilm X-M1

…and with the hot shoe cover and a few more screws gone, the back of the camera is free.

Image courtesy of iFixit

iFixit looks inside the Fujifilm X-M1

What’s heard but never seen? The speaker inside your camera! You knew it was there. This is what it looks like.

Image courtesy of iFixit

iFixit looks inside the Fujifilm X-M1

Behind the LCD you’ll get a glimpse of the motherboard, veiled by a plastic covering.

Image courtesy of iFixit

iFixit looks inside the Fujifilm X-M1

Here’s a clear view of the motherboard underneath, with Fujifilm’s image processor in plain sight.

Image courtesy of iFixit

iFixit looks inside the Fujifilm X-M1

And here’s the back of the sensor assembly, just underneath the motherboard.

Image courtesy of iFixit

iFixit looks inside the Fujifilm X-M1

There’s not a whole lot of camera left to disassemble at this stage, and the top plate can be removed cleanly with the appropriate ribbon cable disconnected.

Image courtesy of iFixit

iFixit looks inside the Fujifilm X-M1

Here’s a look at the LCD and its articulated arm away from the camera body.

Image courtesy of iFixit

iFixit looks inside the Fujifilm X-M1

And there you have it, the inner workings of the X-M1 laid out neatly for inspection.

Image courtesy of iFixit

Articles: Digital Photography Review (dpreview.com)

 
Comments Off on X-ray: iFixit looks inside the Fujifilm X-M1

Posted in Uncategorized


Flickr may be up for sale as Yahoo Board of Directors looks to shed web properties

30 Mar

The future of Yahoo and its many operations, including the photo sharing behemoth Flickr, is uncertain. According to reports, the company’s board is now accepting bids for its web properties, with a deadline of two weeks to submit proposals.

While Yahoo has not specifically said which operations are up for sale, they have given hints to what a new, slimmed-down Yahoo might look like. According to Reuters, if the board’s restructure goes through as planned, Yahoo will center around Yahoo Search, Mail and Tumblr, as well as four ‘digital content strongholds,’ which include News, Sports, Finance and Lifestyle.

This seems to indicate that at least according the company’s board, Flickr has no place in the future of Yahoo. But not so fast – there are several other factors at play that could put the kibosh on a sale altogether.

One of these factors is an attempted hostile takeover of Yahoo’s board by activist investor Starboard Value. Many shareholders, unhappy with financial results, have run out of patience with the current boards plan to turn Yahoo around. This is where Starboard Value comes in. Last Thursday, they announced their intent to overthrow CEO Marissa Mayer, and presented a list of nine alternative board members to replace the current board at the annual shareholder meeting in June.

If Yahoo is unable to get the ball rolling on sales of its assets before June, there’s a chance that a new board will be ushered in, and move the company in a different direction entirely.

On the other hand, more than 40 companies have expressed interest in owning a piece of Yahoo, including Microsoft, Verizon, AT&T, Comcast, Time and many more. Whether or not any of those companies specifically have an interest in Flickr is difficult to say. As of June 2015, Flickr had a formidable 112 million active users. That’s not quite the 400 million users Instagram claims to have, but its still a sizable community. For the record, Flickr was first purchased by Yahoo back in 2005, for $ 25 million.

All the while, Mayer is sticking to her plan for turning around the company, which includes laying off 15 percent of the company’s workforce, closing unprofitable ventures, all while spinning off Yahoo’s stake in Alibaba Group as well as Yahoo Japan into a separate company.

Needless to say, if you’re in the market for a photo sharing site, now’s the time to bust out the checkbook and make an offer. We just hope if Flickr does make its way into new hands that it goes to a good home.

Via Reuters and The Associated Press

Articles: Digital Photography Review (dpreview.com)

 
Comments Off on Flickr may be up for sale as Yahoo Board of Directors looks to shed web properties

Posted in Uncategorized


All those moving elements: LensRentals looks inside the Leica SL 24-90mm F2.8-4

25 Feb

LensRentals Leica SL 24-90mm F2.8-4 teardown

The Leica SL 24-90mm F2.8-4 may not break any new technical ground, but when the SL’s ‘kit’ lens made its way to LensRentals headquarters, the team endeavored to take a careful look inside. With the solidly constructed lens partially disassembled, they got a closer look at its impressive number of moving elements. Take a look at some of the highlights here, and for a full look inside the 24-90mm head over to LensRentals.

Weather-sealing

Sliding the rear of the lens off took a little muscle according to LensRentals’ Roger Cicala, ‘as it’s very tightly sealed by the thick, greenish weather gasket underneath.’ Leica promises this keeps the lens protected from dust, moisture and splashes.

The inner barrel assembly

With the zoom key and six screws in the internal chassis removed, the outer assembly of the lens barrel can be removed, and Cicala finds that ‘the zoom and focus rings are one modular assembly connected to the main chassis.’

Not all focusing mechanisms are created equally

With the inner barrel exposed, part of the 24-90mm’s focus-by-wire linkage can be seen. Says Cicala: ‘I won’t argue with those who prefer a mechanical focusing linkage, and I agree that some electric focusing mechanisms feel sloppy and inaccurate. But I’ll add that they aren’t all made equally, and the Leica focus feels quite good and seems very accurate.’

A ‘complex dance’ of moving elements

With the casing and front barrel removed, the lens’ helicoid grooves are visible. These allow the moving elements to travel on their separate paths. ‘This is a really nice example of the mathematical formulas involved when you move elements. Notice none of those grooves are parallel; as you zoom the lens the various elements move in a rather complex dance.’

Focusing assembly up close

Although they’d sworn not to do a full teardown, Roger and company wanted a better look at the focusing group so out it came. And that’s where things got interesting. 

‘You can see the stepper motor (green line) of course. The actual focusing element is what Aaron is holding the group by. The larger group in the center is where the entire assembly is attached to the helicoid. One of the first things we notice (red arrows) is this group has 3 pairs of adjustable eccentric collars. These were thoroughly glued in place so we left them alone, but it seems each pair has one collar for tilt and another for centering of this group. None of the other moving groups had eccentric adjustment collars visible.’

A peek at IS

The teardown stops at this point, but not before a glance up the barrel toward the image stabilization unit. While those screws tempt Cicala and crew, memories of finicky IS systems kept them from going any further.

Articles: Digital Photography Review (dpreview.com)

 
Comments Off on All those moving elements: LensRentals looks inside the Leica SL 24-90mm F2.8-4

Posted in Uncategorized


How tough can it be? LensRentals looks at why it’s so hard to make lenses

11 Feb
Just check it and fix it, it can’t be that hard. Can it?

Why can’t you just make them better? It sounds like a reasonable question until you start unpacking exactly what it entails. This is exactly what Roger Cicala and company do in the latest LensRentals blog post. As usual with Cicala’s posts, the closer he looks, the more complicated the question becomes. So why can’t everyone just (repeatably and affordably) make lenses, you know… better?

With his usual critical (and somewhat wry) eye, Cicala looks at the importance and challenges of quality assurance (the processes to ensure you build things to standard) as well as quality control (checking that you’ve done so). This includes a look at the impacts of design tolerances, manufacturing tolerances, repeatability and the need to make products affordably-enough that people will be willing to buy them. And just what can you do with the ones that aren’t quite right?

It’s a long article but if you’ve ever wondered why they don’t just check and fix every lens as the last step of the production line, or you’ve found yourself using the phrase ‘you get what you pay for’ and you’d like to understand why it’s often true, it’s well worth a read.

And, if you get a chance to read it all, we’d love to know whether you end up more impressed by Leica’s ability to make expensive, mechanically simple, manual focus single-focal-length lenses really well or by the ability of the big brands to build collapsable, image stabilized kit zooms for next-to-nothing and have them work at all. Let us know in the comments.

Articles: Digital Photography Review (dpreview.com)

 
Comments Off on How tough can it be? LensRentals looks at why it’s so hard to make lenses

Posted in Uncategorized


Design, looks and desire: Olympus does it again

01 Feb

You really can’t tell whether a camera is any good just by looking at it. Some people do indeed think that they can, but they will be people who admit quite openly that they know nothing about cameras. To those unfamiliar with the market, and the reasons we need different body shapes, some cameras will simply look more ‘professional’ than others. And bigger cameras will inevitably be considered much more serious than those whose designers have gone to great lengths to make compact.

Colorful cameras are obviously less credible than ones that have silver bits on them, and infinitely less credible again than ones that come cloaked entirely in matte black. Chrome and silver can make some believe the subject of their gaze is antique, and those that have no fancy knobs or shiny bits may be considered simply old-fashioned. 

Our use of Leica rangefinders when I worked as a cruise ship photographer prompted more than one jolly passenger to remark that there seemed to be no relationship between the extortionate prices the company charged for pictures and the state of the old-fashioned equipment we were forced to use. The passengers believed that our featureless, sparkle-less, prism-less, block-shaped cameras, that we had to focus ourselves, were relics of a former era. That indeed we were using M4s in 1991 instead of the M6s of the day is neither here nor there, as they essentially both look as ancient as each other. When we explained that these cameras cost of lot of money the response was generally that perhaps we should take our mother shopping with us to avoid being ripped-off. 

It’s expected that the uninitiated will make quick decisions about a camera just by the way it looks, and in many cases to base a buying decision on its visual credentials. Serious enthusiasts and professional photographers would never do that of course. That’s why all camera brands design their cameras to look plain and unexciting. 

I’m just looking, dear

As much as the more sensible of us declare that all their camera equipment purchases are grounded in logic, there are very few of us that cannot be influenced by the way a camera looks. That doesn’t mean we have to buy the best looking model, but I think that most of us will at least admire the style of the new Olympus PEN-F.

Those milled dials on the top plate and the neat flared appendage on the port-side forward facing are undeniably attractive. They may even create a twitching credit card in the pockets of those who had no prior idea they were in the market for a new camera. The clunky metallic dials may not represent the practicality of some other ways of working, but they certainly make for a more appetizing visual than a collection of black finger wheels ever could.

Olympus’ repurposing of the film rewind post, with its gnarled head, to become the on/off switch, is a clever piece of work that lends the whole design a convincing impression of both heritage and originality, rather than looking like just another retro reproduction. 

Creative license

It is ironic perhaps that the design of 2016’s PEN-F has very little in common with the original model. That it has a lens and is available with a chrome or black top are about the only similarities. In my opinion, the PEN-F of 1963 was actually less than absolutely gorgeous unless decorated with ‘Hollywood’ lighting, used in a classy portrait or featured in a period drama.

‘the new PEN-F is left looking more like the love-child of the Leica lll than it does anything from the Olympus archive of the early 1960s’

The rather-too-long top plate of the original makes the lens appear off-balanced compared to the central mount and active top plate of the 2016 model. The original also had no dials on the top plate and the action required to rewind a film was achieved with a crank handle rather than a gnarl-headed post. Olympus generally didn’t use big top-plate shutter speed dials until the OM series of 35mm SLRs, and it ran out of the gnarl-headed rewind posts after cameras like the 1948 35 1 – the first 35mm camera to be sold in Japan. 

So in the new PEN-F what we are looking at is some historical fiction rather than a recreation. But that’s OK, history often looks much better with a heavy dose of make-believe – just ask Asterix and Obelix. 

While the link between the new and old PEN-F models might not be as strong as it is between the original Leica MP and the ‘modern’ MP, I don’t think anyone is going to lose any sleep over it. The point is that the new model is very good looking, and good looking gets attention from photographers and ultimately helps to sell cameras. 

Looks versus logic

The Fujifilm X100 – massively popular even before it had been tested, and fortunately just as popular afterwards!

Fujifilm might have a fantastic X-Trans sensor in its X-series cameras, but I expect a good many of those X-T1 and X-Pro1 bodies sold because they look so cool. I know there were enormous back orders for the X100 even before it had been tested by anyone, which demonstrates that plenty of people were prepared to put their money down even before they knew if the camera was any good.

The strength of the X series design has even outweighed the widely acknowledged sluggish AF performance of some of the models, and we hear proud owners making excuses as though for a fondly looked on three-legged dog. ‘Yeah, I know the AF isn’t that great, but it’s such a beautiful camera. I love using it.’ Like the Sirens of Greek mythology, the intoxicating curves of a well-toned camera body can prove a powerful draw to a normally logical person. 

I suppose a company’s heritage can reduce the risk of a good looking camera performing badly when you buy before you try, and it’s reasonable enough to expect that the PEN-F will operate as well as the OM-D bodies and the top-tier of the current PENs (and our initial impressions have been positive). More importantly perhaps there is no reason for us to think that it will NOT perform at least just as well. 

A wolf in wolf’s clothing

It will be interesting to see how sales of the PEN-F compare with those of Panasonic’s Lumix DMC-GX8. It is after all very similar in terms of key specification – probably the same sensor, enhanced touch functions including touch-pad AF, the same viewfinder position (minus the articulation) and the same lens range to choose from. In fact, the bodies are so astonishingly similar that the PEN-F looks more like a stylish adaptation, or a flattering imitator, than a competitor – but to my eye at least the PEN, with its contours, layers and more rounded feel takes the beauty pageant rosette. The designers have done a great job. 

A camera has to perform, of course, and it won’t sell well otherwise, but an eye-catching design that appeals to the right audience is an important differentiator and often what gets the product noticed, mentioned in the press, remembered by the public and purchased in a crowded market. 

With all things being mostly equal – except that Olympus has more heritage in the camera market, and Panasonic has 4K and a head-start – I suspect that it will be on looks that most people make the choice at the camera counter between the GX8 and PEN-F.

Not for the first time

The O-Product, from 1988

Olympus has had quite a history of designing original and cool-looking cameras, and I suspect its success over the years has been as much down to the person wielding the drafting pencils as it has the people with the spanners and screw-drivers. Outstanding creations from the archive include the O-Product, the Ecru, the delightful XA and the Mju and Mju-mini digital cameras. My teenage son bought a Trip 35 from an online store that restores and re-covers them, and he thinks it is one of the coolest cameras ever made – to the best of his knowledge, of course. The model he has was likely created 20 years before he was – a better example of enduring design would be hard to find. 

The Olympus Trip 35 was in production for twenty years, and sold 10 million units from its introduction in 1968 The XA series was popular for its looks and bolt-on flash unit as well as for its sophisticated controls. Launched in 1979 the XA4 was the last model, going on sale from 1985

Is it OK to buy and love a camera because of the way it looks? Yes and no. If you buy only because of the way it looks you are about to risk your money, but if style and grace sway you from one good product to another that’s probably alright. I guess it is a question of why we take pictures and why we are into photography. Some people like their cameras more than they like taking pictures or looking at the pictures they take, while for some the end result is the be-all and end-all of the process and anything beyond pure functionality is extraneous.

Most people can find a balance between the two – we buy the best we can, and can give ourselves permission to enjoy the way our equipment looks. Photographers are supposed to be creative people, and creative people like looking at and using nice things. We can choose to remember that there are many reasons for getting into photography and many for continuing to take pictures, but for most of us it is supposed to be enjoyable. We don’t all have to be seduced, but we can allow ourselves to admire some beautiful design, whether for you that’s the PEN-F or a Canon Rebel. Either way, Olympus is certainly going to cause a stir with this new design, just as it has done so many times before. 

Articles: Digital Photography Review (dpreview.com)

 
Comments Off on Design, looks and desire: Olympus does it again

Posted in Uncategorized


Art of Photography: NYC Blizzard Photo Looks Like a Painting

01 Feb

[ By WebUrbanist in Art & Photography & Video. ]

blizzard photo painting art

As roads closed and kids turned staircases into sledding hills and snowboarding slopes across East Coast cities during Jonas, one photographer stopped to shoot a few pictures that turned out looking like modern-day impressionist paintings.

winter storm photo nyc

Photographer Michele Palazzo managed to capture not only the swirling snow around the structure, but an installation of snowflakes inside mirroring the exterior weather. Despite Sprint and Apple logos, hallmarks of the present age, there is something timeless about the composition.

winter storm photos

According to Colossal, “the snowflakes you see in the window of the Flatiron are part of a paper origami installation by Chelsea Hrynick Browne in the Prow Artspace. The cloudy atmosphere and gusty winds creates patterns that appear uncannily like brush strokes. You can see more of Palazzo’s shots from the morning of January 23rd on EyeEm.” (See more storm photos, thumbnails above, over at the EyeEm Blog).

Share on Facebook


[ By WebUrbanist in Art & Photography & Video. ]

[ WebUrbanist | Archives | Galleries | Privacy | TOS ]


WebUrbanist

 
Comments Off on Art of Photography: NYC Blizzard Photo Looks Like a Painting

Posted in Creativity