RSS
 

Posts Tagged ‘List’

Canon and Sony dominate Lensrentals’ most rented gear of 2017 list

28 Dec

Lensrentals has released its most rented gear of 2017 list, and the results are very interesting. You can check out the full list here, but we thought we’d point out the three things that immediately caught our eye.

1. Sony’s claim that it’s beaten Nikon to take the #2 position in sales of full-frame interchangeable lens cameras (ILCs) is backed up by the rental data. According to Lensrentals, for the first year ever, Sony has out-rented Nikon and “is slowly closing the gap to Canon.”

2. That said, Sony’s top renting piece of gear—the Sony a7S II—only reached the number five spot behind four Canon products; the Canon 24-70mm F2.8L II, Canon 70-200 F2.8L IS II, Canon EOS 5D Mark III, and Canon EOS 5D Mark IV took the numbers one, two, three, and four spots, respectively. Canon may not have released anything overly exciting this year, but there’s no doubt it’s still the best-selling camera brand in the world.

3. Finally, the last bit that caught our eye is that a battery—Sony’s NP-FW50, which was recently replaced the the NP-FZ100 that our own Richard Butler loves so much—took the number 6 spot, beating out some seriously popular gear like the Canon 50mm F1.2L and Canon 6D. This just foes to show: upgrading the Sony a9 and a7RIII to the much bigger FZ100 battery was an absolute necessity.

To see the full list and breakdown, or dive into a few other categories like last year’s most-rented list or the most popular new equipment rented in 2017, head over to the Lensrentals blog.

Articles: Digital Photography Review (dpreview.com)

 
Comments Off on Canon and Sony dominate Lensrentals’ most rented gear of 2017 list

Posted in Uncategorized


Nikon releases official D850 lens recommendation list

12 Oct

Nikon has published a list of lens recommendations for D850 owners, highlighting a total of eleven lenses that are suitable for use with its newly-launched, high-res, high-speed DSLR. The list covers prime, zoom, and speciality lenses, all of which are Nikon products (duh).

Here they are for your perusing pleasure below, just in case you want to make sure your glass is up to snuff with your fancy new camera:

Prime Lenses

  • 20mm f/1.8G – $ 796.95
  • 28mm f/1.4E – $ 1,996.95
  • 105mm f/1.4E – $ 2,196.95
  • 200mm f/2G – $ 5,696.95
  • 400mm f/2.8E – $ 11,196.95

Zoom Lenses

  • 14-24mm f/2.8G – $ 1,896.95
  • 24-70mm f/2.8E – $ 2,396.95
  • 70-200mm f/2.8E – $ 2,796.95
  • 80-400mm f/4.5-5.6G – $ 2,296.95

Specialty Lenses

  • 8-15mm f/3.5-4.5E – $ 1,246.95
  • 19mm f/4E PC – $ 3,396.95

Articles: Digital Photography Review (dpreview.com)

 
Comments Off on Nikon releases official D850 lens recommendation list

Posted in Uncategorized


How to shoot the solar eclipse: a list of resources for photographers

16 Aug
The first successfully captured photograph of a total solar eclipse was shot on July 28, 1851, by Prussian photographer Johann Julius Friedrich Berkowski. Your eclipse photos can look better than this, with a little advice from some of our friends.

If you live in North America or are a citizen of planet Earth, you’ve probably heard chatter about the upcoming solar eclipse starting the morning of August 21st. It’s a rare opportunity for a lot of folks across the United States to see and/or photograph a partial or total eclipse of the sun, and it’s all happening just under a week from now.

We’ve already published our guide to photographing the eclipse (and a plea to consider not photographing it), but the Internet has no shortage of great information on the subject, some of which goes very in-depth. In an effort to provide you with the totality of eclipse photography resources, we’ve rounded up some of our other favorite articles and guides below. Good luck, and remember to protect those eyes and sensors!

Canon eclipse guide – 16 articles on shooting the eclipse

Canon’s guide to photographing the solar eclipse is very impressive and thorough. It features more than 15 articles on the subject. There’s also a nifty ‘Solar eclipse pocket field guide’ PDF you can download and print. The guide is slightly geared to Canon shooters, but we feel the information is useful to all photographers, regardless of brand of choice.

Read Canon’s eclipse guide

B & H eclipse guide- An easy-to-read complete guide

B & H also posted a really thorough guide on everything you should consider to safely and successfully shoot the eclipse. And unlike the Canon guide, these tips are all in one (long) article.

Read B & H’s eclipse guide

National Geographic – The creative side of photographing the eclipse

National Geographic’s guide to shooting the eclipse is less technical nuts-and-bolts and more about planning, composition and creativity. Nat Geo pinged pro shooters Stan Honda and Babak Tafreshi to share their advice on getting the shot.

Read Nat Geo’s eclipse article

Wired – Tips for shooting an eclipse with a smartphone

Smartphones, with their tiny sensors and wide-angle lenses might not seem like the obvious choice for photographing the eclipse, but Wired has some tips for making the most of the camera you likely always have on you. In short, they recommend purchasing an accessory telephoto lens to attach to your phone (there are several decent brands that make them), and stabilizing the rig with a small tripod.

Read Wired’s eclipse article

Nikon – Exposure advice

Nikon put together some useful information on the various types of eclipses, and what kinds of exposures you might use over the course of a total solar eclipse. If you’re a Nikon shooter, the post addresses camera settings for various Nikon lines.

Read Nikon’s eclipse article

Nikon also put together a couple of videos on eclipse gear preparation and shooting advice, for those who prefer to watch instead of read. Watch them here.

Astropix.com – Catching the light

This eclipse guide was recommended in our forums by a reader. Written by astrophotographer Jerry Lodriguss, it is one of the most complete and detailed guides to eclipse photography we’ve come across on the Internet. If you are serious about nailing the shot, this is your guide. However, for the more casual/enthusiast photographers, this guide goes a tad above and beyond.

Read the Astropix.com guide

Popular Mechanics – How to photograph a total solar eclipse

Unlike the Astropix.com guide above, Popular Mechanics guide is more enthusiast-geared, but still covers all the core eclipse shooting information. There’s also a nine-minute video that largely covers the same material found in the article. And the author also briefly addresses post-production, something most other guides gloss over.

Read Pop Mech‘s guide


Feel free to share your town eclipse resources in the comments below.

Articles: Digital Photography Review (dpreview.com)

 
Comments Off on How to shoot the solar eclipse: a list of resources for photographers

Posted in Uncategorized


Google releases list of Street View-ready certified 360-degree cameras

12 May

Google has released a list of 20 360-degree cameras that are available or will be launched over the coming months that have been certified according to Google’s new ‘Street View ready’ standard. This means they can be used in conjunction with the Street View app to create content for the Google Street View platform. 

The cameras meet one of four new “Street View ready” standards, allowing users to choose the way of uploading 360-degree content that is most suitable for them.

  • Street View mobile ready: 360 cameras that can publish Street View directly from a mobile app, without requiring a desktop workflow

  • Street View auto ready: 360 cameras tailored for vehicle-based collection with the highest accuracy

  • Street View vr ready: 360 cameras or systems that collect geometry in addition to generating sets of connected 360 photos

  • Street View workflow ready: Publishing tools (sometimes bundled with cameras) that can upload to Street View accounts

You can see the list of certified cameras in the graphic at the top of this page. More information on the Street View ready standards is available on the Google developer website. Many of the cameras in the list will be on show at Google’s Street View Summit in Tokyo, Japan this week.

Articles: Digital Photography Review (dpreview.com)

 
Comments Off on Google releases list of Street View-ready certified 360-degree cameras

Posted in Uncategorized


Flickr says smartphones were the most popular device this year, iPhone tops list

08 Dec

Flickr has published its 2016 end-of-year report detailing the most popular devices and brands on its platform. Per the report, 48% of photos published on Flickr this year were captured using smartphones, and 47% of them were captured using iPhones specifically. The top three iPhone models were the iPhone 5s, the iPhone 6, and the iPhone 6s.

As far as brands go, Canon was the second most used at 24% and Nikon came in third at 18%. Device types, meanwhile, show DSLRs ranked second after smartphones at 25%, point-and-shoot cameras at 21%, and mirrorless models at 3%. Comparing the figures with last year’s report, smartphone uploads are up 9%, DSLR uploads are down 6%, point-and-shoot uploads are down 4%, and mirrorless uploads have remained steady.

Via: Flickr Blog

Articles: Digital Photography Review (dpreview.com)

 
Comments Off on Flickr says smartphones were the most popular device this year, iPhone tops list

Posted in Uncategorized


How to Use a Travel Photography Shot List to Come Home with Better Photos

01 Jul

Checking off your travel photo listWant to bring back travel photos that your friends actually enjoy viewing on Facebook? Want to make sure you don’t miss anything when visiting a new culture? Then it’s time to make a list!

We all have our easy ruts we fall into when photographing, but travel, for me, is about expanding my view. That’s why I take a travel shot list and try my darnedest to get at least one of each shot when visiting a new location.

What’s on my list?

Here are some tips for you to help make a travel photography shot list for your next trip. Feel free to use my list and add to it with your own ideas.

1 – People – old, young, and in-between

Spread out your people photos between age ranges. I’ve seen a bazillion images of old ladies from Cuba, while often missing are people like me; middle aged and fairly normal, even a bit boring. Round out your people photos with more variety, is all I am saying.

Portraits in Bhutan

What’s not to love about those shoes and that smile?

Kids are an easy target as they often love having their picture taken. You will need to be aware, though, that not all parents wish for their children to be photographed. That’s the crux of it; parents worry how the images this stranger just took will be used. Sometimes all it takes is a simple “Hello” first to the parents to gauge if taking photos is okay. If language is a barrier, you can also point to your camera, then to the children with an inquisitive look on your face. Either way, no matter the answer, respect the parent’s choice.

Peruvian kids

Kids playing in Inca ruins, Peru

Delhi street market scene

Street scene in Delhi, India with people my age.

Men at Red Fort, Delhi, India

People watching at the Red Fort, Delhi, India

2 – Food – preperation, presentation, social aspect

Food brings us together. It’s a basic need we can all relate to, even if we don’t know exactly what we are about to eat.

Cooking at a Sikh Temple

Inside the commercial sized kitchen at the Golden Temple in Amritsar, India

Don’t just shoot the Instagram-worthy image of a plate of the amazing new delicacy you are experiencing, find a way to shoot the preparation of food. Get behind the counter (where it’s allowed) to see how it’s cooked, and where it comes from. As you plan to share these photos (why else are you taking them?), you may find that a large, and often hidden, swath of your friends and followers have a strong interest in food prep.

Buddhist monastery kitchen in Nepal

The full kitchen at a monastery, high in the Himalayas of Nepal

3 – Architecture – old, new, juxtaposed

In some locations the old and the new architecture matches, Bhutan comes to mind. I watched artisans paint a brand new home with traditional patterns and motifs from the nearby 400 year old monastery. Everything there fit a certain style.

Buddhist Temple in Punakha, Bhutan

Looking up at the Punakha Temple, Bhutan

Then we have countries making vast changes from the old style to what constantly evolves as modern – think of Tokyo or Dubai. Look for the differences even where you think there is just one style.

4 – Water – how is it used?

While food brings us together, water is even more vital to our lives. In California we are familiar with our current drought, but forget that not every place has this problem. Some places are quite extravagant with their use of water, while it is a scarcity in others.

Water in use in Nepal and India

Scarcity of water in Kathmandu means water lines, while a woman in Varanasi, India, washes her clothes in the river.

How do the locals use water? Do they wash their laundry in the rivers? Are there fountains everywhere? Are their cities built along waterways, or with vast ports?

Infinity pool and Dubai

An infinity pool 23 stories up in the Burj al-Arab, Dubai, UAE

Old water storage tank overflowing and leaking

In the woods of Oregon, there is often way too much water.

5 – Transportation – private and public

How do people get around? At home we have our patterns, and often don’t see the other forms of transport we might use. But when you travel, it will hopefully be obvious how the people there transport themselves.

Tuk-tuk ride at night

Tuk-tuks in Amritsar, India, are the easiest way to get around town.

It might a passel of buses, camels, rickshaws, taxis, or Maseratis.

Also, how are goods moved? Does your location have shipping traffic and a lot of cargo? From continent to continent, the methods for moving goods from here to there can be vastly different.

Boating on the Ghanges River

Boating along the Ghanges River in Varanasi, India

6 – Commerce – macro and micro

When I think of macro-commerce I think of things like whole industries like: agriculture, tourism, and banking.

With micro- commerce, I think of markets and vendors, where money actually changes hands. Who’s selling what, and who is buying? Is there a special technique to transactions?

image

Try to capture both the large scale, and intimacy of commerce, and show how things may be very similar, or very different from what you are used to back home.

7 – Nighttime

When the sun goes down, don’t stop shooting! Learn to find light, and exploit its unique qualities during the night. Maybe you have some moonlight or some neon in your location. No matter the source, there is still light at night.

Balanced Rock, Arches National Park, at Night

Balanced Rock in Arches National Park, Utah, USA takes on a new look at night.

Does your location shut down when the sun hits the horizon? Or does it rally for an all-night bender?

I found the markets in Aqaba, Jordan come to life once the heat of the day was done. I also found that the town had way more neon signs than I ever expected, but hadn’t bothered to notice while touring in the daylight. Get out at night and explore.

Noel in Aqaba, Jordan

Neon in Aqaba, Jorda

image

8 – Religion

How different parts of the world practice religion has always fascinated me. There isn’t a single part of this globe, that does not have some nod to the local religion, in some aspect of their lives.

Minaret of a mosque in Oman

Colorful minaret in Jebel Shams area of Oman

It may be subtle, such as a small altar to burn incense, or it could be the overt repetition of churches across a city. Travel is a time to break out of your routine and try new things. Stick your head (respectfully) inside a temple. Tour a mosque. Visit a cemetery to see the influence of religion on those in the past.

Buddhist monks in ceremony, Bhutan

Photography inside many Buddhist temples in Bhutan is banned, but on the night of this retreat for monks from all around the valley, I was allowed to shoot the ceremony.

Military tombstones and flags located in Eastern Washington, USA

Military tombstones and flags located in Eastern Washington, USA

9 – Landscapes – natural and manmade

I love landscapes, so they come easy to me. But, I have not always been a fan of cities and people. So, it takes me some effort to really appreciate the organization and layout of a nice cityscape. But it’s always worth it to bring back a mix of both in your images.

View of Canyonlands National Park at sunset

No people to see. Canyonlands National Park, Utah, USA.

Photographers and Cho Oyu, Nepal

A few people give a sense of scale to Cho Oyu, the 6th highest mountain in the world, Gokyo, Nepal.

Sunrise view of Seattle, Washington and Mount Rainier

Here there are a lot more people in Seattle, Washington, USA

I am reminded of the craze for photos of Iceland. I’ve seen my fill, and rarely was a single cityscape in the mix. Black sand beaches with ice, waterfalls, all that stuff shows up – but most photographers have left out the manmade landscape. Include it! At least once.

10 – Icons – clichés big and small

I know people who refuse to shoot iconic locations. “They’ve been over shot and I wouldn’t be caught dead shooting them,” is a common refrain. Ignore those people.

Taj Mahal and reflection

The classic Taj Mahal view.

You’re traveling, so have fun. Shoot the Eiffel Tower if you’re in Paris. Hit up Mesa Arch in Canyonlands National Park, and why not get a reflecting pool image of the Taj Mahal, or a cigar smoking lady in Havana? Do it. Get a posed photo of Masai Mara villagers, a llama in front of Machu Picchu, pretend to push over the Tower of Pisa.

Heck, even get a photo of that same waterfall everyone else visiting Iceland has shot.

That being said, you probably shouldn’t share only the cliché shots. Unless you’re on assignment to shoot something highly unique, go ahead and hit the clichés, then move on to the rest of the list. Better yet, look around your cliché location for something new to bring back and share.

Tourists at teh Taj Mahal

The not-so-classic view of the Taj Mahal, but a lot more fun.

11 – Wildlife – domestic and truly wild

My daughter’s obsession with taking photos of cats in Morocco sticks with me as a reminder to not ignore the domestic animals, along with the wild. I’ve photographed big cats in India and Africa, tarantulas in Peru and breaching whales in Alaska. But, I’d be remiss if I didn’t convey the fact that the town of Essouira, Morocco, with its fresh fish markets, is a haven for cats of all kinds.

Breaching humpback whales, Alaska, USA

Humpback whales in Alaska, USA

FIghting Hippos, Serengeti National Park, Tanzania

Fighting hippos in the Serengeti National Park, Tanzania

What about the beasts of burden? The donkeys, llamas, horses and camels? Put those on your list as well.

image

12 – All the pretty plants and flowers

Some of us just don’t care that much about plants. A green thing giving off oxygen at home is the same as a green thing giving off oxygen halfway across the world.

Rhododendrons in the Himalayas, Nepal

Rhododendrons at 14,000′ up in the Himalayas

But, I had no clue there were rhododendrons in the Himalayas of Nepal, much the same (but smaller), as both the ornamental and wild versions, I knew in Washington state growing up. When you get down to the tropics, the plants certainly get exotic, don’t they? Grab their wonderful colors and adaptations to share with friends back home.

Conclusion

This list can be just a start for your own customized version. Take it, shape it, make it your own. Put your favorite things on the list, but also keep those that don’t interest you. Growth as a photographer comes from trying new things and shooting new subjects.

Lastly, when it’s time to share your trip photos, I would suggest using 2-4 images from each category when making an online album. This will force you to pick only the best and it will give your viewers a good cross section of what you saw on your travels.

googletag.cmd.push(function() {
tablet_slots.push( googletag.defineSlot( “/1005424/_dPSv4_tab-all-article-bottom_(300×250)”, [300, 250], “pb-ad-78623” ).addService( googletag.pubads() ) ); } );

googletag.cmd.push(function() {
mobile_slots.push( googletag.defineSlot( “/1005424/_dPSv4_mob-all-article-bottom_(300×250)”, [300, 250], “pb-ad-78158” ).addService( googletag.pubads() ) ); } );

The post How to Use a Travel Photography Shot List to Come Home with Better Photos by Peter West Carey appeared first on Digital Photography School.


Digital Photography School

 
Comments Off on How to Use a Travel Photography Shot List to Come Home with Better Photos

Posted in Photography


The Top 10 Camera Features Wish List of dPS Readers and Writers

17 Apr
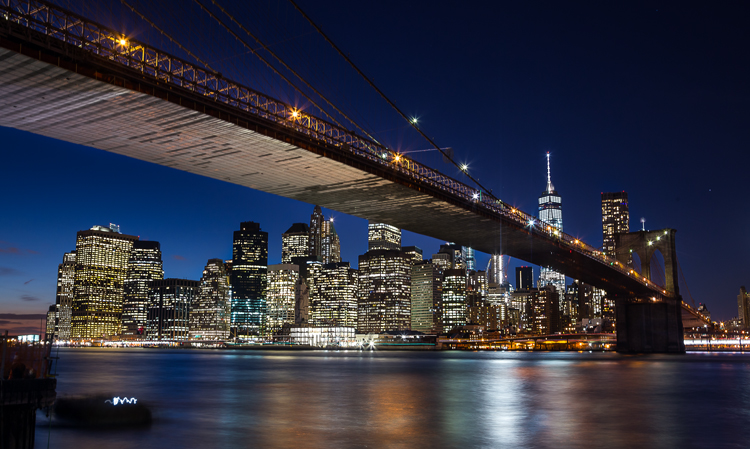
Brooklyn Bridge picture taken using a remote shutter release and a neutral density filter, which could be eliminated with camera improvements.

Brooklyn Bridge picture taken using a remote shutter release and a neutral density filter, which could be eliminated with camera improvements.

It is becoming almost cliche, but there has never been a better time to be a photographer. What we can do now with modern digital cameras, without spending that much money, is incredible. Without breaking the bank, you can now get an extremely high resolution digital camera, with low light performance and a dynamic range unheard of just a few years ago, that shoots at speeds measured in multiple frames per second. If that isn’t enough, it will also double as a video camera with HD quality as a bare minimum. It will even send the pictures wirelessly to your phone. It seems ungrateful to ask for more. Still, everything can be improved, can’t it?

And just to be clear – when I say improved, I don’t mean adding more megapixels. Or demanding even better low light performance and dynamic range. Or achieving even faster focus and shooting speeds. The manufacturers know everybody wants that stuff, and they seem to be putting all their energy into those areas.

But doesn’t it seem like there are features that could be added to cameras that wouldn’t require a technological breakthrough? Or that wouldn’t make your camera cost a fortune? It always seemed that way to me. So I started asking around to other photographers, then I started asking readers, and finally I asked my fellow dPS writers.

How would you improve digital cameras?

I got some good answers, and have combined them with my own to create a list of 10 new features (a wish list) that could be added to digital cameras to make them better. Here they are, in no particular order:

1. A Small LCD for the Histogram

The first improvement is a separate, smaller LCD on the back of the camera. Why? Let me explain.

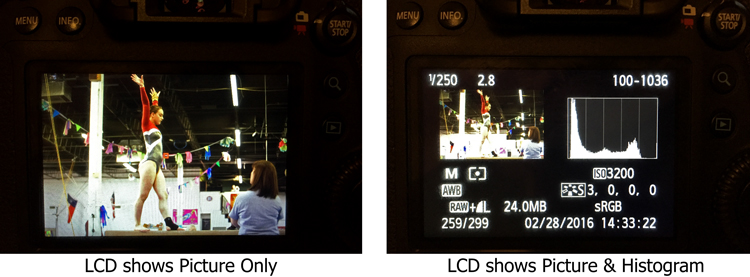
We all know that the best way to evaluate exposure when you are shooting is to look at the histogram. Looking at just the picture on the LCD doesn’t work as well when you are trying to evaluate exposure. But look what happens to the picture on the screen when you add the histogram:

LCD-graphic

On the left, where you have the full picture, you can clearly see it. But once you add the histogram, the picture on the right becomes tiny. It is unusable and tells you nothing. We are essentially forced into a position of having to choose between a picture we can see, or just viewing the histogram (but not both). I’d like to do both.

To fix that, you could just put another very small LCD on the back of the screen. It would show only the histogram, so that you could still have a full sized version of your picture.

2. Three Dials

When you set the exposure level of your pictures, there are three controls: shutter speed, aperture, and ISO.

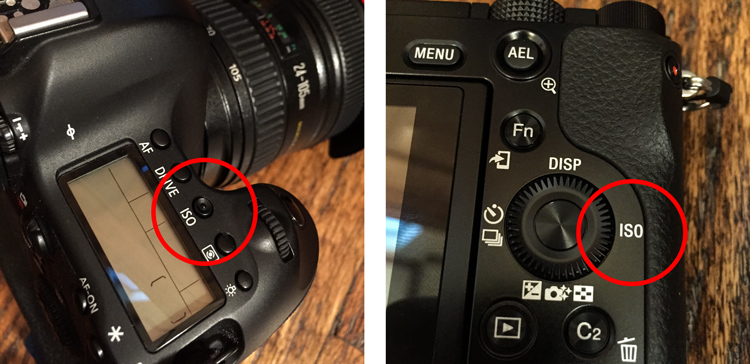
At the same time, how many dials do we have to set those three controls? Two – and that’s if we’re lucky. Entry level cameras often only have one. To change all three exposure controls with only two dials, means you have to press buttons while turning dials. It’s a rather cumbersome process, for the most important and commonly used functions of the camera. If we have three exposure settings, shouldn’t we have three dials to set them?

The odd man out is always ISO, and I personally think this is a hold-over from the days of film. Back then, you couldn’t change the ISO except by changing your film. When digital came along, everyone was pretty happy to be able to change the ISO at all, so having to press a button didn’t seem like a big deal. In addition, at that time, available ISO ranges were extremely limited and if you raised the ISO much then digital noise quickly became a problem.

But now? ISO ranges are huge! Even entry level cameras have ISO ranges up to 25,000. ISO is now truly a equal partner in the exposure triangle. It should be treated as such. That means it should have its own dial. You shouldn’t have to press buttons to adjust it.

ISO-controls-graphic

Stop ISO discrimination! Let’s make it an equal member of the exposure triangle by giving ISO its own dial!

Where would you put the extra dial? There are many places you could choose from, but one thought is to get rid of the mode dial. Having a dedicated dial to quickly change the mode is another hold-over from a time when there were fewer camera controls (and no menus). Who changes their modes so frequently that the most valuable real estate on the camera needs to be taken up with a dial for it? Don’t most people just pick a mode and use it most, or all of the time? Even those that change modes don’t do so often enough that it needs its own dial.

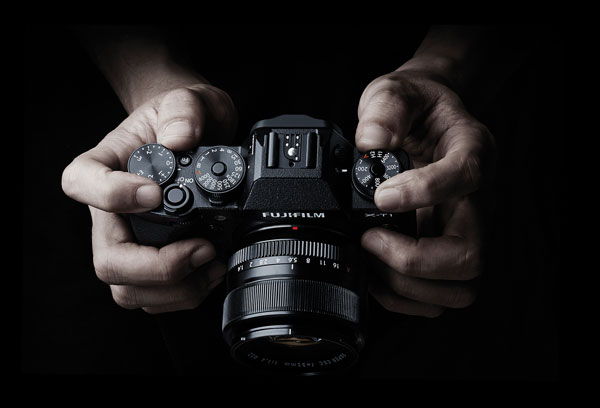
Note: It actually appears that this change might be on the way. There are three dials on most Fujifilm mirrorless cameras and one of them is dedicated to ISO. Perhaps others will follow suit.

Supplied by Fujifilm

Supplied by Fujifilm

3. Lower ISOs

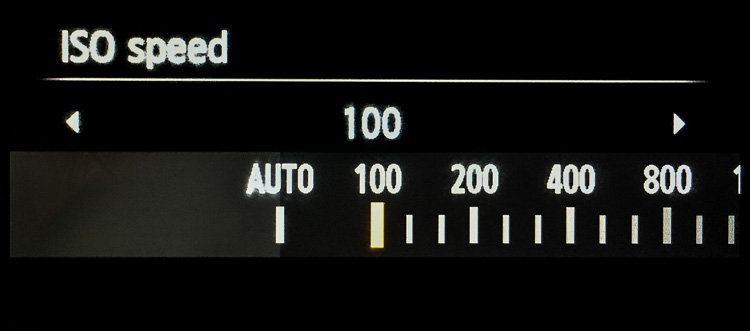
Speaking of ISO, in the rush to expand ISO values on the high side, the lower side of the ISO scale has been completely neglected. The camera manufacturers have worked very hard to make digital sensors more sensitive to light. It would seem like a simple thing to make the sensor less sensitive to light. Why couldn’t cameras have ISO levels of 50, 25, 12, and so on?

Why would that matter? It would put us in more control over shutter speed, and avoid the necessity of carrying around neutral density filters. Why do landscape photographers need to carry around a bunch of neutral density filters to slow down their shutter speeds? If we could lower the ISO, that would require a longer shutter speed for a proper exposure. It seems like that could just be built in, and would make it much simpler. Instead of adding a 3-stop neutral density filter to your lens, you could then just reduce the ISO from 100 down to 12 (3 stops).

Why stop at ISO 100? We should see ISO 50, 25, 12, 6, 3, and so on.

Why stop at ISO 100? We should see ISO 50, 25, 12, 6, 3, and so on.

Of course, we might need to talk about the numbering system for these low ISOs. Moving down 10 stops from ISO 100 would result in ISO .09 which may not work.

4. Retractable Remote Shutter Release

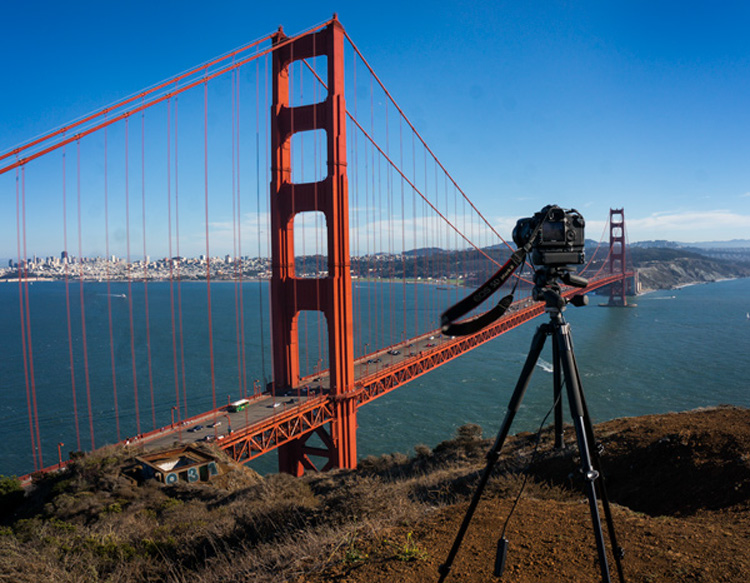
Speaking of landscape photographers, something every one of them needs is a remote shutter release, or an intervalometer. It seems like the shutter release could detach from the camera with a retractable cable. That way you could pop it out and trip the shutter, without moving the camera or risking vibration.

TripodAtGoldenGate

Note the remote shutter release hanging down. Wouldn’t it be nice to have a retractable unit?

It would mean that we wouldn’t have to carry around remote shutter releases.

5. Allowing Longer Shutter Speeds

Another improvement would be to allow longer shutter speeds without the need to switch over to Bulb mode. At present, most cameras limit the length of shutter speeds to 30 seconds. If you want to use a longer shutter speed than that you can, but you have to switch over to Bulb mode. It would be nice to be able to take exposures of a minute or longer without having to switch modes.

Why is this important? Largely because of bracketing (or Auto Exposure Bracketing, or just AEB for short). When you bracket, you are taking three (or more) exposures: one at normal exposure, one underexposed, and one overexposed. If you are starting with a long shutter speed, then the longer shutter speed required for the overexposed picture will often need to be longer than 30 seconds.

For example, if you are taking a bracket of three photos, with your starting shutter speed at 15 seconds, and you set the exposures 2 stops apart, the bracket won’t work as you hope. In this example, the overexposed picture of the bracket would need a shutter speed of one minute (starting at 15 seconds, adding one stop doubles your shutter speed to 30 seconds, and the second stop doubles it again to one minute). But your camera will only allow a shutter speed of 30 seconds, so that won’t work. Your camera will take the normal and underexposed photos, but the overexposed one will be limited to 30 seconds.

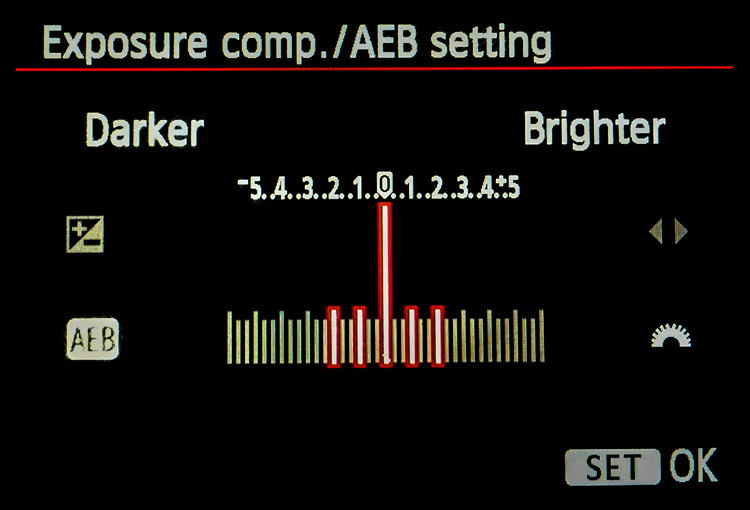
Here is a pretty common bracket for those who use them (5-shots, with each shot separated by 1 stop). If the original shutter speed is longer than 6 seconds, the camera will not capture the entire bracket because the most overexposed picture would need longer than 30 seconds.

Here is a pretty common bracket: 5-shots, with each shot separated by 1 stop. If the original shutter speed is longer than 6 seconds, the camera will not capture the entire bracket because the most overexposed picture would need longer than 30 seconds to expose.

How often does this happen? A lot more than you might think. Landscape photographers are known for being out before the sun is up, and they all want to use a combination of a small aperture to maximize depth of field and a low ISO to minimize noise. The only way to get a proper exposure in these conditions is to use very long shutter speeds. These are the same people who have very little control over their lighting and often face dynamic range problems, so they are the most likely to bracket their photos.

6. Self-Timers

Why are self-timers on cameras limited to two and 10 seconds? A reader named Jeff Johnson wondered about this (as well as raising some of the other improvements mentioned in this article). Every $ 10 digital watch in the discount store will allow you to set timers of different ranges, why not our digital cameras?

This is another one that seems to be a hold-over from a prior era. Timers were mechanical devices at one time, and it may have made a lot of sense to limit the options. Now, it doesn’t make sense. It seems like we ought to be able to set whatever length of timer we want, or at least have a few more options.

7. Improved Wifi

One exciting recent development in cameras has been the introduction of Wifi. It allows you to transfer your pictures to your phone or other device wirelessly. But it is usually clunky. You have to turn off your phone’s data connection to connect with your camera. Some have raised the idea of using bluetooth for connection to phones, tablets, and laptops (in addition to wifi). dPS writer John McIntire echoed that, and pointed out the smartphone and tablet control for things like timelapse and long exposures.

 8. Hyperfocal Distance Calculator

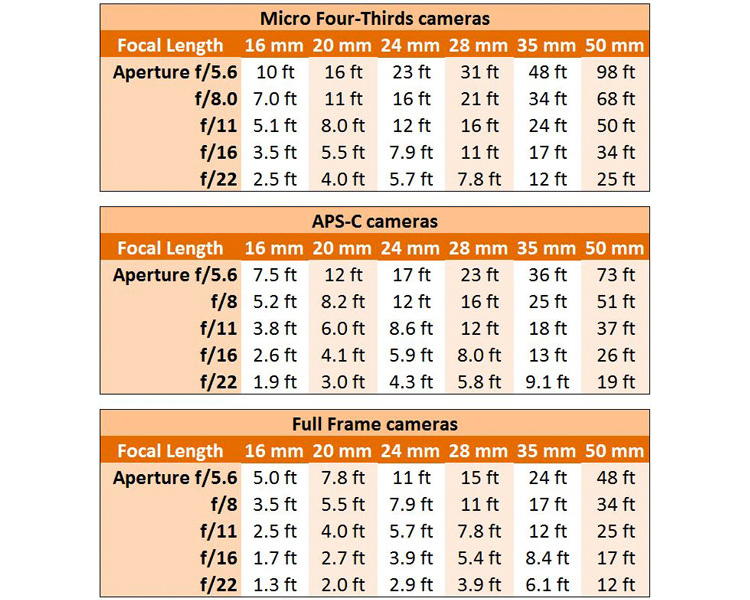
Despite its name, the concept of hyperfocal distance is not that complicated. It is just the closest point at which you can focus, and still keep your entire background acceptably sharp. It depends on only three factors:

  1. The sensor size of your camera
  2. The focal length you are using
  3. Your aperture setting.

There are charts and apps that will help you calculate the hyperfocal distance for your shot.

Hyperfocal Distance Charts

Hyperfocal Distance Charts

But why should you be forced to calculate it at all? The aforementioned Jeff Johnson had another great idea of having the camera calculate it for you. After all, the camera is a computer. It already knows all three of the variables involved. Why couldn’t the camera just tell you the hyperfocal distance? It could be part of the camera’s display.

Note: Once again the Fuji cameras lead the way, as the X-T1 and possibly others, do indeed have a hyperfocal distance display inside the viewfinder.

9. Internal storage

Storage has changed remarkably fast in a short period of time. Just a few years ago, you might have been carrying around a bunch of 4 GB memory cards with you. After a couple hundred pictures, you’d swap it out for another. But now, the sizes of memory cards are huge. 128 GB is commonplace, and not all that outrageously expensive. There are even 256 GB cards or even 512 GB cards available as well. As a result, most of us just buy a large card and leave it in the camera. We download the pictures periodically, and resume shooting with the same card.

That’s already a better situation than what we had a few years ago, but doesn’t it seem weird that there is no storage at all in digital cameras (at least not in the mirrorless cameras and DSLRs we tend to use)? It did to Leanne Cole, who wondered why we are fooling around with memory cards at all at this point. Given how much storage can fit in a small place, haven’t we reached the point where storage should be built-in to the camera? Why not have a 500 GB drive already added?

10. Your Changes

These are some items we’d like to see. I think some of these are good ideas, but I suspect there are better ideas out there. So what would you change? Are there things you would add? Are there features you’d like to see put on the digital camera wish list?

Please let us know in the comments below.

googletag.cmd.push(function() {
tablet_slots.push( googletag.defineSlot( “/1005424/_dPSv4_tab-all-article-bottom_(300×250)”, [300, 250], “pb-ad-78623” ).addService( googletag.pubads() ) ); } );

googletag.cmd.push(function() {
mobile_slots.push( googletag.defineSlot( “/1005424/_dPSv4_mob-all-article-bottom_(300×250)”, [300, 250], “pb-ad-78158” ).addService( googletag.pubads() ) ); } );

The post The Top 10 Camera Features Wish List of dPS Readers and Writers by Jim Hamel appeared first on Digital Photography School.


Digital Photography School

 
Comments Off on The Top 10 Camera Features Wish List of dPS Readers and Writers

Posted in Photography


Designing the Perfect Camera – What Features are on Your Wish List?

18 Feb

The perfect camera doesn’t exist, but if I were a camera designer, I know exactly what sort of camera I would make for myself, and how I’d improve on the one that I’ve already got. I’m not asking for the impossible either – all these ideas could be implemented using current technology. Really, what I would do is take the camera I already own – the Fujifilm X-T1 – and add the best bits from other cameras, to make a kind of super-camera, or at least one that is better tailored to my own needs.

1 – Sensor size

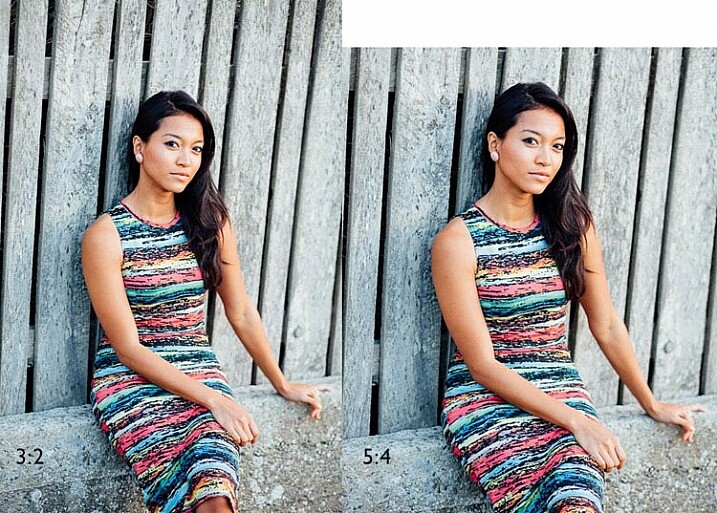
Let’s start with the sensor. The X-T1’s sensor uses the same 3:2 aspect ratio as other APS-C and medium format cameras. This often works well when taking photos in the landscape orientation. But it doesn’t work nearly so well when taking photos in the portrait orientation (with the camera turned on its side).

Aspect ratio

The portrait on the left has an aspect ratio of 2:3 (width always comes first), the same as the sensor on the X-T1. The portrait on the right shows how it would look if the sensor had a 4:5 aspect ratio. The area is the same, but the width and height are different.

It’s surprisingly hard to create a good composition that utilizes all the space in the frame well, especially for landscapes and portraits. It’s much easier with a shorter rectangle, such as those found in large format cameras (aspect ratio 5:4), some medium format film cameras (7:6) and Micro four-thirds cameras (4:3).

For example, check out the landscapes of Joe Cornish. He uses a large format camera for a lot of his work, and he uses the portrait orientation a lot. It works really well with the short rectangle.


My proposal is this. Ditch the 3:2 aspect ratio sensor and place it with one that uses the 5:4 aspect ratio. But keep the area of the sensor – don’t make it bigger or smaller. This would give you several benefits:

  • It’s easy to compose images within the 5:4 aspect ratio.
  • If you crop to a square (as I often do because I love the square format) you use more of the sensor than when you crop the current APS-C sensor.
  • You get a slight improvement in image quality, especially at wide apertures, because you are using the centre part of the lens to create the image.
Aspect ratio

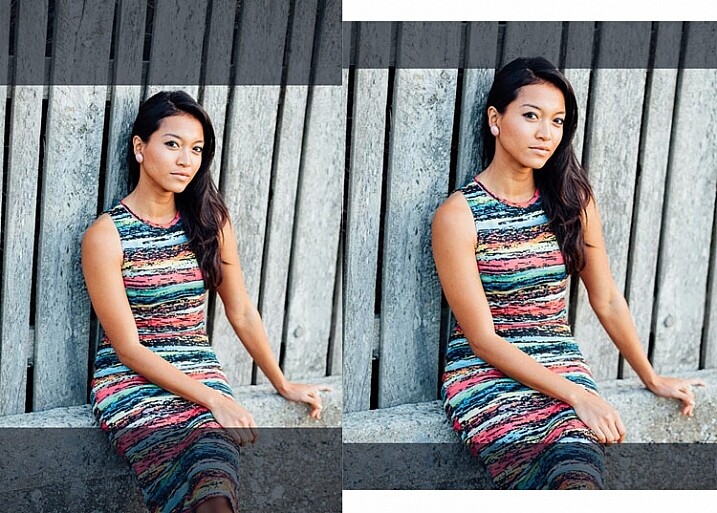
The above two photos, cropped to a square. The dark grey area shows the unused part of the sensor. You lose less information captured from the 5:4 sensor than you do from the 3:2 one.

What I don’t want to see, is a full-frame camera introduced into the Fujifilm range. The problem with having two sensor sizes in the same range, is that it greatly complicates the process of making, and buying lenses. It’s far better, as Fujifilm has done so far, to use a single sensor size throughout the range (in my opinion).

2 – In-Camera Image Stabilization

I think this is a fantastic idea, and I’d like to see it in Fujifilm cameras. The advantage of having Image Stabilization in the camera is that you can use it with any lens. That includes wide-angles, which you can then potentially hand-hold at shutter speeds like 1/4 or 1/8 second, giving all sorts of interesting creative possibilities when it comes to recording movement. Sony and Olympus have got this one right.

Fast shutter speed

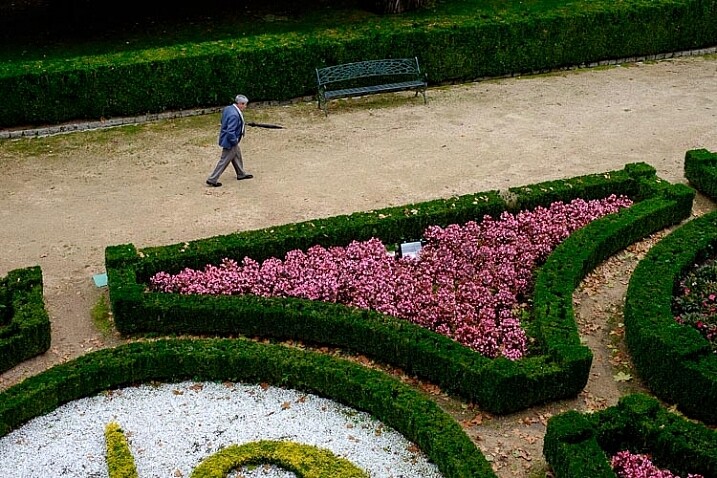
I took this photo with a 35mm lens at 1/180 second to freeze movement. This lens doesn’t have Image Stabilization, but if it were built into my camera, I could try taking the photo at a shutter speed as slow as 1/15 or 1/8 second. The man would be a blur, creating a different image entirely. Image Stabilization lets you try this with a hand-held camera, so you don’t have to use a tripod.

3 – Quick control dial

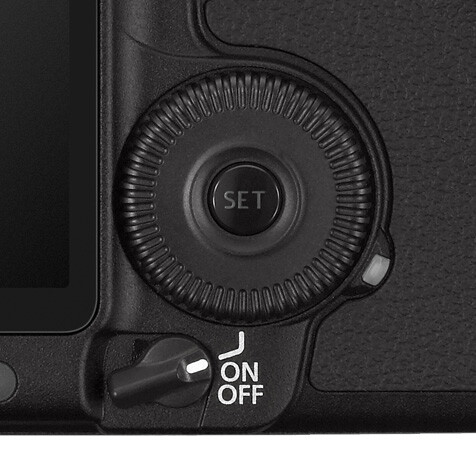
Mid-range and high-end Canon cameras have a quick control dial – a thumbwheel on the back of the camera, that you can move while looking through the viewfinder. The big advantage of the quick control dial is that you can adjust exposure compensation without removing your eye from the viewfinder.

Quick control dial

The quick control dial on the EOS 5D Mark II. Its position means that it’s easy to move with your thumb, while looking through the viewfinder.

The X-T1 can already display a histogram in the viewfinder. With a quick control dial you can adjust exposure compensation (when in an automatic mode like aperture priority, shutter priority or program) as you go, to get the histogram where you want it. All guesswork regarding exposure is gone. The current exposure compensation dial is too hard to move while looking through the viewfinder, and reduces the usability of the camera.

The joystick added to the X-Pro 2 for quick movement through the autofocus points would also be a welcome addition.

4 – Dual card slots

Probably coming in the XT-2, but essential for backing up photos. Good quality memory cards are virtually indestructible. If your camera saves a copy of each photo on two different cards this makes backing up photos much easier, especially while travelling.

So Fujifilm, if you’re listening, I know I’m only one user among many, but I’d love it if you could give some consideration to these ideas. Especially the one about sensor size, which I think could revolutionize the way we use cameras.

Your turn

If I could add just one feature to my X-T1 it would be the 5:4 aspect ratio sensor. So here’s a question for you – if you could add just one feature to your camera, which would it be and why? I’m looking forward to reading your answers, this should be interesting.


Mastering Lenses photography ebookMastering Lenses

My new ebook Mastering Lenses: A Photographer’s Guide to Creating Beautiful Photos With Any Lens shows you how to get the best from the lenses you own already. A comprehensive guide to exploring the creative potential potential of wide-angle, normal and telephoto lenses, it’s also the ultimate buying guide for readers thinking about purchasing a new lens for their camera. Please click the link to learn more or buy.


googletag.cmd.push(function() {
tablet_slots.push( googletag.defineSlot( “/1005424/_dPSv4_tab-all-article-bottom_(300×250)”, [300, 250], “pb-ad-78623” ).addService( googletag.pubads() ) ); } );

googletag.cmd.push(function() {
mobile_slots.push( googletag.defineSlot( “/1005424/_dPSv4_mob-all-article-bottom_(300×250)”, [300, 250], “pb-ad-78158” ).addService( googletag.pubads() ) ); } );

The post Designing the Perfect Camera – What Features are on Your Wish List? by Andrew S. Gibson appeared first on Digital Photography School.


Digital Photography School

 
Comments Off on Designing the Perfect Camera – What Features are on Your Wish List?

Posted in Photography


List of Resources for Making a Photography Website

08 Feb

I’ve just made a new photography website for my fashion, portrait, and event photography. This meant researching the different options currently available (as of December 2015) for creating photography websites. So whether you’ve just gotten your first camera, or are a seasoned pro looking to update your photography website, here are some options to consider.

I’ll make some recommendations about specific companies that I’ve used. Most articles would make money on these through affiliate links; but there are no affiliate links here (I get no benefit recommending them), these are just companies that I’ve been happy with.

Editor’s note: none these companies have not been researched or checked by dPS, and are solely the recommendations of the author. As with any purchase please do your own due diligence, read online reviews, and do trial periods where possible, before choosing your web suppliers. dPS is not responsible for any issues that may arise if you follow these suggestions.

make-photography-website8727-2

Why make a photography website?

Now that the majority of photos aren’t printed, sometimes they can get lost in your hard drives and forgotten. Sharing the pictures you make with family and friends is much easier when your photos are online. Depending on the photography website you use, you can also get useful feedback on your pictures, or even sell them to buyers around the world. Now is also the best time to start getting followers, if you haven’t already done so.

As well as sharing, developing, and selling your photography online, having a photography website helps encourage you, and gives you a sense of accountability so you keep practicing. Old photos are also one of the most valuable things we own, professional or amateur, and photo albums are often what most people would choose to save in a fire. Keeping your memories online not only shows you how your photography has improved, but also keeps them safe in the cloud. When my Western Digital hard drive arbitrarily malfunctioned and lost all of my photos, I was thankful to have uploaded my favourite ones online.

Make a photography website for free

Alan O'Rourke

By Alan O’Rourke

There are several excellent free options to get your photography online.

  • Flickr – Like a resurrected giant, Flickr offers a huge 1 TB of complimentary storage and has a thriving community.
  • Facebook – A humble Facebook page (not your personal profile but a business page) for your pictures is an ideal way to start to gain a following.
  • Google Plus – Less popular lately, but better quality, and good if you want to be found online by the Google search engine.
  • Instagram– Even if this isn’t your main site, it’s very useful to have as a photographer.
  • Tumblr – A clean, free way to create a blog and feature your most recent photography.
  • 500px – A relative newcomer, the 500px design is clean and contemporary; their free option is fine.
  • Behance – A professional space for your best photos that looks more prestigious.

Make a photography website

As well as the free options, you might like to make a photography website that you have more control over. Personally after much research I opted for a self-hosted WordPress site using a pre-designed theme that I customized. To do so you will need;

A Domain name

The domain name is your address on the internet. For example: http://digital-photography-school.com is the domain name, or URL for dPS. I get my domain names from www.Internet.bs or www.NameCheap.com.

Hosting

This is your real estate on the internet. You need a place to park your site, that is called hosting. Your host online is where all the files for your site will be stored (hosted).

I use www.LiquiLayer.com (really excellent, personal support) and www.HostDeal.com. I’ve heard good things about www.HostGator.com, www.DreamHost.com and www.HostWinds.com, but haven’t used any of those personally.

make-photography-website_1413

Content Management System

This simplifies building your website tremendously. I use WordPress and highly recommend it. Most web hosts will give you options to install it very easily.

WordPress Theme

This provides a structure for your website. There are both free and paid options available, which allow you to make a great looking site faster. Here are my favourites:

SLR Lounge’s WordPress Theme – I recently discovered this free WordPress photography theme and used it to build my latest website. It has a clean, simple style and creating the site took a few days.

Screen Shot 2016-01-30 at 1.16.20 PM

Home page of my new site

Screen Shot 2016-01-30 at 1.17.21 PM

Portrait page

MySiteMyWay’s InFocus Theme – (Paid theme) I’ve used MySiteMyWay’s themes for several websites. As well as the design, I’ve been incredibly happy with the ongoing support, which has saved me a huge amount of time, and allowed me to do things I wouldn’t otherwise have been able to do.

Screen Shot 2016-01-30 at 1.22.01 PM

Home page

Screen Shot 2016-01-30 at 1.22.31 PM

Gallery page

The X Theme – (Paid option) It’s a silly name, but this Premium WordPress theme looks good, and they have done very well with updating it. There is a lot of features available here for more advanced internet users and web designers.

Screen Shot 2016-01-30 at 1.28.18 PM

Themeforest – (Free and paid options) Themeforest is the marketplace for WordPress themes online. Because they are constantly being released and updated, and because creating a website can be quite a personal choice, it is worth having a look here to see which themes are currently rated highly.

Designers

It can be helpful to hire a designer/ coder to help you with creating your photography website.

  • Fiverr – This is my go-to site for getting help with websites and so on. It’s cheap, fast, and so far I’ve been very happy with the results.
  • Elance – More professional than Fiverr; expect to pay more as well.

Pay monthly for a photography website

If designing a site isn’t for you, there are quite a few companies that can help. I don’t use these options personally because I like being able to move my website to another hosting provider if I want, or archive a site and bring it back later.

  • Smugmug – An established player that will allow you to show, share and sell your photos.
  • SquareSpace – The choice of many top professionals, although caveat emptor, several are sponsored. It’s quite pricey, but the designs it offers for photographers really look incredible, and it’s the easiest way to get a good looking photography website online quickly and easily.

Some bonus photography related companies

While we’re on the subject, here are a few companies that are very useful for photographers.

  • WeTransfer – Ideal for sending large files or even whole photoshoots. Their free option is excellent, and the paid version is great for photographers who want more options.
  • Dropbox – Very well integrated, and a great way to back up your photos online.
  • Google Drive – Again, an excellent option to save and send photos.
  • PicSurge.com – I use this a lot. It’s a well-designed site that allows you to show photos in good looking galleries that remain live for years. It lets you password-protect your images, and allows clients/family/friends to download files individually or collectively – and it’s free!

Conclusion

So those are some of the main options to consider if you want to make a photography website in 2016, and some reasons why you might want to consider doing so if you haven’t already. Hopefully this has been useful – please feel free to share your own websites in the comments below!


Editor’s note: please see this page for website resources, personally recommended by dPS founder and chief, Darren Rowse, over on his other site dedicated to blogging – ProBlogger. If you’re really interested in blogging you may wish to sign up there to get free weekly blogging tips.

googletag.cmd.push(function() {
tablet_slots.push( googletag.defineSlot( “/1005424/_dPSv4_tab-all-article-bottom_(300×250)”, [300, 250], “pb-ad-78623” ).addService( googletag.pubads() ) ); } );

googletag.cmd.push(function() {
mobile_slots.push( googletag.defineSlot( “/1005424/_dPSv4_mob-all-article-bottom_(300×250)”, [300, 250], “pb-ad-78158” ).addService( googletag.pubads() ) ); } );

The post List of Resources for Making a Photography Website by Ben Evans appeared first on Digital Photography School.


Digital Photography School

 
Comments Off on List of Resources for Making a Photography Website

Posted in Photography


Reading List: 7 Great Photography Books for Beginners

04 Sep

We like to think of ourselves here at Photodoto as a resource that beginning photographers can utilize to help them improve their photography and find new, interesting sources of inspiration. We even have our handy-dandy 7-day email course, which you can receive for free by entering your email in the box just to the right of this paragraph. But sometimes, Continue Reading

The post Reading List: 7 Great Photography Books for Beginners appeared first on Photodoto.


Photodoto

 
Comments Off on Reading List: 7 Great Photography Books for Beginners

Posted in Photography