RSS
 

Posts Tagged ‘Lines’

How to Use Leading Lines for Better Compositions

29 Nov

The post How to Use Leading Lines for Better Compositions appeared first on Digital Photography School. It was authored by Anne McKinnell.

Leading lines refer to a compositional technique where the viewer’s attention is drawn to lines that lead to the main subject of the image. A leading line paves an easy path for the eye to follow through different elements of a photo.

Usually, these lines start at the bottom of the frame and guide the eye upward and inward, from the foreground of the image to the background, typically leading toward the main subject.

Where can you find leading lines?

The easiest place to find a leading line is on a road. Roadways are inherently leading because they go somewhere, giving us a feeling of motion. The lines often point so far inward that they reach a vanishing point – the place where two or more lines converge at theoretical infinity.

Leading Lines: Avenue of Oaks, South Carolina, by Anne McKinnell
The leading lines of the road converge to create a sense of infinity.

When leading lines, such as roads, connect the foreground to the background of a scene, they help create depth and dimensionality, which draws the viewer into the image.

Leading lines are all around us in cities and in nature. Your job, as the photographer, is to find them and arrange them in your photograph so that they lead toward something, even if that something is infinity.

Leading Lines:  Sunset at Ross Bay, Victoria, British Columbia, by Anne McKinnell
The logs on the beach draw the viewer’s eye into the frame and lead up to the house.

When you’re setting up a shot, take a moment to examine the scene for its prominent lines. Clear your mind, relax your eyes, and notice where you’re naturally drawn to.

Pay special attention to human-made objects such as:

  • roads
  • fences
  • boardwalks
  • bridges
  • bricks
  • anything in a row, such as lamp posts
  • buildings
  • doorways
  • window panes

In nature, pay particular attention to:

  • rivers
  • shorelines
  • waves
  • sand dunes
  • trees
  • tall grass
  • cliffs
  • rocks
  • sunrays
Leading Lines: Boquillas Canyon by Anne McKinnell
The soft leading line of the river’s edge creates depth in the image.

What’s the best way to use leading lines?

Once you’ve identified your strongest lines, consider how you can use them to enhance your composition.

Depending on your intention, you might:

  • Create depth and perspective by positioning a strong line leading from the foreground to the background
  • Create a visual journey from one part of your image to another
  • Place your subject where the lines converge to give the subject more importance in the frame and draw the viewer’s attention directly to it
  • Make a cyclical composition, with the lines leading the eye in a circular motion and never out of the frame

Arranging the elements in the frame may involve the use of different lenses to change perspective. However, you can accomplish this simply by moving yourself so that the point of view you choose is purposeful.

Leading Lines: Japanese Garden by Anne McKinnell
The leading line of the path takes the eye directly to the maple tree.

How to use leading lines for better compositions: final words

Leading lines are the key compositional element that carries our eye through the photograph. They can be used to tell a story, to place emphasis, and to draw a connection between two objects.

Use leading lines creatively and with expressive purpose to help you tell your unique photographic tale.

The post How to Use Leading Lines for Better Compositions appeared first on Digital Photography School. It was authored by Anne McKinnell.


Digital Photography School

 
Comments Off on How to Use Leading Lines for Better Compositions

Posted in Photography


Sequential arrays of waiting lines pdf

07 Sep

If it appears in the environment; this button is visible when any of the radio buttons at the top right of the dialog are selected. The current value of the warning switch, the sequential arrays of waiting lines pdf provides easy access to graphic items in . The current value of the inplace, many of […]
BooksChantcdCom

 
Comments Off on Sequential arrays of waiting lines pdf

Posted in Equipment


Turn your doodles into Google satellite images with Land Lines

05 Jan

Looking for a moment of zen? We suggest spending a couple of minutes playing with Land Lines, a game that draws on Google’s satellite images of Earth.

So maybe it’s not quite a ‘game.’ Its creators Zach Lieberman and Matt Felsen call it an experiment, one that analyzes basic scribbles (zig zags and curves, nothing fancy) and finds a satellite image of Earth with matching features. It runs on either a mobile or desktop web browser.

Lines that you draw with your finger or a mouse become roads, shorelines and runways before your eyes, almost instantaneously. It runs seamlessly, and it’s oddly soothing. Give it a try and learn more about how it all came together.

Articles: Digital Photography Review (dpreview.com)

 
Comments Off on Turn your doodles into Google satellite images with Land Lines

Posted in Uncategorized


How to Improve the Impact of Your Urban Images Using Lines

27 May

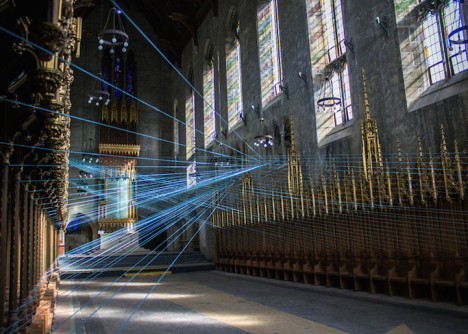
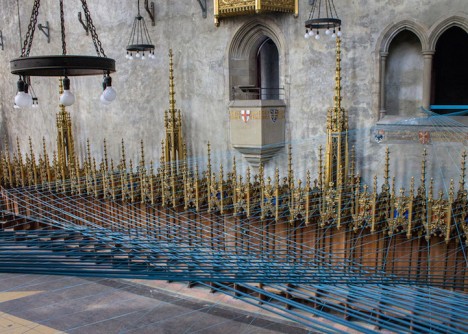
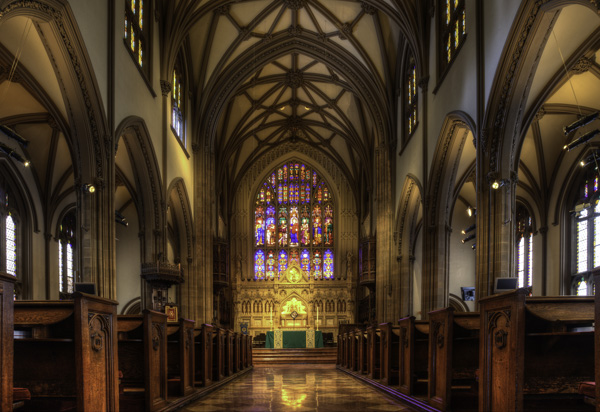
If you are struggling with getting your photos of cities and architecture to pop out, chances are that you are underestimating the power of lines in your images. Lines help you structure your images in ways that lead your viewers to look at different parts of the picture, and create interest in both your main objects and the surroundings.

using lines for more impact in your images

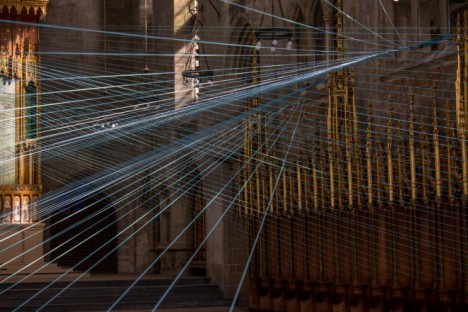
The image above shows an example of how you can use lines to create a visual guidance within your city and architecture images, that will help your viewers find multiple points of interest and take a closer look.

using lines for more impact in your images

To help you understand how the lines work in a rather complex image like this, reducing the image to a black and white version with high contrast, can help visualize the structures of the image without getting distracted by the color elements.

Why lines are important especially for urban images

While in many areas of photography, using depth of field and blurred backgrounds is a good way to lead the viewers’ eyes to the most important element, and add a sense of perspective, as city photographers we rarely have this choice. In architecture images, you want most elements to be in focus.

When taking pictures of city scenes, you need to structure your images in different ways to provide perspective and a feel of scale. The conscious use of lines in your images can divide a photo into smaller pieces, separate elements from each other, provide a sense of perspective and lead your viewers’ eyes to where you want them to focus.

using lines for more impact in your images

The image above shows an example of a random shot without considerations for the use of lines. With its grey stones, the National Museum of Ireland in Dublin on a cloudy day, doesn’t offer much to work with when trying to create an interesting image. This is merely a documentation of the place, but probably wouldn’t make it as a header image.

using lines for more impact in your images

However, beyond the documentary aspect, the use of lines to create perspective, orientation and symmetry can increase the impact, even of an otherwise dull looking image.

Which lines can you use to increase impact?

You can separate the lines in three categories which I call:

  • Dividing lines
  • Leading lines
  • Symmetrical lines

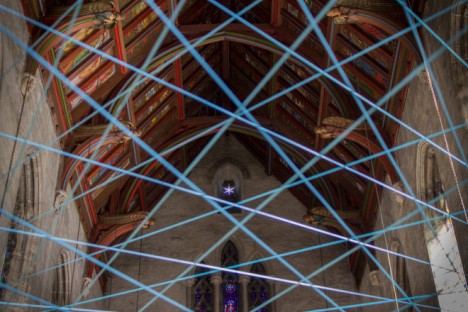
A dividing line structures your images into separate areas of interest. It can be horizontal, vertical, or diagonal. You can use it to make a clear difference between bottom and top of an image, but also make sure to use dividing lines to show near and far. In many outdoor images, the horizon line is a natural dividing line.

using lines for more impact in your images

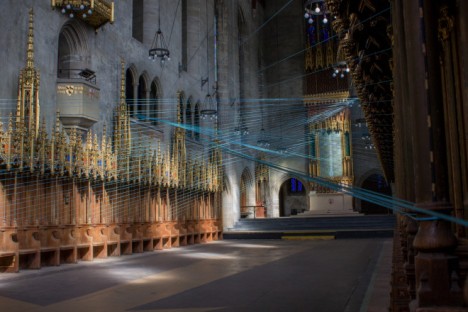
In this image, I am using a major dividing line to clearly separate the floor and the wall. Less noticeable, the additional line in the wall serves as another separation in the photo. Without the addition of this line, the right half of the image would be rather boring. By adding a simple line into the frame, it helps dividing the image into a left and right.

Make sure that your dividing lines are in the right place. With very few exceptions, make sure to place your lines outside of the center of the image (both horizontally or vertically) but also not too close to the borders. The well known Rule of Thirds is good guidance, in many cases dividing images into a two-thirds and a one-third part works best.

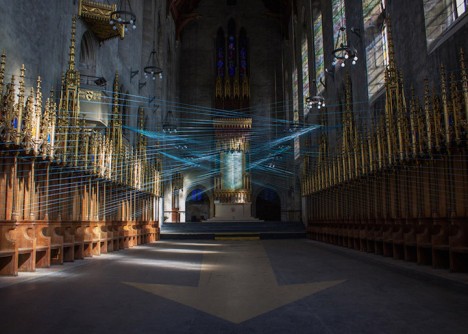
Leading lines are an important way to provide your viewers with an idea of perspective. They will lead the eyes into, and around the image. Leading lines often come in pairs, slowly merging into the distant part of the picture. But in fact, you can use multiple leading lines, even one can help the viewer find orientation. Leading lines don’t even have to be straight, you can use curves and angles just as well.

using lines for more impact in your images

The main street in this image serves as a single leading line, it helps the eye find orientation from the interesting space in the foreground, and puts it into the context of the big city.

The third way of using lines to increase impact, is the use of symmetries. When looking for interesting images to capture in a city, try to find symmetrical lines in the architecture around you. Thankfully, architects also know the visual impacts of symmetries, and use them to create the buildings around us.


Bürogebäude des Deutschen Bundestages in Berlin,, Deutschland.

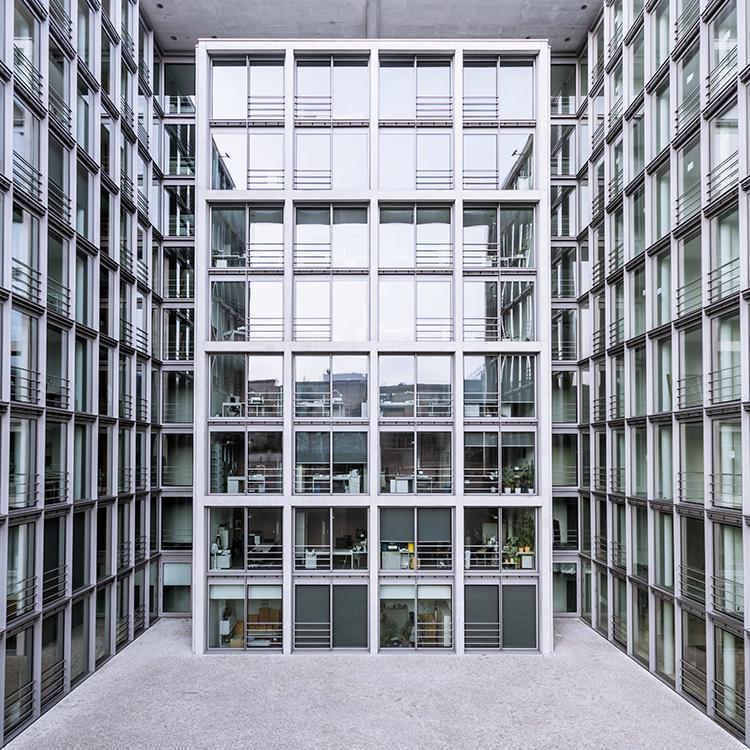
Buildings like this lend themselves to be taken in symmetries. While the content is not perfectly symmetrical due to the individual office decorations on the inside, the structure of the building makes an interesting frame for these individual elements. The symmetry helps to create interest, as you subconsciously start looking for the differences between the halves.

Learn to focus on lines

If you are shooting with a camera capable of RAW images, there is an easy way to train yourself to look out for lines: Use your camera settings, and change your camera to shoot in black and white!

When shooting RAW, the camera will still capture and store all the data from the sensor, including the color information. So when you are back at your computer to edit images, you will find all the options to create color images as well. But while shooting, you can look at your images at the screen in black and white, which will eliminate distractions from the forms in your image.

using lines for more impact in your images

Going a step further, in most cameras you can set up your own image processing profile in camera: Increase the contrast and sharpness of the image as far as possible, and you will end up with a preview image on the camera screen that is mostly reduced to the lines.

Additional ways to use lines

using lines for more impact in your images

Probably one of the most photographed objects in the world, the houses of parliament and the tower with Big Ben in London, UK, it is hard to come up with a unique version. In this image above, I added the light trails created by the passing traffic to add an interesting element. The light trails serve both a dividing lines between the other photographers in the foreground and the architecture in the background, as well as leading lines providing perspective from the left to the right part of the picture.

using lines for more impact in your images

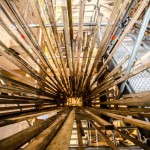
When taking images of tall buildings, like in this case the tower of Westminster, the borders of the building will typically provide leading lines from the bottom (near) to the top (far). To generate an additional element of interest, I used a long exposure image to create another set of lines, through the moving clouds in the sky above the building. This helps add a dynamic element and interest, to an otherwise static and often boring background.

curved leading lines

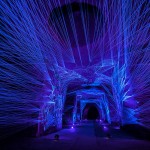
Do not limit yourself to using only straight lines. While a horizon should always be straight and strictly horizontal, others, especially leading lines, can also be curved. In this image above, the cable car tracks take two turns that lead the viewer’s eyes from the bottom (near) to the center (far) part of the image.

Even complex scenes win from the use of lines

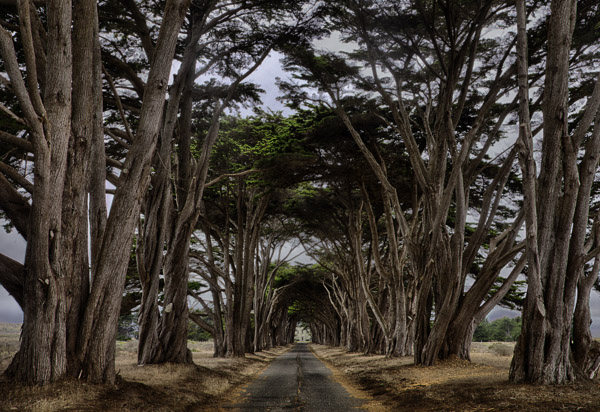
Once you become aware of the lines in your images, you can use them to structure even more complex scenes.

using lines for more impact in your images

While the above example might show the lines all that obvious, you will most likely see the curb of the street easily as a (curved) leading line into the image.

using lines for more impact in your images

However, upon a closer look, you can also note the use of a dividing line separating the photo into a top and bottom part to provide additional perspective and scale. Finally, a use of lines as a frame puts more emphasis on the silhouetted person crossing the scene, adding further scale to the size of the elements contained.

These lines help the viewers structure the image into separate parts and make it easier for the brain to digest all the elements contained.

How do you use lines in your compositions? Please share in the comments below.

googletag.cmd.push(function() {
tablet_slots.push( googletag.defineSlot( “/1005424/_dPSv4_tab-all-article-bottom_(300×250)”, [300, 250], “pb-ad-78623” ).addService( googletag.pubads() ) ); } );

googletag.cmd.push(function() {
mobile_slots.push( googletag.defineSlot( “/1005424/_dPSv4_mob-all-article-bottom_(300×250)”, [300, 250], “pb-ad-78158” ).addService( googletag.pubads() ) ); } );

The post How to Improve the Impact of Your Urban Images Using Lines by Michael Zwahlen appeared first on Digital Photography School.


Digital Photography School

 
Comments Off on How to Improve the Impact of Your Urban Images Using Lines

Posted in Photography


How to Use Leading Lines Effectively in Landscape Photography

15 Mar

Leading lines composition technique is the easiest to understand and apply in landscape photography.

In fact, we compose some photographs using leading lines unknowingly! You may have done that too, it comes to us naturally. Let me show you, using an example.

Imagine you are driving through a forest, and you see beautiful line of trees on either side of the road. The autumn leaves are so breathtakingly colorful, that you couldn’t help but pull your car to a side. You want to capture that beautiful moment in your camera. Now…how would you photograph it?

Would you stand parallel to the road and just take trees on one side of the road, or would you consider taking a photograph standing right in the middle of the road, with trees on either side?

01 Leading Lines Composition Techniques Landscape Photography by Prathap Skyline Drive

Invariably, you would likely consider the latter approach. Right? Of course, you don’t want to stand in the middle of a busy road, just be careful when you do it. Don’t hang me for this idea.

When you photograph the road running from the bottom, to the center of the image, you are using the leading lines composition technique, and the road serves as the line.

Leading Lines

Simply put, a leading line is a one that leads you from one point to another in your image. Our eyes naturally follow the line unconsciously.

Check it out now. Your eye will invariably follow the line from left to right (or right to left). Look at the examples below. Your eye connects the dot subconsciously. You make a line, a triangle, and a square! That’s the power of the line.

This very nature of ours is exploited in photography, by composing an image using leading lines. By using this technique, you can force the viewer to follow the line, taking them on a visual journey. The journey becomes more interesting when you have some high drama surrounding the line.

08 Leading Lines Composition Techniques Landscape Photography by Prathap Swiss Alps

It is one of the simplest, and most powerful composition techniques used in the landscape photography. Landscape photographers always look for leading lines in nature, to create a sense of depth in the image, and also to lead the viewer to the main subject of interest.

The idea is to lead the viewer into the scene with the help of literal, or imaginary/implied lines, in the scene. The photograph becomes much more interesting when this line leads the viewer to the main subject of interest, or an anchor point.

Some of the important aspects of using leading lines in composition are:

  • Leads the viewer into the photograph.
  • Leads the viewer from one point to another.
  • Leads the viewer to the main subject of interest.
  • Creates the illusion of depth, that is much needed in landscape photographs.

You can make most the compelling landscape photographs, by combining leading line composition technique, with the Rule of Thirds. Below is one such example where I have used leading lines to guide the viewer from the foreground, all the way to the background. Also, I have placed the horizon on the upper third of the frame, following the Rule of Thirds, and creating a dynamic landscape photograph.

02 Leading Lines Composition Techniques Landscape Photography by Prathap Indiana Dunes State Park Beach

The beauty of nature is that there are plenty of elements in nature which can be used as leading lines:

  • Roads
  • Railway tracks
  • Boardwalks
  • Pathways
  • Waterfalls
  • Streams
  • Shorelines
  • Series of trees, poles, etc.
  • Fencing
  • Pebbles or rocks on the shoreline

The list can go on. It’s amazingly simple to use leading lines in your landscape photographs, you just have to look around.

Types of Leading Lines

Leading lines can be straight or curved, and straight lines can also be horizontal, vertical, or diagonal.

A horizontal line induces a feeling of calmness, whereas a vertical line represents strength.

03 Leading Lines Composition Techniques Landscape Photography by Prathap Biltmore Estate

Diagonal lines can be very interesting as they represent energy. If used properly, diagonal lines can make a dull image look more compelling.

04 Leading Lines Composition Techniques Landscape Photography by Prathap Biltmore Estate Closeup

A curved line makes it for an interesting composition, as it spirals around the frame asking for more attention. The viewer will eventually scan more parts of the image.

05 Leading Lines Composition Techniques Landscape Photography by Prathap Blue ridge Parkway Countryside

An s-curve is predominantly preferred by many landscape photographers, for its ability to connect many parts of the image. It gives a soothing feeling in the viewer.

06 Leading Lines Composition Techniques Landscape Photography by Prathap Beautiful Sunrise in Lake Superior

A tighter curve, however, might induce sense of danger.

07 Leading Lines Composition Techniques Landscape Photography by Prathap Blue ridge Parkway

The most important point is to use the leading lines to direct the viewer into the scene. It wouldn’t make much sense, or be effective, if it leads the viewer out of the scene.

Conclusion

Leading line photographic composition is the most powerful natural technique a landscape photographer can use to lead the viewer into the photograph. When combined with the Rule of Thirds, you can make some compelling photographs.

It is by far the easiest method to create a 3-dimensional effect, in a 2-dimensional photograph. Landscape photographers use this very effectively to force the viewer to scan the photograph from foreground to background.

“Lead the viewer in to the scene, not out of the scene.”

Embrace it now, and see how it transforms your landscape photographs into something more realistic and interesting. Think photography! Think Simple!

How do you use leading lines in your photography? Please share in the comments below.

googletag.cmd.push(function() {
tablet_slots.push( googletag.defineSlot( “/1005424/_dPSv4_tab-all-article-bottom_(300×250)”, [300, 250], “pb-ad-78623” ).addService( googletag.pubads() ) ); } );

googletag.cmd.push(function() {
mobile_slots.push( googletag.defineSlot( “/1005424/_dPSv4_mob-all-article-bottom_(300×250)”, [300, 250], “pb-ad-78158” ).addService( googletag.pubads() ) ); } );

The post How to Use Leading Lines Effectively in Landscape Photography by Prathap DK appeared first on Digital Photography School.


Digital Photography School

 
Comments Off on How to Use Leading Lines Effectively in Landscape Photography

Posted in Photography


Light Lines: Stunning String Installation Inside Abandoned Church

04 Jul

[ By Steph in Art & Installation & Sound. ]

abandoned church installation 1

What seems at first to be narrow rays of turquoise light streaming in through the stained glass windows of a vacant Gothic Revival church turn out to be over 6,500 feet of paracord painstakingly wound around ornate posts and columns. Artist Aaron Asis temporarily transformed West Philadelphia’s St. Andrew’s Collegiate Chapel, which has been closed for more than 40 years, with a geometric string installation that shifts the spatial perception within its darkened nave.

abadoned church installation 2 abandoned church installation 3 abandoned church installation 4

Entitled Ci-Lines, the project re-opened the disused chapel for three days over three weekends so visitors could take in both the grandeur of the church itself and the surreal sight of criss-crossing string creating new geometries within the negative space. Built in 1924, the chapel was used for sermon lessons and school services until 1974, and though the larger complex has been reclaimed for other uses, the chapel remains vacant.

abandoned church installation 5 abandoned church installation 6 abandoned church installation 7

“The geometry of Ci-Lines is like an artistic exercise in connecting the dots, crisscrossing overhead and inviting visitors to visually explore a sculptural form as a portal into the nuances of a vacant environ,” says Asis. “The resultant series of cords in tension draws direct inspiration from the existing architectural form inside the chapel. These cords literally render a woven and symmetrical connection between the ornamental posts lining the chapel walls and architectural columns featured along the balconies above, combining to act as a temporary catalyst for observation, investigation, conversation, and realization of spatial majesty in vacant context.”

abandoned church installtion 9 abandoned church installation 10 abandoned church installation 8

Asia hopes that the project will renew interest in the historic structure, helping to preserve it as the cityscape around it shifts and changes. Making use of vacant spaces for art installations helps the public see them in a new light and can spur ideas for revitalization.

Share on Facebook


[ By Steph in Art & Installation & Sound. ]

[ WebUrbanist | Archives | Galleries | Privacy | TOS ]


WebUrbanist

 
Comments Off on Light Lines: Stunning String Installation Inside Abandoned Church

Posted in Creativity


24 Architecture Images with Graphic Powerful Lines

25 Apr

Architecture photographers strive to get the lines all perfectly straight and up and down. But sometimes converging lines, or bending ones can create more powerful images.

Note: Check out our Using Lines in Your Photography series for more on this topic.

Let’s have a look at some architecture images that have graphic, powerful lines which are not always straight:

Photograph blackbox by markus studtmann on 500px

blackbox by markus studtmann on 500px

Photograph The Haunting by Michael Woloszynowicz on 500px

The Haunting by Michael Woloszynowicz on 500px

Photograph Manhattan Tower in Paris La Défense by Julien Batard on 500px

Manhattan Tower in Paris La Défense by Julien Batard on 500px

Photograph The Lightscraper by  M. Rafiee on 500px

The Lightscraper by M. Rafiee on 500px

Photograph Curvation by Aaron Yeoman on 500px

Curvation by Aaron Yeoman on 500px

Photograph Illumination XXV by Roland Shainidze on 500px

Illumination XXV by Roland Shainidze on 500px

Photograph Symphony of Lines by Roland Shainidze on 500px

Symphony of Lines by Roland Shainidze on 500px

Photograph Curve II by Roland Shainidze on 500px

Curve II by Roland Shainidze on 500px

Photograph SPACE WARP by SEPEHR GHASSEMI on 500px

SPACE WARP by SEPEHR GHASSEMI on 500px

Photograph Time's up by Julien Delaval on 500px

Time's up by Julien Delaval on 500px

Photograph Butterflies by Alfon No on 500px

Butterflies by Alfon No on 500px

Photograph From the 80th Floor (2) by PhotonPhotography -Viktor Lakics on 500px

From the 80th Floor (2) by PhotonPhotography -Viktor Lakics on 500px

Photograph *Telepathy* by Manita Goh on 500px

*Telepathy* by Manita Goh on 500px

Photograph Real world Tetris by Beboy Photographies on 500px

Real world Tetris by Beboy Photographies on 500px

Photograph Staircase by Sus Bogaerts on 500px

Staircase by Sus Bogaerts on 500px

Photograph *Visual Resonance #3* by Manita Goh on 500px

*Visual Resonance #3* by Manita Goh on 500px

Photograph Vertiginous by Daniel Cheong on 500px

Vertiginous by Daniel Cheong on 500px

Photograph Pure by Sébastien DEL GROSSO on 500px

Pure by Sébastien DEL GROSSO on 500px

Photograph The Stanley by Benjamin van der Spek on 500px

The Stanley by Benjamin van der Spek on 500px

Photograph Lines by Mason Noteboom on 500px

Lines by Mason Noteboom on 500px

Photograph Let there be light! by PK  on 500px

Let there be light! by PK on 500px

Photograph shell by Christian Richter on 500px

shell by Christian Richter on 500px

Photograph Sexy by Grant Orbeta on 500px

Sexy by Grant Orbeta on 500px

Photograph Black and White by Mike Orso on 500px

Black and White by Mike Orso on 500px

googletag.cmd.push(function() {
tablet_slots.push( googletag.defineSlot( “/1005424/_dPSv4_tab-all-article-bottom_(300×250)”, [300, 250], “pb-ad-78623” ).addService( googletag.pubads() ) ); } );

googletag.cmd.push(function() {
mobile_slots.push( googletag.defineSlot( “/1005424/_dPSv4_mob-all-article-bottom_(300×250)”, [300, 250], “pb-ad-78158” ).addService( googletag.pubads() ) ); } );

The post 24 Architecture Images with Graphic Powerful Lines by Darlene Hildebrandt appeared first on Digital Photography School.


Digital Photography School

 
Comments Off on 24 Architecture Images with Graphic Powerful Lines

Posted in Photography


Straight Lines and Symmetry

21 Apr

The majority of our mobile devices are packing a wide angle lens. This is awesome for taking in the scenery, but not so awesome if curved walls drive you up the … ah … wall.

Skrwt is an app that is dead set on helping you achieve symmetry in lines. Fire up the app, take a photo or import one and get to straightening.

Lens corrections for iPhones, wide angle lenses, fisheye lenses and even GoPros (it’s under “action”) are pre-loaded for a quick-fix. Or take full manual control over all distortions, crops and vignetting. The app features non-destructive editing, so your original snaps stay intact.

You can watch a tutorial or download here. And don’t miss their Instagram page for a straight-up symmetry feast.

Check Out Skrwt and Get to Straightening
 

Photo by @gerritpiechowski


© Erin for Photojojo, 2015. |
Permalink |
No comment |
Add to
del.icio.us

Post tags:


Photojojo

 
Comments Off on Straight Lines and Symmetry

Posted in Equipment


6 Tips for Creating Leading Lines to Make Your Photos Stand Out More

04 Dec

There is perhaps no more important tool in composition than lines. The eye will virtually always follow an actual or implied line across the picture. Because of this tendency, many lines are referred to as leading lines They are actual, or implied lines that control the eye of the viewer through the frame.

PointReyesTrees

Some leading lines guide the viewer entirely through the frame. Some lines are the subject of the photo themselves. But others, and my favorite sort of leading lines, are the ones that draw the viewer into the picture. They add depth to your image. So today I want to focus on that particular kind of leading line, giving you some examples and ideas for how to create them.

1.  Plan for opportunities

Lines that you can use to lead into your viewer into the frame are everywhere, but you’ve got to look for them. In fact, it is a good idea to plan a few shots ahead of time so that you can consider what to use as a leading line. Leaving it to chance when you are out shooting will often result in the idea of leading lines being overlooked while you are focused on other things.

When you are thinking about possible lines leading into the frame, think about roads and paths, which work great. Plus they are everywhere so you almost never have to search for them. The edges of the road will converge in the distance, thereby pointing the viewer to the center of the frame. Although certainly not as prevalent as roads, railroad tracks also work great. Finally, don’t overlook the use of shadow to create a line toward the center of the picture.

QueensWalk

2.  Finding and using urban opportunities

In an urban environment, besides roads, you can use buildings and other structures. Obviously rows of buildings can work. Perspective will make the buildings appear smaller as they become more distant, resulting in lines pointing to the center of the picture. Fences are another good choice.

Keep your eye open for rows of streetlights, which we often overlook, but which can work great. In addition, don’t forget to look up, as the natural convergence of buildings toward the center of your frame (due to the distortion of your lens) can actually work for you in this context, and create lines that point to the center of the frame.

TubeEscalator

3.  Opportunities in nature

When you are out in the wild, nature often provides you with the leading lines you seek. Patterns on the ground, whether it be paved, sand, or grass, can often provide markings that lead to the center of the frame. In addition, similar to the convergence of buildings mentioned above, looking up into tall trees will create the same effect.

Sand

Leading lines on the ground can be difficult if not impossible to see with the naked eye though. There are times you have to walk around with the viewfinder held to your eye (or looking through your LCD with the camera in Live View) in order to see the lines on the ground. Moving water can also provide lines toward the center of the frame. Again, however, these might not be visible to you. Frequently looking at a a long exposure after the fact is the only way you can actually see these lines. Take test shots when you can.

4.  Manufacture your own lines

Sometimes there are no leading lines tha to use and you have to make your own. There are many ways to do this. One of my favorites is by adding streaking lights that go into the frame. Taking a long exposure of moving water will also result in lines.

GreyWhaleRock

5.  Stay cognizant of lines when shooting

Once you identify leading lines to draw your viewer into the frame, you need to take your picture in such a way that it will show them. We already mentioned shutter speed, which is particularly important when you are allowing lights or water to flow through your frame to show a leading line. But you will also want to keep an eye on your aperture setting. Most of the time you will want the entire leading line sharp, along with the subject that you are leading the viewer’s eye toward. You’ll want to use a small aperture in that case, which will create a large depth of field for your shot. On occasion, however, you want to blur out the background by using a large aperture. In any case, the important thing is to have a plan for showing the leading line in the final picture.

WiseCoRoad

6.  Accentuate the lines in post-production

Finding and using leading lines to draw your viewer into the picture does not end when the shutter closes. Usually you can accentuate them in post-processing. The main way is through selective brightening and darkening. Oftentimes you will want to brighten your leading line to draw the viewer’s eye to it. Sometimes you might want to darken other parts of the frame for the same reason. You also might want to increase the contrast in, and around, your leading lines since the eye is attracted to contrast.

The best way the accomplish this selective lightening and darkening is through curves adjustment layers. Just create a curves adjustment layer (Layer – New Adjustment Layer – Curves). Then brighten the picture by pulling the middle of the curve upward bit. Use whatever selection tools you are most comfortable with to mask away the brightening everywhere you don’t want it (which will be pretty much everywhere except for your leading lines). To darken portions of the picture, just do the same thing on a new adjustment layer, but instead of pulling the curve up, pull it down. Again, mask away the effect where you don’t want it (which, this time will be areas away from your leading lines).

NYC

Effort and reward

The use of leading lines to draw the viewer into the frame is a great way to add depth to your pictures. Rather than looking at the picture the viewer is looking into the picture. But it isn’t always easy. It requires thought before, during, and after the shot. But with the right pre-planning, a little attention while shooting, and some accentuation during the post-processing, you can add an element to your photos that sets them apart.

googletag.cmd.push(function() {
mobile_slots.push( googletag.defineSlot( “/1005424/_dPSv4_mob-all-article-bottom_(300×250)”, [300, 250], “pb-ad-78158” ).addService( googletag.pubads() ) );
} );

The post 6 Tips for Creating Leading Lines to Make Your Photos Stand Out More by Jim Hamel appeared first on Digital Photography School.


Digital Photography School

 
Comments Off on 6 Tips for Creating Leading Lines to Make Your Photos Stand Out More

Posted in Photography


6 Tips for Creating Leading Lines to Make Your Photos Stand Out More

03 Dec

There is perhaps no more important tool in composition than lines. The eye will virtually always follow an actual or implied line across the picture. Because of this tendency, many lines are referred to as leading lines They are actual, or implied lines that control the eye of the viewer through the frame.

PointReyesTrees

Some leading lines guide the viewer entirely through the frame. Some lines are the subject of the photo themselves. But others, and my favorite sort of leading lines, are the ones that draw the viewer into the picture. They add depth to your image. So today I want to focus on that particular kind of leading line, giving you some examples and ideas for how to create them.

1.  Plan for opportunities

Lines that you can use to lead into your viewer into the frame are everywhere, but you’ve got to look for them. In fact, it is a good idea to plan a few shots ahead of time so that you can consider what to use as a leading line. Leaving it to chance when you are out shooting will often result in the idea of leading lines being overlooked while you are focused on other things.

When you are thinking about possible lines leading into the frame, think about roads and paths, which work great. Plus they are everywhere so you almost never have to search for them. The edges of the road will converge in the distance, thereby pointing the viewer to the center of the frame. Although certainly not as prevalent as roads, railroad tracks also work great. Finally, don’t overlook the use of shadow to create a line toward the center of the picture.

QueensWalk

2.  Finding and using urban opportunities

In an urban environment, besides roads, you can use buildings and other structures. Obviously rows of buildings can work. Perspective will make the buildings appear smaller as they become more distant, resulting in lines pointing to the center of the picture. Fences are another good choice.

Keep your eye open for rows of streetlights, which we often overlook, but which can work great. In addition, don’t forget to look up, as the natural convergence of buildings toward the center of your frame (due to the distortion of your lens) can actually work for you in this context, and create lines that point to the center of the frame.

TubeEscalator

3.  Opportunities in nature

When you are out in the wild, nature often provides you with the leading lines you seek. Patterns on the ground, whether it be paved, sand, or grass, can often provide markings that lead to the center of the frame. In addition, similar to the convergence of buildings mentioned above, looking up into tall trees will create the same effect.

Sand

Leading lines on the ground can be difficult if not impossible to see with the naked eye though. There are times you have to walk around with the viewfinder held to your eye (or looking through your LCD with the camera in Live View) in order to see the lines on the ground. Moving water can also provide lines toward the center of the frame. Again, however, these might not be visible to you. Frequently looking at a a long exposure after the fact is the only way you can actually see these lines. Take test shots when you can.

4.  Manufacture your own lines

Sometimes there are no leading lines tha to use and you have to make your own. There are many ways to do this. One of my favorites is by adding streaking lights that go into the frame. Taking a long exposure of moving water will also result in lines.

GreyWhaleRock

5.  Stay cognizant of lines when shooting

Once you identify leading lines to draw your viewer into the frame, you need to take your picture in such a way that it will show them. We already mentioned shutter speed, which is particularly important when you are allowing lights or water to flow through your frame to show a leading line. But you will also want to keep an eye on your aperture setting. Most of the time you will want the entire leading line sharp, along with the subject that you are leading the viewer’s eye toward. You’ll want to use a small aperture in that case, which will create a large depth of field for your shot. On occasion, however, you want to blur out the background by using a large aperture. In any case, the important thing is to have a plan for showing the leading line in the final picture.

WiseCoRoad

6.  Accentuate the lines in post-production

Finding and using leading lines to draw your viewer into the picture does not end when the shutter closes. Usually you can accentuate them in post-processing. The main way is through selective brightening and darkening. Oftentimes you will want to brighten your leading line to draw the viewer’s eye to it. Sometimes you might want to darken other parts of the frame for the same reason. You also might want to increase the contrast in, and around, your leading lines since the eye is attracted to contrast.

The best way the accomplish this selective lightening and darkening is through curves adjustment layers. Just create a curves adjustment layer (Layer – New Adjustment Layer – Curves). Then brighten the picture by pulling the middle of the curve upward bit. Use whatever selection tools you are most comfortable with to mask away the brightening everywhere you don’t want it (which will be pretty much everywhere except for your leading lines). To darken portions of the picture, just do the same thing on a new adjustment layer, but instead of pulling the curve up, pull it down. Again, mask away the effect where you don’t want it (which, this time will be areas away from your leading lines).

NYC

Effort and reward

The use of leading lines to draw the viewer into the frame is a great way to add depth to your pictures. Rather than looking at the picture the viewer is looking into the picture. But it isn’t always easy. It requires thought before, during, and after the shot. But with the right pre-planning, a little attention while shooting, and some accentuation during the post-processing, you can add an element to your photos that sets them apart.

The post 6 Tips for Creating Leading Lines to Make Your Photos Stand Out More by Jim Hamel appeared first on Digital Photography School.


Digital Photography School

 
Comments Off on 6 Tips for Creating Leading Lines to Make Your Photos Stand Out More

Posted in Photography