RSS
 

Posts Tagged ‘Lights’

How to Photograph the Northern Lights (Aurora Borealis)

17 May

The post How to Photograph the Northern Lights (Aurora Borealis) appeared first on Digital Photography School. It was authored by Christian Hoiberg.

how to photograph the northern lights

Want to know how to photograph the northern lights?

In this article, I’m going to share plenty of northern lights photography tips and tricks – so that you can capture stunning aurora shots of your own.

This advice comes from lots of experience; I’ve had the pleasure of watching and photographing the northern lights, also known as the aurora borealis, for years (and I still find myself shouting in awe when I see them elegantly dancing in the sky!).

So if you’re ready to become an expert, then let’s get started.

How to see the northern lights

The first step in photographing the northern lights is, obviously, finding them. It’s simply not possible to see the aurora whenever and wherever you want – you must be in the right region and follow a few simple steps, as I discuss below:

1. Be in the Northern Hemisphere

The northern lights aren’t visible all over the world. As the name indicates, they are a phenomenon visible in the Northern Hemisphere. 

Places such as northern Norway, Iceland, and Alaska are typical areas you can witness the northern lights.

While you generally want to be north of the Arctic Circle (or close to it), you can witness the lights further south during extreme solar storms. But this is not as common and the display is rarely as impressive compared to “northern” northern lights.

When planning your trip to the north, you’ll need to bear one more fact in mind:

The northern lights season lasts from late fall to early spring. After all, northern lights are only visible in the night sky, and in the Arctic, the sun doesn’t set during the summer months – so there’s no darkness and no northern lights.

the northern lights over the ocean

2. Get away from light pollution

It’s nearly impossible to see the northern lights from the downtown of a large city. You might catch a glimpse if the northern lights are strong, but the display won’t be nearly as impressive as if you leave the city lights behind.

To increase your chances of capturing the northern lights, you should get away from light pollution and find a location where you can clearly see the stars.

There are a few different tools you can use to find areas with minimal light pollution. Dark Sky is a great website for this purpose; it shows a detailed map of light pollution.

the northern lights over ice

3. Look for clear skies (and a high Kp-index)

In order to see the northern lights, you need to see the stars – so cloudy nights aren’t good for aurora borealis photography. If the sky is cloudy, you might as well enjoy the comfort of a warm cabin.

Fortunately, when you’re north of the Arctic Circle, clear nights typically mean you will get a glimpse of the northern lights. The display might not always be strong, but chances are high that you’ll at least get a nice arch across the horizon. 

Keep in mind that weather conditions change quickly in the Northern Hemisphere. Just because it’s cloudy one moment doesn’t mean it’ll be cloudy in an hour, so you should keep a close eye on the forecast and stick your head outside from time to time. 

Also, a quick tip: To predict the aurora display strength, refer to the Kp-index. Note that the higher the Kp-index, the stronger the display. (There are other factors involved in predicting the northern lights, but the Kp-index is the easiest and most convenient.)

the northern lights over a mountain

How to photograph the northern lights

Once you’ve found the northern lights, how do you actually photograph them? It’s easy to get overly excited and forget about the technicalities – after all, the northern lights are stunningly beautiful – but I urge you to study the next few steps so that you’re as prepared as possible when the sky explodes.

1. Use a tripod and a remote shutter release

Photographing at night means that you’re working with long exposures (i.e., slow shutter speeds). It’s therefore essential that you mount the camera on a tripod. This will make sure that your camera stays still for the duration of the exposure.

You should also consider using a remote shutter release when you’re photographing the northern lights. This removes any chance of the vibrations caused when you press the shutter.

An alternative is to use the camera’s self-timer – but sometimes you want to capture the image at an exact moment with no delay, which is why I highly recommend a remote release.

the moon and the aurora borealis

2. Use a wide-angle lens with a large aperture

I generally encourage photographers to experiment with different focal lengths, but there’s no getting around it: an ultra-wide-angle lens is ideal for photographing the northern lights. 

A wide-angle lens allows you to capture both the landscape and the sky in one shot. That way, you can incorporate the northern lights into a good composition.

Also, when you first experience the northern lights, you’ll realize that they can fill up the entire sky. It’s impossible to capture all this beauty with a narrow focal length lens (in fact, even wide-angle glass isn’t always enough!).

It’s also important to use the widest possible aperture. A wide aperture means more light reaches the sensor, allowing for a brighter exposure.

For that reason, apertures such as f/2 and f/2.8 work well for night photos. You can get away with f/4 if your lens doesn’t open to f/2.8 – but you’ll need to increase the ISO or extend the shutter speed to pull it off, neither of which are great for northern lights photography.

aurora borealis over a river

3. Adjust the shutter speed and ISO according to the northern lights

Guides such as the 500 rule or the NPF rule are great indicators of the shutter speed you should use for night photography – but these do not work for northern lights.

Why?

Because the best shutter speed completely depends on how active the northern lights are. I’ve experienced extreme displays where I’m using a 1/2s shutter speed and an ISO of 200, yet I’m still overexposing the sky!

Therefore, you need to adapt the shutter speed to the situation and make changes throughout the night. I typically use a shutter speed between 4 and 20 seconds. 

Now, a fast-moving northern lights display requires a faster shutter speed. The bright light moving across the sky will quickly get overexposed. But when the display is slower, you get away with a longer shutter speed.

The ISO also depends on how bright the night sky is. I typically use a value between ISO 1600 and ISO 6400. That said, on rare occasions, I go all the way down to ISO 200.

I’ll admit that it does require some experience to get your settings right from the very beginning. But keep an eye on the image preview between every few shots, and you’ll learn exactly what to adjust for great results.
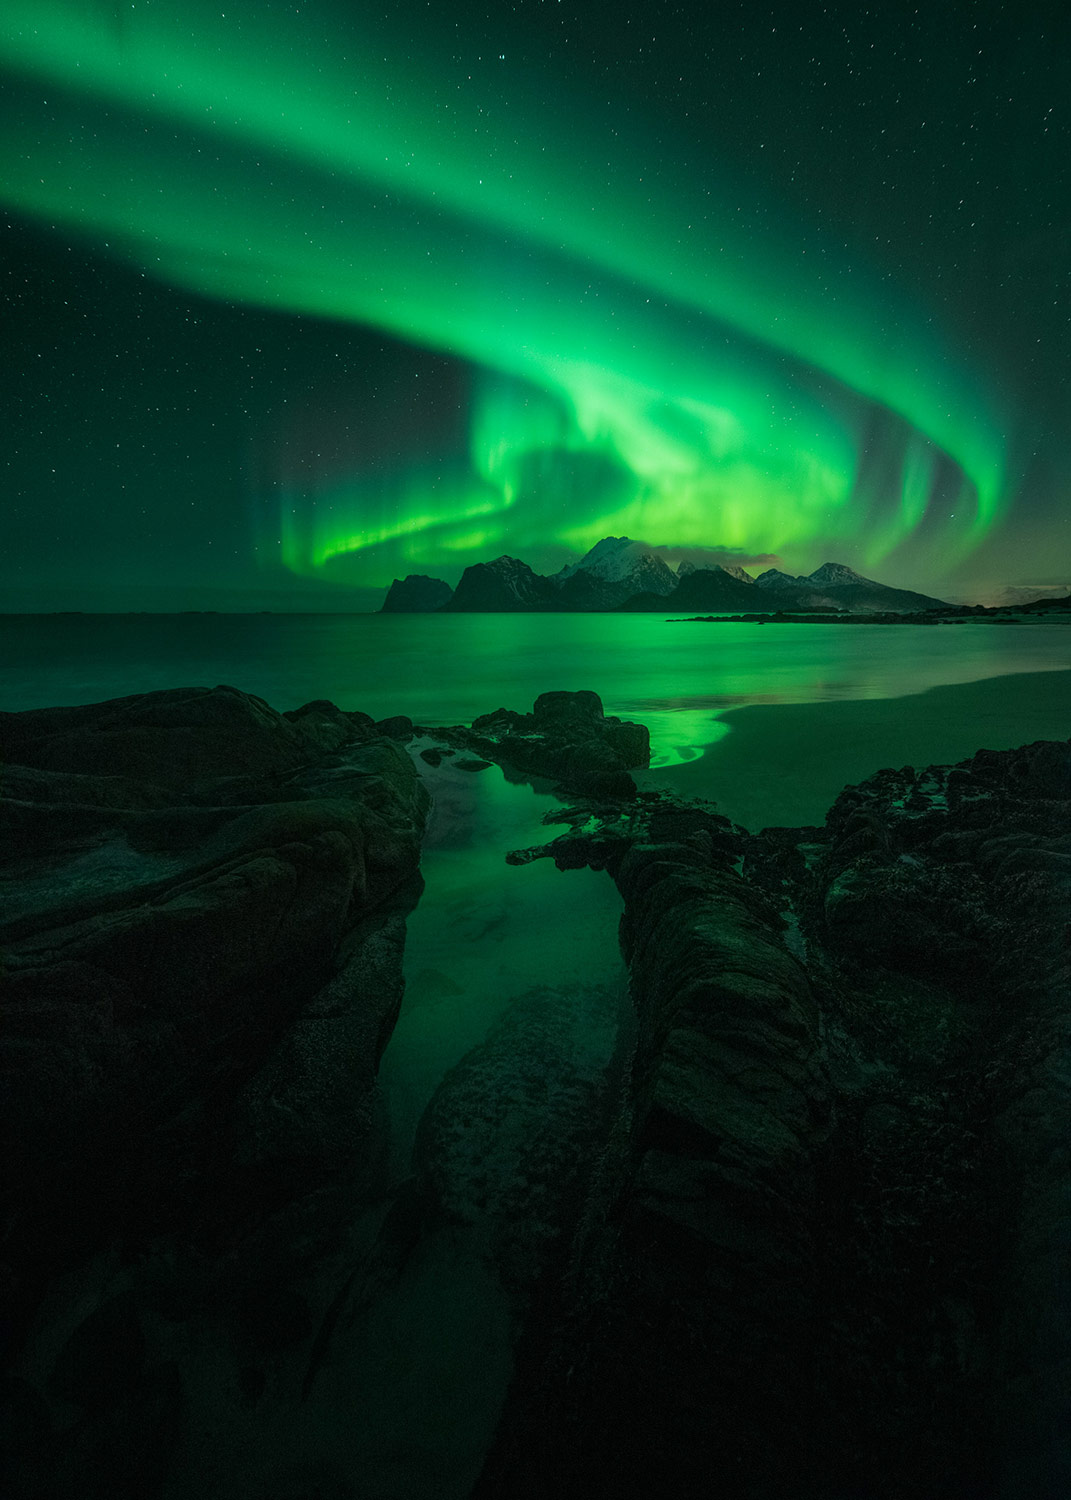
the aurora borealis over a mountain how to photograph the northern lights

4. Use a cold white balance (3000-4000K)

I know that the white balance technically doesn’t matter if you’re shooting in RAW, but I’m someone who prefers to make the photo look as good as possible in-camera.

So when photographing the northern lights, avoid using Auto White Balance or preset modes. While these often do a great job during the day, they’re less consistent at night. You might get some okay results with Auto White Balance, but it won’t always work.

I recommend that you set the white balance manually – use Kelvin mode and chose a value somewhere between 3000K and 4000K. This will produce a colder and more natural-looking sky.

(Using values above 4000K makes the green in the northern lights look muddy and strange, which is something you want to avoid.)

purple and green aurora borealis how to photograph the northern lights

5. Bring something warm to drink!

The winter nights in the Northern Hemisphere can be quite cold and miserable. It’s essential that you stay warm when you’re outside waiting for the northern lights. Good clothes (and several layers) help a lot, but it’s also nice to bring a thermos with a warm drink.

Once you get too cold, it’s hard to stay motivated. Especially if you’re planning to shoot for a while or make a timelapse.

How to photograph the northern lights: conclusion

Now that you’ve finished this article, you should be well-equipped to photograph the northern lights.

That said, if you want to learn more about northern lights photography – so you can start creating images like those in this article, fast – I highly recommend my course, Northern Lights Photography Made Easy. I teach all the essentials of capturing and processing stunning images of the night sky’s most amazing feature. So check out the course here!

how to photograph the northern lights

The post How to Photograph the Northern Lights (Aurora Borealis) appeared first on Digital Photography School. It was authored by Christian Hoiberg.


Digital Photography School

 
Comments Off on How to Photograph the Northern Lights (Aurora Borealis)

Posted in Photography


(Select) Android smartphones now work with Profoto’s professional lights via Profoto Camera app beta

02 Dec

One of the most-asked questions Profoto received after releasing its Profoto Camera app for iOS was: ‘when will it be available for Android devices?’ Now, four months after releasing the Profoto Camera app for iOS alongside the release of its B10/B10 Plus strobes, an Android version is here, albeit in beta and limited to a select number of Samsung devices, for now.

As with its iOS counterpart, the Profoto Camera app for Android beta makes it possible for Android users to trigger a number of its strobes, speedlights and compact LED lights using the company’s AirX Smart-TTL technology. Specifically, the app will work with Profoto’s A10, B10, B10 Plus, C1 and C1 Plus flashes, bringing full flash tube sync support.

Click to enlarge.

Getting this support wasn’t easy, says Profoto in its announcement post:

‘One difference in synchronizing external flash to a mobile device compared to traditional capturing devices like DSLR or MILC is that smartphone cameras require a much more flexible flash-length on different shutter speeds. This makes it more difficult to fire the flash at the exact time and duration to light the image. Up until now, attempts to synchronize the two have fallen short, making Profoto the world’s first company to successfully bring the full power of professional flashes to smartphones with their proprietary Profoto AirX technology’

The Profoto Camera app for Android is available for free in the Google Play Store as an ‘early access’ beta starting today for the following Samsung smartphones running Android OS 8 or later:

  • Galaxy S8 line
  • Galaxy S9 line
  • Galaxy S10 line
  • Galaxy S20 line
  • Galaxy Note 9 line
  • Galaxy Note 10 line
  • Galaxy Note 20 line

Profoto doesn’t specify when the app will likely be out of beta, nor when we can expect to see support for other phones. It’s likely going to be a slow-going process, as Profoto needs to create specific algorithms for each device to ensure compatibility with the onboard camera systems—no small feat considering the fragmentation of devices running Android OS.

Articles: Digital Photography Review (dpreview.com)

 
Comments Off on (Select) Android smartphones now work with Profoto’s professional lights via Profoto Camera app beta

Posted in Uncategorized


DPReview TV: The quality of light, and how different types of lights affect your photos

19 Oct

Having light is critical for photography, but what about the quality of light? Our resident mad scientist, Don Komarechka, explains how different light sources can impact your photos.

Subscribe to our YouTube channel to get new episodes of DPReview TV every week

Articles: Digital Photography Review (dpreview.com)

 
Comments Off on DPReview TV: The quality of light, and how different types of lights affect your photos

Posted in Uncategorized


Video: How to capture abstract macro photographs using little more than paper and lights

07 Apr

Considering most of the world is well into a few weeks of self-isolation, you’ve probably photographed nearly everything you can in your household, leaving little left to document. Now, it’s time to get really creative and to help make the most of a rough situation is Ben from Adaptalux, who’s shared a 15-minute video showing how you can capture abstract macro photographs using little more than a few lights, a few sheets of paper and a little bit of creative thinking.

Throughout the 15-minute video, Ben walks through a number of different setups and other variations you can experiment with to capture the macro abstract photographs, but the basic tools you’ll need on hand include a camera, a close-up capable lens, a tripod (not necessary, but will very much simplify the process), at least one light source, several sheets of white paper, paper clips (or bobby pins) and a flat surface that’s either transparent or translucent.

While Adaptalux lights are unsurprisingly mentioned in the video, any lights should do and if you have a few gels sitting around, you can get extra creative by mixing up colors.

If you prefer a non-visual explainer, Adaptalux has also published an accompanying blog post on its website that details the process. You can find more tutorials on Adaptalux’s YouTube channel, where it offers up a complete playlist dedicated to ‘Macro Photography Tutorials.’

Articles: Digital Photography Review (dpreview.com)

 
Comments Off on Video: How to capture abstract macro photographs using little more than paper and lights

Posted in Uncategorized


Lume Cube 2.0 review: rugged, portable lights for stills and video

15 Mar

Way back in 2014, Lume Cube Inc. sailed past its fundraising goals when it launched its brand-new, eponymously-named LED lighting system on Kickstarter. Aimed both at still and video shooters, the original Lume Cube offered 1,500-lumen light output and Bluetooth wireless control in a remarkably compact package. And despite measuring just 4 x 4 x 4.5cm (1.6 x 1.6 x 1.75″), it was also both rugged and waterproof.

Enter the Lume Cube 2.0: as portable as ever with some key improvements under the hood. In short, we think it’s an incredibly handy little light with a robust ecosystem of accessories. See our condensed findings below and read on for the full analysis.

Key takeaways:

  • Compact, size, rugged and waterproof construction inspire confidence and use in a variety of situations
  • Excellent quality of light, with daylight white balance and a high CRI value
  • Optical sensor to act as a slave flash for stills shooting
  • Fine control over brightness
  • Impressive battery run-time, but longer charge times
  • Good max brightness for size, but still struggles under sunlight
  • Excellent, if pricey, accessory system

What’s new?

Although it’s exactly the same size as its predecessor and has the same light output as before, the updated Lume Cube 2.0 now runs for three times as long at full power, and is easier to recharge too. And the light it produces has improved noticeably in terms of its color rendition, coverage and evenness.

The new version also offers an added low-light mode with a 1-10% power range in 1% increments, controllable either from the smartphone app or the Lume Cube’s own physical controls. And the product bundle has been expanded, with a modification frame and two filters included as part of the base product bundle.

The standard Lume Cube 2.0 kit (left, $ 90) now includes the modification frame with diffuser and warming filters. The Pro Lighting Kit (right, $ 300) includes a carry case packing two lights with modification frames, a dozen filters, two grids, and a full set of barn doors, snoot and diffusion bulb for each light.

Who is it for?

As before, the Lume Cube 2.0 is aimed both at still and video shooters, regardless of whether they’re using a sizable interchangeable-lens camera rig, GoPro, smartphone or even a drone.

For standalone cameras, most functionality can be used without a smartphone at all, and the Lume Cube works either a continuous light source or an optically-triggered slave flash. Alternatively, multiple lights can be controlled individually or as a group using an Android / iOS app.

Smarter physical controls and a better-placed optical sensor

The Lume Cube 2.0 looks quite similar to predecessor, and its size and weight are unchanged. The biggest difference is that the optical sensor has moved from the front of the light to its top, sharing its location with the status LED. In its new home, it’s now easier to trigger from a wide range of angles.

It sits in between a clearly-labeled pair of opaque black buttons on the top deck which replace the translucent buttons of the original model. These together provide access to power control, brightness adjustment, optical slave flash, and low-light mode.

The non-swiveling hot shoe mount shown in this image is included in the standard bundle. The Pro Lighting Kit doesn’t include any mounts; the ball head mount shown atop this page costs $ 25.

Charging is quicker and easier, but waterproofing suffers

Around back, the charging port is now a modern, reversible USB-C connector, and is covered by a soft rubber flap. While it’s still a bit fiddly to pull open with recently-trimmed nails, it closes securely, stays in place, and it’s really nice not to have to worry about the lights being affected by rain. (And to be able to take them underwater too, if that’s your thing.)

While less bothersome than the screw-in cover of the original Lume Cube, it’s also easier for water to circumvent, though. As a result the new model is waterproof to a maximum depth of 9.1m / 30ft, down from 30.5 / 100ft for its predecessor. That’s still plenty for snorkeling and probably a pretty significant proportion of recreational scuba too, but if you’re planning on deeper dives you may want to stick with the earlier version.

Wider, more even and daylight-balanced light

On the inside, everything is new. The battery, LED and optics have all been replaced, and while it still has a light output of 1,500 lumens (750 lux at 1m), the Lume Cube 2.0 now has a 5600k daylight color temperature, down from the 6000-6500k of its predecessor.

At the same time, the quality of its light has improved, with a Color Rendering Index score of 95. The Lume Cube 2’s new lens is also less prone to hot spots, and has a wider 80-degree coverage, up from its predecessor’s 60-degree beam angle.

Here’s a view from the rear, with the Lume Cube on its optional ball head mount atop my personal Pentax K-3. This mount is much better than the basic one included in some kits, as it lets you aim the light in almost any direction.

Smarter firmware and new features

The Lume Cube 2.0 has also received some smart updates in the firmware department. Perhaps most importantly, it now requires a three-second long press of the power button to switch on. This ensures that unlike its predecessor, it won’t switch itself on in your camera bag and drain its battery right before it’s needed.

The new firmware also allows brightness to be adjusted in either direction using the Lume Cube 2.0’s physical controls, unlike the original version which could only increase brightness to its maximum before looping back around to its minimum brightness setting on the next step.

And a new mode accessed with a long press of both buttons at once allows a much narrower 1-10% brightness range with a more precise 1% step size, rather than the full range in 10% steps as is the default. It’s handy if you’re shooting long exposures but still need just a little illumination.

Same accessories and mounting system, but now it’s in the bundle

A wide selection of filters and accessories can be attached to the Lume Cube 2.0 using the exact same modification frame attachment as before, allowing owners of the original Lume Cube to upgrade their lights or add new ones while keeping the rest of their gear.

A wide variety of optional mounts are available, including this spring-loaded smartphone clip ($ 20) to which I’ve attached the ball head and a Lume Cube 2.0 with bulb diffuser.

The frame itself now ships even in the base product bundle along with a pair of warming and light diffusion filters. Each of these uses name-brand LEE filter materials from the company’s LED-specific Zircon line. The level three warming filter drops the color temperature to 4,500 kelvin, and the diffusion filter is the lowest strength available.

Incredibly portable yet decent battery life too

The Lume Cube 2.0 is very solidly built, with not a hint of creak or flex anywhere. It’s also impressively small. Even with a modification frame attached it’d fit in looser pants pockets, and you could easily bring two or three in a jacket pocket and almost forget they were there until you needed them.

Given the compact size and relatively powerful output, I was really impressed by battery life, which is a huge improvement on the previous iteration’s 25 minutes. At 100% brightness, I could manage anywhere from 62 to 90 minutes on a charge, depending on whether or not Bluetooth was enabled, meeting the manufacturer spec precisely.

Battery life impresses, and you can charge the lights while using them

And by dropping to 50% brightness, I managed an average of three hours, 38 minutes per charge with Bluetooth active. That absolutely demolishes not only the original Lume Cube’s runtime, but also the spec sheet, which promises only 2.5 hours!

I must say it surprised me that controlling the lights via Bluetooth decreased the battery life as much as it did, though. The good news is that the Bluetooth radio does eventually go to sleep if the light is left inactive for a while. Once fully asleep, it needs to be woken back up with a physical button press before it’ll respond via Bluetooth again.

Fast charging requires a fast, modern USB-C charger and cable

The only place I didn’t come near the manufacturer spec was recharging. Lume Cube’s documentation promises around 45-60 minutes for a full charge, but using the supplied USB-C to USB-A cable and a wide variety of different chargers capable of up to a maximum of 18 watts per port, I was never able to recharge in less than two hours, 49 minutes.

I used three Lume Cubes for this shot. One was unfiltered on a mini-tripod near the bottom front of the cage, and another with bulb diffuser was pointed straight down from a bit above and in front of the birds. Finally, a third was just out of frame right and, in turn, was aimed to bounce off a small folding reflector just out of frame left.

To get near the claimed time you’ll likely need a recent, high-powered USB-C charger with Power Delivery support, as intended for charging laptops and the like, plus a Power Delivery-compatible USB-C to C cable. Unfortunately, I haven’t one to test with myself to confirm the claimed charging time.

Recharge and use your lights at the same time

The good news is that you can charge and use the lights at the same time if you’re within reach of a power outlet. This can potentially extend run times a lot, especially if you can switch off entirely or dial the brightness down significantly while setting up and between groups of shots.

I did just that while working to get the shot of my pet parakeets above, avoiding having to stress the birds any more than was necessary.

Note, though, that it’s not recommended to go above brightness level 80 while also charging. This is likely due to heat concerns, as after extended periods at 100% power, the Lume Cubes can get uncomfortably hot to the touch even without charging at the same time. (Not enough to burn instantly, but enough that you couldn’t persuade me to hold my finger on it.)

So long as you’re not in direct sunlight, the Lume Cube 2.0 is sufficiently bright for daytime use at shorter distances. Compared to the unlit shot (left), a Lume Cube at arm’s length (right) not only fills in shadows, but is strong enough to cast its own.

Best for smaller subjects or in lower ambient light

The Lume Cubes’ small size is great in terms of portability, but it comes at the expense of daytime usability. For what they are, these are pretty powerful lights but they’re simply no match for full sunlight, where they struggle to fill in shadows even at full power from just a couple of feet away.

A small reflector would be a better choice here, using the sun’s own power to provide light where it’s needed. In full shade or even indirect sunlight, though, even just a single Lume Cube can make quite a noticeable difference, so long as it can be kept fairly close to the subject.

That makes it quite well-suited to things like head-and-shoulders portraits, selfies and talking head video capture, and so on. And once you take the sun out of the equation, shooting indoors or at night the Lume Cubes really shine, if you’ll pardon the pun.

This image required just a single Lume Cube. I positioned the camera directly above the cash, then put a sheet of glass at a 45-degree angle in between. I bounced the light from a single unfiltered Lume Cube off this, and shielded the subject from direct lighting.

Up next, let’s take a look at the Lume Cube 2.0’s accessory mounting system, and its Android / iOS app experience, before wrapping up with a final conclusion.

Articles: Digital Photography Review (dpreview.com)

 
Comments Off on Lume Cube 2.0 review: rugged, portable lights for stills and video

Posted in Uncategorized


Elinchrom launches ELC 125 and 500 studio strobe lights for preorder

26 Feb

Elinchrom has launched two new studio strobes for preorder, the ELC 125 and ELC 500. Both products are wired lights that feature TTL with manual lock, HSS up to 1/8000s and support for 100V and 240V AC power sources. The two models share a number of other features, as well, including a metal tilt-head, Smart Pro-Active Cooling, Auto-On from standby mode and support for powering the lights down to 7 watts.

The two products vary in size and capabilities. The smaller ELC 125 model features a 7 to 131W power range with 5 F-stops, +/- 150K color stability across the power range, 2kg (4.4lbs) weight, 23 x 16.7 x 26.30cm (9 x 6.5 x 10.3in) dimension and a recycle time that varies based on the power source.

At 120V, Elinchrom says the ELC 125 features a recycling time of 0.1 to 0.8s, a duration that drops to 0.06 to 0.45s at 230V.

The ELC 500 model is similar, but with larger dimensions at 28.0 x 16.7 x 26.3cm (11.2 x 6.57 x 10.35in), 2.5kg (5.5lbs) weight, 7 to 522 watts power range with 7 F-stops, and +/- 200 color stability over the power range. This model also features a recycle time that varies based on power: from 0.09 to 1.9s at 120V to 0.06 to 1.1s at 230V. The ELC 125 has a flash duration of 1/7750s and the ELC 500 of 1/9430s.

Other mutual features between the two products include a customizable Favorite button, 120W-equivalent daylight 20W 92 CRI LED modeling lamp, auto power dumping, a cooling fan, group color indicators built into the side logos and what Elinchrom calls an intuitive interface.

The ELC 125 and ELC 500 studio strobes are available to preorder from retailers like B&H Photo now for $ 619 / €529 and $ 899 / €769, respectively.

Articles: Digital Photography Review (dpreview.com)

 
Comments Off on Elinchrom launches ELC 125 and 500 studio strobe lights for preorder

Posted in Uncategorized


How to Create Twinkle Lights for Christmas Tree Portraits in Photoshop

23 Dec

The post How to Create Twinkle Lights for Christmas Tree Portraits in Photoshop appeared first on Digital Photography School. It was authored by Jackie Lamas.

how-to-create-twinkle-lights-in-photoshop

Christmas is almost here and like you, many photographers are getting ready to photograph their holiday sessions and are likely using Christmas trees. In this article, we’re going to show you how to add a little more twinkle to your Christmas photos so that you can wow your clients. Even if your trees have lots of lights, this will show you how to create twinkle lights in Photoshop so you can add more cheer to your photos!

Image: Learn how to add twinkle lights to your holiday photo sessions in this article.

Learn how to add twinkle lights to your holiday photo sessions in this article.

Step 1. Create your twinkle lights pattern

In order to add the twinkle lights to the lights and create more lights, you’ll need to first create the brush preset. This isn’t as difficult as it seems. Of course, you could download brush presets online, but there’s nothing like having the perfect brush you’ve created for your photos.

1.1 Create a new document. It doesn’t have to be a large document. Use a predetermined one and make sure you aren’t using artboards and that your resolution is at 300dpi. A white background will help you see what you’re doing.

Image: Create a new document. It doesn’t have to be large since you’ll end up with a bru...

Create a new document. It doesn’t have to be large since you’ll end up with a brush preset that can be sized after.

1.2 Next, go into Brush Settings. If you don’t see this on the icon menus on the left (or where you have your tools), you can open it by going to Windows -> Brush Settings and the window with the settings will pop up.

How to Create Twinkle Lights for Christmas Tree Portraits in Photoshop

Choose the round brush with zero hardness – it should be brush 30 in the brush menu. It’s a predetermined brush.

Here, you’ll want to select the roundness of the brush to around 8%. This will make sure your brush is flat to make the different strokes of the twinkle.

For this tutorial, we’ve made our twinkle with 5 points, but you can get creative with the size and add in additional points if you like.

Image: You can see how the brush is flattened.

You can see how the brush is flattened.

1.3 Choose the angles of your brush. Respectively, they are 90-degrees, 180-degrees, 45-degrees, and -45-degrees to make the five points. You can set a ruler to help guide you, making sure the lines intersect in the middle. For this one, I just painted with the brush by eye.

How to Create Twinkle Lights for Christmas Tree Portraits in Photoshop

1.4 Once you have all five points or as many points as you want for your twinkle, go back to the Brush Settings and change the roundness back to 100%. With this brush, go to the center of your star and fill in the middle with a couple of clicks to add more to the middle.

This will give the twinkle a little more fullness and make it look like an actual light in the Christmas tree.

How to Create Twinkle Lights for Christmas Tree Portraits in Photoshop

1.5 We’re almost done! Finally, we’ll add in a nice Gaussian Blur to the twinkle so it looks more real in the background and the points on the starburst aren’t too harsh when you’re adding them into the images.

Of course, this is preference and you can make one brush with the blur and another brush without so you have options. We’ve added the blur to our starburst. Go to Filter -> Blur -> Gaussian Blur and choose how much blur you want.

How to Create Twinkle Lights for Christmas Tree Portraits in Photoshop

1.6 Now you have a nice full twinkle light! From here, we’ll need to create the Brush Preset pattern so that you can use it in the future on any image in Photoshop. Go to Edit -> Define Brush Preset -> Change the name to what you’d like to call it and click OK.

How to Create Twinkle Lights for Christmas Tree Portraits in Photoshop How to Create Twinkle Lights for Christmas Tree Portraits in Photoshop

This will create your brush pattern! Now you have your twinkle light brush ready to use and you can change the color and size.

Step 2. Clone lights to make the twinkle lights look more real

If you add your twinkle lights to the photo, it will look oddly out of place. This is because it needs an actual light to shine off of an actual light source. The best way to do this is to clone a light in the original photo to other parts of the tree before using the twinkle light brush.

While you could just paint on dots, they don’t have the same color and gradient as a light that is already in the tree and may look out of place.

2.1 To do this, first create a new layer so that your twinkle lights can become moveable after you’ve added them. Also, this will keep you from cloning and using the brush on the original image in case you need to start over, you can simply delete the layer.

How to Create Twinkle Lights for Christmas Tree Portraits in Photoshop

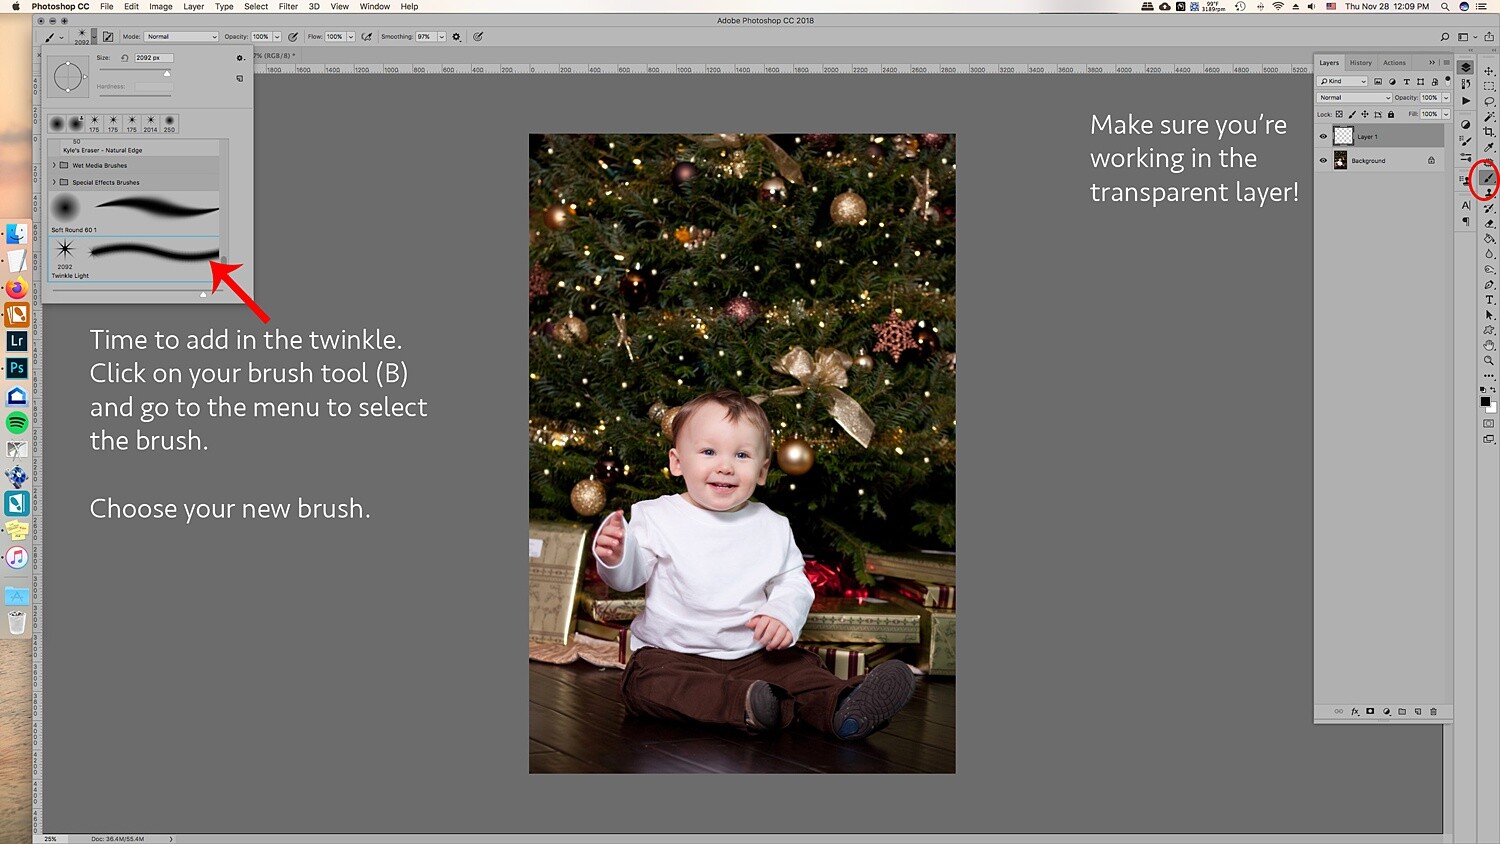
2.2 Now go to the layer of your original image, click on the Stamp Tool. In the menu bar at the top, make sure that you uncheck where it says Aligned. This will make sure to only clone the light as you click on various parts of the layer.

How to Create Twinkle Lights for Christmas Tree Portraits in Photoshop

Click on ATL and click a light. Make sure the brush is just large enough for the light tip so you don’t clone too much of the tree/background.

2.3 Once you’ve made your selection of which light you’ll clone, go back to the new layer and click on the parts of the image you see that you want to add the lights in. Don’t worry, you’re not cloning on the image itself, this layer is transparent and that’s why you can see the photo in the layer below. It helps to see where you’re putting the extra lights.

How to Create Twinkle Lights for Christmas Tree Portraits in Photoshop

2.4 All right, now that you’ve added more lights to the tree, you are ready to add in the twinkle lights brush! Go to Brush and choose the brush you just created. Usually, new brushes show up at the end of the brush list.

Choose your twinkle light brush. Make sure that the color for your brush is set to white. Alternatively, you can choose the color picker and get a warmer yellow color that matches the lights. It’s your choice! You can also add colored lights if you wish!

Leave the hardness and opacity at 100%, go to your new layer where you’ve cloned the lights on. Go to each light and add in the twinkle onto it. Adding the lights and the twinkle makes the twinkle look real and not too fake.

How to Create Twinkle Lights for Christmas Tree Portraits in Photoshop How to Create Twinkle Lights for Christmas Tree Portraits in Photoshop christmas-twinkle-lights

Change the size for a few of the twinkles so they look more random.

How to Create Twinkle Lights for Christmas Tree Portraits in Photoshop

3. Add in additional colors

The great thing about doing the twinkle lights this way is that because you’ve added them onto a transparent layer, you can move them around and resize them as you need.

The amazing part is that you can duplicate the twinkle lights layer, move it around, and add colors to it to create colored twinkle lights. Here’s a break down of how you do that for multiple colors:

3.1 Duplicate the twinkle lights layer.

How to Create Twinkle Lights for Christmas Tree Portraits in Photoshop

3.2 Move it around and transform it so that it’s not directly on top of the other twinkle lights. If you’re going to add in more colors, I suggest that you don’t add in too many twinkle lights in the original layer so that you can fill in those empty spots with the colored twinkle lights.

3.3 Go to Layer -> New Fill Layer -> Solid Color. Choose a color. I did blue, green, and red. But you can add in any color.

How to Create Twinkle Lights for Christmas Tree Portraits in Photoshop

3.4 You’ll end up with a solid color onto your images. Don’t worry, right-click on the layer and choose Create Clipping Mask to clip it to the twinkle light duplicate layer.

How to Create Twinkle Lights for Christmas Tree Portraits in Photoshop

How to Create Twinkle Lights for Christmas Tree Portraits in Photoshop
3.5 Go to Blending modes at the top of the layer window and choose Color. This will overlay the color on the twinkle lights and make it look more real.

How to Create Twinkle Lights for Christmas Tree Portraits in Photoshop

How to Create Twinkle Lights for Christmas Tree Portraits in Photoshop

3.6 A great tip is to merge each color to the twinkle lights layer. Then add a mask so that you can go into the layer with your brush and take out the twinkle lights for that layer without having to deal with the color clipping mask and all that.

It’ll make removing them easier. This is ideal in case you need to remove one from an ornament or face.

How to Create Twinkle Lights for Christmas Tree Portraits in Photoshop

You can also add a clipping mask to the original twinkle lights layer to help brush out unwanted twinkle lights as well.

Image: Using a mask on the layer can help you to take out unwanted twinkle lights.

Using a mask on the layer can help you to take out unwanted twinkle lights.

And that’s it! That’s how you add in additional twinkle lights in color to your image!

Image: Before and after with the twinkle lights in color. You can make it more subtle by adding fewe...

Before and after with the twinkle lights in color. You can make it more subtle by adding fewer twinkle lights.

Use in non-holiday images as well

Use this tutorial on other images where you’d like to add in some twinkle too! It doesn’t have to just be for holiday sessions, simply just use the brush only with a color set.

Image: Use the twinkle lights brush on other portraits that you’d like to add some sparkle to.

Use the twinkle lights brush on other portraits that you’d like to add some sparkle to.

Make sure you’re working on the transparent layer and play with opacity levels and additional colors.

How to Create Twinkle Lights for Christmas Tree Portraits in Photoshop

In a new transparent layer, I selected the twinkle lights brush and added the twinkle lights to various parts of the layer in white in different sizes. Then, set the blending mode to Overlay to get the right look. I also lowered the opacity.

Twinkle lights with more than 5 points

The great thing about adding in twinkle lights is that you’re creating your own brush preset! This lets you create different types of brushes, and one might be adding more points to the twinkle light.

Image: Here’s a comparison of no twinkle lights, a five-point twinkle, and a multi-point twink...

Here’s a comparison of no twinkle lights, a five-point twinkle, and a multi-point twinkle light.

Go through all of the steps in Step One, only this time add more angles and add in more points. It also looks great when you change the size within the same brush.

Image: In the close-up, you can see that the brush preset has more points than the five-point twinkl...

In the close-up, you can see that the brush preset has more points than the five-point twinkle light brush we made previously.

It’s really all about preference, so play around and see what look is the right one for your portraits.

In conclusion

Image: Before and after on another photo. This is more subtle and only uses white twinkle lights.

Before and after on another photo. This is more subtle and only uses white twinkle lights.

It may sound complicated the first time you give it a try, but with time it gets easier! Adding in additional twinkle lights can give your holiday photos a little more twinkle and pop that will make your clients very happy to see in their final images!

Will you be using this tip to add in twinkle lights to your images?

The post How to Create Twinkle Lights for Christmas Tree Portraits in Photoshop appeared first on Digital Photography School. It was authored by Jackie Lamas.


Digital Photography School

 
Comments Off on How to Create Twinkle Lights for Christmas Tree Portraits in Photoshop

Posted in Photography


Profoto Launches Two Amazing Lights for Smartphone Photographers

20 Sep

The post Profoto Launches Two Amazing Lights for Smartphone Photographers appeared first on Digital Photography School. It was authored by Jaymes Dempsey.

Profoto Launches Two Amazing Lights for Smartphone Photographers

If you’re a smartphone photographer, then you’ve probably struggled to deal with indoor lighting. After all, smartphones don’t come with a high-quality flash; it’s easy to get noisy images when shooting indoors.

Until now.

Because Profoto has just released two lights made specifically for the smartphone: The Profoto C1 and the Profoto C1 Plus.

What are the C1 and C1 Plus?

The two items are billed as Profoto’s “very first studio lights for smartphones.” They’re small, orb-shaped lights, and they’re compact enough that you can take them anywhere without much hassle.

According to Profoto:

The light the C1 product range delivers is natural looking and beautiful with a soft, gentle fall-off…[F]rom now on you will always have natural-looking, beautiful light with you.

Note that the C1 Plus is both more expensive and more advanced than the C1. The C1 Plus includes a greater power output (4300 lumens versus 1600 lumens). The C1 Plus also includes a thread mount, so you can screw the light onto a stand and shoot with both hands. And the C1 Plus features better battery life than the C1.

Both the C1 and the C1 Plus offer rechargeable batteries. They also include multiple modes for increased flexibility: a continuous shooting mode and a flash mode. To use the Profoto lights, you can pair them with your smartphone via the special Profoto Camera app. Then you can take photos that are synced with the Profoto flash.

The Profoto C1 costs $ 299, while the Profoto C1 Plus costs $ 499.

But just who are these lights for?

If you like to use your smartphone on the fly, without any preparation, then I’d recommend against the Profoto C1. Despite its small size, you probably don’t want to carry the flash with you constantly. But if you’re the type of shooter who often shoots in low-light situations or prefers to capture more carefully considered shots, then the Profoto C1 could be exactly what you need.

If the Profoto C1 captures your attention, then you should also check out another product: The Godox R1, which was announced a few hours after the C1/C1 Plus announcement. The Godox light is similar to the C1 and C1 Plus, though it offers slightly different lighting options. For those hoping to purchase the Godox R1, keep an eye out for a release date!

Would you use either of these lights? what are your thoughts? Share with us in the comments!

The post Profoto Launches Two Amazing Lights for Smartphone Photographers appeared first on Digital Photography School. It was authored by Jaymes Dempsey.


Digital Photography School

 
Comments Off on Profoto Launches Two Amazing Lights for Smartphone Photographers

Posted in Photography


Godox’s new R1 and RF1 lights are compact LED discs that look a little familiar

20 Sep

Godox has unveiled the R1 and RF1, a pair of LED-powered lights designed to be compact and portable for photographers and videographers on the go.

Before we dive into the good stuff though, let’s go ahead and address the elephant in the room—yes, theses lights and their accompanying dome accessory bear a striking resemblance to Profoto’s new C1 and C1 Plus lights.

The functionality is slightly different and Godox doesn’t consider its R1 and RF1 units ’studio’ quality, but it’s difficult to overlook the uncanny similarities between the four units.

With that out of the way, let’s get down to the details. Both the R1 and RF1 are compact lights that feature integrated magnets for Godox’s AK-R1 round head accessories (sold separately) and securing to surfaces for easy mounting. The units are charged via the onboard USB-C port and settings are controlled via the Godox app over Bluetooth.

The R1 is the entry-level version that features RGB LED lights with variable color temperature (2500K-8500K) and a Television Lighting Consistency Index (TLCI) of >95. The R1 is designed for continuous use with variable power output and a features battery life rating of one hour when used at full power.

Godox says the R1 features 14 different RGB lighting modes—including ‘music,’ ‘lightning,’ ‘screen,’ ‘candlelight’ and more—as well as 8 other modes that change the color temperature.

The RF1 is identical to the R1 with the expiation that unlike the R1, which is limited to continuous mode, the RF1 features Godox’s 2.4Ghz Wireless X System, which turns it into a flash when used with computable Canon, Nikon, Sony, Fuji, Panasonic, Olympus and Pentax camera systems.

Godox doesn’t offer any information on output power, recycling time or even pricing and availability information. We have contacted Godox regarding these details and will update the article accordingly when we hear back. Until then, we’ll just have to wait and see. That said, it’s probably a safe bet that both of these units will come in much cheaper than the $ 299 and $ 499 price tag Profoto is asking for its C1 and C1 Plus units, respectively.

Articles: Digital Photography Review (dpreview.com)

 
Comments Off on Godox’s new R1 and RF1 lights are compact LED discs that look a little familiar

Posted in Uncategorized


Profoto launches C1, C1 Plus mini studio lights for smartphones

19 Sep

Profoto has unveiled a small studio light that was designed specifically for smartphone use. The Profoto C1 and C1 Plus are small enough to fit in a pocket, retaining the same portability of smartphones while offering more advanced lighting capabilities than what is offered by the average phone flash.

The Profoto C1 and C1 Plus both feature rounded designs, as well as automatic flash power and exposure alongside a manual control option. The lights are designed to wirelessly connect with the user’s smartphone using Bluetooth, after which point they work in tandem with the Profoto camera app.

Both models feature a Li-Polymer battery that recharges in two hours using USB-C. The fully charged battery can power up to 2,000 full-power flashes, also offering 30 minutes of continuous light for the C1 and 40 minutes of continuous light for the C1 Plus. Both models produce ‘close to daylight’ colors with a color rendering index >90.

The Profoto C1 model has a max 1600 lumens and 800 lux flash output, four warm and three cool LEDs for color temperatures ranging from 3000-6500K, and inner reflectors under the integrated dome diffuser for producing ‘natural shadows.’ When used as a modeling light, the model offers max 280 lumens / 140 lux and CRI 90-98.

The C1 Plus is more advanced, offering a max flash output of 4300 lumens and 1700 lux, a click-on magnetic mount for using light-shaping accessories, a 1/4″-20 thread for mounting the light, and compatibility with all of Profoto’s AirTTL remotes. When used as a modeling light, this model offers max 280 lumens / 140 lux and CRI 90-98. Both the C1 and C1 Plus feature manual capture buttons on the lights.

The Profoto C1 and C1 Plus lights are available to order from a number of retailers, including B&H Photo and Adorama, for $ 299 and $ 499, respectively.

Articles: Digital Photography Review (dpreview.com)

 
Comments Off on Profoto launches C1, C1 Plus mini studio lights for smartphones

Posted in Uncategorized