Taking great selfies requires the right light, angle, setting, and editing. Getting a great shot is so much more than just clicking a button. It requires skill, practice, and good technique. Come along and learn how to master the art of the perfect selfie using photography tricks and tools described below. In general, a great selfie is shot using an Continue Reading
Photodoto
Posts Tagged ‘lighting’
How to Take the Perfect Selfie: The Right Angle, Lighting and Photo Editor
19
Sep
7 Composition and Lighting Tips to Improve Your Landscape Photos (Video)
13
Jun
The post 7 Composition and Lighting Tips to Improve Your Landscape Photos (Video) appeared first on Digital Photography School. It was authored by Jaymes Dempsey.
Looking to take your landscape photography to the next level?
In this video, professional landscape photographer Nigel Danson takes you through his shooting process and shares 7 simple tips and tricks to elevate your photos. While Danson mostly focuses on composition, he throws in a couple of lighting tips for good measure – and each piece of advice is carefully illustrated with breathtaking video footage and stellar example photos.
So give it a watch! And then leave a comment below, letting us know your favorite tip from the video.
The post 7 Composition and Lighting Tips to Improve Your Landscape Photos (Video) appeared first on Digital Photography School. It was authored by Jaymes Dempsey.
A Lighting Ratios Guide: How to Make (or Break) Your Portraits
28
Mar
The post A Lighting Ratios Guide: How to Make (or Break) Your Portraits appeared first on Digital Photography School. It was authored by Darlene Hildebrandt.

Want to take your portraits to the next level with lighting ratios?
You’ve come to the right place.
Because in this article, I’m going to share everything you need to know about lighting ratios for amazing portraits, including:
- What lighting ratios are
- Basic ratios for portrait photography
- Tips for using ratios
(And much more!)
So if you want to become a portrait photography master, then let’s get started.

What is a lighting ratio in photography?
As a math term, a ratio is a comparison of one thing to another.
So when calculating lighting ratios, you measure the light falling on the light or highlight side of the face and compare it to the light falling on the shadow side of the face.
For instance, if you have twice as much light falling on the highlight side of your portrait, then the lighting ratio would be 2:1. If you have four times as much light falling on the highlight side of your portrait, then the lighting ratio would be 4:1.
But how exactly do you measure light?
While you can do it with the built-in meter in your camera, it is much easier and more accurate to use a handheld incident light meter. You see, your in-camera meter takes a measurement of the light reflecting off your subject – whereas a handheld meter can measure the amount of light falling on your subject and therefore gives you a more accurate value.
Lighting ratios: key concepts
To properly measure and understand lighting ratios, you need to know a few things.
First, light is measured by f-stops. The aperture dial on your camera generally goes up in 1/3-stop increments, though the full stops for aperture are f/1, f/1.4, f/2, f/2.8, f/4, f/5.6, f/8, f/11, f/16, f/22, f/32, etc.
(A simple way to remember all the numbers is to memorize f/1 and f/1.4; all the other pairs are doubled from these with a few rounded off.)
You also need to understand that shutter speeds are also representative of f-stops, with the full stops at 1s, ½s, ¼s, 1/8s, 1/15s, 1/30s, 1/60s, 1/125s, 1/250s, 1/500s, 1/1000s, etc. Shutter speed full stops are easier to remember as they are generally doubled (with a couple instances of rounding, such as 1/8s to 1/15s).
Finally, know that each full stop is double (or half, depending on whether you go down or up) the amount of light compared to the previous one.
For example, if you are shooting at f/4 and want to shoot at f/5.6, you will need to double the amount of light to get an equivalent exposure (you’ll need one more full stop of light). If you want to narrow your aperture by 2 stops, you’ll need to add 2×2 – or 4 – times more light. Likewise, 3 stops correspond to 8 times more light (2x2x2) and so on.
Knowing this, you can figure out how to create and measure ratios. In the next series of photos, I will demonstrate four different lighting ratios and how they were achieved.
1:1 ratio

A 1:1 ratio is even lighting.
In other words, there is no difference in the meter readings on both sides of the face. As you can see in the photo above, 1:1 lighting is very flat, and it can be achieved in a couple of different ways.
First, you can use fill flash and make the flash equal to the main light source. This is harder to achieve until you’ve had some practice, and you’ll often end up overpowering the light with flash.
Secondly, you could use a reflector. It will need to be very close to the subject, and the goal is to eliminate all shadows on the subject’s face.
This is a 1:1 ratio, and it’s pretty easy to see and recognize visually.
2:1 ratio

As the numbers suggest, a 2:1 ratio occurs when one side has twice as much light compared to the other.
So knowing that plus what you know about f-stops, we can set up this lighting ratio.
First, put your subject into the light where you are going to photograph them.
Using a light meter, measure the light falling on the side of their face closest to the light source (i.e., the highlight side). Let’s say that measures f/8. (Keep your shutter speed the same for all measurements to maintain consistency.)
Then bring in your reflector and use the light meter again, but this time measure the light falling on the side of the subject’s face that is farther away from the light source (from here on in, this will be referred to as the shadow side).
Note: If you are using a handheld meter, make sure to shield it from excess light that comes from the other side of your subject. So if you are metering the shadow side nearer the reflector, shield the meter so the main light source isn’t hitting it.
Now, you know that your highlight side has a reading of f/8. To achieve a 2:1 lighting ratio, you’ll need to get your meter to read f/5.6 (which is one stop less light) on the shadow side. So adjust the reflector distance until the meter settles on f/5.6.
Also, it may help to study the image above and recognize the contrast range from the highlight to the shadow side of the face. It’s subtle, but you should be able to see it.
4:1 ratio

A 4:1 ratio is double a 2:1 ratio. So if 2:1 featured twice as much light – or one stop – how much light will a 4:1 ratio require?
The answer is four times as much light (2×2), which is a 2-stop difference from the highlight side to the shadow side of the face.
I teach an available light class, and I always recommend working with natural light before you advance on to speedlights. With available or natural light and a reflector, it is much easier to learn and practice lighting because you can see what happens as you make changes (WYSIWYG). Flash is harder to predict as you can’t see it without actually taking a photograph.
So if our main light (the window) is still at f/8, what should be the value of our fill light/reflector (or the shadow side) to achieve a 4:1 ratio? Let’s do the steps again: f/8>f/5.6>f/4.
Therefore, two stops less than f/8 is f/4 (and this is the desired measurement to create a 4:1 ratio). Look at the photo above and compare it to the 2:1 image; do you see how the shadow side is getting darker?
8:1 ratio
The last ratio we’ll look at is 8:1.
The 8:1 ratio requires 8 times as much light, or 3 stops, on the highlight side of the face compared to the shadow side.
As you can see in the image above, 8:1 lighting is quite dramatic, and anything greater than 8:1 will not hold much detail on the shadow side of the face at all.
In fact, prints have a maximum contrast range of 4-6 stops, so unless you want one side of the face overexposed or the shadows pure black, I suggest keeping your lighting ratios at 8:1 or smaller.
Note that an 8:1 ratio can be a bit tough to create. You may need harsher lighting and possibly a black reflector to add blacks into the shadow side (rather than reflecting light onto it).
We calculate it the same way as above: if 4:1 is 4 times the light, then 8:1 will be 8 times the light, or 3 stops.
So if we are still at f/8 on our highlight side, we need to get our shadow side to read: f/8>f/5.6>f/4>f/2.8.
How to use lighting ratios
Now that we have this knowledge of ratios, let’s put it to use! Remember: The ratio can add to the success of your portrait, or it can ruin it.
If you look at the example images again, pay attention to how the mood of the image changes with the ratio. Notice how the higher ratios create more drama and power. Notice how the lower ratios are softer and more innocent.
Generally somewhere between 2:1 and 4:1 is the commonly used ratio for most portraiture. It’s enough to create three-dimensionality on the face, but not too much to create unattractive, deep shadows. I personally like a 3:1 ratio (1.5 stops) or a 4:1 ratio, myself.
For a child or baby, you often want a lower ratio because the softer result goes well with the subject matter. But a grizzled old cowboy with weathered, wrinkled skin and unkempt whiskers looks much better with 4:1 or 8:1 lighting. Why? He’s rougher, tougher, and can handle the increased contrast, plus it’s suitable for his look.
If you’re worried about not owning a handheld meter, you don’t necessarily need to go out and buy one. I’d only suggest you do that if you plan on getting into studio lighting. Otherwise, just practice seeing the difference between the various ratios (which is why I suggest natural light), and if they aren’t a perfect 4:1 or 8:1 or whatever, then it doesn’t matter. Just learn to recognize when it’s too strong and when it’s too weak for the effect you want to create.
Here’s another example of ratios at work. None of it is right or wrong, but which do you think is the most appropriate ratio for my subject? Figure that part out, and you’ll be ahead of the game!


Note: I’d like to thank my subject, Gabriel Biderman from B&H Photo Video, for these shots.
Lighting ratio tips
Now that you understand the lighting ratio basics, let’s take a look at some quick tips that’ll make your photos look better.
First, get your subject out of the sun. Shooting in bright sunlight makes it almost impossible to control your ratios, plus the light won’t be desirable or flattering on the subject’s face. Use natural light from a window with indirect lighting (no direct sun coming in) if you can. And if the sun is streaming in, try adding sheer curtains or even stretching a white bed sheet across to diffuse the light.
Second, here are some lighting ratio starting points:
- For babies and small children, use a lower ratio like 1:1 or 2:1. Children move so quickly that keeping them in the light and facing in the right direction is exceedingly difficult, and even light helps mitigate this issue.
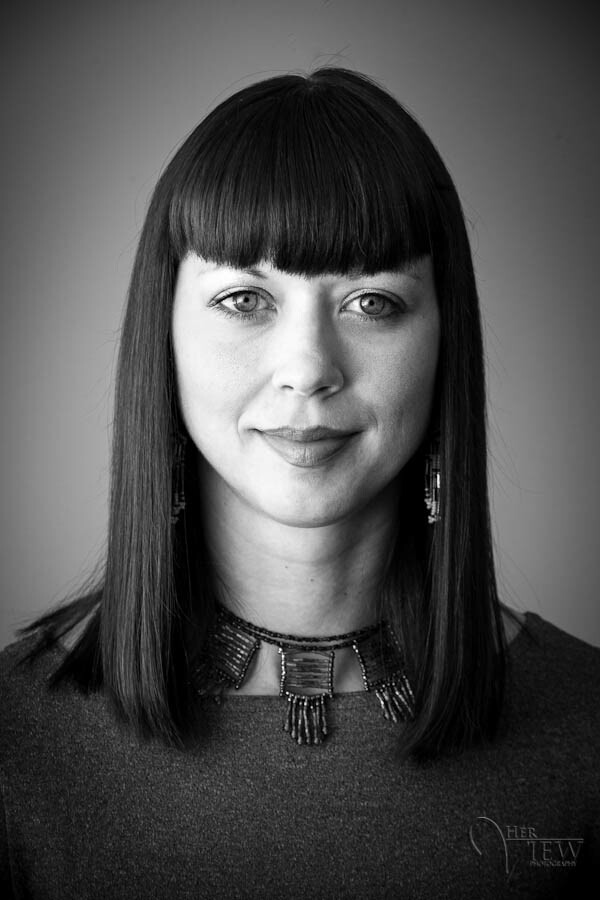
- For women, use a medium ratio like 2:1 or 3:1.
- For men and business portraits, use a slightly stronger ratio, such as 4:1 or 6:1.
- For artists, bands, and other dramatic portraits, use a higher ratio.
Finally, keep in mind that there are no steadfast rules on how to do ratios in portraiture. Like everything in photography, it’s about learning the techniques, then using them as suggestions while you experiment and find your own style or voice.
For instance, can you put 8:1 lighting on a glamorous movie star or 1:1 lighting on a coal miner? Absolutely!
(I’ll even give you some homework that’ll prove both ratios can be effective if they are done well.)
Homework and action steps
Your homework assignment is to research the following photographers. Tell me how they broke the general rules I’ve mentioned above, yet still had great success and amazing images:
- George Hurrell
- Richard Avedon
- Yousuf Karsh
Those three photographers right there are some of the greatest portrait artists to ever live. Learn from them.
A lighting ratios guide: conclusion
Now that you’ve finished this article, you know all about lighting ratios – and you know how to use them for stunning results.
So what’s the next step?
Practice! If you simply dedicate a few minutes per day to working with portrait lighting, you’ll become a master in no time at all.
Now over to you:
What do you think of these lighting ratio concepts? Will they help you in your portrait photography? Share your thoughts (and images) in the comments below!
The post A Lighting Ratios Guide: How to Make (or Break) Your Portraits appeared first on Digital Photography School. It was authored by Darlene Hildebrandt.
6 Portrait Lighting Patterns Every Photographer Should Know
25
Jul
The post 6 Portrait Lighting Patterns Every Photographer Should Know appeared first on Digital Photography School. It was authored by Darlene Hildebrandt.

In classical portraiture there are several things you need to control and think about to make a flattering portrait of your subjects, including: lighting ratio, lighting pattern, facial view, and angle of view. I suggest you get to know these basics inside out, and as with most things, then you can break the rules. But if you can nail this one thing you’ll be well on your way to great people photos. In this article we’re going to look at lighting pattern: what is it, why it’s important, and how to use it. Perhaps in another future article, if you enjoy this one, I’ll talk about the other aspects of good portraiture.
Lighting pattern I’d define as, how light and shadow play across the face to create different shapes. What shape is the shadow on the face, in simple terms. There are four common portrait lighting patterns, they are:
- Split lighting
- Loop lighting
- Rembrandt lighting
- Butterfly lighting
There are also Broad and Short lighting which are more of a style, and can be used with most of the patterns above. Let’s look at each of them individually.
1. Split Lighting

Split lighting is exactly as the name implies – it splits the face exactly into equal halves with one side being in the light, and the other in shadow. It is often used to create dramatic images for things such as a portrait of a musician or an artist. Split lighting tends to be a more masculine pattern and as such is usually more appropriate or applicable on men than it is for women. Keep in mind however, there are no hard and fast rules, so I suggest you use the information I provide here as a starting point or guideline. Until you learn this and can do it in your sleep, default to the guideline whenever you’re not sure.

To achieve split lighting simply put the light source 90 degrees to the left or right of the subject, and possibly even slightly behind their head. Where you place the light in relation to the subject will depend on the person’s face. Watch how the light falls on them and adjust accordingly. In true split lighting, the eye on the shadow side of the face does pick up light in the eye only. If by rotating their face a bit more light falls on their cheek, it’s possible their face just isn’t ideal for split lighting.
NOTE: any lighting pattern can be created on any facial view (frontal view showing both ears, or ¾ face, or even profile). Just keep in mind that your light source must follow the face to maintain the lighting pattern. If they turn their head the pattern will change. So you can use that to your advantage to easily adjust the patten just by them rotating their head a little.
What the heck is a “catchlight”?

Notice in this photo above that the baby’s eyes have a reflection of the actual light source in them. It shows up as a little white spot, but if we look closer we can actually see the shape of the light I used in this portrait.

See how the bright spot is actually hexagon with a dark centre? That’s the light I used which was a small hexagon shaped soft box on my Canon speedlight.
This is what is known as the “catchlight”. Without the eye of the subject catching this light, the eyes will appear dark, dead and lifeless. You need to ensure that at least one eye has a catchlight to give the subject life. Notice it also lightens the iris and brightens the eye overall. This also adds to the feeling of life and gives them a sparkle.
2. Loop Lighting

Loop lighting is made by creating a small shadow of the subjects noses on their cheeks. To create loop lighting, the light source must be slightly higher than eye level and about 30-45 degrees from the camera (depends on the person, you have to learn how to read people’s faces).

Look at this image to see where the shadows fall, and on their left sides you can see a small shadow of their noses. In loop lighting the shadow of the nose and that of the cheek do NOT touch. Keep the shadow small and slightly downward pointing, but be aware of having your light source too high which will create odd shadows and cause loss of the catchlights. Loop light is probably the most common or popular lighting pattern as it is easy to create and flatters most people.

In this diagram the black backdrop represents the bank of trees behind them. The sun is coming over the trees but they are completely in the shade. A white reflector is used at camera left to bounce light back into the subjects’ faces. The reflector may or may not be in the sun but you can still pick up light even if it’s not. Just play with the angles, by changing the placement of the reflector you can change the lighting pattern. For Loop lighting it will need to be somewhere around 30-45 degrees from the camera. It also needs to be slightly above their eye level so the shadow or loop of their nose angles down towards the corner of the mouth. That is one mistake I often see beginners make with reflectors is to place them down low and angle it up. That lights up the bottom of your subject’s nose and does not create a flattering pattern.
3. Rembrandt Lighting

Rembrandt lighting is so named because the Rembrandt the painter often used this pattern of light in his paintings, as you can see in his self portrait here. Rembrandt lighting is identified by the triangle of light on the cheek. Unlike loop lighting where the shadow of the nose and cheek do not touch, in Rembrandt lighting they do meet which, creates that trapped little triangle of light in the middle. To create proper Rembrandt lighting make sure the eye on the shadow side of the face has light in it and has a catch light, otherwise the eye will be “dead” and not have a nice sparkle. Rembrandt lighting is more dramatic, so like split lighting it creates more mood and a darker feel to your image. Use it appropriately.


To create Rembrandt lighting the subject must turn slightly away from the light. The light must be above the top of their head so that the shadow from their nose falls down towards the cheek. Not every person’s face is ideal for creating Rembrandt lighting. If they have high or prominent cheek bones it will probably work. If they have a small nose or flat bridge of the nose, it may be difficult to achieve. Again, keep in mind you don’t have to make exactly this pattern or another, just so long as the person is flattered, and the mood you want is created – then the lighting is working. If you are using window light and the window goes down to the floor, you may have to block off the bottom portion with a gobo or card, to achieve this type of lighting.
4. Butterfly Lighting

Butterfly lighting is aptly named for the butterfly shaped shadow that is created under the nose by placing the main light source above and directly behind the camera. The photographer is basically shooting underneath the light source for this pattern. It is most often used for glamour style shots and to create shadows under the cheeks and chin. It is also flattering for older subjects as it emphasizes wrinkles less than side lighting.

Butterfly lighting is created by having the light source directly behind the camera and slightly above eye or head level of the subject (depends on the person). It is sometimes supplemented by placing a reflector directly under their chin, with the subject themselves even holding it! This pattern flatters subjects with defined or prominent cheek bones and a slim face. Someone with a round, wide face would look better with loop or even split to slim their face. This pattern is tougher to create using windowlight or a reflector alone. Often a harder light source like the sun or a flash is needed to produce the more defined shadow under the nose.
5. Broad Lighting
Broad lighting is not so much a particular pattern, but a style of lighting. Any of the following patterns of light can be either broad or short: loop, Rembrandt, split.

Broad lighting is when the subject’s face is slightly turned away from centre, and the side of the face which is toward the camera (is broader) is in the light. This produces a larger area of light on the face, and a shadow side which appears smaller. Broad lighting is sometimes used for “high key” portraits. This type of lighting makes a person’s face look broader or wider (hence the name) and can be used on someone with a very slim face to widen it. Most people however want to look slimmer, not wider so this type of lighting would not be appropriate for someone who is heavier or round faced.

To create broad lighting the face is turned away from the light source. Notice how the side of the face that is towards the camera has the most light on it and the shadows are falling on the far side of the face, furthest from the camera. Simply put broad lighting illuminates the largest part of the face showing.
6. Short Lighting

Short lighting is the opposite of broad lighting. As you can see by the example here, short lighting puts the side turned towards the camera (that which appears larger) in more shadow. It is often used for low key, or darker portraits. It puts more of the face in shadow, is more sculpting, add 3D qualities, and is slimming and flattering for most people.

In short lighting, the face is turned towards the light source this time. Notice how the part of the face that is turned away from the camera has the most light on it and the shadows are falling on the near side of the face, closet to the camera. Simply put short lighting has shadows on the largest part of the face showing.
Putting it all together
Once you learn how to recognize and create each of the different lighting patterns you can then start to learn how and when to apply them. By studying your subject’s face you will learn which lighting pattern will be best for them, and for the type of portrait and mood desired. Someone with a very round face that wants to appear slimmer in a grad portrait, will be lit very differently than someone that wants a promo shot for their band that makes them appear mean or angry. Once you know all the patterns, how to recognize and master quality of light, direction of light and ratio (we’ll discuss that in a future article) then you will be well equipped to handle the challenge.
Of course it is much easier to change the lighting pattern if you can move the light source. However if the main light source is the sun, or a window – it’s a bit tougher to do that. So what you will need to do instead of moving the light, is to have the subject rotate in respect to the light to change the direction it falls on them. Or change your camera position. Or change their position. So basically move the things you can move in relation to the light, if you cannot move the light source itself.
Practice Exercise
Corral yourself a subject (as in a real live person, not your dog) and practice creating each of the lighting patterns we just discussed including:
- butterfly lighting
- loop lighting
- Rembrandt lighting
- split lighting
Remember to show both broad lighting and short lighting – for each of the different patterns, where applicable. Don’t worry about any other aspect (ratio, fill light, etc) for now, just concentrate getting the patterns down pat first. Use light from a window, a floor lamp with a bare bulb (take the shade off) or the sun – but try and use a light source that you can see what’s happening (I’d suggest that you do not try using flash until you’ve got more experience, it’s harder to learn with because you can’t see it until after the photo is taken) This also works best to start out with the subject facing the camera directly, no turning except to create the broad and short.
Show us your results please and share any challenges or problems you encountered. I’ll try and help you solve them so you and others can learn from it, and get better for next time.
If you’re on Pinterest – here’s a graphic to save this tutorial.

The post 6 Portrait Lighting Patterns Every Photographer Should Know appeared first on Digital Photography School. It was authored by Darlene Hildebrandt.
Computational photography part III: Computational lighting, 3D scene and augmented reality
09
Jun
Editor’s note: This is the third article in a three-part series by guest contributor Vasily Zubarev. The first two parts can be found here:
- Part I: What is computational photography?
- Part II: Computational sensors and optics
You can visit Vasily’s website where he also demystifies other complex subjects. If you find this article useful we encourage you to give him a small donation so that he can write about other interesting topics.
The article has been lightly edited for clarity and to reflect a handful of industry updates since it first appeared on the author’s own website.
Computational Lighting
Soon we’ll go so goddamn crazy that we’ll want to control the lighting after the photo was taken too. To change the cloudy weather to sunny, or to change the lights on a model’s face after shooting. Now it seems a bit wild, but let’s talk again in ten years.
We’ve already invented a dumb device to control the light — a flash. They have come a long way: from the large lamp boxes that helped avoid the technical limitations of early cameras, to the modern LED flashes that spoil our pictures, so we mainly use them as a flashlight.
Programmable Flash
It’s been a long time since all smartphones switched to Dual LED flashes — a combination of orange and blue LEDs with brightness being adjusted to the color temperature of the shot. In the iPhone, for example, it’s called True Tone and controlled by a small ambient light sensor and a piece of code with a hacky formula.
 |
- Link: Demystifying iPhone’s Amber Flashlight
Then we started to think about the problem of all flashes — the overexposed faces and foreground. Everyone did it in their own way. iPhone got Slow Sync Flash, which made the camera increase the shutter speed in the dark. Google Pixel and other Android smartphones started using their depth sensors to combine images with and without flash, quickly made one by one. The foreground was taken from the photo with the flash while the background remained lit by ambient illumination.
 |
The further use of a programmable multi-flash is vague. The only interesting application was found in computer vision, where it was used once in assembly schemes (like for Ikea book shelves) to detect the borders of objects more accurately. See the article below.
- Link: Non-photorealistic Camera: Depth Edge Detection and Stylized Rendering using Multi-Flash Imaging
Lightstage
Light is fast. It’s always made light coding an easy thing to do. We can change the lighting a hundred times per shot and still not get close to its speed. That’s how Lighstage was created back in 2005.
 |
- Video link: Lighstage demo video
The essence of the method is to highlight the object from all possible angles in each shot of a real 24 fps movie. To get this done, we use 150+ lamps and a high-speed camera that captures hundreds of shots with different lighting conditions per shot.
A similar approach is now used when shooting mixed CGI graphics in movies. It allows you to fully control the lighting of the object in post-production, placing it in scenes with absolutely random lighting. We just grab the shots illuminated from the required angle, tint them a little, done.
 |
 |
Unfortunately, it’s hard to do it on mobile devices, but probably someone will like the idea and execute it. I’ve seen an app from guys who shot a 3D face model, illuminating it with the phone flashlight from different sides.
Lidar and Time-of-Flight Camera
Lidar is a device that determines the distance to the object. Thanks to a recent hype of self-driving cars, now we can find a cheap lidar in any dumpster. You’ve probably seen these rotating thingys on the roof of some vehicles? These are lidars.
We still can’t fit a laser lidar into a smartphone, but we can go with its younger brother — time-of-flight camera. The idea is ridiculously simple — a special separate camera with an LED-flash above it. The camera measures how quickly the light reaches the objects and creates a depth map of the scene.
 |
The accuracy of modern ToF cameras is about a centimeter. The latest Samsung and Huawei top models use them to create a bokeh map and for better autofocus in the dark. The latter, by the way, is quite good. I wish every device had one.
Knowing the exact depth of field will be useful in the coming era of augmented reality. It will be much more accurate and effortless to shoot at the surfaces with lidar to make the first mapping in 3D than analyzing camera images.
Projector Illumination
To finally get serious about computational lighting, we have to switch from regular LED flashes to projectors — devices that can project a 2D picture on a surface. Even a simple monochrome grid will be a good start for smartphones.
The first benefit of the projector is that it can illuminate only the part of the image that needs to be illuminated. No more burnt faces in the foreground. Objects can be recognized and ignored, just like laser headlights of some modern cars don’t blind the oncoming drivers but illuminate pedestrians. Even with the minimum resolution of the projector, such as 100×100 dots, the possibilities are exciting.
 |
| Today, you can’t surprise a kid with a car with a controllable light. |
The second and more realistic use of the projector is to project an invisible grid on a scene to build a depth map. With a grid like this, you can safely throw away all your neural networks and lidars. All the distances to the objects in the image now can be calculated with the simplest computer vision algorithms. It was done in Microsoft Kinect times (rest in peace), and it was great.
Of course, it’s worth remembering here the Dot Projector for Face ID on iPhone X and above. That’s our first small step towards projector technology, but quite a noticeable one.
 |
| Dot Projector in iPhone X. |
Vasily Zubarev is a Berlin-based Python developer and a hobbyist photographer and blogger. To see more of his work, visit his website or follow him on Instagram and Twitter.
Articles: Digital Photography Review (dpreview.com)
lighting essentials advanced workshop – a brief review
06
Jun
For those not familiar, Lighting Essentials are a series of workshops put on by Don Giannatti (you may know him as “Wizwow” on flickr). I am a big fan of Don, not only is he an excellent photographer, with years of commercial experience under his belt, but he is also a fantastic teacher – which is just as difficult a skill unto itself. He’s also a really down to earth guy with a low tolerance for BS and fools, which I find refreshing, particularly in the online photo community which can often turn into a bit of a hive-mind circle-jerk at times (you know what I’m talking about)…
Anyway, I got to go to his workshop in Philly in ’08 and it was awesome – definitely kicked my work up a couple of notches. At the time I was already somewhat experienced with lighting, so I wasn’t sure what to expect, but I was blown away; it was amazing to watch Don demonstrate things that I already “knew” lighting wise, and still be able to pick up something new – a new way of thinking about it, new ways of analyzing and constructing and deconstructing light.
A few weeks back, I had the opportunity to attend the advanced lighting essentials ‘shop down in Baltimore. Different than the standard workshop, this one assumed a baseline familiarity with lighting to begin with – getting a baseline exposure, balatncing flash/ambient, ratios etc… This was fantastic, as we were able to jump right into working with little “catch up” required. The format was well done. Don split us up into groups, with various assignments/challenges – in the morning we worked “in studio” talking about and working on precision lighting techniques for still life/objects. I gained a whole new respect for product photographers – it’s a lot more difficult than you’d think. One light, and lots of carefully placed white/black cards/diffusers etc… I particularly appreciated this as it really made you focus on analyzing and constructing light carefully rather than the “throw some strobes on it till it looks good” approach which many lighting novices seem to take.
In the afternoons we worked with models, but instead of the standard “how to light/balance” we focused more on creating a mood or complex lighting schemes – sometimes using 4, 5 or more lights – little accents and subtleties to construct a meaningful lighting scheme. Now I tend to be more minimalist in terms of my own lighting (I tend to favor zero, one or two lights – rarely more) but even so it was valuable to concentrate on the subtleties of the lighting scheme as a whole.
One of the things I like the best about Don’s workshops is that it’s all hands-on. There’s no “sit around and listen to the instructor talk about how great he is” for 6 hours, as is the case with many “workshops” – Don has everyone jumping right in and shooting right off the bat. It’s simply “talk about technique -> apply technique”. Good stuff. We also spent quite a bit of time talking business. Don has been a full time photographer as well as designer and creative director for many years, so he has a fantastic amount of the experience in the industry and shares freely. There are few things more valuable for a new photographer than the lessons of experience from someone who has “been there and done that”. It’s like going through the school of hard knocks without having to take the knocks.
To sum up, aka the TL;DR version: if you get a chance to attend one of Don’s workshops, go for it – it’s worth every penny. What boggles my mind is that folks who will drop thousands on a new camera body or lens, are so hesitant to spend money on education or workshops. I can say without reservation that the couple of hundred bucks for the LE workshops improved my work far more than any gear purchase I have made (and yeah, I’m also guilty of chasing the latest and greatest toys when it comes to gear).
finally some shots from the ‘shop:


Tweet This Post Stumble This Post
A beginner’s guide to lighting tools – with stay-at-home-friendly DIY versions
26
Apr
DIY studio lighting solutions
 |
One of the most important skills that photographers can learn is how to control and manipulate light. After all, it’s the very definition of photography! So if you aren’t already a master of photography lighting, use this quarantine time at home to explore and practice lighting techniques. In this article, I’ll show you some of the most popular lighting solutions that professional photographers use, and DIY versions that you can make with regular household products.
This guide is geared towards those with little-to-no knowledge of lighting, but it can also be useful for professionals. Gear can malfunction at any time, and it is helpful to know how to hack quick solutions, especially on paid jobs.
Light sources: Pro Photographer Version
 |
The lights that professional photographers use can fall into two broad categories: natural light and artificial light. Natural light simply means any available ambient light, most commonly sunlight. The plus side to natural light is that there is plenty of it available, and you can use it as-is or with modifiers such as a reflector (more on this below).
However, the downside to natural light is that it changes throughout the day, and is not always consistent. Natural light at sunrise or sunset has very different qualities than that of midday natural light.
While it’s beneficial for pro photographers to know how to use natural lighting, understanding how to use artificial lighting is also valuable since one cannot always rely on natural lighting to be available. Most photographers incorporate artificial lighting in the form of strobes, Speedlights, or LED panel lights.
Strobes and Speedlights are external flashes that produce a bright burst of light at high power. In comparison, LED panels are external lights that are always on, giving you a real-time preview of what your subject will look like with lighting on. The main downside to LEDs is that they are generally not as powerful as strobes or Speedlights.
Light sources: DIY Version
 |
The best DIY light source is a flashlight. This can be a dedicated flashlight or the one on your cell phone will do just fine.
From here on out, we’ll talk about lighting modifiers. The most important thing to understand about a modifier is that it (naturally) can’t be any brighter than the light that already exists, so it is best to start off with the most powerful light you can find. For the DIY versions of these modifiers, don’t worry if your materials are wrinkled, stained or dirty. All we’re doing is using them to reflect light, so little imperfections are fine.
Light Modifier: Reflector – Pro Photographer Version
 |
The most basic and inexpensive light modifier is a reflector. This tool manipulates light by bouncing it off of reflective surfaces. There are several different kinds of reflectors out there, but the handiest by far is the 5-in-1 reflector. This gives you five different tools to work with:
- A silver side for highly reflective, neutral-colored light.
- A gold side for highly reflective, warm-colored light.
- A white side for reflecting soft light.
- A black side for absorbing or blocking light.
- A translucent panel for diffusing light.
Light Modifier: Reflector – DIY Version
 |
5-in-1 reflectors are quite cheap, so get one if you can afford it. But if you want to use household items, you can recreate the effects of the 5-in-1 reflector with some common materials:
Tools Needed
- Tape, scissors, binder clips or clamps, large foam boards (most of these can be found in a craft or hardware store).
- A silver side – aluminum foil works fine.
- A gold side – this is more tricky to reproduce, but gold gift wrap could work.
- A white and black side – white or black foam board is the best option.
- A translucent panel – parchment paper (explained use is in the next section).
Step 1: Cut the large foam boards into your desired size, but keep it in a rectangular or square shape to help it stay balanced. Determine the ideal size by figuring out what kind of photo subject you are trying to light. A larger photo subject = a larger foam board.
Step 2: The foam board can be used as-is if you simply want a white or black surface to bounce light off of. Simply attach the binder clips or clamps to the bottom of the reflector to give it feet to stand on, and start using it.
Step 3: If you have aluminum foil or metallic gift wrap, take it a step further by wrapping the foam board cutout with the reflective material. It doesn’t matter if the foil or gift wrap is wrinkled – all you want is the reflective quality of the material. After your foam board is wrapped and secured with tape, attach the binder clips or clamps for feet, and you’re ready to go.
Light Modifier: Softbox – Pro Photographer Version
 |
Similar to the translucent panel of a reflector, a softbox diffuses light. It can turn harsh light with heavy shadows into soft, even light. Like all other lighting modifiers, softboxes vary in terms of size and shape. When choosing softboxes, consider the size of your photo subject – a larger softbox is needed to light larger subjects – and if your subject has any reflective surfaces. Softboxes can often be seen in reflections (ie. glass bottles, or a photo subject’s eyes). This may impact the shape of the softbox that you should use.
 |
Bottles of wine or other beverages are often shot with rectangular softboxes so that the reflection compliments the bottle’s form. |
Light Modifier: Softbox – DIY Version
 |
In the previous section, the use of parchment paper was not explained because you would use the parchment paper in much of the same way you would make this DIY softbox.
Tools Needed:
Tape or glue, Exacto knife (or scissors), large clamps, large foam boards, parchment paper (most of these can be found in a craft or hardware store).
Step 1: Cut the foam board into a certain size, if desired, but it is best to use the largest foam board that you have available.
Step 2: Cut out a generous portion of the middle of the foam board, leaving a foam board frame. This is easiest done with an Exacto knife.
Step 3: Tear off a piece of parchment paper large enough to fill in the foam board hole. Tape or glue the parchment paper to the foam board frame.
Step 4: Depending on the size of your DIY softbox, you may be able to balance it on a surface if you use large clamps as feet. If you have a really large softbox, use an assistant to hold it in place, or set your camera on a timer and hold the softbox yourself.
 |
To get the best light out of your DIY softbox, play around with the placement of your light source and the softbox. A good rule of thumb is that the larger the softbox, the softer the light quality. However, the proximity of the softbox to your photo subject also affects the light output – the closer your photo subject is to the light source, the softer the light appears.
Light Modifier: Snoot – Pro Photographer Version
 |
The last type of photography lighting modifier I’ll discuss is the snoot. A snoot is a long tube that fits on the front of a light, producing a targeted beam of light, similar to a spotlight. Photographers often use snoots as a hair light in portrait photography to create separation between the subject and background.
Light Modifier: Snoot – DIY Version
 |
There are many ways to DIY a snoot. Which tool is best for you really depends on the size of your light source, since the snoot needs to tightly fit around the end of your light. Assuming that you are using a relatively small flashlight, the cheapest and easiest way to DIY a snoot is to use the inner cardboard piece of a toilet paper or paper towel roll. Simply cut and toilet paper piece and rearrange it to tightly fit around the end of your light, and tape or glue the shape into place.
And there you have it – plenty of ideas to experiment with around the house. Watch the video below to see these DIY solutions in action, and let us know your best household item lighting hacks in the comments!
Articles: Digital Photography Review (dpreview.com)
LitraTorch 2.0 Review – LED Lighting for Photography and Video
18
Apr
The post LitraTorch 2.0 Review – LED Lighting for Photography and Video appeared first on Digital Photography School. It was authored by Suzi Pratt.

LED lights are fantastic for both photography and videography, but they tend to be large and cumbersome to use on-camera. This is where the LitraTorch 2.0 steps in. Released in late 2018, this second iteration of the popular LitraTorch promises “studio lighting in your pocket.” How does it actually perform? Read this LitraToch 2.0 review to find out!

Specs
- Truly compact at 1.5 inches x 1.5 inches
- 16 LEDs – double the original version of 8 LEDs in version 1
- 3 brightness levels (100, 450, and 800 lm) + stroboscope (blinking light) mode
- Color temperature is 5700 Kelvin (bright, cool and neutral color)
- Optional filters to change the color cast
- Simple One-Touch Operation – just one button to cycle through the brightness settings
- Standard Micro-USB charge port with charging cable
- Waterproof up to 20m/60 ft
- US$ 89.99
What’s in the box?
Each LitraTorch 2.0 comes with a white silicone diffuser, belt clip, GoPro mount, 1/4 inch tripod cold shoe mount, and a USB charging cable.

Recommended extra accessories
These items are not included with the LitraTorch 2.0, but you can purchase them to enhance its functionality:
- a carrying case
- battery brick (the LitraTorch can be charged via micro USB and is usable while charging)
- LitraTorch filters and accessories (more on those below)
Pros
1. Solid construction
The LitraTorch 2.0 is not only a strong LED light, but it is also built tough to withstand extreme conditions. It is made of a waterproof aluminum body (up to 60 feet or 20 meters) and drop-proof. With its solid build and compact size of 1.5 inches x 1.5 inches, this light is the perfect compliment to action cameras like the GoPro. But it can also work well with other DSLR or mirrorless cameras, or by itself.
2. Strong light with 3 brightness modes
The LitraTorch 2.0 is packed with 16 LED lights, double the amount in the original LitraTorch. There are 3 brightness levels with outputs of 100, 450, and 800 lumens, and a stroboscope (blinking light) mode. Thanks to the positioning of the LED lights, there is a very even light spread with no center hot spot.
Color temperature is 5700 Kelvin (bright, cool and neutral color). The only way to change the color cast is to use optional filters that are available as an add-on.


3. Built-in rechargeable lithium-ion battery
The LitraTorch 2.0 is powered by a built-in battery that can be recharged via micro USB. Fortunately, the light can work while it is charging. The battery lasts for about 7 hours on strobe, 4 hours on level 1, 70 min on level 2, and 35 min on level 3.
4. Flexible mounting options
Also built-into the LitraTorch 2.0 are two holes that accept 1/4 inch tripod screws. When used with the included 1/4 tripod screw cold shoe mount, this makes it easy to mount the light to the cold shoe or hot shoe of a camera or cage. The back end of the LitraTorch also has a built-in magnet for fast and easy attachment to magnetic surfaces.

5. Optional light shaping accessories to customize your light output
By itself, the LitraTorch and its dimmable settings are great as a key light, fill light, or hair light. However, there are optional accessories that you can purchase to further customize the way you shape light.
6. Barn doors
While the wide spread of the LitraTorch 2.0’s 16 LED lights is great for an even light spread, sometimes you want a more targeted light. This is where the optional barn doors can be helpful if you want the light to illuminate a specific part of your frame. The barn doors include a white diffuser and fold down flat when not in use.


7. Colored filter set
The LitraTorch 2.0 outputs a clean and neutral 5700k light, but it doesn’t offer any color options unless you add these colored filters.
This optional filter set includes 5 filter frames that you can use individually or stacked on top of each other. There are 3 sets of tungsten 4600k filters, 3 sets of tungsten 3200k filters, 1 white diffused filter, and 1 each of red, yellow, blue, and green filters.
While helpful and easy to use, these filters are small and easy to lose, so keep an extra eye on them!


Cons
The LitraTorch is pretty simple and straightforward, but there are a few things that could be improved.
1. Micro-USB charging port
While I appreciate the ability to charge the light via micro-USB, I wish this was USB-C instead since that charges faster, and most of my gear uses USB-C.
2. Built-in battery that can’t be replaced
The main downside to having a built-in battery is that you cannot replace it. Once the LitraTorch 2.0 is drained, you have to pause to recharge it and do not have the option of swapping in a fresh battery. On the bright side, the light still works while it is charging.

3. Does not come with a carrying case
When you buy the LitraTorch 2.0 by itself, it comes with a handful of small accessories, including a belt clip, which is really useful. However, there’s no carrying case, so you can easily lose these smaller pieces like the tripod and GoPro mount. If you get this light and plan to use a lot of small accessories with it, be sure to get a carrying case.
In conclusion
As a compact, high quality LED light, the LitraTorch 2.0 does not disappoint. It is easy to use with several dimming options and a plethora of light shaping tools to increase the usefulness of this light. But it can also be used by itself to light up any situation.
If you’re looking for a budget-friendly, high-quality compact light, this might be it!
Video
The post LitraTorch 2.0 Review – LED Lighting for Photography and Video appeared first on Digital Photography School. It was authored by Suzi Pratt.
Practice your portrait lighting in lockdown with this virtual studio program
16
Apr
 |
With many people being off work at the moment it might seem the perfect time to practice our photography – except that in so much of the world we’re not allowed to go out of the house let alone meet up for a portrait shoot. Software company Elixxier claims to have a neat solution in its recently updated set.a.light 3D application that allows us to keep experimenting, perfecting and testing studio set-ups even when we have to stay at home.
Users of the application can create a virtual studio filled with lights, modifiers, backgrounds as well as a host of models to choose from. Photographers can pose their models and add lights to the scene while previewing exactly how each move and position will change the way the picture looks.
 |
The program allows us a 3D view of the set-up we are creating so we can view the relationship between models and lights from the side or even above, and users have a choice of manufacturer-specific studio lights, speedlights and continuous light sources. A range of softboxes, snoots, barndoors and grids are available to alter the way the light looks, and colored gels can be added for atmosphere.
Users are able to shift the position of the lights and alter their intensity while seeing the effect immediately in the camera preview window. There is also a choice of lenses, apertures, shutter speeds and, of course, camera positions that all have an impact on the way the picture looks. You can even select the size of the sensor to match that of your camera so the settings, lens effects and looks can be mirrored in your real-life set-ups with a live sitter.
Not only can you experiment with your lighting set-ups using set.a.light but the complex range of options allows users to have precise control over the model’s poses. Legs bend and props can be placed under feet to get more shape into a pose, and even individual fingers can be carefully arranged. Models can be dressed, or undressed, the way you want them and glasses can be added for an extra challenge – in a range of colors and styles.
 |
Once you are happy with the way the model looks you can actually ‘take’ the picture and the result is rendered out as a normal picture file. You can also save the lighting diagram and 3D plan so you can refer to it at a later date when preparing to shoot a person for real. The program is great to allow us to practice during this lock-down, but in normal times it lets us test and experiment at leisure without the cost of studio and model hire, and it should make us more prepared when we arrive at a real shoot.
The latest version of the program adds a community discussion area where users can share their setups with others and chat about how images could be improved.
The Basic version of the application costs €79 (approx. $ 90) at the moment, while the Studio version is €154 (approx. $ 170), and company offers a free trial of the full version for 15 days. For more information see the Elixxier website.
Articles: Digital Photography Review (dpreview.com)
DIY Lighting and Background Accessories for the Budget-Conscious Photographer
07
Feb
The post DIY Lighting and Background Accessories for the Budget-Conscious Photographer appeared first on Digital Photography School. It was authored by Ana Mireles.

Do you want to take your photography to the next level, but don’t have the budget for professional equipment? Just a few dollars and a trip to the stationery shop can do the trick. Keep reading for some DIY lighting and background accessories using paper.
Professional photography studios have multiple lights and accessories to create their images. If you want to learn about them, here’s a great introduction guide.
However, when there’s no budget at hand, it’s time to get creative.
I’ll show you some ideas on how to create DIY lighting and background accessories using paper only. This has the intention of being a starting point to spark your creativity according to your needs and whatever you can find in your area.

DIY lighting and background accessories
DIY diffuser
There are two types of light, hard and soft. Hard light is very bright and usually, a condensed light that casts well defined, intense shadows and contrasting hot points.
It can be natural on very sunny days, or artificial from flash and strobes.
This can be great for certain types of photos, but other times it can be very unflattering for the scene.

Hard light with no diffuser. 0.5 sec, f/2.8, ISO 200
Soft light means that the subject is illuminated more evenly, the shadows become softer, and the entire mood is different.
Professionally, hard light is turned soft by using umbrellas or softboxes.
You can achieve a softbox effect using vellum paper as I did on the image below. In case you can’t find it, any type of tracing paper will do, or even oven paper from your kitchen.

Hard light turned soft with the use of DIY lighting accessories – vellum paper. You can also use tracing paper or oven paper. 0.5 sec, f/2.8, ISO 200
DIY Reflector
A light reflector bounces the existing light so that you don’t have to add a second source. This is very helpful to fill in shadows or darker areas of the image to bring out more detail.
You can find these in different sizes and colors, but the DIY stationery solution I chose was a foam board. It’s very light, easy to cut, and has a glossy exterior that maximizes the reflection.

1/5 sec. f2.8 ISO 200
In the above example, see how much light I gained just by placing a piece of foam board opposite the flash. It’s so much that I even lost the contrasting effect I wanted. However, I wanted to show you how big the difference is.
If you want less light, you can place it further away or change the angle. It takes some practice to learn how to use reflectors to light your subject, but it’s really worth it. If you need to block the light instead, you need to use flags, which you can achieve with black paper.
Creative uses
DIY Gels
Other DIY lighting and background accessories you can create are gels. Gels are pieces of colored, semi-transparent material that you can use to modify your light. Professional gels are graded to exact colors and density. This is because you can then compensate for the exposure and white balance in your camera and different light sources. However, for creative lighting, you can use simple cellophane paper or plastic index dividers.

1 sec. f. 2.8 ISO 200
Creating bokeh with wrapping paper or foil
Bokeh is an effect created by the lens when you send the background out of focus. You can easily create it by using crumbled metallic wrapping paper or aluminum foil as a background. If you want to create colored bokeh, buy wrapping paper with iridescent designs.

You can create a great bokeh background simply by using crumbled metallic wrapping paper or aluminum foil as a background. 1/10 sec, f/8, ISO 200
Once you place this background, light it from the side with any kind of lamp, flash or even window light. The most important thing though is to keep it out of focus. If you’re not sure how to achieve the shallow depth of field needed, check out this article.
Using paper to create a textured backdrop
Of course, you can make a backdrop with any kind of paper – that’s not news. However, I encourage you to add texture to it and see the difference. This, of course, makes a busier background, so it may not suit all subjects, but it can be a creative solution for many others.

This background was created using crumpled tissue paper. 1/5 sec. f2.8 ISO 200
I found that tissue paper is great because it’s cheap, light, easy to manipulate, and comes in multiple colors. You can just crumble it, cut it into pieces, and form patterns.
In this example, I cut it into squares and then twisted the center to create the ruffles, then pasted it all together with alternating shades of green.
Conclusion
So there you have it – some incredibly simple, and affordable DIY lighting and background accessories that you can buy on a small budget from almost any stationery store. Try these out, and if you have any other tips to add, please share them with us in the comments!
And for more photography DIY ideas, check out the following articles:
- How to Make a DIY Lens Hood to Eliminate Lens Flare
- How to Use Ordinary Items to Make DIY Photo Filters
- DIY Photography: How to Make Your Own DIY Lightstick for Cool Photos!
- DIY Photography Backdrops for Still Life and Product Photography
- How to Make a DIY Photography Softbox (video)
- Try this DIY Neutral Density Filter for Long Exposure Photos
- DIY Food Photography Props on a Budget
The post DIY Lighting and Background Accessories for the Budget-Conscious Photographer appeared first on Digital Photography School. It was authored by Ana Mireles.
You must be logged in to post a comment.