RSS
 

Posts Tagged ‘Letter’

Interview: David ‘Dee’ Delgado’s love letter to New York City, shot on 4×5 film

09 Apr
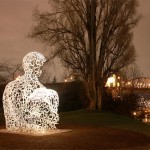
Genesis + Ronald, Before Prom, Westchester Ave (May 2019)

David ‘Dee’ Delgado has spent his entire life exploring New York City. Born and raised in the Bronx, in his younger years he traveled the city as a graffiti artist before transitioning into photography. “I got busted a couple of times and I got tired of getting locked up for doing graffiti,” he says. “So I started taking pictures of my friends.”

He worked as a graphic designer but says he found himself in a creative rut in a career where all his creativity was expended on behalf of the clients – “it was soul-draining in a sense.” And so Delgado found himself gravitating back to his cameras. Six years ago, at the suggestion of his wife, he quit the job that he hated and dove head-on into documentary photography.

Shot entirely on 4×5 film, Delgados project, ‘On My Block’, is an homage to the people and places that make New York City so special

These days Delgado works as a freelance photographer for clients like Getty, Reuters, Gothamist and others. He’s spent the last year very busy, on the ground documenting stories about COVID-19, the George Floyd police brutality protests and the 2020 election. In between all of that he’s continued to work on an ongoing personal project called On My Block, which he debuted earlier this year on his Instagram account.

Shot entirely on 4×5 film, On My Block is a homage to the people and places that make New York City so special. We spoke with Delgado to learn more.


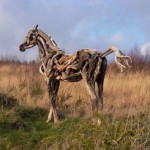
Saint Guadalupe, Simpson Street (February 2019)

When did you start shooting images for On My Block?

I started photographing On My Block in December 2018, I went into it with a direct purpose, although it has morphed. In the beginning, I was thinking about it in terms of gentrification – I’m a native New Yorker, I was born and raised here and I’ve seen how much the city has changed. I turn 45 this year, so I’ve been around for a decent amount of time.

Shooting 4×5 is a lot slower, especially when you are using a field camera. It slows things down and lets you connect to people, have a conversation and an interaction

I started seeing the city change so much and was reminiscing back to when I was a graffiti writer and I would go around the city. I decided I wanted to document the city and the people in it. What they are and how I remember them and how I remember it being like. That’s when the project morphed into more of a love letter to New York and less about gentrification. It’s a love letter to the city that I love and know.

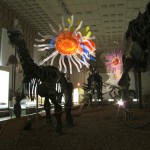
Black and his Son Liam, Barber Shop, Cypress Ave (February 2019)

What camera are you using to shoot the work?

I did not want to shoot digital for this project. I have my cameras that are meant for assignment work and then I have my cameras that are my personal cameras that I use just because I love the medium.

This gives me a break and it gives me the ability to be a little more artistic. As opposed to the hard news, with this, I can slow down and make a pretty photo

This whole project was shot on a Toyo 45A which is a 4×5 field camera. It’s not a light camera. It’s a heavy camera. Lugging that camera along with the film, film holders, and a dark cloth is not an easy task. Shooting 4×5 is a lot slower, especially when you are using a field camera. It slows things down and lets you connect to people, have a conversation and an interaction, you can make the connection through the camera in a sense. It just slows down the whole process.

Why was it important to shoot on film? How do you select what film stocks you use for this project?

I’m a big film buff and I knew I did not want to shoot this in black and white. I wanted it to look less documentary and more personal. The project was shot on Kodak Portra 160, I just found the soft and warm tones of the film leant themselves to what I wanted the project to look like.

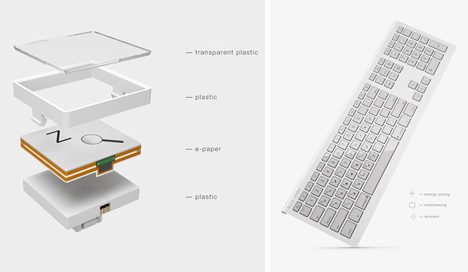
Kayla, Malcolm-X Boulevard and W.117th St (July 2019)

How does being born and raised in the Bronx influence the way you see and photograph in other New York City neighborhoods?

When you are young in New York it’s like, ‘don’t leave the stoop,’ but I always wandered. I would always push. ‘I can make it down the block to the bodega before mom notices.’ I always pushed the boundaries of where I was allowed to go. Once I became a little bit older and I was able to leave the stoop I would jump on the subway and I would pick a stop and go there. I would end up in Prospect Park, I would end up in Queensbridge, I would end up in Washington Heights.

I was always pushing the boundaries of my borders and was interested in embracing the city for what it is: multinational and multicultural

I’ve always been the person that was talkative and I would speak to people, I would connect to people. I’d be in Queens and when I was growing up, people in Queens used to use slang that was called ‘dun language’, and me being from The Bronx, I didn’t know how to speak dun language. But then I met guys who did and I would practice my dun language with them.

Then I’d be in the Heights, you know I’m Puerto Rican, and I’d be around the Dominican community and they are having Tres Golpes for breakfast and I was like ‘what the hell is that?’ and its salami and fried cheese and yucca, and I’d try it. I was always pushing the boundaries of my borders and was interested in embracing the city for what it is: multinational and multicultural.

Monica Flores, Macy Place, and Prospect Ave (December 2018)

Do you see this work as being related to the work you do as a freelance news photographer, or is this a project that gives you a mental break from that world?

This gives me a break and it gives me the ability to be a little more artistic and have a little bit more freedom. As opposed to covering the hard news, with this, I can slow down and make a pretty photo.

What can we expect to see as you continue the project?

It’s a project that is morphing on a continuous basis. Right now I’m playing with archival photos, I may include a different factor of photography in it. Chapter 2 is something I am still playing with.

What’s your quintessential New York food and where is the best place to get it?

Oh wow. Hmm. One of my favorite things – I was raised in Little Italy in the Bronx, 183rd and Crotona – is Madonia’s chocolate bread on Arthur Avenue. That’s definitely something that if you are here in New York, you have to try.


More photographs from On My Block

$ (document).ready(function() { SampleGalleryV2({“containerId”:”embeddedSampleGallery_0775908954″,”galleryId”:”0775908954″,”isEmbeddedWidget”:true,”selectedImageIndex”:0,”isMobile”:false}) });


About:

David ‘Dee’ Delgado is a Puerto Rican independent photographer based in New York City mainly focused on documentary and photojournalism. The interest in learning and his desire to help people made him realize the necessity of documenting his surroundings and broadening the conversation with the use of a camera. See more of Dee’s work on his site, dispatch.nyc.

Articles: Digital Photography Review (dpreview.com)

 
Comments Off on Interview: David ‘Dee’ Delgado’s love letter to New York City, shot on 4×5 film

Posted in Uncategorized


Open letter to Panasonic: Innovations in manual focus could make Lumix S a winner for cinematographers

17 Feb

Jack Lam is a cinematographer based in Beijing and Hong Kong. His body of work includes TV commercials, seasonal TV drama series and theatrical feature films. His commercial clients include Cathay Pacific, Lenovo, Airbnb, Alibaba, and Mandarin Oriental Hotel Group. He also works with DJI as a design consultant for their cinema products.

This guest editorial has been lightly edited for style and clarity.


As a working cinematographer, I am super excited by Panasonic’s announcement of the Lumix S mirrorless camera system. The Panasonic GH5 is so well-designed, it has become a reliable workhorse for many video shooters. I have no doubt a full-frame version of it will be amazing, and everything I read about the S1/S1R confirms that.

However, Lumix S has the potential to become much greater that what we see in this product launch. With this brand new camera system, Panasonic has a unique opportunity to create the perfect small camera system for professional cinematographers. But doing so requires Panasonic to address a long-standing problem that is overlooked by all other camera makers, as well as some rethinking of conventional ideas on camera design.

This missing feature – one that can become a potential killer feature for Panasonic – is good manual focus control for video.

“What’s the big deal with MF?” one may ask, “Don’t most cameras already have MF?” Well, when I say good manual focus control, I mean good enough for real working professionals – advanced documentarians and Hollywood cameramen alike.

The new Lumix S series cameras present an excellent opportunity for Panasonic to redefine the interface between mirrorless cameras and cinematographers who need pro-level focus control.

I want MF control that is simple, accurate, reliable, repeatable, predictable, measurable and ergonomically sound. It should also be wireless-capable and highly integrated as part of the camera (so that we can keep the camera small and don’t need to add six other accessories just to pull focus). Do you know of any small (DSLR/mirrorless) camera in the market that fulfills all of the above requirements? I have found none.

My perspective

My work varies widely in budget and crew size, ranging from run-and-gun documentaries, TV commercials to feature films for national theatrical releases. While the Arri Alexa is my go-to camera of choice for most of my work, I also use small form-factor mirrorless cameras when I see fit. I used to own every Panasonic GH model from the GH1 to the GH4, before I took a break from the m43 system for the full-frame Sony A7S.

This missing feature – one that can become a potential killer feature for Panasonic – is good manual focus control for video.

There are many instances where a smaller camera is the better camera for the job (for example, run-and-gun docs, sensitive locations, small gimbal, special car rigs, crash cams, etc.). Unfortunately, every time I shoot with a small camera I am faced with one big problem, a problem that haunts every video shooter but one that receives very little attentions in camera reviews: how do I pull focus? To be more specific, how do I pull focus effectively and professionally, as my director expects me to? How do I make sure I can nail the focus equally well in the first take, the second take, and each take thereafter?

The problem with focus pulling in today’s cameras

I am sure every DSLR video shooter shares this experience. Ever since the so-called DSLR video revolution, anyone looking to get into this game must build their own camera rig with all kinds of third-party components as if making a science project. Finding the right combination of lenses, lens adapters, focus gears rings, follow focus system, and the rig cage to hold everything together… All of these take a lot of time and energy to experiment and to troubleshoot, while we should really be focusing our time on our own artistic growth. The worst thing is, despite all the time and money we spend, the resulting rigs we built are never very good. They are unreliable, clumsy to use, and not very ergonomic.

The need to piece together unstandardized third-party camera parts also introduce uncertainties to productions. While we can order an Arri Alexa kit from any rental house in the world and have a pretty good idea of what to expect, it is never the case with DSLR/mirrorless camera rentals. Running a multi-camera shoot usually means operating with camera rigs from multiple brands, and their parts are not always compatible with each other.

All such desperate attempts in rig-building are primarily meant to provide a means of focus control. At the heart of this problem is the fact that camera manufacturers have failed to provide a good solution for focus pulling as part of their camera design.

Would you call such a monster user friendly?

Autofocus is not the answer for professionals

With the incredible progress in autofocus technology, can AF help us achieve good focus pulling, or even replace MF altogether? The answer is a resounding NO. Autofocus IS NOT and WILL NEVER be a good solution for professional cinematographers.

I have tried the AF in some of the latest cameras in the market. Dual pixel phase detection, facial recognition, AI subject tracking… I have to say the amount of technology is very impressive. AF works amazingly for stills, but for video I find it only useful under very limited conditions. Perhaps AF can be useful when I am following only ONE subject with a small gimbal without a focus puller’s help. Maybe I can give AF a try when I am shooting a sit-down interview on a slider. But when it comes to professional filmmaking, these said situations are just ‘kindergarten focus pulling’.

With the incredible progress in autofocus technology, can AF help us achieve good focus pulling, or even replace MF altogether? The answer is a resounding NO. Autofocus IS NOT and WILL NEVER be a good solution for professional cinematographers.

Real focus-pulling in a professional setting is much more complicated and much more nuanced. It often involves multiple actors and multiple marks. The camera may be panning from actor to actor, who may or may not be hitting their marks. We need to synchronize our focus shifts with dialogue beats, action beats, and emotion beats. Sometimes we need to predict the action and rack focus before the actor moves. Sometimes we don’t want to focus on the actor’s eyes. In fact, even the term ‘follow focus’ can be misleading because sometimes we intend to not follow anything at all to create a certain mood. Until the day arrives when a computer can understand dialogues, emotion, and esthetics, it is only foolish to think that AF can replace a focus puller.

I would even argue that the reason why some video shooters would even consider trying AF is only because there is no good MF control available to them. If we have an easy way to control MF reliably, most of us wouldn’t even need to bother with AF at all.

After all, why dumb down to artificial intelligence when we have the intelligence (and heart) of a real human being?

Focus control for stills and video are two different animals

The old saying goes, “To a man with a hammer, every problem looks like a nail.” When camera engineers started making still cameras that shoot video, the obvious solution for focus control was to use the existing AF system that works so well for stills and applied it to the video mode. Then the marketing department finished the job by calling it the new frontier of filmmaking.

However, focus control for motion picture is a very different task than getting sharp focus in a still image in many ways. For stills, all we need is to place the focal plane at the right subject as quickly as possible. How the image looks during the focusing process does not matter. For video, there is an element of time, and every frame counts. During a focus pull, the soft frames are just as important as the sharp ones as a form of artistic expression. That means hunting for focus is not an acceptable strategy.

For stills, all we need is to place the focal plane at the right subject as quickly as possible… For video, there is an element of time, and every frame counts.

To put it simply, focusing for stills is a question of WHAT to focus on. Focusing for video involves the interpretation of WHAT, WHEN, and HOW FAST to focus, and that makes it a much more complex problem for a computer to solve because it requires the understanding of intention.

Besides, focus pulls that look timely and confident often require one to know the focal distance of out-of-frame subjects ahead of time. Camera-based AF technology simply can’t do that.

Touchscreen tapping IS NOT focus pulling

There is an element of performing art in focus pulling. To a focus puller, the focus wheel is like piano keys are to a pianist. A focus puller’s distance scale is like a musician’s octave scale. A real focus puller thinks in terms of feet and inches, and prefers to have total control of focal distance. Then there is rhythm and timing in focus pulling, just like music.

For the same reasons why a piano app on an iPad can never replace a real piano, touchscreen tapping can never truly replace the focus wheel. If you want to build a camera that is loved by real professionals, you must first understand and respect the way a professional works.

If a professional musician can’t fit a grand piano in his tiny New York apartment, what would he get instead? The same goes for focus pulling with small cameras.

Focus pulling truly is an art form (let the pros do it their way)

If you still have any doubt in the above statement, this YouTube video by Fandor does a great job explaining the intricacy of focus pulling.

Please note – many of the focus pulls featured in this video, while being very easy to perform manually, are simply not possible with AF.

This YouTube video by Fandor does a great job explaining the intricacy of focus pulling. Many of the focus pulls featured in this video, while being very easy to perform manually, are simply not possible with AF.

Small cameras deserve professional manual focus control too

Skeptics may say, “if you care so much about the art of focus pulling, you should be using those big, expensive camera systems.”

This is certainly not true. Even big Hollywood productions have a need for small cameras with good focus control. I once spoke with cinematographer Tom Stern, ASC, about his experience shooting the movie American Sniper (2014). He shared that one day they had an interior helicopter scene, and it took a very long time to set up their Alexa XT cameras inside the tiny space. Director Clint Eastwood figured they were running out of time and made the call to “let’s bring in that little camera”. They ended up shooting the whole scene with the Blackmagic Pocket Cinema Camera.

In retrospect, Mr. Stern expressed disappointment with this camera for two reasons: 1) the image didn’t match well with the Alexa; 2) the pocket-sized camera wasn’t so small anymore after the cinema lens and the Preston follow focus system (and the required accessories to support it) were mounted.

Sadly, four years after the movie was made, we still don’t have a small camera that fully answers Mr. Stern’s demands.

Articles: Digital Photography Review (dpreview.com)

 
Comments Off on Open letter to Panasonic: Innovations in manual focus could make Lumix S a winner for cinematographers

Posted in Uncategorized


DJI shares open letter regarding corruption allegations, asks media to ‘pay close attention to the facts’

04 Feb

Three weeks ago, DJI released a statement regarding its ongoing investigation into an alleged corruption scandal that could ultimately cost the Chinese drone manufacturer upwards of more than $ 150 million. Now, DJI has published an open letter on its website detailing more information and urging ‘the media to pay close attention to the facts [DJI has] presented.’

In its initial statement, DJI said that during its internal investigation regarding the alleged corruption, ‘DJI itself found some employees inflated the cost of parts and materials for certain products for personal financial gain […] DJI took swift action to address this issue, dismissed a number of employees who violated company policies, and contacted law enforcement officials.

Since the initial statement, DJI has published an open letter on its website that provides more details on the investigation, the events that led up to it and what it plans to do going forward.

As DJI embarked on a management reform effort last year, we discovered problems that had evolved during our period of high growth,‘ reads the letter. It later goes on to say ‘DJI has discovered instances of cost inefficiency, purchasing manipulations and outright theft. We cannot ignore these issues. Indeed, for the sake of the vast majority of our employees who work hard and honestly, we need to uncover and eliminate these problems.

Although it’s not a full-fledged apology to consumers and investors, DJI does accept blame for letting the corruption getting as bad as it did, saying ‘in the past emphasized corporate growth over new internal processes.

DJI says fostering better management will be the key to eliminating such corruption in the future and says ‘will now take a leading role in developing clear policies, procedures and expectations to address corner-cutting and employee theft‘ and calls upon other companies to implement similar processes.

The letter also implores the media to ‘pay close attention to the facts we have presented.’

DJI has been expected to file for IPO in 2019, so these statements and open letters appear to be a part of an intense effort to suppress the fallout from the corruption and its financial implications.

Articles: Digital Photography Review (dpreview.com)

 
Comments Off on DJI shares open letter regarding corruption allegations, asks media to ‘pay close attention to the facts’

Posted in Uncategorized


A Love Letter to the Humble Softbox

08 Oct

When it comes to shaping and modifying your light, there are so many options available it can be hard to stay in one place for long. In the beginning, you’ll use the basics such as a softbox or an umbrella. But as you get comfortable with noticing the tiny differences in light, you’ll quickly graduate to more specialized modifiers. Beauty dishes, reflectors (the kind that fits to a strobe), octaboxes and striplights all do wonderful things to your light. And you can easily get caught up in the ways these and other modifiers can be used.

Overlooked

Despite all these options, I feel the basics can sometimes be overlooked. Have you ever stopped to think why the humble softbox has become so universal? No doubt there are many answers to that question, but an important one is that it works – and works well.

To be clear, I’m talking about the basic rectangular photographic softbox around 3′ x 4′. Not too large, and not too small. (Popup softboxes have their place, but we’re not talking about them in this article.) With the right techniques, these workhorses of the photographic studio can give you beautiful, soft light that suits just about any subject you can think of.

Basics

You probably already know the basics of how a softbox works. But for the sake of posterity, let’s go through it again.

A softbox is mounted on the front of the strobe to shape and more evenly distribute the light. They’re often fitted with silvery material on the inside to help bounce the light around and ensure it spreads evenly through the diffusion material at the front. This diffusion material effectively becomes your light source. Because your light source is now much bigger than the bare strobe, the quality of light changes from hard to soft (hence the name ‘softbox’).

Manipulating the quality of the light gives you much more flattering light for almost any subject, especially portraits.

Never Forgotten

For these reasons a great deal of photographers start their camera lighting with a softbox. They’re cheap, easy to find and use, and provide excellent results. But as their skills increase, and new and more complicated techniques open up, it can be hard to resist the allure of fancy, niche modifiers.

For a few years I used nothing but a beauty dish. Even now I tend to favor large octaboxes for portraits. But in this article I want to show you that just because you’ve moved on to other things doesn’t mean you should forget the basics. As I said, there’s a reason the softbox has become so universal.

Examples

Here are several examples of what you can achieve with a simple 3′ x 4′ softbox that cost around $ 35.

Note: As you’ll see in the annotations, for some of these shots a 5-in-1 reflector ($ 15) was also used.

1.

In this example, the softbox is directly in front of and offset slightly from the subject. This results in a lighting pattern called ‘loop lighting’. Because the light source is so close, the resulting soft light is ideal for portraits.

2.

Like the previous example, the softbox for this image is really close to the subject. But this time, it’s placed at 45 degrees and slightly above. Look at the catchlights in his eyes, and you can see exactly how close the light source is. Again, the light here is really soft, and you can see this quality in the smooth tonal transitions from the highlight areas to the shadow areas.

3.

This setup is almost the same as the previous setup, except the softbox is slightly further away and there’s a white reflector at camera right.

Placing the light further away reduces the speed of the light falloff, which in this case means that the shadows don’t dominate as quickly as in the previous example. The reflector also helps with this.

4.

Medium-sized softboxes are well suited to clamshell-styled setups. Simply place your softbox directly in front of and above your subject, pointed down at 45 degrees. Then place a reflector underneath and pointed upwards at 45 degrees. (Without a reflector this would be called ‘butterfly lighting’.)

5.

Softboxes can be used to great dramatic effect when used as side lighting. Deep shadows and soft highlights can really add a lot of depth to your images.

6.

The previous examples all had the softbox in close for the softest possible light. You can also pull your light source back to make use of harder light to good effect. But pay close attention to the clearer transitions between the shadow and highlight areas.

The End

I’m not telling you to limit yourself to a softbox. By all means, go out and use and explore every modifier you can get your hands on. Just remember that as you’re planning your lighting for any given situation, sometimes the ease and simplicity of the basics might give you the results you need.

The post A Love Letter to the Humble Softbox appeared first on Digital Photography School.


Digital Photography School

 
Comments Off on A Love Letter to the Humble Softbox

Posted in Photography


Letter from the reviews editor: Pentax K-1 Mark II studio scene re-shoot

01 Jun

Introduction

Back on May 7, we published our review of the Pentax K-1 Mark II. For our studio scene analysis we used the SMC Pentax-D FA 50mm F2.8 Macro lens, rather than the SMC Pentax-FA 77mm F1.8 Limited that we’d used for the original K-1 review. This isn’t ideal (we try to shoot our studio scene as close to 85mm as we can, on full-frame bodies) but we did this because after some comparison tests, we found that the 50mm F2.8 was slightly sharper than our copy of the 77mm in the central portion of the frame, and that’s where we’re looking when we draw our conclusions.

While the center looked better, as many of you noticed, the top right corner of the scene shot with the 50mm F2.8 was soft; softer than the same area in images shot with the K-1. However, given the sharper central area (and the lack of a better sample of the 77mm at the time), we opted to publish the review regardless, since we don’t draw any sharpness or resolution conclusions from the edges of our studio scene.

Unfortunately, after the review was published we discovered a processing error with one of the K-1 II’s studio files, taken at ISO 12,800. This was swapped out, with an editors’ note added as soon as we became aware of it. More seriously, we also discovered that the K-1 Mark II’s JPEG profile had been incorrectly set to ‘Auto’. This resulted in differences in color and saturation compared to the K-1, which had been set correctly to the default: ‘Bright’.

See the updated K-1 Mark II
image quality page

Upon considering the cumulative effect of these differences, we spoke to Ricoh, who were kind enough to send us a second K-1 II, a K-1 and a hand-picked 77mm F1.8 Limited, so that we could re-shoot. Now that we’ve had a chance to compare the results of both cameras with the new 77mm F1.8 (which is noticeably sharper than the lens with which we originally tested the K-1), I wanted to share our findings with you.

The re-shoot and the results

First and most notably, it’s still clear that the accelerator unit in the K-1 Mark II is applying noise reduction to Raw files that the user cannot disable or remove. At high ISO values this still results in a loss of detail and contrast and the introduction of artifacts, but we have to acknowledge that a portion of our assessments were based on the incorrectly processed ISO 12,800 file. Our impression of JPEG color has also improved markedly as a result of using the correct ‘Bright’ profile.

As a result, we have adjusted both our scoring and some of the wording throughout the review to reflect this. It’s important to note that scoring and our overall assessment of the camera are not significantly changed, though; here’s why.

Most notably, it’s still clear the K-1 Mark II is applying noise reduction to Raw files

Despite the two-year gap between them, the K-1 Mark II still represents a minor upgrade over the K-1. Yes, you can now choose ISO 819,200, but the quality and therefore the utility of this setting is questionable. Autofocus tracking is improved, but still uncompetitive. Noise reduction in Raw does reduce visible grain at high ISO values, but its value to demanding users of such a high-end, high-res camera who are likely to want complete control over their images strikes us as suspect. The K-1 II’s lagging video capabilities look increasingly amiss in today’s market, and lastly, the Dynamic (hand held) Pixel Shift does not actually align images moved by a single pixel, instead approximating a super resolution technique that’s been around for years.

Read the full Pentax K-1 II review

All of this is certainly not to say the K-1 Mark II is a bad camera. Both the K-1 II and its predecessor are built like tanks, come with a bevy of unique features and are capable of absolutely outstanding image quality. We aim to give credit where credit is due, but as always, our first obligation is to help photographers spend their hard-earned money wisely. The fact remains that, despite our reassessment of the K-1 II’s image quality and JPEG color in particular, there are many ways in which the K-1 Mark II is simply outclassed by the competition.

Because of this, it’s still difficult for us to recommend the K-1 Mark II over competing models, and still difficult to recommend existing K-1 users pay $ 500 for the upgrade.

The final word

In the end, we are beholden to our readers and endeavor to hold all information that we publish on DPReview to the highest standards of accuracy. We fell short of that goal in this instance, and I apologize wholeheartedly for that. I hope that in fixing our mistakes with the K-1 Mark II, we’ve provided some additional and useful value to our review. We will take what we’ve learned from this experience to improve our future reviews in the hopes that we can continue to provide the most detailed and useful photography content on the internet.

As always, thanks for reading.

Carey

Articles: Digital Photography Review (dpreview.com)

 
Comments Off on Letter from the reviews editor: Pentax K-1 Mark II studio scene re-shoot

Posted in Uncategorized


A letter from the Publisher

04 Jan

The first week of a new year is an important time for every business, and DPReview is no different. As we reflect on the past year and define our goals for 2018, I want to take this opportunity to introduce myself. Some of you might know me from occasional forum posts and comments—usually to explain a new site feature, or some new style of advert. My name is Scott Everett, and I’m DPReview’s new General Manager and Publisher, replacing Simon Joinson, who stepped down in October.

At its core, DPReview is a group of people. Those people are dedicated to investigating all of the latest developments in photographic imaging technology, and providing informed, unbiased analysis to our readers. We’ve been doing this in one way or another for almost 20 years; I joined DPReview in 2011, which feels like a long time ago, especially in such a fast-paced industry, but the site’s essential mission hasn’t changed in that time.

We are, of course, also a business. Traditionally, like most websites, DPReview has generated the majority of its income via conventional ‘banner’ advertising. But as advertisers increasingly move away from conventional ads and seek to position different types of content in as many channels as they can, we’ve faced an important question: how can we meet the needs of our advertisers while maintaining the trust of our readers?

Regular site visitors will have seen new kinds of content appearing on DPReview over the past couple of years—from long-form videos to occasional co-branded articles. Most of it has proven popular with our readers (thanks as always for the feedback), but we’re not going to rest on our laurels. And we are most definitely not going to compromise the high editorial standards that brought you here in the first place.

Simon Joinson, Barney Britton, and Allison Johnson listen politely as I attempt to explain something.

You’ll see some changes on the site in 2018 and beyond. We are in the middle of automating many of the tests we perform on cameras and lenses (yes, we plan to bring back lens reviews), which we hope will increase the consistency of our product reviews, and hopefully decrease the amount of time that some of them take. We are also working hard to re-think the user experience of the site on both desktop and—perhaps more importantly—mobile.

In an era when countless blogs offer up half-baked opinions on new products within minutes of their launch, DPReview with our labor-intensive method of testing might seem like something of a dinosaur. But we’re OK with that.

While both the photography and publishing worlds have changed drastically since I bought my first digital camera (an Olympus E-1, if you were curious), DPReview in 2018 is what it always was: a website run by and for discerning photography and technology enthusiasts. And our readers are our most valuable asset. This site would not be what it is without the community of photographers that visit every day.

So hello, thank you for your support, and Happy New Year!

Scott Everett, Publisher and General Manager, DPReview.com

Articles: Digital Photography Review (dpreview.com)

 
Comments Off on A letter from the Publisher

Posted in Uncategorized


3D Four Letter Words: Robert Indiana’s LOVE Sculptures

15 Feb

[ By Steve in Art & Sculpture & Craft. ]

LOVE-sculpture-0
Looking for love in all the right places? Replicas of artist Robert Indiana’s iconic Pop Art “LOVE” sculpture have spread to the 4 corners of the globe.

LOVE-sculpture-1d

LOVE-sculpture-1b

Robert Indiana (formerly Robert Clark) first expressed the essential iconography of “LOVE” in 1958 but it wasn’t until 1964 that the image garnered wide public notice, via a Christmas card commissioned by the Metropolitan Museum of Art. One of the first three-dimensional LOVE sculptures has stood, since 1970, in front of the Indianapolis Museum of Art.

LOVE-sculpture-1c

LOVE-sculpture-1a

Like many metal artworks designed to stand out in the open, the IMA’s LOVE sculpture is made from Cor-ten steel, an alloy that weathers to a rich, slightly iridescent, purplish-brown patina after years of seasonal changes. The sculpture measures 12′ x 12′ x 6′ and has recently undergone a structural and aesthetic restoration.

I LOVE New York

LOVE-sculpture-2c

LOVE-sculpture-2a

LOVE-sculpture-2b

There are currently around 50 LOVE sculptures installed in public and private spaces worldwide. Some are better-known than others, mainly due to their proximity to pedestrian traffic. One of the first NYC LOVE sculptures was installed at 59th Street and 5th Avenue in 1971, while perhaps the most prominent NYC LOVE sculpture stands at the corner of 6th Avenue and 55th Street in Manhattan. Kudos to Flickr users Chee917 and Robert Wright (wrightrkuk), who snapped the sculpture in 2012.

LOVE Is Blue

Vancouver LOVE sculpture

LOVE-sculpture-3b

Most of the world’s LOVE sculptures have red painted facades with blue or blue & green sides to match Indiana’s original MOMA card and popular USPS stamp. This isn’t a must, however, as Indiana famously neglected to properly copyright the work. This bright blue representation outside 1445 West Georgia Street in Vancouver, Canada (later moved) shares its blue & green color scheme with another LOVE sculpture located at the Park Mall in Singapore.

Reflections of LOVE

LOVE-sculpture-4

Photographer Wassily from nl brings us the striking scene above. Featuring a large LOVE sculpture set into the reflecting pool outside the Langen Foundation’s main building in Neuss-Holzheim, Germany, the photo dates from 2005 shortly after the building opened.

Next Page – Click Below to Read More:
3d Four Letter Words Robert Indianas Love Sculptures

Share on Facebook


[ By Steve in Art & Sculpture & Craft. ]

[ WebUrbanist | Archives | Galleries | Privacy | TOS ]


WebUrbanist

 
Comments Off on 3D Four Letter Words: Robert Indiana’s LOVE Sculptures

Posted in Creativity


E-Ink Keyboard: Letter Keys Morph into Custom Symbols

19 Feb

[ By WebUrbanist in Gaming & Computing & Technology. ]

e ink custom keyboard

Electronic ink is energy efficient and easy on the eyes, so why not adapt it to the keyboard? It is, after all, one of the few components of everyday technology that still has printed type in a screen-dominated world.

e_inky

electronic ink keyboard concept

Designed by Maxim Mezentsev & Aleksander Suhih the E-inkey keyboard for Pixel Studio (p1x.ru), the concept is simple: e-ink key displays that can shift to gaming keys, shortcuts or program-specific icons smoothly on demand, just like turning the digital page in your favorite e-book reader.

electronic oled color keyboard

There is already a working precursor to this, and it is more than a prototype – the Optimus Maximus keyboard has configuration software for full customization (letters, images, icons, colors), but uses power-sapping and heavy-touch OLED technology (making it harder to go wireless or even push buttons).

eink customizable multitasking keyboard

While this is not yet in production, the specs give some hope that it might make its way to Kickstarter or an equivalent soon – it definitely falls under the “please take my money!” category for tech geeks and design professionals alike.

Share on Facebook


[ By WebUrbanist in Gaming & Computing & Technology. ]

[ WebUrbanist | Archives | Galleries | Privacy | TOS ]


WebUrbanist

 
Comments Off on E-Ink Keyboard: Letter Keys Morph into Custom Symbols

Posted in Creativity


E-Ink Keyboard: Letter Keys Morph into Custom Symbols

07 Feb

[ By WebUrbanist in Gaming & Computing & Technology. ]

e ink custom keyboard

Electronic ink is energy efficient and easy on the eyes, so why not adapt it to the keyboard? It is, after all, one of the few components of everyday technology that still has printed type in a screen-dominated world.

e_inky

electronic ink keyboard concept

Designed by Maxim Mezentsev & Aleksander Suhih the E-inkey keyboard for Pixel Studio (p1x.ru), the concept is simple: e-ink key displays that can shift to gaming keys, shortcuts or program-specific icons smoothly on demand, just like turning the digital page in your favorite e-book reader.

electronic oled color keyboard

There is already a working precursor to this, and it is more than a prototype – the Optimus Maximus keyboard has configuration software for full customization (letters, images, icons, colors), but uses power-sapping and heavy-touch OLED technology (making it harder to go wireless or even push buttons).

eink customizable multitasking keyboard

While this is not yet in production, the specs give some hope that it might make its way to Kickstarter or an equivalent soon – it definitely falls under the “please take my money!” category for tech geeks and design professionals alike.

Share on Facebook


[ By WebUrbanist in Gaming & Computing & Technology. ]

[ WebUrbanist | Archives | Galleries | Privacy | TOS ]


WebUrbanist

 
Comments Off on E-Ink Keyboard: Letter Keys Morph into Custom Symbols

Posted in Creativity


25 September, 2012 – Sigma DP1 Merrill Review & Open Letter to Sigma’s CEO

16 Oct

When I started working with the Sigma DP2 Merrill I was floored by the image quality. It’s a quirky camera that needs patience to use, but rewards with sensor and lens quality unmatched in the industry for its price and size.

It’s sister camera, the DP1 Merrill, with an effective 28mm focal length lens, started to ship recently and I was very curious to learn if it could match the optical quality of its older sibling. My review is now online.

As remarkable as these cameras are when it comes to image quality, sadly Sigma’s raw software is truely horrid. But, it’s the only game in town unless and until Sigma starts working with the major software companies or adopts DNG export.

I have therefore written an open letter of concern to Sigma’s CEO which is also part of my SD1M review.


"You and Jeff did it again!  A great series of videos.

I’ve watched the earlier Camera to Print series as well as the LR 2 & 3 videos and as usual, I learned 
new technique and ideas even though I’ve been behind a camera for 45 years.

Additionally, the rapport you two have is most engaging, enjoyable, and totally different than the sterile video tutorials from others (I’m afflicted with being a visual learner). 

Again, a great series of videos that have helped me grow once again." 


The Luminous Landscape – What’s New

 
Comments Off on 25 September, 2012 – Sigma DP1 Merrill Review & Open Letter to Sigma’s CEO

Posted in News