RSS
 

Posts Tagged ‘Lapse’

A decade of sun: NASA captured 425 million photos of the sun and made a time lapse

30 Jun

NASA’s Solar Dynamics Observatory (SDO) has been very busy capturing images of the sun over the last decade. From June 2, 2010 through June 1, 2020, the SDO captured 425 million images of the sun. Per NASA, the team amassed about 20 million gigabytes of images of the sun in the past decade and with that data, NASA compiled 10 years’ worth of images into the amazing timelapse video above.

Using three primary instruments, the SDO captures an image of the sun every 0.75 seconds. One of these instruments, the Atmospheric Imaging Assembly (AIA), captures images every 12 seconds at 10 different wavelengths of light. In the timelapse video published by NASA, we see photos of the sun captured at the extreme ultraviolet wavelength of 17.1 nanometers. This wavelength allows us to view the sun’s outermost layer, called the corona.

Generally, the hour-long timelapse video features a compiled image from each hour of every day for the past 10 years. Although, there are a few exceptions. There are dark frames caused by the Earth or moon eclipsing SDO as they pass between the spacecraft and the sun. There was also a week-long outage of the AIA instrument in 2016. Any off-center images of the sun are due to periodic instrument calibration.

As you can imagine, the SDO has witnessed many interesting events during its period of observation. In the video above, at 6:20, you can see a prominence eruption from the lower right area of the sun from June 7, 2011. At 12:24, you can see the transit of Venus across the face of the sun on June 5, 2012. This event won’t occur again until the year 2117. On July 19, 2012, a brilliant display of looping plasma showed a complex event in the sun’s magnetic field, this can be seen at 13:06. About six weeks later, on August 31, 2012, the ‘most iconic eruption of this solar cycle’ occurred, witnessed at 13:50 in the video.

Jumping ahead to 36:18, you can view Mercury as it transits across the face of the sun on May 9, 2016. It is more difficult to spot than Venus, but you can learn more about it here. Mercury appears again at 57:38, as it transited the sun again on November 11, 2019. This will Mercury’s last transit until 2032. A full list of interesting events you can witness in the video can be found in the description on YouTube.

‘An X8.2 class solar flare flashes in the edge of the Sun on Sept. 10, 2017. This image was captured by NASA’s Solar Dynamics Observatory and shows a blend of light from the 171 and 304 angstrom wavelengths.’ Image and text credit: NASA/GSFC/SDO

Scott Wiessinger (USRA) was the lead producer on the video above. Tom Bridgman (GST) was the lead data visualizer. Leading scientific writing was Mara Johnson-Groh (Wyle Information Systems). The music, ‘Solar Observer,’ was written and produced by Lars Leonhard.

If you’d like to learn more about NASA’s Solar Dynamics Observatory, you can find a wealth of fascinating information by clicking here.

Earlier this year, NASA published a shorter video that covered 10 of the most important things scientists have learned during SDO’s first decade in space. You can check that out below.


Image credit: Images via NASA/GSFC/SDO

Articles: Digital Photography Review (dpreview.com)

 
Comments Off on A decade of sun: NASA captured 425 million photos of the sun and made a time lapse

Posted in Uncategorized


Aerial Time Lapse Basics with DJI Mavic Pro 2 Drone Specific Examples

17 Apr

The post Aerial Time Lapse Basics with DJI Mavic Pro 2 Drone Specific Examples appeared first on Digital Photography School. It was authored by Peter West Carey.

Drones can capture images and footage you might have only dreamed of in the past. Now that ability is easily extended to time lapse photography.

I prefer to refer to my drone as a flying camera. While there is certainly some fun to be had in the simple joy of flying around and looking at stuff from high up, I use my drone primarily to create images and footage with an eye toward cinematic appeal. Time lapse imagery can convey a sense of place that still images and videos lack.

The Basics

This post is written based on experience with the latest model DJI Mavic 2 Pro. While manufacturers differ how they handle time-lapse creation, the tips below are meant to introduce you to what’s available. Some tips will be specific for this model but I will also offer more tips for aerial time-lapse creation in general.

Some drone manufacturers will compile the time lapse video for you while others simply record each individual photo, allowing you to compile the video yourself.

It’s important to note that all experimentation and practice should be done in an open space, away from people, buildings, pets and in accordance with all laws and regulations for your location. I practiced over land many, many times before I felt confident using the automatic modes for time lapses over water.

Tips Before Getting Started

Check exposure and anticipate

Changing exposure during a timelapse shoot, be it on land or in the air, is often a tricky endeavor. I suggest, when getting started, to anticipate your lighting situation and not attempt to change exposure during a timelapse shoot if your drone allows it.

It can be difficult to make exposure adjustments depending on your brand of drone (and some don’t allow it at all) – it’s hard enough to safely fly a drone while shooting. Try not to add too much complexity on top of that.

Try different interval timings and drone speed, 2 seconds is a lot different than 10 seconds

The speed of your drone, distance to objects and the length of your interval will have a large impact on your time lapse. There’s a reason DJI limits the speed of the drone in certain modes (explained below) to 4.5MPH. Anything faster than that and the video shows way too much motion to be palatable.

But if you’re flying slow, a 10-second interval might be ideal for helping show the movement of slow-moving clouds or shadows.

Let me show you the difference between a 2-second interval (at 1.6MPH) and a 5-second interval (at 4.5MPH) while a drone circles me.

It’s going to take some experimenting to get it right.

Look at your total time to create 

DPS writer, Ryan Chylinski, explains the importance of shoot length in this helpful post. When flying a drone, it’s even more important to make sure you don’t run out of card space and that you judge the movement of your drone compared to the total time it will take to shoot your time lapse.

Will you cover too much ground? Will your drone still be in line-of-sight (which most countries require as part of drone flying regulations)? What obstacles might your drone encounter when flying that long?

Plan ahead to avoid simple mistakes.

Point one way, film another

Facing one direction while flying another can offer a dynamic look to your video, rather than simply flying straight ahead. You can use a backward facing drone to get a typical pull-back shot or point slightly off of perpendicular for a dolly shot, such as the sunrise below.

Leave yourself time to return home

Do you have enough battery to shoot and return?

This is one of the most important question to ask. Some drones will warn you, but some won’t.

I had a frightening experience when I misjudged distance and return time while shooting a time lapse over water and nearly lost my drone (and polluted the environment). Midway through the flight I aborted the shoot and returned with a safe margin of battery, but I lost the shot.

Work altitude shifts into your scene

Altitude shifts are a like using a typical slider, but on steroids. You’re not limited to the four or 10 feet of a ground-based slider so the changes can be over a much larger distance. You also don’t need to stay moving parallel to the ground the whole time.

Here’s a simple example of a pullback that covered about 1000ft over land/water while steadily climbing 140ft in altitude.

Fly smooth

Using a pre-built, computer-controlled mode, like the ones mentioned below, help ensure smooth flight and operation. If you are controlling your drone manually while shooting a time lapse, ensure that your movements are slow and steady, allowing for your camera to shoot enough photos for a smooth video.

Here’s an example of what happens when I panned down then up too fast while shooting.

Result: Ruined video. Also, to my liking, the pan left and right are too fast.

DJI’s different methods – What do they mean?

DJI fits all of their time lapse modes into a section it calls Hyperlapse. Hyperlapse is just a cool sounding phrase meaning a moving time lapse. The Hyperlapse modes will all shoot and compile the video for you, typically in 1080p and 25 frames per second. You can also choose to save the individual RAW files if you wish to use your own time lapse software.

Safety Note: While the drone uses its side, front, rear, top and bottom sensors to detect objects, it still requires your attention at all times. If it finds an object in its path, it will stop shooting. It is very important to remain in control of the drone and ready to intervene. In Course Lock and Waypoints modes, if you make any adjustment to the controls of the drone, it will exit those modes and stop shooting.

Course lock

Course lock is the mode I use most often and it’s the one I’m going to start with. It allows you to aim the drone in one direction for flight and then either point the camera any way you like, or choose a subject to be tracked.

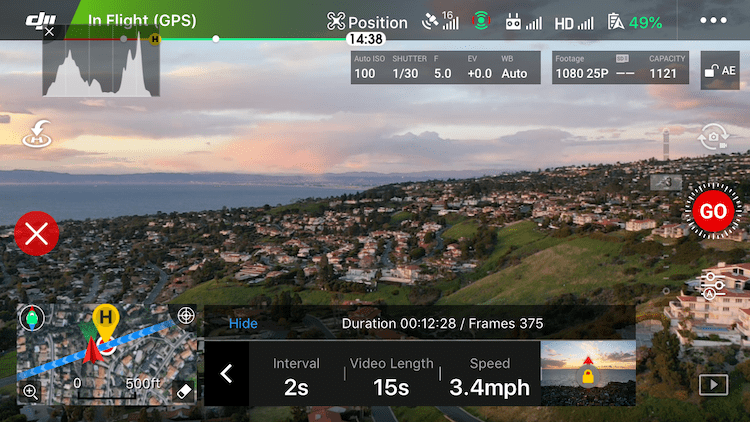
You start by setting course and then the interval, video length and speed. Each item is set by first tapping it and then moving the slider accordingly.

Setting the course is as simple as pointing the drone in the direction you wish to go and tapping the lock icon next to interval, video length and speed. In this case, I pointed the drone directly at the sun. The little image of a lock means my course is locked.

Next, you’ll want to point the drone’s camera in the direction you want to film. Then adjust the shooting settings.

In this example, I left the interval at 2 seconds but then set the video length to 15 seconds.

With that change to video length and interval, the app shows me how many photos it will take and the length of shooting.

After that I set the speed to 3.4MPH.

All that is left is to hit GO and watch the scene unfold! (Notice the course lock section still shows the drone’s intended direction toward the sun.)
Free/Manual

Free Mode is straight forward and gives you the most control. After setting the shooting interval and video length as you would in Course Lock Mode, you are free to fly any which way you please. Up, down, backward, forward, left and right.

But be warned: fast course changes or high speeds will cause your video to be anything less than smooth.

At any time you can press the C1 button (on the underside of the controller) to lock course and speed.

As Free Mode can be used while the drone is on the ground, you can actually use it as a still camera for time lapse.

Circle

As you saw in the videos up top, choosing your speed and interval is important for Circle Mode.

Start by setting the distance from your subject for your drone. Ensure the circle your drone will subscribe in the sky does not encounter any obstacles. If need be, adjust your drone’s height or distance from your subject to achieve the framing you desire.

Next, select Circle Mode from the Hyperlapse options.

Now set your interval, video length and speed as described in the Course Lock Mode. Then select the direction your drone will fly; either clockwise or counterclockwise.

Above these settings, the program will tell you how long the shoot will take and how many frames will be shot. In the example, that will be 5 minutes and 48 seconds to take 175 frames.

Most importantly, choose your subject! You do this by drawing a box on the screen by pressing and dragging until it highlights your subject.

Press GO and your drone will start snapping and moving. When it is finished, you will see a screen as the drone creates (synthesizes in DJI speak) the video.

In the example above, you will notice the path the drone took, which is a very pretty circle (with my initial flight path to get the drone in place mixed in). All Hyperlapse modes require this video synthesizing and the length of time depends on the number of shots. Until video creation is complete, you cannot take any photos or video, but you can fly the drone as normal.

Waypoints

Waypoints Mode is a bit trickier to work than the others, but offers a lot of control and unique results.

After selecting Waypoints Mode you will set your interval and video length as the other modes. You will then set the waypoints your drone will fly. You can set up to five waypoints and a minimum of two.

To do this, fly to the first waypoint, orient your view as you like and press the + symbol in the Hyperlapse tray at the bottom of the screen to lock that waypoint. Continue this method, flying to each waypoint and pressing +.

In this example, I have set two of my five waypoints and will continue adding until all five are set. The map on the left side shows each waypoint with a number and the direction the camera will face.

When you are finished plotting each waypoint, you have the choice to fly the waypoints in order marked or in reverse. If you choose “In Order”, the drone will fly itself to the first waypoint and begin. Otherwise, the drone will begin at the last waypoint selected and fly backwards (but will pay attention to your selected camera orientation for each waypoint).

While the drone flies, you will see the waypoints on the map along with a timer showing how long the drone has been flying and the total time it will fly the route. Next to that is the number of images taken followed by the total images to be shot.

More Examples

Course Lock while facing perpendicular to flight path

Course Lock while flying backward

Course Lock while flying backward with an upward pan for clouds

?

Conclusion

Time Lapse videos from a drone offer a unique and sometimes challenging option. They take planning not only to consider the subject matter and lighting, but also for the safe operation of your drone while it is taking photos.

Each mode offers different options and it’s best to play with them in a safe environment to get the hang of what you can accomplish.

Have fun and post some examples as you try out this technique. I’d love to see them!

The post Aerial Time Lapse Basics with DJI Mavic Pro 2 Drone Specific Examples appeared first on Digital Photography School. It was authored by Peter West Carey.


Digital Photography School

 
Comments Off on Aerial Time Lapse Basics with DJI Mavic Pro 2 Drone Specific Examples

Posted in Photography


Grand Canyon time lapse records rare cloud inversion

30 Dec

In search of some tranquility on this last Friday before 2018? Well, Skyglow project collaborators Gavin Heffernan (of Sun Chaser Pictures) and Harun Mehmedinovic have just the video for you. They captured remarkable time-lapse footage of a cloud inversion in Arizona’s Grand Canyon. This event occurs when an upper layer of warm air traps the cold air in the canyon, and the canyon fills with rolling fog and clouds for a spectacular sight.

Turn down the lights and experience a few minutes of peaceful clouds that are reminiscent of ocean waves – and don’t forget to turn up your headphones for the full effect.

Via: Laughing Squid

Articles: Digital Photography Review (dpreview.com)

 
Comments Off on Grand Canyon time lapse records rare cloud inversion

Posted in Uncategorized


Times Lapse: Minute-Long Video Shows Every NYT Cover Printed Since 1852

24 Mar

[ By WebUrbanist in Design & Graphics & Branding. ]

new york time lapse

The times are always changing, but few things bring it home quite so elegantly (and quickly) as an extended look at the front pages of a classic publication, compressing over 150 years of history (and 60,000 pages) into a single minute.

Data artist Josh Begley takes viewers on a whirlwind tour of New York Times cover images. His time(s)-lapse video spans from early days when they were entirely text to the advent of black-and-white then color images.

times

times two

While so much has changed, detailed maps and wood engravings appearing to liven up the pages as the years pass in seconds, much remains the same.

times over itme

time after time

The effects captured reflect both continuity and evolution, encapsulating not only a publication-specific shift but also the broader history of modern print publishing.

Meanwhile, for fans of history, typography and the Times (via Colossal): “Typesetter Carl Schlesinger and filmmaker David Loeb Weiss documented the last day of hot metal typesetting” in the film above. “This amazing behind-the-scenes view not only captures the laborious effort to create a single page of printed type, but also the the emotions and thoughts of several New York Times employees as they candidly discuss their feelings about transitioning to a new technology. One man decides he’s not ready for the digital age and plans to retire on the spot after 49 years, while others seem to transition smoothly into the new methods of production.”

Share on Facebook


[ By WebUrbanist in Design & Graphics & Branding. ]

[ WebUrbanist | Archives | Galleries | Privacy | TOS ]


WebUrbanist

 
Comments Off on Times Lapse: Minute-Long Video Shows Every NYT Cover Printed Since 1852

Posted in Creativity


Review: Inexpensive Time Lapse with the YI 4K Action Camera

12 Sep

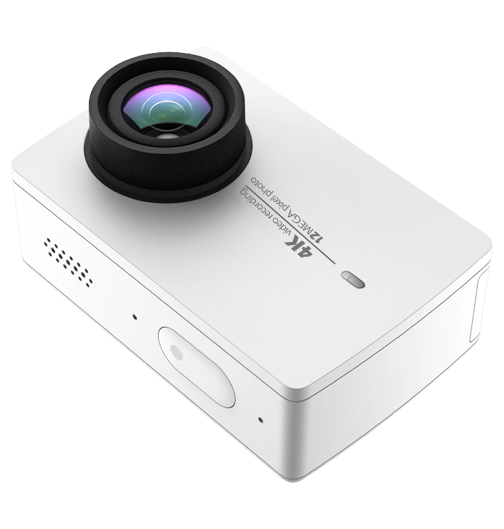
While this is essentially a review of a small action camera, that produces both stills and video, I’m going to focus on using the little YI 4K Action Camera, to kickstart your love of time lapse photography.

YI Technology – YI 4K Action Camera

Time lapse photography can produce stunning results that can inspire you to travel, to capture behind the scenes of your photographic projects, even as a great way to capture your holidays. Your week at the beach might only last a few minutes as a time lapse (as opposed to a couple of hours of video to make your friends sit through!) However you use it, there’s no denying it’s fun to use, and fun to try.

p15

Gear for time lapse photography

So, time lapse with amazing results requires a bit of gear, right? A camera that allows you to adjust your shutter and aperture. A trigger that allows you to set your camera to capture the time lapse, either indefinitely or for a certain period of time. If you want to take it further, you might look at something that allows you to have movement in your time lapse, rather than a static shot, just to add interest. (more on that, next article)

That being said, can you create a good enough looking time lapse, to start your journey into this fun and creative style of photography with an action camera? That’s the question I set out to find an answer to, with this latest hardware review.

I have a GoPro, it’s great! It’s the Hero4 Black, and it does time lapse, but it’s actually pretty expensive! Expensive enough, with some accessories and a spare battery, that you might actually consider just getting an entry level dSLR!

I also have a very brilliant Sony Action Cam 4K. Again, a spare battery and you’re up over half a grand. So, looking at options, I once again find myself wading into the “not really brand name” manufacturers of the lesser known! Enter YI Technology YI 4K Action Cam. There are a handful of reviews popping up online for this little camera, and most I’ve read or watched are positive. I’m not going to talk about the whole video side of the unit much, though it produces decent quality 4K footage for the price tag. This review is all about the camera’s time lapse ability.

p13

The specs in brief are as follows:

  • Main Processor – Ambarella A9SE chipset, includes a 800 MHz dual-core. Cortex-A9 ARM CPU and a high-performance digital signal processing (DSP) subsystem with a 32-Mpixel image sensor pipeline (ISP), and an advanced H.264 encoder capable of 4K resolution.
  • Image Sensor – SONY IMX377, 1/2.3″, 12 megapixels CMOS image sensor with Exmor R ability.
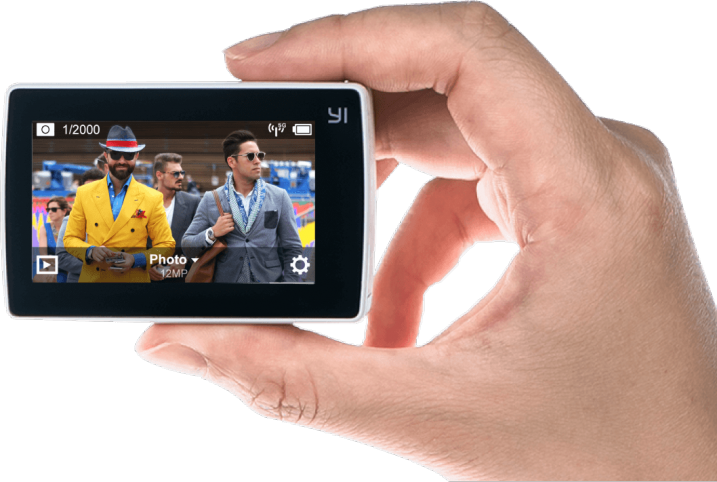
  • LCD Screen – 2.19″, 640×360 resolution touch screen, 330PPI, 250cd/m2 brightness, 30FPS, 160° FOV, 16:9.
  • Lens – Lens f/2.8 aperture / 155° wide-angle lens, 7G, f=2.68mm.
  • Wi-Fi – Broadcom BCM43340 Dual-band 5GHz /2.4GHz, built-in (802.11 abgn), offers 30Mbps download speed.
  • Weight – 3.4 ounces camera + battery (96.4 grams).
  • Size – 65 x 42 x 30 mm.

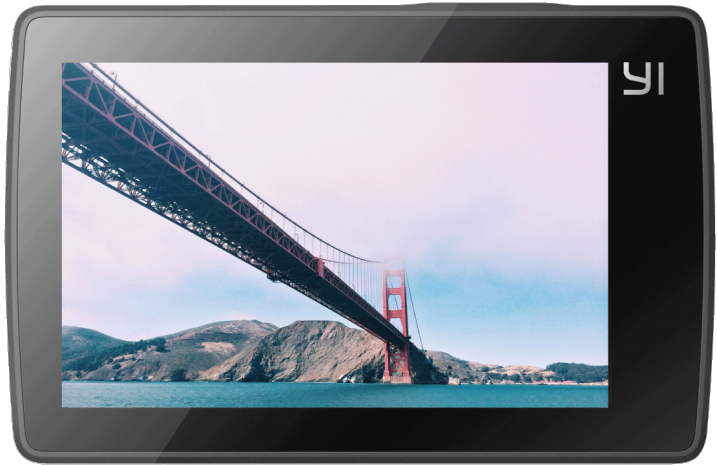
Said to have a Gorilla Glass rear touch screen, and I’ve got to say, that it’s actually useable! Responsive and clear, and also quite good at playing back your Time Lapse sequence on the camera.

Yi-4K-ActionCam-Review-Time-Lapse-Simon-Pollock-Gtvone

What’s it like to work on your time lapse creation with the YI 4K?

It’s actually very simple, there’s a touch screen rear display (as per above) and you simply tap it, select time lapse (either photo or video version of time lapse), dial in some adjustment, and press the go button! Now, the unit saves the time lapse in one of two formats, you may have noticed I said “Photo or Video time lapse” above, which is basically the output you get when you select either. In video time lapse mode, you get a single file at the end of your sequence, with photo time lapse you get the time lapse movie as the individual images.

There are benefits to both. With the video version of the sequence, you get a simple video at the end, that you can directly upload and share with your friends. The downside of this is that if you get a dodgy image (bird flies across, a drastic light change, etc.) in the middle of your time lapse, with the photo version you can simply delete the offending frame and you’re good to go. In video mode, you would need to edit that frame out with a video editor of sorts. Keeping in mind you may lose a little continuity in your time lapse if you delete more than a couple of frames, and you’ll see jumps.

I’ve made a quick example. At 1:03 in this video mode time lapse, someone over my back fence switched on their outside light and the white balance (auto, in video time lapse mode) jumped a gate and ran off into the hills! Take a look, you’ll see what I mean. It’s only 4 frames and I could edit it out, but left it in to show you what I mean. In photo time lapse mode, you can preselect the white balance and this wouldn’t have happened. My sweet darkening purples changed to blue.

Does the YI 4K work as an entry level time lapse camera? Absolutely it does, and with better specs than the current GoPro Hero 4 Black, it’s a decent little all-round package if you want something less expensive to document your photoshoots with too.

Conclusion?

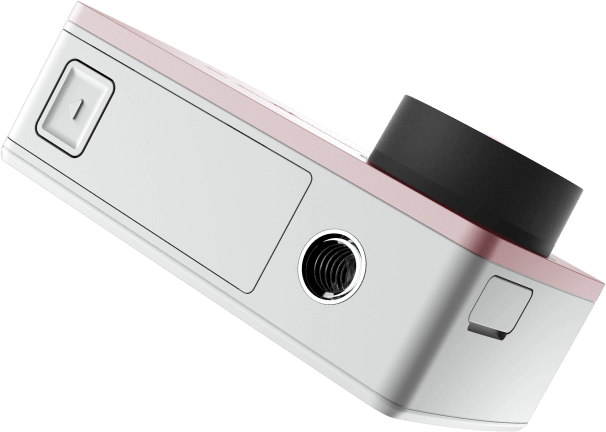
I really enjoyed using the YI 4K as I call it. It’s easy to use, produces a good result, and is very well priced for what you get. One other thing I really like is the inclusion of a 1/4 20″ metal tripod mount in the bottom of the camera. So, you can stick a tripod plate on it, or screw it straight onto a light stand for use on set, or just to get your YI4K up high for a time lapse.

I’m not about to bin my GoPro or Sony Action Cam, but there is rumoured to be a GoPro 5 dropping sometime very soon – we shall see how they stack up.

p6

What I like about the YI 4K Action Camera:

  • Simple iOS app to change all settings on the YI 4K.
  • Good quality images from an Action Cam.
  • Multiple options for time lapse (Video / Stills).
  • Fantastic touchscreen included in device by default.
  • Good battery life.
  • Tripod mount on the camera.

What I’d like to see improved:

  • More standard accessories

I’m not really thinking I should give this a star rating as I’ve really only used it for time lapse, but if I were to give it a rating, it’d have to be a 4.5 out of 5 I think! Good job, YI Technology.

googletag.cmd.push(function() {
tablet_slots.push( googletag.defineSlot( “/1005424/_dPSv4_tab-all-article-bottom_(300×250)”, [300, 250], “pb-ad-78623” ).addService( googletag.pubads() ) ); } );

googletag.cmd.push(function() {
mobile_slots.push( googletag.defineSlot( “/1005424/_dPSv4_mob-all-article-bottom_(300×250)”, [300, 250], “pb-ad-78158” ).addService( googletag.pubads() ) ); } );

The post Review: Inexpensive Time Lapse with the YI 4K Action Camera by Sime appeared first on Digital Photography School.


Digital Photography School

 
Comments Off on Review: Inexpensive Time Lapse with the YI 4K Action Camera

Posted in Photography


How to Shoot and Process a Time Lapse Movie – Quick Method

27 Jun

The other day I was in the city and I was watching the clouds because they were moving so fast. It was a sign that bad weather was on the way, but I also knew the clouds would be a good opportunity to try some time lapse photography.

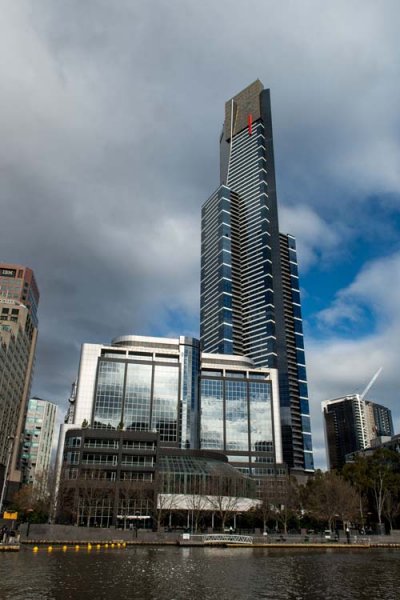
Eureka Tower image for time lapse

There are many ways of taking a series of images to use for time lapse photography. My camera was setup on a tripod and set to take a photo every five seconds over 10 minutes. In total 120 images were taken, however that number is up to you. The other day I took 300 images to use for one.

You can do this in various ways and it is best to check your camera manual to see if you can take photos at intervals. If you can’t then you may have to use something like an intervalometer or just manually take a photo every five seconds or whatever interval you choose.

When I got home I did some research and found a fairly easy way of putting the images together to get a quick time lapse. Follow along a I show you how you can do this as well.

Lightroom

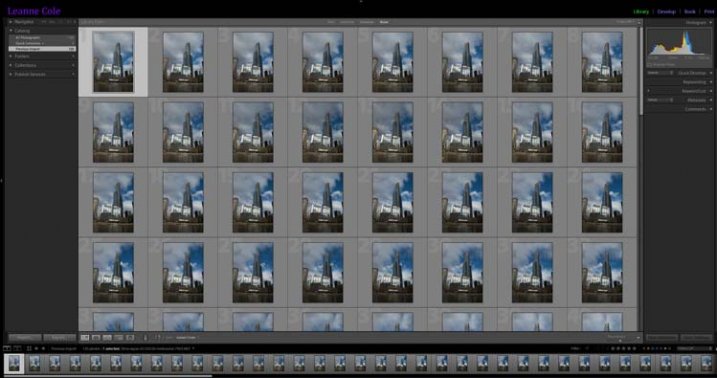
The 120 images were imported into Lightroom. If you are unsure of how to Import photos then look at this article: Quick Tip: Importing to Lightroom Made Easier.

The images for the time lapse in Lightroom

The images for the time lapse in Lightroom

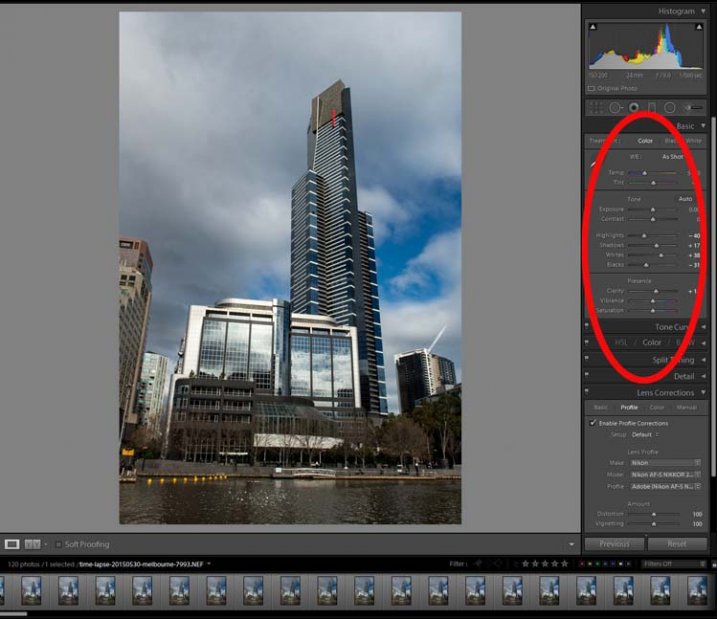
Choose the first image and you do some basic processing to it in the develop module. I straightened, then cropped, a bit of a building out of the side of it, brought out the shadows and highlights.

Processing done to the image.

Processing done to the first image.

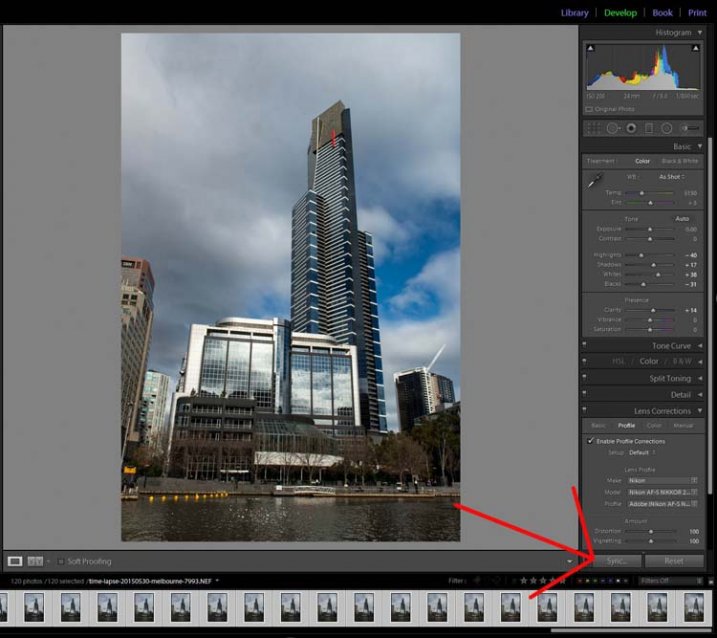
Select all images for the time lapse and click Sync, in the bottom right of the Develop module.

The Sync Button

The Sync Button

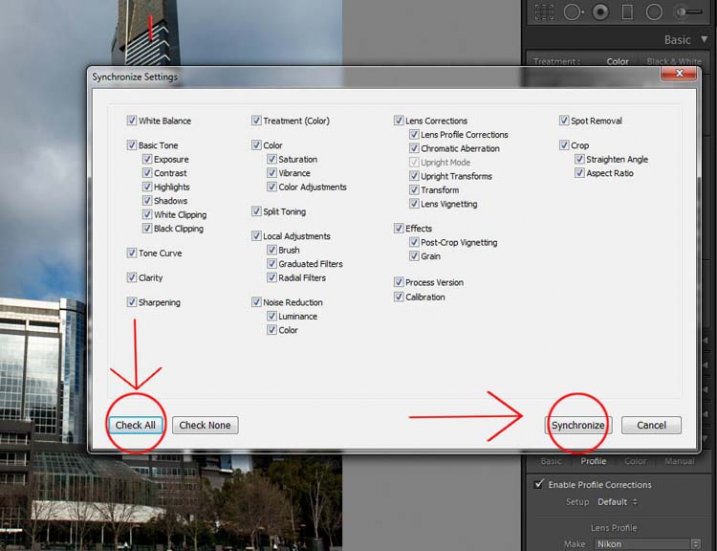
When the window to Synchronize Settings comes up, tick the box at the bottom to Check All. You want all the changes that you made to the first image to be applied to all of them. They are basically all the same image except for the changes that you want to use for the time lapse.

Press Synchronize in the bottom right of the window. You will see that all the images change and are now ready to be exported.

Synchronizing the images.

Synchronizing the images.

Exporting the Sequence

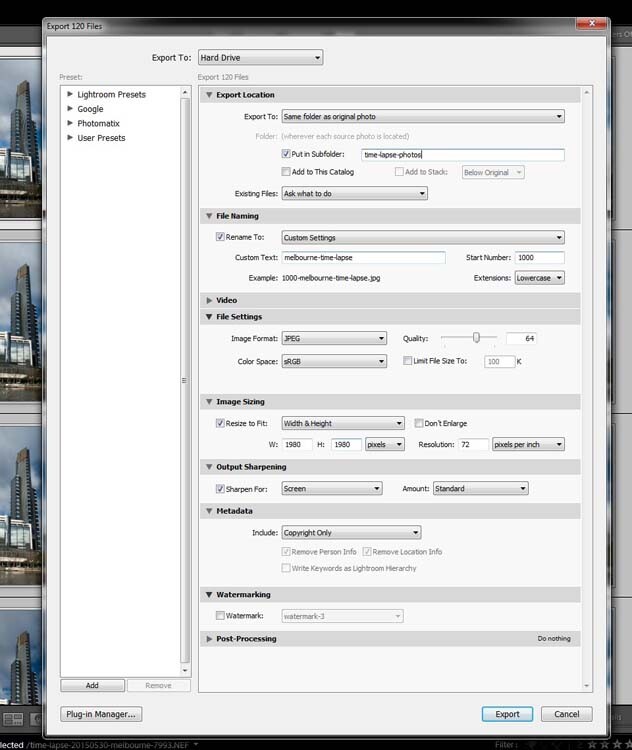
There are a few things to consider when you export them, one is the way you rename them. If the number or sequence isn’t at the front of the file name then there may be software problems to put them in the right sequence. It doesn’t make a difference with Photoshop CC.

The images should be changed to jpeg. It is only for the internet so you can use a low resolution, 72 dpi is okay. The size of the image was changed to 1980 pixels for the longest side, which is a good size for videos and for HD.

In the following image you can see which export settings I used for the Time Lapse sequence images.

Exporting the images.

Exporting the images.

Press Export. Then, to put the images together to make the time lapse you will need to move into Photoshop.

Photoshop CC

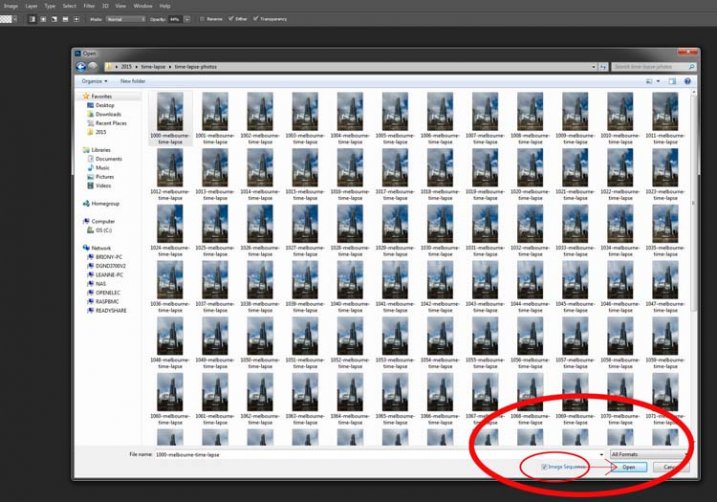
In Photoshop you need to go to File and Open. (File > Open) Go to the folder with the exported images and select the first one in the sequence. In the same window, before you press Open, make sure you check the box that says Image Sequence which is down near the bottom.

Getting the images ready for the time lapse.

Getting the images ready for the time lapse.

Once you have checked it, select Open.

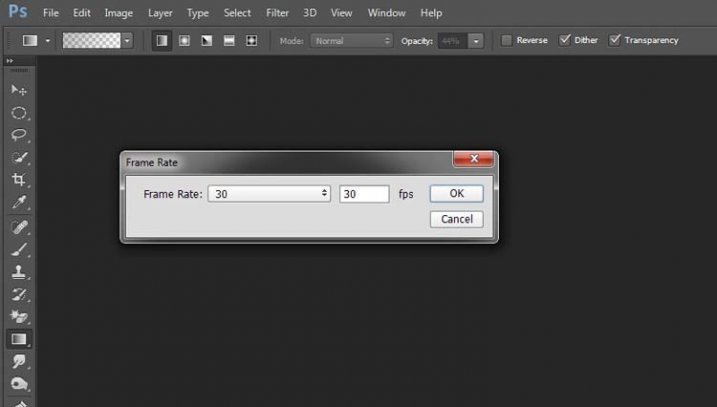
Before Photoshop opens them a new window will come up asking you how many frames per second you want to use.

Setting the frame rate.

Setting the frame rate.

At this stage you can just click OK; you will have a chance to change it later on if you want to make it slower or faster.

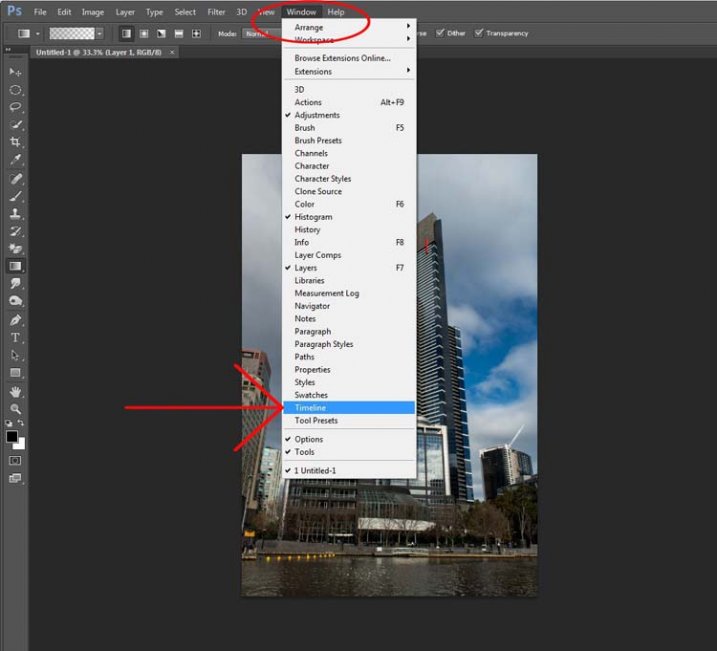
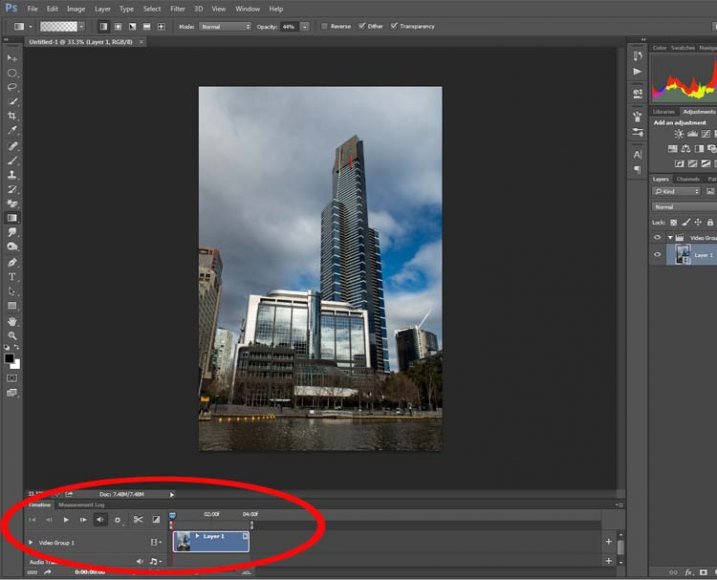
To make it a time lapse you need to open another window in the Photoshop main window. Go up to Window in the main menu at the top, and then down to Timeline and select it. (Window > Timeline)

Opening the Timeline.

Opening the Timeline.

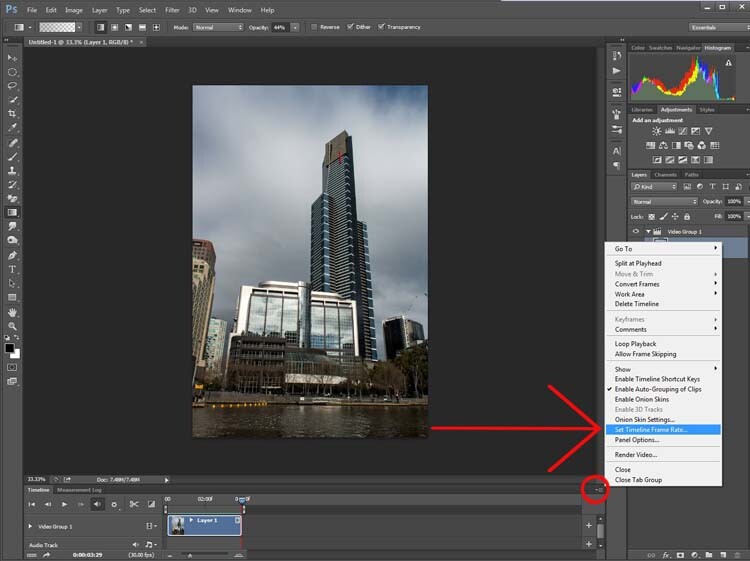
You will see a new window appear down the bottom. Look at the following image:

Looking at the Timeline.

Looking at the Timeline.

If you press the play button you will see your time lapse run.

If you want to change the Frame Rate this is the time to do it. In the Timeline Window, up in the top right corner, you should be able to see a down arrow with lines next to it, click on that and a drop-down menu will appear. Go down and select Select Timeline Frame Rate…

Changing the frame rate.

Changing the frame rate.

You can change this as many times as you like. Keep doing it until you get a frame rate you like. Once you are happy with how long it runs for, you can render the video.

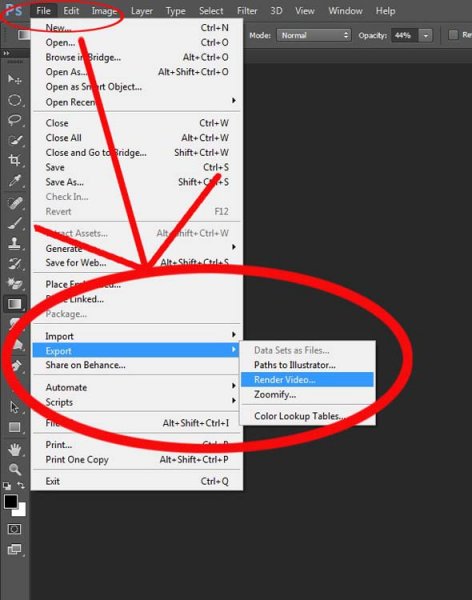
Go up to File, then select Export. In the drop down menu choose Render Video. (File > Export > Render Video)

Exporting the video.

Exporting the video.

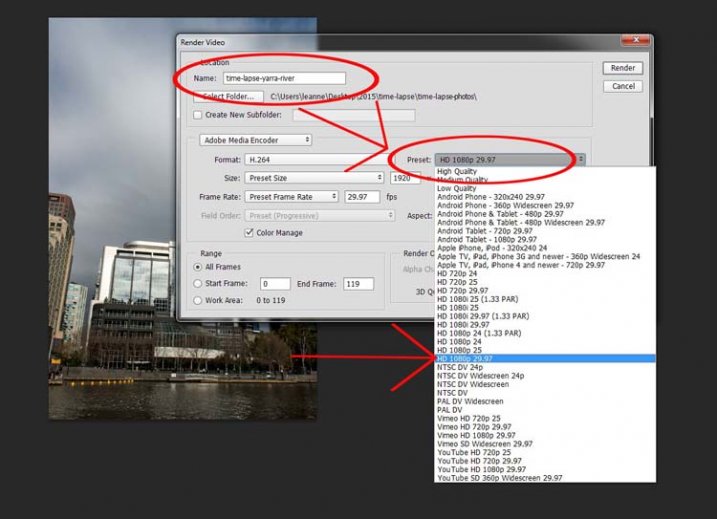
After initializing, the Render Video window will come up. In this Window you can name your video and decide in what format you want it saved.

Working out the video type.

Working out the video type.

Set it on one of the HD settings and you will get an MP4 video. It gives you quite a good video.

If you decide you really like doing them there are lots of other methods, this is just a quick way to do time lapse movies using Lightroom and Photoshop CC.

googletag.cmd.push(function() {
tablet_slots.push( googletag.defineSlot( “/1005424/_dPSv4_tab-all-article-bottom_(300×250)”, [300, 250], “pb-ad-78623” ).addService( googletag.pubads() ) ); } );

googletag.cmd.push(function() {
mobile_slots.push( googletag.defineSlot( “/1005424/_dPSv4_mob-all-article-bottom_(300×250)”, [300, 250], “pb-ad-78158” ).addService( googletag.pubads() ) ); } );

The post How to Shoot and Process a Time Lapse Movie – Quick Method by Leanne Cole appeared first on Digital Photography School.


Digital Photography School

 
Comments Off on How to Shoot and Process a Time Lapse Movie – Quick Method

Posted in Photography


NYC Comes Alive Around Massive Mural in Time Lapse Video

09 May

[ By Steph in Art & Street Art & Graffiti. ]

Screen Shot 2015-05-08 at 9.49.43 AM

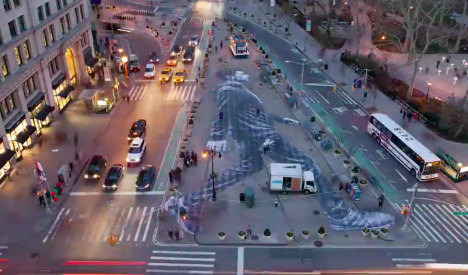
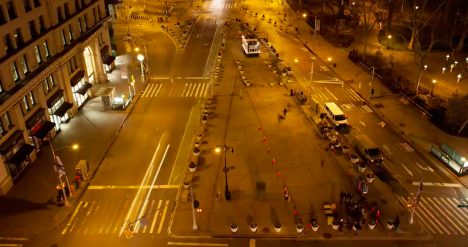
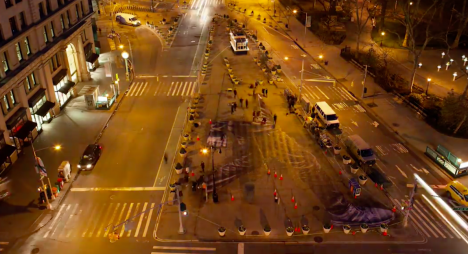
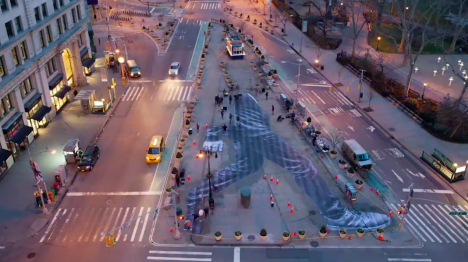
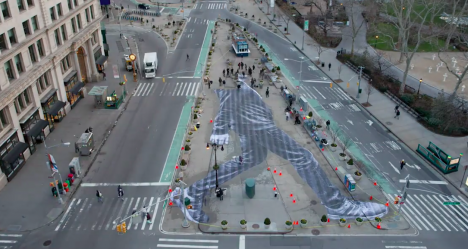
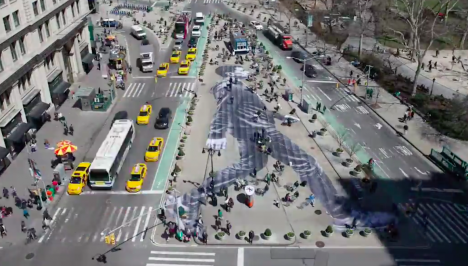
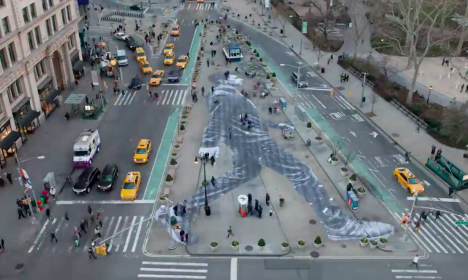
A 150-foot-tall figure of a man walking materializes on a Manhattan sidewalk, slowly coming into focus as the city awakens around it, in a new time-lapse video. French photographer and street artist JR directs a team of workers who can be seen scrambling around the piece like worker bees as the hours pass, the sun arcs over the site and thousands of people mill by.

Screen Shot 2015-05-08 at 9.46.23 AM
Screen Shot 2015-05-08 at 9.47.03 AM

The New York Times commissioned JR to create the piece for an accompanying story on walking in the city, and produced the video. A camera perched atop the adjacent Flatiron building captures the action as the team wets the pavement before dawn, preparing to adhere the giant paste-up.

Screen Shot 2015-05-08 at 9.47.20 AM

Screen Shot 2015-05-08 at 9.47.33 AM

It’s cool to see the process behind installing a wheat paste project this big, and the time lapse shows just how much work goes into it despite the fact that it’s not being hand-painted onsite.

Screen Shot 2015-05-08 at 9.48.41 AM

Screen Shot 2015-05-08 at 9.49.19 AM

JR is known for journalistic murals made of his own photography, putting giant faces all over urban structures like walls, roofs, streets and train cars. The photo-realism is especially effective when it’s paired with aging, deteriorating surfaces.

Share on Facebook


[ By Steph in Art & Street Art & Graffiti. ]

[ WebUrbanist | Archives | Galleries | Privacy | TOS ]


WebUrbanist

 
Comments Off on NYC Comes Alive Around Massive Mural in Time Lapse Video

Posted in Creativity


Review of The Promote Control for Time Lapse and Focus Stacking

20 Aug

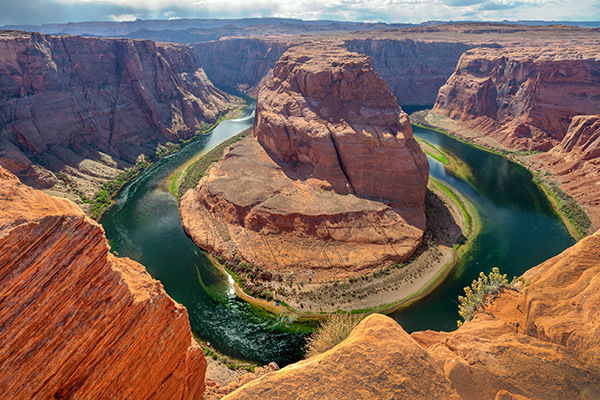
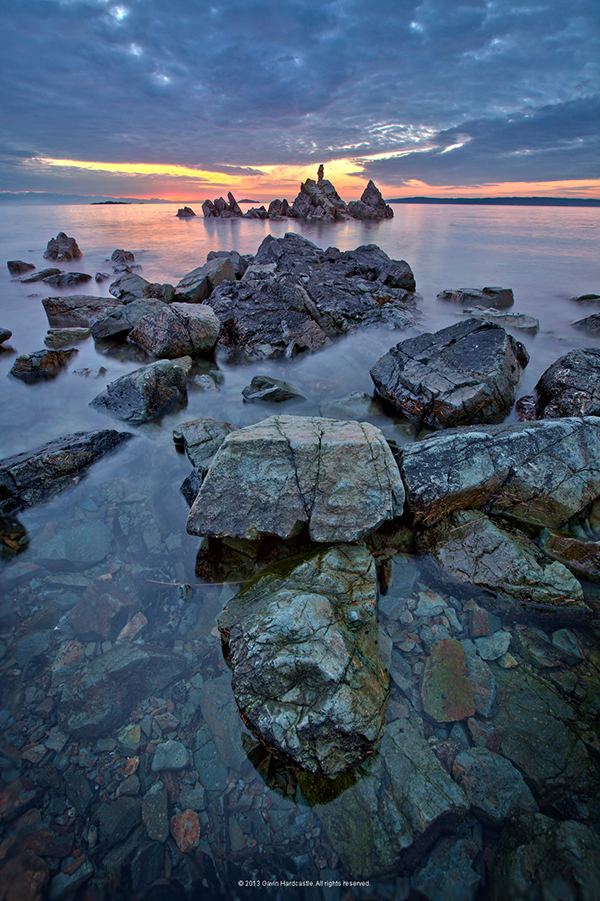
Want to take super sharp “focus stacked” photographs that boast corner to corner sharpness with perfect focus? Want to shoot spectacular ‘holy grail’ time lapse sequences that capture the change from day to night? How about advanced bracketing for HDR shooting? Do you fancy getting shots like this?

Horseshoe Bend Focus Stacked Gavin Hardcastle

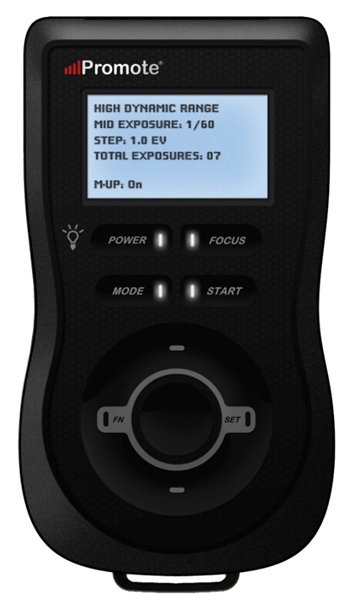
The Promote Control from Promote Systems delivers very precise control over DSLR cameras to open up new creative possibilities. Here’s a list of things that the Promote Control can do:

  • Promote Control ReviewHyperfocal Distance Calculator
  • Remote Shutter (One Shot)
  • Time Lapse Intervalometer
  • HDR Bracketing
  • BulB HDR Bracketing
  • Bulb Ramping for Time Lapse
  • Focus Stacking
  • Video Control
  • Manual Shutter for long Bulb Exposures

This device is like a Swiss Army Knife for photographers who want to get the most out of their DSLR cameras. Currently priced at $ 299, it’s an accessory that will appeal to the more hardcore shooters, but for those photographers that regularly need advanced HDR bracketing, focus stacking or bulb ramping, the Promote Control is worth every penny.

Rather than go into every single function of the Promote Control, I’m going to highlight its three most powerful features, which I believe merit the asking price themselves.

Focus Stacking

As a landscape shooter, I mostly want corner to corner sharpness in my images and sometimes I’ll use focus stacking to achieve maximum sharpness throughout the frame. This really only works when your static subjects are perfectly still, with little to no breeze. If you’ve ever tried focus stacking the manual way, you’ll know that there is some margin for error and it can take practice to do it well. The Promote Control takes all the guess work out of focus stacking by incrementally adjusting your focus from start and end points that you specify.

Once you’ve done this a couple of times you’ll never be able to go back to doing it manually. When you see the results of your focus stacked image and the lack of weird looking artifacts that can sometimes result from inaccurate focus adjustments done manually, you’ll be hooked.

Macro and small product photographers will love this feature.

Here’s an example of a focus stacked shot with corner to corner focus using a mid range aperture.

Focus Stacking with the Promote Control

Here’s a video demonstrating how this works with the Promote Control.

Bulb Ramping for day to night Time Lapse

If you’ve ever tried to shoot a time lapse sequence of the setting sun, you’ll know that there are only two ways to capture the correct exposures as the light changes. You either adjust the shutter speed manually while shooting (which introduces terrible flicker) or you use a bulb ramping device that can gradually and smoothly alter your shutter speed over time.

This technique is known as Bulb Ramping, and there really aren’t that many devices out there that do a good job. The Promote Control has become something of a “go to” bulb ramping solution for quite some time now, because it simply does such an excellent job of adjusting your DSLR camera’s shutter speed in tiny increments, over a set period of time. You tell the Promote Control how long you’d like to shoot, and when you’d like it to begin increasing or decreasing the exposure time.

Of course, it can’t know exactly when the changes in light occur, you have to know in advance by casing your location the night before, and making a note of the sunset time. The Promote  Control simply does what you tell it to do, and it does it well. Here’s a video of Joel Schat explaining how to achieve bulb ramping with the Promote Control.

HDR Bracketing

If three or five bracketed exposures simply aren’t enough to capture the dynamic range of your scene, how does 45 exposures sound? Simply tell the Promote Control what shutter speed to use for the middle (or correct) exposure, then tell it how many EV steps to use and the number of total exposures. The Promote Control will do the grunt work while you look around for the next shot.

A jack of all trades

Everything that the Promote Control does, it does well. I expect that most users will only use two to three of this device’s powerful features but at $ 299 it’s worth every penny.

Build quality

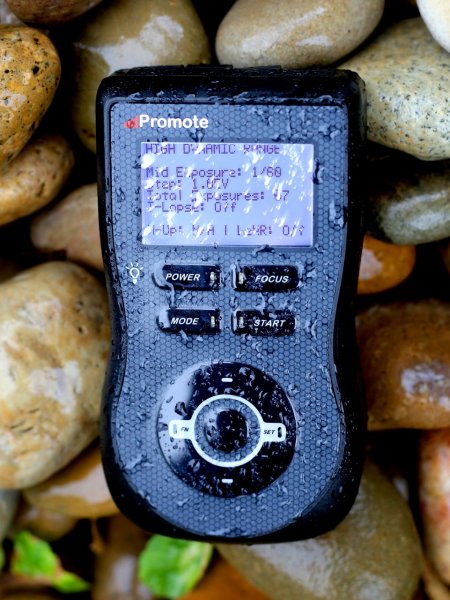
weather sealed promote control

The Promote Control is very well built. It’s a solid little unit that’s about the same size as a Smartphone, but is just under an inch thick. The backlit LCD screen is easy to read and there are only eight buttons on the entire unit. It’s small enough to pack into any mid-sized camera bag, and comes with a tidy little carry case. It even comes with a lifetime warranty for manufacturing and workmanship defects. How often do you see that?

The device is powered by two AA batteries which last a long time. You can also power the Promote Control with an external DC power jack for taking super long exposures, or lengthy time lapse shoots.

What I’d like to see in the next update

To me, there is one glaringly obvious function that is missing from this device. HDR Focus Stacking. Why not combine the advanced HDR bracketing feature and the focus stacking feature? When I focus stack manually, I often have to bracket in order to capture the dynamic range. I can’t imagine why this feature is not available with this device.

My only two complaints

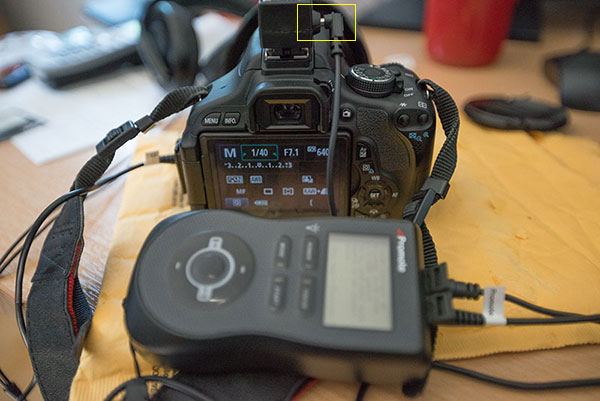
The Promote Control is such a simple little device that there’s not much to complain about, it either works or it doesn’t. My only gripe isn’t with the unit itself, but with the hotshoe attachment, required for bulb ramping when shooting time lapse sequences. I found that the cable fell out of the hotshoe attachment at the slightest nudge, not something I would trust out in the field when shooting a lengthy time lapse.

Hot Shoe Cable

I had problems with the cable that attaches to the hotshoe accessory.

My other complaint is that the Promote Control is not compatible with mirrorless cameras like my Sony A7R. Full compatibility only extends to Nikon and Canon, with limited compatibility for Sony and Sigma cameras. This is the only reason I decided not to buy the Promote Control. But if Promote Systems manages to catch up with the mirrorless movement, I’ll be unleashing the credit card.

I asked Promote Systems about it and this was their response:

We get a lot of requests for compatibility with the A7/A7R and we would love to support the cameras, but unfortunately Sony doesn’t make that possible. They implemented a tethering protocol on A7 cameras, but just as with earlier cameras, it refuses to save images on the card – you MUST pick them up and save them elsewhere, or all subsequent USB image acquisition commands will fail. Until Sony resolves the issues with not saving images on to the in-camera card when tethered, we can’t do much about it, unfortunately.

Why can’t my camera do all this?

When you look at what the Promote Control does and the results that it achieves, there’s obviously a demand for this level of functionality. There’s no reason why digital cameras can’t have all of this functionality built in, and with cameras like the Sony A7R able to run Apps that users install, it’s only a matter of time until all of this can be done in camera. Until then, Promote Systems are filling a gap in the market and they are doing it very well. I’m going to award the Promote Control 4 stars.

Would you buy this clever little device?

The post Review of The Promote Control for Time Lapse and Focus Stacking by Gavin Hardcastle appeared first on Digital Photography School.


Digital Photography School

 
Comments Off on Review of The Promote Control for Time Lapse and Focus Stacking

Posted in Photography


Time Lapse Videos Made Easy

21 Jul

Extra photos for bloggers: 1, 2, 3

If you had the power to speed up time you could have romantic sunsets in under a minute or knit a scarf in just 30 seconds.

The Digital Time Lapse Camera gives you that magic! It takes high quality wide angle photos and smashes them into a ready-to-watch video at the touch of a button.

The latest version of our beloved Time Lapse Cam sports better quality optics, low light recording capabilities and a wide angle lens for more interesting shots.

Set it up on a shelf at a hoppin’ party or on a tripod in your growing garden and let it snap tonso pics and stitch them together for you.

Say buh-bye to intervalometers, complicated settings menus and hours of post processing. The Digital Time Lapse Cam is all the magic you need.

Make Time Lapse Vids at the Touch of a Button
$ 249 at the Photojojo Shop


© Britta for Photojojo, 2014. |
Permalink |
No comment |
Add to
del.icio.us

Post tags:


Photojojo

 
Comments Off on Time Lapse Videos Made Easy

Posted in Equipment


Rhino Slider PRO 4ft Review – Camera Rail System for Time Lapse and Video

02 Jun

If you’re into Videography or time lapse photography, chances are you’ve either already got yourself a slider or are considering making that purchase. Smooth camera movement can really add major production value to your footage and the key word here is ‘smooth’. Having your camera glide through space like it’s floating on air gives a huge boost to any kind of footage.

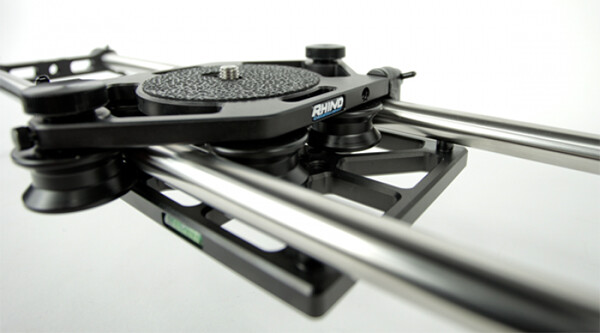
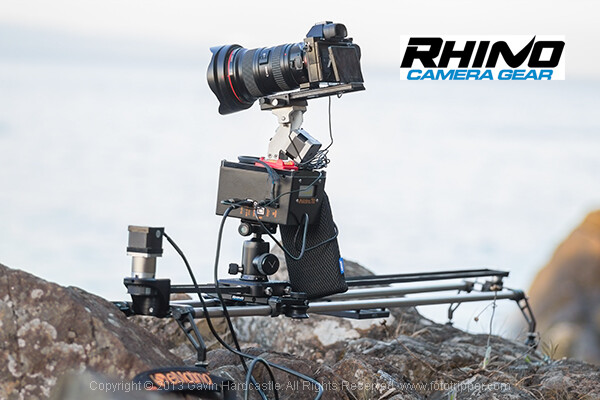
Enter the Rhino Slider Pro 4ft from Rhino Camera Gear, currently priced at $ 550. As the name suggests, this is a four foot wide slider, onto which you can attach your camera or take things a step further and add a robotic tripod head for a three axis solution of motion control awesomeness.

Rhino Slider PRO 4ft

How Smooth is the Slide?

The most important thing to consider when thinking about buying a slider is the smoothness of the sliding action. This is where the Rhino slider excels. The sliding motion of the carriage on to which you place your camera is as smooth as silk. Once you’ve set the tension on the outer wheels of the carriage, you’re good to go and you can rely on a super smooth slide every time.

Rhino Slider Pro Review

Build Quality

There is a huge difference between the build quality of a sub $ 300 slider and what you’re getting with the Rhino. This is a sturdy, well built unit, that performs well in all kinds of conditions. Sliders are a bit like tripods, if you buy a really cheap one –  it’ll probably end up in the trash. Spend a little more and you’ll get a unit that delivers the goods and lasts a long time. All of the Rhino slider parts are well machined and have that solid, reliable feel to them.

Rhino Slider Review PRO 4ft - Gavin Hardcastle

Heavy is Good Right?

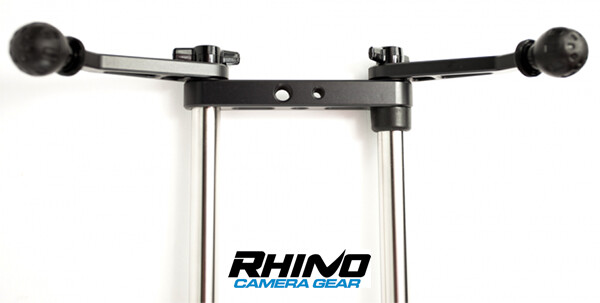
Of course, all of that stability comes at a cost of added weight. The product page on the Rhino Camera Gear web site says that the Rhino Pro 4FT Slider weighs around 10 pounds (4.54 kg). That might not sound like much but by the time you’ve strapped on your camera bag, tripods and any other gear, you’ll be carrying the Rhino slider in its case and holding it in your hand. Talk about a forearm workout. Turns out you can’t have your cake and eat it.

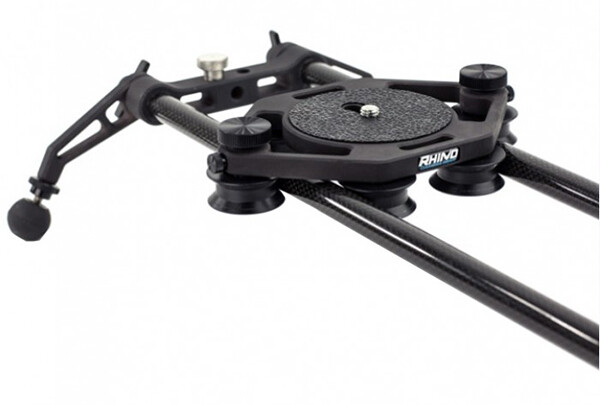
For those concerned about the weight, you might want to consider the carbon fibre rails or two foot rails to keep things more portable on long bush hikes.

Rhino Slider Carbon Legs

Rhino Slider Pro shown with Carbon fibre rails which weigh much less than the stainless steel ones.

The Rhino Gear Carry Case

The test unit I received from Rhino Camera Gear came with the Rhino Armor – Slider Carrying Case 4ft, which is an additional $ 100. Let’s be honest, you’re not very likely to be dragging a 4ft slider into the bush without the carry case so you might as well consider it a foregone conclusion that your total cost will be $ 650. On the plus side, the carry case has space for extra rails so that you can extend the length of your slide. Having more rails means more weight, so I’d definitely opt for the carbon rails.

I found the case to be just a little too short. It was difficult and fiddly to fit the slider back in the case due to the four legs on the ends of the slider. If the case had been an inch longer I reckon this would have been much easier. I’m guessing they make it super tight so that the slider doesn’t shift in the case during transport but there’s tight, and then there’s this.

Rhino Armor Carry Case

Pros for the Rhino Slider PRO 4ft

  • Super smooth sliding action
  • Build quality
  • Value for money
  • Ease of use

Cons against the Rhino Slide PRO 4ft

  • Carry Case could be an inch longer to make it easier to pack the slider
  • Stainless steel rails are heavy – consider buying carbon rails if you are going on long hikes
  • End plates could have been taller. I found that the carriage hit my tripod plates long before it hit the rubber brakes.

Rhino Slider PRO Review

Would I Recommend It?

Having looked at the prices of similar sliders that boast the same build quality, the Rhino slider is looking like a bargain at $ 550 (+ $ 100 for the carry case). Before shelling out the dollars though I’d like to test out the carbon fibre rails to see if they perform as well. If the whole rig could be made lighter, that would eliminate my worst grumble and make this a near perfect product. If you’re not too bothered about the weight of those stainless steel rails, I think you’ll be extremely satisfied with the build quality and smooth sliding action of the Rhino Slider Pro 4ft from Rhino Camera Gear.

The post Rhino Slider PRO 4ft Review – Camera Rail System for Time Lapse and Video by Gavin Hardcastle appeared first on Digital Photography School.


Digital Photography School

 
Comments Off on Rhino Slider PRO 4ft Review – Camera Rail System for Time Lapse and Video
Posted in Photography