RSS
 

Posts Tagged ‘Landscapes’

Carpe Lux: The otherworldly nighttime landscapes of Reuben Wu

19 May

The otherworldly nighttime landscapes of Reuben Wu

Reuben Wu’s ethereal, meticulously framed location work – largely surrealist reinterpretations of natural scenes taken at night – is absolutely unparalleled in nature photography.

Inspired by illustration, film, and even the famous land artist installations of recent decades, the triple-threat talent works as photographer, filmmaker and sound designer. He often utilizes a continuous light source mounted on a drone to provide otherworldly illuminations in his images, which you’ll see in his Lux Noctis and Aeroglyph projects featured here.

Equally at home in Photoshop or Premiere, he’s highly sought after by a commercial roster of tech and automotive giants like Apple, Audi, GE, Google, IBM, Jaguar, Land Rover, Samsung and Tesla.

The otherworldly nighttime landscapes of Reuben Wu

Wu uses continuous LEDs for both multiple and long exposures, as in his Aeroglyphs, which use the quite diminutive Fiilex AL250 aerial LED light.

It’s equivalent in tungsten output to a 200W fixture, but draws only 30W, helping him to maintain the battery life while he experiments with compositions and lighting techniques. For automotive, he employs the more powerful Fiilex P360 and P180 ‘portable’ lights to paint on the illumination, as if chiaroscuro, he says.

Wu employs complex layering, compositing and processing in his imagery and motion work, resulting in subtle, minimalist captures that belie the complexity of the work behind the scenes.

Wu works with a GPS-enabled 3DR Solo drone, sometimes equipped simply with an iPhone, or sometimes mounted with a system as serious as the Phase One XF 100MP stills camera

He locks down his compositions during the day, and will experiment with lighting techniques throughout the night. Wu works with a GPS-enabled 3DR Solo drone, sometimes equipped simply with an iPhone, or sometimes mounted with a system as serious as the Phase One XF 100MP stills camera. At under 5lbs., the drone fits in a backpack, important for the long hikes he often finds himself on. Wu also researches each location extensively, utilizing sun- and moonrise tracking to plan for shots.

Looking to give back to image creators, Wu is active in social media as head curator for the extremely popular Instagram photography group, Imaginary Magnitude. Interested photographers can tag their photography on the site with #imaginarymagnitude for a chance to be featured. You can follow him on Instagram, Twitter and Facebook or see his full body of work on his website.

I spoke with Reuben about his work and where he gets artistic inspiration.

The otherworldly nighttime landscapes of Reuben Wu

What inspired you to start creating these images?

Svalbarg was the first photo trip that I did which was purely about me exploring and taking pictures for myself. Also, it was the first project I did which gained traction in the media. That was back in roughly March, 2011. Since, it’s been published on quite a few different channels and it was pretty much that project which made me think I should put more time into this and try to make it into a career.

The otherworldly nighttime landscapes of Reuben Wu

The work is almost surrealist, and I love your eye for color. How much of this is color processing, how much is knowing the location, and how much is lighting?

It’s a combination of everything. Like with everything in photography, it’s all about adjustment of reality, and seeing the opportunities of other realities in an environment. A lot of this comes down to imagination. If you’re in a place which connects you to things that really inspire you, you key into those specific things, whether it’s the color or geometry or the shape of the land.

I do postproduce, but there is an element of realness that I keep in all my work because I think that’s important for people to have belief for these images to trigger peoples’ senses of imagination and wonder about the planet.

The otherworldly nighttime landscapes of Reuben Wu

Did you have any direct influences in landscape photography?

I came from a background of drawing rather than photography. So photography is the way I make art, now. I think a lot of my inspiration comes from painting, and a lot of illustrations. The old Romantic sublime landscape paintings of the 19th century, like Frederic Church, and Caspar David Friedrich, where the landscape is not exactly what you see in front of you.

As I said, it’s like this inside vision, which is then translated to the outside. I think that’s one of the things which inspires me in my photography. I’m working on the picture almost like a painting, so that there is a kind of crafted approach of creation, rather than straight photography.

There are also illustrators. People like the French illustrator Moebius. Film directors like Tarkovsky and David Lynch. All of these artists that I appreciate have a kind of sublime quality to their work, whether it’s about color or time or motion. It has an otherworldly quality, which I really enjoy.

The otherworldly nighttime landscapes of Reuben Wu

I really love the Lux Noctis project, which seems like very complicated long exposures. Is that primarily what you’re working with? Are you trying to to to say something with these environmental portraits?

One of the main concepts behind the project is the fact that everyone is flooded by all of these landscape photos that you see online, and everywhere else, and they all follow the same rules of lighting. It’s always at sunrise, or sunset, in a beautiful golden hour light. Or moon light!

The composition is always kind of governed by these celestial bodies in the sky. I wanted to be able to influence the landscape in some way without changing it physically. To light a landscape in exactly the way I wanted, was really interesting to me. I wanted to free myself from the sun, and the moon, and all that kind of conventional photography.

The otherworldly nighttime landscapes of Reuben Wu

There was an opportunity to use this new technology, of using a drone, and using a light, which fits onto a drone. This is something that was not possible in the past without using a balloon or a helicopter and a searchlight. It fits inside my backpack. It’s small, with a small light, and GPS controlled. I can control my camera and the drone at the same time.

The other thing was my own kind of personal experience of exploration. I really wanted to be able to see these places in a completely new light and for me to feel like I’m exploring the place for the first time, even though I might not be.

The otherworldly nighttime landscapes of Reuben Wu

You’re lighting for multimedia, for drones, for photography, and also for these cinemagraphs. So your lights have to be continuous to be able to address everything, right?

Yes. I’m not really a fan of using strobes. I was really interested in nighttime photography. I wanted new ways of doing that. A lot of time I’m working in the dark. I like being able to see what I’m about to photograph.

The photos are like the creation of a new world, and I like to be part of that new world. It’s the kind of the thing that gets me excited, so being able to use continuous lights is really important for me because I can see what I’m doing.

I was in touch with 3DR, and they put me in touch with Fiilex, who had this brand new light—the AL250—at that time, it was a prototype. I went out with my drone, and the camera, which actually started this series.

After they’d finished developing the final product, they sent me that light. It had its own power supply and was a question of plug-and-play, and fit onto the drone itself. That was my first experience with the Fiilex lights, and since I’ve been using some of their lights in other photography projects, not necessarily just the drone stuff. I really enjoy using them.

The otherworldly nighttime landscapes of Reuben Wu

I really liked the cinemagraph work that you did for Land Rover and Audi. What was your lighting?

On Land Rover, I wanted to light the panel work of the car, at night. It is quite a complicated process, because you’re taking multiple pictures, for different positions of the light, against the car body panels. It’s a technique that commercial car photographers do, where you position the light against the panel so that the paint lights up without the reflection.

So it was, basically, me with my remote shutter, and one of my Fiilex lights, handheld. And in the other hand, I had my iPhone so I could see what my camera saw. Making sure that the position was right and there were no reflections, I took about 50 or 60 different photos of the same thing. Then they were all layered together. That’s not an automatic thing, either. That has to be done by hand.

I was able to to make the composite layer, which was the car, and then there was the environmental lighting of the background house. There I used the headlights to be the motion aspect of the cinemagraph. I have this fog stuff which comes out, in aerosol.

I ran the fog through the headlights and recorded video of that, and laid that on top of the still in Premiere Pro. Immediately, you have a really highly finished commercial photo with a moving aspect to it, and it works really well.

This time we were shooting out in Utah. The landscapes are really crazy out there… like being on the moon

With Audi, I used my Fiilex P180e kit, which was the the smallest kit that they had, and fits inside a backpack. I really love it because I can carry it everywhere. It’s really lightweight. I had those two lights kind of positioned around the Audi. This time we were shooting out in Utah. The landscapes are really crazy out there. This was like being on the moon. There was no sun. It was just darkness. You couldn’t see the car in front of the camera.

I was testing the lights in different directions in different positions. I positioned one behind the car, so that it would light the ground, and it would silhouette the profile. The lights are all gelled, obviously. I also used the drone overhead to light the car from above. So I had different points of lighting, and different lighting scenarios, which were all captured in separate plates. The beauty of doing it this way is that once you have everything that you need, you can create a sequence that you want in post, rather than having to deal with shooting an entire sequence on set.

The otherworldly nighttime landscapes of Reuben Wu

Explain Imaginary Magnitude!

It’s a curated feed which I set up in late 2016. It was born from a desire to share the photography which really excited me, stuff which inspires me, but also stuff which I see from day to day on social media. The stuff created by artists who don’t have huge followings, and also artists from all different walks of life.

The actual name, Imaginary Magnitude, is a science fiction book from an author, Stanislaw Lem. It’s kind of a text about books that haven’t been written yet. So this is kind of speculative, fictional, imaginary artwork that I’m thinking of. I really enjoy doing it. I never thought I’d enjoy it so much, talking to other artists and sharing other artists’ work and the sense of community which forms itself around it. I’ve been getting in touch with photographers and artists that I like, and asking them to curate the feeds. That’s another side of how it works, as well.

Articles: Digital Photography Review (dpreview.com)

 
Comments Off on Carpe Lux: The otherworldly nighttime landscapes of Reuben Wu

Posted in Uncategorized


Video: Shooting landscapes on the Fujifilm GFX 50R with Nigel Danson

13 Jan

Photographer Nigel Danson recently had a chance to use the new Fujifilm GFX 50R for one of his landscape shoots. In this video, he shares his thoughts on the benefits and challenges of using a medium format camera like the GFX 50R for his work. Additionally, he shows us a few prints made from the camera.

For more great content from Nigel, please visit his YouTube channel.

Visit Nigel Danson’s YouTube channel

  • Introduction
  • Ergonomics
  • Handling
  • Looking at the images
  • Would I get one?
  • Wrap-up

Articles: Digital Photography Review (dpreview.com)

 
Comments Off on Video: Shooting landscapes on the Fujifilm GFX 50R with Nigel Danson

Posted in Uncategorized


Tips for Shooting Landscapes With a Telephoto Lens

05 Jun

Landscape photography is the realm of the wide-angle lens. Right? Isn’t it? I’m sure I read that somewhere. “When photographing the landscape, use a wide0angle lens.” I know I’ve heard that. We probably all have. But it’s just not true. So in this article, I’ll give you some tips for shooting landscapes with a telephoto or long lens.

Tips for Shooting Landscapes With a Telephoto Lens - sunset over the mountains

At 100mm, I was able to bring in the details of Denali, and the nearby Alaska Range as seen from Talkeetna, Alaska.

Think beyond the wide view

Sure, wide-angle lenses are great for the landscape, I use them frequently. But they shouldn’t be the only tool in your box when you are photographing the landscape. In fact, as I was browsing through my image catalog looking for images for this article, I found that many of my favorite landscape shots were made with a lens other than a wide-angle. Many were in the 70-200mm range, and a few were even made with super telephotos at 500mm or 600mm.

If you spend much time photographing landscapes, then you’ll know that there are situations where a wide-angle falls short. Here are some thoughts, and examples of when to apply telephoto lenses of different lengths to your landscape photography.

black and white landscape scene - Tips for Shooting Landscapes With a Telephoto Lens

An otherwise non-descript mountain becomes an interesting subject when the dappled sunlight plays over the tundra.

50-100mm Short Telephoto

Just a step above the “normal” lens lies the short telephoto. Many frequently used zooms, such as the popular 24-70mm and 24-105mm lengths fall into this category. Since images made in this range are not much above a standard lens, they share many of the same characteristics.

A substantial depth of field remains, even at fairly wide apertures, and the field of view is wide enough to include large features of the landscape, such as entire mountains, or broad bends of a river.

mountains in warm light - Tips for Shooting Landscapes With a Telephoto Lens

While holding on to some of the advantages of a wide-angle or standard lens, short telephotos also retain some of the challenges. This range is not for landscape details alone, rather, substantial elements of sky or foreground are often included, reminiscent of classic landscape composition.

As in a wide-angle landscape, you must consider the many different layers of an image (foreground, mid-ground, background, subject, etc.). Unlike a wide shot, however, depth of field is compressed, so when possible, use a high f-stop (like f/11 or f/16).

man on a hilltop - Tips for Shooting Landscapes With a Telephoto Lens

Think of this range (50-100mm) as a tool to simplify your composition, but that doesn’t mean it’s easy to make an image work.

100-200mm Range

storm on the horizon and mountains - Tips for Shooting Landscapes With a Telephoto Lens

The storm described below rolls over the Kelly River in the Noatak National Preserve of Northwest Alaska.

As I was paging through my Lightroom catalog looking for images, I was surprised to find that this range of focal lengths (100-200mm) is actually one of my most-used. I expected to find a lot of portraits and action shots but was surprised to see how many landscapes appeared.

A couple of years ago, I was hiking with a group of clients on a remote mountainside in far northwestern Alaska. It was late autumn, my last trip of the season. The tundra below was a mosaic of red, yellow, and orange. We’d summited a small peak and were on our way down when ominous clouds appeared on the far side of the valley. From the way the precipitation blew, I could tell that those clouds held not rain, but snow, and a lot of it.

My mind went two directions at once. The guide in me, safety oriented and risk-averse, told me I needed to get down the mountain with my clients, and fast. We still had a couple thousand feet of descending, plus three or four miles to walk to reach the safety of camp.

The photographer in me, however, wanted to drop my pack, pull out the camera and go to work. I compromised, pausing regularly to shoot as we made our way down carefully. I relied heavily on a mid-range telephoto, reaching out with my lens to find the patterns in the tundra, the rolling storm, and the sweep of the river.

hillside in red and orange - Tips for Shooting Landscapes With a Telephoto Lens

Telephoto lenses allow you to play with patterns. Here I worked with a creek flowing through the autumn tundra in Denali National Park, Alaska.

As that focal length was too long to show a broad field of view, I isolated the components that told the story. I ignored the foreground, cropping it (in the camera) completely out of the composition. From my perch high above the river, everything in the frame was far away, maximizing depth of field and relieving any necessity to choose a focal point. A

That is where this range of telephotos thrive: distant landscape elements can be shown in context, sharp from front to back.

200-400mm Long Telephoto

sunrise reflection - Tips for Shooting Landscapes With a Telephoto Lens

At 300mm, a detail can become a subject, or something entirely abstract, like these distant mountains reflected at dawn in the Salar de Uyuni, Bolivia.

High in the Himalayas of Bhutan, I rose before daybreak and walked a quarter mile to a mid-valley hillock. At 15,000 feet even that small exertion winded me. I recovered, gasping, and watched a dense bank of fog roll past in the gray light.

As morning dawned, the fog began to break, alternately revealing and hiding narrow views of the surrounding peaks. The rocks and glaciers of the mountains high above the fog layer were lit by the bright morning sun, while I shivered in damp mist.

Through the 24mm lens on my camera, I saw little but gray. Frustrated, I pulled the lens off and replaced it with a long telephoto zoom. When a window opened in the fog, I followed it with my camera waiting for something to appear. Letting the clouds do my composition for me, I snapped images: a glacier, a jagged ridge, a spear-headed peak.

sunlight on part of a rocky mountain cliff - Tips for Shooting Landscapes With a Telephoto Lens

A flank of Jhomolhari, a Himalayan peak, appears through a hole in the clouds. With a wide-angle, this would have been a small sliver of a gray image.

When the circumstances are right, a long telephoto can be a trip-salvaging tool for a landscape photographer. The morning described above was the one chance I had to make images from that camp high in the mountains. Without a long lens, that sweet light touching the mountains above would have appeared as a tiny speck in a sea of gray.

Rarely is there much depth in images made in this focal range. The depth of field is shallow at most apertures, and it can be difficult or impossible to retain focus in all of the image’s layers. So select your focal point carefully, and then compose your image to suit the story you want to tell. The focal length may cut the landscape down to smaller parts, but that doesn’t make your composition any less important.

400mm and Above Super-Telephotos

There aren’t many photographers who spend thousands of dollars on a 500mm or 600mm f/4 lens to shoot the scenery. And yet super-telephotos are capable of capturing surprising and unique landscapes.

I’ll be honest. My big glass stays at home unless I expect to see wildlife. In the backcountry, where I shoot a lot, my 500mm f/4 is just too big to lug around. However, on a number of occasions, it’s proved useful for making some atypical images of the landscape.

A 600mm equivalent allowed me to bring in a ridge of Denali in Denali National Park, Alaska, and show close detail.

Several years ago I was leading some bird photographers on a trip to the coastal plain of the Arctic National Wildlife Refuge. We were camped near the coast, on a river delta just spitting distance from the Arctic Ocean. We had been happily exploring the tundra, photographing the abundant birds and rarely paying attention to the landscape.

But one evening (late-night really), the never-setting sun was at its lowest and shed golden light across the expanse of tundra between us and the mountains. It was crystal clear, every detail visible in the distant peaks. The tripod-mounted 500mm leaning atop my bruised shoulder was the perfect tool.

The great distance to the mountains allowed large swaths of the coastal plain and foothills to maintain focus. Everything was compressed, making elements that were miles apart appear close to one another. I played with the light on the mountains, exploring the Brooks Range with my camera from 50 miles away.

caribou on the tundra - Tips for Shooting Landscapes With a Telephoto Lens

The distant Brooks Range loom over the Coastal Plain of the Arctic National Wildlife Refuge, a place, where for now at least, caribou still roam wild.

The next morning, it was still clear when a herd of caribou (above) some ten thousand strong, passed by a few hundred yards from our camp. The long glass combined with the animals were the perfect combination for showing what a dramatic and wild place is the Arctic Refuge. The compressed field made the distant mountains loom close providing more context for the caribou in the foreground.

Super telephotos are all about compression and isolation. The landscape through long glass looks nothing like it does to the human eye. Distant elements grow close, and unless your focal point is in the distance, depth of field is compressed to a few feet. These lenses are a tool for isolating patterns, compressing distances, and exaggerating sizes.

Conclusion

At 500mm lens with a 1.4x teleconverter allowed me to provide a close-up image of the full moon rising over the Andes of Bolivia, just as the last alpenglow touched the volcano.

Long lenses allow you to play with details. Here, sun falling through the clouds in Southeast Alaska makes a simple composition.

When it comes to landscape photography, telephoto lenses are often forgotten. They slip to the bottom of packs or are simply left at home.

Your bag or closet are bad places for telephoto lenses. They should be accessible, ready to help you see your landscape in a new, and creativity-inspiring way. So pull your long lens out, click it onto your camera, and explore the way the lens changes your perspective of the landscape.

The post Tips for Shooting Landscapes With a Telephoto Lens appeared first on Digital Photography School.


Digital Photography School

 
Comments Off on Tips for Shooting Landscapes With a Telephoto Lens

Posted in Photography


New dSP Course: How to Shoot Landscapes & Nature Like a Pro

11 Apr

Would you like to learn how a professional landscape photographer composes stunning landscape shots.

Aussie Photographer Johny Spencer has shot and edited 10’s of 1000’s of landscape photos as part of his career as a professional landscape and nature photographer for the National Parks Service.

And he’s partnered dPS to create our latest course, shot in HD video – it’s called Landscapes & Nature Like a Pro.

You’ll take a journey with Johny from his studio to the great Aussie outback where you’ll learn how to:

  • Take long exposure shots for that beautiful silky affect with water
  • Photograph nature up close with macro focusing
  • Compose detailed landscape shots even when the light isn’t ideal
  • Shoot in the forest with dappled light
  • Create amazing panoramas
  • Use water to create stunning reflection images
  • And how to shoot sand dunes, seascapes and wildlife

You’ll get an over the shoulder experience riding along with Johny as he shoots breathtaking scenes on location, then show you all his tips for editing in Lightroom back in the studio.

Here’s Johny Spencer to tell you a little more about the course:

2 Weeks Only: Special Launch Bonuses and Discount

All up there’s over 4 hours of landscape & nature photography training that you can consume at your own pace… as well as two special launch bonuses:

  • Lightroom Preset Pack – worth $ 40
  • 60 Day Community Access (case studies, assignments and photo critiques) – worth $ 40
  • Best of all – to celebrate the release of this brand new course we’re not only offering these launch bonuses but you can also pick it up at 30% off the normal price.

    Hurry this special course launch offering is only available for 2 weeks.

    Check out the some of Johny’s amazing photos and the full course description here.

    Guaranteed to Improve Your Landscape Photography

    As with all of our courses, eBooks and presets this course comes with a 30 day money back guarantee, so if you do access the course and decide it’s not for you, we’ll refund you – no questions asked.

    The post New dSP Course: How to Shoot Landscapes & Nature Like a Pro appeared first on Digital Photography School.


    Digital Photography School

     
    Comments Off on New dSP Course: How to Shoot Landscapes & Nature Like a Pro

    Posted in Photography


    7 Tips for Creating Natural-Looking HDR Landscapes Using Aurora HDR

    27 Feb

    Aurora HDR is one of the best and easiest photo editing programs available for quickly creating HDR images. With that said, it has a wide range of tools and filters to help you achieve your HDR goals. To help you sort through them all, this article will highlight seven tips for creating natural-looking HDR landscapes in Aurora HDR 2018.

    1. Keep HDR editing of sunsets and sunrises to a minimum

    Everyone knows that sunrise and sunset provide optimal landscape photography opportunities. Golden hour bathes everything in a beautiful, often colorful natural light. As a result, it’s best to take a more subdued editing approach to keep the scene as natural looking as possible, especially when dealing with HDR. Otherwise, you risk over-processing your image.

    7 Tips for Creating Natural-Looking HDR Landscapes Using Aurora HDR

    Original starting image (the middle exposure of a 5-image bracketed set). Image courtesy dPS Managing Editor, Darlene Hildebrandt.

    NOTE: On that note, many of the tips below will include editing tools and sliders that have been pushed to their extremes. This is meant as a demonstration to show what you could do by using these tools at their maximum, but it’s not suggesting you should do this.

    2. Intelligently bump contrast and color with HDR Enhance

    7 Tips for Creating Natural-Looking HDR Landscapes Using Aurora HDR

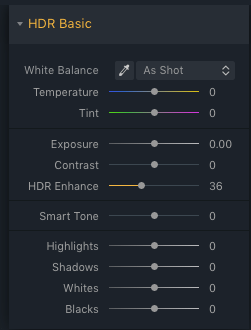
    One of the first tools you should utilize is called HDR Enhance. Found in the HDR Basic panel, it’s a newer feature available in Aurora HDR 2018 and it serves as a replacement for the clarity slider. When activated, HDR Enhance brings out the details and textures in your image while minimizing any residual artifacts such as image noise that might be introduced in the process.

    In the example below, the HDR Enhance slider has been pulled to the extreme for demonstration purposes. Notice how the contrast in the foreground and the distant rocks have increased significantly, and the color in the sky really pops.

    7 Tips for Creating Natural-Looking HDR Landscapes Using Aurora HDR

    HDR Enhance at 100.

    7 Tips for Creating Natural-Looking HDR Landscapes Using Aurora HDR

    But adding too much HDR Enhance is like adding too much clarity. The rocks and sand in the foreground have so much contrast and clarity that they look unreal, and the rocks and hills in the background now have a halo effect (generally considered undesirable).

    To reduce these effects and thus make your landscape appear more realistic, tone down HDR Enhance significantly (or use the masking brush to apply or erase the effect wherever you choose). By having the slider at 36 as opposed to 100, there’s still a nice pop of details and color.

    7 Tips for Creating Natural-Looking HDR Landscapes Using Aurora HDR

    HDR Enhance scaled back to 36.

    3. Bump up the contrast

    To make your image appear less flat, bump up the contrast. Going to extremes results in lots of shadows, reducing details in any dark areas. It also saturates color in the sky and in the reflection on the water.

    7 Tips for Creating Natural-Looking HDR Landscapes Using Aurora HDR

    Contrast at 100.

    By lessening contrast to about 20, shadows are still enhanced, but the details are better preserved. Note that the trees on the hill are still visible.

    7 Tips for Creating Natural-Looking HDR Landscapes Using Aurora HDR

    Contrast scaled back to 20.

    4. Use Smart Tone to brighten up an image

    7 Tips for Creating Natural-Looking HDR Landscapes Using Aurora HDR

    Since increasing the contrast introduced more shadows to the image, brighten it up again by using the Smart Tone filter. Dragging the slider to the right brings more light to areas of the image that are dark, without dramatically affecting parts of your image that are already bright.

    Below, you can see an extreme version of the Smart Tone slider in action. Notice how the shadowed areas are brightened, revealing lots of detail, particularly in the hill on the right. This is what you can do with Smart Tone, but it’s not necessarily what you should do since the image now appears very flat without any shadows or contrast, and the dreaded halo has appeared again.

    7 Tips for Creating Natural-Looking HDR Landscapes Using Aurora HDR

    Smart Tone at 100.

    To appear more realistic, pull back Smart Tone to about 22. This gives a hint of detail to the trees in the right, similar to what a reflection on the water might cause. It also brightens that patch of sand to the right.

    7 Tips for Creating Natural-Looking HDR Landscapes Using Aurora HDR

    7 Tips for Creating Natural-Looking HDR Landscapes Using Aurora HDR

    Smart Tone dialed back to 22.

    5. Enhance Saturation, Vibrance, and Color Contrast

    At this point, let’s turn our attention to the colors. Play with the Temperature slider in the HDR Basics panel to add some warmth to images like this sunset. Then scroll down to the Color panel and tweak the Saturation and the Vibrance sliders.

    7 Tips for Creating Natural-Looking HDR Landscapes Using Aurora HDR

    Depending on your image, you may need to bump these either up or down. Just avoid taking them to their extremes; generally, somewhere between 5-20 will be a good range. You can also bump up the Color Contrast slider, which controls the contrast between primary and secondary colors.

    7 Tips for Creating Natural-Looking HDR Landscapes Using Aurora HDR

    Saturation, Vibrance and Color Contrast boosted.

    6. Use Image Radiance for an ethereal effect

    7 Tips for Creating Natural-Looking HDR Landscapes Using Aurora HDR

    Now we’re looking at a few finishing touches that you can add to your HDR landscape shots, and one option is Image Radiance. This adds a soft, dreamy glow to your photo, and it is best used on sunset or sunrise images. In this particular scenario, Image Radiance seems particularly important since it can contribute a soft, hazy effect typical of ocean shots.

    Increase the Image Radiance slider to about 37. Doing this will introduce some shadows to your image, but that can easily be fixed with the Brightness and Shadows slider in the same panel. You can also adjust Vividness and Warmth here too if you see fit.

    7 Tips for Creating Natural-Looking HDR Landscapes Using Aurora HDR

    7. Add a subtle Vignette

    7 Tips for Creating Natural-Looking HDR Landscapes Using Aurora HDR

    The final edit that you might do to an HDR landscape image is to add a vignette. In the case of a sunrise or sunset, a vignette can be particularly helpful to add a subtle frame around the subject, drawing more attention to the focal part of the scene, the setting sun.

    Within Aurora HDR, the Vignette panel is at the very bottom. You can control not only the size, amount, roundness, and feathering of the vignette, but also the inner brightness. As well you can adjust the placement of the vignette, meaning you can easily create a vignette that is not centered on the image – very handy if your subject is following the rule of thirds and is off-center.

    When adding a vignette, note that the amount is a negative number for a dark (black) vignette and a positive number for a bright (white) one.

    7 Tips for Creating Natural-Looking HDR Landscapes Using Aurora HDR

    Final image with the vignette added.

    Bonus tips

    In addition, Aurora HDR also has tools for correcting Chromatic Aberration and Lens Distortion. It also comes loaded with several “Realistic HDR” presets that you can use to get started, and then just tweak the settings to your liking.

    Over to you

    There you have it, seven tips for processing landscape HDR photos in Skylum’s Aurora HDR. If you were inspired to create your own HDR landscapes, please share them in the comments below along with your post-processing tips and tricks.

    Disclaimer: Skylum (formerly Macphun) is a dPS advertising partner.

    The post 7 Tips for Creating Natural-Looking HDR Landscapes Using Aurora HDR by Suzi Pratt appeared first on Digital Photography School.


    Digital Photography School

     
    Comments Off on 7 Tips for Creating Natural-Looking HDR Landscapes Using Aurora HDR

    Posted in Photography


    2017 Buying Guide: Best cameras for landscapes

    20 Dec

    Landscape photography isn’t as simple as just showing up in front of a beautiful view and taking a couple of pictures. Landscape shooters have a unique set of needs and requirements for their gear, and we’ve selected some of our favorites in this buying guide.

    Articles: Digital Photography Review (dpreview.com)

     
    Comments Off on 2017 Buying Guide: Best cameras for landscapes

    Posted in Uncategorized


    Sony a7R III Pixel Shift lifts a veil off your landscapes

    12 Nov

    Sony’s replacement of its popular a7R II comes packed with new features, most of them aimed at performance, ergonomic and autofocus improvements. But there are image quality improvements as well, like more dynamic range, but also a new Pixel Shift feature that hasn’t yet been talked about much.

    Cameras with sensor-shift mechanisms are increasingly offering these pixel shift modes by precisely moving the sensor in one pixel increments to sample each color at every position, thereby overcoming the downsides of the Bayer filter array. And getting you sharper images with less moiré, with potentially less noise thanks to multi-sampling and less math required to figure out the R, G and B colors at each pixel. How does this look in the real-world? Explore our Pixel Shift vs. non-Pixel Shift Raw comparison below (Raws processed using Sony Imaging Edge with all sharpening and noise reduction settings zeroed out, and only tonal adjustments applied to deal with the high scene contrast):

    $ (document).ready(function() { ImageComparisonWidget({“containerId”:”reviewImageComparisonWidget-39809707″,”widgetId”:566,”initialStateId”:null}) })

    Move around the image and you’ll see a marked increase in clarity almost everywhere. The buildings’ windows are sharper and clearer, all the foliage far more defined… these Pixel Shift results are frankly astounding for static scenes. It’s like a veil has been lifted off your scene: something landscape photographers will simply love. All details are clearer, crisper, and there is no hint of moiré anywhere. The last time I saw this jump in clarity was going from a Rebel with kit lens to a 5D with L-series lens, to put this in perspective.

    Last time I saw this jump in clarity was going from a kit lens on a Rebel to an L-lens on a 5D

    And it’s not because of extra sharpening (which would come at the cost of more noise, which we don’t see), but because of the extra sampling. We’d also expect a decrease in noise, but we can’t quite tell here because of the non-standard workflow and because – to the credit of the a7R III’s dynamic range – this sunset scene still doesn’t have enough dynamic range to challenge the a7R III and make shadows visibly noisy.* That’s saying a lot.

    This sunset scene doesn’t have enough dynamic range to challenge the a7R III. That says a lot.

    What’s more: Sony’s recent lenses have enough resolving power to take advantage of this mode. You see the resolution increase at least partly because the lenses have enough resolving power to take advantage of the extra pixel-level sampling (theoretically, increasing the resolution of any part of the imaging chain has the potential to increase sharpness, but your lens needs to resolve enough to begin with to see the dramatic differences we’re seeing here). You can’t always take that for granted (see the limited increase in resolution of Pixel Shift modes on Micro Four Thirds cameras in our studio scene, for example).

    Studio Scene Comparison

    We know you’re itching to compare these results to all our other cameras, including those with their own Pixel Shift modes. Well, here you have it (Phase One 100MP camera is included as a benchmark so you know what the details are actually supposed to look like in our scene):

    $ (document).ready(function() { ImageComparisonWidget({“containerId”:”reviewImageComparisonWidget-26066373″,”widgetId”:565,”initialStateId”:null}) })

    The first thing you might notice is the lack of moire in our saturated color wheels, something even the Phase One 100MP sensor fails at. The Pentax K-1 offers a similar performance here: sampling three primaries at each pixel position helps overcome the color aliasing typically associated with Bayer filters.

    Pixel Shift removes color aliasing in the newspaper print$ (document).ready(function() { $ (“#icl-3794–1566952198”).click(function() { ImageComparisonWidgetLink(3794); }); }) as well (check back above). It also produces less moire in the black and white text$ (document).ready(function() { $ (“#icl-3798-785963340”).click(function() { ImageComparisonWidgetLink(3798); }); }) of our scene. The lack of moire and increased resolution allows you to read down to the last line with ease – something the a7R II can’t claim.

    You can even start to see the texture in our color wheel$ (document).ready(function() { $ (“#icl-3795-1120823446”).click(function() { ImageComparisonWidgetLink(3795); }); }) that not even the Pentax in Pixel Shift mode (much less the original a7R II) can resolve. The Phase One and Pentax medium format cameras are the only other cameras sharing that honor.

    Traditional cameras with Bayer arrays particularly resolve less in saturated colors, where the lower resolution of the red or blue pixels really starts to show. So take a look at the massive increase in resolution in our saturated threads$ (document).ready(function() { $ (“#icl-3796–2100605088”).click(function() { ImageComparisonWidgetLink(3796); }); }). You can resolve individual strands the a7R II – or a7R III without Pixel Shift – don’t show. The K-1 does well here too, but remember the a7R III images are processed through Sony ‘Imaging Edge’, and we expect things to improve once Adobe provides support (which, to our understanding, it will).

    Just generally speaking there’s more detail throughout our scene: take a look at our Beatles patch$ (document).ready(function() { $ (“#icl-3797–29172716”).click(function() { ImageComparisonWidgetLink(3797); }); }). You can make out individual threads otherwise only visible to the Phase One. The increased resolution of the a7R III over the K-1 probably helps resolve more threads, though the incredibly sharp Sony FE 85/1.8 may have some role to play here as well.

    If you’re curious how well the 50MP Canon 5DS R compares: not so well. Individual threads are not well resolved$ (document).ready(function() { $ (“#icl-3800–1236522308”).click(function() { ImageComparisonWidgetLink(3800); }); }) (if not noisy, particularly in the reds), and color aliasing$ (document).ready(function() { $ (“#icl-3801–202191445”).click(function() { ImageComparisonWidgetLink(3801); }); }) can be an issue.

    Are we impressed?

    How could we not be? Landscape, cityscape and architecture photographers will absolutely love this new feature paired with the already excellent sensor in the a7R III – as long as they steer clear of (or clone out) moving objects in the scene. The increase in resolution and decrease in aliasing Pixel Shift brings is obvious in both our studio scene and real world result. It’s frankly dramatic in the latter.

    Are we impressed? How could we not be? Landscape, cityscape and architecture photographers will love this

    There can be obvious artifacts in anything moving though, so that’s a potentially significant (albeit expected) caveat for landscapes with motion (water, fast clouds), telephoto shots prone to movement from wind and vibrations, etc. You’ll want to use a sturdy tripod with a remote release or self-timer. Furthermore, for now, using Sony’s ‘Imaging Edge’ software is clunky, but once Adobe incorporates support, we can’t wait to start shooting landscapes and perhaps tougher subjects in this mode to see how well it copes.


    * That said, this was still a high dynamic range scene that we exposed for the highlights and tone-mapped in post using Sony’s ‘Imaging Edge’ software (the only option for processing Pixel Shift files at the moment). So shadows have been lifted many stops – yet remain noise free. You’ll have to excuse the somewhat flat result, as we didn’t have access to the tools we’re used to to tonemap HDR images while retaining proper local contrast. More to come…

    Articles: Digital Photography Review (dpreview.com)

     
    Comments Off on Sony a7R III Pixel Shift lifts a veil off your landscapes

    Posted in Uncategorized


    How Including People or Manmade Objects in Your Landscapes Can Add a Sense of Scale

    25 May

    My natural instinct as a landscape photographer has always been to keep people and manmade objects out of my images. I want to create images of nature that are pure and free (or at least appear to be free) of human interference. That said, over the past few years, I have started to backtrack on this a bit, especially when the camera fails to show the true scale of a landscape. In this article, I’ll share a small collection of images from my portfolio that include situations where allowing people or objects into the scene made the image a success.

    Add a manmade object to show size

    Na Pali Coast Sunset Sony A7RII and Sony 16-35 f/4 | ISO 500, f/4.5, 1/800th.

    Here is (quite possibly) the most beautiful and rugged stretch of coastline on Earth, the Na Pali Coast of Kauai. I’ve photographed it from land, sea and air and still there is just no way to truly capture how incredible it is in person. On my most recent trip to the Garden Isle, I took my workshop group on a sunset cruise up to photograph whales and the Na Pali Coast.

    As we were taking in the incredible scenery, I noticed one of the many helicopters that tour the coastline cutting through the scene. Using my Sony FE 16-35 f/4 lens, I framed a shot with the helicopter (flying right to left) on the right side of the frame (it’s the tiny little white spot) with plenty of space on the left side to see where it was headed. Take away the helicopter and it’s still an incredible scene, but without the helicopter, there’s just no way to accurately communicate how massive these cliffs are.

    Use tourists to show scale

    Balanced Rock Sunset Sony A7 and Canon 16-35 f/2.8 | ISO 100, f/11, 1/20th.

    One of the easiest to reach landmarks in Arches National Park (located in Moab, Utah) is Balanced Rock. You just drive to the parking lot, and you’re pretty much there. But to get the sunset in the background, you’ll need to walk to the other side.

    As our group was getting into position for what was turning out to be a beautiful sunset, a tourist climbed right up onto the rocks and started taking selfies. Ugh. Well, instead of getting upset, I decided to make lemonade out of the lemons and yelled over to him, asking if he’d mind throwing his hands up in the air. We were able to get a shot showing just how huge this sandstone rock formation really is, and the pose of the tourist turned out quite nice.

    Go with the flow

    Grand Canyon Lookout Sony A7RII and Sony 16-35 f/4 | ISO 100, f/7.1, 1/10th.

    Like the previous image, sometimes you just have to go with the flow. As Bruce Lee so famously said, “Be water, my friend.”

    As the sun set over Grand Canyon National Park in Arizona, I was in position to walk away with some really nice shots of the pink glow over the canyon. And just like in Moab, I saw a tourist walk right into the frame as I was about to press the shutter. This time though, he was much closer to the camera and as luck would have it, he was dressed in a cowboy hat, boots, and a leather backpack. Perfect! I never said a single word to this guy, he just stood there looking out over the canyon holding onto the tip of his cowboy hat. I assume he posing for someone else, but I was plenty happy to steal a few frames for myself.

    Add yourself into the shot

    Delicate Arch Beneath the Milky Way Sony A7S and Sony 16-35 f/4 | ISO 4000, f/4, 30 seconds.

    You can’t always have people walk into your frame at the perfect time, wearing clothing that perfectly matches the location you’re photographing. Sometimes you have to take matters into your own hands, as I did here at Delicate Arch in Arches National Park.

    My workshop group and co-instructor Mike were down inside the “bowl” beneath the arch and I stayed up top to light paint the arch for them during their 30-second exposures. We had walkie-talkies and Mike would give me a countdown to begin painting the arch in different ways. Since I couldn’t really concentrate on getting any of my own shots, I set my Sony A7S on a tripod, put it in time-lapse mode and just hoped to come out with one or two shots at the end of the night.

    In the image above, that light shining under the arch is yours truly. I was standing beneath it, wearing a headlamp, so the students could get a silhouette of me looking up at the arch. After the shot, I looked over toward my camera (not on purpose though) and the direct light caused a starburst effect. This turned out to be my favorite image I’ve taken at this location by far. Not bad for the “set it and forget it” method!

    Conclusion


    Sometimes there just isn’t a good way to transfer a three-dimensional landscape to a two-dimensional photograph. Things always get lost in translation to some extent. At the end of the day, we are part of nature and if including a human or manmade object into an image help give the viewer a more accurate sense of scale, I say go for it.

    The post How Including People or Manmade Objects in Your Landscapes Can Add a Sense of Scale by James Brandon appeared first on Digital Photography School.


    Digital Photography School

     
    Comments Off on How Including People or Manmade Objects in Your Landscapes Can Add a Sense of Scale

    Posted in Photography


    In praise of shooting monochrome landscapes

    30 Apr

    Taking color out of the equation forces the viewer to focus on shapes and textures

    In an age of wide color gamut displays and HDR-everything, DPR regular Nicolas Alexander Otto urges his fellow landscape shooters to embrace shooting in black-and-white. Here are a few reasons why he embraces monochrome for landscape work – and thinks you should too.

    Reducing imagery to its essentials, breaking it down to texture and shape, can help render the image more accessible to the eye. In this instance – a shot of the Iceland’s famous Vestrahorn – the patterns in the dunes leading the eye towards the mountain range in the distance are not visually overwritten by the color of the grass in the fore- and mid-ground thus stand out more and suffice to lend the foreground dynamism which might otherwise be not visible enough.

    Taking color out of the equation forces the viewer to focus on shapes and textures

    In this next example (above) the line work isn’t as important, but the different contrast areas with strong tonal differences are aided by the black and white treatment, enabling the small lighthouse to stand out as a visual anchor and helping to create a focus on the balance between the lighter slopes and dark areas on each side of the cliff.

    You can emphasize what’s unique about the subject

    I think an abundance of color can indeed sometimes distract from the motif in itself in regards to how it carves out the essence of a landscape. You may get sundown coloring or blue hour at every spot on earth, but a certain shape of rock might be unique to the place you’re shooting. If that’s what you want to capture, you may want to consider shooting black and white in order to prioritize forms over hues.

    Pre-visualizing a scene in black and white can help you find better compositions

    Pre-visualization is key. This means that photographers have to determine in field what the monochromatic image will look like after processing and decide on site how to compose and shoot accordingly. Subsequently, thinking in black and white may enable us to find better compositions; those which do not need color in the first place.

    While I personally enjoy color as much as black and white, I often find myself trying to shut out color while composing, aiming to focus on the abstract rather than the concrete. This helps me to find my way around cluttered foregrounds or difficult light. It’s an approach I find helpful from time to time and would recommend trying, even though it may take some time to get used to (I guess everyone who has the option to use black and white directly in their live view is a lucky camper in this regard). Taking a picture and converting it in camera for a preview might be cumbersome but can be helpful as well.

    Black and white promotes detachment from reality

    A black and white image is always a departure from our inherent logical view of the world which is secondarily governed by color (primary is light and dark).

    This entails certain freedoms such as to depart further from reality, which can be a liberating feeling as a photographer, opening up more creative possibilities. Often times a black and white image can simply ‘get away’ with more dramatic editing and capture technique since it is not regarded as a ‘authentic representation of reality’ as much as a color image.

    You can be a bit more aggressive with processing

    There’s a perception that editing images, in one way or another, deteriorates the character of the image. Black and white images however don’t seem to be subject to the same amount of critique because they are governed by a different frame of reference.

    Take a look at more of Alex’s work and be sure to read our Readers’ Showcase Q&A with him.


    Do you regularly shoot monochrome landscapes? Why do you embrace black-and-white? Let us know in the comments.

    Articles: Digital Photography Review (dpreview.com)

     
    Comments Off on In praise of shooting monochrome landscapes

    Posted in Uncategorized


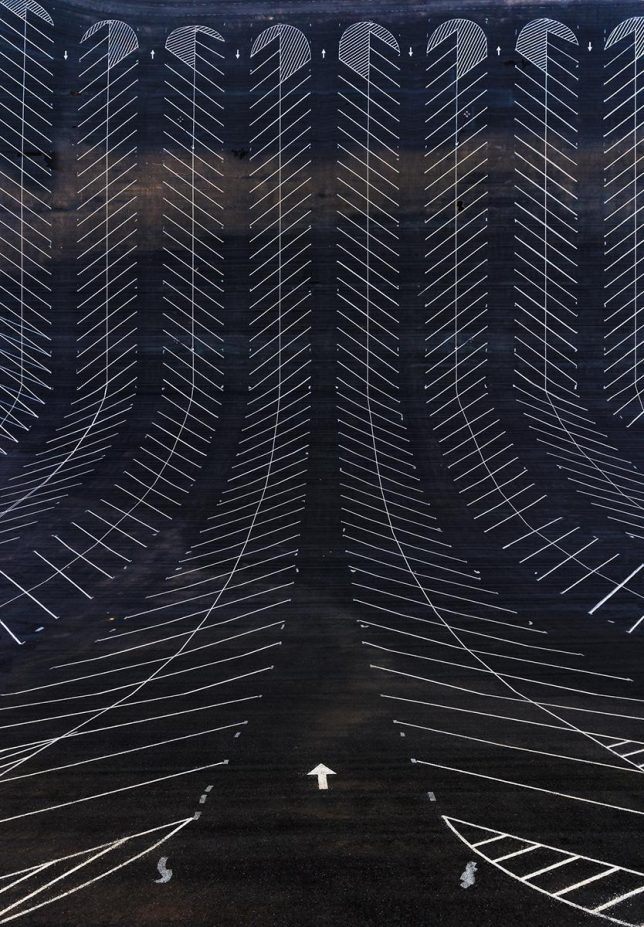
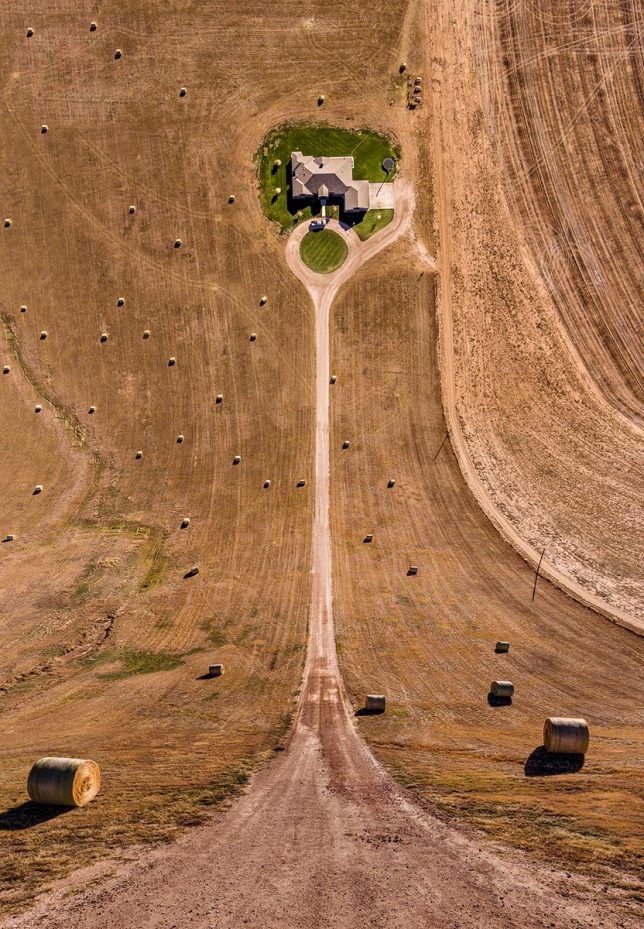
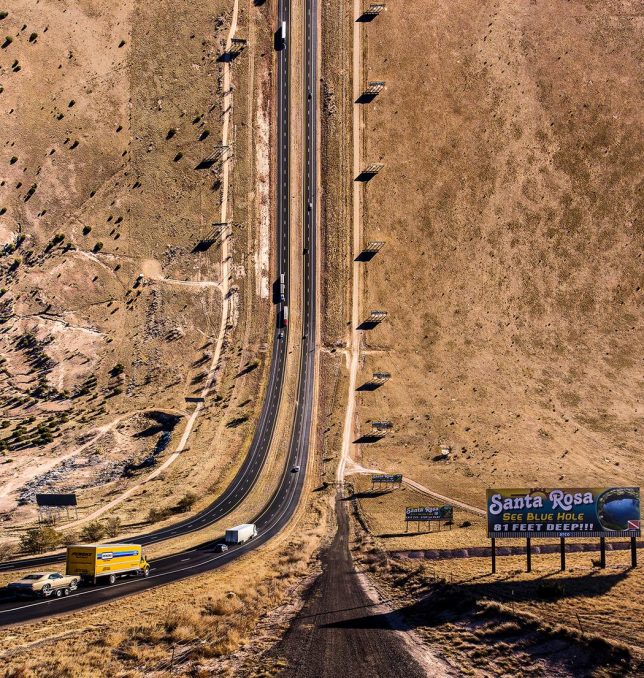
    Drone Distortions: Manipulated Landscapes Warp and Bend Upon Themselves

    11 Mar

    [ By SA Rogers in Art & Drawing & Digital. ]

    american drone landscapes 1

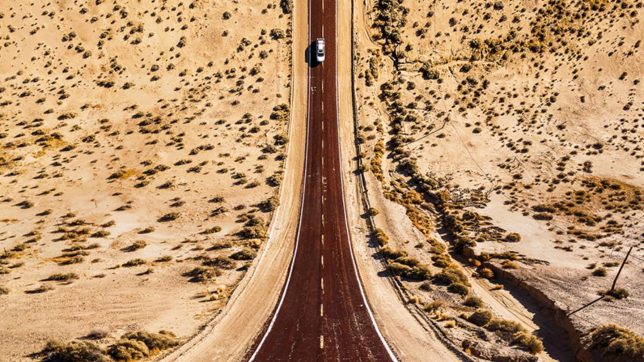
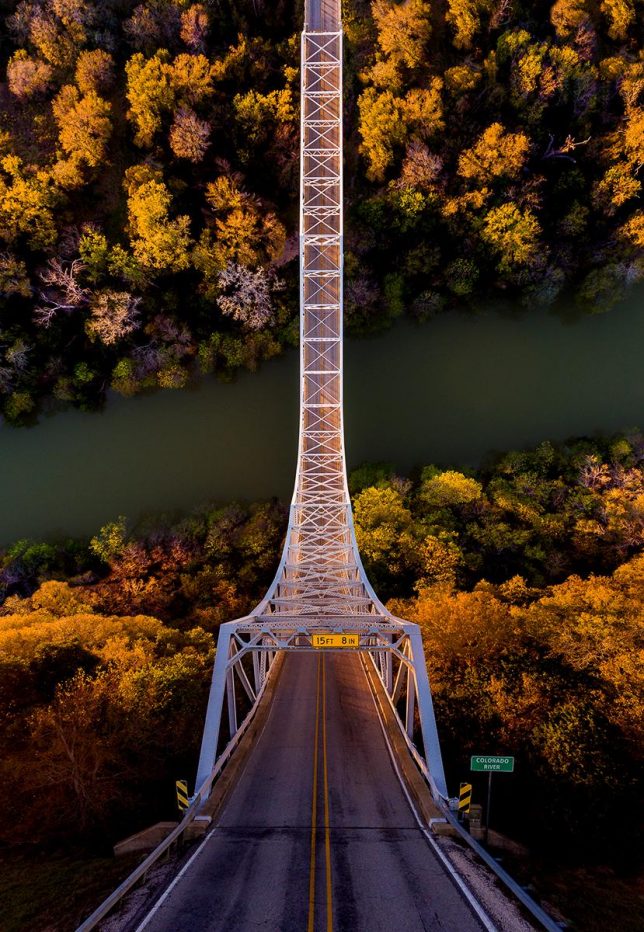
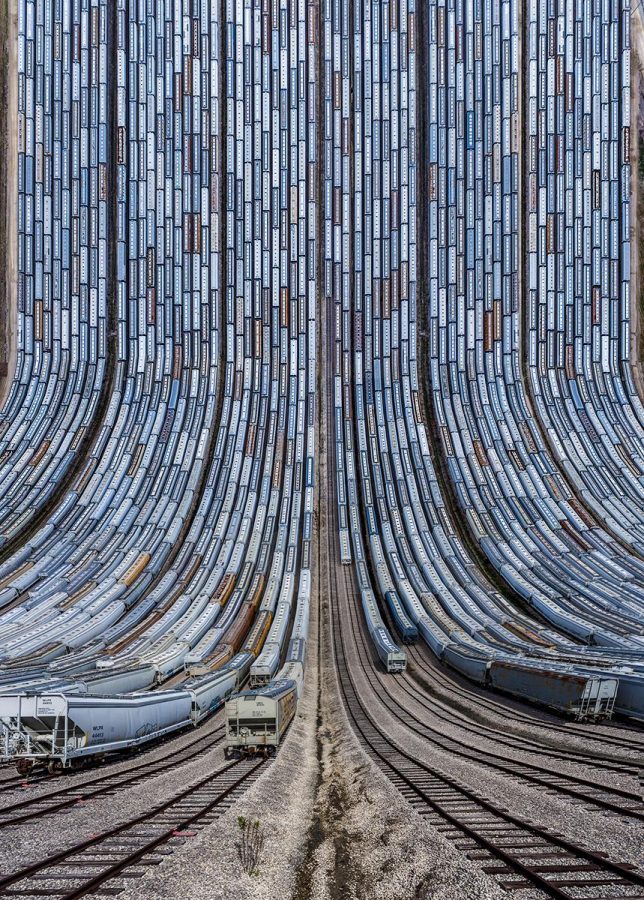
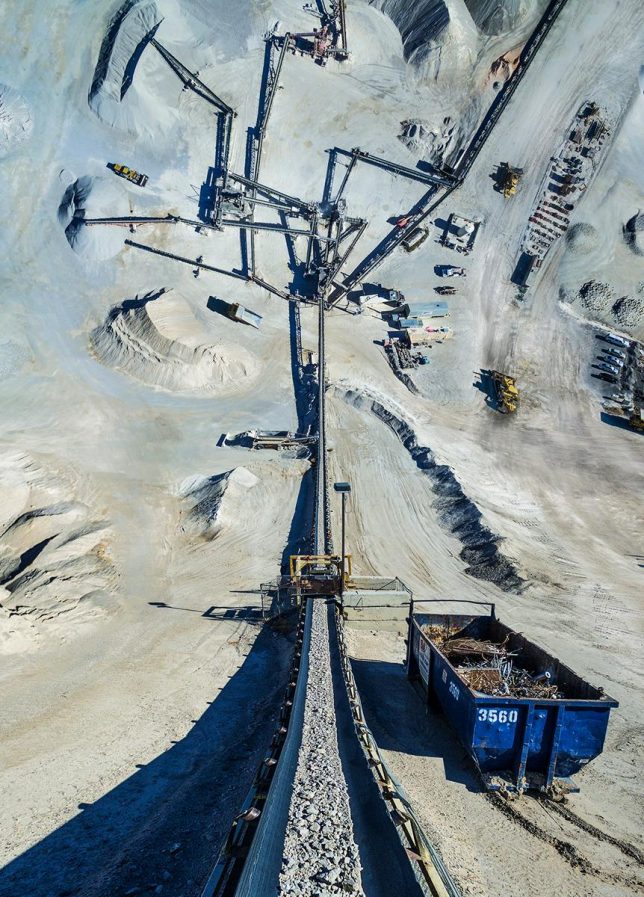
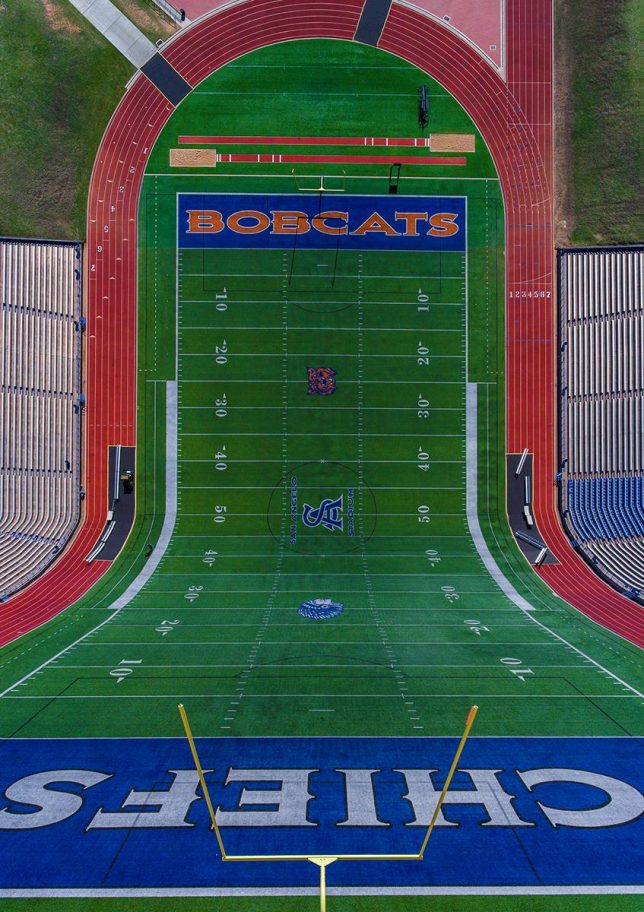
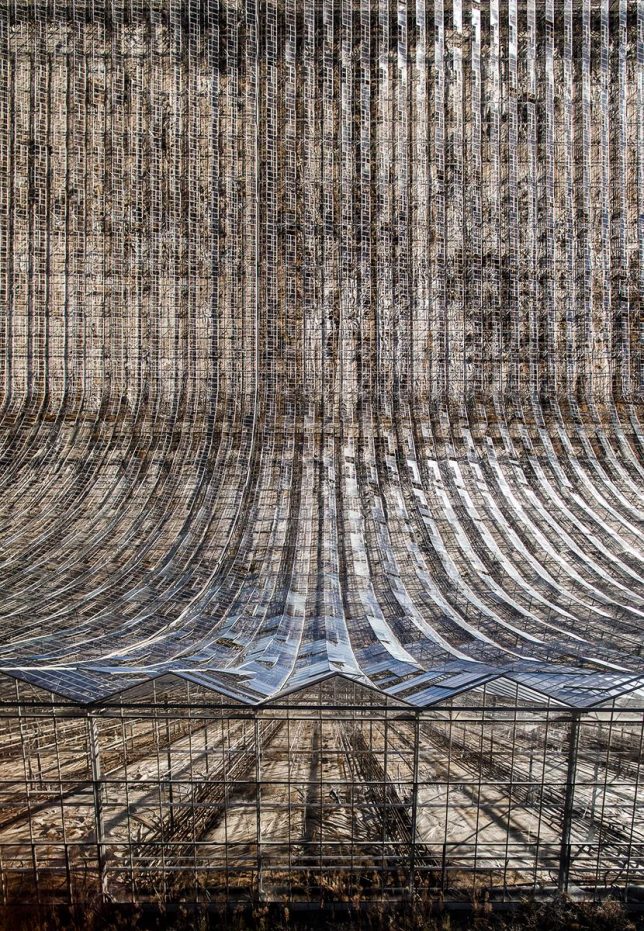
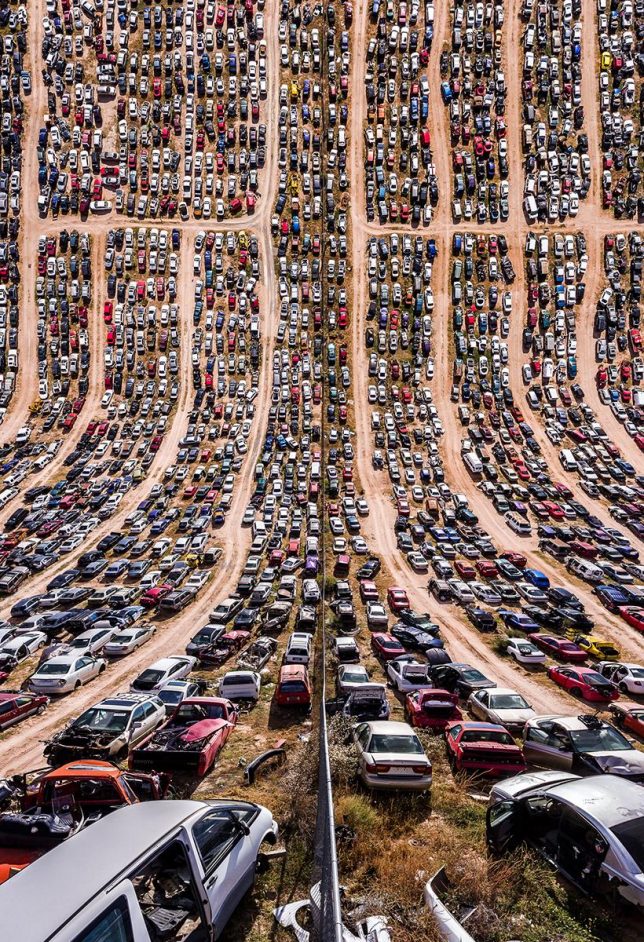
    Gazing at any one of these stretched-out, gravity-defying landscape photos, you feel like you’re at the pinnacle of a rollercoaster, about to zoom down to ground level. Except instead of being elevated on an artificial track, you’re on flat ground, positioned at the high end of a nearly 90-degree angle with no care for gravity. Turkish artist Aydin Büyüktas warps American landscapes, nearly doubling them in half to show multiple perspectives at once.

    american drone landscapes 5

    american drone landsacpes 4

    american drone landscapes 10

    A continuation of the ‘Flatlands’ series, which previously saw similar manipulations of urban Turkey, the images draw on a satirical sci-fi novella by Edwin Abbot entitled ‘Flatland: A Romance of Many Dimensions.’ To create the images, Büyüktas flies drones over his chosen setting to capture aerial images and then uses 3D software to stitch the images together.

    american drone landscapes 3

    american drone landscapes 2

    american drone landscapes 9

    The scenes chosen for Flatlands II include the pits of mines, desolate desert roads, junkyards, train yards, farms, bridges and empty parking lots. Büyüktas flew his camera-equipped quadcopter total of about 10,000 miles to capture thousands of photos. The finished series required about two months of planning, a month of photography and many more months of digital composition.

    american drone landscapes 6

    american drone landscapes 7

    american drone landscapes 8

    “We live in places that most of the time don’t draw our attention, places that transform our memories, places that the artist gives another dimension; where the perceptions that generally crosses our minds will be demolished and new ones will arise,” says the artist. “These works aim to leave the viewer alone with a surprising visuality ironic as well, multidimensional romantic point of view.”

    Share on Facebook


    [ By SA Rogers in Art & Drawing & Digital. ]

    [ WebUrbanist | Archives | Galleries | Privacy | TOS ]


    WebUrbanist

     
    Comments Off on Drone Distortions: Manipulated Landscapes Warp and Bend Upon Themselves

    Posted in Creativity