It’s 6pm, it’s cold, and the sun is on its way to set. The tripod is placed, the composition is done – now I just have to wait for the big show that Mother Nature puts on every day to happen again. The sky is threatening, but with a little luck, the sun will pierce the clouds to pass above the lighthouse in front of me.

If I think about the first time I went out with the tripod on my shoulder, it makes me smile. I knew more or less where to go, I had no idea of the exact time at which the sun would set, nor where. Failure was inevitable!
Years have passed since then, and many things have changed. But the biggest and decisive one is in my hands right now: PhotoPills – photo planning app.
What is PhotoPills?
PhotoPills is like having a Swiss Army Knife for all photography matters in your pocket, at your service. Whether you’re a seasoned photographer, or someone who’s barely touched a camera, PhotoPills has you covered. You have a question, you get the answer.

Using PhotoPills at Durdle Door (UK)
Beginners will love it. I see it in every single workshop I run. There, in the field, before deciding the frame and the shooting spot, people enjoy using the Augmented Reality views, to easily track the position and the path of the Sun, the Moon, and the Milky Way. It’s the simplest way to understand what’s going to happen next.
On the other hand, on a more advanced level, being able to plan your shots directly on a map, even the Milky Way shots, saves a ton of time. PhotoPills’ Planner is so well designed, that you can quickly figure out the perfect shooting spot, date, and time for any scene you imagine.

PhotoPills screen menu
Everything starts from a clean and user friendly interface.
You can choose between three menus, simply through a swipe to the right or left at the top of the interface. After choosing your camera, the map type, and other settings in “My Stuff” menu, you can enter the main section called “Pills” where you have the access to all the available modules.
The possibilities are almost endless, and in this article, I’ll do my best to describe some of the things you can do with this app. Are you ready?
Widgets
Imagine that you’re going to bed (at home, or anywhere in the world) and want to know at what time the sun will rise tomorrow, when the golden hour starts, or when the Moon will rise, or what about the the galactic center visibility times?
The first thing that I love in this App, is that all you have to do is to pull down from the top of the screen and enable the three PhotoPills widgets in the notification center. If you do so, you’ll have all the key light, sun, moon and Milky Way information in just one swipe. Also, you’ll have access to the five upcoming photo plans you’ve saved using the Planner.

I love using the widgets when I’m traveling, since it’s so easy to have everything I need on one single screen. A cool feature is that it works offline too. As it happens with the Augmented Reality views, PhotoPills doesn’t need an internet connection to give you all the key data you need.
But that is not all, in the case you want to have all this information (and much more) for a different location or date, just use the new Sun and Moon Pills. So easy, and so nice to have everything together. I really hope that an Apple Watch version will be implemented soon too.
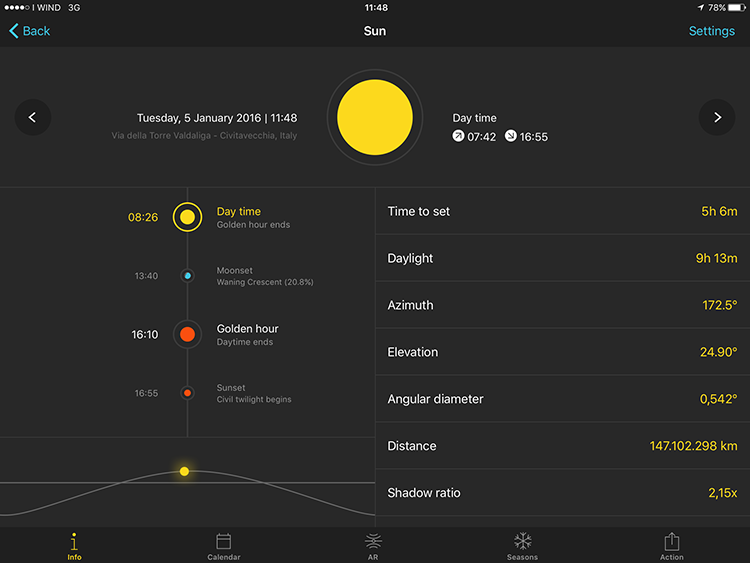
Sun Pill
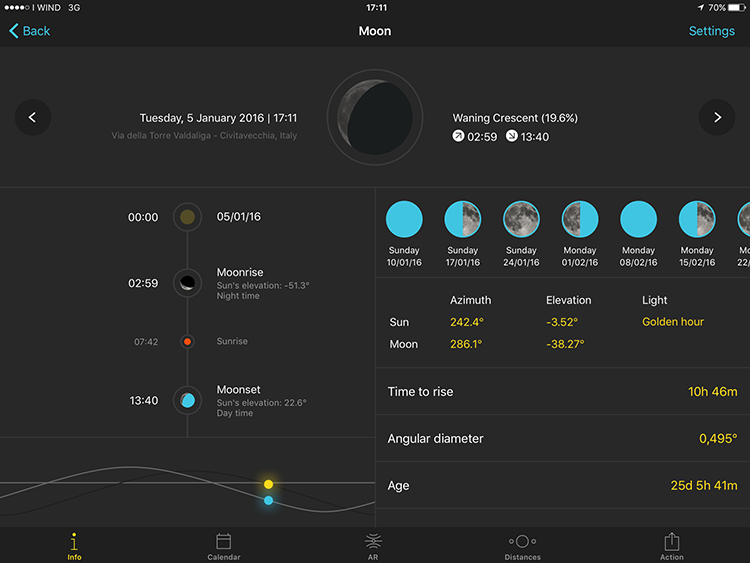
Moon Pill
Augmented Reality
In a landscape image, composition is more than fundamental. How many times have you arrived at your shooting location, and wondered where the sun would set? For me, every time – but before using PhotoPills, I was never able to have a precise answer.
The Augmented Reality (AR) module included in the App, makes things so easy. Just point your phone at a subject, and use the AR tools available within the Sun, Moon and Night AR pills to see where the Sun, the Moon or the Milky Way will be in the image.

Sun AR in action
Besides, and this is particularly clever, you can change the time to see how everything evolves, just by scrolling on the screen with your finger.
The application is also useful for all the star hunters out there – with the Night AR view it is easy to plan star trails shots. For example, if you’re planning to shoot a circumpolar, the Night AR view will also help you locate the North Star (Polaris). And, if you live in the southern hemisphere, PhotoPills will give you the position of the south celestial pole, right where you need to frame.
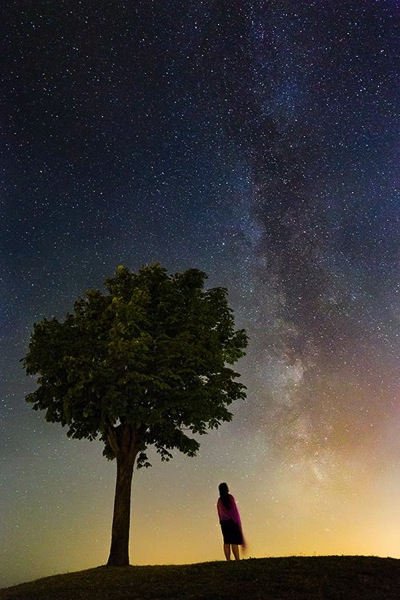
A Milky Way shot planned using Night Augmented Reality
Planner
If the Augmented Reality tools are my students’ favorites, I simply love the Planner. I use it to plan every shoot.

No matter if it’s a sunset in Vernazza (above), a moonrise in Iceland, or the Milky Way in Yosemite National park, the PhotoPills Planner helps me find the right time, for the alignments I’m looking to happen. It’s my imagination’s best ally.
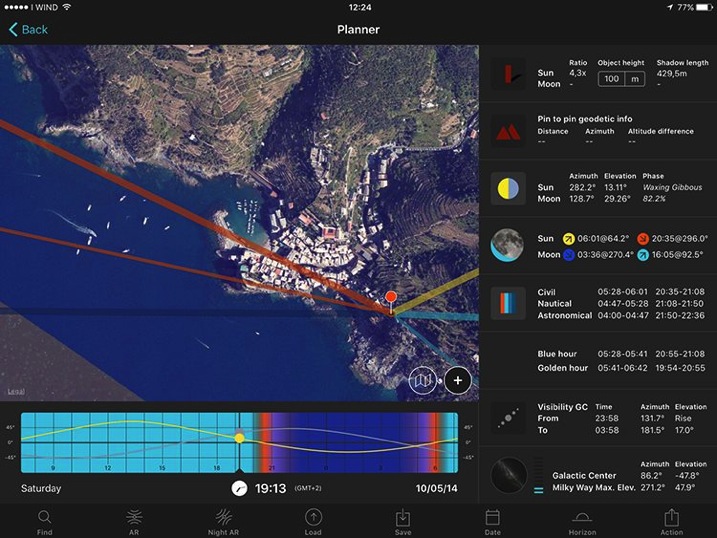
Planning Pill for Vernazza shot above
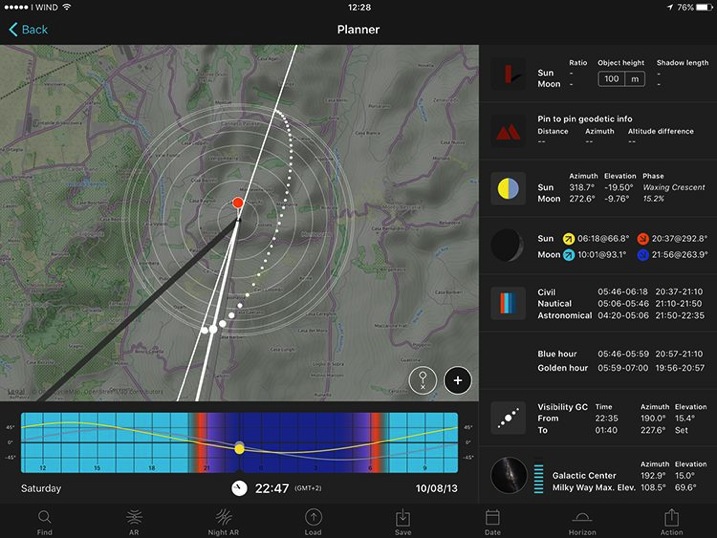
Planning Pill for Milky Way shot above
A lovely feature, is that once I’ve figure out the shooting spot and shooting time, I can save the plan in my To-Do list of planned photos. Then, every time I have an idea, I plan it and save it in my list. This way, I make sure not to miss any of my favourite shots.
Location Scouting
We’re all exploring new locations all the time, looking for new possibilities, and to be able to store the most valuable places in our own database is just a must. So, every time I find a place I’d like to remember and study for a possible shot, I use PhotoPills to save it as a Point of Interest.
Another useful feature is that I can upload to PhotoPills all my .kmz files, so I can bring with me all the plans already made with Google Earth!

Point of Interest visualized on map
Calculations
Knowing the shooting time and spot is obviously the first step, but you also need to make many more decisions before pressing the shutter – this is where PhotoPills is brilliant.
These are just four of the numerous calculators I use to figure out the settings I need:
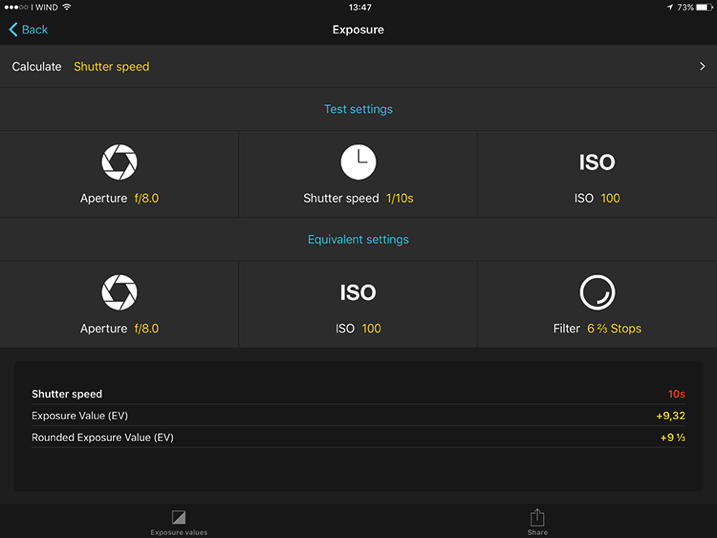
Long Exposure calculator
Long Exposure calculator: You already know, my favorite one! With this module I’m able to calculate the exact exposure time when using ND and GND filters. By the way, PhotoPills has the only Long Exposure calculator that allows you to convert the shutter speed for non-standard f-stop reductions.
Spot Stars calculator: When shooting the Milky Way, it helps determine the maximum exposure time that allows me to capture the stars as big bright spots. The longer the exposure time, the more light is collected by the camera sensor, and the brighter the stars will appear in the image. If I go beyond this exposure time, stars will begin to appear as trails in the image, which is something I want to avoid at all costs.
Time lapse calculator: If you’re doing time lapse photography, this calculator will save you lots of time. Just set the frames per second (24fps), the duration of the event you’re shooting (example 6 hours), the desired clip length (30 seconds) and the image size (4Mb) to get the shooting interval (30 seconds), the number of photos (720) and the total memory usage of the SD card (2.81Gb). I used to need 15 minutes to figure out all those numbers, before I started using PhotoPills.
Depth of Field calculator: I use it to calculate the distance where to focus, to maximize depth of field (hyper focal distance). This becomes very useful in my night shots, since I want everything in focus, from the foreground to the stars. I simply calculate the hyperfocal distance and then I make sure to focus my lens at a slightly longer distance. This assures me that I’ll have the stars in sharp focus.

DoF Calculator
Conclusions
PhotoPills is definitely a must have for (but not only) landscape photographers. The features are many and well-maintained, and the difficulties that you can encounter at the beginning, can quickly be overcome thanks to the Academy (a virtual university of PhotoPills where you can follow video tutorials, and read insights on each function of the application to really turn our ideas into real images).
The price of $ 9.99 in the App Store is higher than average, but is ridiculous compared to the large amount of features and practical uses, as PhotoPills replaces much of the paid, and free apps, in one go.
It must be mentioned that PhotoPills is currently available only for iPhone and iPad, but the Android version has been announced to launch in 2016.
After many months of use, now I cannot imagine a photographic adventure without this application. Once you fall into the Imagine-Plan-Shoot creative loop, you won’t be able to stop pushing your imagination, and this will lead you to discover a new world of possibilities.
Definitely, give it a try!
Pros:
- Clean and friendly user interface
- Many different tools in a single application
- Cached maps for offline use
- Possibility to import POI from .kmz files
- Localized languages
- Tons of tutorials
To be considered:
- Android version still in development (release expected in 2016)
Do you use PhotoPills or another photography planning app? Please share your experiences and tips in the comments below.
googletag.cmd.push(function() {
tablet_slots.push( googletag.defineSlot( “/1005424/_dPSv4_tab-all-article-bottom_(300×250)”, [300, 250], “pb-ad-78623” ).addService( googletag.pubads() ) ); } );
googletag.cmd.push(function() {
mobile_slots.push( googletag.defineSlot( “/1005424/_dPSv4_mob-all-article-bottom_(300×250)”, [300, 250], “pb-ad-78158” ).addService( googletag.pubads() ) ); } );
The post PhotoPills: The Photographer’s Swiss Army Knife by Francesco Gola appeared first on Digital Photography School.

Digital Photography School











You must be logged in to post a comment.