RSS
 

Posts Tagged ‘Kaleidoscope’

Fractal Filters are faceted photo filters that turn your camera into a kaleidoscope

07 Jan

There’s no shortage of weird and wild photography accessories designed to add a little flair to photographs, but Fractal Filters might be one of the most interesting to hit the market in some time.

Created by Nikk Wong and originally funded on Kickstarter, Fractal Filters are creative photo filters designed to add prism-like effects to photographs using shaped and faceted glass elements.

Currently, the Fractal Filters are sold in a ‘Classic 3 Pack’ that use the patented PrismaLed optics and unique cuts to add rainbows, reflections, and halos to photographs. The kit includes the Penrose Fractal Filter, Pascal Fractal Filter, Julia Fractal Filter, a carrying case, and a sticker.

$ (document).ready(function() { SampleGalleryV2({“containerId”:”embeddedSampleGallery_2265290105″,”galleryId”:”2265290105″,”isEmbeddedWidget”:true,”selectedImageIndex”:0,”isMobile”:false}) });

The filters are made to be held by hand in front of a camera lens using the three extra-large finger holes built into the aluminum frame. Wong suggest using lenses with a focal length longer than 40mm and at F5.6 or wider, but the idea is to get creative, so don’t feel limited.

In Wong’s own words, ‘Fractal Filters are designed to provide the user a unique way to look through the lens, both making difficult shooting situations easier and easy situations more spontaneous and creatively elastic.’ Below is a gallery of sample images capture with the Fractal Filters:

$ (document).ready(function() { SampleGalleryV2({“containerId”:”embeddedSampleGallery_8071872203″,”galleryId”:”8071872203″,”isEmbeddedWidget”:true,”selectedImageIndex”:0,”isMobile”:false}) });

The ‘Classic 3 Pack’ kit is available for $ 99 on Fractals’ website and includes the Penrose Fractal Filter, Pascal Fractal Filter, Julia Fractal Filter, a carrying case, and a sticker.

Articles: Digital Photography Review (dpreview.com)

 
Comments Off on Fractal Filters are faceted photo filters that turn your camera into a kaleidoscope

Posted in Uncategorized


How to Create a Kaleidoscope and Make Unique Abstract Images

22 Apr

Struggling to remain creative

I’ve recently been struggling to shoot creative images and found myself in a rut battling to see things with fresh eyes. As I needed to come up with a topic for my next article (this one!), I decided to take this as an opportunity to experiment and come up with some new ways to shoot abstract images.

How to Create a Kaleidoscope and Make Unique Abstract Images

Here’s one of the images I took using the kaleidoscope I made. I processed this image in Analog Efex.

Inspiration can come from anywhere

I decided to focus on abstract images since they seem to be speaking to me lately. The challenge became to create unique abstracts and have fun at the same time. Well, I happened to come across this video on the web. I was looking for a craft to create with my son, and the idea sprang from there.

The Construction Details

How to Create a Kaleidoscope and Make Unique Abstract Images

Here’s the finished Kaleidoscope. It’s a pretty simple design.

I decided to adapt this idea and create something I could use with my DSLR. I went to my local home renovation store purchased a mirror and had them cut it into three sections. My mirrors are 16cm wide by 31cm long. I chose this size so that my wide angle lens could fit inside the kaleidoscope opening. I didn’t want any of the outer edge included in my images.

Clear packing tape was used to attach the mirrors forming a triangle. I then taped three pieces of cardboard around the outside of the mirrors. This was done to protect my hands from the sharp edges of the glass.

How to Create a Kaleidoscope and Make Unique Abstract Images

Here’s a top view. You can see that it was a pretty rough tape job.

You could certainly choose to attach more mirrors together if you want. The important thing to remember is that you always want to use an uneven number of mirrors so that the shape is more conducive to creating abstracts. The look of the image you shoot will change with the size and number the mirrors you use. Have fun and experiment.

How to Create a Kaleidoscope and Make Unique Abstract Images

I used both my Canon 5D with a wide angle lens and my phone. Note that this technique doesn’t work with a telephoto lens.

Now it’s time to have fun and play

After constructing my kaleidoscope, it was time to start experimenting. I immediately thought of trying to photograph some flowers. My idea was to place a bright bloom on a black background. I was curious about what types of images I could create.

Unfortunately, Mother Nature wouldn’t cooperate. We had a massive snowstorm, and I was stuck in my house with no chance to purchase some flowers. So it was time to experiment with other items. I found some square pieces of felt sitting around my house and decided to try using them. Here are the results.

How to Create a Kaleidoscope and Make Unique Abstract Images

Here you can see how I set up the kaleidoscope with some pieces of felt underneath it.

How to Create a Kaleidoscope and Make Unique Abstract Images

I again took this image into Analog Efex for editing.

As you can see, my kaleidoscope created some rather interesting designs and shapes. It was a lot of fun to see what types of designs could be created. I used several different items in front of the mirrors. I tried fabric, tinfoil, camera lenses and even Lego toys.

People photos

After experimenting with so many different materials, it was time to try it with people. My son was willing to have his photo taken. Here are the results. He spent a few minutes giggling at the images. It would be interesting to see what a larger kaleidoscope and mirrors might do to portraits like this.

How to Create a Kaleidoscope and Make Unique Abstract Images

It’s an interesting effect. My son loved messing around with it.

I then experimented with photos of a good friend. These images were shot through the kaleidoscope from images projected on my computer screen. They were taken from different Facebook photos. It was a lot of fun, and he was certainly entertained by the results as much as I was. I truly appreciate him allowing me to post the results here on the web. Thanks, Ali.

How to Create a Kaleidoscope and Make Unique Abstract Images

He was hesitant at first to let me post this but we had a lot of fun messing around with the image. There’s a little bit of banding from the computer screen but oh well we were just having fun.

Drawbacks of the experiment

One of the things I noticed as I shot was the very fuzzy and slightly darker reflections. That bothers me. Parts of the image that contained the original piece of fabric were much brighter and sharper than the reflections. I found the effect to be quite displeasing. So, I need to experiment more with the kaleidoscope to try and alleviate that.

Perhaps a light shining from above might change this effect, it is something I will consider for the future. As you can see from this experiment, I used a very rough and simple set up. It was put together quite quickly. In the future, it would be beneficial to try several different methods for positioning the kaleidoscope and my camera. You will note that I used both my DSLR and my cell phone for these shots. I used the Lightroom mobile App as it allowed me to use some pretty specific manual controls.

How to Create a Kaleidoscope and Make Unique Abstract Images

I used my phone for several of the shots.

Things learned from this experiment

This whole activity was very insightful. It was well worth the afternoon I spent creating and shooting. It has sparked my curiosity. As a result, I created a list of questions that can be used to further the project and inspire more creative shooting.

  1. What types of objects look best when shot with a kaleidoscope?
  2. How can post-processing change the look and feel of these abstract images?
  3. What would be the effect of a larger kaleidoscope?
  4. What would happen if I added much smaller sections of mirrors to a kaleidoscope?

There’s so much more that I can learn from this exercise. It feels like just the surface has been scratched. The use of mirrors for creating interesting abstracts is now on my list of projects. If you’ve experimented with different techniques, tell us about it. Share your experiments good or bad. There’s so much to learn. There’s also a lot of fun to be had during that experimentation. Perhaps as I perfect this technique, I will produce a further article that will contain my lessons learned. But for now, I hope my afternoon of tinkering will inspire you to try new ways of creating images.

How to Create a Kaleidoscope and Make Unique Abstract Images

This is a shot taken from my computer screen through the kaleidoscope.

How to Create a Kaleidoscope and Make Unique Abstract Images

I used black velvet and an old lens from my film camera for this shot. I think this one is my favorite images.

There’s so much to learn. There’s also a lot of fun to be had during the experimentation phase. Perhaps as I perfect this technique, I will produce a further article that will contain my lessons learned. But for now, I hope my afternoon of tinkering will inspire you to try new ways of creating images.

The post How to Create a Kaleidoscope and Make Unique Abstract Images by Erin Fitzgibbon appeared first on Digital Photography School.


Digital Photography School

 
Comments Off on How to Create a Kaleidoscope and Make Unique Abstract Images

Posted in Photography


How to Turn Your Images into Kaleidoscope Patterns

29 Nov

This tutorial is a lot of fun, transforming photographs into kaleidoscopic wonders, often with surprising results. The resulting kaleidoscope patterns make fantastic desktop backgrounds and wallpapers too.

Remember kaleidoscopes? Those curious tubes with an array of mirrors and colorful beads inside? As a kid, I would while away sunny weekends straining my eye against the viewing aperture, hypnotized by the endless combination of shapes, patterns, and colors. Although I now spend most of my time looking through the viewfinder of a camera, the magic of the kaleidoscope remains in my mind as an early foray into image making.

Step 1 – Setting up the canvas
kaleidoscope-01

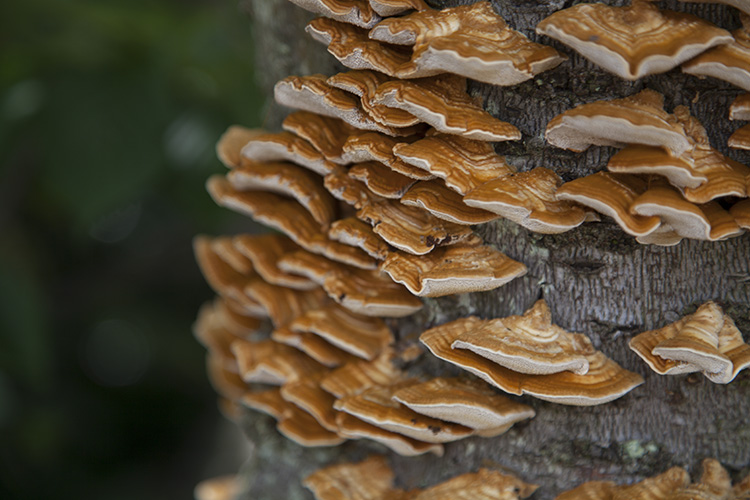
First, select a photograph. I’ve chosen this photograph of some fungi growing on an old tree stump. From my own experimentation I’ve found images with bold, contrasting colors and negative space result in the best kaleidoscopic images.

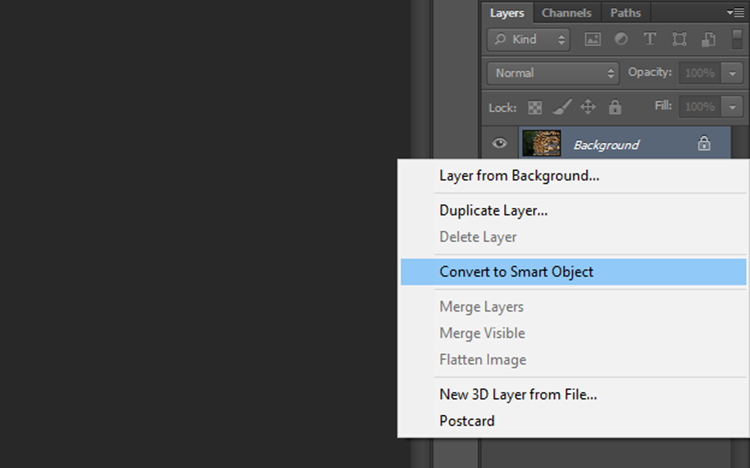
Once you have selected an image and opened it in Photoshop, right click on the image in the layers panel and select Convert to Smart Object. This will enable you to move the image around the canvas.
kaleidoscope-02

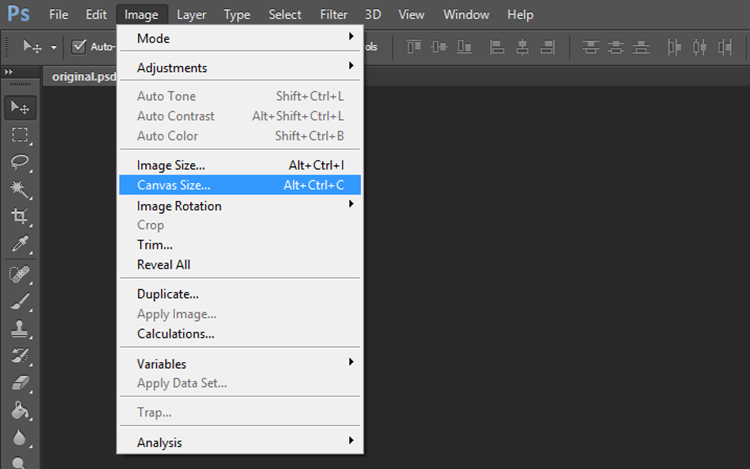
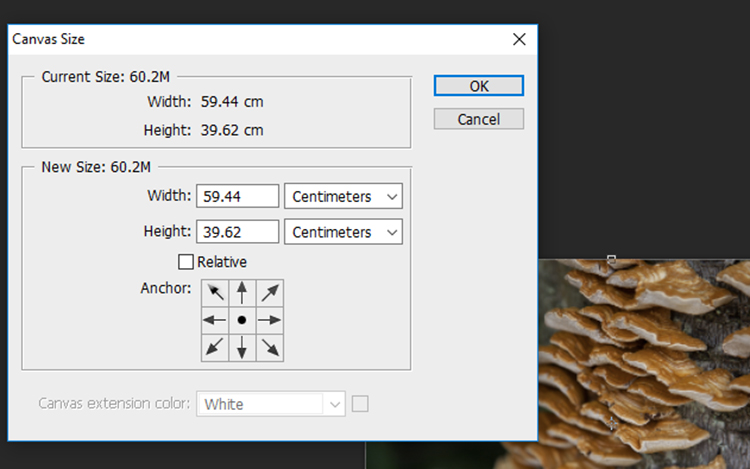
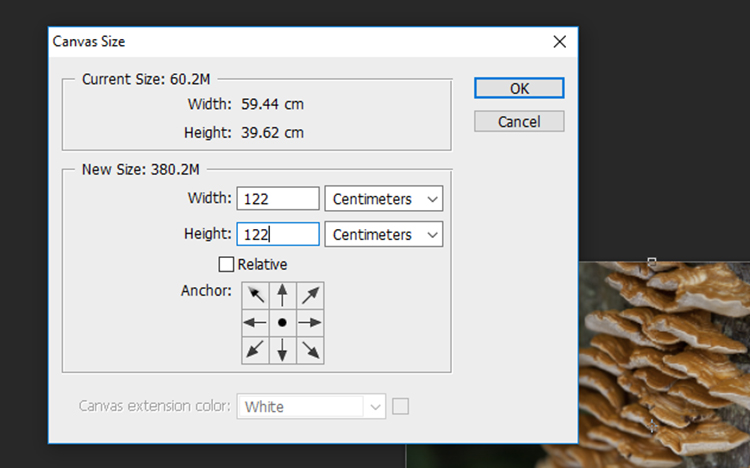
Now we need to add some space around the image. Go to Image > Canvas Size and a window will pop up with the dimensions of your current image.
kaleidoscope-03

To calculate the dimensions of the canvas, look at the largest side of the image, double that figure and add four. For example, the image I selected was originally 59.44 x 39.62cm so I multiplied 59 by 2 to get 118m then added 4 to get 122. Add the same value to the smaller side of the image so that the canvas will be square. Click OK.
kaleidoscope-04

kaleidoscope-05

Step 2- Creating the template

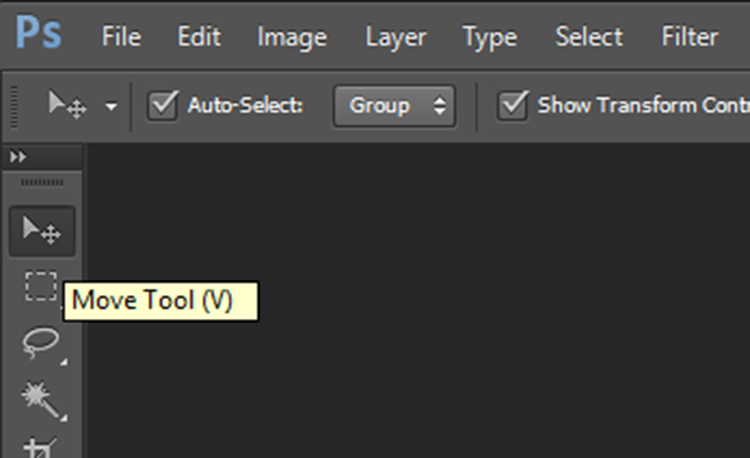
Zoom out so you can view see the entire canvas and select the Move Tool located at the top of the left toolbar.
kaleidoscope-06

kaleidoscope-07

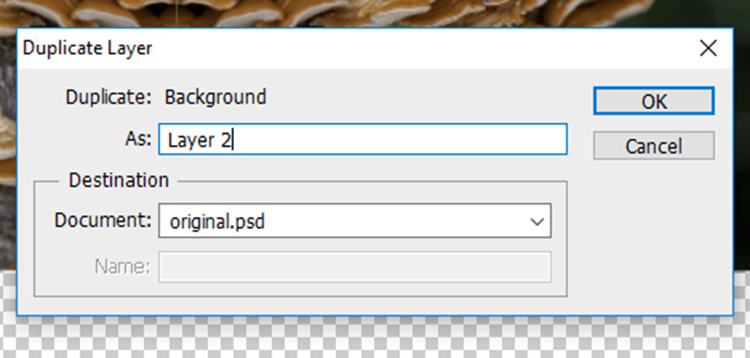
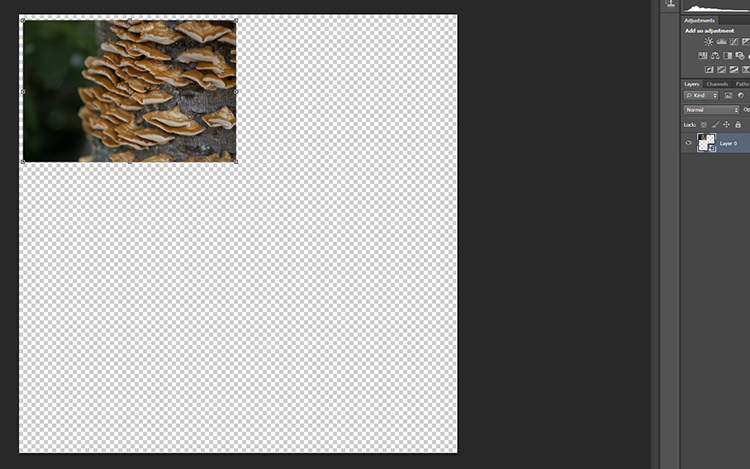
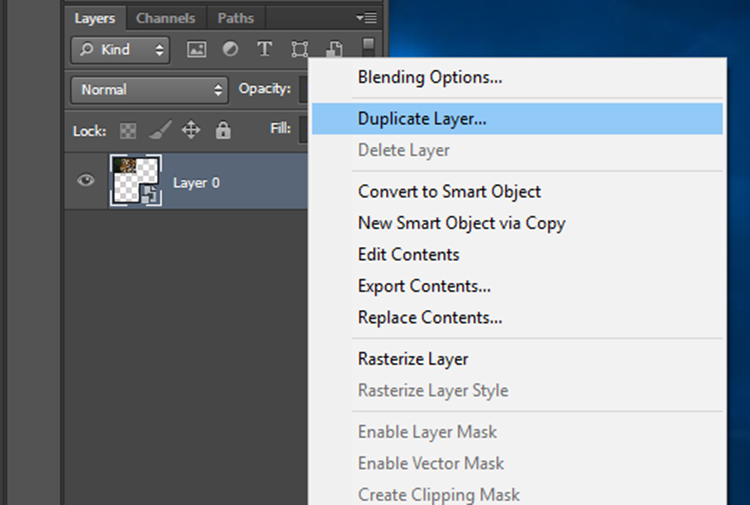
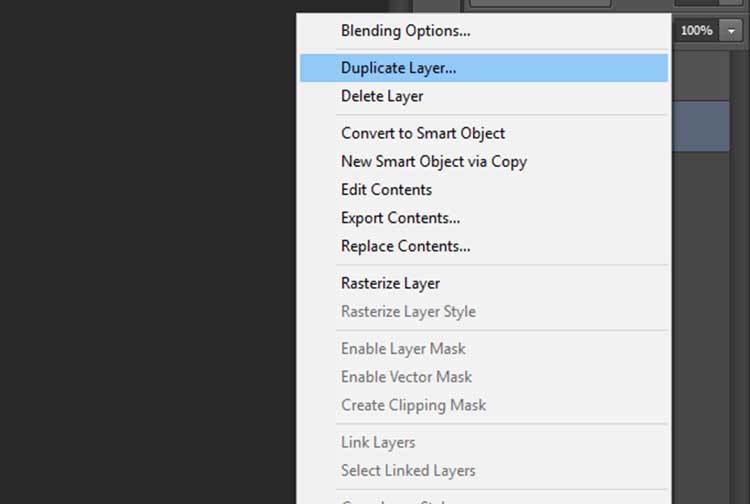
Click on your photograph on the canvas, and with the left mouse button depressed, drag the image to a corner of the canvas. Leave a few centimeters between the image and the edge of the canvas. Don’t worry about making this too exact as we will crop it to more exact proportions later. Now, duplicate this layer by right clicking it in the layers panel and selecting Duplicate Layer (or use the keyboard shortcut Cmd/Ctrl+J).
kaleidoscope-08

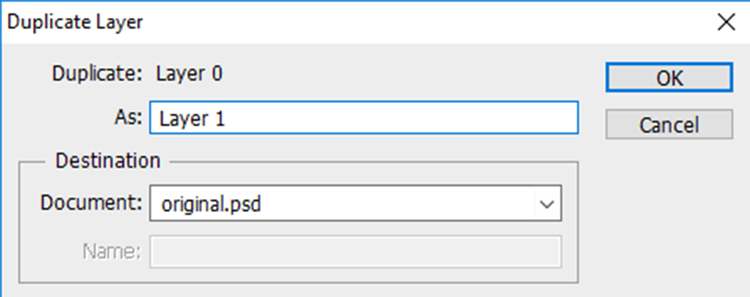
In the Duplicate Layer prompt, rename this layer as “Layer 1” as we will be duplicating a number of layers over the next few steps. Click OK and a new layer will appear in the layers panel.
kaleidoscope-09

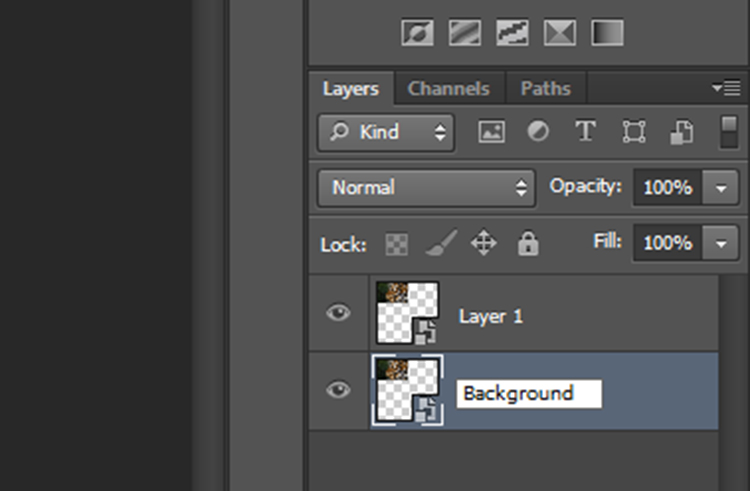
Rename the original image layer as “Background” by double clicking on the name “Layer 0” in the layers panel. This will help avoid confusion later.
kaleidoscope-10

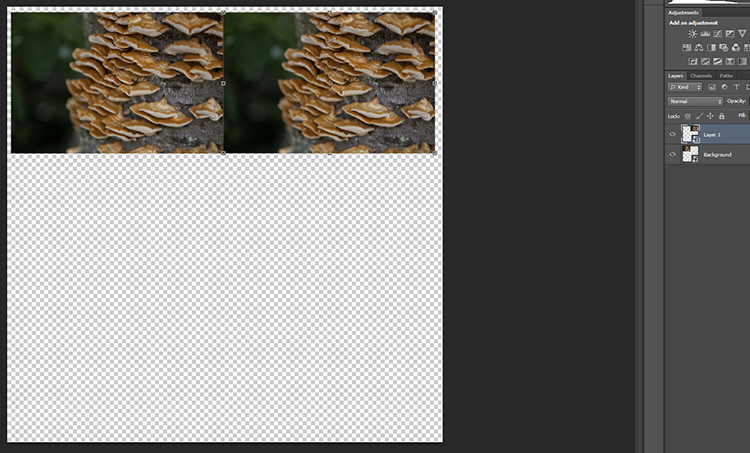
At the moment, both layers will be in the same spot on the canvas, with Layer 1 sitting on top of Background. With the Move Tool selected, click on the top layer, and with the left mouse button depressed, drag Layer 1 next to the Background image.
kaleidoscope-11

kaleidoscope-12

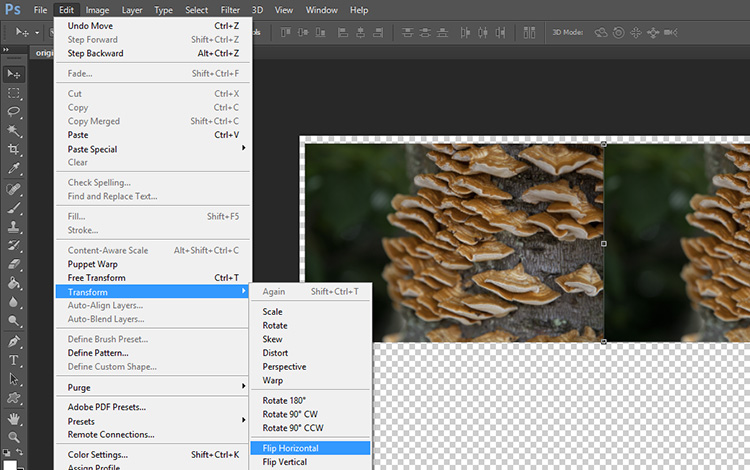
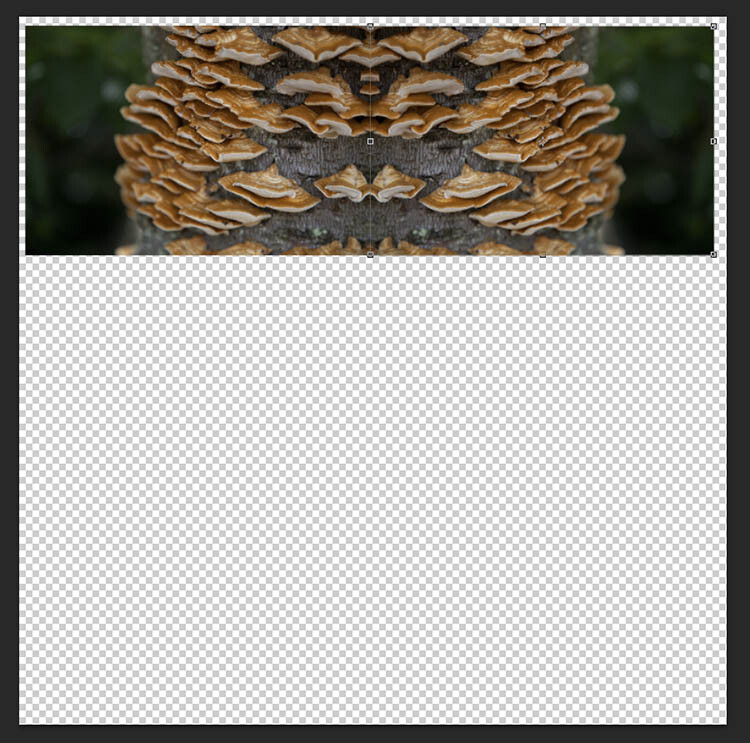
Keeping Layer 1 selected, click Edit on the main toolbar and then Transform > Flip Horizontal. Layer 1 will flip to create a mirrored image of the Background.
kaleidoscope-13

Your image should look something like this now.

Just two more to go!

Duplicate the Background layer again, and when the prompt window appears, rename it “Layer 2”.
kaleidoscope-14

kaleidoscope-16

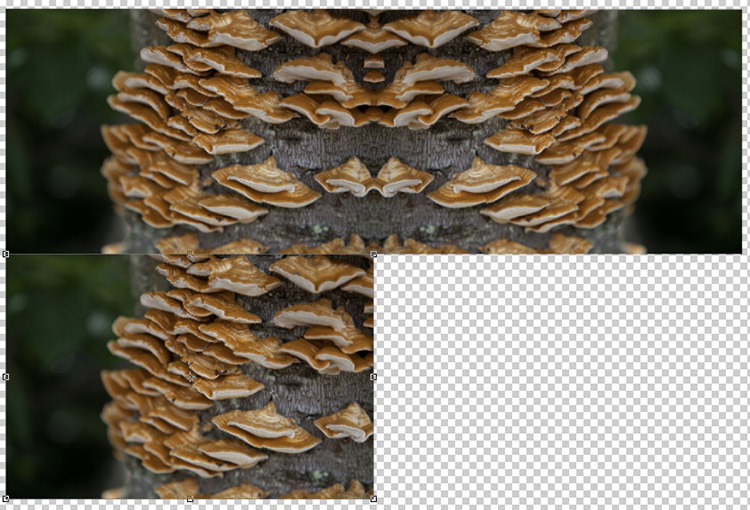
With the Move Tool selected, click on the newly created Layer 2 (which will be over Background). Keep the left mouse button depressed, and drag Layer 2 underneath Background.
kaleidoscope-17

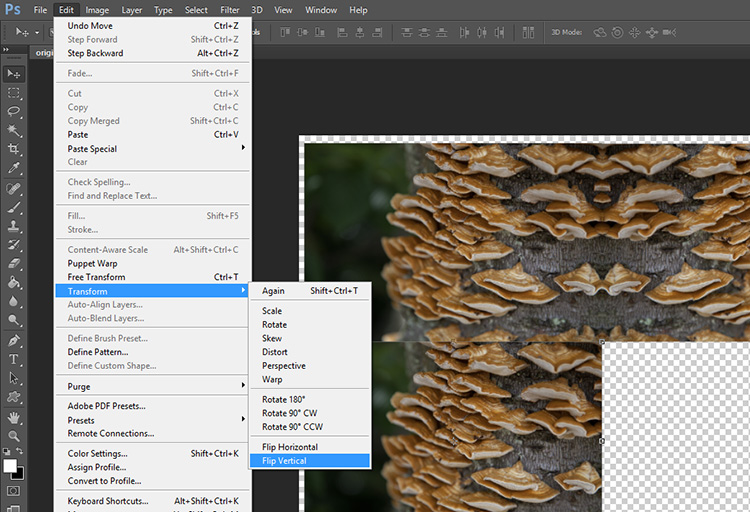
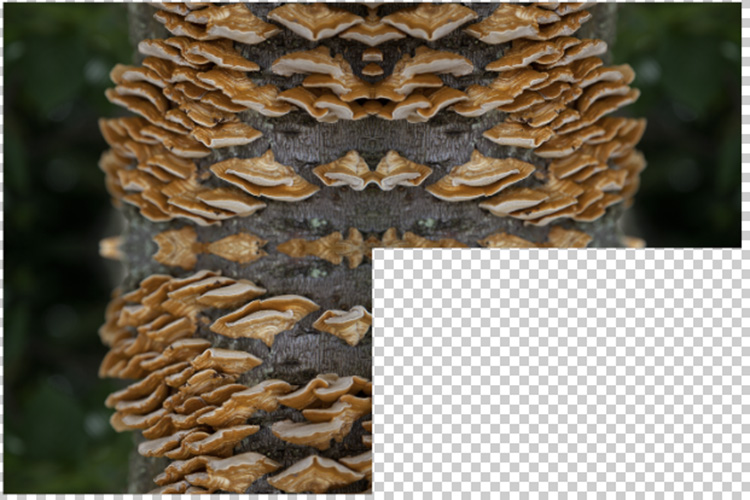
With Layer 2 selected, click Edit on the main toolbar and then Transform > Flip Vertical. Layer 2 will flip vertically to create a mirrored image of Background from below.
kaleidoscope-18

kaleidoscope-19

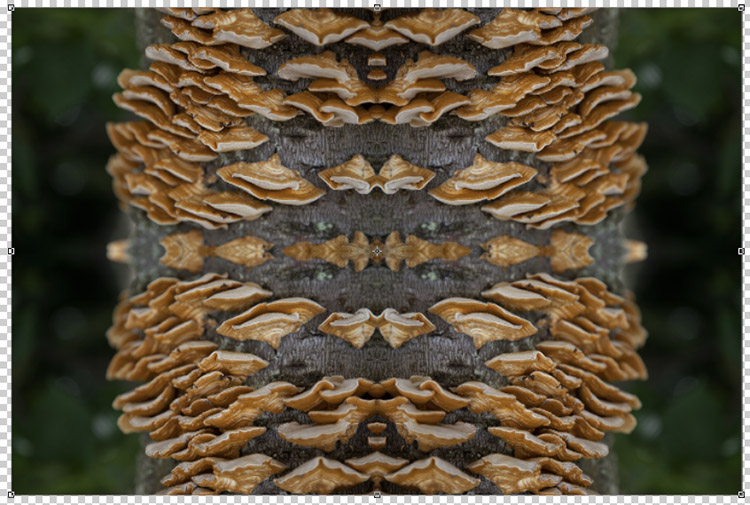
Duplicate Background one more time, this time naming the layer “Layer 3”. With the Move Tool selected, click on the newly created Layer 3 (which will be over Background) and with the left mouse button depressed, drag Layer 3 into the remaining slot to complete the rectangle.

With Layer 3 selected, click Edit on the main toolbar and then Transform > Flip Horizontal. To complete the pattern, keep Layer 3 selected click Edit on the main toolbar and then Transform > Flip Vertical.
kaleidoscope-20

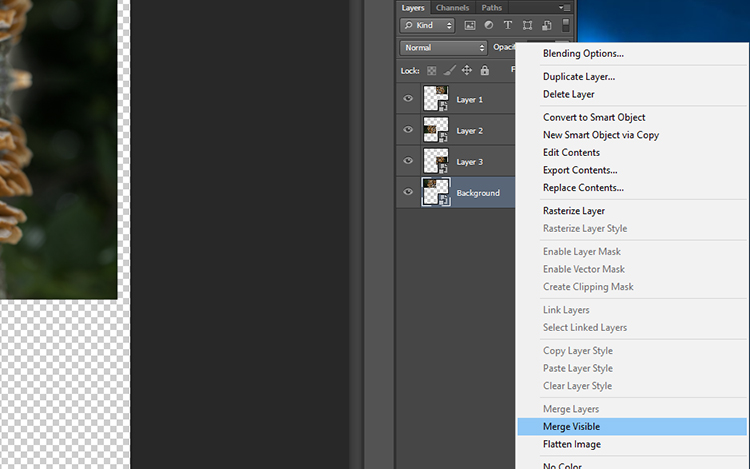
The next step is to merge the layers of the rectangle you have made so that it can be moved around as one layer. To do this, right-click on the layer titled Background in the layers panel and select Merge Visible.
kaleidoscope-21

If it hasn’t done so automatically, it is a good idea to rename this merged layer as “Background” so it will be easier to keep track of which layers are where. You now have the template for your kaleidoscopic image!

Step 3 – Creating the kaleidoscope

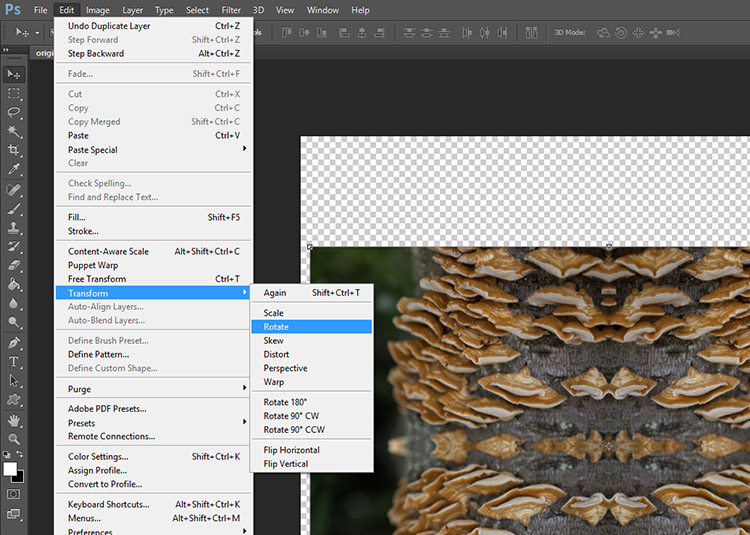
Select the Background layer, and with the Move tool selected, drag the layer into the center of the canvas. Right-click on Background in the layers panel and select Duplicate Layer. Rename this layer as “Layer 1”.

With Layer 1 selected, click Edit > Transform > Rotate.
kaleidoscope-22

In the Transform settings panel, there is a text box next to the symbol of an angle. In this text box, type 45 and press enter. Layer 1 will be rotated to a 45-degree angle.

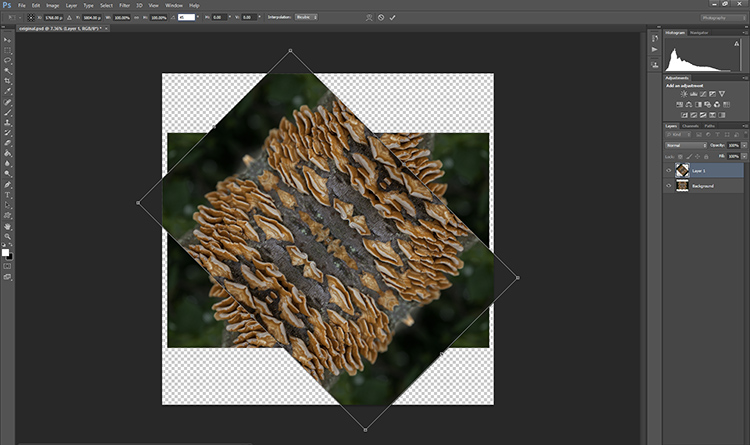
kaleidoscope-23

kaleidoscope-24

Duplicate Background again, this time renaming the layer “Layer 2”. With Layer 2 selected in the layers panel, click Edit > Transform > Rotate. In the Transform settings panel, in the text box next to the angle symbol, enter -45 and press enter.

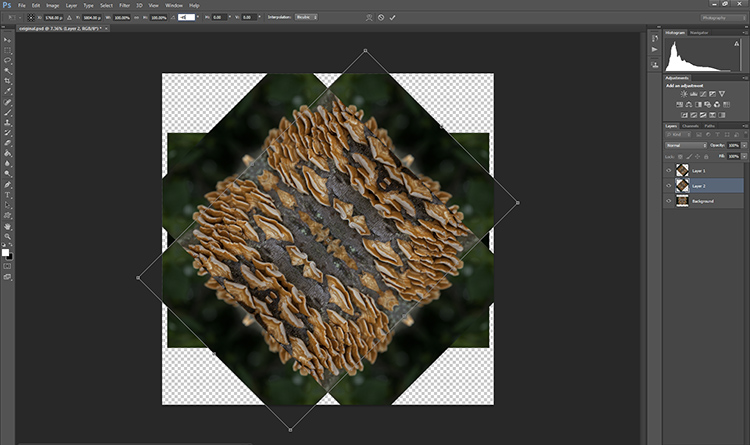
kaleidoscope-25

kaleidoscope-26

Duplicate the Background layer one last time, renaming the layer “Layer 3”. With Layer 3 selected in the layers panel, click Edit > Transform > Rotate. In the Transform settings panel, in the text box next to the angle symbol, enter 90 and press enter. The layer will be rotated 90 degrees.

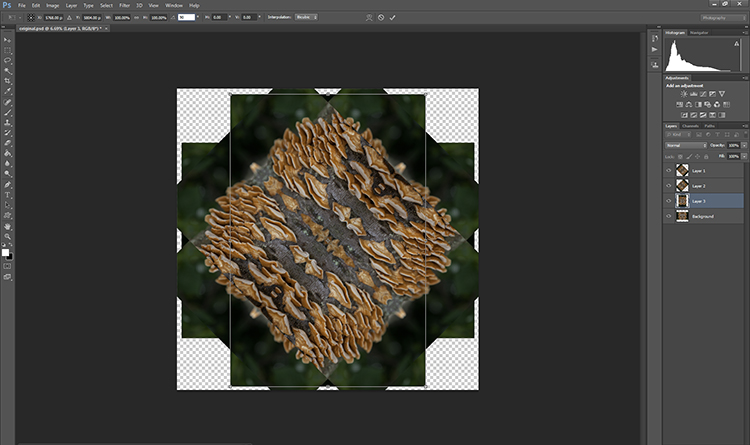
kaleidoscope-27 kaleidoscope-28

Step 4 – Blending Modes

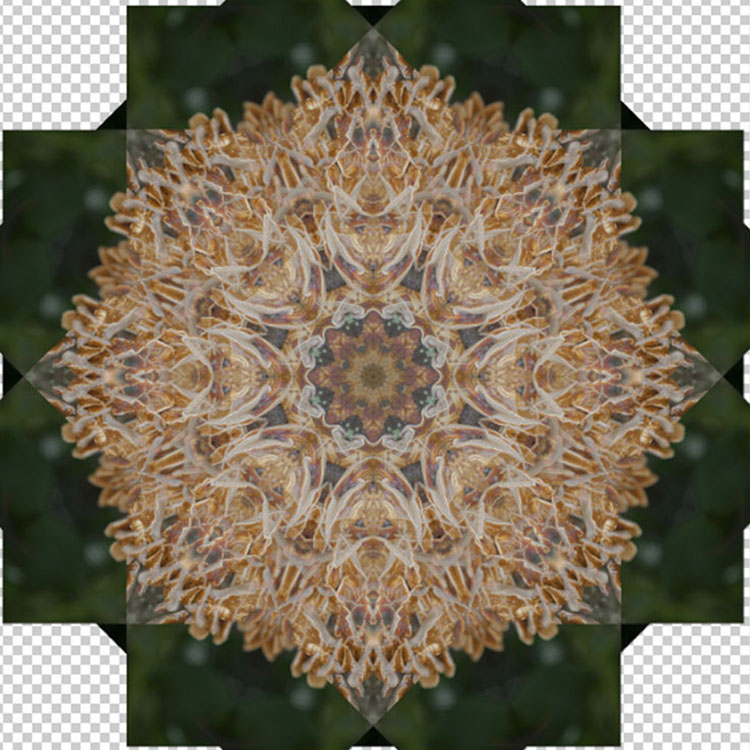
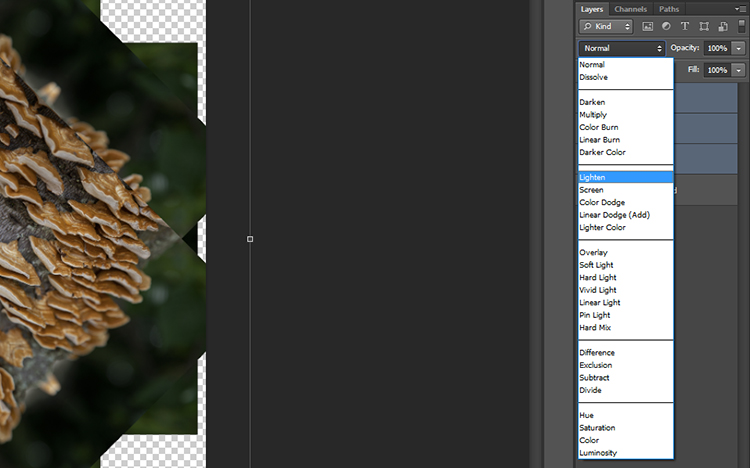
Select the top three layers in the layers panel by holding down the shift key and clicking on Layers 1, 2, and 3. With the layers selected, click on the Blending Mode drop down menu (red arrow below) and select the Lighten option. The selected layers will blend to form a kaleidoscope pattern.
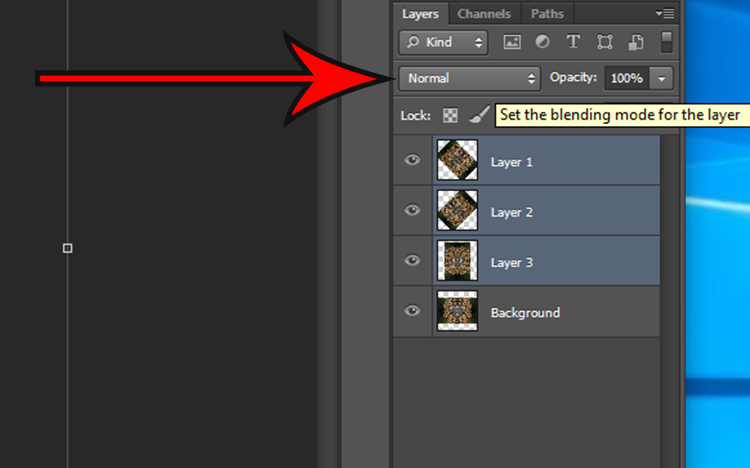
kaleidoscope-29

kaleidoscope-30

kaleidoscope-31

Crop it

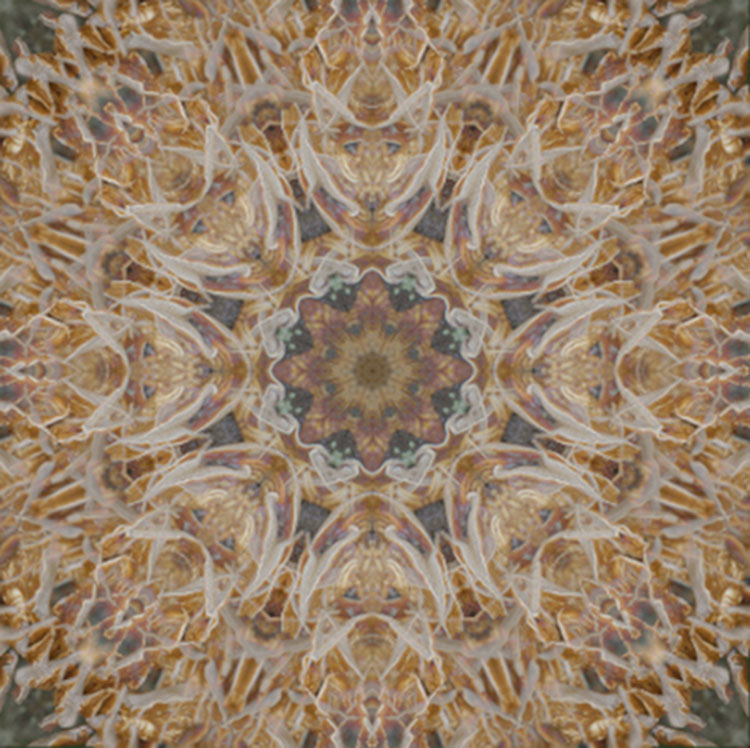
To neaten up the image you can crop the edges of the kaleidoscope down to a square or rectangle. With the Crop Tool selected, hold the shift key on your keyboard and drag the corners of the Crop Tool over the image to create a square or rectangle. When you are happy, press enter and save the image via File > Save As.
kaleidoscope-32

Step 5 – Making a desktop background

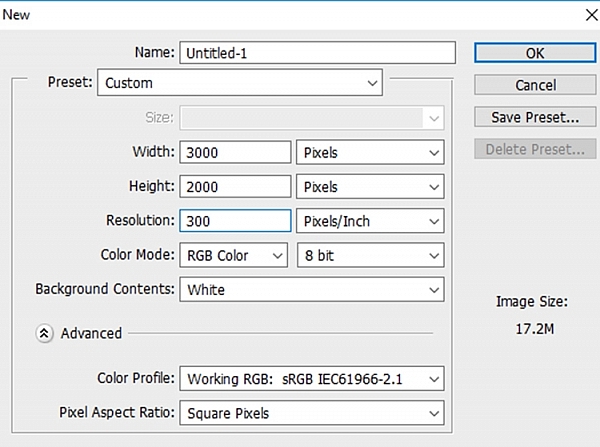
To make a wallpaper effect, open a new Photoshop document by selecting File > New and entering the dimensions 3000 pixels by 2000 pixels in the text boxes. Make sure the resolution set to at least 300 pixels/inch, so it will look nice on a large monitor screen.
kaleidoscope-33

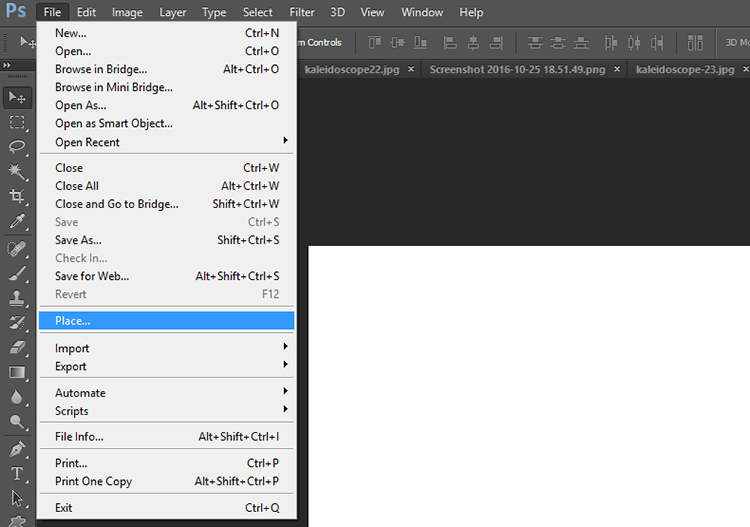
Select File > Place… and select your new kaleidoscope file.
kaleidoscope-34

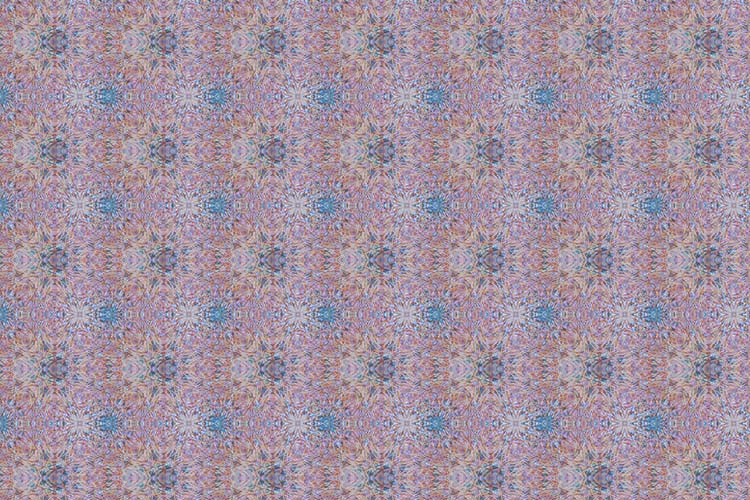
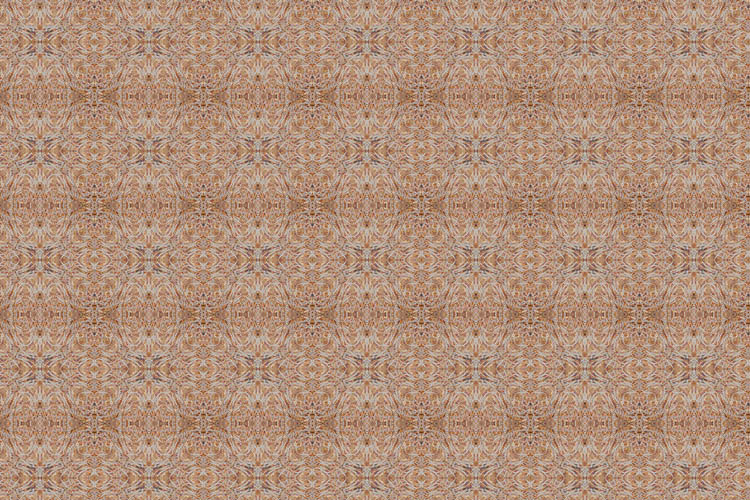
Once placed in the Photoshop canvas, you can choose to duplicate the image any number of times to create an interesting pattern, or add layers on top of one another and have fun experimenting with more Blending Modes. The possibilities are endless! Here are a few ideas.

Have you done this technique before to make a kaleidoscope pattern? Please share your results in the comments section below.
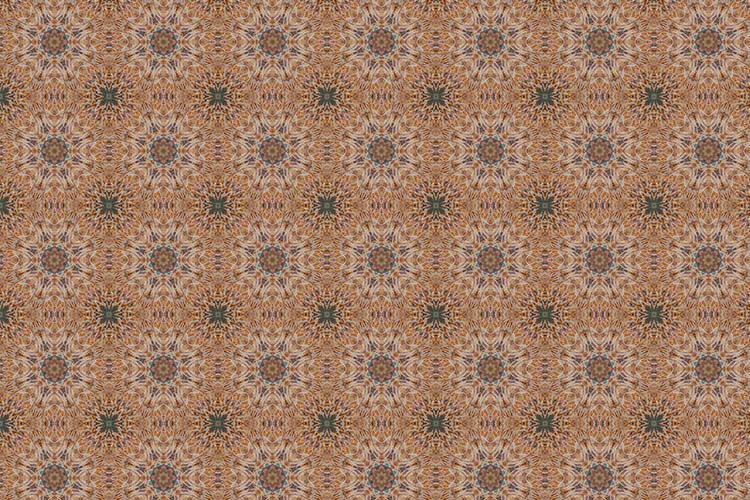
desktop

desktop-01

desktop-02

googletag.cmd.push(function() {
tablet_slots.push( googletag.defineSlot( “/1005424/_dPSv4_tab-all-article-bottom_(300×250)”, [300, 250], “pb-ad-78623” ).addService( googletag.pubads() ) ); } );

googletag.cmd.push(function() {
mobile_slots.push( googletag.defineSlot( “/1005424/_dPSv4_mob-all-article-bottom_(300×250)”, [300, 250], “pb-ad-78158” ).addService( googletag.pubads() ) ); } );

The post How to Turn Your Images into Kaleidoscope Patterns by Megan Kennedy appeared first on Digital Photography School.


Digital Photography School

 
Comments Off on How to Turn Your Images into Kaleidoscope Patterns

Posted in Photography