RSS
 

Posts Tagged ‘Inverse’

The Inverse Square Law & Color Temperature

08 Jul

Image by Alana Tyler Slutsky from her Surrealia series as featured on Fashion Photography Blog (FashionPhotographyBlog.com)

LIGHT: THE INVERSE SQUARE LAW & COLOR TEMPERATURE


Hey FashionPhotographyBlog.com readers,

Welcome back and hang tight! Last time we are talked about the science behind lighting.

Today’s topic gets a little confusing.

The “Inverse Square Law” shapes EVERYTHING in photography.

What does that even mean?! When opening up a stop, the light doubles. When closing down a stop, the light halves. This is applicable to light as well as all aspects of your camera: aperture, shutter, ISO.

*DISCLAIMER* Before we get into this:

LEARN YOUR APERTURE AND SHUTTER VALUES! It’s the only way any of this will make sense.

Aperture and Shutter Values Chart as featured on Fashion Photography Blog (FashionPhotographyBlog.com)

As far as light goes, if you move a light x2 as close, it appears x4 larger. If a light is moved x2 away, it appears 1/4 of the original size. Surface Area = Distance ²

As far as the Inverse Square Law goes according to your camera (All numbers here are purely for example purposes)… If you have an aperture of f/11 and open up to f/8, the amount of light coming into your camera will double (same can be said of you change from ISO of 400 to 800 or a shutter speed of 1/60 to 1/30). If you have an aperture of f/11 and stop down to f/16 the amount of light coming into your camera will be cut in half (same can be said of you change from ISO of 400 to 200 or a shutter speed of 1/60 to 1/125.)

Real life example:

A light at 5′ with a meter reading of f/8 gives 100% (correct exposure)

A light at 10′ with a meter reading of f/4 gives 25% (2 stop difference. Your image is now underexposed.)

Basically… As you move away, the cone of light gets wider but weaker. Using the outer cone of light for weaker light output is called feathering and gives you a more diffused light.

Light Intensity to Light Source Chart as featured on Fashion Photography Blog (FashionPhotographyBlog.com)

Color Temperature

All lights have a different and specific color temperature, which is measured in Kelvins. The lower the number, the warmer the color is, the higher the number, the cooler the color the light gives off.

Color Temperature Chart as featured on Fashion Photography Blog (FashionPhotographyBlog.com)

Be certain to set your own white balance based on the type of light you’re shooting in. White balance in camera makes up for changes in color based on the type of light you’re shooting with. Color shifts will occur when color temperature is not balanced correctly. If you don’t know what type of light you’re in, you can always use Auto White Balance (AWB)- when using AWB the camera figures out (approximately) what the color temperature is of the light source you’re shooting in and shifts colors in camera accordingly.

White Balance examples as featured on Fashion Photography Blog (FashionPhotographyBlog.com)

The most common types of light used in photography are continuous lights and flash.

Continuous lighting, such as hot lights, are.. You guessed it… A continuous form of light.  This type of light, with incandescent bulbs, are tungsten balanced.  There are special bulbs and special lights referred to as “HMI’s.” These lights have bulbs which are balanced to day-light. HMI’s are commonly used in the film industry.

Flashes (Strobes) are short bursts of light and are balanced to daylight. Types of flash include but are not limited to speed lights, mono-lights (single flash units), pack lights (generator and flash head units), ring lights, etc.

Now that you have dealt with all of the boring stuff, check in tomorrow to see how everything from the past two days applies to real life and shooting.

See you tomorrow –

Alana


IMAGE SOURCE:

Feature image & image 1: photography by Alana Tyler Slutsky from her Surrealia series. To view the rest of the photos from this series visit her website.

Image 2, 3, 4 & 5: Alana Tyler Slutsky

Fashion Photography Blog

 
Comments Off on The Inverse Square Law & Color Temperature

Posted in Uncategorized


An Introduction to the Inverse Square Law

21 Aug

I don’t know about you, but I was never much of a math student.  I needed a tutor in high school for both geometry and physics.  I chose a double major in college (Journalism/English) that required no math.  I practiced law for fourteen years, where any math I needed was either pretty easy or done on a calculator.  Even when I ditched my briefcase for a camera bag and embarked on a new career, I felt pretty secure in the knowledge that confusing math had no place in the world of photography.

And then the Inverse Square Law reared its ugly head.

It didn’t jump out and attack me right away.  No– the Inverse Square Law is much too cunning for that.  It was patient.  It bided its time.  It waited for me to get comfortable in my new skin a professional photographer.  It waited for me to feel secure in my knowledge and execution of studio lighting and off-camera flash.  And then it showed itself.

We all deal with light.  It is the defining element of what we do.  We capture light in a box and use it to tell a story.  Some photographers put themselves in the “natural light” category, while others work their magic with a firm grasp of off-camera flash.  While the Inverse Square Law comes into play more often with strobes, it is absolutely a concept that applies to every light source, and therefore affects every photographer.

So, what is it?  In all of its overly technical glory, the Inverse Square Law– as it applies to photography– is an equation that relates the intensity of a light source to the illumination it produces at any given distance.

Huh?

Regardless of how you classify yourself as a photographer, you already know that light travels.  It can be diffused.  It can be reflected.  It can be deflected.  But it travels.  This means that over time and distance its intensity can and will diminish.  What does that mean for your photography?  It means that doubling the flash-to-subject distance reduces the light falling on the subject to one-quarter.  Logically, we might assume that doubling the distance would reduce the power by half.  In actuality, however, doubling the distance reduces the power by 75%  More simply put, the Inverse Square Law is used (among other things) to determine the fall-off– the difference in illumination on a subject as it moves farther away from the light source.

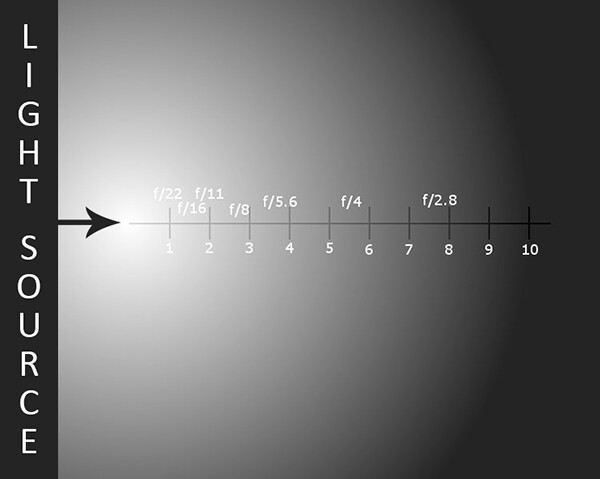
Let’s take a look at a graphic that will help us get our heads around this.  We are looking at a blank wall approximately ten feet long, illuminated with a single light source.  Meter readings along the wall show the progression of one-stop increments.  Notice how we move one stop from f/22 to f/16 in a matter of inches, yet we move one stop from f/4 to f/2.8 over the course of a few feet.

The Inverse Square Law relates the intensity of a light source to the illumination it produces at any given distance.

The Inverse Square Law relates the intensity of a light source to the illumination it produces at any given distance. One-stop increments are spread over a wider area the farther the light travels.

Now that we understand what the Inverse Square Law is and how it affects the intensity of light, how do we apply it to our photography?  Let’s assume that we are photographing a family of four on our wall.  If we position them closer to the light– let’s say in the f/8 – f//11 range– we are going to have a lot of contrast between the subjects.  Those closer to the light source catch the brunt of the light and may be overexposed, while those further from it could be underexposed.  The variance in the light over such a short distance means the light falling on our subjects will be very uneven.  If, on the other hand, we move our family down the wall to the 7- or 8-feet mark, we have a wider area in which to achieve a more even exposure across the group.

Remember, though, that the same principles apply not only to our subjects, but to the relationship between the light source and the background as well.  If we are photographing our imaginary family with a plain white wall for a background, simply moving them closer to or farther away from the wall will affect whether the wall appears white, gray, or even black.

So far, we’ve discussed what the Inverse Square Law is and how it applies to off-camera flash.  But what about natural light?  The same concept applies, whether you are using window light, a reflector, a sunset, or any other non-electrical light source.  The principles of how light travels do not change just because the light in question has no batteries.  Doubling your subject’s distance from the window, for example, is going to result in the same 75% drop in intensity that you will experience with strobes or speedlights.

So, what’s the bottom line?  The best advice I can give about the Inverse Square Law is to simply be aware of it and understand its potential impact on your photos and lighting setups.  The more you understand light and how it behaves, the better equipped you will be to efficiently compose and create consistent images with less trial and error.


Post originally from: Digital Photography Tips.

Check out our more Photography Tips at Photography Tips for Beginners, Portrait Photography Tips and Wedding Photography Tips.

An Introduction to the Inverse Square Law


Digital Photography School

 
Comments Off on An Introduction to the Inverse Square Law

Posted in Photography