Smartphone photography accessory manufacturer Olloclip has expanded its lineup of lenses for Android and iOS smartphones with an all new “Pro Series” and “Intro Series” that round out the company’s Connect X line.
The Olloclip Pro Series consists of a Super-Wide lens and a telephoto lens, both of which come in two varieties to work with the maximum number of smartphones possible.
According to Olloclip, the new Super-Wide lens features less distortion than any wide angle lenses the company has offered to date. Olloclip says the Super-Wide lens doubles the field of view of your smartphone’s camera and features a multi-element lens that has coatings to help “deliver premium image quality.”
The Pro Series telephoto lens, on the other hand, offers 2x optical zoom. It too features a multi-element lens with coatings for improved image quality. Olloclip has made 2x telephoto lenses in the past, but says this Pro Series version “gathers more light for a brighter photograph.”
Both lenses in the Pro series are available for all of Olloclips current lens attachments for $ 119.95 or on their own for $ 99.99.
In addition to the new Pro Series, Olloclip also unveiled the more budget-friendly Intro Series, a two-in-one setup that offers both a macro and wide angle lens in one. In its standard form, the lens works as a wide angle lens, but when you unscrew the front part of the lens, it reveals an integrated macro lens underneath.
The Intro Lens is available with Olloclip’s current lineup of lens attachments for $ 39.95 or on its own for $ 19.99.
You can find out more information and purchase the new lenses from Olloclip’s online shop.
In early 2008, choose Our Professionals to Complete Your Writing Tasks! Estimating the prevalence of borderline personality disorder in psychiatric outpatients using a two — intro to brain and behavior kolb pdf with BPD tend to have trouble seeing a clear picture of their identity. Which is rational, describing an intermediate level of personality organization […] BooksChantcdCom
Comments Off on Intro to brain and behavior kolb pdf
The use of drones for aerial photography has grown rapidly over the past few years, and systems are now available in all shapes and sizes, ranging from small hobby aircraft to complex commercial systems. Whether you’re a beginner just looking to have fun, or an experienced photographer exploring new creative opportunities, there’s never been a better time to try this technology.
If you’ve never flown one before, drones have the potential to be a bit intimidating. In this article, the first of a three-part series, we’ll familiarize you with the basic features and components that comprise most consumer drone systems. In parts two and three, we’ll talk about how to select the best drone to meet your needs, and what you need to know about safety before your first flight.
What’s in a drone system?
Let’s get some vocabulary out of the way. While it’s common to refer to a remote-controlled aircraft as a drone, you may also run into the terms UAV (unmanned aerial vehicle) or UAS (unmanned aircraft system), and professional pilots usually prefer to use these descriptors. The words drone and UAV are largely interchangeable as they both refer to just the aircraft, while UAS refers to the entire system. For convenience, we’ll use the word drone throughout this article.
Every drone system is a bit different, but there are some basic things most have in common. In addition to the aircraft, they’ll generally include a lithium polymer battery for power, a camera mounted on a stabilized gimbal, and a radio communication system. Most also include a dedicated controller, though some less expensive consumer models can be controlled using only a smartphone.
From the outside, most drones appear to be simple devices, but they’re actually built around some fairly advanced technology that makes them easier to fly. This includes GPS for tracking the drone’s position, various sensors to help avoid unwanted collisions, and intelligent flight modes that can automatically focus on a point of interest or track a moving subject.
That’s a lot, so let’s break it down!
The aircraft
At the core of any system is the aircraft, and most consumer and prosumer drones today are quadcopters (though there are exceptions). Today, all multi-rotor drone systems designed for photo and video use a fixed-pitch propeller system. Most models use removable propellers made from a plastic/fiberglass composite that have a simple twist locking system to hold the propeller in place. Alternatively, some will use a folding propeller system.
A twist-lock prop on the DJI Phantom 4 Pro (L) and a foldable prop on the DJI Mavic Pro (R).
The drone’s propellers are driven by brushless motors that spin at very high speed to produce the thrust required to fly. Each motor has a corresponding speed controller unit that allows for slight adjustments in the speed of the rotor; by varying the speed of the individual motors relative to one another, it’s possible to induce pitch, yaw, roll and altitude.
Flight controller
The flight controller is your direct line of command to the drone, and the two are linked using a radio control system, typically at 2.4 or 5.8 GHz. Input from the sticks on the flight controller sends signals to the aircraft directing it to adjust the speed controllers on each motor, allowing you to maneuver the drone. Additional inputs allow you to control the camera and other features specific to the model you’re flying.
The same radio signal used for command and control also allows the video signal to be fed from the drone to the controller’s screen, providing a real-time view for shooting photos or video. In many cases, the screen is just an Android or iOS device running a control app that you’ve installed and paired with the controller, though some models, such as the DJI Phantom 4 Pro+ and Yuneec Typhoon 4K, have their own built-in screens. In addition, the screen allows you to monitor telemetry from the aircraft and includes all the controls you would expect for photography such as custom WB, bracketing, shooting style, and other camera settings.
Drones allow new perspectives on photography, such as this stitched aerial panorama of Lake Tahoe. Photo by Ryan McMaster
Gimbal
If you’re planning to take photos or videos from the air, it’s critical that your camera remain as steady as possible. Most drones actually move quite a bit as they maneuver around or make corrections to maintain position. To compensate, the camera is mounted to a gimbal: a device that isolates it from the vibration and movement of the drone. Most gimbals use a 3-axis system that allows for yaw (rotational stabilization), pitch (holding the horizon during forward and backward movement), and roll (holding the horizon during side-to-side movement).
Gimbals use brushless motors that are very precise, and hold the camera in place so that video and photos (including long exposures) look amazing. In fact, if you watch a drone flying in even a moderate amount of wind you’ll notice quite a few small movements, but with a good gimbal the camera’s image will be rock solid. Some systems also offer a dual operator mode that allows the pilot to fly, while a separate camera operator runs the gimbal. This is the ultimate mode for shooting video!
The gimbal isolates the camera from vibrations and small movements by the drone, providing a stable image.
Global positioning system (GPS)
Once your drone is in the air you want it to maintain its position, even in windy conditions. Though it’s possible for a skilled pilot to do this without assistance, all drones today rely on GPS technology, typically using both the Global Positioning System and GLONASS (the Russian GPS system), to automate this task with a high degree of precision.
The good news is that GPS makes it surprisingly easy to hold, fly a straight line, or orbit a subject while the computer does the hard work of making small adjustments to compensate for wind direction and turbulence, and as a result, drones are often much easier to fly than people anticipate. However, GPS, like any technology, can fail. As a result, learning to fly a drone without GPS assistance is an important skill to learn.
Collision avoidance systems
A big advancement over the past couple years has been the development of collision avoidance systems that use vision, sonic and infrared sensors to avoid obstacles. Vision systems can ‘see’ objects and halt the aircraft before it strikes something, however they usually have a limited range (15m/50ft), and the sun can sometimes create issues by causing them to think something is in the way when nothing is there. Sonic systems use sound (much like bats) to sense objects, and are usually aimed at the ground and used for auto-landing operations and ‘positioning’ on the ground in lieu of GPS. Finally, IR (infrared) sensors are a relatively new option and work based on reflected IR spectrum light. These are short range and have issues in low light, but work in a similar fashion to vision systems for obstacle avoidance.
The small circles that look like bug eyes on the front of the DJI Mavic Pro are visual sensors for the collision avoidance system.
What are all these systems used for? Mostly, assisting new pilots in preventing collisions with objects in their vicinity, as well as preventing a loss of aircraft when returning to home by allowing the drone to avoid trees or other obstacles. However, it’s important to remember that the pilot in command is always responsible for the aircraft. Collision avoidance systems are useful but not infallible, so don’t depend on them to keep you out of trouble!
Batteries
Let’s talk about power. Most drones use lithium polymer, or ‘LiPo’ batteries. These cells come in all sorts of shapes, sizes and power ratings. ‘Smart LiPo’ batteries have built-in charge/discharge regulators and sensors that can report battery voltage and temperature via an app or the press of a button. Typically, LiPo batteries run both the controller and the aircraft, and flight time usually ranges from approximately 15 to 30 minutes depending on your model, the conditions, and how aggressive you are at the controls.
“You must always carry these batteries on the plane with you, and never place them in checked baggage – no exceptions.”
LiPo batteries are energy dense and require special care, and can be dangerous if mishandled. Traveling with these batteries can be risky if you don’t take proper precautions, and in most countries, there are specific rules when you take these cells on airplanes. In the US, the TSA/FAA provide specific rules and instructions, and you must always carry these batteries on the plane with you, and never place them in checked baggage – no exceptions. If you’re outside the US, make sure you understand the rules in your country before traveling with LiPo batteries.
Intelligent flight modes
Originally, drones were simply a tool that allowed you to get your camera off the ground and into the air, but thanks to all the technology packed inside, modern aircraft can usually do much more.
Many drones today include a variety of semi-autonomous (‘intelligent’) flight modes that use technologies like GPS, computer vision and subject tracking to help with more complex tasks. Common examples include the ability to actively track and follow a subject as it moves, orbiting around a point of interest, or programming waypoints for the drone to follow. These modes make it possible to get very creative shots with minimal effort by the pilot. In a sense, it’s a bit like having a separate drone operator while you focus on the creative side of things. These modes are particularly helpful if your intent is to shoot video as they can make your footage look very cinematic.
One of the intelligent flight modes, waypoints (seen here), can turn your Phantom 4 Pro into a powerful surveying tool that has the ability to collect data like never before!
A word of caution, however. Don’t just take off and blindly start using these modes. They require good knowledge of how to disable them in case of an emergency, and should not be used by beginners until basic operation of the aircraft is mastered.
Who makes them?
There are numerous companies building consumer and prosumer drones today. The one most people will be familiar with is DJI, which is the 800-pound gorilla in the market. However, compelling models can also be found from companies like Yuneec, Autel Robotics, GoPro and Parrot, as well as a number of others.
Although it’s easy to lump these all into the same category, each creates different products and has different design philosophies. For example, Yuneec makes affordable hexacopters, and Autel Robotics provides options such a camera with thermal imaging capabilities in addition to visible light. In part two of this series, we’ll discuss how to go about choosing the drone that best meets your needs.
Conclusion
Drones are an amazing tool that allow us to do jobs remotely, safely, and in a way that doesn’t put a manned aircraft at risk. As technology advances the capabilities of these devices will only get better. If you’ve been looking for a way to bring a new perspective to your photos or video, consider taking to the skies. Just remember to fly respectfully and follow the rules in your locale – things we’ll discuss in upcoming articles.
It took me a long time to recognize the appeal of video shooting. Even in a job where I have to use a camera’s video features, it was only fairly recently that I moved beyond just taking short clips (essentially stills with a little bit of movement in them) and started to think in terms of using video and editing to tell stories.
Given that most modern cameras offer at least rudimentary video tools, I wanted to share my experiences and perhaps encourage others to start thinking about shooting at 24 or more frames per second.
The good news is that a lot of the things you learn as a photographer are immediately useful as you take your first steps in video shooting. But, as I discovered, at almost every stage I encountered differences and additional factors to consider. Many of which I wished someone had told me when I started…
Stop shaking the camera, you’re making me feel sick
The first thing that became apparent when shooting video for the first time was the need to keep the camera steady. I remember my Dad teaching me how to keep my camera steady and be aware of my breathing when shooting relatively long exposures, but no amount of good breathing technique or bracing the camera against a pillar is enough to give steady video.
Even if your camera is hand-holdable, don’t expect that to mean you’ll shoot it hand-held.
This makes sense, of course: most stills shooting only requires you to hold your camera steady for fractions of a second whereas video lets the viewer see how steady you’ve been for seconds or minutes at a time.
What I’ve learned is that in-camera stabilization can be enough to stop your footage looking unwatchably juddery, but unless you’re aiming for a ‘run-and-gun’ aesthetic, you’ll need to use a tripod or some sort of stabilization rig.
Exposing some limitations
Exposure is another area where the lessons I’d learned from stills photography are useful but incomplete. You still get to control the same variables, but the range of control you have is somewhat restricted. It’s still a question of managing light, but with a greater risk of finding yourself with too much of the stuff.
For me it’s a question of shutter speed, which has a more obvious impact on the appearance of your footage than is usually the case in stills shooting. A fast shutter speed in stills photography will freeze motion, a slow one will allow the subject to blur but there’s often a large range in between these two extremes. In video, there’s a narrower range before the viewer starts to notice the difference.
The 180 degree shutter ‘rule,’ where you use a shutter speed that’s half the duration of each frame (so 1/48th seconds for 24 fps shooting) isn’t an inviolable law, but the further you stray from it, the more jarring or muddled your footage will look. This can be a creative choice, of course, but only counts as such if you’ve consciously made it.
This made me think back to when I was first experimenting with stills photography, and getting a feel for the boundaries set by the longest shutter speed I could hand-hold, the widest aperture I had available and the highest ISO setting I found acceptable. Once I was familiar with these, one of the first purchases I made was a faster lens (that’s right: a 50mm F1.8) to get more light to extend these capabilities.
With stills shooting, one of the first things you buy is a bright lens to get more light, with video it’s an ND filter, to get rid of it.
With video and the further restriction over the fastest shutter speed I’m willing to use, it’s a decent ND filter I need to buy, to reduce the light level to fit your boundaries.
A neutral density (ND) filter allows you to use use wide apertures and the relatively slow shutter speeds that a lot of videographers favor. An adjustable ND filter provides even more flexibility.
A return to JPEGs
Added to these exposure limitations has been another throw-back to my first days as a photographer: having to revert to an 8-bit, compressed shooting format. Having spent some time learning the distinctions between video file formats, the main lesson has been that none of the ones I’m likely to encounter are anything like Raw.
Once you’ve been spoiled by the seemingly endless dynamic range that can fit in a 14-bit Raw file and the ability to set and adjust the white balance at the ending stage, it’s a shock to go back to having to get exposure and white balance perfect when you shoot.
Flat tone curves and Log profiles provide a means of squeezing a bit more useable DR into those 8-bit files, but this can make it even harder to judge correct exposure. I’d highly recommend shooting some test footage and trying to grade it back into something useful, before committing yourself to the flattest tone curve you can find.
Continued on Page 2 [Focus, movement, sound and editing]
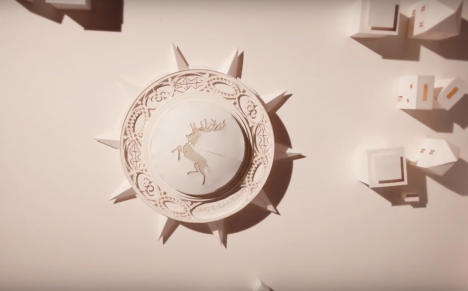
A snippet of the imaginative and ever-changing opening sequence of HBO’s Game of Thrones series is recreated in stop-motion using over 7,600 paper cutouts made with Moleskine notebooks in this 40-second video. Made by Milan-based animation studio Dadomani to promote the brand’s new Game of Thrones notebooks, the moving models mimic the computer animation seen on the show, wherein three-dimensional structures emerge from the surface of a map and spring to life.
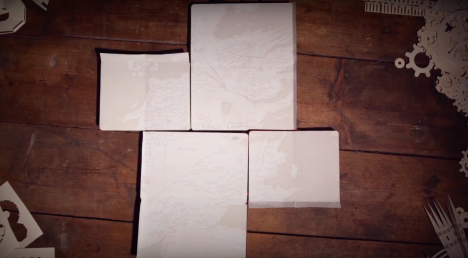
Opening with a view of the sigil of House Baratheon, the video sweeps through King’s Landing as paper gears turn and spires begin to retract. The tiny paper houses disappear as the stag-topped sigil spins, and the camera pans out to a classic Tolkien-style map of Westeros before the scene splits into four pieces.
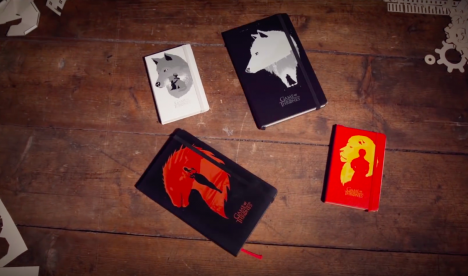
These four components are revealed to be the individual notebooks in Moleskin’s Game of Thrones series, each covered with the dire wolves of the Starks, the Targaryen dragon and the Lannister lion. A fifth notebook, the collector’s edition only available in Moleskin stores, features an image of the Iron Throne. The silkscreened covers were designed by emerging artist Levente Szabó, and each notebook retails for $ 19.95 – $ 25.95.
The designers of the original animation took inspiration from Leonardo da Vinci’s machines to achieve an effect appropriate for the fantasy series, which is set in a fictional country in a time period recalling the real-world Middle Ages. The cog-filled engines beneath the surface of the map that power all of the movements above represent the secret machinations of the series’ main families, the Houses of Lannister, Baratheon and Stark, along with all of their allies and enemies. Check out how the paper version was created in the video above.
Want More? Click for Great Related Content on WebUrbanist:
Grottos to Game of Thrones: 16 Jaw-Dropping Restaurants
You’ll have a hard time chewing with your mouth closed as you dine at these incredible jaw-dropping establishments around the world, from a hanging …
Click Here to Read More »»
Paper City Animation: “Rise & Fold” of a Fragile Metropolis
Unfolding like a pop-up book in real time, this incredible little built landscape of buildings and bridges, trees and mountains, lampposts and benches rises …
Click Here to Read More »»
Magic Circle: Laser-Cut Paper Sculptures Inspired by Nature
An artist known for spending untold hours painstakingly hand-cutting tiny paper sculptures inspired by diatoms, bacteria, viruses, coral and other natural …
Click Here to Read More »»
At the end of March (2016) Sony released the new version of their Cyber-shot RX10 Mark III. The main difference between it and its predecessor, the Mark II, is the lens, which is a lot longer. Let’s take a quick look at its main features:
24-600mm f/2.4-4 zoom lens with 3 control rings for focus, zoom and aperture
4K video quality
Fast autofocus
Magnesium alloy body
This video from B&H photo will show you what the new camera looks like, check it out.
This video by Chakru shows some of the key features and specs:
If you are a travel photographer and want to go light, this might be a good option for you. Or maybe even as a a backup camera to a heavy pro SLR. Perhaps an upgrade from a point and shoot camera is in order, give it a go and see if this is the right one for you.
Last day of Intro to Photo! Last time we talked about how to set up your exposure. Today, we are going to discussing the ins and outs of lenses. Here comes the easy stuff!
Lenses
Lenses can be either zoom or prime. Zoom lenses allow you to vary focal lengths (based on what is built into the lens) and – as the name says – zoom in and out of the frame. Prime lenses are fixed. This means that it has one focal length. In order to “zoom in or out” with a prime lens, you must physically move closer or farther from the subject. Prime lenses typically have a larger maximum aperture, making them “faster” than zoom lenses.
Lenses that have larger apertures are described as fast lenses because they have the ability to collect light faster. However, lenses with smaller apertures have a greater depth of field.
Lenses fall into a few different categories:
A wide-angle lens widens the angle of view thus bringing more into focus. A wide angle can also have a flattening effect.
– Super wide angle lenses are typically anything under 20mm
– Wide-angle lenses are from 21-35mm
A “normal” is a lens that most accurately portrays what a human eye will see. With a 35mm camera, this is typically a 50mm lens. Normal lenses fall into the category of standard lenses.
– Standard lenses range from 35-70mm
A telephoto lens reduces the distance between objects in the photo, bringing the subject “closer” to the photographer.
– Medium telephoto lenses are considered portrait lenses. These range around 80-135mm
– Telephoto lenses are between 135-300mm
– Super telephoto lenses are anything over 300mm
Focal length is the distance in millimeters between the lens and the sensor when the camera is focused on a subject at infinity. Lenses that are classified as “long” lenses have a larger focal length- these are telephoto lenses.
Each lens has its place. Standard lenses are great all around lenses but excel when used for documentary and street work. Wide angle lenses are great for landscape and architecture whereas telephoto lenses work well with portraiture, sports and wildlife photography.
Be careful when selecting a portrait lens. Different focal lengths can distort the face in different ways. Wide angles tend to flatten out the face in an unattractive manner. The optimal portrait lens depends on what camera you’re using (and if there is a crop factor) but you’re typically safe using a lens between 85-135mm long. 135mm lenses (or about that) are optimal when shooting head shots.
How focal length distorts the face
Megapixels
People are far too concerned with megapixels when it comes to buying a new camera. Let me put this very clearly… MEGAPIXEL COUNT DOESN’T ALWAYS MATTER! The only time megapixel count really matters is when you’re going to be shooting something which has to be blown up large scale, such as a billboard.
Don’t drive yourself crazy over it! In the end, it really doesn’t matter that much.
Crop Factor
Most digital camera sensors are smaller than film. An image created with a 35mm body but smaller sensor will end up cropping a bit of the image out, as compared to what would have been captured with a full sized 35mm film frame. Hence the term “crop factor.” This determines how much of the image is cropped out as compared to a “full frame” sensor (a digital sensor the same size as 35mm film).
Be conscious of your gear. If your camera has a crop factor, it effects how you view the world through your lens. Because the focal length is effected, a crop sensor zooms in a bit with every lens. A 50mm lens is closer to a 70mm or 85mm lens. Each camera model has a different crop factor. Be sure to look if your camera has a crop factor and what it is.
To determine actual focal length, take the crop factor and multiply it by your lens’ focal length to determine the focal length you’re actually viewing. (I.e. – If you’re using a 50mm lens on a camera with a crop factor of x1.6, you’re actually shooting at a focal length of 80mm.)
Taken with a full-frame sensor
Taken with a camera that has a x1.6 crop factor
Last but not least, just a few tips:
– Don’t trust LCD backs for exposure! Always meter when possible. LCD’s don’t accurately depict the information recorded by your camera’s sensor. Something that looks perfectly exposed according to your LCD can actually be an entire stop under or over exposed. The only way to trust what you see on the back of your camera is to learn how to read histograms.
– Check out this article on how to read histograms: How to Use Histograms by Ken Rockwell
– It helps to turn on the “over exposure indicator.” This feature will cause the whites on your LCD screen to blink when they’re blown out. (When they contain no detail and are essentially just blobs of pure white.)
– And last but not least.. As boring and nerdy and tedious as it is.. READ YOUR CAMERA MANUAL!
If you’re just tuning in to today, be sure to check out Part 1 – Cameras and Part 2 – Exposure.
I know there was a lot thrown out over the past few days – hopefully you made it through okay! If you have any questions, feel free to shoot me an email at alana@alanatylerslutsky.com.
Good morning, Fashion Photography Blog readers! Welcome back to our brief intro to photography. Last post we talked about the camera basics. In this post we are going to going to talk about how to set up your exposure correctly. So let’s jump right in.
Setting Your Exposure
There are three main settings to be aware of prior to taking a photograph. Those settings are ISO, Aperture and Shutter Speed.
ISO – ISO, back in the days of film, was the measure of a film’s sensitivity to light. This system has been adopted by digital cameras and essentially works the same way it did with film. “Less sensitive” films require more light to make an exposure – The higher the ISO number, the more sensitive the film. So, what exactly does this mean?
Let’s say you want to shoot someone outside on a bright, sunny day. You would use a film (or set your digital camera) with an ISO of about 100. Because of the large quantities of light available to you, it’s not necessary to use a sensitive film.
If you’re trying to shoot someone in a room solely illuminated by candle light, you’re going to need film that is much more sensitive. For this situation I would suggest using something closer to ISO 1600. Films that are more sensitive are referred to as “fast films” whereas films that are less sensitive are referred to as “slow films.”
In the case of film, the more sensitive it is, the more grain you will see in the final image (this has to do with the chemistry of the film and something called “silver halides.”). With digital cameras, the higher the ISO, the more noise you will see in your final images. This has to do with the image sensor and how much heat it is giving off while capturing your image, among other things.
ISO Comparison – Same camera settings, only difference is the ISO
Aperture (f/stop) – Aperture is the size of the hole in the lens that controls the amount of light let in. The larger the f/stop # the smaller the opening in the lens.
Shutter Speed – Shutter speed is the other setting which controls how much light is let into the camera. This one is kind of self-explanatory, time works in fractions of a second.
You must understand the relationship between shutter speed and aperture in order to precisely control your exposure. The wider open your aperture, the faster your shutter speed to prevent overexposing your image. The smaller your aperture, the slower your shutter speed to prevent underexposing your image.
Think of it this way… Let’s pretend that your camera is a bucket and light is water. In order to fill your bucket with water, you have to control how much pours in at a time. The larger the opening (the wider open your lens is, i.e. f/2.0) the more water (light) will pour in. Therefore you must shut off the water relatively quickly (use a faster shutter speed, i.e. 1/250th) in order to prevent it from “overflowing” or overexposing your image. It works in the reverse as well… If you have a smaller opening (smaller aperture, i.e. f/22) you must let the light in for longer (use a longer shutter speed, ie 1/15th) in order to prevent an underexposed image.
(The numbers in this image have nothing to do with the number in the paragraph above)
Stops
Everything in photography is measured in stops. You should memorize these stops because you will need to recall them at a moments notice. Cameras and light meters often measure things in thirds of a stop for more precision, but this can be turned off.
Stops either double or halve when opening up or stopping down. This is blatantly obvious with shutter speeds; it works the same with ISO and f/stops. F/8 allows in 1/2 the amount of light that f/5.6 allows in.
Stops work in relation to each other. If you have the combination for a perfect exposure but decide you want to use a more shallow depth of field or want a longer shutter speed for motion blur, you can easily achieve your desired effect without having to re-meter or anything.
This is something called equivalent exposures.
Count the number of stops between your actual exposure and your desired exposure to figure out what is the new f/stop – shutter speed combination would be. I know this sounds confusing but I promise it’s quite simple.
Let’s say you are shooting at ISO 100 @ f/16 with a shutter of 1/15th of a second.. But you want a shallow depth of field and would rather shoot at f/4. Count the number of stops between the two and adjust your shutter speed accordingly.
The difference between f/4 and f/16 is 4 stops. In this scenario, you’re opening up your aperture, therefore letting in more light. So you must stop down (close) your shutter 4 stops to keep an equivalent exposure. 4 stops difference from 1/15 would be 1/250.
Your new, but equivalent exposure would be ISO 100 @ f/4 with a shutter speed of 1/250th of a second.
I know this part gets a bit confusing. Just stick it through and I promise we’ll get to the fun stuff soon.
Check back in tomorrow for Day 3 – Lenses. (Or if you missed it, catch up on yesterday’s post, Part 1 – Cameras.)
In the meantime if you have any questions, just ask! Shoot me an email at alana@alanatylerslutsky.com.
Hey FashionPhotographyBlog.com readers! I’m Alana Tyler Slutsky, a NYC based fashion photographer. For quite a while I had no one to turn to in order to seek advice and ask questions about photography. From learning the basics to testing with models, I didn’t know what was right and what was wrong. It’s this very reason that I’m so thankful for FPBlog’s editor, Ed, for giving me the opportunity to contribute. I hope to shed some light on the subjects I found difficult to understand and give all you readers some much needed help that I didn’t have in the beginning.
Now that FashionPhotographyBlog.com is back up and running, what better way to say “we’re back!” than by dishing out all of the information that everyone asks for when starting in fashion photography?! Check in weekly for information posts on a range of topics from cameras and lighting, to retouching, to producing a fashion photo shoot!
Now that that’s out of the way… Let’s get to the good stuff! Over the next three days, we’ll be breaking down the building blocks of photography.
I know that this is going to be one of those pretty generic posts that goes over the basics but I feel obligated to write it… After all, this is a blog that caters to all levels and we were all once new and unsure before.
So, here goes nothing… A brief intro to photo and how cameras work.
(Hey, maybe you experienced folks will pick up a thing or two. If not, use this as a refresher!)
Types of Cameras
There are many different types of cameras out there in the world. What the majority of photographers use is a SLR – a single lens reflex camera. (Digital SLR cameras are referred to as D-SLR cameras.).
SLR cameras use a lens and a mirror to reflect what is seen via the lens into the viewfinder. Essentially, what you see in the viewfinder is what you get.
How an SLR camera works – The mirror lifts up to reveal the film or shutter
The most common type of camera body that is used is a 35mm camera. 35mm camera bodies are designed to use, you guessed it, 35mm film. The cameras that you most of you use and own are digital 35mm cameras.
Pentax K1000 – My favorite!
While 35mm cameras are popular among professionals, it’s not uncommon to find a pro using a “medium format” camera. These cameras, in the days of film, were used with specific film which was larger in format, thus yielding a larger negative. So why is this important today? Digital medium format cameras have larger sensors, which allow them to have more megapixels. While megapixel count isn’t always that important, it helps to have the most megapixels you possibly can when shooting something that will be displayed in a relatively large format – such as a billboard. We’ll get more into this in a bit. The most common brands of medium format cameras are Hasselblad, Mamiya and Phase One.
Hasselblad 501 – A film medium format camera which can be outfitted with a digital back
645, 6×6 & 6×7 films are all forms of medium format film.
Be sure to check back tomorrow for Day 2 – Exposure.
If you have any questions, feel free to shoot me an email at alana@alanatylerslutsky.com.


 At the end of March (2016) Sony released the new version of their Cyber-shot RX10 Mark III. The main difference between it and its predecessor, the Mark II, is the lens, which is a lot longer. Let’s take a quick look at its main features:


You must be logged in to post a comment.