RSS
 

Posts Tagged ‘Interesting’

Lensrentals tears down the Canon EOS R5 and finds interesting sealing and thermal flow

09 Sep
Image credits: Photos published with kind permission from Lensrentals.

Since Canon announced the 8K-capable EOS R5 mirrorless camera, there has been heated discourse online about the thermal flow inside the camera and its propensity to overheat. Curious photographers have been wondering what the inside of the EOS R5 looks like and what sort of design features Canon has implemented into its latest high-resolution full frame camera. Wonder no more as Roger Cicala and Aaron Closz at Lensrentals have disassembled a Canon R5 to see what’s going on inside.

In terms of thermal design, when tearing down the R5, the duo found multiple heat sinks and thermal pads. For a photo camera, there is a lot of heat sink inside the EOS R5. However, compared to a video camera, the R5 features ‘not even a fraction of what’ is seen in a video camera.

Cicala speculates that it’s possible the camera has been designed to allow heat to exit through the top panel of the camera, as the connection of the top panel to the main body does not feature the same level of sealing found in the connections between the body and the bottom and side plates.

You can see some of the sealing along the edges where the side plate attaches to the main body. Image credit: Lensrentals

Speaking of sealing, after having removed the camera’s grip, battery door, bottom plate and side plates, Cicala and Closz found an impressive level of sealing throughout the camera. The battery door has weather resistant gaskets around the edge and the bottom of the battery door compartment itself is a soft gasket material.

Along the bottom plate, Canon placed a ‘soft rubber gasket along the entire mating edge of the pieces.’ This provides a ‘greater seal area’ than what is usually seen in disassembled cameras at Lensrentals headquarters. The same sealing gaskets found here are also present where other body parts are sealed together, such as along the sides of the camera.

Of the weather sealing in the EOS R5, Cicala writes, ‘When we took these pieces apart, you feel the suction when they disengage. That’s not something we’ve seen in other cameras. The thing about weather sealing is it only takes one weak place to leak, but this sealing seems to be a step up from anything we’ve seen before.’ This is certainly a promising find for prospective R5 owners.

While there are gaskets around the I/O ports on the R5, Cicala notes that the HDMI and digital out ports are part of the main printed circuit board (PCB). This means that users should be careful to not damage these ports, as it will result in an expensive repair. On the other hand, the tripod plate and tripod mount itself are both replaceable parts and not soldered anywhere. This is great news for the team at Lensrentals, as they regularly must take apart cameras to make repairs like this before sending them out to new customers.

Moving to the back of the camera, the R5 has more dials than the EOS R but maintains an identical wiring arrangement. There’s a new flex design on the LCD side and you can even see a mark made by a Canon tech in the image below.

On the back of the circuit boards, there is a notable difference between the EOS R5 and the EOS R. The new camera has ‘immensely more intense and dense circuitry.’ In the image below, the green sub-board ‘appears to be about DC power conversion.’ On the left black board, the large white chip is a Wi-Fi chip.

Located beneath the green sub-board is either an aluminum heat sink or an electronic shield. Cicala notes that ‘electronic shields tend to be quite thin, but this is a manly piece of aluminum, 0.98mm thick. I speculate it’s more about heat than electronics. Notice I said ‘speculate.”

When removing the main PCB, Cicala and Closz found a large aluminum heat sink on the underside of the board. There is a layer of insulating tape over the sensor as well. There is also a thermal pad located underneath the CPU, which Cicala speculates means that Canon is directing heat from the four SDRAM chips located around the CPU to one heat sink and the heat from the CPU itself to a different area.

After removing the circuitry, the Lensrentals team was able to inspect the image stabilization system and image sensor arrangement. The sensor assembly is held in place by three screws. To ensure that the image sensor stays perfectly parallel to the lens mount, Canon uses shims to make tiny adjustments. The EOS R used spring tension screws instead. Cicala assumes that ‘the vibration of an IBIS unit could loosen them over time’ and notes that ‘every IBIS camera we’ve opened uses shims.’

Once the circuitry and image sensor/IBIS unit has been removed from the R5’s body, there’s not much left besides the shutter assembly. Lensrentals don’t take apart shutter assemblies as they are incredibly labor-intensive to rebuild and if anything is not lined up perfectly, the shutter timing will be off and only factory software can be used for recalibration.

The sensor is mounted directly to the IBIS plate. Some cameras use screws and plastic tabs to support the sensor, which Lensrentals has seen result in fractures. ‘On all the edges of the Canon unit, the sensor is mounted directly to the IBIS plate; no tabs. That doesn’t mean it can’t break, of course, or glue comes loose. But this seems sturdier to me,’ says Cicala.

Summing up the findings, Cicala writes that the R5 is ‘pretty thoroughly filled up, there are lots of parts and not much air.’ The new weather sealing method found in the lower two-thirds of the camera ‘seems to give a really, really tight seal.’ The IBIS unit ‘is very compact but well-engineered.’

With respect to thermal flow, Cicala believes there are a pair of separate heat sinks. One of them is located under the voltage board and the other between the main PCB and sensor assembly. Both heat sinks include thermal pads to direct heat. There may also be a heat sink in the tripod plate, although it’s unclear. Cicala says, ‘In a small photo camera, there’s not a lot of ventilation/convection current to let the heat out. This camera is better sealed than most; I doubt there’s very much ventilation at all. Somebody should look into that.’

For many more images and details, head to Lensrentals’ full teardown.

Articles: Digital Photography Review (dpreview.com)

 
Comments Off on Lensrentals tears down the Canon EOS R5 and finds interesting sealing and thermal flow

Posted in Uncategorized


Canon EOS R6: more than a mirrorless 6D, more interesting than EOS R5

24 Jul
The R6 need not necessarily be overshadowed by the R5

I’ve been guilty of it myself: describing the EOS R6 and R5 as the mirrorless successors to the 5D and 6D lines of DSLRs. Guilty because, while it might be literally true, it risks obscuring a subtle re-positioning of the two cameras. Personally, I think the R6 is a much more interesting camera than the 6D series DSLRs were and, consequently, more interesting than the R5.

Just in case it needs to be said: we’ve not fully tested the R6 yet and I’m not suggesting you should go out and buy one. But here’s why I think it’s the more interesting one, for more people.

It’s a higher-end camera

Yes, the price is higher than for the 6D series. Canon has always felt confident in pricing its cameras a little above its rivals, but the R6 goes beyond this. Obviously it was always going to look particularly expensive next to the relatively elderly Nikon Z6 and Sony a7 III which, as they approach what’s likely to be the end of their product life, are being sold for considerably less than their original prices, but the R6’s launch price is significantly above even that.

In the US, at least, the R6’s launch price is 25% higher than those of its closest peers (though only 8% up on the somewhat disappointing EOS R). But, then again, its specs are higher, too. It shoots faster, comes closest to offering full-frame 60p video capture and promises a greater degree of image stabilization than anything else can. It’s hard to find an obvious weak-point on the spec sheet: even in areas such as battery life and viewfinder resolution, where it is out-gunned, it’s still competitive with the majority of its rivals.

Differentiating without diminishing

It’s no R5, of course. Market segmentation and product differentiation are a fact of life. No one is going to give you all their best features in anything less than their range-topping model, not if they want to sell any of their flagship product. And not if they want to stay in business.

Placing them side-by-side showed how distinct the 5D and 6D series are: for example the 5D IV (right) has a more substantial rear dial and a joystick, while the 6D II (left) has an articulating touchscreen.

If you get segmentation right, it means enthusiasts don’t have to pay professional prices to get a camera that suits their needs. Get it wrong and it can start to look… well, petty. But, ultimately, the question is not necessarily ‘how many features can we squeeze out of this hardware?’ but a balance between ‘which features would these users appreciate?’ and ‘which features can we include without undermining the R5?’

From any reasonable perspective, the R6 gives you an awful lot of R5’s performance. Its IBIS system is supposedly a match for the more expensive model, including that headline-grabbing claim of up to 8 stops of correction. That in itself is a stand-out feature. Similarly, the R6 will shoot at the same rates as the R5, and will do so using the same AF system. This means non-pro photographers (and, no doubt, some pros) get most of the core capabilities of the much more expensive camera.

The R6/R5 differences are far fewer (the R6 is on the left). The R6’s construction isn’t quite as solid-feeling, it lacks a top LCD or the ability to add audio notes to images, but the handing is otherwise all-but-identical.

Most significantly, you get the same multi-dial-and-joystick user interface and shooting experience in the R6 as you do in the R5. It would have been easy to omit the joystick from the R6 (they use different exterior panel moldings), but instead you get a camera that’s every bit as usable.

This is a world away from the 6D series, which lacked the 5D’s joystick, 4K shooting and a host of other core features.

What’s missing

What you don’t get is resolution. Depending on what your current camera is, 20MP may well feel like a step backwards. 20MP is more than enough resolution for a lot of applications (including those at which the Canon EOS-1D X and Nikon Dx cameras are targeted). But you’re unlikely to be getting the most out of those exotic new RF lenses and, much as you might like to kid yourself, you’re unlikely to see any significant low-light benefit. Realistically though, it’s only a 10% reduction in linear resolution, compared to its 24MP peers so probably not worth losing sleep over.

It doesn’t shoot 8K and doesn’t have an All-I capture option but the in-body IS and more-than-competent video spec make the EOS R6 a reasonable option both for video and stills shooters.

The R6’s lower pixel count also highlights that the camera lacks the current feature du jour: a high-res pixel shift mode. The inclusion of stabilization means it should be possible, depending on how many patents surround the technology (most brands’ implementations are subtly different, which could suggest there’s IP being skirted around). But personally I’ve not found it very useful for much of my photography, since it is most effective for static or close-to-static subjects.

More than a mirrorless 6D?

I’m not a full-frame shooter, myself, but I have a lot of friends who take their hobby seriously enough that they’ve owned 5Ds over the years. Looking at the R6, I can imagine an awful lot of these 5D owners being happy with the R6, for considerably less money than they paid for their DSLRs. So although you could see the R6 as an overpriced 6D replacement, I think that, at least for some users, it might be a credible, more affordable substitute for a 5D.

Articles: Digital Photography Review (dpreview.com)

 
Comments Off on Canon EOS R6: more than a mirrorless 6D, more interesting than EOS R5

Posted in Uncategorized


How Using Props in Portraits Can Make Your Photos More Interesting

26 Sep

The post How Using Props in Portraits Can Make Your Photos More Interesting appeared first on Digital Photography School. It was authored by Kevin Landwer-Johan.

There are many ways using props can make portraits more interesting. Often photographing a person can be challenging. This can be so for both the photographer and the person being photographed. Using props can not only add interest to the portrait, but it can also help your subject relax more.

What are props and how can you use them effectively?

Image: © Kevin Landwer-Johan

© Kevin Landwer-Johan

A prop is any element you add to a photograph which adds interest or meaning to your subject or the concept you’re creating. What you can use is up to your imagination. They can be anything from an ancient tree stump to a melting ice cream cone.

Image: © Kevin Landwer-Johan

© Kevin Landwer-Johan

Props can add humor to photographs. Using a prop well with a nervous subject can help them relax. You can use props effectively to help contextualize your subject. Without a prop, a portrait may not convey much or any concept. With the addition of a prop, a portrait can take on a whole new meaning.

A prop is often used to add visual information about the person;

  • their occupation
  • hobbies
  • character
  • or location

Using props to help illustrate a story

When you’re illustrating a story using a portrait, adding a prop can add depth and meaning. A prop incorporated into a photo will tell more of a person’s story than a caption, or even a whole paragraph.

Image: © Kevin Landwer-Johan

© Kevin Landwer-Johan

Making a series of travel portraits with a visiting friend I asked her to bring along her backpack. She was going to the station to purchase a ticket for a later date and would not have brought her luggage. Having it with her for the photographs helped to create more of a visual story.

Image: © Kevin Landwer-Johan

© Kevin Landwer-Johan

The location and the train tell part of the story. Having her backpack in the pictures lets you know she was traveling, not just there to meet a friend. The more relevant visual information you can include, the more interesting your portraits become. Well-used props help stimulate the viewer’s imagination.

Image: © Kevin Landwer-Johan

© Kevin Landwer-Johan

Isolated studio portraits using props

Isolating your subject on a plain background is a popular method of taking a portrait. A subject on their own can produce great character portraits. But for many people, it can be somewhat intimidating.

Image: © Kevin Landwer-Johan

© Kevin Landwer-Johan

Using a prop can help them relax and enjoy the experience more. Having something in their hands to concentrate on distracts them from your camera. Feeling less intimidated by it, they are more likely to give you vibrant expressions.

I took a series of photographs for a small drama school. Using props helped the students feel more at ease. They were confident performers, but many of them were not so comfortable in front of the camera. Including props allowed their tutor, who was assisting me, to encourage them into character.

Image: © Kevin Landwer-Johan

© Kevin Landwer-Johan

A single prop keeps a studio portrait simple and adds meaning that would not be evident without it. Creating concepts for stock photography in this manner it’s possible to facilitate a whole series of photos.

Including props will add depth and interest to a series of photos of the same person. It can be challenging to take more than one or two different portraits of a person on an isolated background. Using props will give you more diverse options for what you can achieve.

Image: © Kevin Landwer-Johan

© Kevin Landwer-Johan

Bring your own props or use what’s available

Often asking a person to bring along their own props can help create a meaningful portrait. Using items that they relate to and tell something about themselves will add genuine feeling to the portraits.

I asked this friend if I could photograph her and also what she’d like to use as a prop. Immediately she replied, “ice cream.” She loves ice cream so it was appropriate and meant she’d enjoy the photo session. The weather was so hot that even with the air conditioning blasting the ice cream melted quickly. We went with the flow and used the prop for additional makeup as well. It was a fun session.

Image: © Kevin Landwer-Johan

© Kevin Landwer-Johan

Any well-established portrait studio has a diverse selection of props. Your subject doesn’t have to own a prop. If they can choose from a selection you have, they might find something that lights up their imagination.

Even simple things that are common can work as props. Having someone read a book or make a phone call can help them focus on what they are doing and not on your camera.

Image: © Kevin Landwer-Johan

© Kevin Landwer-Johan

Finding props on location helps to incorporate your subject in the place. Having them pick up some produce at the market, or interact with some part of the environment can make for a more illustrative portrait.

Conclusion

Working with props definitely adds diversity to photographing people. Use the props to support your subject. Having the prop and subject in the same frame is not enough. Encourage them to interact with the props in different ways. The way your subject relates to the prop is important. This will influence the feel of the photo.

Image: © Kevin Landwer-Johan

© Kevin Landwer-Johan

Work to develop a healthy relationship between your subject and their props. This is part of your job as a photographer. Doing this, you’ll create more entertaining portraits.

Have you tried using props for a portrait session? Let me know in the comments below the props you have found helpful during the session. Also, what type of props help make the most interesting portraits?


using-props-in-portraits

The post How Using Props in Portraits Can Make Your Photos More Interesting appeared first on Digital Photography School. It was authored by Kevin Landwer-Johan.


Digital Photography School

 
Comments Off on How Using Props in Portraits Can Make Your Photos More Interesting

Posted in Photography


6 Scenarios to Try for More Interesting Beach Photography

12 Aug

The post 6 Scenarios to Try for More Interesting Beach Photography appeared first on Digital Photography School. It was authored by Jeremy Flint.

Coastal adventures are a spectacular way to explore with your camera and to soak in the sea views and fresh sea air. There are so many amazing beaches and miles upon miles of coastline around the world or closer to home to entice photographers to the sea. Beautiful seascapes can vary from wide open clifftop vistas to picturesque harbors, tranquil ocean views, secluded coves, and even fishing villages. Here are 6 scenarios to try for more interesting beach photography:

1. Monumental views

Coastal adventures 01

Sailing boat at sea

Firstly, take in the bigger picture when capturing your seascapes.

Seek out and find those great sweeping ocean views that cover a wide expanse of sea. Be sure to use a wide-angle lens to photograph the scene too. By photographing the sea and sky, you can add another element to the scene to improve your photos.

An interesting sky also adds texture and atmosphere to the sea view and creates interesting beach photography.

2. Interesting patterns

Coastal adventures 02

Cornwall, England

During your adventures at the coast, look for interesting patterns and textures to photograph. You will find many details such as shells, patterns in the sand, and interesting rocks. Rockpools can be great subjects to focus your camera on to make dramatic beach photos.

Consider how your image may be affected by the tide and decide what you most want to achieve with the look of your photos. Shooting at high tide or low tide can alter the appearance of your image. At high tide, for example, some attractive rocks may look even better with the swell of the ocean circling them as opposed to when the tide is out, and the rocks separate from the sea. Try to time your visit to coincide with your photo objective. Alternatively, visit a location and plan a return visit when the tide levels are suitable.

3. Secluded coves

6-scenarios-to-try-for-more-interesting-beach-photography

Cornwall, England

Finding and photographing a secluded cove is a great way to spend your adventures capturing coastal scenes.

When photographing these wonderful locations, find a suitable vantage point from higher up, such as on a ledge or from beach level. Take care when photographing the sea and be careful when standing near cliff edges or moving over slippery rocks – they can be treacherous.

Another thing to be aware of is the tide times, which are very important for your own safety. If you can coincide your visit when the tides are receding this is usually a favorable time to prevent being trapped by the incoming seas or being caught out by a rogue wave.

4. Find hidden gems

6-scenarios-to-try-for-more-interesting-beach-photography

Cornwall, England

Think beyond the familiar landmarks when photographing the coast. There are endless opportunities and locations for you to discover.

One of the best ways to find new places is to explore the coast on foot. Instead of heading for the nearest beach, venture out for a long walk along the coastal paths. You never know what you might see. Behind every turn and headland, there are often hidden gems to discover. These may include secret beaches that have seen few visitors. Perhaps you will find sea caves lying beneath the clifftops which have been formed by the sea eroding the land over time.

5. Coastal shores

6-scenarios-to-try-for-more-interesting-beach-photography

Cornwall, England

Coastal shores can offer some of the most dramatic and best photo opportunities for seascapes. Crashing waves and moody skies after a storm can be great for your coastal photos.

How you capture your coastal adventures depends on the type of image and mood you want to evoke.

The coast can look very different throughout the day. You could either go there in the late afternoon to capture the suns rays striking the cliffs or visit during the day when the beach is busier and more active with people.

Visiting at different times of the day will give you the chance to capture a wide variety of shots to include in your collection.

6. Sunsets

6-scenarios-to-try-for-more-interesting-beach-photography

Land’s End, Cornwall, England

Photographing Sunsets by the sea are one of the most popular things to capture – and for a good reason. The coastline often looks its best at this time of day when the colorful glow is spectacular. Views of the sea get transformed into wonderful vistas with great light. Sand dunes and rock ledges can look great with the sunset light shining on them.

Shooting into the sun is another great way to capture the sunset during your coastal adventures.

Conclusion

Use these tips to capture more interesting beach photography and seascape images. Next time you are visiting the coast remember to look out for great ocean views, interesting details, secluded coves, hidden beaches, coastal vistas, and dramatic sunsets and share your images with us below.

What do you enjoy about beach photography?


6-scenarios-to-try-for-more-interesting-beach-photography

The post 6 Scenarios to Try for More Interesting Beach Photography appeared first on Digital Photography School. It was authored by Jeremy Flint.


Digital Photography School

 
Comments Off on 6 Scenarios to Try for More Interesting Beach Photography

Posted in Photography


Learn These 5 Elements to Capture Interesting Architectural Photography

04 Aug

The post Learn These 5 Elements to Capture Interesting Architectural Photography appeared first on Digital Photography School. It was authored by Jeremy Flint.

Architectural photography is an enjoyable genre of photography to shoot. It encourages you to visit and capture urban structures and environments, whether it be towns or cities, or whilst taking in views of majestic buildings, bridges, or interiors. Architecture can be present in many different forms from ancient to modern and both internal and external. If you have you ever wondered what steps to consider when shooting interesting architectural photography, this article will help you to identify some key elements to contemplate during the process.

Architecture Photography 01

Brasov, Romania

1. Choose a subject

The first fundamental aspect to consider when capturing interesting architectural photography is the subject. Your choice of subject can be anything from a streetscape to a city scene or famous landmark. Once you’ve found an object or theme to visit and photograph, think about what appeals to you about it. Think about what you want to photograph, such as the entire structure or just part of it.

Whatever you decide to photograph, be happy with your decision and take some pictures.

You can choose to focus on capturing wide shots and detail shots. A scenario where you may choose to shoot wide may include a prominent sky that adds beauty to the composition or a street scene that portrays many interesting buildings together. On the other hand, you may choose detail shots when there is a particularly striking facade or object on a building. For example, a statue makes a great feature on its own.

Architecture Photography 02

Bran Castle, Romania

2. Select your camera settings

The next thing you will want to do is set up your camera and choose your settings. In terms of architecture photography, you will need to select an appropriate aperture, ISO, and shutter speed. The aperture you choose depends on what you are trying to achieve with your photos.

If you are trying to achieve a narrower focus and render the front or back elements of the image out of focus, you will want to select a wider aperture (smaller f/number) from anything between f/2.8 to f/5.6. A scenario where you may choose to use a narrow depth of field is when you want to isolate an object from the background such as a doorframe. Alternatively, another scenario may be when shooting a single point of interest such as a statue.   

However, if you aim to make everything in your image sharper, I recommend selecting an aperture between f/8 to f/22. A scenario where you may want a wide depth of field may include stunning cityscape scenes. Here, you may want everything in focus within the frame. A cityscape can include some monumental buildings and the night sky or people walking within a street scene.

Architecture Photography 03

Cluj-Napoca, Romania

A lower ISO is important to reduce noise in the final image, so I suggest an ISO of 100-400.

The shutter speed you choose depends on the overall look and feel you want to achieve in your image. A faster shutter speed of 100th of a second or more will help to keep moving objects sharp such as cars or people. In contrast, a slower shutter speed of one second or more will let more light into your frame and start to blur moving subjects.

3. Decide on a composition

Architecture Photography 04

Sibiu, Romania

One important step in capturing architecture is the composition.

Composition simply refers to how you arrange the elements in a frame.

When looking at pictures of famous icons such as the Taj Mahal, Houses of Parliament or Big Ben, you’ll notice these structures often photographed in similar ways. One thing I would encourage is to find new angles of familiar landmarks when doing architectural photography – something that stands out from the others. You can achieve this by changing your viewpoint or angle.

4. Shooting interior architecture

Architecture Photography 05

Sibiu, Romania

When shooting interior architecture photography and exteriors, there are a few fundamental differences to consider, notably the light and composition. You will need to take into account the fact there is usually less light when shooting indoors, so change your settings to accommodate. Due to low light, use a tripod and slower shutter speeds to allow more light into your image. This helps you to manage different types of light, including candles, lamps, and outside light projecting internally. You will also need to balance mixed artificial and natural lighting.

The other major difference is the composition.

You may find more restriction photographing indoors than outdoors. Restrictions such as limited space, internal structures or part of the building’s architecture that may restrict or limit your view and composition. As a solution, use a wide-angle lens or try to take a step back (if you can) to get more of your chosen subject into your frame.

Alternatively, zoom your lens in further to eliminate distracting elements.

Structures often provide interesting internal features which can vary depending on the type of architecture and the country you are in. Church interiors, cathedrals, and even modern and historic buildings can all house hidden gems from altars to pillars, delightful structures, and stained glass windows.

The best lenses for shooting small or large spaces are usually a 24-70mm lens or a wide-angle lens such as a 16-35mm.

5. Shooting exterior architecture

Shooting exteriors is one of the most popular and fun subjects in architectural photography. You will often see pictures of the exteriors of the most famous buildings around the world and in your local area in publications. If you choose to shoot exteriors, you may decide to focus on the whole structure, the roof or a particular aspect of the external building that is interesting.

Architecture Photography 05

Peles Castle, Romania

Photographing exteriors can be challenging especially in changing light and high contrast conditions but can result in some great images.

Conclusion

In conclusion, remember these important steps when shooting architecture including choosing a subject, selecting your camera settings, deciding on composition and choosing whether to photograph interior or exterior architecture.

Share any additional steps you have for interesting architectural photography and your images with us below.


Capture-Interesting-Architectural-Photography

The post Learn These 5 Elements to Capture Interesting Architectural Photography appeared first on Digital Photography School. It was authored by Jeremy Flint.


Digital Photography School

 
Comments Off on Learn These 5 Elements to Capture Interesting Architectural Photography

Posted in Photography


An Interesting Subject Does Not Make An Interesting Photograph

10 Jun

The post An Interesting Subject Does Not Make An Interesting Photograph appeared first on Digital Photography School. It was authored by Kevin Landwer-Johan.

Many beginner photographers, and some more experienced ones, fall into the trap of thinking a good subject will make a good photo. It’s not true. I’ve seen loads of terrible photos of fabulous subjects.

A good photographer makes good photos, no matter what the subject. I like how British photographer Martin Parr describes his work. He says his aim is to make the ordinary look extraordinary.

An Interesting Subject Does Not Make An Interesting Photograph

The late afternoon light makes this landscape more interesting. © Kevin Landwer-Johan

To make the best photo, whether or not your subject is impressive, you need to:

  • Expose it well.
  • Time it right.
  • Choose the best lighting.
  • Compose it carefully.
  • Connect on some level.

Achieving all these five aspects of interesting photographs in a single frame is challenging. It takes skill, practice, and patience.

Being mindful of these pillars of good photography will lead you away from the snapshot trap when you see something interesting. Learning to keep these things in mind, you will gradually improve and be able to make the most mundane object look great when you photograph it.

An Interesting Subject Does Not Make An Interesting Photograph

Without the interesting cloud formation, this landscape would be rather dull. © Kevin Landwer-Johan

Master your camera technique

Confidence in managing your camera is essential. Using your camera without understanding much of how it works will frustrate your creative growth. Learning what each of the main settings does on your camera is not difficult.

Control of the exposure is made using the aperture, shutter speed, and ISO settings. Focus is either automatic or manual. None of these are hard to master when you put your mind to it and spend some time practicing. Figuring out what part of your composition needs to be exposed well and where the focus point needs to be are part of your creative choice.

Mastering the basic technical aspects of using your camera will free you up to become more creative with your photography.

An Interesting Subject Does Not Make An Interesting Photograph

Careful exposure makes this winter tree more interesting. © Kevin Landwer-Johan

Press your shutter at the right time

Choose the optimum moment to take your photo. Consider the action happening in front of you. Look at the colors as they change when the sun is rising and setting. Watch a flower blooming in your garden. Each instance you take a photo, make sure it’s the optimum one.

What determines the decisive moment for when you take a photo depends on many things. Each circumstance is different, so it’s important for you to observe what’s happening carefully.

Sometimes you’ll need to respond quickly. Other times you’d best be patient and wait, or come back another time. This is so for landscape and architecture photography where the right light and weather conditions are so vital.

Anticipating when the best time is will help you nail it more often. Think about what will happen next. What is the sequence of events that will unfold? How are clouds moving in the sky? Will they cover the sun before it sets?

In situations where you have some control over your subject and the action, timing is not so difficult to predict. You can ask the model to flick her hair back on the count of three. You could ask your kids to run and jump over the sleeping dog and be ready for them.

Timing is one of the key elements which influence good photos. Each picture you take is a short moment in time. Making sure you capture the right moment can often make or break your photographs.

An Interesting Subject Does Not Make An Interesting Photograph

The day I took this photo it was raining – all day. The sun came out in the evening and it was worth waiting for. © Kevin Landwer-Johan

Craft your compositions

Relying on your subject to make your photo interesting means you may not compose it well. Don’t just plonk it central in your viewfinder, focus and click. Everyone with a camera can do that.

Move around. Look for a better background without distractions. Take a little time to think through some rules of composition. Are there strong lines you could incorporate? Will using the rule of thirds make the photo stronger? What else is in the frame and is it relevant to your photo?

Use different focal length lenses to incorporate more or less background. With a wide lens, you’ll see more background. Using a longer lens will cut more of the background and help isolate your subject. Longer lenses also give the impression of compressed distance where wide lenses do the opposite.

Lots of the best street photography looks as if it’s been made in a hurry. People rushing past, glancing at the camera. Or absorbed in what they are doing. Mostly these photos are not snapshots. The photographer has planned well and anticipated the action. Then waited.

Action is more easily caught and composed well when patience and observation are applied.

An Interesting Subject Does Not Make An Interesting Photograph

The whole dam was interesting, but it was too hard to find an interesting angle for the whole structure, so I cropped in tight. © Kevin Landwer-Johan

Lighting for feeling

Hard light or soft light will create different moods.

Strong contrast when you have hard light is more dramatic. If you want a softer, more romantic feeling, hard light is not the best. Even with an interesting subject, such as a newborn baby or a flower, harsh lighting will not provide a gentle feeling in your photograph.

Matching the lighting to the mood you wish to create in your photograph will make the photo feel right. There are no fixed rules. You must decide for yourself with each photo. This is part of your creative expression as a photographer.

Think about the direction the light’s coming from. It is hard or soft? How is it affecting your subject? Is there too much shadow or contrast for the mood you want?

An Interesting Subject Does Not Make An Interesting Photograph

© Kevin Landwer-Johan

Connect with your subject

No matter what you choose to photograph, the more you connect with your subject the better photos you will make of it.

I always thought this applied only to people, and maybe animals. I’ve changed my perspective, and now think it can apply to anything you photograph.

I love flowers. My wife loves them more and loves to grow them. She takes much better photographs of flowers than I do because she has that passion. It shows in her pictures.

If you love the location you live in, or maybe where you grew up, you will photograph it more intimately than a stranger to it probably will.

How you connect with people you’re photographing will certainly make a huge difference in your photos.

An Interesting Subject Does Not Make An Interesting Photograph

© Kevin Landwer-Johan

Conclusion

Take your time. Be more observant. When you find your next alluring subject, consider how you can make the best photo of it. Don’t rely on its interest value alone.

Travel photography is prone to snap-shooting. When you travel, you always see new and interesting things to photograph. This is part of what makes travel so interesting. I often encourage people who take our photography workshops not to be travel snapshooters.

Ansel Adams said, “The most important component of a camera is the twelve inches behind it.” Think about your subject and how you can treat it.

Remember, it’s the photographer who makes the picture interesting, not the subject.


The post An Interesting Subject Does Not Make An Interesting Photograph appeared first on Digital Photography School. It was authored by Kevin Landwer-Johan.


Digital Photography School

 
Comments Off on An Interesting Subject Does Not Make An Interesting Photograph

Posted in Photography


How to Make Interesting Abstract Smoke Photos

07 May

The post How to Make Interesting Abstract Smoke Photos appeared first on Digital Photography School. It was authored by Rick Ohnsman.

How would you like to learn a little “photo magic?” A magician not wanting to reveal his secrets might tell you his trick was all done with “smoke and mirrors.” The expression speaks of a kind of deception used to fool the viewer. No fooling here though, as you’ll learn the technique. You really will photograph smoke and later, mirror your image to add even more interest. So it really is smoke and mirrors. Shall we begin?

Abstract smoke photography - Firebird

Can you see the Firebird? How was this done? Read on for the tricks to this abstract magic.

Tools for the trick

Here’s what you will need to create your photo:

Camera

Most cameras will work for this kind of photography. Being able to use manual control and manual focus will make things easier. You will also need to be able to fire a flash mounted off-camera using either a wired or wireless method. A lens which will allow you to focus on an object a few feet away will be best. The shots shown here were done with the Canon “nifty fifty”, a 50mm f/1.8 prime lens mounted on a Canon 50D camera. For a relatively inexpensive lens, it is very sharp.

Abstract Smoke Photography - Use stick Incense

A package of 40 incense sticks from the dollar store is probably enough for a lifetime of smoke photography.

Flash

You will want an external flash you can mount off-camera. The pop-up flash on the camera won’t work for this. You will be mounting the flash off to the side of your shot so it illuminates the column of smoke pointing perpendicular to the direction you’re pointing the camera. Having a light stand on which you can mount it will be helpful. You also don’t want any of the light to hit the background or flare into the camera, so a snoot which will direct the beam of the flash at the smoke column works well. You may also be able to fashion a “barn-door” arrangement with cardboard (or even tape). Whatever works to keep the light only on what you want – the smoke column.

Tripod

The flash will provide plenty of light and also freeze the action, so you really aren’t concerned about motion blur. The advantage of a tripod is simply to help you compose and frame the shot and provide some consistency.  If you don’t have a tripod or simply prefer to handhold your camera, that’s okay too.

To better see the smoke and also give you more flexibility later in editing, a black or very dark background will work best. Black posterboard, black cloth, the black side of a reflector, or whatever you have should work. Because the column of smoke you’ll be photographing will be relatively small, you won’t need anything very large.

Smoke-producing object

Incense, the kind that comes in stick form, works very well for this kind of smoke photography.  It’s cheap, burns for a long time, and produces just the kind of smoke needed.

Location

Unless you have an absolutely calm day with no wind, shooting outdoors probably isn’t going to work. Even the slightest air currents will affect your smoke pattern. Shooting indoors, particularly in a modern home, might be a good way to test your smoke detectors but having the alarm go off just as you’re getting started with your work is rather disruptive.  I found shooting in the garage to be a good option. It was dark, the air was still, and after the session, it was easy to open the door and clear the smoke. Just be aware of the requirements needed; still air, no smoke detectors, (or at least temporarily disarmed ones), the ability to make the room dark, and a door or window you can open afterward to clear the smoke afterward, and you’ll be set.

Abstract Smoke Photography - Setup diagram

Setting up

The diagram above shows a basic setup. Put your camera on a tripod a couple of feet from where you will place the incense stick.  Taping the stick to light stand may allow you more flexibility in positioning it in the frame, but whatever you use, you will want to frame the shot so you put just the tip of the stick at the bottom of the frame, leaving a couple of feet above for the column of smoke. Whether you use a portrait or landscape orientation with your camera is up to you, just remember the smoke will drift around. Being a little loose with the framing isn’t a bad idea, you can always crop later.

The background should be a couple of feet behind the incense stick. If you light properly, it won’t show anyway so this isn’t crucial.

Position the flash on a light stand so it’s to the side of the camera and points perpendicularly to the camera angle. You will be side-lighting the smoke. Some photographers also put a reflector on the opposite side to bounce a little light on the other side of the smoke. You can experiment and see if you like that.  The shots here use only the one flash. As mentioned above, what is crucial is that no light fall on the background nor flare into the camera lens. A snoot is the easiest means of achieving this.

Abstract Smoke Photography - smoke photo straight out of camera

The smoke patterns are constantly changing and no two will be alike.

Camera and flash settings

In the darkened room where you’re working, use a flashlight or other dim lighting so you can still see the incense stick and do your framing. Focus on the tip of the stick, then turn off the autofocus so the focus stays locked.  Leaving on autofocus will almost guarantee frustration, as while shooting, the camera lens may hunt, trying to find and focus on the drifting smoke.

Shoot in Raw mode, (which you usually do, yes?) Doing so will allow greater editing flexibility later.

Set your camera around ISO 200, f/8 and about 1/60th of a second for starters.

Leave the flash off.

Make a shot before lighting the incense in the darkened room.

You should get a totally black frame and that’s what you want with no flash.

Now put the flash in manual mode and set it to about half power. You should have already connected it to the camera with a cord or perhaps set up a radio trigger so it will fire when the shutter is tripped.

Make a shot with the flash on and you should be able to just see the tip incense stick.  If so, you’re now ready to get smokin’.

Abstract Smoke Photography - The Seahorse

This image is straight out of the camera. Note the tip of the incense stick at the bottom right.

Making your photos

Light the incense stick, blow out the flame and a thin column of smoke will rise from the tip.

Make a shot and check it. Is it focused?

Be sure, as you don’t want to make a whole series only to later find out they aren’t sharp. If you need to adjust your focus or perhaps go to a smaller f/stop for more depth of field, do so now.

Also, check the exposure. If things are too bright, drop the flash power or reduce the ISO. If the smoke is too dim, do the opposite. You want to clearly see the smoke, but nothing else.

If all looks good, keep making shots. Occasionally wave your hand near the smoke column or gently blow on it to vary the smoke pattern. You will want some variety so you can later choose your favorite shots.

Abstract Smoke Photography - Smoke photo mirrored and colored with a gradient

This is the same image as the one before it, but horizontally mirrored and colored with a gradient.

Basic editing

What program you want to edit with is up to you. You will want to adjust the blacks so as to leave only the white smoke details. Then adjust the whites, highlights, shadows, exposure, and contrast by eye, tuning the shot to your liking.

If there are elements you wish to eliminate, paint them out with a black adjustment brush or use layers and masks in Photoshop if that is your preferred technique.

Abstract Smoke Photography - horizontal and vertical mirroring

The Gordian Knot – This image was mirrored both horizontally and vertically and then colored with a gradient.

Mirrors and colors and abstracts, oh my!

You got the smoke, now what about the mirrors? Yes, the white smoke patterns on a black background are interesting but you can take this much further. I used Corel Paintshop Pro, but Photoshop would work too. Or for that matter, any photo editor that supports layers will work. (Keep in mind Lightroom does not support layers so while you can edit, colorize, and do other things with it, the mirroring part is beyond its capabilities).

Here are the basic steps:

  • Open in your basic edited smoke image. Select the entire image and copy it.
  • Paste the copied image on top of itself as a new layer.
  • Mirror (flip) the upper layer horizontally or vertically. (In Photoshop, Edit, Transform, and Flip Horizontally or Vertically).
  • Change the blending mode on the upper layer to Lighten. You will now see the upper layer mirrored and superimposed over the lower layer and some interesting patterns will be created.
Abstract Smoke Photography - Alien Gas

Alien Gas – A straight smoke shot later colored green.

Abstract Smoke Photography - Negative version of smoke photograph - Purple Haze

Purple Haze – Now, take the image above, reverse it so it’s a negative, (the black becomes white and the green becomes purple), then mirror it both horizontally and vertically.

You can move the layers so they overlap each other in various ways and change the pattern. You might want to make the canvas larger and put the mirrored image next to itself or even have multiple layers with the image flipped both horizontally and vertically.

You’ve now entered the realm of abstract art and anything goes.

Maybe you’d like to add some color?

Create another layer at the top of the stack and fill it with a gradient.  Now use the Overlay or Soft Light blending mode and watch your smoke take on the colors of the gradient.

If you’d like to hand-paint the smoke,  create a blank layer at the top. Turn the blending mode to Overlay, and using the Brush tool (and a color of your choice) to paint the smoke, watching the white smoke take on that color while the black is left untouched.

Try putting a photo on the upper layer and switching the blending mode on that layer to Overlay.

Abstract Smoke Photography - The Witch Doctor

Like Rorschach inkblots, what you see is very individual. I call this one – The Witch Doctor

Something I find fascinating with these abstract smoke compositions is that they resemble Rorschach InkBlots. Everyone interprets them differently and can see different images in what are, after all, just random patterns of drifting smoke. The titles on these shots are what I interpret.

What do you see?

Smoke in other photos

You may have reasons to want to include smoke in your photos that is not an abstract interpretation. The same basic technique can work with side lighting.

The “Smokin’ Hot Peppers” was lit with two flashes, one on either side of the vase and an incense stick placed in and behind the peppers in the vase.

Abstract Smoke Photography - Smokin Hot Peppers

A flash on either side of the subject was the only difference here, otherwise, this image uses the same technique.

Pseudo-Smoke

Here’s one last trick that could work for you when you want something that looks like smoke but you’re in a no-smoking workspace.

Get some dental floss, fray it a bit, and tie it to a penlight or small flashlight letting the light shine down the length of the floss and onto your subject.

Now make a long exposure during which you keep the floss constantly moving. Smokeless smoke, just another option to have in your bag of photo tricks.

Abstract Smoke Photography - Pseudo Smoke Effect - Simulated Smoke

Looks like smoke, but it isn’t.

Conclusion

You’ll find that photographing smoke is all about the lighting. Side or backlighting will work best and a dark background helps the smoke show up better. Beyond that, it’s simply a matter of experimenting.

Give it a try and make a little photo magic. And share with us in the comments below!


The post How to Make Interesting Abstract Smoke Photos appeared first on Digital Photography School. It was authored by Rick Ohnsman.


Digital Photography School

 
Comments Off on How to Make Interesting Abstract Smoke Photos

Posted in Photography


Abstract Table, An Interesting Tasting Menu in Oakland, California

08 Oct

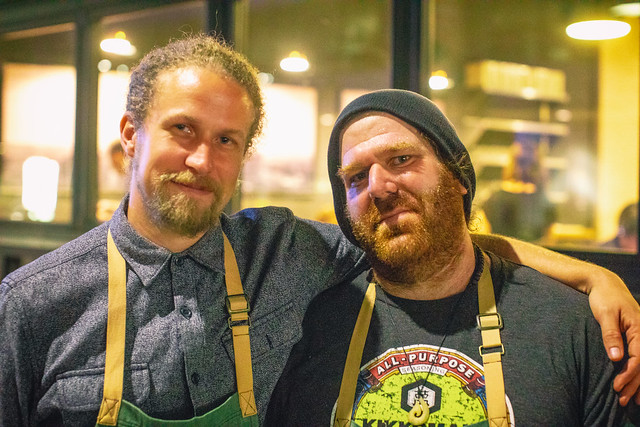
Duncan Kwitkor and Andrew Greene, Abstract Table
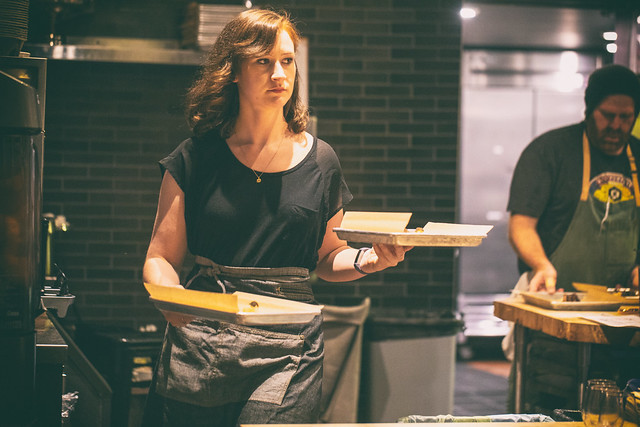
Chefs Duncan Kwitkor and Andrew Greene — Abstract Table, offering up a 5 and 7 course tasting menu Friday and Saturday nights at Gastropig.

Last night my wife and I had a chance to dine at the opening of a new pop up style 7 course tasting menu called Abstract Table, currently being offered as permanent Friday and Saturday night dinner service at the Gastropig in Oakland’s Uptown District. The menu is prepared by chefs/artists/friends Andrew Greene and Duncan Kwitkorand (formerly of Duchess in Oakland’s Rockridge District). The duo’s initial tasting menu features many unique and interesting flavors put together loosely around a Japanese style with a “Fine Dining on Paper” theme. Courses are served on paper and metal trays.

This is the first dinner series at the Gastropig and Greene and Kwitkorand plan to offer a winter themed tasting menu later this year as well. The tasting menu is modestly priced at $ 50 for a 5 course tasting and $ 70 for a 7 course tasting. Wine and sake are offered to accompany the meal or you can bring your own bottle (like we did with the excellent 2000 Peter Michael Les Pavots) and pay corkage.

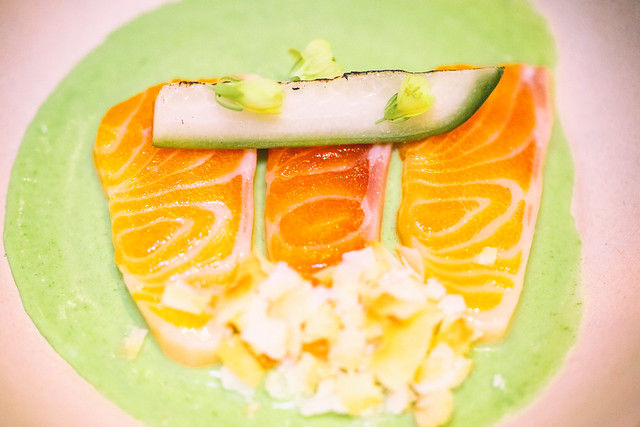
Of the 7 courses that we tried I think my personal favorites were the ocean trout with wild arugula sage, pickled grilled cucumber and coconut and the dessert panna cotta. My wife enjoyed the bok choy quite a bit and thought it was an interesting and unique approach to a salad. Overall I found every course quite enjoyable and appreciated the artistic orientation and presentation to the food. It is nice to see an interesting tasting menu approach and a new addition to Oakland’s food scene, especially at a fairly reasonable price.

They are currently offering two dinner services, one at 6pm and one at 8:30pm. Reservations are available via Resy.

More from Eater San Francisco here and the San Francisco Chronicle here.

More of my photos from last night’s opening here.

Oh and if you still haven’t had the baconslut egg sandwich at breakfast at Gastropig yet you are missing out!

Abstract Table

Abstract Table
First course: Japanese mushroom soup, mitsuba, negs oil

Abstract Table
Second course: Bok choy, sea bean, pear, hazelnut, yuzu kasha vinaigrette

Abstract Table
Intermezzo: Coastlive Farms heirloom tomato, purple yam, miso

Abstract Table
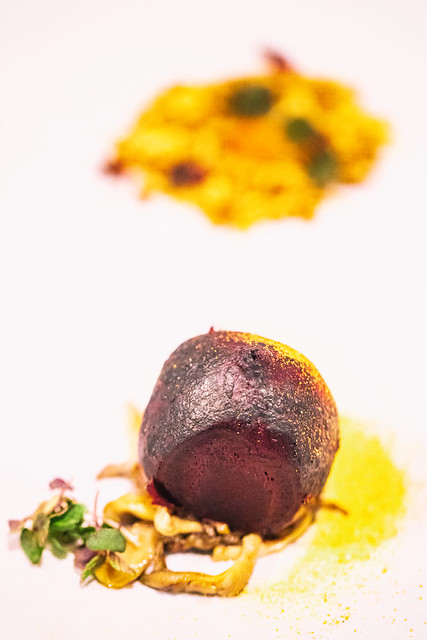
Third course: Charcoal beet, oyster mushroom, furikake granola, fish caramel

Abstract Table
Fourth course: Ocean trout, wild arugula sage, pickled grilled cucumber, coconut

Abstract Table
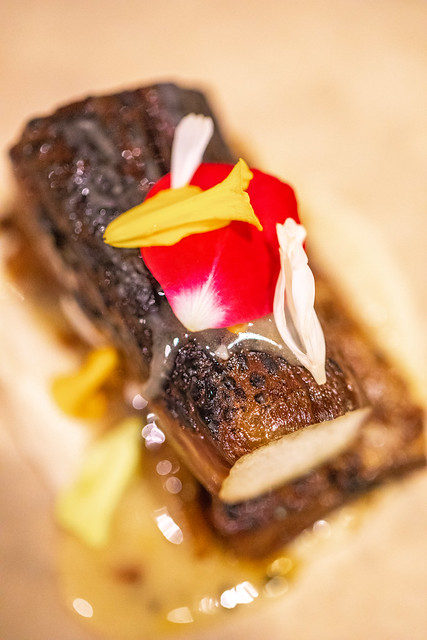
Fifth course: Beef cheek, turnip, tamari onion, edamame puree, sake glaze

Abstract Table
Sixth course: Lamb breast, smoked cauliflower, Japanese eggplant, togarashi honey

Abstract Table
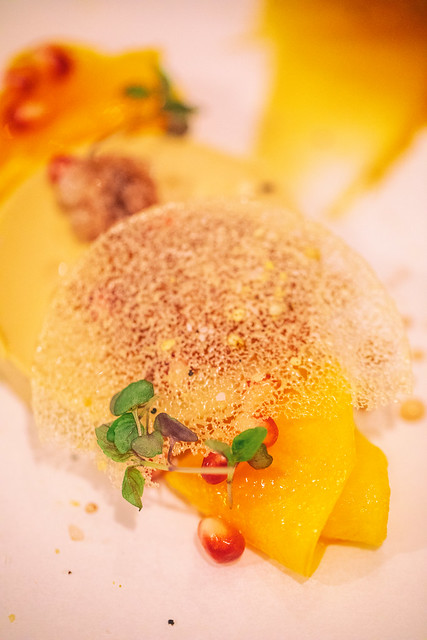
Seventh course: Hojicha panna cotta, persimmon, white chocolate tile, pomegranate granita

Peter Michael Winery 2000 Les Pavots
The excellent 2000 Peter Michael Les Pavots

Abstract Table
Dinner service Friday and Saturday evenings at Abstract Table


Thomas Hawk Digital Connection

 
Comments Off on Abstract Table, An Interesting Tasting Menu in Oakland, California

Posted in Photography


7 Tips to Make Travel Photography Interesting Again

20 Sep

It’s difficult to define travel photography these days. I see the same photos on Instagram all the time. Overly processed landscapes and sunset shots, the same pictures of a famous landmark over and over again and thousands of posed selfies on a beach swing. Most of these photos are considered to be travel photography but for me that’s not what it’s about.

How to Make Travel Photography Interesting Again - camel safari

A camel safari in Jaisalmer, India.

Travel photography is about showing a country and its culture, people, and natural wonders. For me, travel photography is National Geographic and Steve McCurry and not the photos intended to lure people to a destination. These photos are often fake and don’t represent the real thing.

Good travel photography, I believe, needs a hint of photojournalism to be honest and real. Here’s my advice and tips to make your travel photography more interesting and stand out from all the rest.

1. Include tourists

Traveling has never been easier and cheaper so it’s hard to avoid bus loads of tourists, especially around landmarks and famous attractions. So why not include them in your shots?

I know an empty Taj Mahal or beach looks amazing, but let’s face it, it’s just not reality anymore and including tourists is a creative way can make your photos more interesting. You can try to create a sense of place or size by adding a person in a photo of a landmark. It will change how your audience looks at the picture dramatically because suddenly they can, for example, feel the real size of a structure compared to that person in the photo.

Include tourists - How to Make Travel Photography Interesting Again

Mount Ijen in Indonesia. The tourists that look like ants on the ridge give the viewer a sense of how majestic this place is in person.

people in a pond by waterfall - How to Make Travel Photography Interesting Again

Kuang Si Waterfalls. The tourists make the place feel real and touchable.

You can also look for interesting or funny scenes. Tourists can act strange or do remarkable things so adding them in the frame together with the subject you want to show creates an extra storyline in your travel photography. Tourists also make interesting subjects by themselves. I always love to observe groups visiting famous landmarks.

tourists taking a photo at Batu Caves Malaysia

Tourists taking a photo at Batu Caves Malaysia.

tourists on a boat in India - 7 Tips to Make Travel Photography Interesting Again

2. Do portraits of real people and get their story

There are lots of portraits around of locals working in tourist destinations dressed in traditional clothing but we’ve all seen those before. Why not try to take a portrait of a real local. Someone who’s working or that you meet on the street.

Do you go to a bar every night and talk to the same guy who serves you a beer? Why not take his portrait and ask about his life. Most people love it if you’re interested in their life and including a story to a photo adds a lot of value.

Portrait of a guy - 7 Tips to Make Travel Photography Interesting Again

I met Lek on a beach in Koh Lanta. He owns a beach bar where I went every night for a drink. He told me about his life and his plans for the future.

Always try to approach people and ask to create their portrait. You can only make a good portrait when there’s some kind of interaction with your subject. Don’t shoot a portrait from far away with a big zoom lens. It shows.

Portrait Indian man - 7 Tips to Make Travel Photography Interesting Again

A guide we hired in Jaisalmer, India.

3. Point your camera in the opposite direction

Famous landmarks and natural wonders make great travel photography but what’s on the other side? People often take the same obvious pictures or try to find a new angle at best. But it’s also really interesting to see what’s on the other side of where everyone’s pointing their camera.

Is there a similar view close by or is there a nice contrast you can shoot? Shooting with a different point of view is great when you want to try and make a photo story or series about a place. Don’t just get different angles of the same location or building. Get a sense of the surroundings too.

volcano at sunset - 7 Tips to Make Travel Photography Interesting Again

The obvious view.

town opposite the volcano - 7 Tips to Make Travel Photography Interesting AgainAn equally interesting view of the town where I stayed on the other side.

4. Make an effort, don’t fix it in post-processing

This is a real issue with photography, in general, these days when it’s so easy to digitally enhance your pictures. I’m not saying you shouldn’t do some post-processing but out there are tons of pictures where people have replaced skies, taken out objects or added sunlight.

This has nothing to do with travel photography because then you’re just showing something that’s not real. Remember the “hint of photojournalism”? Why would you show something that wasn’t there?

Berastagi in Sumatra - 7 Tips to Make Travel Photography Interesting Again

I wanted to show the beautiful colors of the town of Berastagi in Sumatra. I went to the same spot three evenings in a row to capture the perfect light.

Always try to make an effort to get the best shot possible. If you weren’t able to get the shot you had in mind, try again the next day or even a few hours later. Weather and light change fast sometimes and that can work to your advantage.

It’s so much more rewarding when you finally get a great photo of what you actually saw.

5. Go to lesser-known areas or destinations

Especially when you want to shoot portraits, it’s a good idea to get far away from popular tourist areas. The locals will be much nicer to interact with and you’ll more likely be able to ask for a portrait without being asked for money.

Another advantage is that you can discover new and interesting locations that may have never been photographed before. A small temple in a back alley where the locals go to pray or the favorite fishing spot of a local community. Those are the pictures that will stand out and make an interesting story afterward.

many with bags of cotton candy - 7 Tips to Make Travel Photography Interesting Again

I accidentally came across Marina Beach in Chennai, India. There were no other tourists anywhere and it was the perfect place to approach locals and shoot portraits.

6. Street photography is travel photography and vice versa

I don’t like keeping these two genres of photography in different categories because when you’re traveling, you will most likely walk the streets – a lot! The street is where you can find the essence and soul of a country. The real locals with their real jobs and daily life going on around every corner.

I love to explore the streets of cities and towns to find interesting scenes and good stories. A lot of times when I visit a destination I don’t go to the popular locations at all and I try to stay in the quieter neighborhoods where I can see how the locals live.

The best travel photography is shot right on the streets, far away from any tourist destinations. You just have to look for it. Travel photography needs street photography and vice versa.

woman grilling fish on the street - https://digital-photography-school.com/top-street-travel-photography-tips-2017/

Grilling fish on the streets of Hat Yai, Thailand.

family on a motorcycle

7. Don’t be afraid of the dark

I’m not talking about shooting a building using a tripod. Cameras are so good these days that you can easily kick up the ISO to 3200 or even 6400 and shoot handheld. Yes, there will be more noise but I think people are too scared of it.

Good photos will still be good with a reasonable amount of noise. When you go out at night, just leave your tripod behind for once and try to shoot handheld. You’ll get a different and often surprising result. I’ve shot some of my best photos at night, handheld.

Don’t worry if the resulting frame is not tack sharp. This doesn’t make a good photo look bad all of a sudden.

Dark evening scene - 7 Tips to Make Travel Photography Interesting Again

A night scene I encountered while walking around in the streets of Hat Yai, Thailand.

Dark scene - 7 Tips to Make Travel Photography Interesting Again

Conclusion

I hope you found these tips helpful. If you apply them and practice, you can make your travel photography more interesting than the average images. Please share your comments, questions, and images in the section below.

The post 7 Tips to Make Travel Photography Interesting Again appeared first on Digital Photography School.


Digital Photography School

 
Comments Off on 7 Tips to Make Travel Photography Interesting Again

Posted in Photography


Market report provides interesting insights into camera module industry

07 Nov
Graph: Yole Développement

Market research & strategy consulting company Yole Développement has just released its “Camera Module Industry Market and Technology Trends 2017″ report, and the document includes a number of interesting findings and forecasts that photographers, specially those interested in smartphone photography, should pay attention to.

According to the report, the market for cameras in mobile devices is still the main driver of the camera module industry that reached $ 23.4 Billion in 2016 and is projected to reach $ 46.8 Billion by 2022.

The researchers at Yole Développement also found the manufacturers of autofocus and optical image stabilization systems had to adapt to the large production volumes and low cost requirements of the smartphone makers. This has resulted in a restructuring effort and a move of production capacity from Japan and Korea to China and Vietnam. Companies like New Shiko and TDK have been able to benefit the most from these developments.

In the sub-markets for image sensors and lens sets, the quasi-monopolies of Sony and Largan are about to end as the competition is quickly catching up in terms of technology. Module makers, like market leaders LG Innotek, are hugely dependent on customer loyalty as the loss of a large customer could potentially result in a collapse of the company.

The report also finds that the average cost for mobile camera modules has remained relatively constant. However, with high-end AF- and stabilization systems and and active alignment now being much more commonplace, complexity has increased disproportionally. The current total cost of camera module per phone is pretty much proportional to the number of cameras installed—two cameras cost the manufacturers $ 16, three cameras around $ 24, and those implementing four cameras in their devices have to calculate with a cost of more than $ 30 per handset.

Articles: Digital Photography Review (dpreview.com)

 
Comments Off on Market report provides interesting insights into camera module industry

Posted in Uncategorized