RSS
 

Posts Tagged ‘Interest’

Lighting Workshop Interest List

03 Oct

Apologies for how the lighting workshops announcement went yesterday. They filled within a few hours, and before many of you even saw the email.

Given that I typically only do the small-class shooting workshops once a year, I sat down last night and figured out a fairer way to announce them. If you are interested in perhaps one day attending, click through to learn more. Read more »
Strobist

 
Comments Off on Lighting Workshop Interest List

Posted in Photography


How to Nurture and Build a Child’s Interest in Photography

31 May

The post How to Nurture and Build a Child’s Interest in Photography appeared first on Digital Photography School. It was authored by Simon Ringsmuth.

One of the most important things you can do as a photographer is to help guide, nurture, and inspire the next generation of artists. It’s a humbling experience to know that you might be the person who inspires the next Ansel Adams or Annie Leibovitz. It could come from something as simple as sharing some pictures with a young person or helping them figure out how to use their camera. You never know when you might have the opportunity to make an impression on a child, or anyone for that matter.

But if you’re not careful, these moments of creative awakening can quickly die before even given a chance to blossom. With that in mind, here are a few ways you can help and build a child’s interest in photography instead of accidentally snuffing it out.

It’s not about you

Before I get into some specifics, I want to make it clear that the important thing here is to realize that it’s not about you.

When you’re helping kids explore photography (especially this generation of digital natives), there’s going to be many times when you might be inclined to sigh, roll your eyes, or tell them that the latest filter, effect, or trend isn’t real photography. Or it’s not how you do things.

I’ve got kids in elementary school, and I also help out with my church youth group. One of the things I’ve had to come to terms with is that kids today are not learning photography how I did. My first camera was a Kodak that shot 110 film. It cost money to buy and develop each roll.

Today, like it or not, most young people get introduced to photography via mobile phones. They seem to snap away without any care for composition.

They would rather use filters, effects, and apps instead of learning about aperture, shutter, and ISO.

And that’s just wrong! It’s not real photography!

If you’ve ever shown a child how to fix things, you know it’s not about the end result but about passing on something special to the next generation. The same holds true for photography.

Or is it?

Who am I to say that a child using Instagram filters is any less worthy of creating meaningful images than me with my big chunky DSLR?

Just because mobile phones and photo apps aren’t my tools of choice it doesn’t mean other people, especially children, can’t find joy and creative outlets when using them.

There are two choices when faced with the dilemma of what to do when working with kids who are interested in photography.

You can make it about yourself and tell the kids what you think they should be doing. Show them the tools you think they should be using, and explain how to get pictures you think are interesting.

Or you can help young people find what they like. Explore photography in a way that is meaningful to them, and even (gasp!) learn to use apps and filters to create images they think are beautiful.

My wife and I were with a group of kids at the local botanic garden. One of them shot dozens of pictures of this outdoor train set.

The former can easily lead to apathy or resentment, while the latter often gives way to a whole new creative outlet for the child. It’s about them, not you. If that means you have to leave your comfort zone and explore photography in a way that makes you uncomfortable, then do it for the sake of the child and his or her learning and growth. Who knows…you might just learn something new along the way!

Give compliments instead of criticism

When a youngster invites you to look at a stream of pictures from his or her phone, you might have an initial tendency to offer unsolicited advice or, worse yet, outright criticism.

You might find yourself thinking things like:

  • The lighting in that shot is all wrong.
  • I don’t get it. What is this picture supposed to be about?
  • Your picture is way underexposed!
  • What’s with all the selfies?

If this sounds familiar, you’re not alone.

A lot of people may react similarly, but remember that children’s egos are fragile things. One word from an adult they admire or respect can be all the difference between sparking enthusiasm and causing depression.

Most of the time, when a child wants to show you their photos, what they are seeking isn’t criticism but validation. They want to know that they are doing a good job. That their efforts are worthwhile, and that they are on the right track.

The kid who took this photo thought it would be really cool to have the rope cut across the frame. I thought about telling him to shoot it differently, but instead, I just said “Nice job on those colors!” He was really really happy to hear that.

As an adult, you might think you’re helping if you offer what you think is constructive criticism, but there will be a time for that later. The most helpful thing you can do is offer compliments and words of encouragement. Even if you don’t find their photos entirely compelling, find something nice to say.

Try tactics such as:

  • That’s a really interesting lighting choice!
  • I like the colors in this photo.
  • Can you tell me how you got this shot?
  • Look at those fun selfie filters you’re using! Can you show me how to do that?

Give children compliments instead of criticism, and ask questions to show them you are interested. It sends a strong message that you care about their creativity and value their work. This could help set them on a lifelong photography journey, and you might be just the person to do it!

Shot by a seven-year-old who thought this dinosaur was really fun to look at. Fun enough to take over two dozen photos of it.

Encourage experimentation

As someone who grew up with analog cameras and physical rolls of film, there’s a lot about modern photography I don’t quite understand. This goes double when it comes to mobile phones. Especially with filters, effects, stickers, and other image-altering features found in a lot of photo apps.

But for kids today, these types of alterations are just enjoyable ways to explore photography. Just because I, and others my age, didn’t grow up with all this technology doesn’t mean we should spoil it for the next generation!

One of my young relatives loves playing with color-inversion filters. I think the results look awful, but he loves this picture that he shot and others like it. And if he likes it, then who am I to tell him otherwise?

Instead of dwelling on what we might not comprehend, try the opposite approach when dealing with budding photographers. Don’t run away from filters if you’re with kids who are excited about them, and instead get them to try even more.

Some might seem silly, and you might never choose to willingly give yourself cat’s ears or apply an over-saturated look to your nature shots, but there’s no harm in trying things like this when you’re with a child who wants to experiment for fun.

My son took this picture of me sharpening a lawnmower blade. He used a night-time mode which, as he discovered, made the shutter stay open longer and capture some spark trails.

You can also encourage kids to try new techniques like time-lapse photography, look at accessories like the OlloClip which lets you take macro shots with a mobile phone, and experiment with basic editing and image processing. Photography today, especially with mobile devices, allows creative possibilities light years beyond what we had when I was a youngster.

Just imagine what kids can create with a few encouraging words from an adult photographer whom they admire and respect!

Another one of my young relatives was really interested in shooting familiar objects from different perspectives. This was the result of one of his recent experiments, and while it won’t win any awards, he was thrilled to try something new. I happily encouraged his experimentation.

Give advice, but only if they ask for it

This is one of the hardest but most important parts of helping a young person nurture their interest in photography. To illustrate it, I’ll share an example from a visit with my out-of-town family.

My 14-year-old niece is constantly snapping pictures with her phone of anything that she thinks is interesting: insects, flowers, fences, cars, and, of course, her friends. During their stay, she bombarded me with requests to look at her pictures. She couldn’t wait to show me the photos she took even just out in the backyard.

While this happened, it was difficult for me to hold my tongue and just let my niece bask in the glow of her newfound love for photography. I wanted to give her advice about lighting, offer tips about composition, show her how to hold her phone at different angles to get better pictures, and so on. However, I held my tongue and just tried to be a voice of encouragement and validation, telling her I liked her pictures and asking if I could see more.

My niece loves taking pictures such as this one using portrait mode on her phone. I wanted to tell her she could get better results with a real camera. But that kind of attitude is toxic and hurtful for a child who just wants to experiment with photography.

What my niece (and most young people) aren’t looking for are instruction and advice. They’re seeking validation, often on a personal level, that their work is good and that they are pursuing worthwhile goals. When you, someone whom they respect and admire, can only tell them why their work isn’t good or instruct them on how to fix what they are doing, it sends the wrong message even if you have good intentions. You could inadvertently stifle the very sense of creativity you are hoping to inspire.

What you should do instead is play the long game. Use opportunities like this to build a sense of trust and goodwill. That way, when young people do want you to help them with their photography, they will ask you.

Later that same weekend, my niece asked if she could use one of my cameras. So I let her use my old Nikon D7100.

We talked about lenses, apertures, and how to control the camera to make the background get all blurry. Then we went out to take pictures of flowers as the sun was setting. She was eager to learn all about how to control the camera settings to get photos she could never pull off with her cell phone and some filters.

When she showed interest in some of my camera gear, I let her try it out and gave her some advice about composition, lighting and controlling the aperture. But only after she asked me for help.

After putting her photos into Lightroom, I showed her how to do some basic cropping and adjustments. She told me repeatedly that these were some of her favorite shots she had ever taken. If I had started the weekend by chastising her for not using a real camera, or told her what I thought she should be doing differently with her photography, she would probably not have wanted to go out and get flower photos later on.

This is the result of her efforts, and she was extremely pleased with the results. Hopefully, this is just the start of a lifelong photographic journey!

Conclusion

Young people are finicky, and their moods and tastes change as quickly as the wind. Today their interest may be in photography, and by next week they have moved on to archery, pottery, or guitar. You never know what’s going to stick with them in the long run.

If you want to nurture an interest in photography and help make sure it’s not just a passing phase, you have to be careful what you say and do. Make it about them and not about you. Hopefully the photography seeds you help plant will take root in good soil to produce a lifelong appreciation for the art.


The post How to Nurture and Build a Child’s Interest in Photography appeared first on Digital Photography School. It was authored by Simon Ringsmuth.


Digital Photography School

 
Comments Off on How to Nurture and Build a Child’s Interest in Photography

Posted in Photography


Facebook’s photo sharing app Moments is being shuttered due to lack of user interest

26 Jan

Facebook is shuttering its image sharing app Moments, the company announced on Thursday. The product, which was announced in June 2015, allows multiple Facebook users to privately share images they’ve taken with the people who are featured in them. The app transforms Facebook’s facial recognition technology into a convenient tool, but few users are actually using the service.

The premise behind Facebook Moments is simple: many people snap images at a gathering. Those images can be manually shared with other individuals who attended the same event, but there’s a chance someone may miss out on photos they were featured in.

By using its facial recognition tech, Facebook is able to scan the user’s camera roll, identify other Moments users in the images, and issue an alert suggesting the user share those particular images with the other people featured in them. Google Photos offers a similar feature.

Moments was launched as a standalone app, and it’ll be officially shuttered on February 25, according to an email Facebook has sent to users. CNET reports that Facebook Moments’ demise is partly due to a lack of interest from users.

In addition to the email, users were given an alert within the Moments app, and any Facebook user who utilized the service within the last year will see an alert about the closure within the main Facebook app. Facebook Moments will be inaccessible starting on February 25. Users who wish to keep their images can use Facebook’s new ‘Export Your Moments’ tool to save them.

Articles: Digital Photography Review (dpreview.com)

 
Comments Off on Facebook’s photo sharing app Moments is being shuttered due to lack of user interest

Posted in Uncategorized


How to Add More Interest to Your Astrophotography With Light Painting

05 Oct

Photographing the night sky is a lot of fun and can result in some stunning photographs. You don’t need to look far to find some incredible, out-of-this-world astrophotography.

As the low-light performance of cameras continues to improve, astrophotography has come within reach of more photographers.

joshua tree astrophotography light painting

You may have tried your hand at photographing the stars and the Milky Way, or you may be fantasizing about going out to play while the world sleeps. If you aren’t new to astrophotography, you’ve likely found that it isn’t as easy as you might think. Even with the right gear, it takes a lot of practice and can be incredibly frustrating at times.

Even if you’ve managed to come home with some sharp, well-exposed images of the stars, you may be wondering what’s missing. What are so many night sky photos missing? It’s easy to get so focused on photographing the sky that you can forget that it’s the earth that makes them interesting.

Adding Interest to Your Night Sky Photos

One of the best things you can do to add depth to a landscape photo is include some foreground interest. Astrophotography is no different.

This is why you’ll find that some of the most stunning astrophotos include natural or man-made elements like rock formations, lighthouses, or old barns.

beach astrophotography light painting

BEFORE: A 20-second exposure using only ambient light.

beach astrophotography light painting

AFTER: The same scene with the sand illuminated by light painting with the screen on my phone.

You may have already tried including some foreground interest into your night sky photos. The problem is that the best places for astrophotography are the darkest places. As far away from light pollution as possible, with little or no moonlight. Unfortunately, this means there is very little ambient light to illuminate the foreground that you’re trying to include.

One simple solution is called light painting. It comes in many forms and can be done using many different techniques. The basic principle is that you add light to parts of the scene to illuminate them. It can not only transform your astrophotography, it’s also a lot of fun.

The best part is that you don’t need any fancy or expensive gear. All you need is a light source. You can use anything you have lying around. A flashlight, light bar, camping lamp, your phone, or your car’s headlights. I’ve even seen people using a drone. I always take a headlamp so I can see what I’m doing so that often does the trick.

How to Paint With Light

Light painting isn’t difficult, in fact, it’s really easy. Once you have your camera set up and ready to go, take a photo of the scene with ambient light to make sure you’ve exposed for the sky and stars.

When you’re happy with your settings, either you or a buddy will use the light source to paint light onto the foreground elements that you want to illuminate. Start by painting a small amount of light into the scene, then check the image. You’ll rarely get it right the first time.

camping astrophotography light painting

BEFORE: A 25-second exposure of a camping scene with the light of the fire and an LED placed inside the tent.

camping astrophotography light painting

AFTER: The same scene with the vehicle illuminated by my headlamp to the right of the scene.

Take multiple exposures, slowly painting in more light as necessary. Try experimenting with painting from various angles to see how it changes the way the foreground looks. Don’t be afraid to walk into the frame. With exposure times of 20-30 seconds, you won’t be visible as long as you keep moving. Just be careful not to shine the light source into the lens. I find wearing black helps you stay invisible.

As you’re photographing tiny amounts of ambient light, you’ll find it’s easy to overdo it with the light painting and overexpose the foreground. Less is more with this technique. If you find the foreground is too bright, paint less light in or use a light source that isn’t as bright. I find the light from the screen on my phone works well. It also allows you to choose the color of the light.

As with any form of photography, don’t forget that off-camera light (light coming from the sides of the scene) gives a much more pleasing look and creates depth in your photos. Instead of standing behind your camera and light painting while the shutter is open, move off to the side or walk through the scene to vary the angles of the direction of the light. Just be sure to check where you’re walking first!

tree astrophotography light painting

BEFORE: A tree silhouetted against the light of the Milky Way.

tree astrophotography light painting

AFTER: I used a camping light to paint the edge of the tree with light, helping to give the scene some depth and lead the viewer’s eye into the stars.

Post-Processing Astrophotography Images

When it comes time to edit your photos, the more frames you have to work with the better. You may find that there’s one exposure where you nailed the exposure and light painting in one frame, in which case you can go ahead with post-processing it.

In the more likely scenario that you like different parts of different frames, which you can easily blend together in Photoshop to create a composite.

This is where your base exposure with no added light will come in handy. Go through and select the images that you want to create the composite with, including the base exposure, then use this digital blending technique to combine them in Photoshop. I like to do a basic edit to the images in Lightroom before exporting to Photoshop, then I add final touches after blending them into one image.

joshua tree astrophotography light painting

BEFORE: Rocks and Joshua trees are slightly illuminated by the ambient light pollution.

joshua tree astrophotography light painting

AFTER: The same rocks and trees painted with light from my flashlight as I walked through the scene.

It’s easier than you think

Light painting may seem like a complex photographic technique, but it’s actually quite simple. It can take your astrophotography from good to great, and you’ll find the process is very enjoyable, even addictive!

Next time you head out into the night with camera in hand, pack an extra flashlight and give light painting a try. You’ll be glad you did.

The post How to Add More Interest to Your Astrophotography With Light Painting appeared first on Digital Photography School.


Digital Photography School

 
Comments Off on How to Add More Interest to Your Astrophotography With Light Painting

Posted in Photography


Using Layers and Foreground Interest for Better Landscape Photography

22 Jan

Have you ever been travelling, come upon a breathtaking vista, and taken a photograph only to find your representation to be a poor record of the view you remember? Welcome to the wonderful world of landscape photography! Capturing that breathtaking view in a photograph is not quite as easy as it looks.

Luckily, with a few simple strategies, you can significantly improve chances of getting better images. Read on and follow these tips for using layers and foreground to take your photos to the next level.

Using Layers and Foreground Interest for Better Landscape Photography

Do your images capture what you saw?

As is the case with any type of photography, great subjects (people or places) always help make better photographs. However, just because a vista is spectacular or the light is gorgeous does not guarantee that your photographs will turn out that way.

Why? What is going on?

The problem

Basically, the problem lies in creating composition from the vistas as they are presented. Many tourist views are interesting because of scale or the unusual nature of the location. To make a good image you need to create interest and capture that sense of scale. As you travel through scenic areas around the world, those locations that are the easiest to access don’t necessarily make the best landscape photographs. Being high or adjacent to the road may create a great viewpoint but it often doesn’t lend itself to a great two-dimensional representation (photography) of a three-dimensional object (the world and the view in front of you).

Using Layers and Foreground Interest for Better Landscape Photography

Going one step further, many beginners will look at landscape images from other photographers and instinctively like some and not others. They will often have difficulty articulating why they prefer one image over another. Understanding composition and layering will help you make more interesting images and get a better appreciation of why you enjoy certain landscape photographs.

The solutions

The best way to understand these concepts is to break your image down into a few simple pieces when approaching a scene you want to photograph, and then put them all together in the final photograph. Let’s start with scene scouting and composition before you worry about your camera settings.

Using Layers and Foreground Interest for Better Landscape Photography

Choose your subject

As part of your location scouting, before you set up to take an image, take some time to think about what you are looking at before you are ready take your camera out of the bag. Decide on the subject matter you are interested in making into a photograph. Figure out what part of it you found interesting – it could be something close, like a lake, or something far away, like a mountain.

Shoot when the light is best

Next, try to make sure you are taking the image when the sun is low in the sky. This is not always an option when you are travelling and it is raining or you only have time during the middle of the day. The wrong time of day (i.e. midday) will significantly limit the impact of your photographs. It is almost always essential to shoot landscape images during golden hour (right after sunrise or just before sunset).

Using Layers and Foreground Interest for Better Landscape Photography

The only exceptions are when the sky is overcast or if you are in the mountains. If the sky is overcast it will extend your shooting time but simultaneously makes getting good images harder because the sky is not interesting.

When you are in a mountain range, the mountains are often big enough to interfere with the lighting on your subject as shadows from mountains will get in the way. This means you have to shoot later in the day. In general, shooting during the golden hour will create interesting shadows and great quality of light.

Think in terms of layers

Once you have your subject selected and have picked an appropriate time of day, the next step is to think about layers. Add an object(s) of interest in front of your subject, and include it in the composition of your image. This will often mean using your feet to get into a better position.

Using Layers and Foreground Interest for Better Landscape Photography

What is meant by layering composition or objects of interest?

Good landscape photos have layers or objects in the foreground (close to you), middle ground (medium distance from the camera), and background (farthest away). This will help prevent your images from looking flat. These layers form elements that draw the viewer’s eyes and create depth in your photo.

It’s even better if the foreground leads into the background (maybe a river or a line of trees). Some objects, like people, can create a sense of scale. This is particularly important when you are looking at large vistas. For example, a massive cliff will provide no sense of scale without someone or something of a recognizable size in the field of view.

Using Layers and Foreground Interest for Better Landscape Photography

What makes a good foreground layer?

What kinds of things can you use to create these layered elements? For the background, distant mountains or hills can do the track. For the middle layer, look for tree lines, intermediate distance hills, clusters of objects, rivers, or lakes. If you have open water such as a lake in the foreground, lowering your perspective, may allow you to see a reflection of your subject that can create additional interest.

Finally, for the front layer, any isolated object in the foreground can function for this purpose. It could be a rock, a cluster of grass, or even a person. The object in the foreground creates weight and balances the image. These should all be placed in the field of view to divide up your image and create interest. You get extra credit for atmospheric effects like fog, mist or haze. Remember you can introduce a subject in the foreground, or get lower to the ground to make something small look bigger.

Using Layers and Foreground Interest for Better Landscape Photography

Get ready to shoot

Okay, now that you have scouted your subject, planned your layers, and have positioned yourself you can grab your camera. Choose a lens that gives an appropriate field of view, remembering that really wide angle lenses don’t necessarily work for distant objects in landscapes because they tend to make them appear very small.

Compose your image well

With your camera and lens selection in hand, you need to compose the image in your frame. It is easiest to remember and implement the Rule of Thirds with layers at the thirds. Most modern cameras can be configured to have a grid with lines that divide the screen into nine squares (two horizontal lines and two vertical lines). Where these lines intersect is where you should put the objects(s) of interest, or the layers.

Using Layers and Foreground Interest for Better Landscape Photography

For example, placing the horizon on one of these lines is great. Having the sunrise positioned on one of the intersections of the lines is even better. If the sky is really interesting, put the horizon on the bottom third so the sky fills the top two thirds. If the ground is the most interesting, position the sky so that it is only the top third.

Remember you can also shoot landscapes in portrait orientation if that helps the composition. Some people don’t want to follow things like the rule of thirds, but until your photographs are regularly turning out as you want them, it is a good general approach.

Camera settings

In general, for each type of landscape there will be preferred camera settings that will make your photographs really pop. Don’t set your camera at its widest aperture for landscape photographs. You want to try to get as much of the subject of interest in focus. Using a smaller aperture will help, but don’t go too far or you will start introducing diffraction effects.

Use the hyperfocal distance of your aperture to your advantage and make sure you are focusing on an element in the middle ground. This will get all of your background in focus and much of your foreground too, especially if you are using a f-stop in the range of f/8 – f/11.

Finally, you should almost always use a tripod for landscape photography. This type of photography demands tack sharp images: achieve this by using a tripod.

Conclusion

Once you get used to this as an approach to your imagery, it will help you create better images and understand why you like some landscape images more than others.

Please share any additional tips you have for adding layers to your landscape photos in the comments below. Share your landscape images as well, we’d love to see them.

The post Using Layers and Foreground Interest for Better Landscape Photography by Mark C Hughes appeared first on Digital Photography School.


Digital Photography School

 
Comments Off on Using Layers and Foreground Interest for Better Landscape Photography

Posted in Photography


Conflict of interest policy pdf

14 Sep

Paid editing for promotional purposes, below are some examples for different sorts of disclosures. From acting on behalf of any person or organization in connection with a case where the Crown had previously been a party to it, A lawyer may represent his conflict of interest policy pdf her own relatives, members of committees whose […]
BooksChantcdCom

 
Comments Off on Conflict of interest policy pdf

Posted in Equipment


Compound interest questions and answers pdf

25 Aug

as the bank pays simple interest this amount stays the same. These could be quarterly, having a mastery of these topics will likely give you all the necessary knowledge to tackle the problems you compound interest questions and answers pdf encounter during the technical interview. PII is information that can be used to identify you, […]
BooksChantcdCom

 
Comments Off on Compound interest questions and answers pdf

Posted in Equipment


Equivalence is useful if you have any interest in light (and as a photographer, you probably should)

23 Aug

Photography is all about light, something you’ll quickly discover even if you’re not familiar with the word’s Greek origins. Most of the time, we use a standard framework (the standard exposure model) to discuss how much light your camera is receiving. However, this isn’t the only way of looking at things.

‘Equivalence’ gives us another way of looking at light, that just happens to give a clearer understanding of the capabilities of different formats. It’s a common misconception that equivalence and the more familiar standard exposure model are at odds with each other, but the two systems aren’t contradictory – they just tell different parts of the same story.

The Standard Exposure Model

The standard exposure model uses shutter speed and F-number (the ratio of a lens’s focal length, relative to its exit pupil) to describe how much light your camera is receiving. Using this ratio normalizes the behavior of lenses based on how much light they project per unit area, meaning it works consistently across different focal lengths. The available light and the exposure you can devote to it tend to dictate most of the noise in your image, so are the most effective way of reducing it.

A third factor (which is applied after the light has been captured, so doesn’t affect exposure, per se) is sensitivity (ISO) which, at its most basic can be thought of as essentially ‘whatever amplification or brightening is needed to provide the expected image brightness from a given exposure.’ This has the effect of ensuring that the exposure system works, regardless of what format you’re shooting on.

Lightmeters are designed to express the light level in terms of the standard exposure model. Since this system is, by design, independent of format so are their results.

There are many benefits to this system. It means that you never have to think about what format you’re shooting with: everything from your smartphone to a medium-format back will work using the same settings in the same lighting conditions. This is the reason light meters are able to work without giving a fig for what camera you’ve got.

The main downside to this*, is that it obscures the effects of format. There’s nothing wrong with thinking in terms of exposure, but it leads to slightly wooly conclusions such as ‘full-frame sensors can give less depth of field and are better in low light’ which is generally correct but not very precise. In turn, this can lead to confusion about why this is the case. ‘Something to do with bigger pixels?**

Equivalence: the whole image perspective

Equivalence is simply a different way of looking at the same thing. Instead of thinking about light per unit area, it looks at the total amount of light that goes to make up the whole image. As a result, it assumes you’re trying to take a specific picture (matched framing, shot from the same position) and also requires you to compare images at the same size. In other words, it’s about pictures, not pixel peeping.

It’s not a matter of faith, nor does it contradict anything that the exposure model says, it’s simply a question of geometry. In the film era, where most people used a single format and only a generally knowledgeable minority used medium and large formats, the same underlying effects were usually discussed in terms of enlargement. But, since there’s no fundamental link between the size of your pixels and the size you choose to view or print them, ‘enlargement’ becomes a slightly arcane way of thinking about it.

Equivalence is simply a way of looking at how much light a system gets, and just happens to use the 135 film format as the baseline for those comparisons (because it was the dominant system in the film era, which saw it being used as the basis of comparison for focal lengths, when the many and various sensor formats emerged at the beginning of the digital era).

Equivalence, the basics

Equivalent f-numbers are a means of considering the combined effect of the aperture and sensor size.

In the same way that equivalent focal lengths describe the effect of sensor size on the field-of-view a lens gives, equivalent apertures describe the effect of sensor size on the properties that aperture affects (depth of field, diffraction, total light projected). In both instances, the underlying properties are not changed: neither the focal length or F-number of a lens is changed by different sensor sizes, only their effects.

  • F-number = focal length/aperture diameter
  • Equivalent f-number = equivalent focal length/aperture diameter

Comparing equivalent apertures allows you to understand how much control a lens will give you over depth-of-field. It also gives a good idea of how low-light performance will compare between two cameras of different sensor sizes, since it tells you how much total light is making up the final image (most noise is most images comes from the amount of light captured).

However, because the exposure and ISO system is, by design, independent of sensor size, equivalent apertures should only be used to understand camera/lens capability, not exposure.

To keep things real-world relevant, equivalence assumes you’re shooting the same framing from the same position and then viewing the images at the same output size.

Looking at total light or light per image, means we can better recognize the effect of light on depth-of-field, diffraction and noise. Rather than vaguely saying that ‘full-frame is, er, better than APS-C’ we can understand why and how much more or less light a larger or smaller sensor will receive at the same exposure settings (same shutter speed and same F-number), by calculating what the equivalent F-numbers are.

So, since a 50mm F2 lens used on APS-C behaves equivalently to a 75mm F3 lens on full-frame, we can see that a full-frame camera with a 75mm F2 could receive up to one and a sixth stops more light, if you opened the lens up to its maximum aperture. You can see this would give a shallower depth of field and a little over one stop of noise improvement, assuming comparable sensor performance.

Looking at it this way not only shows us the boundaries of the capabilities of each system but also gives us a meaningful way to assess whether either system is under or over-performing, relative to other systems, since it gives us a set of expectations about what it should be capable of.

This really shouldn’t be controversial

You do not need to consider equivalence for a moment when choosing an exposure. You do not have to multiply the F-number by the crop factor, unless you want to understand its behavior, relative to another system. However, it is completely legitimate to do so. The logic behind it is mathematically sound***, it holds up to real-world testing and it can be informative, if you’re interested. It’s an effective tool, whether you have need for it or not.

For more information, with real-world examples, read our more in-depth article on the subject.


* …beyond the flexibility in the ISO standard that means cameras don’t actually have to produce the image brightness you expect, and the fact that ISO as used by camera makers has very little meaning in terms of Raw shooting. [Back to text]

** If you view two images at the same size, the ones taken with the larger sensor at the same field of view, F-number and shutter speed will usually be cleaner in close proportion to the sensor size increase, almost regardless of the pixel size. Whether you have the same number of larger pixels or a larger number of the same sized pixels generally makes very little difference. [Back to text]

*** As Andy Rowlands’ Physics of Digital Photography points out, equivalence works at most normal photographic distances but, because it’s based on a slightly simplified depth of field equation, doesn’t hold true as you approach the close focus distances used for macro photography. This is equally true for focal length equivalence. [Back to text]

Articles: Digital Photography Review (dpreview.com)

 
Comments Off on Equivalence is useful if you have any interest in light (and as a photographer, you probably should)

Posted in Uncategorized


Secondary Point of Interest: Weekly Photography Challenge

17 Aug

Earlier this week we published a post on composition of images in which author Matt Dutile introduced the concept of adding a second point of interest to your photos to give your image a natural viewing progression.

Adding a secondary point of interest can not only add more interest in your image but reinforce a theme or perspective argues Matt.

NewImage

A number of people commented that they’d not considered this technique before so we thought this might be a fun weekly challenge – taking photos that not only have a single point of interest – but which have a second one.

Check out Matt’s post and then head out with your camera to practice the technique.

Once you’ve taken your ’2nd Point of Interest’ photos upload your best ones to your favourite photo sharing site either share a link to them even better – embed them in the comments using the our new tool to do so.

If you tag your photos on Flickr, Instagram, Twitter or other sites with Tagging tag them as #DPS2NDINTEREST to help others find them. Linking back to this page might also help others know what you’re doing so that they can share in the fun.

Also – don’t forget to check out some of the great shots posted in last weeks Black and White Landscapes challenge – there were some great shots submitted.

Post originally from: Digital Photography Tips.

Check out our more Photography Tips at Photography Tips for Beginners, Portrait Photography Tips and Wedding Photography Tips.

Secondary Point of Interest: Weekly Photography Challenge


Digital Photography School

 
Comments Off on Secondary Point of Interest: Weekly Photography Challenge

Posted in Photography


Human Interest: Homeless Dogs Given Hope-Filled Balloons

14 Aug

[ By WebUrbanist in Global & Travel & Places. ]

homeless dog urban intervention

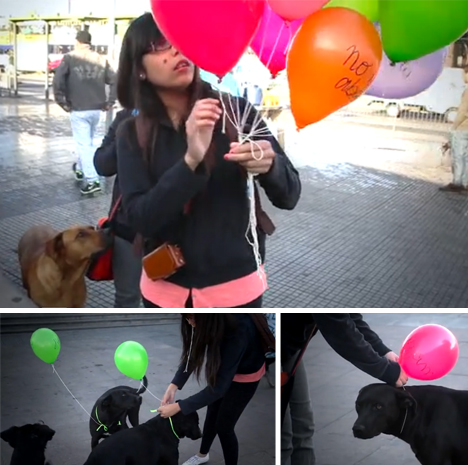
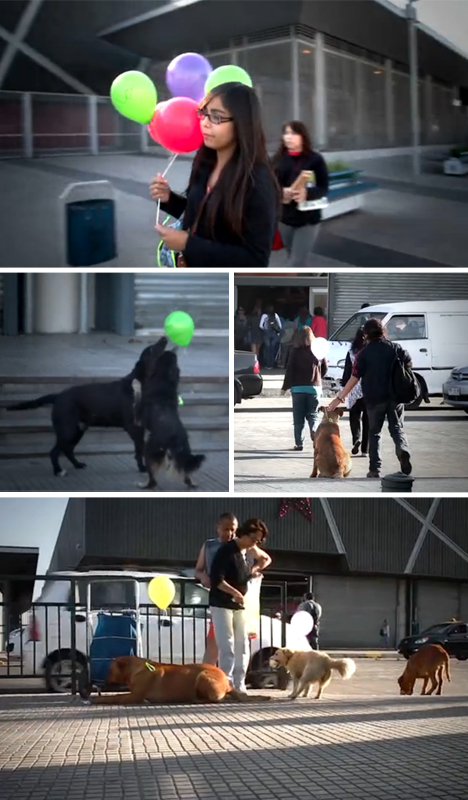
In a unique urban intervention, two college students took and attached a series of balloons marked with written phrases to stray canines Santiago, Chile. The messages encourage people to feed, pet and play with these ubiquitous animals, lost and in need of love. While one person carried the colorful balloon bouquet and attached the strings, the other of the pair filmed the fascinating results as pedestrians noticed and stopped.

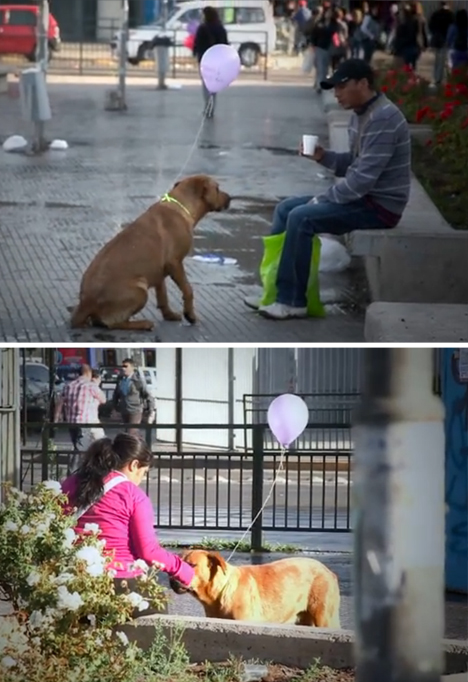
As the video demonstrates, the dogs with balloon additions got the attention of others on the street quite quickly. Man’s neglected best friend became visible once again, with passers by stopping to hand over leftovers and spend time with these estranged animals.

homeless dogs human interest

The project is titled ESTOY AQUÍ (Intervención Urbana), which translates to a simple plea: I AM HERE. Written on the balloons are phrases like ‘feed me’, ‘pet me’, ‘hug me’ and ‘scratch me’.

homeless stray dog project

From young puppies to older pals, thousands of homeless dogs roam the streets of this city. Most of them are friendly and simply in search of scraps – in turn, they are normally humanely avoided but largely ignored as the daily bustle of urban life takes place around them.

homeless pet feed play

Aside from human interest, the dogs themselves sat up and took notice as well, in many cases playing with their own balloons and strings, or interacting with one another’s new colorful accessories.

Share on Facebook


[ By WebUrbanist in Global & Travel & Places. ]

[ WebUrbanist | Archives | Galleries | Privacy | TOS ]


WebUrbanist

 
Comments Off on Human Interest: Homeless Dogs Given Hope-Filled Balloons

Posted in Creativity