RSS
 

Posts Tagged ‘Indoor’

7 Tips for Action-Packed Indoor Sports Photography

27 Sep

The post 7 Tips for Action-Packed Indoor Sports Photography appeared first on Digital Photography School. It was authored by Christina N Dickson.

indoor sports photography: essential tips

Indoor sports aren’t always easy to photography. In fact, for the beginning sports photographer, they can be downright intimidating, thanks to the fast action, low light, and limited camera movement.

Fortunately, experienced sports shooters have developed a number of techniques that make indoor sports photography way easier, including:

  • Simple starting settings for sharp indoor shots
  • Standard gear that every beginner should own
  • Careful research you should do before approaching a sport
  • Much more!

And that’s what this article is all about. I’m going to share my top 7 tips to take your indoor sports photos to the next level – and by the time you’re done, you’ll be ready to head out with your camera and start creating some action-packed photos of your own.

Let’s get started.

1. Use a fast camera

I’m guessing you know this already, but many indoor sports are fast-paced. Basketball, hockey, indoor soccer – all of it requires split-second attention to detail. One moment, a player has the ball/puck; the next, it’s in the goal/basket and the team is celebrating.

man dunking a basketball

Which means that you need a fast camera to keep up with the action. Specifically, I recommend a camera that offers:

  • Interchangeable lenses (i.e., a mirrorless camera or a DSLR)
  • Fast continuous shooting speeds (at least 8 frames per second, though 10+ is better)
  • A deep buffer (so you can take several bursts without pause)
  • Lighting-fast autofocus (ideally with eye autofocus tracking)

Sports-focused cameras do tend to be expensive, but for the serious shooter, it’s absolutely worth it (and there are cheaper models that offer a lot of the fundamental sports features without breaking the bank).

You’ll also want to pay attention to camera low-light capabilities. A camera that can shoot at high ISOs without significant noise is a big deal, because you can push it to the max when shooting in poorly lit arenas. To determine high-ISO performance, you can read reviews, which nearly always do in-depth ISO tests and comparisons.

2. Use a lens with a wide maximum aperture

Indoor sports arenas, even in the best-case scenario, tend to offer pretty limited lighting. That’s where wide-aperture lenses come in; they let you capture plenty of light, thus keeping your shutter speed high (for sharp photos) and your ISO low (to reduce noise).

Professional shooters tend to use lenses with a maximum aperture of f/2.8, and these are ideal, though they’re also expensive. At the very least, you should use lenses with a fixed f/4 maximum aperture.

By the way, you’ll often be positioned away from the action and limited in your movement, so shooting with a wide-angle lens or a fast prime generally isn’t an option. Instead, sports photographers use fast zoom lenses, such as a 70-200mm f/2.8 or a 24-70mm f/2.8. Eventually, you may want to add a fast super-telephoto prime to your bag, but a 70-200mm lens is a great starting point.

3. Shoot with a fast shutter speed

Once again, sports photography is all about the action – and if you don’t use a fast shutter speed, then you’ll end up with blurry, unpleasant photos that nobody likes.

On the other hand, a fast shutter speed will let you freeze movement, even split-second movement, like a hand slamming the ball down through a hoop, or a stick drawing back to smack the puck.

action indoor sports photography

So what counts as fast enough? I recommend a shutter speed of at least 1/200s, but faster is better. If you can, boost this to 1/400s, or even – if the light is good or your camera can handle high ISOs – 1/1000s.

Pro tip: You can sometimes create artistic shots by slowing down the shutter speed to 1/30s or so. Try photographing a moving player and consider panning along for a blurry background effect. Sure, the results won’t be pin-sharp, but they’ll convey movement (and can look great in a creative portfolio!).

4. Use a high ISO

In the previous tip, I emphasized the importance of a fast shutter speed. But if you just crank up the shutter and leave the rest of your settings alone, you’ll let in too little light – and your photos will be wildly underexposed.

Instead, you must balance out the fast shutter speed with a high ISO setting. That way, even as you reduce the light hitting the sensor, you maintain the overall brightness of the photo.

I recommend an ISO of at least 1600, though plenty of cameras these days can handle much more than that (even ISO 6400 and ISO 12800 may be fair game, depending on your model). Since there’s so much variation from camera model to camera model, take some test shots at different ISOs and compare them. Ask yourself: How do I feel about the noise produced at ISO 3200? How about ISO 6400? See what you can tolerate, identify a cut-off point, and then push your ISO as necessary.

5. Shoot in RAW

Here’s one final piece of settings advice:

When possible, use a RAW file format.

You see, RAW files contain all of the data captured the moment you hit the shutter button. Whereas their alternative, the JPEG, produces a compressed version of that RAW file – which, by definition, is lower quality.

This has plenty of consequences. For one, you can make significant edits to RAW files without causing issues, but JPEGs are resistant to serious editing (and the more significant the edit, the more you risk ruining the shot). RAW files also contain more detail, allow you to recover highlights and shadows, and more.

Now, JPEGs are smaller and instantly shareable, plus they’re easier for your camera to process (and therefore allow for longer burst sequences). So if you absolutely need to increase your camera’s buffer, or you like the idea of immediately sharing your images (without needing to process them in programs such as Lightroom or Capture One, as required by RAW files), then you might consider using JPEGs.

Otherwise, shoot RAW.

6. Learn to anticipate the action

What separates the good sports photographers from the great sports photographers? Their ability to predict the action in advance, and therefore be ready to capture a cover-quality shot.

Fortunately, learning to anticipate action isn’t as hard as it sounds. It simply takes a lot of research.

First, familiarize yourself with the rules of the sport you’re photographing. Know the rulebook inside and out; that way, you always know how the gameplay will proceed, when players move down the field, when penalties happen, etc.

players playing basketball in black and white

Second, learn strategy. If you know how teams are likely to approach the game, then you’ll be ready to shoot when the game gets intense.

Third, learn about specific teams and players. This is an advanced technique, but once you get really good at rules and strategy, you can try to determine how a team or player will behave, which gives you a serious advantage. You’ll know exactly what’s going to happen before it does; your photos will practically shoot themselves!

All that said, even the best sports photographers can’t predict every movement – after all, sports are fast and complex – so make sure you’re ready for anything.

7. Look for relationships and expressions

Oftentimes, beginner sports photographers shoot individuals: the basketball player going for a jump shot, the volleyball player spiking at the net.

But if you can capture multiple players together, you can create more compelling images. For instance, you might shoot one player handing the ball to another, two players talking to each other, or opposing players squaring off. It’s about portraying relationships, looking for interactions, and capturing engagement.

moment between two players before gameplay begins

Also, pro tip: Try to photograph players as people, not just as players. In other words, aim to capture emotion, such as anger, joy, or nervousness – in the look one player gives the camera, in the stare one player gives another, in the team huddle just before a buzzer-beater shot.

That way, you’ll create indoor sports photos that people will remember.

Indoor sports photography tips: final words

Hopefully, you now feel equipped to capture some stunning indoor sports images of your own.

Just follow the tips I’ve laid out for you, add in a healthy dash of creativity, and you’ll be golden!

Now over to you:

What sports do you plan to shoot this season? Do you have any indoor sports tips? Share your thoughts in the comments below!

volleyball players celebrating

Table of contents

Sports Photography

  • GENERAL
    • 8 Tips On How to Photograph Sports
    • Tips from the Sports Photography Pros to Help You Get the Money Shots
    • Indoor Sports Photography

    • SETTINGS
      • How To Use Sports Mode
    • LIGHTING
      • Shooting Portraits and Action Sports with Speedlites – Workshop
    • GEAR
      • Lens Review Canon 300mm f4 Lens for Sports Photography
      • Aquatech CO-7 Underwater Sport Housing [REVIEW]
      • Shooting Motorsports with a Micro Four Thirds Camera
    • ADVANCED GUIDES
      • Tips for Photographing Football (Soccer)
        • How to Shoot High School Football
        • Play Ball! Covering Your Bases Shooting Baseball
        • How to Capture the Perfect Action Shot in Sports Photography
          • Low Light Sports Photography
          • 3 Tips for Taking Better Motorsport Photos
          • Catching the Action: Photographing Youth Sports
            • Top 5 Tips for Extreme Sports Photography
          • POST-PROCESSING
            • Using Photoshop to Create the Illusion of Depth of Field with your Sports Photos

          var dpsTopics = {
          id: 3754,
          titles: [{“id”:”use-a-fast-camera”,”permalink”:”https:\/\/digital-photography-school.com\/indoor-sports-photography\/”,”title”:”1. Use a fast camera”},{“id”:”use-a-lens-with-a-wide-maximum-aperture”,”permalink”:”https:\/\/digital-photography-school.com\/indoor-sports-photography\/”,”title”:”2. Use a lens with a wide maximum aperture”},{“id”:”shoot-with-a-fast-shutter-speed”,”permalink”:”https:\/\/digital-photography-school.com\/indoor-sports-photography\/”,”title”:”3. Shoot with a fast shutter speed”},{“id”:”use-a-high-iso”,”permalink”:”https:\/\/digital-photography-school.com\/indoor-sports-photography\/”,”title”:”4. Use a high ISO”},{“id”:”shoot-in-raw”,”permalink”:”https:\/\/digital-photography-school.com\/indoor-sports-photography\/”,”title”:”5. Shoot in RAW”},{“id”:”learn-to-anticipate-the-action”,”permalink”:”https:\/\/digital-photography-school.com\/indoor-sports-photography\/”,”title”:”6. Learn to anticipate the action”},{“id”:”look-for-relationships-and-expressions”,”permalink”:”https:\/\/digital-photography-school.com\/indoor-sports-photography\/”,”title”:”7. Look for relationships and expressions”},{“id”:”indoor-sports-photography-tips-final-words”,”permalink”:”https:\/\/digital-photography-school.com\/indoor-sports-photography\/”,”title”:”Indoor sports photography tips: final words”},{“id”:”use-a-fast-camera”,”permalink”:”https:\/\/digital-photography-school.com\/indoor-sports-photography\/”,”title”:”1. Use a fast camera”},{“id”:”use-a-lens-with-a-wide-maximum-aperture”,”permalink”:”https:\/\/digital-photography-school.com\/indoor-sports-photography\/”,”title”:”2. Use a lens with a wide maximum aperture”},{“id”:”shoot-with-a-fast-shutter-speed”,”permalink”:”https:\/\/digital-photography-school.com\/indoor-sports-photography\/”,”title”:”3. Shoot with a fast shutter speed”},{“id”:”use-a-high-iso”,”permalink”:”https:\/\/digital-photography-school.com\/indoor-sports-photography\/”,”title”:”4. Use a high ISO”},{“id”:”shoot-in-raw”,”permalink”:”https:\/\/digital-photography-school.com\/indoor-sports-photography\/”,”title”:”5. Shoot in RAW”},{“id”:”learn-to-anticipate-the-action”,”permalink”:”https:\/\/digital-photography-school.com\/indoor-sports-photography\/”,”title”:”6. Learn to anticipate the action”},{“id”:”look-for-relationships-and-expressions”,”permalink”:”https:\/\/digital-photography-school.com\/indoor-sports-photography\/”,”title”:”7. Look for relationships and expressions”},{“id”:”indoor-sports-photography-tips-final-words”,”permalink”:”https:\/\/digital-photography-school.com\/indoor-sports-photography\/”,”title”:”Indoor sports photography tips: final words”}] };

          The post 7 Tips for Action-Packed Indoor Sports Photography appeared first on Digital Photography School. It was authored by Christina N Dickson.


          Digital Photography School

           
          Comments Off on 7 Tips for Action-Packed Indoor Sports Photography

          Posted in Photography


          12 Tips For Gorgeous Indoor Natural Light Photography

          29 Jun

          The post 12 Tips For Gorgeous Indoor Natural Light Photography appeared first on Digital Photography School. It was authored by Dena Haines.

          12 tips for indoor natural light photography

          Feeling frustrated with indoor photography? Want to know how you can capture beautiful indoor photos with only natural light?

          Working with natural light indoors can be tricky. So in this article, I’m going to share plenty of tips and tricks I use in my own photography. And I’ll also share plenty of examples along the way – so that you can see my advice in action!

          Let’s dive right in.

          natural light photography indoors

          1. It’s all about the windows

          Indoor photography comes with a significant problem:

          A lack of light. And without light, you can’t get beautiful, well-exposed photos.

          So what do you do? Some photographers turn to artificial lighting, such as studio strobes and flashes. But I prefer to keep things natural, which is why I look for light coming through windows, and I use it to illuminate my subject.

          In fact, as soon as you’ve chosen a subject, walk around your indoor space. Think about the quality of light that the different windows provide; does it flood the room softly? Does it beam in, bouncing off the walls and floors? How would it look when illuminating your subject?

          Soft light will add a soft glow, and harsh light will give a dramatic or moody look.

          Also recognize that the color of light changes throughout the day. Light looks warm at sunrise, cool at midday, and warm at sunset.

          Once you know indoor lighting well, you’ll be able to use it to achieve the perfect effects.

          indoor natural light photography tips 2

          2. Turn off the lights

          Natural light doesn’t like competition.

          Specifically, natural light doesn’t like electric lights, which cause two problems:

          1. Electric lights cast unexpected shadows and will interfere with the directionality of your main window light.
          2. Electric lights produce warmer or cooler illumination, which contrasts with the color of the natural light.

          In particular, skin tones can look odd when artificial and natural light start to mix.

          The easiest way to fix this?

          Just turn off all electric lights! That way, you can keep your colors looking natural while focusing on a single light source.

          3. Shoot in Aperture Priority mode

          In Aperture Priority mode, you choose the aperture while your camera chooses the shutter speed. This gives you flexibility over your exposure without stepping over into the Wild West of Manual mode.

          Aperture Priority is generally marked with an AV or an A, as shown below:

          aperture priority for indoor natural light photos

          So what settings should you dial in for the best indoor natural light photography?

          I’d recommend starting with a wide-open aperture to let in lots of light. Choose a low f-number such as f/2.8 or f/1.8 to keep your exposure nice and bright.

          Plus, when you use a wide aperture, your depth of field will be shallow. So your subject will stay in focus while your background is left soft and blurry. This adds a beautiful effect to portrait, nature, and product shots.

          indoor natural light photography

          Note that, for portraits, an aperture of around f/5.6 or f/6.3 will keep the entire face in focus (though this will depend on your focal length and your distance from the subject). Focus on your subject’s eyes for best results.

          Also, shoot in RAW. A RAW file will give you a lot more to work with when editing – so you can enhance your indoor photos for stunning results.

          4. Choose your white balance in advance

          Some photographers like to select their white balance during post-processing (so they’ll leave their camera set to Auto White Balance when shooting).

          But while this can work, it’s often easier to get the white balance right before taking a photo (plus, it’ll save you lots of time during editing).

          So take your camera off Auto White Balance. Observe the light and consider which white balance preset works best for your situation.

          For instance, I generally use Daylight for indoor portrait photography, though you might also pick Cloudy for a warmer look. And the other white balance presets can work, too, depending on the effect you’re after.

          Honestly, I’d recommend you try several different white balance settings when first starting out – that way, you can determine which looks you like and which looks you’d prefer to avoid.

          (Always bear in mind, however, that the white balance results will change depending on the quality of the light. Applying a Cloudy white balance to a shot lit by cloudy light will give a neutral look, while applying a Cloudy white balance to a shot lit by warm evening light will actually enhance the warm effect.)

          And remember:

          If all else fails, you can always adjust your white balance while editing.

          5. Use a light-catching backdrop

          Remember how I said that indoor settings tend to lack light?

          That’s why you’ll need to maximize existing light. And a simple way to do this is with a reflective backdrop.

          Specifically, a white backdrop will help catch the light and bounce it back onto your subject. Here’s the type of setup I’m talking about:

          light catching backdrop for natural light photography

          The white material helps cradle the light around the flowers:

          catch natural light with a backdrop

          And creating a simple light-catching backdrop isn’t hard, either. The one featured in the above photo was made with a freestanding collapsible clothes rack and a long piece of white material.

          (It’s very easy to set up and very easy to move around!)

          6. Use a light box

          A light box will create a similar effect as a reflective backdrop, but it will help control the light even more.

          In fact, you can construct a light box with lots of cloth – but instead of putting it behind your subject, wrap it all around. Here’s a makeshift light box I used for this food still life:

          use a natural light light box for indoor photos

          And here’s the final image:

          tips for natural light photos

          7. Use a reflector

          A reflector bounces light back toward your subject.

          And it’s a great way to keep your entire subject nicely lit.

          For the shots below, I set up a backdrop and positioned my daughter so that her left side faced the window. She held a reflector in her right hand, which helped lighten the shadows:

          tips for indoor natural light photography

          And here’s a behind-the-scenes photo:

          use a reflector for natural light photography

          8. Use a mirror

          A mirror is another great way to control natural light. Simply hang a mirror in the window; I used a large suction cup with a hook to hang the mirror pictured below:

          indoor natural light photography tips

          Then have your model look in the mirror. As you take your shot, make sure your reflection doesn’t appear. (It can take some patience to get the angles and reflections under control, but it’s worth it.)

          I used a small handheld mirror for this shot. A larger mirror would require less cropping:

          tips for indoor natural light photos

          9. Tidy up

          There are often things lying around the house, especially if you have kids. And this clutter can be distracting in a photograph. It’s worth taking a couple minutes to tidy up before you start shooting.

          In fact, a backdrop can serve a double purpose here: it can control light, while also covering up all the background clutter! It can help make a small space more workable.

          For most of the photos in this article, I pushed our sofa and table into the middle of the living room, then I set up in front of our largest window. Without the backdrop, this location would look far too busy.

          natural light photography indoors 2

          10. Place your subject close to the window

          Earlier in this article, I talked about the importance of windows when doing indoor photography.

          But it’s not enough to just use windows. You also need to carefully position your subject.

          Specifically, place your subject a foot or two away from the light source. That way, you’ll make use of the natural light, and you’ll also avoid the harsh contrast that comes from being too close to the window.

          One more tip:

          Experiment with lighting effects. Try backlighting, sidelighting, and frontlighting (just have your model face in different directions and follow them with your camera!).

          11. Use the curtains

          If the light is harsh, you’ll get unpleasant shadows and contrasty subjects – unless you can diffuse it!

          So here’s what I recommend:

          Use curtains or blinds!

          If you have translucent curtains, let them cover the window completely. If your curtains are opaque, consider closing them partway, then let the light feather onto your subject.

          Alternatively, if your curtains aren’t suitable for diffusing the light, you could hang a piece of diffusive material over your curtain rods.

          12. Shoot reflective objects

          Natural light can turn the most common thing (like the moisture on the window pictured below) into something beautiful.

          Personally, I think reflective objects look gorgeous when hit by sunlight. Here are just a few examples:

          natural light on glass objects
          natural light on reflective objects

          So have fun playing around with reflective objects and natural light. The light will create all sorts of interesting reflections, and it’ll even glisten off shiny objects:

          natural light through water on the window

          Indoor natural light photography: You’ve got to love it!

          It’s easy to love indoor natural light photography.

          The setup is inexpensive, portable, and easy to use, plus you can create beautiful photos no matter the weather or time of day. 

          Don’t forget to have fun and let that inner beauty shine through!

          have fun with natural light

          Now over to you:

          Have you tried indoor natural light photography? Let me know how your natural light shoots go by commenting below!

          The post 12 Tips For Gorgeous Indoor Natural Light Photography appeared first on Digital Photography School. It was authored by Dena Haines.


          Digital Photography School

           
          Comments Off on 12 Tips For Gorgeous Indoor Natural Light Photography

          Posted in Photography


          5 Secrets for Finding Great Indoor Photoshoot Locations

          26 Jun

          The post 5 Secrets for Finding Great Indoor Photoshoot Locations appeared first on Digital Photography School. It was authored by Melinda Smith.

          secrets for finding indoor photoshoot locations

          Not all photographers have a dedicated indoor studio, yet sometimes you need to shoot a session indoors. Maybe it’s freezing outside, and you don’t want to be out in that weather. Maybe you just want something fresh and a little quirky. Maybe a building has a special meaning to you or the person you are photographing.

          Whatever your reasons, if you want to take indoor portraits, you’ll need to find that perfect indoor photoshoot location. And that’s what I’m going to share in this article: all my secrets for finding stunning locations (plus how to get permission to use them).

          With any luck, they’ll help you find the perfect spot for your next session!

          bride on a couch

          1. Always be on the lookout

          Wherever you go, keep your “photography eyes” open. You may be surprised by how many places transform into a great location once you really start looking.

          Some unique and exciting indoor photoshoot locations might include:

          • family photos in the library
          • model portfolio shots in a city building
          • engagement session in the laundromat
          • dance group session in a hotel lobby
          • mom and toddler portraits in a grocery store
          • bridal session in a grand old house, a museum, a quaint bed and breakfast, a roller-skating rink, a university building, a furniture store, a toy store, or a candy store (the list is endless!)

          Look for great lighting, open spaces, interesting backgrounds, and fun things to interact with. Consider whether there are lots of people you might end up disturbing, or whether it’s a relatively calm place where you can photograph in peace.

          Use your imagination and creativity to turn the ordinary into something extraordinary.

          kissing couple in a library photoshoot location

          2. Always ask permission

          Once you’ve found a place you’d like to use for a photoshoot, make sure you ask permission before you bring a client there.

          I find that asking in person is usually best; the staff/owner can see who they’re talking to, and they’ll be much less resistant if they can see your smiling, friendly face. If you do need to ask over the phone, be professional and friendly. Remember, they need to feel comfortable with you coming in, camera setup and model/client in tow.

          If you like a location but aren’t sure who owns it, check city or county records, or ask a neighboring building if they know the owner. It might take time and effort, but you should always find out who owns the property before shooting. It gives all photographers a bad name if you trespass.

          In fact, I’ve had many photoshoots where I call to ask permission, and the owner thanks me profusely for bothering to ask. They usually express their frustration with other photographers who just start shooting without asking. (They allow me to photograph on their property, so obviously they don’t mind people being there, but they always appreciate being asked first.)

          Also, note that some locations, like museums or theme parks, are fine with you taking photographs inside, but you’ll have to pay the entrance fee.

          woman posing on stairs

          Other places charge a fee for photography and some don’t allow photographers at all. If you whip your camera out in either of those types of places without asking permission first, you could be fined huge amounts. It’s not worth it. Ask, and if you get declined, just move on and find another place.

          Remember: It never hurts to ask. Most of the time you’ll be granted permission – and owners are often pleased that you think their building is worthy of being an indoor photoshoot location.

          child with valentine's day gift

          3. Find an owner who will also benefit

          I needed a place to have adorable kids come for Valentine’s Day photos, but I didn’t know who would want multiple kids and families traipsing in and out of their establishment. Then I came across an adorable little candy shop; it was was decorated perfectly, plus it was full of delicious sweets and treats.

          In the end, my photography clients came in and out all day for their sessions, and they ended up buying lots of candy in the process. Many who came had never noticed the little hometown shop with homemade caramel apples and every kind of candy you can think of. They were happy to have discovered it. I ended up with a great place for my Valentine’s Day photos, and the owner got a lot of new business.

          child looking in candy baskets

          Look for places that might benefit from your photoshoot, and chances are the owner will be more than happy to let you use their location (free of charge).

          Also, many small, locally-owned places need a couple of photos of their establishment for websites and advertising purposes, or maybe even a quick headshot, and would be thrilled to let you photograph there in exchange for a photo or two.

          family looking at a dinosaur

          4. Explore your connections

          Do you have a friend who owns a quaint little bed and breakfast? Do they work at a museum? If you get hired to photograph that friend, you may be able to get your foot in the door and photograph at that location.

          Then, if the photoshoot goes well, your friend/client may be okay with you bringing other people back to the property!

          You can also think about your broader friend network. You might not be planning to photograph your best friend, but they may still have a connection to a property that you could use for your shoots.

          That said, be careful not to ask for too much, and be careful not to put anyone in an uncomfortable position. If you sense that a friend is hesitant about letting you use a location, don’t push it. A little respect goes a long way, and you don’t want to be the photographer who people avoid at all costs. Relationships are more important than having a cool place to photograph, so be extra sensitive when following this advice.

          family posing near a dinosaur

          5. Be the best guest

          Once you’ve gotten permission to use a place, never, never, ever let anything get destroyed or damaged. The whole location should be left exactly how you found it.

          If you need to move something out of the way, ask if it’s okay first. Then, when you’re done, put it back.

          Be mindful of what is going on around you, especially if you are photographing kids. You are responsible for what happens during your session, and you never want to pay a big repair bill or lose a friendship because you were careless.

          Remember: When you use public or private property for photos, you are not only representing yourself but also all photographers. If you make it a horrible experience for the owners, you’ll destroy the opportunity for future sessions for yourself and for all other photographers who might think to ask permission.

          Please don’t be a careless photographer who ruins it for everyone. Instead, leave such a great impression that all photographers are welcomed with open arms.

          family sitting together indoor photoshoot locations

          Secrets for finding indoor photoshoot locations: final words

          Well, there you have it:

          Five ways to find the perfect indoor photoshoot location. If you follow the tips I’ve given above, you’re bound to discover some gorgeous locations – and you’ll be able to use them for years to come.

          Now over to you:

          Do you have any other tips for finding great indoor portrait locations? Have you found any gems? Please share your comments and images of your favorite spots below!

          bride posing indoors

          The post 5 Secrets for Finding Great Indoor Photoshoot Locations appeared first on Digital Photography School. It was authored by Melinda Smith.


          Digital Photography School

           
          Comments Off on 5 Secrets for Finding Great Indoor Photoshoot Locations

          Posted in Photography


          Create Beautiful Indoor Portraits Without Flash (NSFW)

          29 Aug

          The post Create Beautiful Indoor Portraits Without Flash (NSFW) appeared first on Digital Photography School. It was authored by Ed Verosky.

          _dps_ambient-techniques_005.jpg

          Ed Verosky is a professional photographer and author based in New York. In this article, Verosky explains how to create portraits using natural and ambient light only. To learn more about achieving great lighting in any situation, check out Verosky’s popular eBook, “100% Reliable Flash Photography.“

          Note: This post contains one image with very mild nudity (in fact, so mild you might not even see it).

          For me, using flash can be the most efficient way to create a high-quality portrait. There’s nothing like it for an editorial shoot when you need that combination of full lighting control, minimal shooting time, and predictable results. Sure, you have to know what you’re doing to make it come together like that. But that ability comes with knowledge and experience.

          Mastering flash means mastering your light in any situation. Sometimes, however, there is beautiful light to be found, just waiting there for you to use it. Natural and constant ambient light can be your best friends if you have a little time and flexibility with the environment and your subject.

          Constant light, as opposed to flash/strobe lighting, will allow you to see and adjust its effect on your subject and the environment in real-time. This is a great way to learn about lighting placement and this knowledge and experience will certainly carry over into your flash portraiture. As I like to say, “light is light,” meaning that the principles of lighting a subject and the environment are essentially the same whether the light source is a quick “flash” or a constant illumination.

          The main difference is that the flash is capable of producing a more intense light but with too short of a duration for the photographer to see the effects of its position on the subject in real-time. With constant lighting, you can casually move the lights and your subject around and know instantly how the changes will affect the portrait you’re making. With a few test shots to check exposure, you’re good to go.

          Lighting setups

          Natural light. Window light is just about the most beautiful light you can find when the conditions are right. It can serve as a huge softbox and be manipulated with any combination of window dressings such as blinds and curtains. Simply place your subject nearby the window and let the light create much of the portrait’s drama. I like to position the subject so that there is plenty of shadow to one side, providing many options for classic portraiture looks.

          _dps_ambient-techniques_001.jpg

          Window light narrowed with curtains. ISO 800, 50mm, f/2.8, 1/80 sec.

          Household lights. You can also make great use of simple household lamps. I like to remove the shades off the room lights and utilize them as bare bulb light sources. To start off, just position the main light in front and to one side of your subject, preferably several inches higher than their head. This will give you a classic lighting pattern to work with. A second light may be placed farther back from the subject and serve as a backlight or kicker, which will add dimension.

          _dps_ambient-techniques_002.jpg

          A setup consisting of two household lamps, minus the lampshades. The kicker is behind Kelly ,and the main lamp is almost directly in front of her, just to camera right. ISO 800, 50mm, f/2.8, 1/60 sec.

          Camera settings

          My general advice for any indoor shooting is to think “fast and wide.” Your initial camera settings should be a balance of the highest ISO possible that will still provide acceptable noise levels for your purposes, the widest aperture your lens will allow, and the fastest workable shutter speed.

          Of course, each of these controls is interrelated and integral to overall exposure, so you’ll have to make some adjustments and concessions for the environment you’re working in, and for the effect you’re trying to achieve in your shots.

          Fortunately, most DSLRs are now capable of low noise even when using high ISO speeds, so most room lighting and even low natural light won’t be a problem for you. But even if your camera happens to produce lots of noise at higher ISOs, that isn’t necessarily a big concern. Either leave the noise as is, or bring some of it down in post-processing using your choice of available noise reduction techniques.

          Many photographers actually artificially add noise back into their images in order to reproduce the look of film, or otherwise reduce the super-clean, slick, digital look coming out of the camera. Simple advice: Don’t worry about the noise unless it gets in the way of the image you’re trying to create.

          Another thing that will really help with achieving beautiful portraits in lower lighting situations is a fast lens. By “fast,” we’re referring to a lens with a wide aperture of at least f/2.8. The wider the aperture, the more light the lens allows to pass through in a given unit of time. This will give you more freedom with your ISO settings (as they won’t have to be so high to compensate for less light coming in through the lens), and faster shutter speeds (as they won’t have to be so low to compensate for less light coming in through the lens). Lenses with wider apertures also have the capability of shallow depth-of-field, which can greatly add to the interest and mystique of your portraiture.

          Shutter speed is an important consideration not just because of its effect on overall exposure, but also because of potential blur with lower shutter speeds. As with ISO, however, the effect of supposedly less-than-optimal shutter speeds is what you make it. You might find an occasional blurry image makes a rather artistic statement. Every portrait doesn’t have to be as sharp as a tack.

          _dps_ambient-techniques_003.jpg

          Another household lightbulb setup, featuring Chris. I used a bare household lightbulb off to camera-left to illuminate her on one side and the background at the same time. The main light is coming in from camera right. ISO 800, 85mm, f/1.8, 1/60 sec.

          So, with those factors in mind, you might want to try the following exposure combination as a starting point and adjust according to your needs:

          • Camera Mode: Aperture Priority
          • Aperture: f/2.8 (or the widest possible for your lens)
          • ISO: 800
          • Shutter Speed (target): 1/100 sec. or higher.

          In Aperture Priority mode, your camera will automatically set the shutter speed for you while you control everything else. You’ll have to pay attention to your shutter speed to make sure it isn’t falling so low as to create unwanted blurring. Again, these are just starting points. With a stationary pose and a steady hand, I’ve managed handheld shutter speeds as low as 1/15 sec. and produced good results. You might also want to try your camera’s Manual mode to maintain full control of your settings. If your lighting conditions are going to be fairly static, I’d recommend it.

          Also, you will most likely benefit from shooting in your camera’s RAW (NEF) format so that critical adjustments, like white balance, exposure, and contrast, can be made easily and with minimal loss of information in post-processing. Although white balance settings aren’t actually imposed on the RAW file, you can set white balance as you wish during shooting in order to get an idea of what the final image might look like. Plus, a chosen WB setting will tell your processing software what color temperature and tint settings to best start off with for each image.

          _dps_ambient-techniques_004.jpg

          Window light illuminates Satu. ISO 800, 50mm, f/4, 1/200 sec.

          Post-Processing

          Aside from the creative post-processing possible with your ambient light images, there are some things you might want to address in the initial post-processing effort:

          White Balance: Not all light sources produce the same color temperatures. Despite what they look like to our eyes, the camera will record various types of household lighting (fluorescent, tungsten, daylight balanced) and natural light (sunset, cloudy, shade) as producing different color casts.

          So if you are shooting a portrait using a bright tungsten light as your subject’s main light, but you have a strong window light coming through in the background, you might have an undesirable color mix to deal with.

          Fortunately, you can correct these types of color mismatches in post-processing by making a general white balance setting choice in your software and selectively altering the offending colors in specific parts of the image. If this isn’t something you’d like to worry about, then don’t. The colors might be acceptable just the way they are. If not, you always have artistic color-altering effects and even black and white conversion options. So, it’s all good.

          Noise Issues: I personally like a little noise in my images most of the time. But if you had to use very high ISO settings to get your shots, and have the need to bring some of the noise down, there are a number of good built-in, stand-alone, and plug-in software options to handle this. I will occasionally use the noise reduction tools in Lightroom or my Photoshop Noise Ninja plug-in, for example.

          Natural and ambient light photography indoors can be a great way to learn the finer points of lighting your portraits. The actual experience for you and your subject is also worlds apart from the strobe and studio effect of working with flash. Unlike outdoor shooting, indoor work without flash can introduce problems having to do with lower lighting situations. Using some of the advice above, you should be able to handle the challenges of low-light portraiture and come away with great-looking images.

          If you would like to learn how to get amazing light in any situation, check out Ed Verosky’s eBook, “100% Reliable Flash Photography.” It’s a great resource that has helped thousands of photographers improve their use of flash and ambient light for portraiture.

          The post Create Beautiful Indoor Portraits Without Flash (NSFW) appeared first on Digital Photography School. It was authored by Ed Verosky.


          Digital Photography School

           
          Comments Off on Create Beautiful Indoor Portraits Without Flash (NSFW)

          Posted in Photography


          DPReview TV: Take better indoor portraits with natural light

          30 Apr

          Want to shoot some portraits with great lighting while stuck at home? We show you how – and you probably won’t need any new gear to do it! If Chris and Jordan can light a scene with a Rubbermaid container lid, so can you.

          Subscribe to our YouTube channel to get new episodes of DPReview TV every week.

          • Introduction
          • Window light
          • Reflecting fill light
          • Negative fill
          • Overexposing windows
          • Controlling background light
          • Three easy poses
          • For more info…

          Sample gallery from this episode

          $ (document).ready(function() { SampleGalleryV2({“containerId”:”embeddedSampleGallery_4339752453″,”galleryId”:”4339752453″,”isEmbeddedWidget”:true,”selectedImageIndex”:0,”isMobile”:false}) });
          Articles: Digital Photography Review (dpreview.com)

           
          Comments Off on DPReview TV: Take better indoor portraits with natural light

          Posted in Uncategorized


          Tips for Doing Better Indoor Sports Photography

          11 May

          Fast-paced movement across the court or rink, cheering crowds, the thrill of the win (or agony of defeat). These are the myriad of elements waiting to be captured by your camera when you photograph a sports event.

          Whether you’re taking pictures at the home arena of your favorite pro team or snapping away in the gym at a high school game, shooting indoors requires you make certain preparations. You must get a handle on your surroundings to ensure sharp, compelling photos that will make viewers feel like they are part of the action.

          Select the appropriate lens

          Typically for indoor sports, you’ll want to have lenses that open to an aperture of f/2.8 to let in the maximum amount of light. A versatile lens to start with would be a 70-200mm f/2.8. From there, it depends on whether you’re shooting hockey, basketball, or another indoor sport.

          For basketball, for instance, a 24-70mm lens is ideal so you can capture the athlete’s full body as he or she jumps up for the basket. For other indoor sports, a 300mm f/2.8 lens will serve you well so can zoom in on the puck or ball.

          Because most pro arenas are now using higher-intensity LED lights, a lens with a 100-400mm or 150-600mm focal-length range, even with a maximum f-stop of f/6.3, is also a viable option.

          Tips for Doing Better Indoor Sports Photography - hockey shot
          Prepare for the big game

          To get the lay of the land, you’ll want to do your homework on the arena or venue in which you’ll be shooting. If you can, find out what kind of lighting the location has and its intensity, either by visiting the venue yourself or asking other photographers who’ve shot there. This will help you better prepare what lens assortment you will need to bring.

          Pack your gear bag early, perhaps a day in advance if possible, then unpack it and look at it again on the day of the event to make sure you’re not missing anything. There’s nothing worse than getting to an event and realizing that you left a lens behind (to save a little weight) that you would’ve been better off having with you.

          Also, scope out what the conditions will be like beforehand. Although you won’t have to worry about certain elements as you would outdoors (e.g., it won’t be raining inside), you still need to be vigilant.

          Case in point: At the Winter Olympics in Pyeongchang this year, they kept the main arena at 53 degrees (11.7 c) so the ice would stay in perfect condition. That’s a lot colder than what photographers are used to inside most National Hockey League arenas. It’s key to know those logistics in advance so you can make the necessary preparations to keep your body warm, as well as to keep your equipment in tip-top shape by protecting it where applicable.

          goalie - Tips for Doing Better Indoor Sports Photography

          Scout out the best vantage point

          Photographing indoor sports is all about focusing on the athletes’ eyes, so being at floor level is usually ideal. If it’s hockey, you’ll want to be at ice level in what’s called the “deep corner position,” which is just south of where the goalie’s line intersects the boards. From that angle, you’ll have the ability to shoot the entire ice.

          For basketball, being on the floor halfway between the side of the court and the basket works best. That offers you the opportunity to not only see the entire playing surface but also to capture players jumping up toward the hoop or coming in for the goal.

          Tips for Doing Better Indoor Sports Photography

          Compensate for various lighting setups

          As mentioned earlier, most modern indoor arenas today have switched to LED lighting. So using regular auto white balance (AWB) is usually sufficient to get you close to the proper color. If you’re using the Kelvin temperature setting, it can range from 4100-5400K, depending on how they’ve set up the LED lights.

          In some hockey arenas, if AWB isn’t cutting it, use a custom white balance and take a reading off of a neutral surface in the arena. In other arenas, it is actually best to do a custom white balance by shooting towards the arena lights themselves. With hockey, for instance, the ice works well because you’ve got such a large white surface to use as your neutral tone.

          In smaller venues, like high school or college gyms, the problem isn’t just that these places are poorly lit. They’re also illuminated with an assortment of different kinds of lights, whether they’re different-colored fluorescents, sodium vapor lamps, or older-style carbon arc lights. If that’s the case, you may find that as a player is dribbling down the court, the sequence of frames you get of that player will each be a bit different in color.

          On Canon cameras, you can use the anti-flicker option to cut down on the pulsing from certain lights. That helps balance the color of the light, but in situations where it varies greatly, you can shoot in auto white balance and then tweak the image when you bring it into Photoshop.

          One other thing to be aware of is shooting through glass. You’ll not only have to worry about reflections, but also the color cast that’s given off by some of the glass sheets used in arenas. Keep an eye out for that so you can adjust accordingly.

          goalie in a mask - Tips for Doing Better Indoor Sports Photography

          Nail down your camera settings

          Exposure is going to depend on each venue’s lighting conditions, but one of the keys to this type of photography is that you need to freeze the action. Shooting at 1/1000th of a second or 1/1250th of a second will freeze most of the action you’ll find at indoor sporting venues.

          In terms of ISO, it wouldn’t be unusual to be shooting at 4000 or 5000. Inside a pro arena, that could give you an f-stop of f/5.6 or f/6.3; in the worst-lit arenas, you could be down to f/2.8 or f/3.5.

          Hone your focusing skills

          You’ll want to use autofocus 99% of the time for indoor sports, although you can certainly override that in situations where the need arises. You may want to shoot in continuous autofocus mode, called AI Servo or Continuous/AF-C, depending on what camera you’re using. This allows you to photograph moving subjects while the camera keeps adjusting focus with the shutter button pressed halfway.

          Or you may want to keep the shutter button separate from focusing and assign another button on the back of the camera to focus, a technique called back-button focusing. It all comes down to personal preference, which you’ll discover the more you shoot.

          Either way, what’s critical for shooting indoor sports is that you select one point of focus. It’s infinitely faster than using the variable dots that manufacturers have built into the cameras, in which the camera decides which one of 61 different places to focus. Get a handle on the sport — and on individual players — so you’ll know when to press the shutter button.

          Experience helps, but so does knowledge of the sport you’re photographing. That includes getting to know not only the ins and outs of the game but also individual players and their particular propensities, such as what side they tend to move toward or when they tend to shoot.

          Practice this by selecting an individual player as he or she flies up the ice or runs up the court and concentrating on that, instead of simply following the puck or ball around. Eventually, you develop almost a sixth sense.

          Shoot high, low, and 360 degrees around

          If you want your photography to stand out, don’t settle for one shooting position. That can be achieved using more advanced techniques, such as using remote cameras. Or you can simply get up and move around the venue so that you’re able to place different backgrounds in your images.

          You want to fill the frame, and it’s not always advisable to do so using Photoshop. It’s better to fill the frame in your camera.

          Keep an eye on the horizon

          They call it that for a reason – it’s horizontal. Double-check your background, such as the boards of an ice hockey rink, to make sure everything is straight, not crooked.

          Tips for Doing Better Indoor Sports Photography

          Watch your cropping

          Don’t cut a player off at the joints, like at an athlete’s ankles or knees. It’s best to stick with waist-up or full length.

          Focus on facial expressions and emotion

          The best sports images show both jubilation and dejection in the same frame. Always be on the lookout for the sort of image where you can witness both teams participating and showing the full range of emotions in a game. That’s not to say the action shots aren’t important; it’s just that it adds so much more to show the players engaged in what they’re doing.

          These kinds of photos are called “rounding out the take”. You don’t want to come away from an indoor sporting event with just 20 action images — a well-rounded photo narrative will include an action shot, a celebration, a dejection, some individual shots of stars that are playing, or rookie players, and then some ancillary images. Those could include, for example, photos of the officials, fans celebrating, or images of both of the goalies if you’re shooting hockey (just in case one of the goalies ends up being the big story of the game).

          If you’re thinking of selling your images, you should also think more generically when it comes to indoor sports photos. In other words, you’ll want to photograph details that tell the story of the sport without pinpointing an individual player or team. That could entail, for instance, a close-up of a puck or a ball, a hand on a ball, or a stick on a puck. Close-ups of skates churning ice and creating ice spray can also tell an interesting story.

          Tips for Doing Better Indoor Sports Photography

          Arrive early and stay late

          There’s nothing worse than rushing to an event and not having time to think out what you’re going to shoot. Some of your best images will come from those early arrivals and from sticking around after the final buzzer, whether it’s players heading into an arena and prepping for a game or images of the players leaving an event.

          If you build in that bit of extra time, you could end up capturing shots that other photographers miss.

          Disclaimer: Tamron is a paid partner of dPS.

          The post Tips for Doing Better Indoor Sports Photography appeared first on Digital Photography School.


          Digital Photography School

           
          Comments Off on Tips for Doing Better Indoor Sports Photography

          Posted in Photography


          5 Creative Indoor Portrait Locations for When the Weather is Blustery

          16 Feb

          What if I told you that you can find some interesting indoor locations and take photos for free? In this article, I will show you five remarkable indoor portrait locations that you can seek out for your winter shoots.

          Winter time is a huge bummer for us portrait photographers. Harsh winds make us (and our models) question our sanity when we step outside for a photoshoot. Sure, we can rent studio space but this can be expensive. Also, let’s be honest, many studio spaces just look bland and uninspiring. Let’s see what else is available.

          Editor’s note/disclaimer: The suggestions made in this article do not reflect the views of dPS and are solely the author’s recommendations and opinions. We suggest that you ALWAYS get permission when shooting at an indoor location that is private property (i.e. anywhere other than your subject’s home or yours). Please be aware of the laws in your area regarding photography in private locations, and follow them so you do not find yourself in trouble with the law. 

          1. LIBRARIES

          5 Creative Indoor Portrait Locations for When the Weather is Blustery - library

          Libraries are an excellent place to shoot portraits. Tall shelves of books and impressive architecture provide a variety of wonderful backgrounds.

          Seek out public libraries and university libraries that are open to the public. I’ve taken portraits of model friends at the Boston Public Library, Boston College, and MIT.

          Some libraries have strict policies about photography, so if you’re unsure just ask a staff member. In many places, “Can I take some photos of my friend in here?” is all it takes to get permission.

          2. CONVENIENCE STORES

          Convenience stores are one of the easiest places to get permission to shoot portraits. Just walk into the store and politely ask the cashier if you can take some photos of your friend inside. That’s how I got these photos:


          When shooting in a convenience store, be aware that the aisles are typically narrow. I recommend bringing a wide-angle lens, such as a 35mm, to allow you to fully capture the setting.

          3. UNIVERSITY BUILDINGS

          Many universities have academic buildings that are open to the public, which makes them a good option to take photos indoors. Empty classrooms are a personal favorite.

          university - 5 Creative Indoor Portrait Locations for When the Weather is Blustery

          university - 5 Creative Indoor Portrait Locations for When the Weather is Blustery

          I want to emphasize that it’s very important to have respect for the space and its owners. In most instances, the worst case scenario is pretty mild – being asked to leave. If you are asked to leave a property, simply leave without making a fuss. In my experience, it’s not common to get kicked out of places for simply taking photos.

          If you’re nervous about confrontation, then ask for permission in advance. Trust me, if you’re polite and transparent, most people will be willing to accommodate your photography (given that you’re not doing it for commercial use or taking photos of their patrons or guests).

          4. GROCERY STORES

          Filled with colorful vegetables and bright lights, grocery stores are a goldmine for portrait photography. You can capture a wide variety of different scenes reminiscent of everyday life. Have your model interact with different items in the store and use them as props.


          Plan to shoot at off-peak hours, such as the middle of a weekday, to avoid throngs of shoppers photo-bombing your pictures. The layout of different grocery stores can vary widely. Some have wide, spacious aisles while others are more densely packed and narrow. Be sure to bring the right lens to properly capture the environment.

          It’s useful to scout out the location in advance if you can.

          5. LAUNDROMATS

          Laundromats are great places to put a different spin on your portraits. If you live in a city, chances are there are plenty of laundromats. If you don’t where to find any near you, start with a simple Google search. Look for self-service laundromats, since these usually don’t have any on-site staff.

          It’s rare that laundromats are completely empty, so get used to shooting around other people. When you ignore the side-eyed glances from people drying their socks, then you can get photos like this:

          laundromat - 5 Creative Indoor Portrait Locations for When the Weather is Blustery

          laundromat - 5 Creative Indoor Portrait Locations for When the Weather is Blustery

          Conclusion

          Again, it’s important to be respectful of your environment and the people there who are just going about their business.

          You don’t need to go to a public park or shoot in a studio to take great portraits. When you think outside the box, then the world can be your photography playground.

          What’s are some of your favorite indoor portrait locations? Let me know in the comments section below.

          The post 5 Creative Indoor Portrait Locations for When the Weather is Blustery by Dan Bullman appeared first on Digital Photography School.


          Digital Photography School

           
          Comments Off on 5 Creative Indoor Portrait Locations for When the Weather is Blustery

          Posted in Photography


          Like a Music Festival, Minus the Dirt: Social Hostel Offers Indoor Camping

          19 Sep

          [ By SA Rogers in Boutique & Art Hotels & Travel. ]

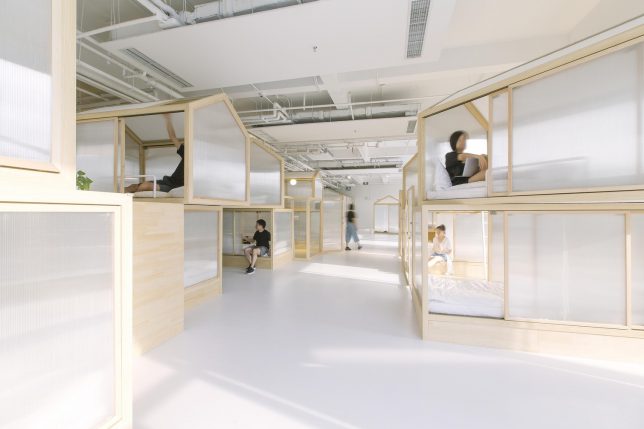
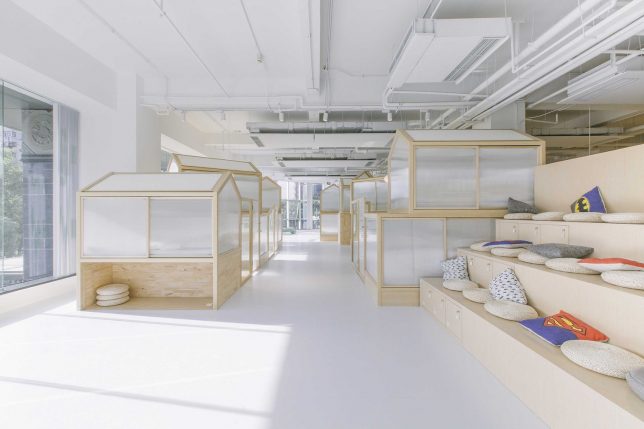
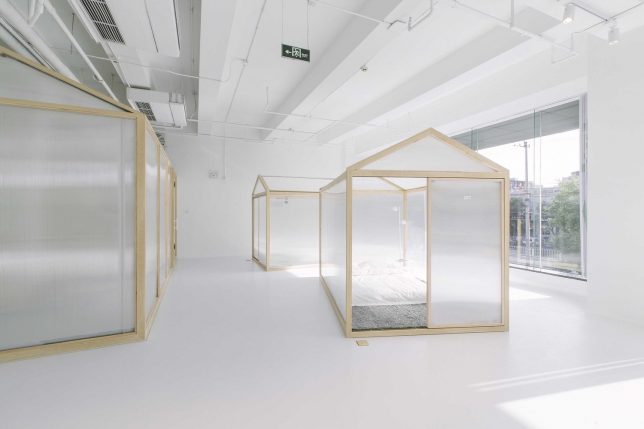
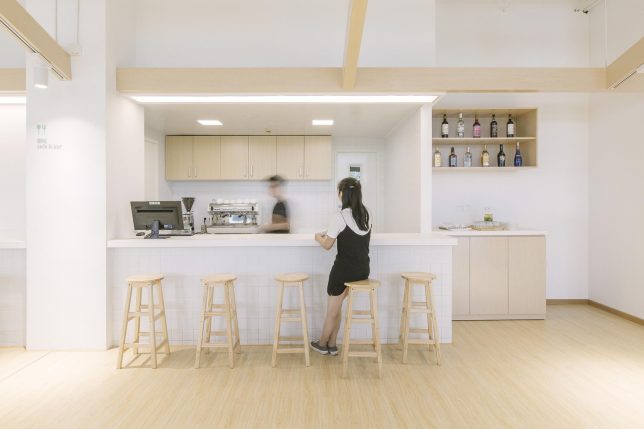
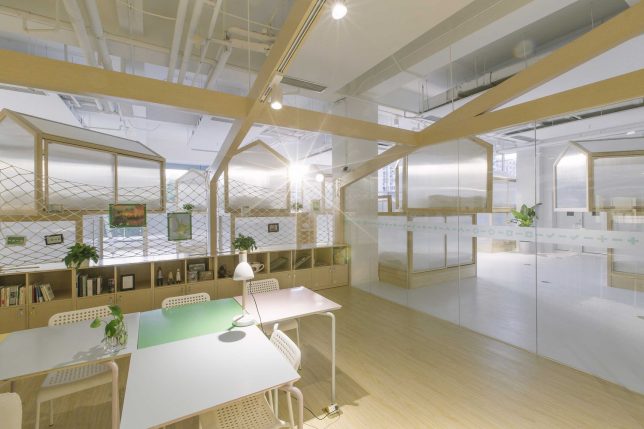
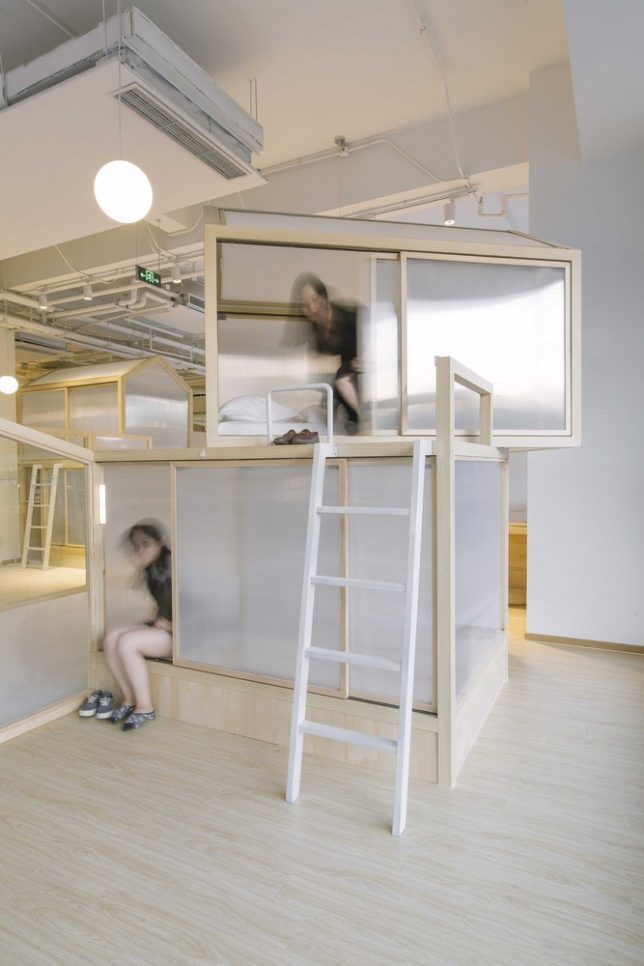
          If you love the sense of community at multi-day outdoor music festivals like Glastonbury, Coachella and Bonnaroo but hate the mud, dust, noise and filthy porta-potties, this hostel was designed just for you. Cao Pu Studio designed ‘Together Hostel’ as an indoor camping experience, with guests staying in translucent individual ‘tents’ under a common roof. The experience emphasizes socializing, with lots of shared interactive spaces, but provides a tad more privacy than the average hostel bunk room.

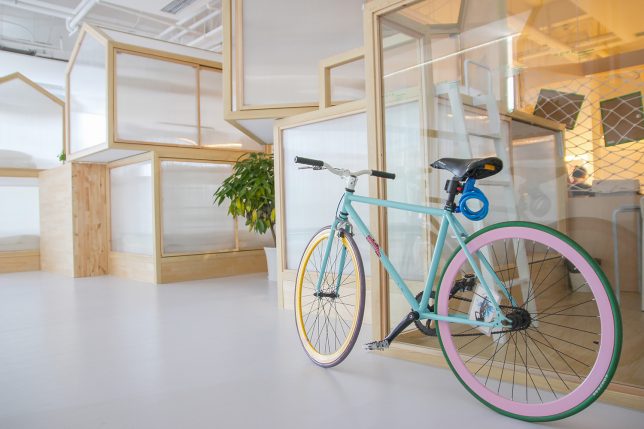
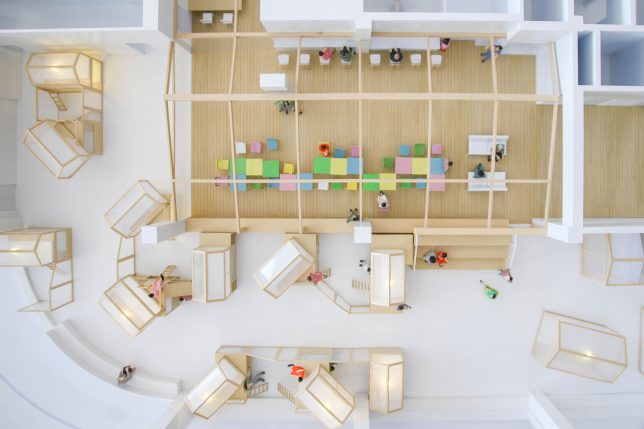
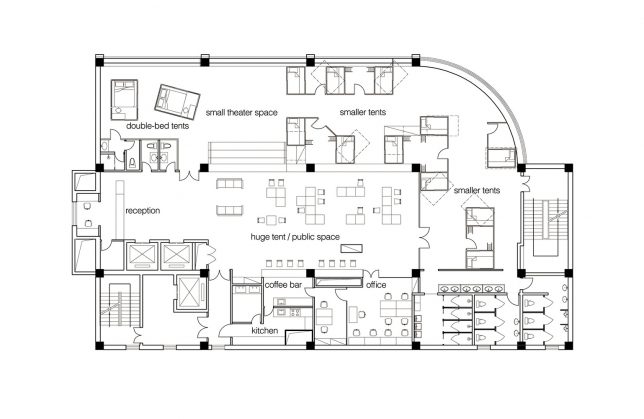
          The tents are organized in groups of four or five, making the hostel ideal for small groups traveling together, or for travelers prioritizing making new connections with strangers. Each tent is equipped with power sockets, extension cords and reading lights. Each of the timber-framed structures is finished in frosted polycarbonate, which doesn’t offer total privacy, but at least gives occupants a sense of their own personal space within the larger hostel without shutting them off altogether. If you’re backpacking, you can even roll out your sleeping pad in the theater area at night instead of sleeping in a ‘tent’ for a lower rate.

          There’s a food court with lots of seating, a shop, a bar, a small theater space, a kitchen, offices and plenty of private showers and restrooms in addition to the tents, which come in single or double sizes. Modular tables in the central hall fit together like puzzle pieces, creating larger or smaller surfaces depending on whether you want to sit with a big group or dine alone.

          The concept capitalizes on growing trends (voluntary or not) toward living in smaller spaces and in closer quarters with others rather than spreading out in suburban-style homes. People who travel on the cheap are accustomed to giving up space and privacy in exchange for a good deal, and this design makes the experience feel cleaner and more intentional. Would you stay at the ‘Together Hostel?’

          Share on Facebook


          [ By SA Rogers in Boutique & Art Hotels & Travel. ]

          [ WebUrbanist | Archives | Galleries | Privacy | TOS ]


          WebUrbanist

           
          Comments Off on Like a Music Festival, Minus the Dirt: Social Hostel Offers Indoor Camping

          Posted in Creativity


          RotterZwam: Abandoned Water Park Turned Indoor Mushroom Farm

          29 Apr

          [ By SA Rogers in Abandoned Places & Architecture. ]

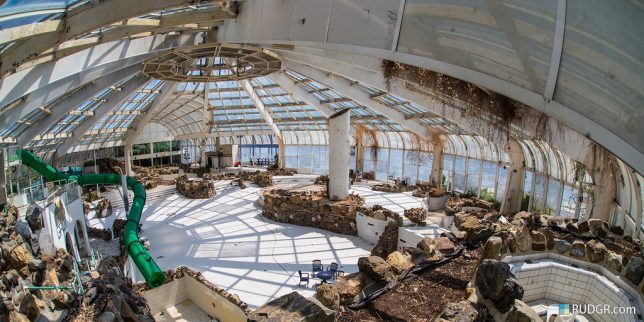
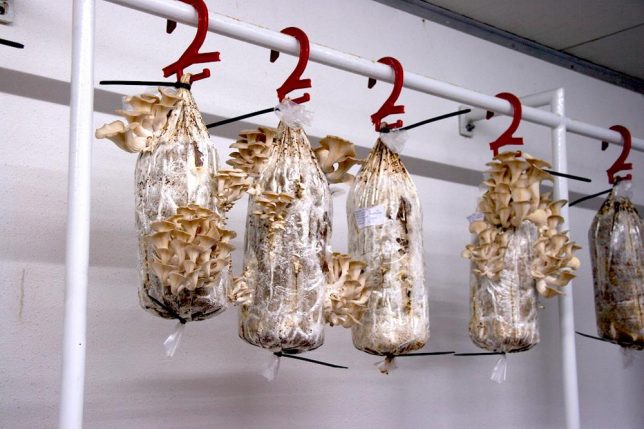
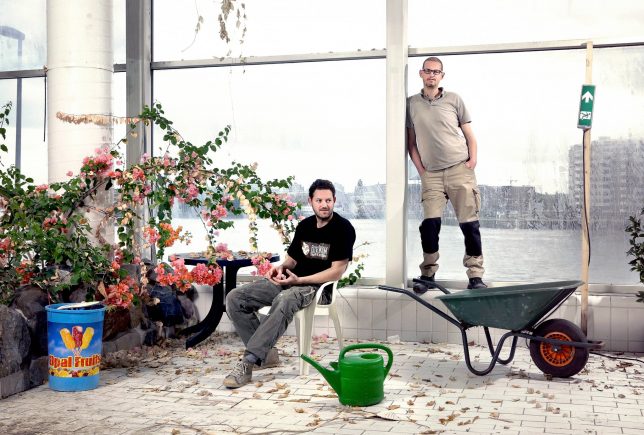
          Bags of old coffee grounds hang in the dank dressing rooms of an abandoned Rotterdam water park, growing oyster mushrooms. Two men turned the former Tropicana space, an old teen hangout, into the perfect damp, dim environment for their business, making use of the structure while the city council decides what to do with it. ‘RotterZwam’ rents the building on an anti-squat lease and have transformed it into a fascinating example of adaptive reuse and urban farming.

          Tropicana is fairly infamous among Rotterdam locals, but closed after the former owner went bankrupt in 2010. The space had been plagued with problems, from hygiene to sexual assault. It sat empty until Siemen Cox and mark Slegers, RotteZwam’s owners, realized it looked like a giant greenhouse.

          Though they hope that central glassed-in space – formerly the pool – will eventually become a greenhouse, for now, they’re making use of the dressing rooms and basement, which offer ideal conditions for fungal growth. The crew hangs bags of coffee grinds from the old Tropicana clothes hangers, and before long, they sprout oyster mushrooms.

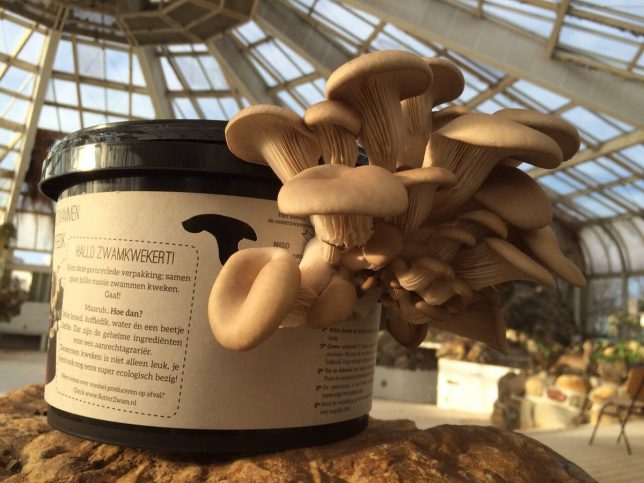
          They collect the coffee from local cafes, transport it in their carrier bicycle, and give the compost to worms to create an extremely low-waste operation. The produce about 20-50kg of mushrooms every week, and sell it to local restaurants, bakeries and food trucks. They also offer DIY mushroom-growing kits.

          “Cities like Rotterdam produce nothing but waste and commuters,” they say in an interview with Vice’s Munchies. “This entertainment park represents that perfectly – we build things and, when we don’t want them anymore, we need others to clean it up, to sweep up our garbage. That’s not how nature works, though – in nature wast doesn’t exist. In this building we hardly ever buy a thing, because eery material or nail is already here.”

          Share on Facebook


          [ By SA Rogers in Abandoned Places & Architecture. ]

          [ WebUrbanist | Archives | Galleries | Privacy | TOS ]


          WebUrbanist

           
          Comments Off on RotterZwam: Abandoned Water Park Turned Indoor Mushroom Farm

          Posted in Creativity


          IKEA Indoor Gardens Produce Food Year-Round for Homes & Restaurants

          13 Jun

          [ By WebUrbanist in Design & Fixtures & Interiors. ]

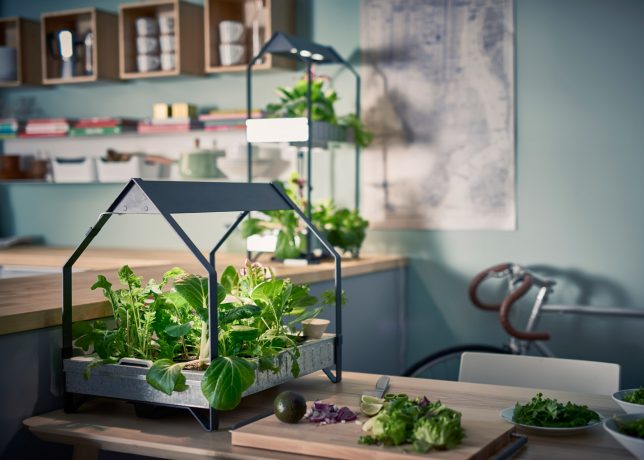
          ikea home garden

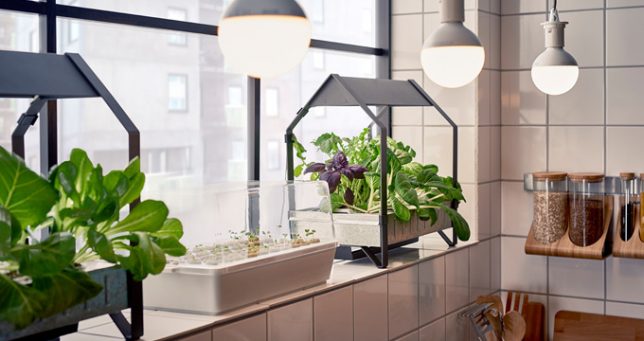
          IKEA recently launched a hydroponic gardening system to allow people to grow fresh produce at home (without soil or sunlight) and has just unveiled a similar system under development that is aimed at helping restaurants raise ingredients in-house.

          ikea home grown

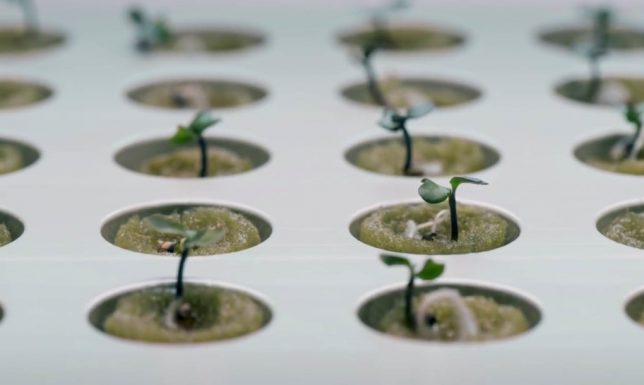
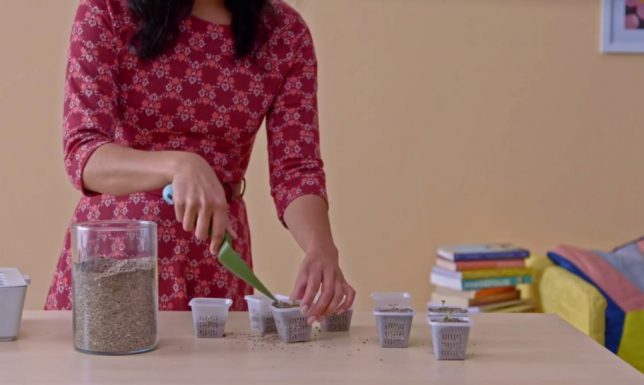
          The KRYDDA/VÄXER hydroponic garden lets sprout seeds without soil using absorbent foam plugs that keep plants moist (without over-watering, thanks to a built-in sensor). Germinated seeds can then be transferred to pots fitted into a growing tray featuring a solar lamp. The system is designed to be easy to use for even inexpert gardeners.

          ikea seeds

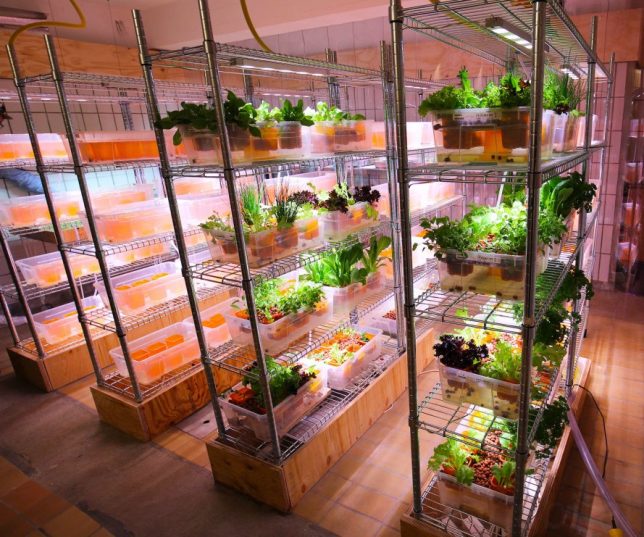
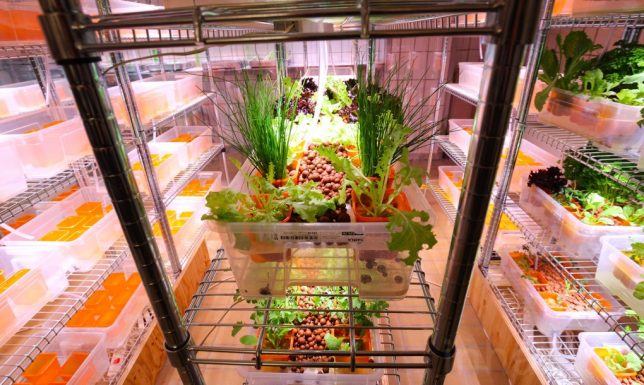
          Meanwhile, in another bit to expand their sustainability model beyond furniture, furnishings and fixtures, IKEA has teamed up with Space10 to create The Farm, an aquaponic garden system for restaurants. A prototype is live and working the basement of Space10’s office in Copenhagen, and the two companies are planning to develop the system further for mass production and commercial deployment.

          the farm ikea

          Few customers realize that IKEA is actually already one of the largest restaurant chains in the world, selling over a billion Euros of food annually. It is well-positioned to push for changes in the food supply chain (photos by Kristine Lofgren for Inhabitat).

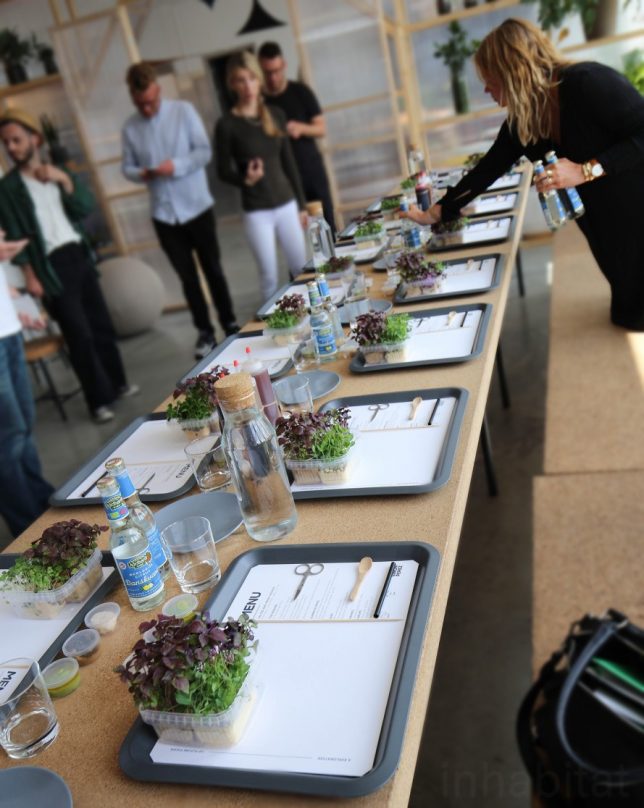
          the farm meal

          The Farm prototype can even create a complete burger (of sorts) on site, specifically: a “bugburger” made of mealworm, beetroot and gluten and top with freshly-grown herbs and lettuce. Aside from this particular (and peculiar) delicacy, however, the design is aimed at bringing as much of the food production process in-house, similar to a recent system developed in Germany allowing grocers to raise and sell their own fresh produce.

          the farm fresh

          ikea fresh food

          On multiple fronts, IKEA is changing the face of the farm-to-table movement, operating in parallel to larger urban vertical farming systems to generate products that are cheap and accessible, making gardening something that any city dweller or restaurant owner can dig into.

          Share on Facebook


          [ By WebUrbanist in Design & Fixtures & Interiors. ]

          [ WebUrbanist | Archives | Galleries | Privacy | TOS ]


          WebUrbanist

           
          Comments Off on IKEA Indoor Gardens Produce Food Year-Round for Homes & Restaurants

          Posted in Creativity