RSS
 

Posts Tagged ‘Improving’

10 Tips for Improving Your Wildlife Photography

18 Oct

The post 10 Tips for Improving Your Wildlife Photography appeared first on Digital Photography School. It was authored by Guest Contributor.

A guest post by wildlife photographer Morkel Erasmus.

wildlife photography tips

Ever since DSLRs became readily available, more photography enthusiasts have started venturing into wildlife photography.

It seems that wildlife photography, in conjunction with landscape photography, has really seen a huge growth spurt over the last few years, at least as it pertains to the number of people practicing it as serious hobbyists or budding professionals.

This is especially true in my native country of South Africa, where it’s long been many a family’s tradition to visit legendary self-drive safari locations such as Kruger National Park. Having neighboring countries like Namibia, Botswana, and Zimbabwe doesn’t affect this trend negatively!

Yet spend some time on your favorite online photography forum (at least those that allow the posting of photos) or on other sites like Facebook or Flickr where photosharing is common, and you might notice that not every photo taken of a wild animal really speaks to you.

I’m not sure whether many folks just snap away and hope the image comes out half-decent, or whether many just think they’re doing their subjects justice (when that is not at all the case). Let me say outright that no offense is intended, and I also take photos that fall into the above categories.

In fact, I do it on every photographic trip I take.

But it’s stepping beyond that and getting a rare wildlife image that ticks all the right boxes that we all need to strive for. And we must be prepared when the opportunity comes along.

zebras fighting

In today’s article, I will attempt to provide you with some easy-to-apply tips and advice for improving your wildlife photography.

Some of these tips might seem like common sense, and you’ve probably read a similar list of “how-tos” elsewhere. But remember that common sense is not so common at all these days and that everyone has their own take on things, however similar it may be.

I do think I will cover a few points that are not just based on pure technical skill; photography is, after all, an art-form. Sometimes we need to be freed up to capture the vision we have in our mind’s eye, rather than stick to conventions and norms.

Here is a quick overview of the points I will cover in this article:

  1. Know your gear
  2. Know the wildlife
  3. Know the wildlife photography “rules;” break the wildlife photography “rules”
  4. Work the light
  5. Shoot wider; shoot closer
  6. The more, the merrier
  7. How low can you go?
  8. The content-technical dichotomy
  9. Patience isn’t a virtue; it’s a necessity
  10. Be there and enjoy it

These are the points that I try to cover when leading a photographic safari or presenting a workshop.

(Also note that I include the genre of bird photography in my definition of wildlife photography.)

Let’s get cracking!

a wildlife photography example of a lion on a dune

1. Know your gear

This sounds like the biggest cliché, but you know that it’s true.

The really great, action-packed moments in wildlife photography last, on average (based on my experience), between 5 and 20 seconds. If you are not deeply familiar with the settings of your camera or the abilities of your chosen lens, you will either miss the shot or blow the images you do manage to capture.

Here’s what’s important:

  • Know the minimum shutter speed at which you can obtain a sharp image with your camera/lens combo
  • Know any added margins that the in-camera or in-lens stabilization gives you
  • Know how to quickly toggle between focus points or focus modes
  • Know how high you can push your camera’s ISO setting and still achieve acceptable results

In general, I like to say that you need to be able to make most, if not all, of the necessary adjustments to your exposure/focus settings without lifting your eye from the viewfinder.

The action you see between the cheetahs in the following image lasted all of 10 seconds, even though we sat with them for more than an hour:

cheetahs playing

2. Know the wildlife

This goes without saying, right? Since much of wildlife photography is based upon capturing fleeting moments of natural history (read: interesting poses or behavior), it pays to be able to somewhat predict your subject’s behavior beforehand.

Granted, not every species is as predictable as the next. But there are patterns of behavior ingrained into every animal species. Knowing your subject can make the difference between being ready and prepared for capturing that “golden moment” and watching in agony as it flies by.

Now, there is only one way to get to know wildlife:

Spend time with it. Don’t just hang around for a few minutes and seek out the next subject if the one you are observing or photographing isn’t delivering the goods. Sit with wildlife. Watch wildlife. Wait.

(This also ties into patience, which I will discuss in more detail later.)

This image was captured by knowing what the Lilac-breasted Roller was going to do to its grasshopper-lunch, and being ready for it:

roller eating lunch

3. Know the wildlife photography “rules;” break the wildlife photography “rules”

There are certain unwritten rules that form the foundation of good photography, regardless of genre. And, of course, then there are certain “rules” that find their application mostly in the genre of wildlife photography.

Understanding proper exposure and the use of the histogram, as well as creating proper compositions using a guideline such as the rule of thirds, are all important to ingrain in your subconscious. You want to be able to instantly capture that fleeting moment properly.

In wildlife photography, much is made about eye contact with the subject, as this gives life to the image. In the case of avian photography (birds), you can take this a step further: the head angle in relation to the camera’s imaging sensor needs to be at least perpendicular to it, but ideally turned a few degrees towards the sensor (and therefore turned towards the viewer, who ultimately gets to view the image captured by the sensor).

The image below, for example, follows strong rule-of-thirds compositional guidelines:
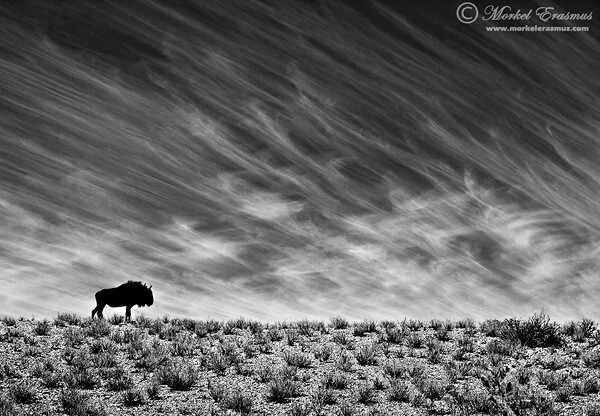
wildebeest on a dune as stunning wildlife photography

Once you know the “rules” and the guidelines, and once you know when and how to apply them, it’s time to start breaking them. You should test the boundaries a bit, you know? You don’t want your photos to always look like the standard images that every photographer is getting.

Take a look at the image below. I mentioned the “need” for eye contact. Yet sometimes it can work to shoot an image in which the subject is not giving the photographer eye contact (this often means the animal is busy with something else and too busy to turn its attention to you).

thirsty Zebra foal makes for intimate wildlife photography

4. Work the light

The first piece of advice I got from a professional wildlife photographer when I started shooting is to stick to the hours of golden light.

This means getting up early in the morning and being in the field before sunrise, and going out in the afternoon to make the most of the last hours of sunlight. The light at midday (mostly between 11:00 and 16:00, at least where I live) is generally harsh and robs images of that spunk that they need. The exception is on overcast days, when the clouds act like a massive softbox and filter out the light evenly.

On days like that, I shoot all day (as long as there are willing subjects!).

Since photography is all about painting with light, you need to know how to use the light to your advantage in wildlife photography. Often, we will find ourselves in a position where the light isn’t ideal or, heaven forbid, the light is sweet but from the wrong direction (and we aren’t in a position to move to a better spot).

The good news is that light from the wrong direction can add lots of mood to an image. Shooting into the light is tricky to pull off, but if you adhere to my first tip (to know your gear), you can get some pretty interesting images from a less-than-ideal light position. The image below is one such photo:

backlit sprinboks at dawn

5. Shoot wider; shoot closer

Too many wildlife photographers get fixated on what I call the “focal-length debacle,” where it becomes an obsession to have the longest/biggest lens possible.

Now, I know this is location-dependent, as you might need more than 600mm just to get any shot at all in certain wide-open spaces. But the issue I want to tackle is more related to our obsession to get as close as possible to the animals and isolate them totally from their environment. The result is often an image that looks like it could be taken of a captive subject in a controlled location, with a perfectly smooth background and no idea of the real environment in which the animal finds itself.

Instead, challenge yourself to shoot at a wider angle to give the viewer a better idea of where you took the image and where your subject has to eke out a living in the wild. This is applicable to any species you photograph, from a squirrel to a deer to an elephant.

The elephant below was photographed with a wide-angle lens and a polarizing filter to give you a sense of the environment, as well as to make the most of the clouds and sky:

elephant in the landscape as wildlife photography

The flip side to shooting wider is (you guessed it!) shooting closer.

And I mean way closer. Get in-your-face close (by changing your position or by using a longer lens with an optional teleconverter) to create different and interesting studies of the animals and birds you photograph. This will also help you think in terms of more abstract compositional arrangements.

Have a look at this photo of a Cape buffalo, for example:

buffalo abstract close-up of ear

6. The more, the merrier

No real intricate explanation needed on this one. In wildlife photography, one is company and two is often a crowd, especially when there’s food or shelter involved. If you have a good view of more than one member of a species, stay a while!

Look at the images below. First up: a solitary African spoonbill, minding its own business on a perch, happy as can be. Throw another spoonbill into the mix, and you have a recipe for good interaction:

spoonbills in the trees; the more the merrier wildlife photography tip

7. How low can you go?

This is not a trick question, nor is it a call to do the limbo. The point of view of a wildlife photograph is just about everything. How you portray your subject can make all the difference in the world.

In short, try to get an eye-level perspective (or go even lower if you can). This brings the viewer of your image right into the scene and confronts them with the view of the world from your subject’s perspective.

Obviously, what counts as eye-level is relative (you will pretty much always be at a lower perspective than a giraffe, for example), but you get the idea.

Always bear in mind the constraints of your environment. In most reserves in South Africa, you are not allowed to get out of your vehicle in the field. This restricts you to a certain perspective.

Look at the images below for illustration. The first African painted dog was photographed from an open game viewer. The result is a somewhat bland shot; it’s nothing special to my eyes.

The second image, however, was taken lying flat on my stomach in a sandy riverbed not 20 meters from the pack of canines, and the alpha male was checking me out. This perspective makes the image come alive.

wild dogs

8. The content-technical dichotomy

This is an interesting one. Does great content trump a technically great image that includes average content every time?

It may be different where you live, but I am particularly relating this one to the African safari experience. Every tourist wants to see the “big 5,” or at least a lion. But if you’ve ever spent time around wild lions in the daytime, you will know that they are actually shoddy models for photography. They sleep up to 20 hours per day.

Conversely, I have had great photo opportunities from impala, who are the most common ungulate you’ll come across down here in the bush. My advice to the discerning photographer would be to look for great opportunities regardless of the species when the light is good!

Have a look at the contrast between these two images: an impala jumping gracefully and a “standard” portrait of a male lion, both in good light. Which do you prefer?

a lion (above) and a leaping impala (below)

Let’s use a second example, lest it look like I am becoming blasé about the subjects I am fortunate to be able to photograph in our wonderful part of the world:

Squirrels.

Everyone photographs squirrels, right? In the images below, the top squirrel is munching something with nice soft light and a nice low angle. And at the bottom, a mommy is carrying her youngster at a precarious height over a large branch at speed by biting down on the youngster’s stomach flap with it holding on for dear life. The light in the tree canopy wasn’t the best, but this is clearly a case of content trumping a technically good image.

squirrels

The jury is still out on this one. Awesome sightings of lions won’t always provide awesome images. Learn to see the potential in the mundane to create amazing photographic moments, then go out and make good images.

The obvious ideal is to capture a wildlife image with great content in great light shot with just the right settings: the utopian photo that most of us will never get right.

9. Patience isn’t a virtue; it’s a necessity

As a wildlife photographer, your images are predicated on the fact that things in nature are unpredictable.

Anything can happen at any time, but most things happen only rarely. Or, at the very least, they rarely coincide with the exact time that you are in that specific spot.

It is therefore imperative that you become patient. Very patient.

Now, I sometimes catch myself being very impatient out in the field. It’s something you constantly have to work on.

In fact, it’s almost a culmination of many of the things we’ve discussed so far. Observing your subjects and getting to know their behavioral patterns requires a great deal of patience.

Often, the implication is that you need to return to the same spot for days before things start to happen. And even if you do that, you run the risk of nothing happening and wasting your time.

The image below was captured after staking out the tree with the impala kill for more than five hours. I had also driven past this tree many times earlier that day to see if there was any action. I knew the leopard would return, but I had no guarantee that it would return before nightfall.

a leopard ascends a tree to find its kill

10. Be there and enjoy it

I will conclude this lengthy article with the following advice (I do hope you haven’t been bored to tears reading this!):

Be there and enjoy it!

running cheetah wildlife photography example

By this, I don’t just mean that you need to physically show up and be at the right place at the right time (although of course that applies).

I actually mean that you need to be present in the moment. Don’t get so caught up in the technical issues and your settings that you don’t take in the moments you are witnessing while out photographing birds and wildlife. We need to be mindful of the privilege of spending time in nature and being in places where humans haven’t quite exerted their full force.

landing kingfisher wildlife photography example

Maybe for you this is just the most isolated spot in your local park where you can sit and observe and photograph squirrels and birds. Or maybe it’s facing a wild Kodiak bear on the Alaskan floodplains.

giraffe with a rainbow in the background wildlife photography

Regardless, enjoy what you are doing! Have fun doing it! How does it help us to spend so much time on this amazing hobby cum art form if we are not enjoying the time spent?

I hope these wildlife photography tips will stand you in good stead out there in the field. They have for me. Good light and good sightings to you all!

About the author: Morkel Erasmus

After having been an avid naturalist from a very young age, picking up a camera for the first time early in 2009 proved to be a pivotal moment in the life of Morkel Erasmus. Since then, he has been infused with an unbridled passion for capturing forever fleeting moments of natural history and sharing them with people to showcase the wonderful natural heritage of his native Southern Africa, and to create awareness to conserve this heritage for future generations.

“I absolutely love being in the wild and unspoiled places of this world,” says Morkel, “and living in South Africa means there are plenty of those to choose from.”

An industrial engineer by profession and an accomplished artist across many genres, from music to poetry, Morkel has always enjoyed whatever allows him to express his creativity to the fullest. Photography turned out to be the perfect marriage of his engineering brain and artistic soul. Showing off God’s glorious creation is something he enjoys immensely. He is also a Nikon South Africa ambassador.

Besides being widely published, Morkel has been honored for his commitment to his craft with various awards in the short span of his photographic career, most notably by receiving a “Highly Commended” award for one of his images in the 2010 BBC Veolia Wildlife Photographer of the Year competition. Morkel is a devoted husband and a proud father of a beautiful daughter and soon-to-be-born son.

See more from Morkel on his homepage or blog, and connect with him on Facebook, Twitter, 500px, and on Instagram.

The post 10 Tips for Improving Your Wildlife Photography appeared first on Digital Photography School. It was authored by Guest Contributor.


Digital Photography School

 
Comments Off on 10 Tips for Improving Your Wildlife Photography

Posted in Photography


Samsung details new 65/14nm stacked sensor design for improving power efficiency, density of mobile image sensors

08 Oct
Stacked Architecture of the chipset Samsung details in its new paper.

Samsung has published a paper detailing a new stacked CMOS mobile image sensor that uses a 14nm processing layer to deliver high-resolution images while reducing power consumption.

The stacked sensor consists of two chips: a 12MP backside-illuminated (BSI) pixel chip on the top that uses 65nm process and a bottom chip for analog and logic circuits that uses 14nm process. By using the super-fine 14nm process on the processing layer, Samsung says it could achieve a 29% drop in power consumption compared to current conventional sensors that use a 65nm/28nm process.

Microphotograph of Implemented Sensor (Left: Top Chip & Right: Bottom Chip)

Samsung says the chip is capable of outputting at 120 frames per second while consuming just 612mW of power. The analog and digital power supply requirements also drop to 2.2V and 0.8V, respectively, compared to conventional 65nm/28nm process chipsets.

What this all translates to is a more energy-efficient stacked sensor for future smartphones that also manages to improve data throughput and reduce noise. It also paves the way for creating sensors with smaller pixel pitches, maximizing the potential for even higher-resolution sensors without increasing the size of mobile sensors. As illustrated in the below graphic, a 16MP sensor with a 1.0um pixel pitch is the same size as a 13MP sensor with a 1.12um pixel pitch.

Of course, smaller pixels means each pixel will be less sensitive, but Samsung emphasizes this shortcoming can be overcome through its pixel-merging technologies such as its Tetracell (2×2) and Nonacell (3×3) technologies, which will merge data from neighboring pixels together to achieve better image quality when light is scarce.

Specifications of the 12MP sensor Samsung details in its paper.

Samsung specifically notes the power-saving nature of stacked sensors using the 65nm/14nm process will be ‘critical’ for 8K video capture and even higher-resolution sensors, as power consumption is one of the biggest factors limiting 8K capture on current smartphones.

As tends to be the case with developments of this kind, there’s no knowing when we might see this 65nm/14nm stacked sensor design inside a consumer smartphone.

Articles: Digital Photography Review (dpreview.com)

 
Comments Off on Samsung details new 65/14nm stacked sensor design for improving power efficiency, density of mobile image sensors

Posted in Uncategorized


13 Tips for Improving Outdoor Portraits

22 Aug

The post 13 Tips for Improving Outdoor Portraits appeared first on Digital Photography School. It was authored by Guest Contributor.

Outdoor portraits present portrait photographers with a variety of challenges and opportunities. Today, James Pickett suggests 13 tips to help you with your outdoor portrait work.

13 Tips for Improving Outdoor Portraits

When I bought my very first digital SLR, there was a sigh of relief. Everything was going to be so much easier, and I wouldn’t have to think anymore.

You know the scenario: You pull the camera out, charge the batteries, go for a walk around the house and down the street, taking the same pictures you have taken every time a new camera came into your life.

“This is great,” you think to yourself. “This is going to make my life so much easier!” I was wrong. In fact, I was dead wrong.

There are three very simple things that improve all photography, including portraits. To this day, there is no trick I have found that replaces the need for proper exposure, white balance, and sharp focus.

1) Never select all of the focus points for portraits; pick one

When you pick the autofocus option that allows the camera to select focus points, you are doing your portraits a terrible disservice.

This feature of a camera is usually designed to pick whatever is closest to the lens and focus there. In some cases, like with my 1DS Mark III, the camera will choose a cluster of focus points and make a “best guess” based on averaging the distance between all of the chosen points. Using one focus point gives you, the photographer, ultimate control.

2) Always focus on the eyes

The eyes are the windows to the soul and should be the focal point of any good portrait. Not only are the eyes the most important part of a good portrait, but they are the sharpest element on the face and should be left that way.

When you are shooting with a wide aperture value and you’re focused on the eyes, the lens’s bokeh will aid in softening the skin, as well.

13 Tips for Improving Outdoor Portraits

3) Shoot wide open for shallow depth of field

There are quite a few reasons to invest in a fast lens capable of wide aperture values; the most common is for shallow depth of field.

If you can shoot at ƒ/2.8 or ƒ/4, you should use it. Most fantastic natural light portraits are from wide aperture values, and it is all because of the wonderful smooth background blur we call “bokeh.”

4) Never, ever shoot a portrait at less than 50mm; try to stay at 70mm or higher

The last thing you want to hear from a client is “Why does my head look swollen?”

Any focal length below 70mm can distort your subject. However, it doesn’t become very noticeable until you are below 50mm. The compression effect of a telephoto lens will also increase the blur of bokeh. Most of my portraits are done between 120mm and 200mm.

5) Always shoot in RAW

These words have bellowed from my mouth a thousand times, and they will surely come out a million more. Raw is an unmodified compilation of your sensor’s data during the time of exposure. It is your digital negative. When you shoot in JPG format, everything but what the image processor needs to make a shell representation of the image you intended to capture is stripped away. For every edit you make to a JPG, you lose more data. With RAW, you can make a vast range of edits before creating the JPG.

How can this make you portrait better? Think about the last time your white balance was set incorrectly and you tried for hours to remove the color cast, only to destroy the image with every attempt. RAW would have saved you by allowing you to fix the color before opening the image for retouching.

6) Always bring a gray card or a piece of a gray card for white balance

Gray cards aren’t free. However, $ 5.95 US for a cardboard Kodak gray card is darn close. To avoid confusion, I am going to explain this backward. When opening Adobe Camera Raw or any other RAW image editing application, there is always a way to select a custom white balance. Usually, it is an eyedropper of some kind that you can use to click on what you think is neutral gray in your image.

Imagine a world where your photoshoot involved 4 locations and a total of 800 images, and all day the camera was set to Auto White Balance. That is 800 different white balance values, a post-production nightmare.

If at each location you have your subject hold the gray card on the first shot, you will save hours of work. When you open images from the first location in your favorite post-production application, all you have to do is click the eyedropper on the gray card, select all the photos, and synchronize the rest. Precious hours will be saved.

(If you plan on taking your time, it may be wise to do this once every 30 minutes or so to compensate for the changing light of day.)

7) Shoot in the shade (avoid direct sunlight)

Direct sunlight is harsh, makes your subject squint, and creates hard directional shadows and unpredictable white balance conditions. When shooting in the shade, there are no more harsh shadows, only smooth, milky shadows created by your subject’s natural features. With proper exposure and white balance, you can make these shots look amazing.

8) Shooting carefully on an overcast day.

Nature’s softbox is a giant blanket of clouds. A good heavy blanket of cloud cover can help you enrich your colors, and make some very smooth and pleasing shadows.

9) If you must use hot, hard, bright light…

Always try to control the direction, use some kind of reflector, and try to mimic a studio light. Putting the sun directly behind your subject isn’t a good idea, unless you are trying to make a silhouette.

When the sun is at my back, I have the subject look off-camera (away from the sun) and get very nice results. Another great trick is to wait for a cloud to move in front of the sun; this usually creates a very bright-yet-contrasted look.

13 Tips for Improving Outdoor Portraits

10) Use an existing reflector

For example, my guess is that about 75% of the delivery trucks on the planet are white. These big, white delivery trucks can make amazing fill light reflectors as long as they weren’t painted with an off-white. (A yellow tint can change the white balance in your shadows.) Picture framing outlets and craft stores always have medium-to-large-sized pieces of foam core lying around that have been left for scrap. They are usually more than happy to part with these scraps and, if not, chances are that there are pieces by the dumpster.

11) Learn the sunny ƒ/16 rule

Why?

So you have a baseline for proper exposure in your mind to work with if no other tools are present.

The sunny ƒ/16 rule states that on a sunny day, with your aperture value set to ƒ/16, your shutter speed will be the inverse of the current ISO speed. For example, if your camera is set to ISO 100, and your aperture value is ƒ/16, your shutter speed will be 1/100th of a second. On a cloudy day (or when in the shade), you simply use ƒ/8 instead. If you own an incident light meter or gray card, use either for the most accurate exposure instead.

(Note: the procedure for metering exposure with a gray card is not the same as a custom white balance.)

12) Bring a sheet and a few spring clamps from home

Leave the expensive 200-thread-count sheets on the bed. You already got them? Well, go put them back. You know that cheap old sheet you stuck in the corner of the closet to use as a drop cloth the next time you paint? Go get it.

(Another option is to buy the cheapest low-thread-count white top sheet you can find.)

A queen-sized sheet is an amazing, cheap diffuser. Sort of a seven-foot softbox for the sun. Wrap an edge of the sheet around a branch or clothesline and clamp for a sidelight.

(Anchor the bottom corners with rocks to keep the sheet from blowing into your image.) Clamp all four corners to anything you can above your subject for an overhead light.

13) Keep the powerlines and signs out!

We have already discussed keeping your camera focused on the eyes, but you must also keep the viewer’s mind focused on the image as a whole. Powerlines, signs, long single blades of grass, single pieces of garbage, and sometimes even trees can be serious distractions from the overall focus of the image: the person you are photographing.

Last, and most important, have a great time shooting! Enjoy what you’re doing, and it will show in your work (as well as in the expression of your subject).

13 Tips for Improving Outdoor Portraits

A few bonus tips for shooting on cloudy days

Clouds are wonderful. They create a giant blanket of natural sunlight diffusion that makes your images rich and powerful. The clouds can fool your mind in ways you can’t imagine, much like your mind corrects for the natural white balance throughout the day.

When you are shooting on an overcast day, using your camera’s custom white balance is especially important. Every day is completely different for color, and that color depends on two things. First, the time of day; most people understand white balance and how it changes throughout the day. Second, you have to account for all of the wonderful things that light has to pass through before it hits your subject.

Pollution changes the color of the light from minute to minute. Even if your eyes don’t see it, your camera does. On a cloudy day, pollution particles are being carried around in the sky by tiny water droplets. Now your sunlight is passing through nature’s prism and reflecting off of pollution particles in infinite directions.

Don’t forget to white balance with that six-dollar piece of cardboard, your Kodak gray card.

The ultimate secret to shooting on a cloudy day is a compass. (You either tipped your head like a confused Chihuahua or just had an epiphany.) I am an experienced, internationally-published photographer, and rarely can I see where the sun is coming from on an overcast day. The light isn’t omnipresent; it’s just diffused, softened, and scattered. Sunlight on a cloudy day is still directional, and your subject still has a dark side. Use a compass to find out where the sun is, put it at your back, and shoot like mad. Never again will you look at an image after and wonder why the sky was blown out when it was so cloudy, or why the clouds look great but your subject is dark.

The post 13 Tips for Improving Outdoor Portraits appeared first on Digital Photography School. It was authored by Guest Contributor.


Digital Photography School

 
Comments Off on 13 Tips for Improving Outdoor Portraits

Posted in Photography


Sony promises firmware updates for a7 III, a7R III and a9, improving AF

16 Jan

Sony has announced two major firmware updates for the a9 alongside updates for the a7R III and a7 III. The a9 updates adds a range of features, including improved tracking in both stills and video, as well as extending Eye AF to animals, something Sony teased at Photokina back in September. The a7R III and a7 III will also gain the improved Eye-AF and animal Eye AF, as well as time-lapse capabilities.

The a9 firmware will be coming in two waves: version 5.0 will be available in March while version 6.0 is slated for ‘summer.’ Firmware version 3.0 for the a7 III and a7R III will arrive in April.

Sony a9 improvements

The nitty gritty of the the a9 updates center on autofocus and usability improvements. Interestingly, there’s no mention of adding Log capability to the a9’s video, which is a shame, given it has such fast readout and minimal rolling shutter.

Firmware version 5.0 will bring about a new ‘Real-time Tracking mode,’ which uses Sony’s latest subject recognition algorithm.

The updated ‘Real-time Tracking’ mode adds consideration of eye detection and pattern recognition to the color, distance and and face detection that was previously being used.

The tracking mode lets you specify a subject and it’ll prioritize their eye, switching to face detection if it loses the eye and treating them as a generic subject to track if they, for instance, turn their head away from the camera. This is likely to be especially useful in video mode, whether previous iterations of face detection could jump to a different face if your intended subject turned away.

Real-time Eye-AF

A real-time Eye AF mode, which will come to the a9, a7 III and a7R III, lets you focus on eyes without pressing a second button and lets you specify in advance which eye (left, right or closest) you want the camera to focus on.

Animal Eye AF

The Eye AF feature has been expanded to be able to recognize animals’ eyes, which Sony says will help both wildlife shooters and photographers taking images of their own pets. Knowing that the camera will focus on eyes means the photographer can concentrate on composition, rather than focus.

Sony says both this mode and the subject recognition aspect of full-time tracking are based on ‘AI,’ which we’re taking to mean they’re based on machine learning (training an algorithm to recognize a subject by showing it lots of images). The company branded the capability ‘Speed x AI.’

You’ll have to wait until firmware version 6.0 for the animal Eye AF mode, on the a9, though

The full list of changes to the a9’s firmware

As well as the AF improvements, the two a9 firmware updates promise more than 20 updates. These include the addition of a screen allowing you to see which buttons are mapped to offer which function.

Press Release

Sony Announces ?9 Camera Upgrade Through Major Firmware Updates

New Firmware Releases will Deliver Enhanced Autofocus Performance and New Functionality for Sony’s Acclaimed Full-frame Camera

SAN DIEGO — Jan. 15, 2019 — Sony Electronics Inc. today announced a major upgrade to its ?9 mirrorless camera that will be available via a firmware updates.

Sony’s revolutionary ?9 camera will receive several major enhancements to its award-winning autofocus (AF) performance and image quality, as well as receive a variety of new features that are designed to improve the overall workflow for professional photographers. In addition, new firmware updates for ?7R III and ?7 III will be available that update these cameras with the latest enhancements including Real-time Eye AF performance and add interval recording capacities.

“These new firmware upgrades demonstrate the strong commitment that Sony has to our customers,” said Neal Manowitz, vice president of Imaging Solutions at Sony Electronics. “Their voice is critical to everything we do, and being able to provide our customers with new capabilities is a source of great pride for Sony.”

Firmware Ver. 5.0 and Ver. 6.0 for ?9

The upcoming firmware version 5.0 for ?9 adds Sony’s newly developed Real-time Tracking mode for object tracking. This mode utilizes Sony’s latest algorithm—including Artificial Intelligence-based object recognition—and processes color, subject distance (depth), pattern (brightness) as well as spatial (distance) information to ensure that all subjects can be captured with extreme accuracy and precision. When photographing or videographing humans or animals, face and eye position information is recognized by AI and the subject’s eye is monitored in real time with extremely high tracking precision. In addition, “Tracking On” helps initiate real-time tracking at any time by simply pressing a custom-assigned button and “Touch Tracking,” which quickly activates through the touch screenii.

With this new firmware version 5.0, Sony’s acclaimed ?9 camera will receive advanced “Real-time Eye AF,” the latest version of Sony’s acclaimed Eye AF technology. This exciting new capability employs AI-based object recognition to detect and process eye location data in real time, resulting in improved accuracy, speed and tracking performance of Eye AF. In all autofocus modes, the camera can automatically detect the eyes of the subject and activate Eye AF with a half press of the shutter button, and the camera will seamlessly track the eyes at all times when in AF-C mode. The new firmware will also enable photographers to select the preferred eye (left or right) of their subject as the focus point.

Other focusing capabilities that will be available with the new firmware include Touch Pad, Touch Tracking, an extended phase-detection AF aperture range that has been increased from F11 to F16, and Fast Hybrid AF for movie shooting that provides smooth, automated focusing for movies.

Image quality will also be enhanced with the new ?9 firmware version 5.0, specifically in the areas of color reproduction. The camera will more accurately account for subtle changes in light for smoother, more natural tonal gradations in elements like the sky. There is a new auto white balance algorithm that gets added as well, which produces more consistently balanced images while burst shooting. Other new functions for efficient controls and data management include My Dial and Dual Slot media menu improvement, rating and protect functions.

In addition to the several new capabilities, the firmware also adds compatibility with Sony’s new Imaging Edge Mobile application – the successor to the PlayMemories Mobile™ application. The new Imaging Edge Mobile application features a ‘Transfer & Tagging add-on’ function to assist professional workflow. This allows photographers to transfer images from their camera to their smartphone during capture using the FTP transfer functionality,and adds support for including IPTC metadata on transferred images.

Version 6.0 firmware for the ?9 camera will add Eye AF for animal eyesi, an exciting new feature for wildlife photographers that will enable interval shooting functionality for creating time-lapse movies.

The new system firmware update version 5.0 is scheduled for launch in March 2019, and version 6.0 is scheduled for Summer 2019.

Firmware Ver. 3.0 for ?7R III and ?7 III

Sony’s popular ?7R III and ?7 III full-frame cameras will both receive enhanced Real-time Eye AF performance with the upcoming firmware version 3.0. This will be available in AF-C mode with a simple half-press of the shutter button. Real-Time Eye AF for animals will also be available.

The cameras will also receive interval recording functionality that will allow for simple creation of time-lapse moviesvii. The new feature can be set for anywhere between 1 and 60 seconds, with a total number of shots from 1 to 9999. AE tracking sensitivity can also be adjusted to “High”, “Mid” or “Low” during interval recording, allowing for reduced changes in exposure over the shooting interval.

The new system firmware update version 3.0 is scheduled in April 2019.

A variety of exclusive stories and exciting new content related to all of Sony’s exciting announcements can be found at www.alphauniverse.com, a site built to educate and inspire all fans and customers of the Sony ? brand. The new content will also be posted directly at the Sony Photo Gallery and the Sony Camera Channel on YouTube.

1. Accurate focus may not be achieved with certain subjects in certain situations
2. Function must be set via the menu beforehand
3. A successor application of PlayMemories Mobile. Existing PlayMemories Mobile users can use this by updating PlayMemories Mobile
4. Add-on mobile application for ‘Imaging Edge Mobile’. Available countries: US/Canada/UK/France/Germany/Hong Kong/China/Australia/Japan. User registration is required to use this application. Compatible with ILCE-9 with firmware update Ver.5.0 or later, ILCE-7RM3, ILCE-7M3
5. Compatible with ILCE-9 with firmware update Ver.5.0 or later
6. IPTC metadata for digital image metadata is a standard created by the IPTC (International Press Telecommunications Council)
7. The latest version of “Imaging Edge” ‘Viewer’ and PlayMemories Home desktop applications is required

Articles: Digital Photography Review (dpreview.com)

 
Comments Off on Sony promises firmware updates for a7 III, a7R III and a9, improving AF

Posted in Uncategorized


20 Ways to Improve Your Photography by Improving Yourself

07 Jan

The post 20 Ways to Improve Your Photography by Improving Yourself appeared first on Digital Photography School. It was authored by Mat Coker.

Photo: Guillermo Sánchez

Sometimes what holds us back in photography is not a lack of “know how” or new gear, but not growing anymore as people. Before you try to improve your photography with a new camera or lens, try working on some weak part of your personality. Once you’ve improved yourself as a person, you’ll make much better use of that new camera or lens!

Whether you’re an amateur or professional, here are 20 personality problems to tackle that can help you grow as a photographer.

Golden hour photography of kids sledding in the snow

Imagine if adults kept growing at the rate toddlers do. One day they’re watching the big kids play, and then suddenly they’ve figured it out for themselves.

1. Stop being lazy – accomplish something big

If you always have a nagging feeling that you should be accomplishing more, then now is the time to do it. Instead of letting half-baked ideas and almost-finished projects pile up, get something completed.

It’s so easy to be lazy. That’s the danger. Accomplishing great things takes work, but being lazy doesn’t.

You can spend hours scrolling through photos that other photographers have taken, always lusting over their projects. Or, you can get off the couch to finish one of your own projects.

Before long, you’ll look back and see a trail of finished work.

2. Don’t work so hard

Maybe you’re the opposite of lazy. Maybe you can’t stop working. Suppose you run a photography business and feel a lot of guilt about missing so much family time. You must stop working a bit and pay attention to the other important things in your life.

When you make more time for friends and family and a little bit of downtime, you’ll grow in your creativity and do greater things when you get back to work.

Expand your relationships and life experiences and you’ll bring a much deeper version of yourself to your work.

Cut back on the hours you work by eliminating tasks that are not essential to your projects or business.

Candid photo of a toddler reading books.

Workaholics could schedule some time into their week to relax with a book. Expand yourself with a thrilling novel or good “how to” book.

3. Get organized

Begin to de-clutter and simplify your life. For example, do you just dump all your photos onto a hard drive or leave them floating around the cloud? You need to get those photos organized.

Get all your photos into one place and get them sorted out.

If you’re a project photographer, them sort them by year and by the project.

If you take a lot of photos every day or every week, I highly recommend sorting them by date.

The system I use is simple.

  • All photos go into a monthly folder
  • The monthly folders go into a yearly folder
  • All yearly folders go into one main folder labeled Photos

When your photos are organized you can begin to sift through them, print them, and enjoy them.

When your photos are in one place it is easy to back them up and know they’re safe.

4. Embrace a little chaos

Perhaps you are so orderly in life that you can’t stand any chaos.

Maybe you’re a photographer who can’t stand dealing with toddlers or people with strong personalities. You need to get out of your comfort zone and embrace a little chaos. Let the toddlers run wild a bit, maybe you’ll notice some great candid moments when you’re not asserting so much control.

Instead of meticulously planning every detail of your life, leave some things to chance. Allow for surprising spontaneity and see where it takes you.

Candid photography of a toddler exploring

Those white pants were so clean when we left the house! Toddlers are agents of chaos. But they’re exploring their world and learning so much.

5. Be more kind

Does your mouth lack a filter? Do you boast that you don’t care about people’s feelings? Are you always annoyed with your clients and don’t mind telling them so?

I recommend you work on being more polite. It’s going to be difficult, but try biting your tongue once in a while.

Don’t be a troll, leaving nasty comments on photography websites. When you say things kindly, your words might help somebody to improve themselves.

Practice saying one thing to every client or photographer in your life that would build them up. When you learn to help others grow, you grow deeply too.

6. Don’t let people walk all over you

Don’t misunderstand the nature of kindness by letting people take advantage of you.

If you’re a photographer in business, you must make people respect your talent, time and prices. Your work is worth something (perhaps more than you think).

Sure, you’ve got a heart of gold. But wake up and see that letting people take advantage of you does nothing to help them.

When the kids get sick it always throws a wrench into our plans. But sometimes those sick days are gateways to something new. We discover something more of their personality or spend the day reading books or listening to stories together. Sometimes, when something ruins our plans it leads to something better.

7. Volunteer

If you know that compassion is a weak point for you, then you should volunteer your photography skills. Go out and work for free, blessing a family or charity who would be thrilled by your offer to help. You might even enjoy the experience!

8. Compassion has some limits

Many photographers suffer burnout in their photography business. One of the main reasons is that they charge too little for their services. When you charge too little, you have to work too much to make a decent living. You will burn out.

Charge a price that is fair to you and your client, not just fair for them. Don’t feel like you have to give everyone discounts. And don’t listen to those few people who will tell you your prices are too high.

Balance good business and your own photography pursuits with some compassion for those who are truly in need.

Toddler portrait with shoes on the wrong feet

Toddlers always put their shoes on the wrong feet!

9. Learn to accept stress without snapping

Do you find yourself constantly snapping in anger or wanting to cry about stress?

You need to learn to accept difficult things more gracefully. It might not be easy. When everything in you wants to snap, restraint takes strength.

Begin by understanding that not everything is worth freaking out over, even though you may feel like it. Often, your initial feelings tell you how to act, and snapping has become a habit.

When you feel volatile feelings rising up, stop and think about them. Is this the best response?

Walk away from dramatic situations and wait to respond when you are at peace.

You’ll find it much easier to deal with criticism of your photography, difficult clients and unruly subjects.

10. Recognize that sometimes your emotions deceive you

Do you feel like crying or throwing up when you think a client has ripped you off or somebody says they hate their photos?

It’s tough to get bad news. But what if you could receive that news without the flood of overwhelming negative emotions? You can make peace with those clients more easily when your emotions are not raging. Sometimes the situation isn’t even half as bad as your emotions are telling you.

Make yourself calm down before you talk with clients or people who upset you. You can overcome overwhelming emotions.

Get toddlers to engage with the camera by playing games with them.

Drawn to the camera in a game of peekaboo.

11. Go out and meet people

Being introverted is not a bad thing, but being very withdrawn is. Spending time on your own is fine, but hating to be around people isn’t a good thing.

You can’t make the most of life on your own. You’ll grow as a photographer when you spend more time with people.

If you’re awkward around people, try acting like an extrovert. Just pretend you love people. Strike up conversations and take an interest in those around you. Before you know it, you’ll be more confident and less withdrawn.

Even if you’re a landscape or wildlife photographer, you’ll benefit from friendships and relationships with other photographers. You can even expand your photography by including people in your landscape and wildlife photos.

12. Most people are not thinking bad things about you

If you’re always worried about what people think about you, you should know this; they’re not thinking about you!

Most people don’t think bad things about you and most people don’t spend much time thinking of you at all.

Resist whatever thoughts you have that scare you about people.

If street photography is your thing, don’t be afraid to actually approach people on the street for a portrait. You’ll be nervous, but your imagination is probably playing tricks on you.

Candid photo of a toddler hiding

13. Be more assertive

If you’re too afraid to take control of your portrait sessions then you need to grow in your assertiveness. Perhaps you love waiting for candid moments, but maybe you’re more afraid to step in and tell people what to do.

People like a certain amount of assertiveness. Most people prefer that you take some control.

14. Don’t be a control freak

Being assertive is a great quality unless you overdo it! You can be so assertive that you don’t let other people be themselves. Your portrait clients like knowing that you’re confident and in control, but they don’t like it when you won’t listen to them and work with their ideas.

Humorous toddler portrait

He thinks he’s so funny stealing my seat every time I get up!

15. Cheer up!

You will go through periods when you just don’t feel the love toward photography that you used to. That’s okay. But the best way to get out of that slump is to act like you love it. Go through the motions of loving it. Don’t act like your photography work is drudgery.

16. Don’t jump on every opportunity!

You can be way too enthusiastic about photography, jumping on every opportunity that comes along.

You can buy every piece of gear, accept every job, and take on every project. But committing to everything will be committing to too much.

Slow down and only commit to what you’re best at or what you want to learn about most.

Candid portrait of a toddler

Dropping fistfuls of sand on himself, he hasn’t got a care in the world.

17. Go explore

Do you feel so insecure about things that you avoid new situations? If you haven’t experienced anything new in a while, you need to go and explore.

Find new landscapes. Meet new people. Try a different art form.

18. Reflect on what you’ve explored

If you’re constantly exploring and discovering new things it might be time that you stop and do some reflecting. What are you discovering through all this exploration? What are you learning about yourself, other people and the world around you? How has your photography improved? How might you improve more?

19. Read a book about a photographer

Maybe you know everything about every photography technique out there, but nothing about the heart of photography. Maybe you know little about the deeply human part of photography.

Go to the library and grab a biography of some photographer to read. Learn about the life experiences that led to their work and techniques.

20. Flesh out your ideas in a photo

If you love ideas and are constantly reading, try bringing some of those ideas to life through photos.

Funny toddler portrait

Sometimes I’m not just capturing moments. I’m trying to capture moments that express something about my subject. What’s the nature of a toddler? What are the ideas about toddler-hood that could be captured in a photo?

Choose 2-3 ways to improve yourself as a photographer

You’ve just read 20 ways to improve yourself that will also help you grow as a photographer. Choose 1 of these things to work on over the next few weeks or 2-3 things that you can work on over the year. As you grow as a person, you’ll grow as a photographer too.

The post 20 Ways to Improve Your Photography by Improving Yourself appeared first on Digital Photography School. It was authored by Mat Coker.


Digital Photography School

 
Comments Off on 20 Ways to Improve Your Photography by Improving Yourself

Posted in Photography


7 Tips for Improving Your Wildlife Photography

20 Sep

Creating attention-grabbing wildlife photography that makes a lasting impression is a difficult and demanding challenge. Typically you’re battling a number of uncontrollable and unpredictable elements, not least your subject’s behaviour, the weather, the environment and lighting.

7 Tips for Improving Your Wildlife Photography

But, when it all comes together it’s truly magical! To ensure you maximize every opportunity and extract the most out of your wildlife encounters, there are a number of approaches that you can adopt to help you get ahead.

Here are seven tips to help you take your wildlife photography to the next level.

1 – Know Your Camera

Wildlife’s special moments are often fleeting. Subsequently your camera needs to become an extension of you. Learning to adjust the focus point, shutter speed, aperture and other settings while continuing to look through the viewfinder, for instance, should become second nature. Leaving you to concentrate on being creative with what’s happening in front of you.

Tips for Improving your Wildlife Photography

If you’re not familiar with the ins and outs of your camera, then you may not be exploiting its full potential and therefore limiting yourself. Take some time out to learn as much as you can about your camera’s features and practice, practice, practice.

If reading the user manual is too much like hard work or you’re a visual learner, search for related video resources online.

2 – Shoot at Eye Level

One of the best ways to ensure your audience is able to feel connected with wildlife through your images is to shoot at eye level with your subject. That often means getting low.

Looking down on your subject can feel unnatural and controlling. Shooting at eye level allows you to create images that are much more intimate, and because the viewer is seeing what they expect to see, there is a real sense of familiarity.

7 Tips for Improving Your Wildlife Photography

From a technical perspective, there are also a number of advantages to adopting this approach.

For instance, by positioning yourself, and more importantly your camera, on a parallel focal plane to your subjects’ eyes you will increase the likelihood of your camera’s sensor picking up, and locking focus on, the sharpest part of the image. This is partly dependent on the depth of field of course.

7 Tips for Improving Your Wildlife Photography

Another benefit of interacting with wildlife at their level is the ability to separate your subject from what’s behind the animal to achieve wonderful, unobtrusive backdrops.

So, be prepared to get down, get wet, and get dirty in order to get the best shots!

3 – Keep Backgrounds Simple

Imagine the scene. Your subject is sitting pretty; you’re at eye level and just about to capture the moment. What you haven’t noticed is a tree protruding out of your subject’s head!

The adrenaline rush is part and parcel of wildlife photography and we’ve all been there. We’ve all been caught up in the moment, but it’s important to remember to take a deep breath and look at the bigger picture. Literally!

7 Tips for Improving Your Wildlife Photography

It only takes a moment to run your eye around the edge of the frame to spot unwanted distractions in the scene and then take the appropriate action. Shifting your position by moving to the left, right, up or down, often only as little as a couple of inches may be all that’s required to craft a more pleasant scene.

7 Tips for Improving Your Wildlife Photography

7 Tips for Improving Your Wildlife Photography

4 – Know Your Subject

Research as much as you can about the animals that you’re going to photograph. It really does pay to be able to envisage what your subject is likely to do in given situations.

7 Tips for Improving Your Wildlife Photography

Animals are habitual and most lead relatively straightforward lives with uncomplicated daily routines. Once you’ve tapped into the characteristics of a particular subject such as its preferred habitat, how and when it feeds, mating displays and so on, the more likely you will be able to predict what’s going to happen next and be ready to capture it.

7 Tips for Improving Your Wildlife Photography

By becoming intimately acquainted with your subject species will result in distinctive, evocative images.

7 Tips for Improving Your Wildlife Photography

5 – Be Prepared

Some of the most iconic wildlife photography images have been captured by photographers who were able to make the most of spur-of-the-moment opportunities. By ensuring they had already dialled-in some baseline camera settings before heading out into the field, they were ready when the action occurred.

7 Tips for Improving Your Wildlife Photography

Nature’s flashes of magic are short-lived and second chances are rare. So checking the available light and firing off a couple of test shots before setting out, will ensure that you’ll be ready at a moment’s notice. As well, this will safeguard you against mistakenly using previously loaded settings from the day before.

7 Tips for Improving Your Wildlife Photography

Even the slowest animals can react suddenly. So try and set your shutter speed as high as possible given the available light and your ISO setting.

6 – Break the Rules

Understanding the fundamental rules of wildlife photography with regards to lighting, camera settings, and composition is essential. Regardless of camera brand, manual or aperture priority, back button focusing versus front, you have to do what works for you.

It’s okay to play it safe. But then again your camera is a tool, and like an artist’s brush, it’s what you do with it that will set you apart from your peers. Try experimenting with side lighting, backlighting (or rim lighting), test different viewpoints, close-up versus wide angle, look for patterns, trial alternative lenses, and settings.

Stretch yourself and you’ll grow as a wildlife photographer.

7 Tips for Improving Your Wildlife Photography

7 Tips for Improving Your Wildlife Photography

7 – Take Care

Finally, never forget that for us [photographers] it’s just about obtaining an image. But for wild animals, every day is a fight just to survive. No photograph is ever worth more than your subject’s welfare.

Share your wildlife tips and images in the comment area below. If you have any questions, please ask.

7 Tips for Improving Your Wildlife Photography

The post 7 Tips for Improving Your Wildlife Photography appeared first on Digital Photography School.


Digital Photography School

 
Comments Off on 7 Tips for Improving Your Wildlife Photography

Posted in Photography


6 Tips for Improving Your Food Photography Instagram Game

27 Jul

Interest in food photography is on the rise thanks to platforms like Instagram and the ability to snap a quick photo of every meal thanks to smartphones. If you’re seeking to one-up your food photography game, you may not need much to make an impact. Keep the camera you have and don’t add any gear to your toolbox. Instead, adjust your perspective and add simple elements to make your dish more natural-looking.

Here are six tips for different food photography angles that you can capture of a dish to get unique shots. All the photos were taken using a DSLR camera and natural light.

1. 45-Degree Angle Shot

This is the most common food photography shot out there: the 45-degree angle shot taken from the perspective of someone sitting at the table. There’s nothing wrong with this shot, as it’s the common view of a dish that most diners can associate with. But it’s a little boring in the sense that almost everyone with a camera will automatically snap this angle.

6 Tips for Improving Your Food Photography Instagram Game

2. Top-Down-Shot

Another food photography angle that is becoming increasingly popular, but can be a little more difficult to achieve is the top-down shot. It’s a bird’s eye view of the dish that can be hard to do from high tabletops or without a wide-angle lens.

This also may or may not be a flattering angle for your food (for example, typically not the best angle to photograph sandwiches or burgers). However, this shot is most effective for showing off a dish with lots of components that can’t be easily seen from the 45-degree angle. It also works very well for displaying a full table spread with many dishes.

6 Tips for Improving Your Food Photography Instagram Game - overhead shot

3. Macro Shot

Now we’re treading into slightly more advanced food photography territory. The macro shot is an extreme close-up image that often reveals fine details that aren’t easily seen by the naked eye. Historically, this type of photo was difficult to achieve without a proper camera and macro lens.

However, many smartphones and even entry-level cameras come equipped with a macro mode that enables you to capture close-up shots. Use that mode to get a new view of your food. Below is a sous-vide egg covered in caviar and flecks of gold. Given its small size, it is best photographed in macro mode to show off those small details.

6 Tips for Improving Your Food Photography Instagram Game - macro

6 Tips for Improving Your Food Photography Instagram Game - macro egg

4. With Another Dish

Don’t just photograph the dish by itself. Instead, show some scale or just add an extra element to the background by sliding in another dish. When possible, make that extra dish complimentary to your main subject. For example, a burger with fries, or a Caesar salad with entrees.

6 Tips for Improving Your Food Photography Instagram Game - other plates

5. Incorporate Restaurant Interior

Besides focusing on the food, take a look at your surroundings and see if there are any interesting elements in the restaurant that might make for a good photography background. The examples below utilize a restaurant’s unique wallpaper and a patio wall of ivy as makeshift photo backgrounds.

6 Tips for Improving Your Food Photography Instagram Game - ice cream

6 Tips for Improving Your Food Photography Instagram Game - background

6. Use Your Hands

After you’re done capturing beauty shots of a perfectly composed dish, take it apart! By adding hands or even utensils pulling food apart, this adds authenticity, as it shows someone actively engaging with the dish. In some instances, this action is almost essential for showing food in its best light. Consider pasta or noodles. Oftentimes, it is covered in sauce or garnishes, making it difficult to see the noodles underneath. This is easily addressed by having a fork or chopsticks dig in there and pull up a bunch of noodles. The same goes for burgers and sandwiches. Photograph it whole, but then slice it in half to show a more organic side to the dish.

In some instances, this action is almost essential for showing food in its best light. Consider pasta or noodles. Often pasta is covered in sauce or garnishes, making it difficult to see the noodles underneath. This is easily addressed by having a fork or chopsticks dig in there and pull up a bunch of noodles. The same goes for burgers and sandwiches. Photograph it whole, but then slice it in half to show a more organic side to the dish.

The same goes for burgers and sandwiches. Photograph it whole, but then slice it in half to show a more organic side to the dish.

6 Tips for Improving Your Food Photography Instagram Game - noodles

A noodle soup dish served as-is, where the noodles are very hard to see.

6 Tips for Improving Your Food Photography Instagram Game - noodles and hand

The above noodle dish being pulled apart by chopsticks.

6 Tips for Improving Your Food Photography Instagram Game - burger

A burger by itself.

6 Tips for Improving Your Food Photography Instagram Game - burger sliced

That same burger sliced in half and held up by a hand.

In Conclusion

Food photography needn’t be super complicated with tons of lighting and food styling. Instead, you can create beautiful and unique food photos by just changing your perspective and adding a few simple elements to give your photos a more natural feel.

Do you have any food photography tips of your own? Feel free to add them in the comments below!

The post 6 Tips for Improving Your Food Photography Instagram Game by Suzi Pratt appeared first on Digital Photography School.


Digital Photography School

 
Comments Off on 6 Tips for Improving Your Food Photography Instagram Game

Posted in Photography


10 Step Guide to Improving Your Photography Without Buying New Gear

17 Mar

Will buying that new camera or lens or travel to iconic places automatically result in beautiful images?

Landscape photographers often dream about the latest gear or traveling to far away places to capture great images. For example, places like Iceland, Patagonia, Lofoten Norway, or Tuscany. The problem is that we spend too much time in front of our computers seeing all those great images on social media platforms and dreaming about photographing those vistas ourselves.

10 Step Mini-Guide - How to Improve Your Photography Without Buying New Gear - leading lines

We believe that going to iconic places or buying the latest gear will automatically make us better photographers, or that this is the only way of capturing great imagery. As with any craft, you need to practice, practice, and then do some more practice. This way you’ll have the greatest possibility of taking that fantastic photo, either close to home, or once you finally go away on that travel adventure of your dreams.

Here are my 10 tips for how to improve your photography without buying new gear:

1) Learn the basics about your camera and photography

Start by reading your camera’s user manual. Yes, it’s very basic and should be obvious to everyone, but you would be surprised how often people buy a new camera and start using it right away, thinking that the camera is going to do all the work. Many camera stores also offer beginner courses. Ask your local camera store about this option before deciding to buy from them.

Learn about topics like leading lines, the rule of thirds, exposure compensation, and the relation between aperture, shutter speed, and ISO. I will not go into this in more detail as it would merit a whole book, but these topics are available in printed books, e-books and here on dPS.

Read more here:

  • How to Use Leading Lines Effectively in Landscape Photography
  • 5 Simple Techniques for Leading the Viewer’s Eye in Your Images
  • How to Use Exposure Compensation to Take Control of Your Exposure
  • Mastering the Exposure Triangle for Newbies
  • Understand Exposure in Under 10 Minutes
10 Step Mini-Guide - How to Improve Your Photography Without Buying New Gear - leading lines

Using leading lines.

10 Step Mini-Guide - How to Improve Your Photography Without Buying New Gear - rule of thirds

Using the rule of thirds.

2) Do your photography under the right conditions

A word photography literally means drawing with light (from the Greek photós meaning “light”, and graphê meaning “drawing, writing”). I would say that at least 80 % of your most successful images will be taken during the sunrise or sunset when the quality of light is the best. The other 20 % will be taken during cloudy days when the light is much softer than days with direct sunlight.

Many photographers don’t consider this second aspect enough. When starting out, I would often photograph during sunny days with clear blue skies with hard light that produced too much contrast. Today I try to do as much photography when there’s a shift in the weather pattern from high to low pressure or vice versa. The reason is that during this period there’s often a build up of dramatic clouds and the weather shifts between rain and sun creating more drama in your photos.

I suggest that you regularly check the weather forecasts and try to plan your photography for these days.

10 Step Mini-Guide - How to Improve Your Photography Without Buying New Gear

10 Step Mini-Guide - How to Improve Your Photography Without Buying New Gear

10 Step Mini-Guide - How to Improve Your Photography Without Buying New Gear

10 Step Mini-Guide - How to Improve Your Photography Without Buying New Gear

3) Scout for new locations and return multiple times to the same place

The majority of my best photos are from places very close to home. Most of the time they were not taken on my first attempt, but rather I had to come back many times to the same location before the conditions were right.

Google Earth is a great tool for your initial location scouting as are social media platforms like 500px, Instagram, or Google+. Remember that you should use these sites for inspiration, and not try to copy the same images that have already been taken numerous times before.

4) Change your vantage point

Have you ever considered the vantage point of your photos? The majority of photographers always take photos from the exact same position as they are standing – at eye level. This creates boring photos that all look the same. It’s also the same vantage point from which your viewers see the world.

By crouching down low or shooting from a higher position, like a hill or even from the top of a rock, it will drastically improve your photos. The visual appearance of your photo can dramatically change by just placing your camera a couple of meters in another direction. You should “work the scene” by looking for different viewpoints and not be satisfied with your first choice.

10 Step Mini-Guide - How to Improve Your Photography Without Buying New Gear - low viewpoint

Taken from a low vantage or view point.

10 Step Mini-Guide - How to Improve Your Photography Without Buying New Gear

Shot from a low view point.

10 Step Mini-Guide - How to Improve Your Photography Without Buying New Gear

Taken from a high vantage point.

5) Use your lenses creatively

Use your wide-angle lens for creating depth in your image and your telephoto lens to compress the landscape. Both techniques are very effective and create totally different effects. By trying to pre-visualize how your want your photo to look, your choice of lens will be much easier. This takes time and comes more naturally as you gain greater experience.

For landscape photography, you often want to maximize your depth of field by taking photos between f8 and f/16. You could go higher than that but then you risk having softer images as most lenses have a “soft spot” between these parameters.

You could also try to zoom or move your lens during the exposure. This technique is more a trial and error basis and often you need to take many photos before you’re satisfied. Luckily all your frames in digital photography are free.

10 Step Mini-Guide - How to Improve Your Photography Without Buying New Gear

Use of a wide-angle lens.

10 Step Mini-Guide - How to Improve Your Photography Without Buying New Gear

Use of a longer or telephoto lens.

10 Step Mini-Guide - How to Improve Your Photography Without Buying New Gear

Created by intentionally moving the camera or lens during the exposure.

6) Use the elements in your surroundings to your benefit

Is there is a rock, a tree, strong colors, some leading lines, etc., that you can use to create interest in your image and lead the viewer’s eyes throughout your image?

Because we are fed daily with thousands of images, it becomes important to immediately catch the viewer’s attention and make sure that their mind is stimulated. Therefore, the image should have a clear object, this could be a person or a landmark, which the viewer can quickly identify.

If the photo is too busy with too many conflicting elements, the viewer will become confused and move on to the next image. Less is often better than more. Consider excluding elements that do not add to the image. It could be annoying things like tree branches entering the photo from the corner, paper bags and other waste in the photo, etc.

10 Step Mini-Guide - How to Improve Your Photography Without Buying New Gear

10 Step Mini-Guide - How to Improve Your Photography Without Buying New Gear

10 Step Mini-Guide - How to Improve Your Photography Without Buying New Gear

10 Step Mini-Guide - How to Improve Your Photography Without Buying New Gear

10 Step Mini-Guide - How to Improve Your Photography Without Buying New Gear

7) Invest in good quality accessories instead of buying the latest camera or lenses

There are some camera accessories that are more important than the latest camera or lens.

The single most important one is a good quality tripod. You should not waste your money buying a cheap aluminum tripod that will shake every time you put your camera on it, resulting in useless blurry images. In the end, you’ll be forced to buy a more expensive tripod anyway, adding unnecessary extra costs. Instead, spend the extra money on a quality tripod from Manfrotto, Gitzo, 3 Legged Thing, or any of the other top brands. Trust me, in the end, you will end up saving money.

Another very important accessory for us landscape photographers are filters. You definitely need a good polarizing filter to reduce the reflections on water and other shiny surfaces. Polarizing filters work the same way as your sunglasses.

https://www.digitalphotomentor.com/?s=challenge

Cameras are also limited in their ability to handle dynamic range. In short, this means the ability to register the darkest and lightest tones and everything in between. An example of this cis when you’re photographing a landscape and the foreground looks good, but the sky is too bright. This is where the graduated filters come into play. They have a dark and light part with a soft or hard transition in between. Generally, you should use a hard transition filter when photographing seascapes, as there is a clear definition between the sky and the water. A soft transition filter is preferred when photographing landscapes where there are trees, hills or mountains.

I’ve tested many different brands and would highly recommend LEE filters, They are expensive, but in my opinion are worth every penny. Lee also produces two neutral density filters called Little Stopper and Big Stopper. These filters enable you to slow down your shutter speed. When you see those photos with silky smooth water or clouds, most likely the photographer used such a filter.

https://www.digitalphotomentor.com/?s=challenge

https://www.digitalphotomentor.com/?s=challenge

https://www.digitalphotomentor.com/?s=challenge

While these accessories will cost you some money, they will be more of a one-time expense. Taking good care of them means you can use your accessories for many years to come.

8) Photograph in RAW format and learn to use a photo editing program

When photographing in JPG mode you let the camera do all the processing of the image. This means you have less control over the final outcome. It’s better to photograph in RAW format and then use a software like Adobe lightroom to post-process them yourself.

For me, the main reason for shooting in RAW is to have a greater dynamic range so that I’m able to save many images that are otherwise too light or too dark. Of course, it’s important to get the exposure correct from the start, but RAW files definitely give you some room for errors. There is a lot of information about RAW format and post-processing, read;  RAW Versus JPG – Why You Might Want to Shoot in RAW Format and How to Use Adobe Camera Raw and Photoshop to Make Your Landscape Images Pop.

9) Learn to focus manually

This is crucial for landscape photography. As mentioned above, you’ll hopefully be taking most of your photos in low light during the morning or evening. You will also be using a tripod to avoid camera shake.

10 Step Mini-Guide - How to Improve Your Photography Without Buying New Gear

During long exposure photography, it becomes very important to focus manually in order to avoid having the focus move during your exposure as is the risk when using autofocus. You should use a small aperture like f/11 and focus about a third of the way into the scene if you desire to have sharpness throughout the frame. Make sure you use your camera’s Live View mode or focus peaking if you own a mirrorless camera, for manual focus assistance.

10) Think before you shoot and study your photos afterward

Often I see photographers arrive at their location, take out their gear, and do the “machine gun “photography approach, taking dozens of photos from the same location over and over again. It’s important to work the scene, moving around looking for the best viewpoints.

The same applies when you’re done editing your photos at home. Try to study your photos and look for improvements. Compare your work with other established photographers to see how you can do things differently next time. This takes time, but after a while, you’ll certainly notice better quality in your work.

Conclusion

These 10 points are just the very basics to get you started. Make sure you search dPS for more information, study photography books, and feel free to leave a comment below or ask any question you might have. Good luck!

The post 10 Step Guide to Improving Your Photography Without Buying New Gear by Jacek Oleksinski appeared first on Digital Photography School.


Digital Photography School

 
Comments Off on 10 Step Guide to Improving Your Photography Without Buying New Gear

Posted in Photography


The 4 Ps – Tips for Improving Your Wildlife Photography

15 May

Taking photographs of wildlife can be one of the most exhilarating photographic experiences you can try. Spotting an animal in the wild can be thrilling, and being able to record that moment can be highly rewarding. However, wild animals can be a particularly challenging subject matter, so wildlife photography can often prove frustrating.

To help you get the most out of this compelling type of images, here are some tips to improve your wildlife photography.

Facetofacewithafox750

#1 PREPARATION

No matter what type of wildlife you have chosen to photograph you will need to spend time getting to know its behaviour, routine and movements. Read up about your subject in advance, or search online for video or audio files, that can help you learn more about spotting your chosen subject. If possible, talk to experts in the field who know where, and when, to spot wildlife. If you are heading to a nature reserve or national park to take photographs, staff and volunteers are normally very willing to let you know of recent sightings, or give you some handy local advice.

Because you may only get a limited time in which to take wildlife photographs, getting to know your camera settings is extremely important. Familiarize yourself with how your camera and lens work before you get to the location so that you don’t miss an important shot by having the incorrect settings.

Before setting out, make sure you have packed all of the required gear, and you have spare memory cards and charged batteries. For wildlife photography, a telephoto lens is probably going to be essential, but do not overlook packing a wider angle lens to capture your animals as part of the landscape. Some of the best wildlife photographs show an animal in its environment and are not necessarily frame-filling portrait shots. If you are using a telephoto lens, a tripod or monopod can also form a useful part of your kit to minimize camera shake. A monopod offers greater flexibility of movement than a tripod when you are tracking wildlife on the move, but can still provide adequate stability for your camera to get sharp images.

Autumnpony750

Check weather reports for the day you are going to shoot wildlife, but do not necessarily be put off by bad weather. Animals do remain active during rainy or stormy days, and it is possible to get some dramatic shots in such conditions. You can buy special covers to protect your camera and lens in wet weather but, often, a durable plastic bag fixed in place with elastic bands can work just as effectively.

As with all genres of photography, lighting is key, and the best light for wildlife photography tends to be around sunrise and sunset. Animals also tend to be more active at these times of day, often searching for food. Therefore, make sure you get up early to be ready to take photographs in the golden light as the sun rises. Shooting into the sunset can transform a mundane subject into something special, so look for opportunities to capture dramatic wildlife silhouettes as the sun goes down (see image below).

Cormorants750

#2 PRACTICE

As with all types of photography, composition can make the difference between a good image, and a great image. When composing wildlife photographs, remember basic compositional guidelines such as the highly effective Rule of Thirds. If your subject is looking to the left or right, leave an appropriate amount of space in the frame into which they can look. The same guideline applies if a moving animal is being captured – always leave room in the frame for them to move into.

Getting down to eye-level (or lower) with an animal can produce dramatic images. Taking a shot of an animal from a standing height looking down on it will usually lack any Wow Factor as this is the angle from which we are most used to seeing wildlife. Laying down on the ground so that you are at eye-level with, or looking up at, the animal will make your chosen subject seem large and powerful, and can add an element of drama to your final image.

A fundamental rule of wildlife photography is that the subject’s eyes must always be in perfect focus. However, the autofocus system on your camera can easily be tricked into locking onto another part of the animal. A helpful way around this is to set the camera to One Shot mode (AF-S for Nikon users), select the centre focus point in the viewfinder, lock the focus on the eyes by pressing the shutter release button halfway down and then, without releasing, recompose your shot. In addition to being perfectly focused on the eyes, the most compelling wildlife images have a catch-light in the eye. A flash, or speedlight, in your kit can be extremely useful for adding light to dark eyes when taking close-up animal portraits.

Hedgehog750

Getting the right focus becomes even harder when shooting an animal in motion. For moving wildlife, select a continuous autofocus mode such as AI Servo (AF-C) and select a single focus point in the viewfinder. Track the action by keeping the single focus point on the subject to ensure that remains in focus at all times, rather than the background or foreground.

Shooting in Aperture Priority mode can be extremely useful for wildlife photography. By using the widest aperture available (such as f/2.8) you will be able to use the fast shutter speeds necessary to produce sharp images. The narrow depth of field from using a wide aperture will also help to blur the background and, therefore, will isolate your subject and really make it stand out in the final image.

Do not be afraid to increase your ISO settings a little in order to keep the shutter speed fast, particularly if shooting in environments where lighting can be difficult, such as in a thick forest. A little bit of noise in your image is more acceptable (and easier to correct if you so wish) than an out-of-focus, or blurry image.

#3 PERSEVERANCE

Saltmarshstag750

While there is no denying that a certain amount of luck definitely comes in handy, the real key to taking better wildlife photographs is patience. Not necessarily the patience required for your chosen subject to appear, but the patience to capture the perfect shot that you have envisioned.

When you do find an animal out in the wild, watch it for as long as possible and not just from behind the viewfinder. Spend time with it and learn its ways. While observing the animal, try to capture some form of behaviour that is unique to that species. Documenting such behaviour can produce compelling wildlife shots. Most importantly, enjoy the experience of wildlife watching as much as taking photographs.

One quick tip is to keep all noise (as in be quiet, not camera noise) to a minimum when you are shooting in the wild. Dress appropriately, tread carefully, and possibly most importantly, switch your phone to silent mode. There is nothing worse than framing a shot and having your subject scared off by a ringing phone.

Swanreflection750

There may very well be some periods of waiting and watching. Try not to get too focused on one particular subject, take a look around while waiting for your subject to return. You never know, there may very well be something more interesting waiting just around the corner.

If you want to put in more practice with your wildlife photography but don’t have much time to spare, a public park can be a great place to visit on a lunch hour or after work. Parks attract a range of wildlife such as geese, swans or deer and often you can get a little bit nearer to the action. A duck pond can produce many opportunities for action shots and is a great place to practice your skills at close range.

#4 PASSION

To take your wildlife shots from good to great, you need to be passionate about the natural world you are photographing. Take the time to appreciate nature and wildlife in all of its forms, wherever you find it. You do not have to go to an exotic location to do great wildlife photography. For example, macro photography offers a range of wildlife opportunities including spiders, beetles and flies. As someone who was once highly arachnophobic, I can now appreciate the beauty of spiders and, since photographing them, I do find them more fascinating than scary.

Pollencoveredbee750

You could even make a few simple changes to your own garden to encourage more wildlife to come to you. Making your garden wildlife friendly can be relatively inexpensive and highly beneficial to local wildlife. Adding a pond or wildflower patch is both good for the environment, and may provide you with photographic opportunities.

Most importantly, take great care when photographing wildlife. Do not put yourself, or the wildlife, at risk and do not disturb their natural habitats in the process of getting your shot. Respect all wildlife, get to know your subject well and you will be rewarded with some great images to share with others, to inspire them to care as much about the natural world as you do.

Sikainthelight750


googletag.cmd.push(function() {
tablet_slots.push( googletag.defineSlot( “/1005424/_dPSv4_tab-all-article-bottom_(300×250)”, [300, 250], “pb-ad-78623” ).addService( googletag.pubads() ) ); } );

googletag.cmd.push(function() {
mobile_slots.push( googletag.defineSlot( “/1005424/_dPSv4_mob-all-article-bottom_(300×250)”, [300, 250], “pb-ad-78158” ).addService( googletag.pubads() ) ); } );

The post The 4 Ps – Tips for Improving Your Wildlife Photography by Richard Beech appeared first on Digital Photography School.


Digital Photography School

 
Comments Off on The 4 Ps – Tips for Improving Your Wildlife Photography

Posted in Photography


Shooting Better Waterfalls: Five Tips for Improving Your Waterfall Photography

14 Apr

Cave Selfie

Perhaps there isn’t a more sought after and photographed subject than water. More specifically, waterfalls. When you really think about it, waterfalls are one of the most basic and simple things that we can find in nature. They are just streams or rivers that happened, by one geological occurrence or another, to find themselves flowing over some height of cliff or stone or other drop-off. Still, we remain captivated by the simple beauty and serenity that can come from being near, and photographing a waterfall.

That’s where we, as photographers, often slam face first into a huge creative and artistic wall. How can you make an interesting photograph of something that has already been so extensively covered by countless other photographers? While there is unfortunately no secret formula for all waterfall photo sessions, there are some very simple and useful tips that can help you create better, and more unique images, of these phenomenal natural occurrences. Let’s dive in (get it?) and get started on the path to better waterfall photography.

Have a plan

I always stress the importance of research and preparedness before any photographic excursion regardless of what the subject or goal might happen to be. This is especially true when you, the outdoor photographer, are readying yourself to photograph waterfalls. There is simply no denying that the more you know about a location, the better your odds will be of coming home with images that you are happy to claim as your own.

Conduct some quick research and find out what the main waterfall or waterfalls are in the area you plan to visit. Google (or another search engine) will be your absolute best friend in this regard. Try to find as many images as you can before you set out so that you can be inspired and have a head start on coming up with your own unique compositions that haven’t been tried with that particular spot.

Map

Also, if at all possible, print out a map of the area and highlight the waterfalls that you feel are the most promising for you on that particular day and focus on those first. Don’t waste time trekking into a place that probably won’t yield a good result. Know before you go, and you will make better use of your time and become a much more efficient shooter.

Use a tripod

The topic of using a tripod can sometimes scare you off just from the sheer repetition of the statement. For whatever reason it seems like this essential bit of knowledge is where most beginner photographers find themselves in a state of complete denial. Believe me, I know how uncomfortable, to downright physically painful and tiring it can be to carry a tripod on your person for an extended amount of time. Still, though not always convenient, a tripod will always help you in the long run to produce better photographs. There is simply no other way to limit camera shake without having a solid shooting platform – there just isn’t. You will need such a platform for the longer exposure times often used when encountering waterfalls. End of story.

Another fact that beginners, and even some seasoned photographers, fail to grasp is that the quality of the tripod plays an essential role in its overall use to you. You will need a tripod that locks securely and reliably, and can handle the weight of whatever camera rig you happen to be shooting, as well as the shooting conditions. I can’t tell you how many long exposure images I ruined due to drifting of the tripod head because all I had available was a suboptimal tripod.

The biggest gripe I hear concerning tripods is that the good ones are too expensive. It’s true that a quality tripod will not be cheap. However, it is just as true that you can still obtain one without being outrageously expensive. Shop around and find a tripod that has good reviews, fits your current needs, and will also grow with you as a photographer. Do you really need carbon fiber? Do you need the most advanced ball head? Ask yourself questions like that and your purchase will make less of a dent on your pocketbook. A good tripod will last you years and yield incredible benefits. It will literally pay for itself and be one of the best investments you will make.

Make the waterfall the secondary subject

Foreground Focus

This image puts the colors of the moss and the detail of the foreground as the first point of interest and less on the waterfall itself.

This tip may seem a little counter intuitive but stay with me. It’s fairly straightforward to walk up to the front of a waterfall and snap a quick photo to take home. That’s great if that’s all you want. But let’s face it, you wouldn’t be pouring through all the great content here on dPS if all you wanted was to make average photos. You want to shoot with a purpose, and make photographs instead of taking snapshots. One of the best ways to do this is to think about the subject differently than the average photographer, and waterfalls offer a great opportunity to do this.

When you arrive at a particular falls you should really study the scene. Give yourself a few minutes before you even start thinking about making an exposure. Watch how the water flows and interacts with the other pieces of the scene. It may be rocks, boulders, sand, trees or any number of artifacts found in such places. Don’t let the waterfall itself distract you from the other photographs that could be there.

After all, the waterfall is not the only thing you notice so why should it be the only thing you show your audience? Look for ways to include different parts of the scene and even have the falls take a back seat if that makes a stronger image. Pay attention to what is often overlooked by other photographers. If you do this you will almost always be able to present the waterfall in a way that has never been seen before.

Pay attention to color

Color is a great way to grab the attention of your viewers and pull them into a photograph. Never underestimate the creative power of color when photographing waterfalls. Water is an incredible thing because it not only reflects the different colors around the surface such as the sky and leaves, but also the colors that come from underneath as well.

Use Color

The first step to getting the most interesting colors from a scene is to always shoot in RAW if at all possible. Shooting RAW will allow the most information to be recorded by your camera sensor, which will in turn give you much greater latitude for getting creative later with your post processing. Experiment with creative white balance and see what happens. Enhance the vibrancy and saturations in some areas and decrease them in another. You will be surprised how much more lively and interesting a waterfall can become with simply letting your imagination run free, and by using color creatively.

On the flip-side of the color coin, is that some waterfalls work much better when photographed in black and white. I have often said that I prefer images that tell a story through black and white, unless the color of the scene can speak louder. If you find yourself shooting a waterfall that lacks a lot of native color then why not put your pre-visualization skills to work (you’re still practicing that, right?) and try to imagine how the image could appear in black and white? Look for contrasts between light and dark areas on rocks, and contrasts within the water itself. Are there any interesting textures or reflections?

Here’s an unprocessed RAW version of a waterfall. Notice there’s not much color to boast about.

Virgin Falls RAW

Here we see the same image after a little cropping and black and white conversion.

Virgin Falls Processed

Lastly, with this photo, the textures and light really made the image so I converted it to black and white as well.

Rocks and Falls

Never discount the power of a monochrome image. Black and white waterfall work can be extremely profitable especially when you’re shooting in the drab and often colorless winter months.

Don’t forget to protect your gear

This isn’t really a tip, but rather a lesson that should be learned and become second nature to the serious waterfaller. When shooting a waterfall of any large size and flow there will always be moisture in the air, whether it is visible to you or not. The shear force of the water impacting the terminus of the fall, with render small droplets into the air that will absolutely ruin your shot and potentially destroy your camera and lenses.

Without Water Drops

The air surround a thirty-five foot waterfall without flash.

Water Drops

Then with a flash firing to show the moisture in the air.

Always use some protective barrier to protect your camera and lens while you set up for your exposure, and for transport around the waterfall. This barrier doesn’t have to be fancy. Personally I use pre sized slip-on plastic container covers that you can pick up at virtually any grocery store. They are perfectly waterproof and fit snugly around my camera and are unnervingly cheap.

Protect Gear

The same goes for your lenses. Even if they are in your camera bag, always protect them from the moisture. Again, low tech is often your best option here. I simply wrap my lenses in a cloth and place them individually into resealable sandwich bags. The cloths will help to absorb any condensation that builds up from temperature changes and were a hard learned lesson for me. Lastly, minimize the amount of time you leave the cap off your lens, and always carry a good lens cloth for wiping the front between takes.

Shooting even small waterfalls can be very rewarding, and are a great way to just get out and enjoy nature. Learning to shoot them creatively, however, can be a little more challenging. That doesn’t mean that it has to be difficult or intimidating. Just remember these five simple tips and you’ll be ahead of the game when it comes to waterfall photography:

  1. Research and plan beforehand.
  2. Don’t desert your tripod.
  3. Think of the waterfall as part of a whole and not the only part of a scene.
  4. Learn to use color creatively or when to get rid of it altogether.
  5. Always protect your gear from the elements.

Now go out and do what you love to do!

googletag.cmd.push(function() {
tablet_slots.push( googletag.defineSlot( “/1005424/_dPSv4_tab-all-article-bottom_(300×250)”, [300, 250], “pb-ad-78623” ).addService( googletag.pubads() ) ); } );

googletag.cmd.push(function() {
mobile_slots.push( googletag.defineSlot( “/1005424/_dPSv4_mob-all-article-bottom_(300×250)”, [300, 250], “pb-ad-78158” ).addService( googletag.pubads() ) ); } );

The post Shooting Better Waterfalls: Five Tips for Improving Your Waterfall Photography by Adam Welch appeared first on Digital Photography School.


Digital Photography School

 
Comments Off on Shooting Better Waterfalls: Five Tips for Improving Your Waterfall Photography

Posted in Photography