RSS
 

Posts Tagged ‘Ideal’

Canon’s RF 85mm F2 Macro IS STM is ideal for close-ups and portraits

13 Jul

$ (document).ready(function() { SampleGalleryV2({“containerId”:”embeddedSampleGallery_3697049869″,”galleryId”:”3697049869″,”isEmbeddedWidget”:true,”selectedImageIndex”:0,”isMobile”:false}) });

The Canon RF 85mm F2 Macro IS STM is a relatively inexpensive telephoto prime lens that’s ideal for both close-up and portrait work. Ostensibly it appears similar in design to the RF 35mm F1.8 IS STM, and together with the RF 35/1.8, should make for a compelling package for wedding photographers wanting to shoot everything from groups to close-up portraits to macro detail shots. The RF 85mm can focus as close as 0.35m (13.8″) and offers a maximum magnification of 0.5x.

Optically, the lens comprises 12 elements in 11 groups, including one UD (ultra low dispersion) element to help reduce chromatic aberrations. On an EOS R or RP, the 85mm F2 offers five stops of image stabilization, but when you attach it to an EOS R5 or R6, with their built-in stabilization systems, Canon claims a benefit of eight stops thanks to the two-way communication between motion and gyro sensors in the camera body and lens. It uses a stepping motor to drive its focus group, so autofocus speeds are unlikely to be as fast as the company’s lenses with Nano USM focus drive systems, and it remains to be seen if focus drive is silent.

The lens is relatively compact, featuring a 67mm filter thread and weighing in at 500g / 1.1lbs. Nine aperture blades aid in producing circular out-of-focus highlights. The lens is not weather-sealed – you’ll need to step up (way up) to the F1.2 version for that.

The Canon RF 85mm F2 Macro IS STM will be available in October for $ 599.

Press release:

THE SECRET IS OUT: CANON OFFICIALLY ANNOUNCES THE CANON EOS R5 AND R6, THE COMPANY’S MOST ADVANCED FULL-FRAME MIRRORLESS CAMERAS EVER

The Company is Also Announcing Four RF Lenses, Two RF Lens Extenders, and a PRO Printer

MELVILLE, N.Y., July 9, 2020 – With anticipation at a fever pitch, Canon U.S.A. Inc., a leader in digital imaging solutions, is excited to introduce the company’s next generation of full-frame mirrorless cameras – the EOS R5 and EOS R6. These groundbreaking cameras are the result of many years of collecting and listening to feedback from Canon users and are sure to meet the needs and demands of a variety of creators. The EOS R5 is a camera designed for professional applications featuring a new 45-megapixel full-frame CMOS sensor and uncropped 8K video recording up to 29.97 fps. The EOS R6 is geared towards advanced amateurs featuring a 20.1-megapixel full-frame CMOS sensor and 4K video recording up to 59.94 fps. The addition of the EOS R5 and the EOS R6 cameras within the EOS R series lineup further solidifies Canon’s commitment to providing the equipment needed for users to bring their content to the next level.

Canon is also introducing four RF lenses and two RF lens extenders: The Canon RF100-500mm F4.5-7.1 L IS USM, Canon RF600mm F11 IS STM, Canon RF800mm F11 IS STM, and RF85mm F2 MACRO IS STM lenses. All four new lenses were designed to meet the ever-expanding demands of the skilled creatives who capture amazing imagery using EOS R series cameras, including the new EOS R5 and EOS R6. In addition to the lenses, there are two new RF lens extenders, a 1.4x and a 2x model, allowing for users to take their compatible RF lens focal lengths even farther, and a 13-inch professional printer, the imagePROGRAF PRO-300, to bring photos to life through the power of print.

“For all of the Canon research and development team members who worked tirelessly on the production of these new products, today marks the culmination of a long journey. For those people looking for the next great tools to work with to expand their creative possibilities, the door is now wide open,” said Tatsuro “Tony” Kano, Executive Vice President and General Manager of Canon U.S.A.’s Imaging Technologies & Communications Group. “The industry has asked for new products that can push their levels of creativity to new heights, and we are confident that the EOS R5 and EOS R6, alongside the new lenses, lens extenders, and the pro printer, will fulfill those needs and more.”

Canon EOS R5 and EOS R6
Both the EOS R5 and EOS R6 cameras have the ability to capture the action of a variety of fast-moving subjects with impressive accuracy and speed. When using the mechanical shutter, each can shoot up to 12 fps and up to 20 fps when using the completely silent shutter. Both cameras are the first to be outfitted with Canon’s advanced Dual Pixel CMOS AF II which utilizes up to approximately100 percent coverage of the AF area and EOS iTR AF X incorporating AF tracking algorithms using deep learning technology and enhanced readout speed of the CMOS sensor and processing speed thanks to the DIGIC X image processor. The 1,053 automatically selected AF Zones are made even more potent by the ability to detect the human eye, face or head as well as the eye, face or body of animals such as dogs, cats and even birds. Adding to the feature set is the 5-axis In-Body Image Stabilizer, having coordinated control with Optical Image Stabilizer in IS equipped RF lenses. This provides up to 8 stops of shake correction, a feature that many creators have long asked for from Canon. Both the EOS R5 and R6 cameras come with a new LP-E6NH battery with a higher capacity than the previous model.

As the new flagship model in the EOS R series lineup, the EOS R5 camera has features that pack a punch for a variety of users who create both still and video content. It has a powerful 45-megapixel full-frame CMOS sensor and is driven by the speedy DIGIC X image processor, giving wide dynamic range as well as boasting an ISO range of 100-51,200 that is expandable up to 102,400. In a camera full of eye-popping features, one that really stands out is the ability to record uncropped 8K RAW internal video recording up to 29.97 fps and 8K internal video recording up to 29.97 fps in 4:2:2 10-bit Canon Log (H.265)/4:2:2 10-bit HDR PQ (H.265). The camera can also record 4K internal video recording up to 119.88 fps in 4:2:2 10-bit Canon Log (H.265)/4:2:2 10-bit HDR PQ (H.265). External recording in 4K is also available up to 59.94 fps. When in DCI modes, the 8K and 4K video recording is uncropped and Dual Pixel CMOS AF II is available in all 8K and 4K recording modes. Additional features of the EOS R5 camera include:

  • Dual-card slots: 1x CFexpress and 1x SD UHS-II
  • Built-in 0.5-inch OLED EVF with approximately 5.76 million dots and a 119.88 fps refresh rate
  • 3.2-inch 2.1 million dots vari-angle LCD touch screen
  • 5GHz/2.4GHz Built-in Wi-Fi® and Bluetooth Technology with the ability to utilize the image.canon application, as well as optional WFT-R10A wireless file transmitter with Ethernet support
  • Enhanced operating controls such as rear-dial, multi-controller • The ability to voice tag photos and videos
  • Weather, drip and dust sealing on par with the EOS 5D series

The EOS R6 camera is well-equipped with a host of new features to push the limits of creativity for imaging enthusiasts. The combination of the EOS-1D X Mark III based 20.1-megapixel full-frame CMOS sensor and the DIGIC X image processor produces an ISO range of 100-102,400 and is expandable to 204,800. Internal video recording at 4K is capable up to 59.94 fps or 1080p up to 119.88 fps in 10 bit 4:2:2 Canon Log(H.265) or HDR PQ(H.265). The camera also features a built-in 0.5-inch OLED EVF with approximately 3.69 million dots and a 119.88 fps refresh ratevi. Additional features of the EOS R6 camera include:

  • Dual UHS-II SD card slots
  • 3-inch 1.62 million dots vari-angle LCD touch screen
  • 2.4GHz Built-in Wi-Fi®vii and Bluetooth Technologyviii with the ability to utilize the image.canon application
  • Enhanced operating controls such as rear-dial, multi-controller
  • Weather, drip and dust sealing on par with the EOS 6D series

Battery Accessory
The optional BG-R10 battery grip accessory will be available for both the EOS R5 and EOS R6 full-frame mirrorless cameras. The BG-R10 accommodates up to two batteries and is compatible with the new LP-E6NH, LP-E6N and LP-E6 batteries. The convenient BG-R10 grip accessory can also improve handling for users while capturing portrait photography.

Canon RF100-500mm F4.5-7.1 L IS USM
The Canon RF100-500mm F4.5-7.1 L IS USM is a high-performance and versatile super-telephoto zoom lens that will find its way into the bags of many photographers. The compact and lightweight lens features optical image stabilization of up to five stops* of shake correction with three different IS modes, including standard, panning and during exposure only. Two Nano USM motors are at the heart of this lens and provide users with high-speed, smooth and quiet auto focus with a minimum focusing distance of three feet. Additional features of the Canon RF100-500mm F4.5-7.1 L IS USM include:

  • Rotation-Type zoom ring and torque adjustment allows for precision control and feel
  • Customizable control ring that enables photographers to adjust exposure compensation, shutter speed, aperture or ISO
  • 12-pin Communication System
  • Canon L-Series grade dust and weather-resistant construction with a fluorine coating
  • Lens hood with side window allows specialty filters to be adjusted even while Lens Hood is attached
  • Compatible with the new 1.4x and 2x RF lens extenders (from 300 to 500mm focal length)

Canon RF600mm and 800mm F11 IS STM
The Canon RF600mm and RF800mm F11 IS STM lenses are the first fixed focal length super-telephoto RF lenses and are incredibly compact and lightweight. The portability of the new lenses is made even greater due to the ability for the lens barrel to retract and lock in place when the lenses are stowed away and not in use. Diffractive Optics technology helps to reduce the necessary number of lenses and greatly diminish the cost of the lenses, making them affordable for a broader group of photographers. Additional features of the Canon RF600mm and RF800mm F11 IS STM lenses include:

  • Lightweight – the RF600mm weighs approximately 2.05lb and the RF800mm weighs approximately 2.78lb, respectively
  • Compact size, RF600mm measures approximately 7.85inch and RF800mm with measures approximately 11.09inch when retracted, respectively
  • Fixed f/11 aperture
  • Optical image stabilization of five stops* for the RF600mm and four stops* for the RF800mm of Shake Correction
  • Lead screw-type STM enables smooth auto focusing for still-image and video shooting
  • Customizable control ring that allows photographers to adjust exposure compensation, shutter speed, aperture or ISO
  • 12-pin Communication System
  • Compatible with the new 1.4x and 2x RF lens extenders

Canon RF85mm F2 MACRO IS STM
The third RF85mm lens in the RF lineup, the Canon RF85mm F2 MACRO IS STM is compact and lightweight, featuring a bright f/2 aperture helping to capture images that have exceptional bokeh. The lens features a maximum magnification of 0.5x and a minimum focusing distance of 1.15 feet, providing users with macro-photography capability. Additional features of the Canon RF85mm F2 MACRO IS STM include:

  • Optical Image Stabilization with up to five stops* of Shake Correction
  • Hybrid IS compensates for angular and shift camera shake during macro photography
  • Control Ring for Direct Setting Changes.
  • 12-pin Communication System
  • Nine blade Circular Aperture

RF Lens Extenders
Lens extenders have long been a practical and useful tool for a variety of photographers. That story continues with the introduction of the Extender RF 1.4x and Extender RF 2x. The new lens extenders inherit the same high image quality, precision AF and reliability, such as being drip and dustproof, of EF lens extenders. When used in combination with the newly-released compatible lenses, the capturing range can be dramatically increased, providing consumers with additional use cases for their existing RF lenses.

Canon imagePROGRAF PRO-300
Completing the lineup of professional printer options from 13 inches through 60 inches, Canon also unveiled today the new 13-inch Canon imagePROGRAF PRO-300 Inkjet Printer along with a new Premium Fine Art Rough paper. Providing an improved workflow and high-quality output within a smaller footprint compared to previous models, this new printer excels at professional printing performance. Combined with the new Premium Fine Art Rough paper that features a textured surface to express the depth of an image, the printer along with the paper and new EOS R5 or EOS R6 camera introduces a new powerhouse professional imaging trio that meets creators’ demands.

Pricing and Availability
The EOS R5 full-frame mirrorless camera is scheduled to be available at the end of July for an estimated retail price of $ 3899.00 for the body only and $ 4999.00 for the R5 and RF 24-105mm F4 L IS USM lens kit**.

The EOS R6 full-frame mirrorless camera is scheduled to be available at the end of August for an estimated retail price of $ 2499.00 for the body only, $ 2.899.00 for the R6 and RF 24-105 F4-7.1 IS STM lens kit or $ 3,599.00 for the R6 and RF 24-105mm F4 L IS USM lens kit**.

The BG-R10 battery grip accessory and WFT-R10A are both scheduled to be available at the end of July for an estimated retail price of $ 349.99 and $ 999.99**, respectively.

The RF100-500mm F4.5-7.1 L IS USM lens is scheduled to be available in September 2020 for an estimated retail price of $ 2,699.00. The RF600mm F11 IS STM and RF800mm F11 IS STM lenses are scheduled to be available at the end of July 2020 for an estimated retail price of $ 699.99 and $ 899.99, respectively. The RF85mm F2 MACRO IS STM lens is scheduled to be available in October 2020 for an estimated retail price of $ 599.99 **.

The RF Extender 1.4x and 2x are scheduled to be available at the end of July for an estimated retail price of $ 499.99 and $ 599.99** each.

The imagePROGRAF PRO-300 Printer will be available later in July for a suggested retail price of $ 899.99. Premium Fine Art Rough paper will also be available later in July for a suggested retail price of $ 44.99 for Letter size, $ 109.99 for 13” x 19” inches and $ 169.99, 17” x 22” inches**.

For more information please visit, www.usa.canon.com/virtualproductlaunch

** Specifications, availability and prices are subject to change without notice. Actual prices are set by individual dealers and may vary.

Canon RF 85mm F2 Macro IS STM specifications

Principal specifications
Lens type Prime lens
Max Format size 35mm FF
Focal length 85 mm
Image stabilization Yes
Lens mount Canon RF
Aperture
Maximum aperture F2
Number of diaphragm blades 9
Optics
Elements 12
Groups 11
Special elements / coatings One UD lens
Focus
Minimum focus 0.35 m (13.78)
Maximum magnification 0.5×
Autofocus Yes
Physical
Weight 500 g (1.10 lb)
Diameter 78 mm (3.07)
Length 91 mm (3.56)
Colour Black
Filter thread 67 mm

Articles: Digital Photography Review (dpreview.com)

 
Comments Off on Canon’s RF 85mm F2 Macro IS STM is ideal for close-ups and portraits

Posted in Uncategorized


Made in the Shade – Why Taking Portraits in the Shade Can be Ideal

07 Feb

The post Made in the Shade – Why Taking Portraits in the Shade Can be Ideal appeared first on Digital Photography School. It was authored by Rick Ohnsman.

dps-taking-portraits-in-the-shade-pinterest

You’re taking portraits, and it’s time for your subjects’ “moment in the sun.” If you really want them to shine, let’s look at why taking portraits in the shade is the way to go.

I can remember when the recommendation to photographers was to “always photograph your subject with the sun at your back, so the light is on their face.”

I think I read that many years ago on an insert in a box of film. Perhaps the idea was not to wind up with a silhouette with the bright sky tricking the camera into an underexposed subject.

There are no doubt circumstances where you might do it this way, but I’m ready to teach you why the shade is your friend and that of your subject as well.

Taking_Portraits_in_the_Shade_Unshaded_and_Shaded

Make a bad location with your subject squinting into the sun work by shading them. 1/160 sec. f/5 ISO 100. White reflector fill.

Why not to shoot portraits in the sun

Let’s list some reasons you probably don’t want to shoot portraits in the sun:

  • The light will be bright, contrasty, and the shadows will be hard and distinct.
  • Your subject will probably squint.
  • On a hot day, your subject will get hot, and cranky and both you and the subject won’t have much fun.  The photos will suffer.
  • The extremes of the exposure range between highlights and shadows will make getting a good exposure difficult.
Taking_Portraits_in_the_Shade_Mixed_Light

Mixed, speckled, uneven shade…don’t do this!

Why taking portraits in the shade is better

  • The light will be diffuse, less contrasty, and the shadows will be minimal
  • Your subject will relax and open their eyes.
  • On a hot day you and your subject will be more comfortable, have more fun, and the photos will show it.
  • Getting a good exposure will be far easier and you will have less editing later to create a nice image.

Light direction

Obviously, when discussing taking portraits in the shade, we’re talking about working outdoors with the sun as your primary light source. Depending on the position of your subject relative to the position of the sun in the sky, the light can come from these basic directions:

Overhead

Most photographers know that the worst time for photos is mid-day when the light is directly overhead. This is especially true for portraits and even more so if you make the shot in direct sunlight.

Working in the shade has the advantage of allowing you to make portraits during midday since the overhead light is diffused.

Side

If the sun is lower in the sky, you can position your subject, so the light comes from either side. There might be circumstances where you’d want one side of the subject to brightly lit while the other side is in shadow, but generally not. Again, taking portraits in the shade is the answer.

Taking_Portraits_in_the_Shade_Fill_Flash_1

Taken in an alley, the light in this shot was from camera right and above. A fill flash helped fill the shadows and put a nice catchlight in the subject’s eyes.

Front

With the sun lower in the sky, you could position your subject, so, as the film insert I mentioned suggested, the sun was at your back and on the face of your subject. Occasionally this works if the sun is not intense, you have the right background, and you don’t mind a more contrasty look.

Most often you’d still be better, that’s right…in the shade.

Back

If the sun is lower in the sky, sometimes you can make backlighting your subject work. With their back to the sun, their face will be shaded. Now it’s you and your camera that will be looking into the sun.

You will need to be careful with your exposure so as not to make your subject a silhouette or totally blow out the background. Sun flare can also be a problem.

This could be a time for spot metering. You may also wish to use a reflector or fill-flash (we’ll cover that in a minute). Properly done, however, you may get a nice rim-light look.

Open vs closed shade

You will hear the terms “open shade” and “closed shade.”  Let’s define those.

Taking_Portraits_in_the_Shade_Open_Shade

The subjects are in a shaded area looking toward a brighter lit area. This is “Open Shade.” 1/250 sec. f/6.7 ISO 400

Open shade

Even with your subject in the shade, the light will still usually come more from one direction than the other. Your subject will be in “open shade” when in the shade, but the ambient light is strongest on their face.

If you can’t determine which direction this is, walk around your subject. Ask them to turn as you walk so as to keep facing you. The position when the light is at your back (and on their face) is the most “open shade” position.

One advantage of shooting in this position is the light will be brighter on their face, and the catchlights in their eyes will usually be most dominant.

Taking_Portraits_in_the_Shade_Closed_Shade

The predominant light is from behind and the subject is looking into a more shaded area. Fill-flash is used to fill the shadows. This is “Closed Shade.” 1/200 sec. f/8 ISO 200

Closed shade

This is pretty much the opposite of open shade. Your subject is in the shade, but looking into a darker area.

An extreme example of this might be a subject standing just inside a doorway where they are in the shade, but looking inside toward a darker room or area.

Usually, this will not be as good because the background will be brighter than the subject, and the eye catchlights will be minimal if they are there at all.

Taking_Portraits_in_the_Shade_Closed_Shade_2

This is “closed shade” where the predominant ambient light is behind the subject and she is looking into a darker area. Fill-flash brightened her face and filled the shadows. 1/180 sec. f/7.1 ISO 100

Making it all work

It might be a fine idea to suggest you always take portraits in the shade. Usually, though, you also want to consider:

  • your location,
  • what you want in the shot other than just your subject 
  • your background
  • where you and the subject can position yourselves
  • camera angle
  • and many other factors other than just where a shady spot might be. 

If you want to pose your subject in front of that iconic landmark, and you’re there during the middle of the day, you may not have much choice where you position them. 

So let’s discuss ways to use shade where you find it, make shade when you need it, and enhance the light you find while still making the portrait you want. 

Let’s take a look at some examples.

Under the trees

It’s often pleasant in the shade of a tree, and sometimes even the tree itself works well in the shot. Depending on where the light may be coming from, you might be working with open or closed shade, and light coming from various directions.

We’ll cover enhancing the light you might find there in a minute, but here’s a couple of things to keep in mind when working in the shade of a tree or other foliage.

1. Light color

The leaves on most foliage are green (though perhaps other colors at different times of the year). Sometimes the translucent leaves will cast their color on your subject.

Kermit the Frog will tell you, “it ain’t easy being green.”

Green light and skin tones usually won’t be a good mix. Keep this in mind.

Shoot in Raw mode, and if necessary, be ready to tweak your white balance and tint slightly in post-production to back off the green color if it appears.

Taking_Portraits_in_the_Shade_Going_Green

With green foliage above and green grass reflecting from below, your subject may go green – not a good look. Shoot in Raw format, and you can tweak the white balance when editing. 1/60 sec. f/5 ISO 400 with fill flash.

2. Dappled light

When making portraits, deep shade is good. Dappled light, the kind where the leaves put a pattern of light and shadow on your subject is bad – very bad.

You can rarely fix this in editing. So when taking portraits in the shade, always look to be sure the shade is complete, and the light is not dappled and patchy on your subject.

This can be especially tricky with group photos where some subjects may be in the shade and others in the sun. See what you can do to have everyone in total shade or, if that’s not possible, find a spot where you can have the light coming from behind them so at least their faces are shaded.

Taking_Portraits_in_the_Shade_Find_Shady_Spots

Take advantage of shady spots that work with your composition. The object making the shade can sometimes work with your shot. 1/125 sec. f/5.6 ISO 200 with pop-up fill flash.

Other shady spots

Depending on where you’re photographing, there might not be trees but other ways to put your subject in the shade.

Buildings, structures, rocks and cliffs – whatever you might find that works with your shot and vision can be useful.

Something to keep in mind is that other structures or objects might be reflecting light into your shady spot. Your subject might be in the shade, but whatever else that is close by, even the nearby sunlit ground, could reflect light into the scene.

Sometimes you can make this work for you. Other times, particularly if the reflecting object has a strong color, it will reflect colored light onto your subject.

Taking_Portraits_in_the_Shade_Color_Cast_Reflections

With the surroundings painted in warm colors, as well as the opposite red brick, the reflected light is going to be warm as well. Shot in Raw mode, I could adjust as desired later in post-processing. 1/30 sec. f/4 ISO 100

Throwing shade

Most people don’t like it when you “throw shade” on them. However, in photography, this can be a good thing, especially when you want to photograph them in the shade, but the place where you want them to stand isn’t shady.

What to do?

Make your own shade!

Anything you can put between the light source and your subject is going to put shade, aka a “shadow” on your subject.

This could be a piece of cardboard, a 5-in-1 reflector (which we’ll discuss in a minute), an umbrella – you name it. If the object lends itself to the theme of your image, you can even include it in the shot. Just be sure whatever you use is large enough to shade the area you need completely.

If you’re making a full-length image of a person and your 5-in-1 can only shade their upper body while their legs are still in the sun, that won’t look good. You’ll either have to restrict your shot to the shaded area or find something bigger to shade them with.

Taking_Portraits_in_the_Shade_Throwing_Shade

Bad light where you want to make your shot? Throw some shade on your subject! Here, I’ve used the black side of a 5-in-1 to shade the subject. A fill-flash nicely evens out the light, also putting a catchlight in her eyes. 1/60 sec. f/6.3 ISO 100

A Scrim shot

The reason you will usually want to put your subject in the shade is that the direct sun is bright, harsh, and produces hard shadows. In the studio, photographers use diffusion to soften the quality of light. Photo umbrellas and softboxes use a translucent material, which scatters and diffuses the light. It also makes the light source “larger” relative to the subject.

This can work outdoors with the sun as well. Rather than use the pinpoint of intense light that is the sun, instead, put the translucent panel of a 5-in-1 between the sun and subject to make the light source larger relative to the subject. It will also make the light more diffuse.

Need something bigger? A translucent shower curtain or piece of white nylon cloth can work well if you have a frame or helpers to hold it.

Of course, there are commercial versions of this if you will be doing a lot of outdoor portrait photography and have the budget.

Taking_Portraits_in_the_Shade_Reflected_Fill

On a sunny day, you might be surprised on how much fill the silver side of a 5-in-1 will throw.

How about some fill?

So you put your subject in the shade, they’re happy, their eyes are open, you like the composition, but now you see the subject is darker than you’d like. What can you do?

It’s time for a little fill light.

There are several ways you can (and often should) add additional light to your subject.

Let’s cover a few.

Reflectors

I mentioned a 5-in-1 reflector above. This is a portable, and usually collapsible, disk typically covered with translucent fabric. Use it alone as a scrim, as we just discussed.

It then has a zip-on cover that is black on one side, white on the other, and turned inside out, silver on the inside and gold on the reverse of that.

Variations exist. So, 1) Scrim, 2) Black, 3) White, 4) Silver, 5) Gold = a 5-in-1.

You can use the colored side to reflect light onto your subject. Black is the side to use when you want to shade the subject. The white will give a softer, less intense light while neutral in color. Silver is the most intense and can be a slightly cooler light, while the gold will warm your subject.

For photographers doing outdoor portraits, I’d almost consider a 5-in-1 reflector mandatory. It is that useful. There are many brands, styles, and sizes. I have a 42″ (106cm) Interfit brand as well as a little 23″ (59 cm) version that, when collapsed, is just 9-inches (23 cm) and fits nicely in my photo bag.

Taking_Portraits_in_the_Shade-5_in_1

One device, 5 ways to use it – a 5-in-1 reflector. I think all outdoor portrait photographers should own one, or even a few of these in different sizes.

Doing it “on-the-cheap” you can also use a piece of white poster board or foamcore.  It has the disadvantage of being less portable, but the advantage of being available in very large sheets if you need that big of a reflective panel.

Fill-Flash

If the only time you use a flash is indoors, at night, or in dimly lit situations, you’re missing a real use of this lighting tool.

Shooting subjects in the shade and then filling the shadows with a touch of flash works exceptionally well, especially with most cameras doing a great job of balancing the fill light using ETTL (Evaluative Through-the-Lens) exposure control.

If you are a new photographer just getting into outdoor portraiture and have a camera with a pop-up flash, I’d strongly encourage you to shoot in the shade and use the pop-up flash for every shot.

Even on sunny days with plenty of light, that little extra flash will fill shadows and put a nice catch-light in your subject’s eyes.

Your portrait photography will improve tremendously. As you advance, a Speedlight is the next step, and beyond that, a fill-flash you can use off-camera.

Backlit/Golden hour/Rim light

Photographers love the “golden hour,” that time in the morning or evening when the sun gets low, and the light is warm. You can make beautiful portraits in such light.

Often you can pose your subject with the light behind them, and the golden glow will rim-light their hair with a beautiful look. (Visualize a model on the beach with the setting sun behind them).

To get some light on your model’s face and better balance the exposure between them and the background, it’s time for some fill light. A reflector or fill-flash will do the trick.

One advantage of the reflector is that you’ll be bouncing the same warm light back onto their face and so your white balance will be consistent.

If you use a flash, consider putting a warming gel on it to better match the color of the background light.

Taking_Portraits_in_the_Shade_Backlit_and_Filled

Here the subject is standing in full sun. With the light from behind, her face is shaded. I used the bright silver side of the reflector for fill. You may need to “feather” the reflection slightly by adjusting the reflector position as it can easily become too bright and make your subject squint. 1/160 sec. f/5 ISO 100

Nature’s Softbox

The average person would think a “nice day for portraits” would be that beautiful, sunny, cloudless “bluebird day.”

They’d be wrong.

On such days you’ll really need the tricks we’ve explored here and should be taking portraits in the shade.

If, however, the day you’ve scheduled to do that outdoor portrait shoot should be overcast, consider yourself blessed, especially if you need to shoot at midday. Now, instead of that harsh, pinpoint light source of the sun with associated hard shadows, the entire sky becomes your light source – “nature’s softbox.”

Taking_Portraits_in_the_Shade_Full_Shade

Made in the shade…This one was done in full shade and filled with flash. Note the catchlight in her eyes. 1/40 sec. f/4 ISO 100

Now the challenge might become working with light that is too flat. The effect of your reflector will be much less on a day like this, but your portable flash could perhaps now become your key light. It can give you just enough contrast to make your portrait more dimensional and interesting.

I’ve also just started exploring the use of portable LED lights for portraiture and purchased a Lume Cube.

This small and intense little light doesn’t immediately strike me as something I’d use for the standard portrait, but when taking portraits in the shade or on overcast days, perhaps it could work into the mix.

After I’ve had more experience with it, perhaps I’ll cover how you can use such a device in a later article.

Go do it and show us your work

It’s always great to see photographers putting new knowledge to work, so we’d love to see the images you make when taking portraits in the shade.

Post your images in the comments below and tell us a little about what you did.  Best wishes!

The post Made in the Shade – Why Taking Portraits in the Shade Can be Ideal appeared first on Digital Photography School. It was authored by Rick Ohnsman.


Digital Photography School

 
Comments Off on Made in the Shade – Why Taking Portraits in the Shade Can be Ideal

Posted in Photography


How to Define Your Ideal Photography Client

21 Feb

The post How to Define Your Ideal Photography Client appeared first on Digital Photography School. It was authored by Mat Coker.

Many photographers in business struggle because they fail to understand who their ideal photography client is. Your ideal photography client is the person you love to work with and who wants exactly what you offer.

When you understand the sort of person who would want to hire you, you can speak directly to them in your social media and on your website. And when they stumble across your work, they will know that you are the one they want to hire.

After a couple of years of experience in business I began to tailor what I want to offer to the people I wanted to work with.

1. Do they want what you offer?

First, you need to determine what you want to offer as a photographer. What is the end product you want to deliver?

That decision includes digital or prints, the number of photos you wish to deliver, your style, number of hours put into the job, retouching, etc.

You may be deciding between:

  • Studio/outdoors (on location)
  • Posed vs candid (lifestyle)
  • Digital vs print
  • Many photos vs few
  • Your vision or theirs
  • Just photography, or a line of products

First, figure out what you want to offer, then match yourself up with people who want what you offer. Don’t be sidetracked by people who say you should be offering something else. Limit yourself to what you actually want to pursue and deliver (but feel free to experiment too).

I offer outdoor family photo sessions that focus more on candid moments than posed ones. I provide families with a digital gallery of 100+ photos. This is what I like to give. I like to spend time with the family and then give them lots of photos to enjoy.

My ideal family wants a lot of photos that they can turn into photo books, etc. I’m thrilled to spend an hour with a family photographing an adventure and then showing them all the fun photos I made.

When somebody contacts me for one posed print I send them to another photographer who specializes in that.

2. Match your approach with their personality

Your personality and approach to your photography is part of what you’re offering.

It may be the case that people want what you offer, but they don’t like your personality or approach.

Don’t take this personally. After all, there are many potential clients that you wouldn’t want to work with either.

For example, some lifestyle photographers take a photojournalist approach to their sessions and will not interrupt the scene. They give very little direction. While other lifestyle photographers direct and control every aspect of the session. The end product may be a collection of candid-looking photos but one photographer micromanaged every detail of those moments while the other influenced very little.

Whatever your approach to photography is, there will be people who don’t like it. Be clear about your personality and the way you work and you will naturally repel people you wouldn’t want to work with and attract the ones you do.

If you’re assertive and take charge, let people know.

If you need space to work out your vision and don’t want constant input from the client, let them know.

I always let parents know there needs to be room for play and fun in our sessions. It’s hard for some parents to let their kids have fun, but when they do the photos show it.

3. Look below the surface

As you seek to attract your ideal client, don’t assume that your ideal clients will have the details of their lives in common with each other or with you.

My ideal customers are quite different on the surface. Some of them live in the country, others live in big cities. Some are covered in tattoos, others have none. They work in offices, the trades, or are entrepreneurs. Some spend nothing on their wardrobe, some spend more on it than the photos. But it’s not what’s on the surface.

My ideal customers are families who love each other. They are creative and want a playful photo session. They like candid moments. They love the human nature that I portray in my photos. They enjoy receiving a gallery filled with digital photos that they can share online, and make photo books and gifts with. Family is everything to them and to me.

What to do when you’re stuck with terrible clients

No matter what sort of photography business you run, you’re going to end up working with the wrong clients sometimes. That’s okay.

Working with the wrong clients helps to reinforce who the right ones are.

When you can learn to make the wrong clients happy, you’ll do even better with the right ones.

Learning to work with people who don’t share your vision will help you to grow. You may even learn something in the process that you wouldn’t have learned otherwise.

I try my best not to attract clients who are too nervous to have fun, or who only want one or two quick shots, or who are too miserable to enjoy the session. But occasionally those people hire me and I do my best to make them happy anyway.

Who is your worst client?

If you’re not sure who your ideal client is, begin by describing the client you don’t want to work with. Then list the clients you’ve been happiest to work with. What did you like about working with them? What did they like about working with you? What was their personality like? Tailor your marketing toward people like them.

The post How to Define Your Ideal Photography Client appeared first on Digital Photography School. It was authored by Mat Coker.


Digital Photography School

 
Comments Off on How to Define Your Ideal Photography Client

Posted in Photography


Landlords Insurance policy – Ways to Learn the ideal Rates

01 Apr

Should you are classified as the proprietor of any built up house, professional or residential, you have to take measures to guarantee its protection and reduce your financial liability in the event that anything takes place to it. Landlord and commercial assets coverage offered by a variety of non-public and community businesses let you to definitely try this quite simply. All you have got to do will be to establish your needs and after that narrow down on an insurance policy enterprise that will supply you with this assistance. A variety of difficulties including theft, non payments of rent, destruction a result of tenant, fireplace, flooding,water damage from flat above who is liable other natural disasters as well as terrorism is roofed by these policies. If just one coverage doesn’t include all your wants pick out a mixture of procedures which will provide you with utmost protection.

Precisely what is Landlords Coverage?

The landlords insurance policy shields the proprietor of a house from any money liability resulting from injury attributable to fire, explosion, flooding, lightning, earthquake, theft, storm and destructive damages. The objects lined by a policy will vary from a single organization on the other. Accidental destruction, lease warranty insurance policy, legal responsibility insurance policy, terrorism, contents insurance policy and lawful protection are a few on the other challenges that will be included by a landlords insurance. Anyone who has a household or other professional areas within their possession need to acquire commercial home insurance plan so that you can shield it from damage due to the lessee or other external variables.

Ways to Pick out the best Landlords Insurance policies Supplier

Your preference of coverage supplier might be depending on the charges that they give. Think about a minimum of five diverse insurance coverage providers before you narrow down to the one that satisfies your necessities. Regardless of whether the costs usually are not the best, you could decide on to go with a particular organization because of the exceptional services they provide or your past working experience with them. The online market place is actually a very good location to start out your exploration concerning the various coverage providers plus the procedures they supply for industrial property insurance policies. You’ll be able to also seek advice from using your spouse and children and friends who have up to now taken insurance policies guidelines from these companies.

More Guidelines and Altering your Insurance provider

If one plan will not include all of your wants, you can constantly opt for extra policies that happen to be designed for unique issues. Discover regarding their availability prior to you strike a offer along with the insurance coverage business. If for virtually any cause you happen to be dissatisfied using the landlords insurance coverage you at this time have or it does not satisfy several of the threats which you think your assets is beneath, then alter to the distinctive company. Enquire regarding the paperwork involved and how significantly it’s going to charge prior to you are taking action.

The post Landlords Insurance policy – Ways to Learn the ideal Rates appeared first on Photonovice.

Photonovice

 
Comments Off on Landlords Insurance policy – Ways to Learn the ideal Rates

Posted in Equipment


The D850 is Nikon’s best video camera yet, but it’s not ideal for beginners

23 Oct

What’s it like to use D850 as a video camera?

Despite there being a mirror between the sensor and the thing you’re trying to film, the D850 is a pretty capable video camera

SLRs weren’t really designed for video but, thanks to the pioneering work of the Canon 5D Mark II, it’s increasingly expected to be a feature they offer. Nikon has struggled more than its big rival in this respect, not helped by a reliance on contrast detect AF and a lens mount designed around the assumption that you’d never need to change aperture while taking a shot. It’s also been somewhat held back by not having a camcorder or broadcast equipment division to lean on during the development process.

Despite all these hurdles, the D850 is the company’s most capable video camera yet, with 4K capture taken from the full width of the sensor. But how videographer-friendly is accessing this capability? And, just as importantly for this do-everything super camera, what’s it like to use for stills shooters, such as wedding photographers and photojournalists who’re increasingly being asked to capture clips as well as stills?

Features

Beyond the headline specs: 4K UHD capture from the full sensor width or 1.5x crop and slow mo 1080 from 120 fps capture, Nikon has added a host of features to make video capture easier.

The most obvious of these features is the addition of focus peaking to help indicate the plane of focus as you shoot. As is fairly common, there are three settings for peaking intensity and a choice of four colors. In addition, there’s a zebra-style highlight warning for setting exposure. But, as we’ll see, having a feature and having it well implemented are not always the same thing.

Having a feature and having it well implemented are not always the same thing

Other features include a Flat Picture Control color profile, which uses a low-contrast tone curve to avoid clipping to black as aggressively as the standard stills profiles do. Some users have tried to create Log or psuedo-Log profiles using Nikon’s Picture Control Utility software, but we’ve not had a chance to test any of these yet, and we’ve not heard of any attempts to build LUTs to simplify the grading process.

There are some other nice touches, too. The camera records its starting aperture and ISO setting along with other shooting metadata such as Picture Style and D-Lighting setting with each clip. This is something you take for granted as a stills shooter, but without any widely-adopted equivalent of the EXIF standard, it’s still pretty rare for the kinds of hybrid stills/video cameras we usually encounter.

The experience

The experience doesn’t always live up to the promise that this list of video-friendly features might imply. Sadly, it’s the headline features that fail first.

The D850 has focus peaking but it can’t be used when you’re shooting 4K. Or when you’re using electronic stabilization. Or Slo-Mo mode. Or when you’ve got highlight warnings engaged. Or in combination with Active D-Lighting. Which, in my experience, isn’t that different from not having focus peaking at all.

The highlight warnings are a lot better. They’re easily engaged* via the touchscreen and persist across the different view modes (grid view, histogram, audio meters, virtual horizon) as you cycle through them. They’re fairly simplistic, though, only indicating areas brighter than the threshold, so they can’t be set to indicate regions that are roughly 75% for Caucasian skin tones, for instance. Also, this threshold is specified in 8-bit brightness values, not IRE %, as is more common.

Then, of course, there’s video autofocus, which is every bit as bad as you’d expect of a system designed around contrast detection using lenses that weren’t. It’s jumpy and indecisive, even when asked to pull focus between two stationary objects.

However, the touchscreen access to many key settings is very good, allowing you to adjust the audio capture on-the-fly without the need for any noise or vibration-creating button presses.

Better still is the option to use the two buttons on the camera’s front plate to adjust either exposure compensation (if you’re using Auto ISO to maintain brightness in manual exposure mode) or Power Aperture, the smooth, motor-driven aperture control mode. These buttons are easily accessible as you shoot, without causing too much camera shake.

What does this end up meaning?

For experienced videographers, none of these are issues you can’t work around to one degree or another. Planning shots to minimize the need to refocus or ‘blocking’ a shot so that any movement is predictable are pretty basic techniques. When working this way, using magnified live view or tap-to-focus single AF to set initial focus then using the lens distance scale to judge movement may be enough.

Alternatively, adding on an external recorder will often bring much more powerful versions of Zebra and Peaking tools where the D850 fumbles, as well as features such as waveforms and false color that are vanishingly rare on hybrid cameras anyway.

Videographers are likely to appreciate the features gained from Nikon’s well-polished stills interface

The camera’s HDMI output is limited to an 8-bit 4:2:2 stream, so there won’t be a big hike in quality, but the videographer willing to experiment with homebrew Log-like profiles will no doubt find it a very capable camera. Ultimately, the D850’s video quality is easily good enough to make these sorts of workarounds worthwhile.

Videographers are also likely to appreciate the degree to which the video side of the camera has gained from Nikon’s well-polished stills interface. Hold the ISO button and the rear dial changes ISO while the front toggles Auto ISO, hold the WB button down when one of the camera’s 6 (!) Custom WB values is selected and you can set a new custom value at the tap of the rear controller. It’s pretty slick when you’re out and shooting.

For stills shooters

For the less experienced video shooter the D850 is likely to be quite a handful, though. Without usable autofocus, you’ll need to learn how to manual focus and minimize the need to, to work around the camera’s shortcomings. This makes it challenging for anyone who can’t control or choreograph the action, which is likely to include exactly the sort of wedding photographers and photojournalists who might be attracted to the D850.

However, you won’t need to learn too much about video exposure in order to make use of highlight warnings and the simple aperture control on the camera, beyond basics such as the 180 degree shutter ‘rule.’

This is helped by at least one feature we’ve been requesting for many years: the camera retains two banks of shooting settings, one for stills, one for video. This means you can specify a custom white balance and color profile and choose exposure settings (including ISO behavior) for video, then jump back to your stills settings at a moment’s notice.

In a clever piece of design, you can even define a button let you check your stills settings, while you’re shooting movies, so you need never be caught out. But this two-setting design is perfect for wedding shooters, who can hit the shutter button to shoot a grabbed still, fractions of a second after capturing some video footage, without the risk of everything looking, well, a bit Flat.

It’s also worth noting that the “e-stabilizer” mode that’s available when shooting 1080 footage is very impressive, making on-the-go handheld shooting a realistic proposition. Better still, its resolution is near indistinguishable from the unstabilized variety, so you can shoot both and intercut at will.

Overall, then, there’s a lot to like about the D850 and Nikon deserves recognition for putting a lot of thought and effort into making its video capture better. However, it does little to make video any easier to shoot for video novices in a way that Canon’s Dual Pixel AF system does. For now, at least, you still need to build up plenty of videography experience to work your way around the D850’s wobbly AF and occasional quirks.


Articles: Digital Photography Review (dpreview.com)

 
Comments Off on The D850 is Nikon’s best video camera yet, but it’s not ideal for beginners

Posted in Uncategorized


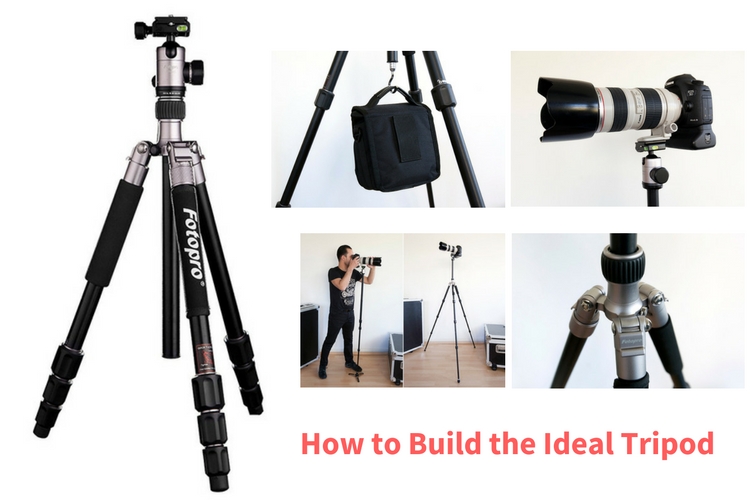
How to Build the Ideal Tripod

14 Dec

When I got into photography more than 20 years ago, I remember spending all my hard earned money on a brand new camera. It was a shiny beautiful brand new Pentax K1000 with a great 50mm f/1.8 lens. I was almost flat broke and all I could afford to buy after that was a roll of B&W Ilford HP5 film to try the camera out. Some time went by until I could afford to buy anything else photography related, but I remember that the next item on my list was a tripod.

I bought one of those cheap aluminum tripods that lacked a lot on the steadiness side. It served me well for a few years until one day it totally fell apart with my precious camera mounted on it. Of course, nothing serious happened because those cameras were built like a tank. It’s amazing the kind of abuse they could take and just keep on working flawlessly like a Swiss clock, but that day I promised myself I would never buy another cheap tripod again in my life.

Building the Ideal Tripod

What is the perfect tripod?

As I started growing up in the photography business, I tried out a lot of different things, from really light carbon-fiber tripods to huge studio columns for large format cameras. The fact is that there is no perfect tripod out there.
Different cameras and different situations require different tripods.

You have to accept that it is a compromise between lightness, steadiness, and versatility, and make your choice.

Honestly, I own more tripods than I would like to admit. The fact is that I always have a really hard time picking the right tripod every time I have to go out on an assignment. So recently I put myself on a quest to search for a nice tripod that would fit most of my needs and would not break my piggy bank.

Building the ideal tripod

The shopping list I am about to describe was made after some serious research. I kept in mind the best price, quality products, and the kind of work I do, which ranges from portraiture to architecture, with a lot of landscaping in between, mostly done on the go. So these choices may not be everyone’s cup of tea, but they work great for me.

Best tripod 01

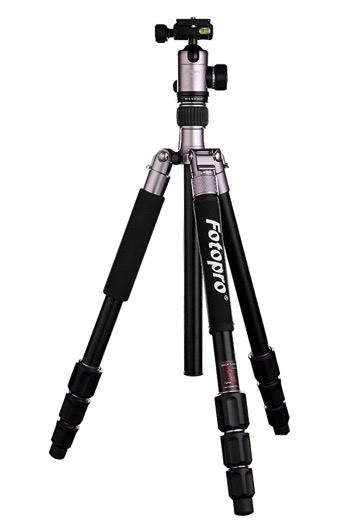
The Fotopro CT-5i tripod.

If you take a look around, you’ll see that there are hundreds of tripod manufacturers on the market. If you eliminate the top brands and focus on the regular consumer brands, you’ll see that many times the same product is sold under different brand names, many times with very different prices.

The thing is that most of these products are made in China, and then exported around the world and sold under the name of local brands. To buy this kind of product is a game of chance because they range from fairly well-made to really bad knock-offs of famous brands made with cheap materials.

Starting with the Fotopro CT-5i tripod

The Fotopro CT-5i I decided to buy is a really good compromise of a good product with a really nice price tag. This particular tripod configuration is used by different manufacturers. You can find this product being sold under different brand names with slight differences.

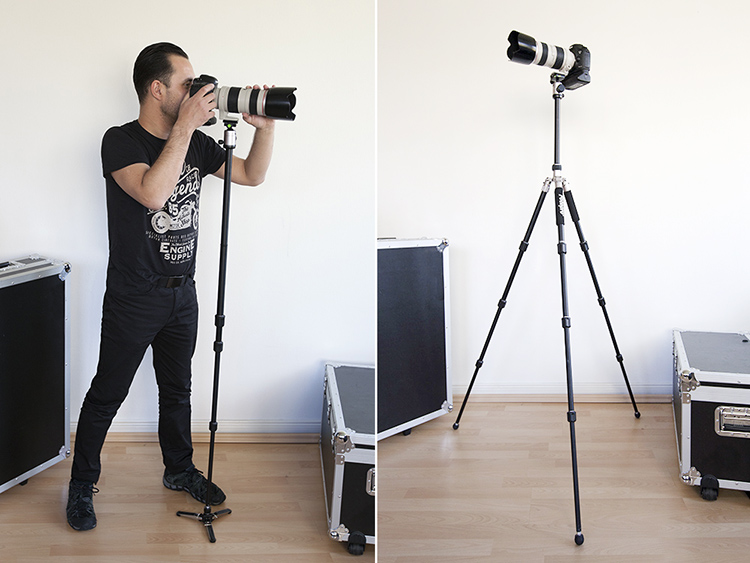
It is a four-section aluminum tripod that weighs 1.38kg (3.04 pounds) and is as small as 43cm (16.9 inches) when folded. It is able to support up to 8kg (17.6 pounds) and extend up to 1.57 meters (5.15 feet).

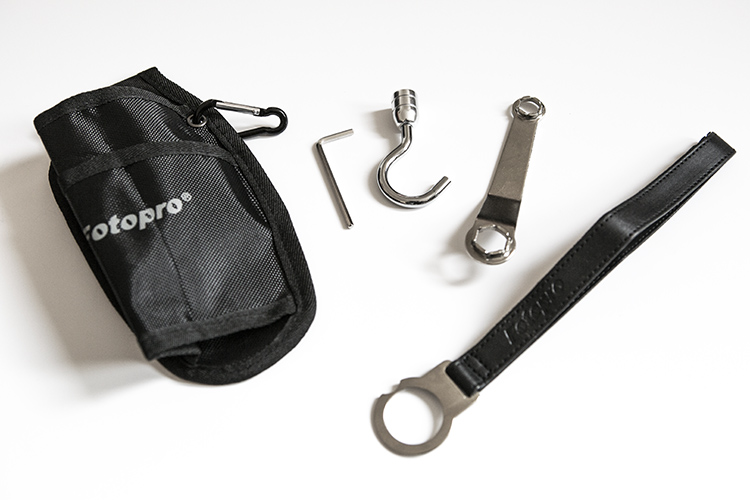
These specifications are perfect if you want a transportable tripod that is sturdy enough to hold a DSLR with a heavy lens, with the ability to remove one of the legs and convert it into a monopod, which is a major plus in my opinion. It also comes with a transport bag and a few handy accessories such as:

  • A belt holder for transport or for a monopod steady stand
  • A couple of hex wrenches for tripod maintenance
  • Hand strap
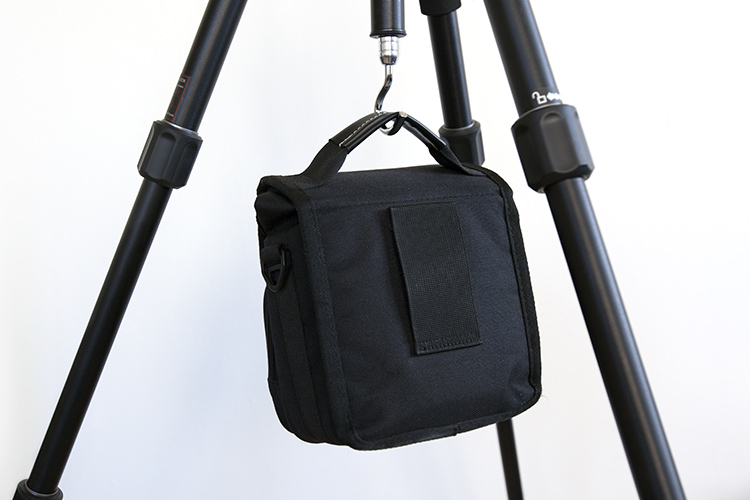
  • A sturdy hook to hang some weight and make the tripod steadier

Best tripod 02

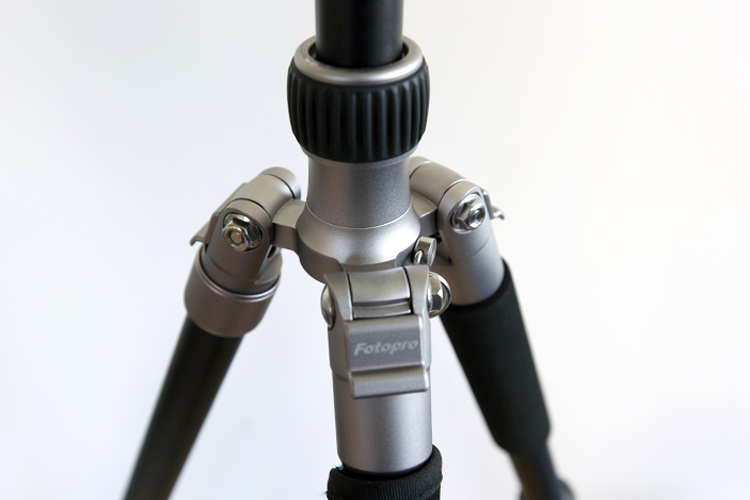
It has a moveable central column and a really clever latch design that opens the legs in three different angles.

Best tripod 03

Customizing my ideal tripod

Even though the design of the product is really good, after using it for a couple of months, I realized I could improve it with a few simple modifications that would make my job easier.

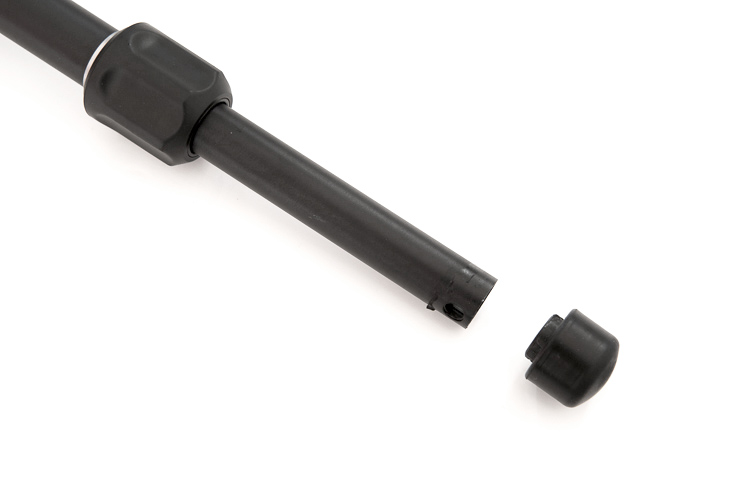
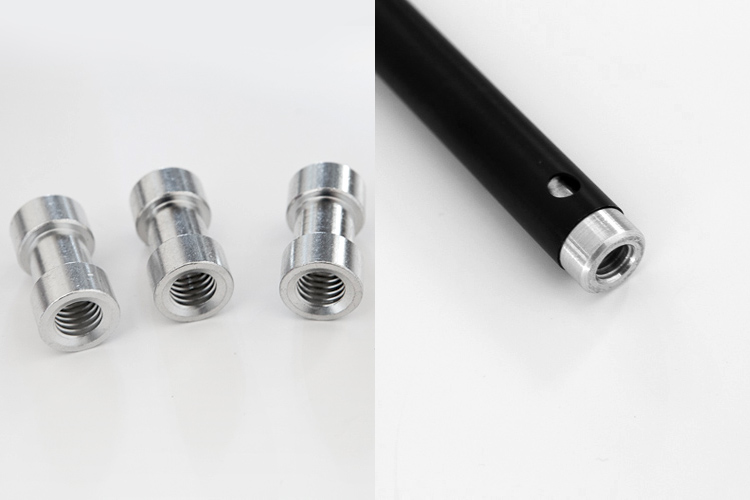
The first task was to remove the original rubber feet and replace them with a set of spigots with a 3/8″ thread.

Best tripod 04

Best tripod 05

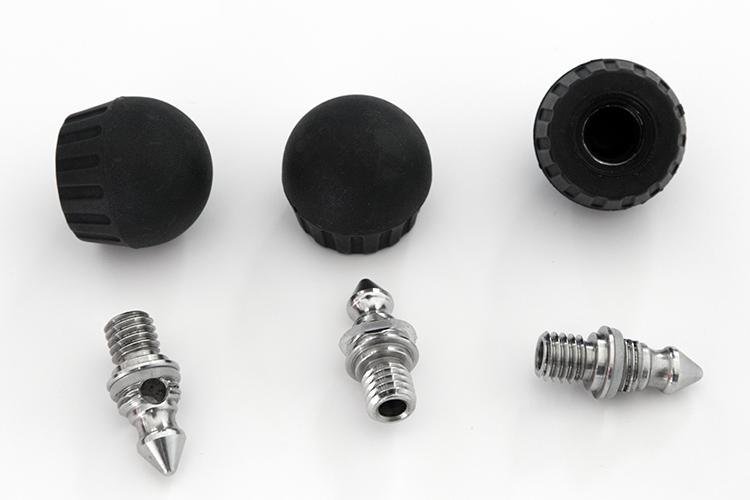
With a little bit of grinding they get a tight fit inside the tube, and now they just give me new attachment possibilities, like these spikes or rubber feet that I can use in different types of ground.

Best tripod 06

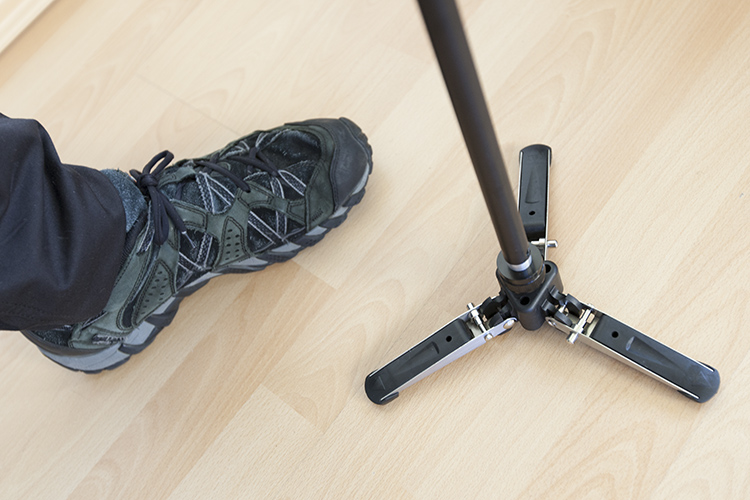
Or I can add a 3-legged locking base to the monopod.

Best tripod 07

It’s a simple modification that adds a lot of versatility, enabling features that are only seen in really high-end brands.

Best tripod 08

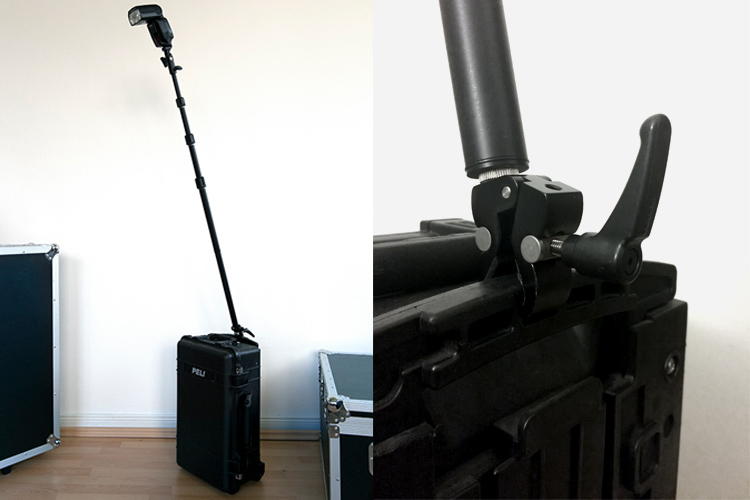
The monopod can also be used as a boom arm or, if I’m in a rush, I even use it as a light stand attached to something like my hard case with a heavy duty clamp.

Best tripod 09

You can also improve the steadiness of the tripod by just hanging something on the hook of the central column like for instance your photo bag.

Best tripod 10

Accessories

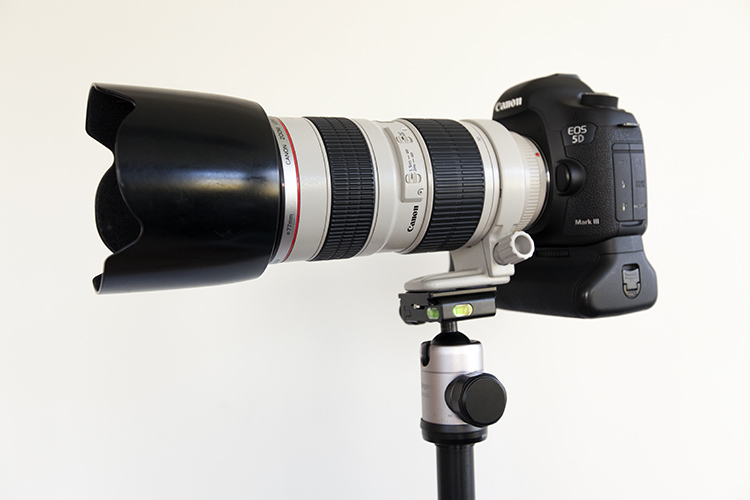
The ball head is a medium size one, with an Arca Swiss style plate able to perform smooth panning movements, even though I have to admit that the knobs don’t offer the best grip, but they do the job.

The bubble levels on the plate base are a good help when you need to check your horizontal or vertical indicators. It seems very well balanced and steady with a DSLR with a heavy 70-200mm f/2.8 lens using the collar attachment.

Best tripod 11

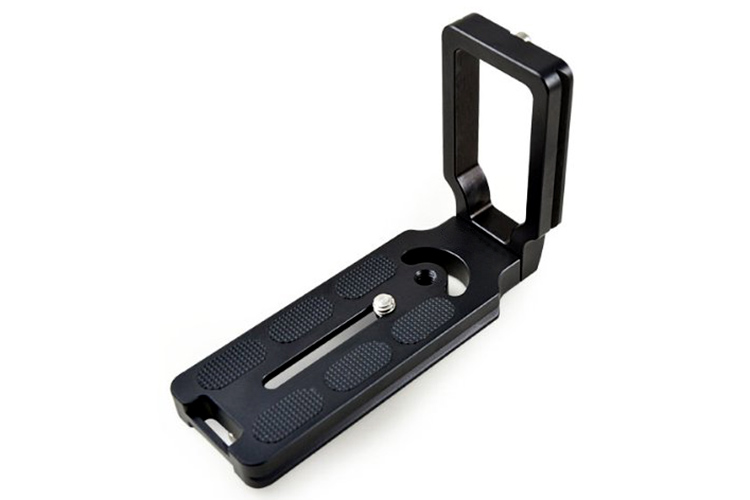
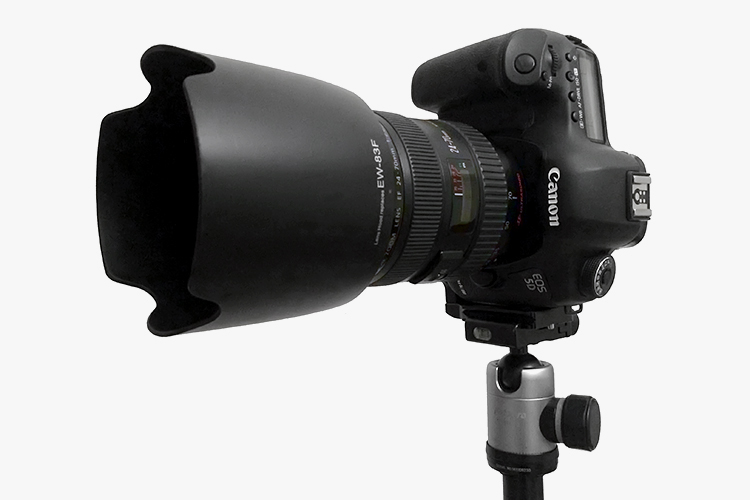
It doesn’t perform that well when you use the camera base screw attachment and turn it to the vertical position, making it totally out of balance. This is the reason why I use an L-Bracket most of the time.

Best tripod 12

The bracket keeps the camera in line with the tripod column, making it balanced and not tilted off-side when you use it in the vertical position.

Best tripod 13

Bottom Line

Sometimes you have to adapt the tools you use to your needs. These customs modifications and add-on accessories just made this tripod a lot more useful to me, making my job much simpler when I have to use one.

What about you, have you done any custom adaptations to your tripod? Please share your ideas in the comments below.

googletag.cmd.push(function() {
tablet_slots.push( googletag.defineSlot( “/1005424/_dPSv4_tab-all-article-bottom_(300×250)”, [300, 250], “pb-ad-78623” ).addService( googletag.pubads() ) ); } );

googletag.cmd.push(function() {
mobile_slots.push( googletag.defineSlot( “/1005424/_dPSv4_mob-all-article-bottom_(300×250)”, [300, 250], “pb-ad-78158” ).addService( googletag.pubads() ) ); } );

The post How to Build the Ideal Tripod by Ivo Guimaraes appeared first on Digital Photography School.


Digital Photography School

 
Comments Off on How to Build the Ideal Tripod

Posted in Photography


Reader’s concept prompts question: what would your ideal camera be?

20 Oct

Enthusiast.png

What does your dream camera look like? One of our more enterprising readers has sketched-out what his would look like – creating an interesting contemporary rangefinder concept. Bristling with Nikon F4-inspired manual controls, each dial and switch also has a ‘neutral’ position to allow the on-screen interface settings to take precedence. Easycass acknowledges the concept may not be entirely possible – an ‘ultra-fast’ 24-105mm lens would dictate a fairly small sensor, and autofocus rangefinders have never exactly been commonplace – but it raises questions the question: ‘What would your perfect camera be?’

News: Digital Photography Review (dpreview.com)

 
Comments Off on Reader’s concept prompts question: what would your ideal camera be?

Posted in Uncategorized


In Pursuit of the Ideal Time-lapse Camera Bag: Gura Gear Bataflae 32L

16 Oct

What is the best camera bag for time-lapse photographers?
Welcome to my quest.

I’ve been shooting time-lapse photography for several years and in that time some great gear innovations have come about. Back when I started exploring time-lapse photography a tripod, camera and intervalometer were all you needed so a standard camera bag was enough. Now that motion control dollies, robotic tripod heads, large batteries and computers are involved a simple camera bag often isn’t enough. Until recently I’ve been using my old camera bag and slowly adding smaller camera bags to the mix. It hasn’t been the most efficient way to travel and eventually I settled on traveling light with only my time-lapse gear in a smaller ThinkTank Sling-o-matic 10 bag that easily fits my eMotimo TB3, a battery, remote, a level and 1-2 lenses or a body & lens. Still I’ve been yearning for more… a bag that I can put everything in, work easily out of it and still travel with (car or plane).

Gura Gear Bataflae 32L

The folks over at Gura Gear were kind enough to let me try out their latest camera bag the Bataflae 32L. In case you’re unfamiliar with the meaning of Bataflae it is Bislama (Vanuatu) for ‘butterfly’, which makes perfect sense when you begin to work with the bag. Rather than have one large flap that opens and closes to access the main storage area of the bag, you can access half the main storage area like a toolbox or open the bag like your standard bag. Personally I’ve fallen in love with the ability to access my gear with greater flexibility. The butterfly design alone makes the bag awesome. Every time I’ve gone back to using a standard camera bag I’ve tried accessing half the main storage area only to be bummed that I can’t. It’s such a simple innovation that after you use it you can’t believe someone hadn’t thought of this before.

Gura Gear Bataflae 32L

Other features that I found to be rather slick include the ability to store the backpack straps for snag free travel, an extra handle on the side of the bag enabling you to lift the bag more easily and extra large side pockets to carry a tripod or in my case components of my time-lapse dolly. The bag comes in two models the Bataflae 32L and Bataflae 26L. The Bataflae 32L has external dimensions of  14 x 21 x 9 inches (36 x 53 x 23 cm) and internal dimensions of 13 x 20 x 7 inches (33 x 51 x 18 cm). The smaller Bataflae 26L has external dimensions of 14 x 18 x 9 inches (36 x 46 x 23 cm) and internal dimensions of 13 x 17 x 7 inches (33 x 43 x 18 cm). The cost for the 32L is $ 449 and 26L is $ 399. Yes a bit pricey, but the material, construction and flexibility make this a great choice. One of the things that attracted me to the 32L was the prospect that I might fit Dynamic Perception Stage One modular dolly rail sections in the bag. These modular rails measure 21″ long and they’re just a bit too long to fit inside without altering the bag. Where there is a will, there is a way I suppose. I’m sure they could be squeezed inside, but I found it workable to store these modular sections in the external side pockets designed for tripods and keep the interior of the bag looking like new.

Gura Gear Bataflae 32L

One question I’ve received after releasing my eMotimo TB3 review was, “How do I carry everything?” Clearly having an assistant would be ideal to help cart around cameras, lenses, dollies, tripods, etc. In the past I’ve saddled up like a mule carrying my ThinkTank Sling-o-matic 10 bag and two tripods (in two bags clipped together with one shoulder strap) over my back with my free hands then carrying my Dynamic Perception Stage One dolly. Clearly having an assistant would be easier on the back. The Bataflae 32L looks to be a more comfortable and flexible solution if you’re aiming to be a bit more mobile in the field.

See more photos after the jump

Gura Gear Bataflae 32L half open with my time-lapse gear (Stage one dolly sled, 8 modular rail extensions, eMotimo TB3, battery, remote and tools)

Gura Gear Bataflae 32L half open with my camera gear (5D Mark III, 5D Mark II, Canon 16-35mm f/2.8 II and Stage 1 dolly ends/tripod plates)

Gura Gear Bataflae 32L open in the standard manner with all my gear

Gura Gear Bataflae 32L containing all my time-lapse gear plus two Indura tripods

Gura Gear Bataflae 32L containing all my time-lapse gear plus two Indura tripods in their cases ready for travel

Copyright Jim M. Goldstein, All Rights Reserved

In Pursuit of the Ideal Time-lapse Camera Bag: Gura Gear Bataflae 32L

flattr this!


JMG-Galleries – Jim M. Goldstein Photography

 
Comments Off on In Pursuit of the Ideal Time-lapse Camera Bag: Gura Gear Bataflae 32L

Posted in Equipment