RSS
 

Posts Tagged ‘highly’

Game Boy Camera gets new life as a low-resolution, highly impractical webcam

05 Sep

Hardware modder, retro gaming enthusiast and Everyday Carry co-founder Bernard Capulong has come to the rescue of an anonymous Redditor who recently expressed their desire for pettiness on the social media platform. The result? A video demonstrating the use of an old Game Boy camera as a modern, live webcam.

On Tuesday, September 1, a Redditor known only by the handle ‘/u/eye_for_an_homunculi’ posted a question on the Game Boy subreddit: is it possible to use an old Game Boy camera as a webcam? The reason, Homunculi explained, was to use the camera as a type of petty ‘gotcha’ in protest of ‘a long list of insane rules’ he or she had to follow when taking an online exam.

It didn’t take long before Capulong dropped a comment demonstrating that it is possible; he shared an image of his setup, as well as video captured using the Game Boy camera as a webcam. The process is expensive if you don’t have the right hardware and fairly convoluted, Capulong explained, making it quite impractical but nonetheless fun.

According to the video demonstrating the project, the Game Boy camera is run off a Super Game Boy 2, the adapter cartridge used to play Game Boy games on the Super Nintendo (SNES) for a bigger-screen experience. Things get a bit more complicated from there, however.

According to Capulong, the adapter cartridge is used with the Analog Super NT, an FPGA-based SNES that includes an HDMI for use with modern displays. Using this HDMI-out functionality, Capulong ran the video signal to an Avermedia Live Gamer ULTRA external capture card, which was then connected to a Windows laptop over USB-C.

Naturally, some interested users wanted to know whether it is possible to do this setup with the OEM SNES console, which quite obviously does not have an HDMI port. In response, Capulong said that while it is technically possible, it would require more effort, including an upscaler cable that would be able to deliver an HDMI signal to the capture card, ultimately increasing the cost and effort involved.

The end result is a novelty that isn’t very useful — many modern webcam applications include filters that could simulate the low-resolution appearance without the convoluted setup and extra costs. With that said, going with the more practical option is considerably less fun.

Articles: Digital Photography Review (dpreview.com)

 
Comments Off on Game Boy Camera gets new life as a low-resolution, highly impractical webcam

Posted in Uncategorized


DJI releases highly anticipated Mavic 2 Pro and Mavic 2 Zoom compact drones

23 Aug
DJI has announced the Mavic 2 Pro, featuring a 1-inch type CMOS sensor (left), and the Mavic 2 Zoom, which includes a 2x optical zoom lens (right).

Drone manufacturer DJI has announced the arrival of two new drones to its Mavic series: the Mavic 2 Pro and the Mavic 2 Zoom.

The Mavic 2 Pro is the first drone with an integrated Hasselblad camera—a project that the companies collaborated on for the last two years. The Mavic 2 Pro utilizes a newly redesigned 1-inch CMOS sensor and 10-bit Dlog-M color profile, which allows the Mavic 2 Pro to capture four times the level of color as its predecessor, the Mavic Pro. The drone can shoot 20-megapixel images, has an ISO sensitivity of 100-6400, an aperture range of F2.8 to F11 and shoots 4K video with 10-bit HDR.

Mavic 2 Pro sample video. Courtesy of DJI

The Mavic 2 Zoom is the first consumer-oriented drone with zooming capabilities. It offers users a 2x optical zoom (24mm-48mm) and a 2x digital zoom (49mm-96mm) and can capture lossless video in full HD resolution. It’s built around a redesigned 1/2.3-inch CMOS sensor, can shoot 12-megapixel images, has an ISO range of 100-3200 and improved focusing speed thanks to its upgraded phase and contrast detection.

A new auto mode on the Mavic 2 Zoom, called Super Resolution, uses the drone’s optical zoom to shoot nine individual images of a scene and then automatically stitch them together into a 48-megapixel photo. The drone’s zooming capabilities have led to new video modes too. Dolly Zoom QuickShot allows videographers to quickly replicate cinematic techniques popularized by folks like Hitchcock, where the camera zooms in on a subject while moving backwards.

The Mavic 2 Zoom can automatically create dolly zoom effects by coordinating the drone’s movement while adjusting the focal length of the lens. Courtesy of DJI

The bodies of the two new models are identical, and are slightly larger than the original Mavic Pro; like the orginal, they also fold down for easy transport. Both are equipped with omnidirectional sensors that can track the drone’s movements left, right, up, down, forward and backward, utilize a 3-axis mechanical stabilization and feature new auxiliary lights on the bottom to help with landing and flying in low-light situations (like dusk and dawn). A redesigned winglet and new motors make the two drones quieter than earlier models.

Example of a ‘Super Resolution’ photo, in which the Mavic 2 Zoom automatically stitches together 9 individual photos to create a high resolution image. Courtesy of DJI

Both models can record at a maximum bitrate of 100 Mbps using H.265 compression, include 8GB of internal storage, and can capture 4K video at up to 30fps as well as HD video up to 120fps. Each has a respectable flight time of 31 minutes.

The new drones also feature updated intelligent flight modes like Hyperlapse and ActiveTrack 2.0, which can now avoid obstacles and continuously track subjects thanks to the 10 sensors found on each drone. OcuSync also gets an update and help keeps the controller and the drone in communication—the Mavic 2 drones can transmit 1080p video up to five miles away from the controller.

The Mavic 2 Pro will retail for $ 1449, while the Mavic 2 Zoom will retail for $ 1249. Both models are available today from DJI.

Press release:

DJI Introduces Mavic 2 Pro And Mavic 2 Zoom: A New Era For Camera Drones

Mavic 2 Series Features Two Industry First Camera Options With New Intelligent Features And Optimized Flight Performance

August 23, 2018 – DJI, the world’s leader in civilian drones and aerial imaging technology, today introduced a new era for camera drones with two additions to its iconic Mavic series: Mavic 2 Pro, the world’s first drone with an integrated Hasselblad camera, and Mavic 2 Zoom, the world’s first foldable consumer drone with optical zoom capability.

The Mavic 2 is the most advanced DJI camera drone ever built, designed for professionals, aerial photographers and content creators. Incorporating the iconic folding design of the world’s most popular Mavic Pro, the Mavic 2 is a powerful platform with new gimbal-stabilized cameras and advanced intelligent features like Hyperlapse and ActiveTrack for easier and more dynamic storytelling. With an impressive flight time of up to 31 minutes and a more stable video transmission system, Mavic 2 delivers the optimal flight experience for capturing epic shots.

“When the Mavic Pro was launched two years ago, it redefined the way people looked at a drone and expanded possibilities for creators around the world,” said Roger Luo, President at DJI. “Today, we enter a new era of aerial photography with the introduction of DJI’s new flagship product, the Mavic 2 series. The Mavic 2 Pro and Mavic 2 Zoom will enable photographers and videographers to take their inspirations to the air quickly and elevate their creative ideas to new heights.”

Mavic 2 Pro: Superior Image Quality with Hasselblad

Co-engineered in partnership with Hasselblad, the world’s leader in medium format photography, the Mavic 2 Pro is the world’s first drone with an integrated Hasselblad camera for outstanding image quality with superior light and color performance. Housing a 1-inch CMOS sensor with a 10-bit Dlog-M color profile, the camera captures four times as many levels of color per channel compared to Mavic Pro to provide maximum flexibility for photo and video editing. The Mavic 2 Pro can capture 20-megapixel aerial shots with utmost color accuracy using Hasselblad’s unique Hasselblad Natural Color Solution (HNCS) technology, while an adjustable aperture from f/2.8-f/11 provides more control across a wide variety of lighting conditions. With 4K 10-bit HDR support, the Mavic 2 Pro can be plugged into a 4K TV with HLG and will play back footage with the right color tones.

Mavic 2 Zoom: A Dynamic Perspective with Optical and Digital Zoom

Powered by a 1/2.3-inch CMOS sensor, the Mavic 2 Zoom is DJI’s first foldable consumer drone with zoom, providing a dynamic perspective that ushers in a new era of creative storytelling. With the Mavic 2 Zoom, you can get closer to your subject at a moment’s notice by combining two-times optical zoom (24-48mm) with two-times digital zoom to simulate a 96mm telephoto lens that captures lossless video in full HD resolution. Hybrid auto-focus on the Mavic 2 Zoom combines phase and contrast detection for higher focus accuracy with an increased focus speed of up to 40% faster than before. Shoot vivid 12-megapixel photos or take advantage of the new Super Resolution feature that uses optical zoom to automatically capture and stitch nine photos together for a highly detailed 48-megapixel image, making it an ideal option for landscape photography.

Exclusive to the Mavic 2 Zoom, the new Dolly Zoom QuickShot mode opens a new visual language for storytelling that was previously reserved for professional cinematographers. It creates an otherworldly warped perspective by automatically zooming in as it flies away from its subject, keeping the subject the same size while the full background of the scene is revealed.

Mavic 2 Series: DJI’s New Flagship Consumer Drone with Powerful Camera Options

Both cameras capture vivid 4K ultra-high definition video with extreme detail, recording at a maximum bitrate of 100 megabits per second using the H.265 compression codec to give you an exceptional degree of latitude in post-production workflows. For photographers, new Enhanced High Dynamic Range capabilities blend a sequence of photos for ghost-free high dynamic range, giving the Mavic 2 Pro an impressive 14 stops of dynamic range and Mavic 2 Zoom up to 13 stops.

New Intelligent Tools For Epic, Cinematic Shots

The Mavic 2 is the ultimate tool for aerial content creation with new intelligent flight modes that make capturing professional-quality results almost effortless. A new Hyperlapse feature produces establishing shots that show the passing of time, which you can share to social media immediately. JPEG and RAW photos can be simultaneously saved on a Micro SD card or the internal storage, leaving more room for post editing. Choose between Circle, Course Lock, Waypoint or Free mode to create timelapses with a simple tap of a button in the DJI GO 4 Mobile App:

  • Free – pilots the drone manually while shooting a Hyperlapse video.
  • Circle – automatically flies the drone in a circular pattern around a subject you select to create a timelapse video that captures the action.
  • Course Lock – keeps the camera fixed on shooting subject while the drone flies in a straight direction to create a unique perspective.
  • Waypoint – plans a complex flight path based on both altitude and GPS coordinates to capture complex shots.

Keeping a moving subject in the frame is now easier than ever with ActiveTrack 2.0. This enhanced auto-track feature delivers a powerful combination of autonomous tracking and obstacle sensing capabilities never before seen in a DJI drone. Using the main camera and the front dual vision cameras, the Mavic 2 creates a three-dimensional map of the area in front of it, and uses new trajectory algorithms to analyze motion and predict the subject’s path up to three seconds in the future. When tracking a target, the Mavic 2 can recognize and avoid obstacles while shooting your target without interruption. It can stay on target, even if your subject momentarily goes behind an obstacle, and can track the subject at higher speeds of up to 44 mph (72 km/h).

Safer, Smarter and Stable Flight

The Mavic 2 delivers autonomous flight capabilities that help you capture shots with even more confidence in complex environments. A fully upgraded FlightAutonomy system transmits data to a more powerful central processor for more accurate obstacle sensing and safer flight. For the first time ever in a DJI drone, Mavic 2 has 10 sensors on all sides of the aircraft to automatically detect obstacles in its path and help prevent collisions, allowing you to focus on capturing the perfect shot.

An improved Advanced Pilot Assistance System (APAS) allows the aircraft to analyze its surrounding environment and automatically fly around obstacles without stopping. In addition, the Mavic 2 has a Bottom Auxiliary Light that turns on automatically to ensure safe and precise landings in low-light situations.

A newly designed OcuSync 2.0 video transmission system enables a more stable connection between the drone and its remote controller. The system features stronger interference resistance and auto-switching capabilities that supports both 2.4 GHz and 5.8 GHz frequency bands with the capability to use different frequencies for uplink and downlink data streams. It delivers 1080p video transmission feeds at a distance of up to 8km, allowing you to instantly edit and upload Full HD footage directly from the video cache in the DJI app in a wider variety of situations. Original resolution photos in JPEG can be saved directly to your mobile device, so you can immediately share what you create without the need to transfer files from the drone.

Aerodynamic Design and Extended Flight Time

The Mavic 2’s redesigned, more aerodynamic airframe reduces body drag by up to 19% compared to the Mavic Pro, allowing the Mavic 2 to fly at speeds of up to 44 mph (72 km/h) in Sport mode. Combined with a more efficient, quieter propulsion system and noise reducing propellers, the Mavic 2 has a maximum flight time of up to 31 minutes.

To ensure crisp photos and smooth, shake-free footage, the Mavic 2 houses an ultra-precise three-axis mechanical gimbal to stabilize its camera even during high-speed motion. Photos and videos can be saved directly to the drone using its 8 GB onboard storage. All DJI users have control over how their data is stored and managed, as part of DJI’s commitment to protecting its customers’ data.

A redesigned remote controller features detachable control sticks for ease of storage and portability. The Mavic 2 is compatible with DJI Goggles with the gimbal (yaw) control range up to -75°¬– +75° in Head Tracking mode, offering users a more immersive FPV flight experience.

Price and Availability

The US retail price of a Mavic 2 Pro, including the drone, battery, remote controller, charger, and four pairs of propellers, is $ 1,499 USD. The US retail price of a Mavic 2 Zoom, including the drone, battery, charger, remote controller and four pairs of propellers, is $ 1,199 USD. A Fly More Kit, including two additional batteries, a multi-battery charging hub, a car charger, a battery to power bank adapter, two pairs of propellers and a carrying bag, retails at $ 319 USD. A gimbal replacement service exclusively for Mavic 2, will be available soon.

Articles: Digital Photography Review (dpreview.com)

 
Comments Off on DJI releases highly anticipated Mavic 2 Pro and Mavic 2 Zoom compact drones

Posted in Uncategorized


Learning to shoot video with a gimbal: a frustrating, yet highly rewarding experience

14 Feb

A new Panasonic GH-series camera always seems to mean having to learn more about video, but that also tends to mean getting experience behind a video camera. I’d like to think I’m getting better as a videographer. Hell, I even remember to record some background audio most of the time, but the GH5S review meant having to learn about a whole new piece of kit.

The GH5S’s oversized sensor means there’s little scope for any kind of sensor-shift stabilization, which means it’s best suited to shooting with external forms of stabilization*. This meant that, in addition to borrowing a nice video lens, I needed to rent (and learn to use) a gimbal.

Gimbaling around

In just a few years, external stabilization has gone from being the preserve of Hollywood movies (most famously by Steadicam) to something that can be provided by sub-$ 1000 equipment. It probably shouldn’t come as a surprise that DJI, best known as a maker of drones, also sells the technology required to mount and control aerial cameras as stand-alone stabilization rigs.

The DJI Ronin M is essentially a scaled-up version of the gimbals DJI mounts its drone cameras on. It provides a cradle that can move in all three axes, with motors to correct for (or provide) movement in each of these directions. At its most simple, it provides a platform that tries to keep the camera steady, regardless of the movements you make while holding the handles. This is both its fundamental role and the thing that makes it tricky to get used to.

The GH5S with Metabones Speedboost Ultra and Sigma 18-35mm T2.0, mounted in a DJI Ronin M: a powerful combination but one that’s not particularly easy to hold at shoulder-height for any length of time.

Initial setup is pretty easy: you connect the camera cradle to a top handle, screw some lateral arms and handles on, then clip a large rechargeable battery pack on the back. You then have to carefully adjust the position of the cradle so that the camera and lens are neutrally balanced (that way the gimbal isn’t having to constantly fight against the camera’s weight to keep the it level).

To make the most of the GH5S I borrowed a couple of nice pieces of kit: a Sigma 18-35mm T2.0 CINE lens and a Speedbooster Ultra 0.71. The problem is that this is a pretty substantial combination, something that would come back to haunt me later.

Lens choice

A Speedbooster is essentially an equivalence machine, condensing the lens’s projected light down onto a smaller sensor, shortening the focal length and lowering the F-number (since you have the same entrance pupil but with a shorter focal length lens). The upshot is that the 18-35mm T2.0 ends up giving essentially the same angle of view and depth-of-field it was designed to provide on APS-C/Super 35 format.

The result is something along the lines of a constant F1.4 lens. And, while it’s not really sensible to start mixing F and T-stops**, it quickly becomes irrelevant. Because, to shoot in daylight, the camera’s base ISO setting (320 in Log mode) meant I had to use a variable ND filter to prevent over-exposure, which meant I could use the aperture primarily to control depth-of-field, without necessarily having an impact on exposure.

Only the realization that I really can’t think in Imperial took the shine off one of my favorite lenses

Coming from a photography background it still feels somehow wrong to throw away light like this, but if your minimum ISO is 320 and you need to keep the shutter speed somewhere around 1/50th of a second, you’re going to have to do something to prevent constant overexposure. Sacrificing it to an ND filter is preferable to stopping down, since you then lose control over depth-of-field and smooth your footage with the power of diffraction.

It was a lovely combination to shoot with, though, offering a really useful zoom range, more than enough control over depth-of-field and beautifully damped controls for everything. Only the realization that this version had its distance scale in feet, and that I really can’t think in Imperial, took the shine off this version of one of my favorite lenses.

In practice

There’s a difference, of course, between knowing the theory and putting it into practice. I knew in principle what 10-bit capture should mean and I knew how a gimbal was supposed to work, but that’s not the same as seeing it out in the field. Or, in this case, in one of Seattle’s public parks.

I’d tested the gimbal the night before. Checked it was level and, via an app on my phone, configured it to move the way I wanted it to. Because while the basic function of a gimbal is to correct for the operator’s movement, the Ronin can also be configured so that a large movement of the handles is treated as an instruction to move the camera. You can configure which axes it’ll move in, how sensitive the system is to your inputs and how quickly it moves the camera in response. It’s all really clever.

It’s also a bit of a handful, at first. I quickly found myself trying to operate the focus and exposure on a camera that was constantly trying to move away from my attempts to grab it. Between this, the sheer weight of the setup and the inability to see the camera’s screen, it was incredibly difficult to make or assess any changes on the camera: a deeply frustrating experience. Then the rain we’d timed our shoot to avoid started. And then turned to hail.

1’9? So that’s, what, about 1/6th my height, plus about one and a half of those 15cm rulers we used at school? I’m not very good at thinking in Imperial measurements.

I was feeling pretty defeated. I’d shot maybe 10 seconds of footage, couldn’t work out how to operate the camera and was beginning to think I was wasting everyone’s time. The rain hammered down and I desperately cast around for a Plan B.

But you know what they say about silver linings? Mine was that the enforced rain break gave me more time to learn to handle the gimbal. In the end I developed a technique that involved powering it down, reaching for the camera with my right hand and letting the carrying frame collapse into the crook of my arms. I could then hold and operate the camera comparatively normally before finally making a grab for the carry handle with my left hand, letting the camera hang, then powering it all back up again.

The Ronin M went from nearly bringing me to tears to being one of the most fun pieces of equipment I’ve ever used

It also became apparent that some of the difficulty I was having was the result of the combined weight of the camera and lens, rather than just user error. The quick-release lever that locked the cameras fore/aft movement wasn’t tightened quite enough to withstand the weight of my setup. So as soon as I let the camera hang on the gimbal to change settings, it was slipping forwards or backwards on its plate, throwing off the balance I’d so carefully set up. Hence its refusal to then work properly afterwards.

With these problems overcome and the sun starting to strike out from behind the clouds, I found myself getting more and more confident with every shot I took. And in a matter of hours, the Ronin M went from nearly bringing me to tears to being one of the most fun pieces of equipment I’ve ever used.

Back at the computer

Even after dragging all the camera gear back up the hill from the beach, the emotional peaks and troughs weren’t complete, though. As with every other video project I’ve undertaken, there’s a moment back at the editing machine where I wished I’d done almost everything differently, if given the chance to do it again. Obviously I was missing the necessary audio for a key part of the video (again) but I also found myself wishing I’d shot using a different color mode.

The moment I applied Nick Driftwood’s LUT to my sole HLG clip, I wish I’d shot the whole thing that way

As I wrote up my review, I speculated whether it’d be better to shoot using the HDR-video-made-easy ‘Hybrid Log Gamma’ (HLG) mode, rather than the V-Log L workflow designed for professionals. I had reason to believe the simpler mode might make better use of the GH5S’s 10-bit video capability. However, the knowledge that I already had the look-up table (LUT) to convert V-Log L footage into something that more usable was enough to tip the balance in that direction, so I shot everything but the closing shot that way.

The moment I applied Nick Driftwood’s LUT (found via Google) to my solitary HLG clip, I wish I’d shot the whole thing that way. It may not prove to be the professional choice but it immediately got me closer to the end point I was hoping for.

I’m acutely aware of the risks of over-using the effect that that gimbal gives

That said, for all that I’d do the whole thing differently, I’m pretty pleased by the way the video turned out. No, my gimbal work isn’t particularly polished and there are a thousand little tweaks and changes I wish I’d made (including, as always, the need to shoot more little ‘B-roll’ clips to cut away to), but I think the results look better than my previous efforts, and that’s how learning works.

I’m also acutely aware of the risks of over-using the effect that that gimbal gives. But I’m itching to get a chance to use one again, hone my skills and bring a little bit of drifty magic to my next project. Once my shoulders have stopped aching.


*Panasonic would say I’ve got cause and effect confused. The outcome is similar though: I needed a gimbal.

**Since these same optics sold for stills use as an F1.8, you could argue that, with a 0.71x focal length reducer it ends up being an F1.3 lens. Certainly it can’t be said to be a T1.4, since the additional glass in the SpeedBooster will inevitably reduce the light transmission a smidge. But, as I say, the numbers don’t matter so much as the effect.

Articles: Digital Photography Review (dpreview.com)

 
Comments Off on Learning to shoot video with a gimbal: a frustrating, yet highly rewarding experience

Posted in Uncategorized


17 Highly Detailed Images That Display Texture

08 Aug

I hope you enjoy this detailed image collection of subjects with a lot of texture. To capture texture in an image requires a few elements to come together – the right lighting, the right camera angle, and a good degree of image sharpness.

I’ll start you off with a couple of my own images, and then we’ll branch out to see what a few other photographers have done to capture texture with their cameras.

By Darlene Hildebrandt (shot in Havana Cuba)

By Darlene Hildebrandt (shot in Granada, Nicaragua) 

By JLS Photography – Alaska

By Nicholas Erwin

By ROBERTO CABRAL PHOTOGRAPHY

By Thad Zajdowicz

By Suzy Hazelwood

By Gabriel Caparó

By Sandy Sarsfield

By BriarCraft – crazy busy in July

By Kate Ter Haar

By XoMEoX

By Peyton Stanton

By Hernán Piñera

By Iain Merchant

By Marco Verch

By Alexander Day

The post 17 Highly Detailed Images That Display Texture by Darlene Hildebrandt appeared first on Digital Photography School.


Digital Photography School

 
Comments Off on 17 Highly Detailed Images That Display Texture

Posted in Photography


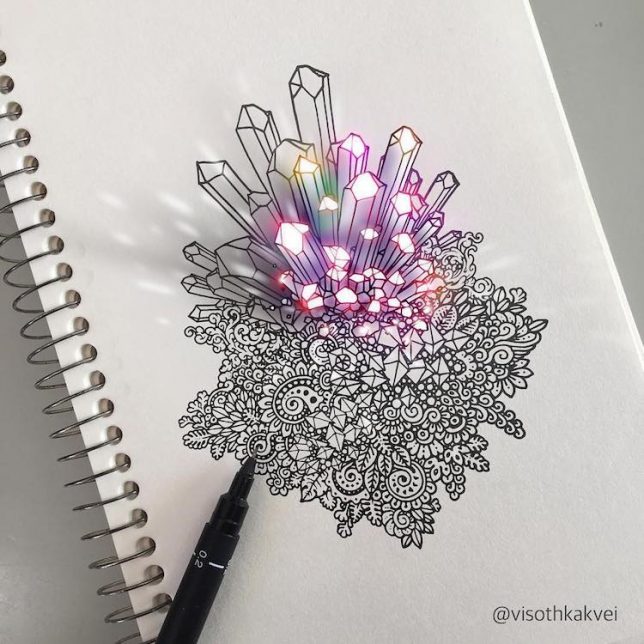
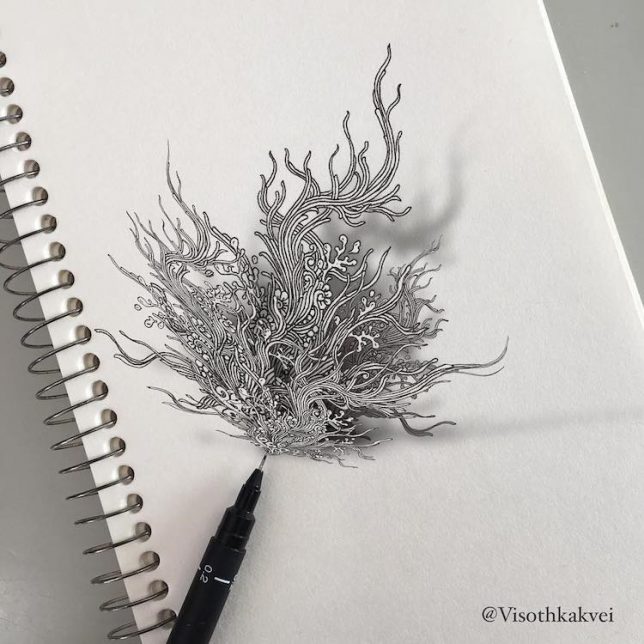
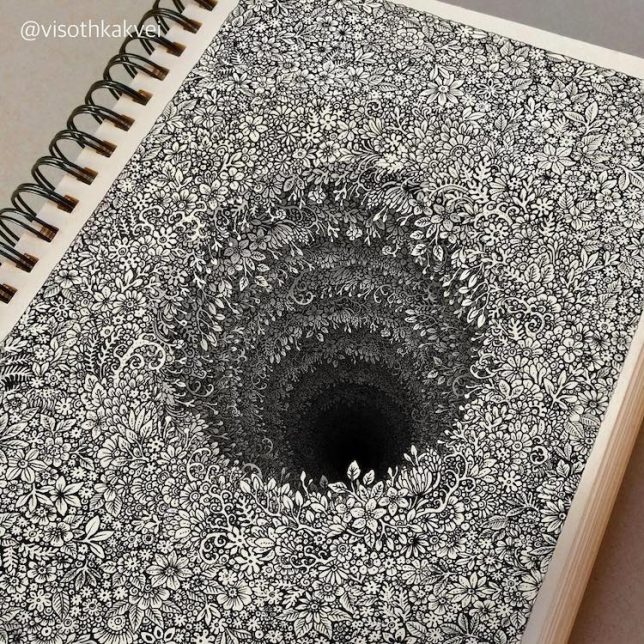
Magic Ink: Highly Detailed Optical Illusion Drawings Pop Off the Page

03 Jun

[ By SA Rogers in Art & Drawing & Digital. ]

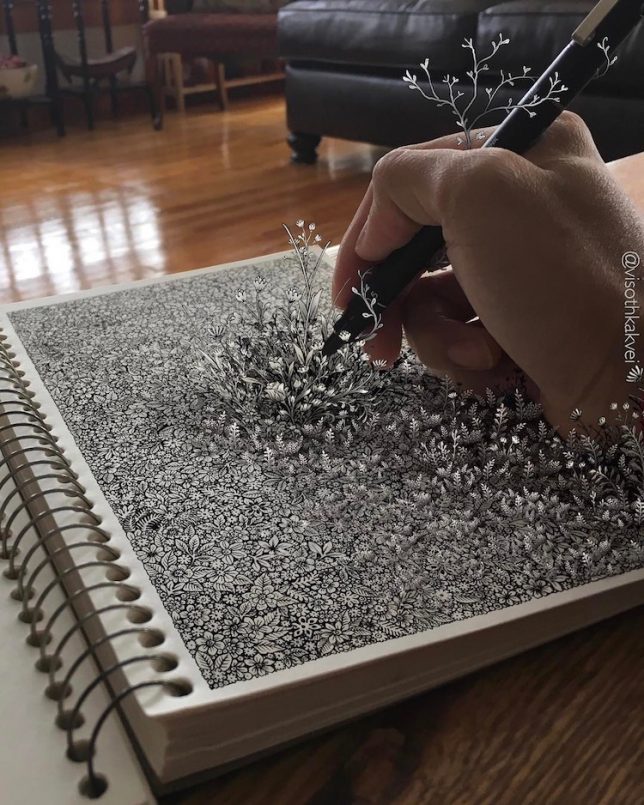
Strategically placed shadows and highlights make these incredibly intricate nature-themed drawings more than just impressive pages in an artist’s sketchbook. The pieces reveal unexpected depths and textures, and sometimes seem to lift right off the pages and into the real world, as if the sketchbook just couldn’t contain their vitality. Artist Visothkakvei shows off a variety of optical illusion techniques on his Instagram.

Fighting for the night. Once he's freed, the world will turn dark forever.

A post shared by Visothkakvei (@visothkakvei) on

Many of Visothkakvei’s works are contained within the bounds of his books. Though the drawings of flowers, leaves, vines and other organic subjects may look like simple doodles, it’s the way the artist layers them, packs them onto the page and adds shadows that makes them special. Some begin to creep beyond the boundaries of the paper.

Awaken #original #art #visothkakvei

A post shared by Visothkakvei (@visothkakvei) on

And, in some cases, it’s clear that more than just two-dimensional physical drawing is involved, though the artist doesn’t reveal his secrets. Some of this looks like he’s taken a photograph of his own hand working on the drawings, and layered digital drawing on top of it in a style that matches, making it unclear where the originals end and the digital additions begin.

Everytime I do the artwork, I see it around me. #original #art #visothkakvei

A post shared by Visothkakvei (@visothkakvei) on

Doodling #art #visothkakvei

A post shared by Visothkakvei (@visothkakvei) on

Check out lots more of these works, along with videos of the drawings in progress, at Instagram.com/visothkakvei.

Share on Facebook


[ By SA Rogers in Art & Drawing & Digital. ]

[ WebUrbanist | Archives | Galleries | Privacy | TOS ]


WebUrbanist

 
Comments Off on Magic Ink: Highly Detailed Optical Illusion Drawings Pop Off the Page

Posted in Creativity


Huawei P10 scores highly in DxOMark Mobile testing

10 Mar

With an overall DxOMark Mobile Score of 87 points, Huawei’s brand new top-end smartphone P10 has secured itself a high DxoMark Mobile ranking. Only the Google Pixel, HTC 10, Sony Xperia X Performance and Samsung Galaxy S7 have performed better. During testing the P10 showed generally good exposure, even in extremely low light, good color rendering and accurate white balance. Images are among the sharpest the DxO testers have seen and show good detail and texture. Autofocus is fast and accurate. The still image results amount to an excellent sub-score of 88 points. 

In video mode the P10 offers 1080p recording at 60 frames per second or 4K video at 30 frames per second. Video footage shows good exposure and dynamic range and accurate white balance. Like the still images, video clips also contain plenty of detail. In video mode the autofocus system reacts quickly to changes of the scene and shows smooth transitions, and the P10 garners a video score of 84 points. More detail can be found on DxOMark.com. 

Articles: Digital Photography Review (dpreview.com)

 
Comments Off on Huawei P10 scores highly in DxOMark Mobile testing

Posted in Uncategorized


Flip, Stack, Connect: 13 Highly Customizable Furniture Designs

05 Aug

[ By Steph in Design & Furniture & Decor. ]

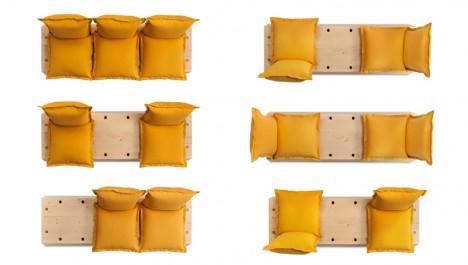
customizable facile sofa

Somewhere between half-hearted DIY jobs and expensive custom-created solutions, there’s customizable furniture kits, which make it easy to create the ideal setup for your home and life without requiring special skills or tools.

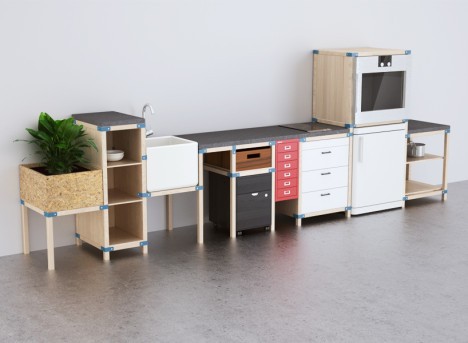
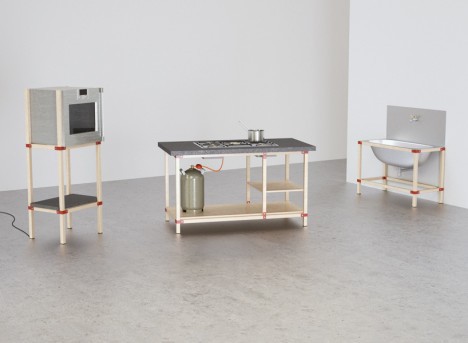
Hacka IKEA kitchen

customizable ikea hacka

customizable ikea hacka 2

People hack IKEA products all the time, creating new items from cheap components available at the Swedish big-box store. The ‘Hacka’ concept is a kit that makes it even easier to do using a series of orange joints and wooden beams. You essentially create your own framework around IKEA products like countertops, sinks and storage cabinets for a completely customizable setup that’s easy to change around at your whim.

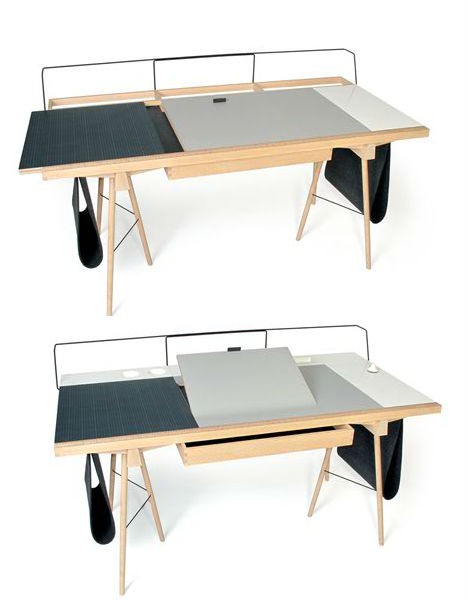
The Homework Desk

customizable homework desk 2

Start with two simple trestle legs and add whatever surfaces work best for you, whether that’s a flat desktop, a self-healing cutting mat, storage for writing implements or some combination of the three. With The Homework Desk, you can incline your surfaces like a drafting table, hang felt slings for additional storage or connect various compartments including pen holders, vertical filing systems and even a hidden phone charger. The whole front ledge of the desk functions as a ruler, too.

Push-Pull Foam Chair

customizable push pull foam

customizable push pull foam 2

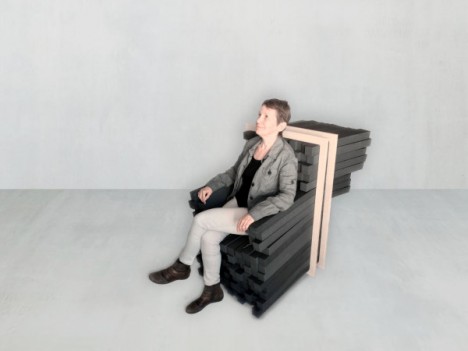
Do you like chairs that are deep and low to the ground, or prefer a higher perch? Do you like armrests, or would you rather have that space free for a better range of movement? The Sink In chair consists of foam bars enclosed within a wooden frame so it’s incredibly easy to create a seat that’s tailored to your exact desires.

Dots Storage System

customizable dots 2

customizable dots
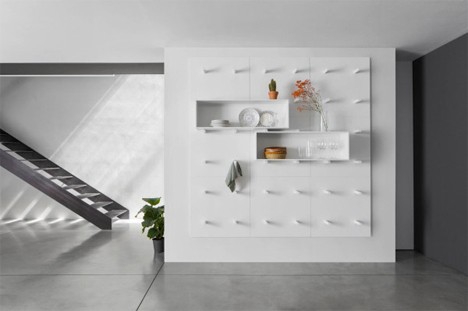
Protruding cylinders attached to wall panels in a grid pattern support a series of boxes for storing and displaying various objects in the ‘DOTS’ system by PolarisLife. Move them around, add more shelves, arrange them however you like them. When the cylinders aren’t supporting a shelf, they can be used to hang things like coats, bags and plants.

Next Page – Click Below to Read More:
Flip Stack Connect 13 Highly Customizable Furniture Designs

Share on Facebook


[ By Steph in Design & Furniture & Decor. ]

[ WebUrbanist | Archives | Galleries | Privacy | TOS ]


WebUrbanist

 
Comments Off on Flip, Stack, Connect: 13 Highly Customizable Furniture Designs

Posted in Creativity


Highly Intelligent ‘About Me’ Page Tips for Photographers to Build Their Brand

09 Jun

Crafting a compelling bio and writing the perfect pitch are quite challenging. Working in a service industry requires its own rules. Nobody wants to hire a person he doesn’t know, doesn’t trust or doesn’t like. That’s why talking about yourself is extremely important while creating your own brand. If you check your Google Analytics, you’d see that the ‘About Me’ Continue Reading

The post Highly Intelligent ‘About Me’ Page Tips for Photographers to Build Their Brand appeared first on Photodoto.


Photodoto

 
Comments Off on Highly Intelligent ‘About Me’ Page Tips for Photographers to Build Their Brand

Posted in Photography


10 Highly Useful Photography Lessons You Can Learn Today From YouTube

14 Feb

It doesn’t matter if you are a beginner or a professional photographer: Learning and perfecting your technique will help you be a better one! Being a photographer is more than shooting and uploading pictures. As in almost any other profession, any good photographer should stay up-to-date with the market and master his skills. By searching for tutorials, you will get Continue Reading

The post 10 Highly Useful Photography Lessons You Can Learn Today From YouTube appeared first on Photodoto.


Photodoto

 
Comments Off on 10 Highly Useful Photography Lessons You Can Learn Today From YouTube

Posted in Photography


5 Highly Recommended Google+ Chrome Extensions

22 Sep

It’s been several months now and I’m really enjoying my time on Google+. One thing that has been making the experience all the more enjoyable is the use of the following extensions in the Chrome browser. The following extensions in some cases improve on the user interface, integrate my activity with other social media sites or just make accessing content easier.  The following extensions are definitely worth checking out and possibly reason enough to use Chrome even more than Firefox, Safari or Internet Explorer.

+Photo Zoom – Allows you to mouse over an image thumbnail and zoom in and out with the motion of your mouse. Saves a click and speeds up browsing time.

Extended Share – Expands adds a “Share on” options under each Google+ entry to quickly share the post on Twitter, Facebook, Linked In and many other sites.

Plus Minus – My favorite feature of this plugin is that it loads more posts automatically as you scroll down, but it does a lot more including designate which Circles show up in your Google+ Stream, mark individual or all posts as read, and more.

Replies and more – Adds a link under each post to “Reply to Author”. This is a huge timesaver even for a fast typist. I use this functionality all the time. The extension does a lot more so check out the extension page.

SGPlus – Is is well… awesome! This is the single best plugin of the bunch as it allows you to use Google+ as a hub to Facebook and Twitter activity. I don’t pull in my feeds from Facebook and Twitter even though I could, but I really like that I can post content in one place and have it appear on Facebook, Twitter and Google+. It’s a huge timesaver. There is tons of documentation on this plugin and they’ve made incredible improvements with it since it was first released.

If you have a favorite Chrome extension that makes your Google+ experience better share it in the comments.

Note yet on Google+ Here’s a Google+  Invite Link

Technorati Tags: Google+, Chrome, Extension, plugin

Copyright Jim M. Goldstein, All Rights Reserved

5 Highly Recommended Google+ Chrome Extensions

flattr this!


JMG-Galleries – Jim M. Goldstein Photography

 
Comments Off on 5 Highly Recommended Google+ Chrome Extensions

Posted in Equipment