RSS
 

Posts Tagged ‘handheld’

Ricoh adds new ‘Handheld HDR’ still capture mode to its Theta V, Z1 360-degree cameras

28 Oct

Ricoh has released updated versions of its Ricoh Theta app that adds new ‘Handheld HDR’ functionality for its Theta V and Theta Z1 360-degree cameras.

The Ricoh Theta app update (version 1.26.0 on Android and version 2.8.0 on iOS) adds Ricoh’s new ‘Handheld HDR’ capture setting for still images and addresses a number of unspecified bug fixes. For the new HDR setting to work, the Theta V and Theta Z1 cameras need to be updated to the latest firmware, version 3.10.1 and version 1.20.1, respectively.

App Store screenshots from the iOS version of the Ricoh Theta app.

All of the apps and firmware updates are free to download. You can find instructions on how to update the Theta V and Theta Z1 firmware on Ricoh’s support pages.

Articles: Digital Photography Review (dpreview.com)

 
Comments Off on Ricoh adds new ‘Handheld HDR’ still capture mode to its Theta V, Z1 360-degree cameras

Posted in Uncategorized


SwitchPod is a ‘minimal’ handheld tripod that switches modes in seconds

31 Jan

A new Kickstarter campaign is seeking funding for SwitchPod, a handheld ‘minimal’ tripod that switches from handheld mode to tripod mode in only a couple seconds. The device requires almost no effort to convert, enabling users to seamlessly transition from recording while holding the device to recording from a flat surface without pausing to adjust the stand.

SwitchPod is compatible with any camera, including smartphones and DSLR models; the company behind it emphasizes high portability, a “nearly indestructible” aluminum alloy design, and support for weights up to 100lbs / 45kg. The tripod features a 1/4-20″ standard screw for directly attaching a camera, as well as support for ball heads and quick release plates.

Two additional 1/4-20″ threads on the tripod’s legs enable users to attach accessories, such as a light and microphone, plus the leg design makes it possible to clip SwitchPod to a bag using a carabiner. Other features include a tightening knob, non-slip feet, two sets of finger grooves for grasping the tripod in different positions, and a circle pad to protect the camera’s base. The tripod weighs 11.1oz / 315g and measures 11in / 28cm long in handheld mode.

The SwitchPod Kickstarter campaign has exceeded its funding goal, but is still open to new pledges. Backers who pledge at least $ 79 USD are offered a single SwitchPod as a reward; shipping is estimated to start in August 2019.


Disclaimer: Remember to do your research with any crowdfunding project. DPReview does its best to share only the projects that look legitimate and come from reliable creators, but as with any crowdfunded campaign, there’s always the risk of the product or service never coming to fruition.

Articles: Digital Photography Review (dpreview.com)

 
Comments Off on SwitchPod is a ‘minimal’ handheld tripod that switches modes in seconds

Posted in Uncategorized


DJI releases nine new accessories for Ronin-S handheld stabilizer

22 Nov

DJI has released a total of nine new accessories for its Ronin-S handheld camera stabilizer, expanding the system and making it more attractive to ambitious video shooters and film makers. Below is a quick run-down of each of the new accessories.

The new Focus Motor enables motorized focusing of lenses and offers lens control with an accuracy of .02 degrees. The Command Unit attaches to the side of the stabilizer and lets users to modify settings such as motor parameters, remote control and operation modes without the need to connect a mobile device.

The Ronin-S BG37 Grip offers an extra 12 hours of operating time via a 2400mAh built-in battery and the Top Hotshoe Bracket mounts to the camera hot shoe and the Ronin for extra security during fast-paced shooting, for example when the stabilizer is mounted to a moving vehicle. The grip comes with a cold-shoe, so you can still attach accessories with the adequate connector.

$ (document).ready(function() { SampleGalleryV2({“containerId”:”embeddedSampleGallery_0548625051″,”galleryId”:”0548625051″,”isEmbeddedWidget”:true,”selectedImageIndex”:0,”isMobile”:false}) });

The Extended Lens Support helps secure the camera and larger lens on then Ronin-S and can be used when the standard support is not long enough. With the Ronin-S Universal Mount the stabilizer can be mounted to a car, jib, cable cam system and more.

Finally, the External GPS Module offers improved stabilization performance during fast accelerations or decelerations and better reaction to sudden camera movements. All new accessories are available now, pricing is as follows:

  • Focus Motor: $ 169 USD
  • Focus Motor Rod Mount: $ 20 USD
  • Focus Gear Strip: USD $ 20 USD
  • Command Unit: $ 129 USD
  • BG37 Battery Grip: $ 99 USD
  • Top Hotshoe Bracket: $ 49 USD
  • Extended Lens Support: $ 20 USD
  • External GPS Module: $ 69 USD
  • Universal Mount: $ 179 USD

More information can be found on the DJI website.

Articles: Digital Photography Review (dpreview.com)

 
Comments Off on DJI releases nine new accessories for Ronin-S handheld stabilizer

Posted in Uncategorized


5 Tips for Photographing Handheld Without a Tripod

27 Sep

Are you frustrated by the inconvenience of a tripod and you prefer shooting handheld? Do you want to take sharp images, but without having to lug around such a large piece of equipment?

Fortunately, it is possible to get stunning images, even images in low light, without using a tripod. In fact, tripods often limit your flexibility.

5 Tips for Photographing Handheld Without a Tripod - dunlin

I rarely use a tripod, myself. While I do appreciate the added stability a tripod provides, I find myself struggling to compose images. I prefer the ability to quickly flow from composition to composition. I also like to shoot from angles that tripods struggle to cover. Hence, I have a lot of experience in photographing handheld.

In this article, I discuss various ways you can shoot without a tripod while still getting sharp images. I will show you how, with very little work, you can take your handheld photography to the next level.

5 Tips for Photographing Handheld Without a Tripod - golden retriever and woman

1. Stabilize Your Body Against an Object

I’ll start with the least technical tip for shooting handheld, that is to become a human tripod!

By this, I mean that you should seek to stabilize your body and arms against an object. I find that the ground is an excellent choice (after all, it’s reliably present).

So, when shooting handheld, I often get down on the ground. I’ll lie on my stomach and press my elbows firmly against the soil. Then I can feel fairly confident when taking my image that things will remain sharp.

Photographing Handheld Without a Tripod - aster

I stabilized my elbows against the ground in order to photograph this aster.

If you don’t want to get down on your stomach, that’s okay. You can also try out several other positions.

For instance, you can crouch down and put your elbows on your knees. Or you can tuck your elbows into your body.

You can also find some other object to stabilize yourself against. I sometimes use large rocks or fallen trees when shooting flowers. It pays to be creative.

2. Use Your Camera or Lens’s Built-In Image Stabilization

Does your camera or lens possess image stabilization technology? If so, switch it on!

You see, image stabilization technology is built in by clever camera manufacturers. It reduces (or eliminates) camera shake using image stabilization.

Image stabilization technology generally works in one of two ways. If it’s built into the camera, the sensor physically moves to counteract any camera shake that the camera has experienced. If it’s built into the lens, an optical element inside the lens is what moves.

Regardless, here’s the key takeaway: Image stabilization technology help to minimize or eliminate camera shake.

Photographing Handheld Without a Tripod - urban abstract

Without image stabilization, getting this urban abstract would have been very difficult.

The downside of image stabilization technology is that it’s expensive. Only some cameras and some lenses possess it, and they tend to be on the pricier side of things.

For those of us who dislike shooting with a tripod, however, image stabilization is a worthwhile investment.

3. Shoot with Shorter Lenses

An oft-cited rule in photography circles is this: you can handhold your lens at a shutter speed that is the reciprocal of the focal length (that is, 1/focal length).

This may sound complex, but it’s really not. To find an acceptably fast shutter speed, take the focal length and make it into a fraction with a one on top.

For instance, if you’re shooting with a 100mm lens, you can handhold at a shutter speed of 1/100th of a second or faster. When you’re shooting with a 400mm lens, you can handhold at a shutter speed of 1/400th of a second or faster. Finally, if you’re shooting with a 25mm lens, you can handhold at a shutter speed of 1/25th of a second.

Do you see the pattern? The longer the lens, the faster your shutter speed must be. Conversely, you can use a longer shutter speed when using a short lens.

Photographing Handheld Without a Tripod - golden retriever

I used a wide angle lens to capture this golden retriever in low light.

This is for a couple of reasons. First, long lenses tend to be bigger and heavier, causing more camera shake. Second, longer lenses magnify camera shake, resulting in blurrier pictures.

Therefore, if you don’t have a tripod to cut down on camera shake, you should use a lens that is more forgiving of the rule (based on the 1/focal length rule).

So if you’re shooting handheld, use shorter focal lengths for more success.

4. Shoot in Burst Mode

Another tip for photographing without a tripod is to shoot in burst mode (high-speed drive mode).

To activate burst mode, you simply have to set the camera to high-speed drive mode and hold down the shutter button. If you have a camera with this capability, you’ll hear the rapid-fire sound of images being taken.

Photographing Handheld Without a Tripod - white-morph reddish egret

Burst mode was essential for getting this early-morning shot of a White-Morph Reddish Egret.

This mode helps with handheld photography for two reasons.

First, when you jab the shutter button with your finger, it generates camera shake. When you use burst mode, however, you only press the shutter button at the beginning of your image sequence. This means that later photographs are taken with very little camera shake because the shutter button is not actually pressed just before the image is captured.

Second, when you shoot in burst mode, the mirror doesn’t cause extra vibrations. You see, many cameras (DSLRs) have mirrors in front of the sensor. When the shutter button is pressed, the mirror flips up, briefly exposing the sensor to light (to capture the image).

When the mirror flips up, this causes small vibrations throughout the camera, another form of camera shake. Yet when you activate burst mode, the mirror only flips up only at the beginning of the burst. The later shots aren’t affected by the vibrations caused by the mirror and as a consequence, they are sharper.

NOTE: This last point doesn’t apply to mirrorless cameras as they do not have a mirror, hence the name!

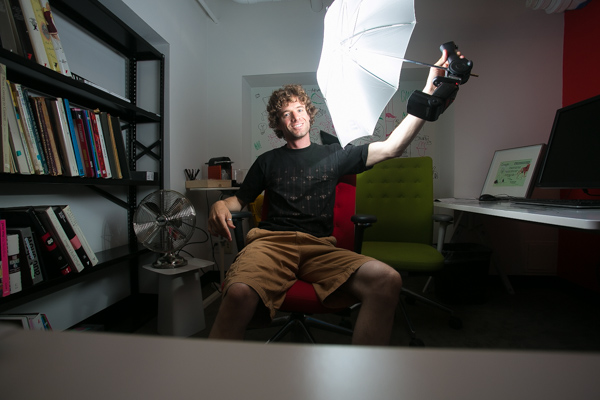
5. Use the self-timer

My final tip for photographing without a tripod is to use your camera’s self-timer.

The self-timer allows you to press the shutter button, and then it waits a specified number of seconds before the image is taken.

Photographing Handheld Without a Tripod - cosmos

I love using the self-timer when photographing flowers.

This useful for the same reason cited above in favor of burst mode. It prevents the camera shake generated when you press the shutter button.

So, next time you’re out in the field and you’re struggling to get sharp images without a tripod, try using the self-timer to reduce your camera shake.

Photographing Handheld Without a Tripod - purple abstract

Conclusion

Many photographers think that tripods are a necessity, but this isn’t necessarily the case. There are methods that you can use to shoot without a tripod while still capturing stellar images.

Photographing Handheld Without a Tripod - architecture ann arbor

  • First, steady yourself by placing your elbows against the ground.
  • Second, switch on your camera or lens’s image stabilization software.
  • Third, shoot with shorter (e.g., wide-angle) lenses.
  • Fourth, photograph using burst mode.
  • Fifth, use your camera’s self-timer.

photography without tripod yellow flower

photography without tripod cosmos

If you follow these tips, your tripod will become far less important, and you’ll take fantastic handheld images.

Have any more tips for photographing without a tripod? Please share them in the comments below.

photography without tripod little blue heron

The post 5 Tips for Photographing Handheld Without a Tripod appeared first on Digital Photography School.


Digital Photography School

 
Comments Off on 5 Tips for Photographing Handheld Without a Tripod

Posted in Photography


Shooting wet plate collodion double exposures… handheld

16 Feb

Wet plate photographer Markus Hofstaetter is always experimenting with his art in different ways—whether it’s capturing creepy halloween portraits, or this failed attempt to capture a fire and water wedding portrait on both digital and wet plate. His latest experiment, however, was a success.

He managed to do something he’s dreamed of for years: he was able to capture wet plate portraits handheld. In fact, he went one better; he shot handheld wet plate collodion double exposures.

One of the hand-held double exposures Markus captured with his newest setup.

The entire ‘journey’—from finding a hand-holdable wet plate camera, to fixing it up and making it ready to shoot, to the actual double exposure shots—is documented in the video above and on Hofstaetter’s blog, in which his tone seems to be “I’m glad I did this, but lord was it a pain in the butt.”

One of the biggest challenges facing Hofstaetter was getting enough light to capture the plates handheld. “Even though these are small plates, I had to use 6000-7000 Watts of Hensel strobe power to get enough light thru the grided softbox,” he writes. But in the end, it worked. And since he was mixing new tech and old technique, he decided that steampunk portraits would be appropriate.

Here’s some of what he captured:

$ (document).ready(function() { SampleGalleryV2({“containerId”:”embeddedSampleGallery_5814074292″,”galleryId”:”5814074292″,”isEmbeddedWidget”:true,”selectedImageIndex”:0,”isMobile”:false}) });

Whether or not you like the final images, you have to admire Hofstaetter’s determination and creativity. He found a camera that would work, 3D printed plate holders because they were missing, and then managed to do something we haven’t ever hear of before. Kudos are definitely in order.

Check out the video up top to see the full journey from purchase to plates, and the head over to Hofstaetter’s blog for more behind the scenes images and other crazy experiments.


All photos, videos, and GIFs by Markus Hofstaetter and used with permission.

Articles: Digital Photography Review (dpreview.com)

 
Comments Off on Shooting wet plate collodion double exposures… handheld

Posted in Uncategorized


Video: Shooting the Milky Way hand-held with the Sigma 14mm F1.8 Art

05 Dec

More than once, we’ve called the Sigma 14mm F1.8 DG HSM | Art lens an astrophotographer’s dream lens. From the moment it was announced, we were dying to get our hands on it; and once we did, it did not disappoint. But what’s the big deal? Why pay $ 1,600 for this lens when the very capable Samyang/Rokinon 14mm F2.4 will cost you half as much and resolve nearly as much detail (if not more)?

Light… that’s why. A point explained beautifully by photographer Alyn Wallace, who recently took the 14mm F1.8 Art out for a spin in the night. After managing to take a hand-held photograph of the Milky Way—an insane and somewhat-pointless but also kind-of-fun experiment to see what F1.8 can really do—he pops the lens onto a tripod for some proper astrophotography and is immediately blown away.

“This lens is a light vacuum,” he says. “It’s like I’ve stuck a black hole on the front of my camera.”

DPReview’s Dale Baskin felt similarly after shooting the Aurora with the Sigma 14mm F1.8 Art, writing in his Gear of The Year post, “Once I tried the Sigma 14mm F1.8 it was game over. I knew I had found the one.”

Of course, the lens isn’t perfect, and Wallace gets into that as well, looking closely at the corners and revealing where pushing this lens to F1.8 is going to cost you. To see his results and drool a bit over a piece of glass that may make its way onto your very own “treat yourself” list this holiday season, check out the full video up top.

Articles: Digital Photography Review (dpreview.com)

 
Comments Off on Video: Shooting the Milky Way hand-held with the Sigma 14mm F1.8 Art

Posted in Uncategorized


The PolarPro Katana Mavic Tray turns your DJI Mavic Pro into a handheld stabilizer

23 Apr

The DJI Mavic Pro camera drone has been designed with portability in mind. The PolarPro Katana Mavic Tray is a new accessory that increases the Mavic Pro’s versatility even further by turning it into a stabilized handheld shooting platform while on the ground. 

This allows Mavic Pro users to use their drone for shooting smooth, cinematic video on the ground that complements the drone’s aerial footage perfectly. The PolarPro Katana Mavic Tray is made from glass-filled nylon and features two grips on either side of the clamping mount that holds the Mavic Pro securely in position. An integrated smartphone mount at the top of the tray lets you use the drone’s companion app for framing and camera controls.

The PolarPro Katana Mavic Tray will be officially launched at the NAB trade show later this week and carry an anticipated MSRP of $ 49.99. More information is available on the PolarPro website.

Articles: Digital Photography Review (dpreview.com)

 
Comments Off on The PolarPro Katana Mavic Tray turns your DJI Mavic Pro into a handheld stabilizer

Posted in Uncategorized


Tips for Using a Handheld Light Meter

17 Jan

In modern DSLRs they all have a light meter built-in to the camera. But sometimes you want a more accurate reading, or to measure the amount of light when using flash (your camera can’t do that), in which case you would turn to a handheld light meter.

Check out this video from Adorama TV (host Daniel Norton) for some light meter basics.

This second video is more advanced. Once again from Adorama TV, with host Mark Wallace, this one covers how to meter for light ratios. Read more about ratios here: Lighting Ratios to Make or Break your Portrait.

In the video above he is using the Sekonic L-358 light meter. Here are a couple other choices, also made by Sekonic. I personally use the L-308 and it works just fine. You don’t need one that’s really fancy but the one he used does have the memory storage for comparing the light, the L-308 does not. So if you want that feature you may want to opt for the L-358.

Have you used a light meter before? If you are shooting with speedlights or studio lights you may find it necessary, but if you shoot landscapes and use mostly natural light you probably do not need one. Let us know your experience in the comments below.

googletag.cmd.push(function() {
tablet_slots.push( googletag.defineSlot( “/1005424/_dPSv4_tab-all-article-bottom_(300×250)”, [300, 250], “pb-ad-78623” ).addService( googletag.pubads() ) ); } );

googletag.cmd.push(function() {
mobile_slots.push( googletag.defineSlot( “/1005424/_dPSv4_mob-all-article-bottom_(300×250)”, [300, 250], “pb-ad-78158” ).addService( googletag.pubads() ) ); } );

The post Tips for Using a Handheld Light Meter by Darlene Hildebrandt appeared first on Digital Photography School.


Digital Photography School

 
Comments Off on Tips for Using a Handheld Light Meter

Posted in Photography


Google awarded patent for folding handheld camera design

14 Jan

$ (document).ready(function() { SampleGalleryV2({“targetContainerClass”:”sampleGalleryImageViewerContainer”,”galleryId”:”6782824935″,”isEmbeddedWidget”:true,”selectedImageIndex”:0,”startInCommentsView”:false,”isMobile”:false}) });

Global tech giant Google could be joining the camera business if a patent it was awarded this month is anything to go by. Filed in June 2014 and just approved on the 12th January this year, the patent issued by the United States Patent and Trademark Office is for a design for a folding camera that’s hinged in the middle like a clamshell mobile phone. The design appears to allow the camera to stand upright on its own, which presents a great deal of stability and also the ability to shoot selfies. It isn’t clear from the drawings whether the camera’s screen is inside the fold or on the back outer surface, but the significant bulge of the lens housing suggests the camera has a wide ranging zoom or high class optics.

The design allows the camera to open out so that its backside outer cover/screen can be brought to face in the same direction as the lens, with the front and back of the device creating one long flush surface, other than a gutter in the fold.

The patent might, of course, come to nothing, but it isn’t inconceivable that the company that seems to be into everything should want to create a standalone camera too. We will have to wait and see, but in the meantime can enjoy a little speculation – the patent is good for 14 years.

Do you think the camera will come to life or would Google be crazy to produce it? Let us know in the comments.

For more information visit the US Patents and Trademarks office website. 

Articles: Digital Photography Review (dpreview.com)

 
Comments Off on Google awarded patent for folding handheld camera design

Posted in Uncategorized


Product Review – Dixie Grip: Rotating, handheld, or mounted hotshoe grip

29 Jul

What is it?

The Dixie Grip

The Dixie Grip is a product that doesn’t exist yet. It’s a Kickstarter campaign product, and it fills a gap in the street portrait world that desperately needs filling – a handheld Speedlite grip.
Don’t believe there is a need for this kind of thing? Case in point: just days after trying the product out and thinking about whether I would have a need for it or not, I was walking with my mentor Payam in New York talking about photography. He was describing to me an engagement session he was shooting in Central Park. He was using a Canon Speedlite with a remote trigger, and his assistant had the flash on a monopod with a softbox mounted onto the unit. The reason for this crazy handheld setup is that having off-camera flash with a softbox is like having a portable studio wherever you go! And having an assistant hold it allows for great flexibility in movement. But there is a problem with this setup. It’s a workaround. The monopod is not an ideal piece of equipment for a Speedlite. It’s awkward, too long, and not ergonomically friendly. That’s where the Dixie Grip comes into play.

What does it do? What’s it good for?

This piece of equipment replaces the light stand with something much more flexible – your hands! Yes, you can mount the grip onto a light stand, but the best part is having the mobility and freedom of using it with your hands. As far as I know, there is no other thing out there that does that, exactly like this. And it holds an umbrella. It’s an ergonomic solution to the mobile problem of traveling light and easy. As my mentor was saying, his assistant was doing the same thing but with a monopod or a tripod, holding the whole awkward kit in their hands. That rig is unwieldy, heavy, and awkward. The Dixie Grip was created for exactly that situation, a light, perfectly sized grip for Speedlites. It’s so simple, it’s amazing it hasn’t been done before.The last part of the product which is pretty slick is that it is adjustable. You can “rotate” the head by simply squeezing these two units together and moving the Speedlite or umbrella up or down. This give you the ability to work with different angles.

How I used it

The Dixie Grip

I brought the Dixie Grip with me to the lakeside with my cousin when I didn’t have an umbrella, and we played around with the equipment to get a feel for it. I made him the assistant and the model. The feel of it was easy enough to use, and since we were standing on sand we didn’t have to worry about getting sand on light stands or moving things around on uneven ground. He just got to hold the grip and it worked exactly as expected.

The Dixie Grip

I got back to the city and was able to use the Dixie Grip with an umbrella which is how it is best used. As you can see in the photos, the light looks great, it’s smooth, and best of all, we could shoot in very tight quarters without maneuvering an awkward tripod stand or monopod.

The Dixie Grip

The Dixie Grip

Summary

In conclusion, I would definitely recommend this product if you shoot on location in different conditions. I could see this being a tremendous asset to a wedding photographer who needs to run and gun with their bride and groom for a quick formal session. I could also see this on the streets of NY with a model in the city. There is no reason not to own one of these. It’s intuitive and easy and it works.

The only drawbacks I found were when I tried using my cheap Yongnuo triggers to fit into the hotshoe. They don’t have tightening rings and just sit on whatever they are attached to. The hotshoe mount on the Dixie Grip was a bit too large for the trigger, so the trigger would slide out easy (which isn’t great when the Speedlite is attached to it). But that was an easy fix with a couple of pieces of cardboard. Or just use normal equipment like a Pocket Wizard and you’ll be fine.

Adjusting the head by squeezing those two pieces together, and moving the Speedlite, was slightly awkward. It didn’t always click into place right away. But I was also using a prototype which I know has some kinks to be smoothed out yet. I expect that component to be rock solid when it comes to production. Which is where you come in!

Kick Starter Campaign for The Dixie Grip

This is the link to the product. The campaign ends July 28th, so help put this thing on the market, and be the very first person to own a Dixie Grip.

I give the Dixie Grip product 4.5 stars out of 5.

The Dixie Grip

The post Product Review – Dixie Grip: Rotating, handheld, or mounted hotshoe grip by Phillip VanNostrand appeared first on Digital Photography School.


Digital Photography School

 
Comments Off on Product Review – Dixie Grip: Rotating, handheld, or mounted hotshoe grip

Posted in Photography