RSS
 

Posts Tagged ‘hand’

CityHome: Control This Smart House with a Wave of Your Hand

19 Jun

[ By Steph in Design & Fixtures & Interiors. ]

CityHome Smart House 1

Two hundred square feet may sound absurdly small, even by New York standards, but what if you could make it feel three times larger with hidden furniture and other amenities that roll out and unfold at a wave of your hand? A team at MIT’s architectural program has come up with a smart solution for micro apartments that makes it quick and easy to reconfigure the entire space with virtually zero effort.

CityHome Smart House 2

CityHome Smart House 3

CityHome consists of a transformable wall system that condenses all the main functions of a bedroom, living room, dining room, kitchen and bathroom into a tiny space without sacrificing most of what you’d have in a larger apartment. You can still cook for and seat a group of six for dinner, sleep in a comfortable full-sized bed and enjoy a movie in a spacious living room.

CItyHome Smart House 4

You tell the room what you need through a combination of hand gestures, voice control and touch elements, with internal motors silently launching the furniture you require at your command. One gesture draws the bed out of the wall, while another calls forth a work desk that doubles as a dining table.

CityHome Smart House 6

Wave your hand to adjust the ambiance of the room via lighting and window blinds, and move the entire unit against a wall or into the middle of the room at the touch of a button depending on whether you want to divide up the space or gain use of the entire room.

CItyHome Smart House 7

For now, CityHome is just a concept, but MIT envisions turning it into an actual product, possibly through crowdfunding.

Share on Facebook


[ By Steph in Design & Fixtures & Interiors. ]

[ WebUrbanist | Archives | Galleries | Privacy | TOS ]


WebUrbanist

 
Comments Off on CityHome: Control This Smart House with a Wave of Your Hand

Posted in Creativity


Mini Book of Major Events: Whole World History in Your Hand

19 May

[ By WebUrbanist in Art & Sculpture & Craft. ]

mini book major events

In a handful of pages in a book the size of a fingernail, this book artist tells a minimalist story of life on Earth, illustrating pivotal moments with brief text and tiny images.

mini life arises page

mini dinosaur extinction page

mini fire discovered page

mini agriculture planting page

A beautiful bit of hand-bound book art, The Mini Book of Major Events is just one of a series of micro-volumes made by Evan Lorzenzen, all of which pack large ideas into the smallest space possible.

mini the plague page

mini electricity discovered page

mini first contact page

mini book of major cover

Of course, selectivity is key – which events warrant mentioning when space is at a premium? Then, how does one illustrate these most effectively at such a minute scale?

mini book wordless volume

tiny book folded open

little book inside pages

little book of big ideas

Along similar lines, The Little Book of Big Ideas tackles large and important concepts from war and death to love and infinity, again with lovely drawings alongside each.

Share on Facebook


[ By WebUrbanist in Art & Sculpture & Craft. ]

[ WebUrbanist | Archives | Galleries | Privacy | TOS ]


WebUrbanist

 
Comments Off on Mini Book of Major Events: Whole World History in Your Hand

Posted in Creativity


How to Apply the Look of Hand Coloring in Lightroom

27 Mar
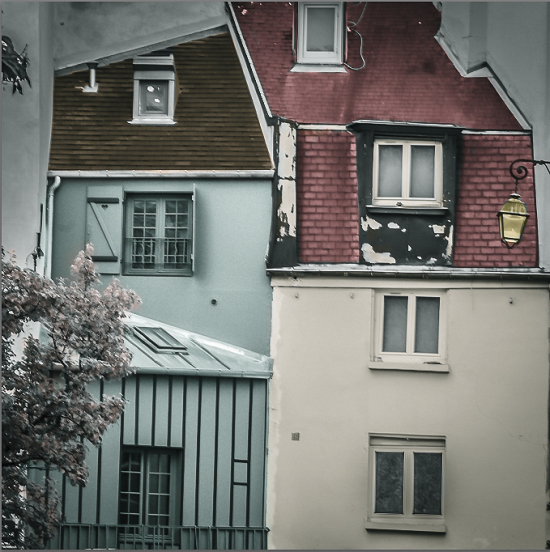
Give a photo the look of a hand tinted image in Lightroom

Give a photo the look of a hand coloring in Lightroom

Before there were color photos there were black and white photos, colored by hand using paints or dyes. Today, courtesy of any good photo-editing program, you can apply your own hand coloring effect to your photos.

Here’s how to apply the look of hand coloring in Lightroom.

To get started, open the image in the Lightroom Develop module. You will want to make the usual basic edits to the image so it shows a good tonal range and contrast.
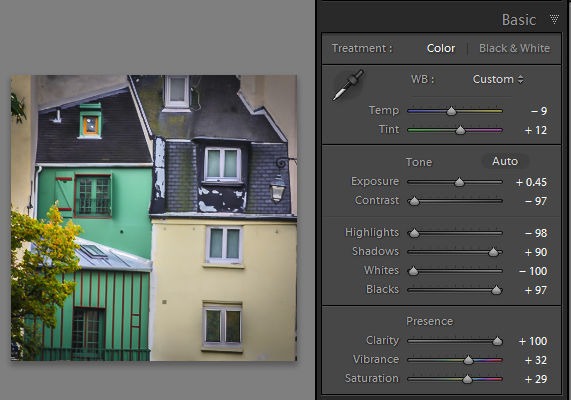
Before colorizing the image, make sure to adjust the tonal range and contrast.

Before colorizing the image, make sure to adjust the tonal range and contrast

Then convert the image to a black and white by clicking B&W panel and adjust how the underlying colors in the image are converted to black and white using the sliders. Lighter areas will show the color better and darker areas will show a more subtle tint.
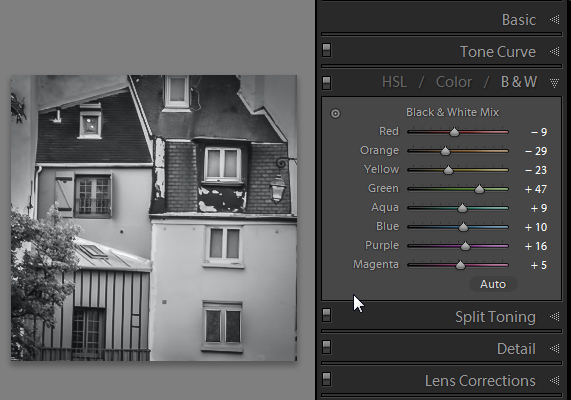
Use B&W to create a black and white image.

Use the B&W panel to create a grayscale or monochromatic image

When you’re ready to add color to the image, click the Adjustment Brush and return all the sliders to zero by double clicking on the word Effect at the top of the panel (circle in red below).
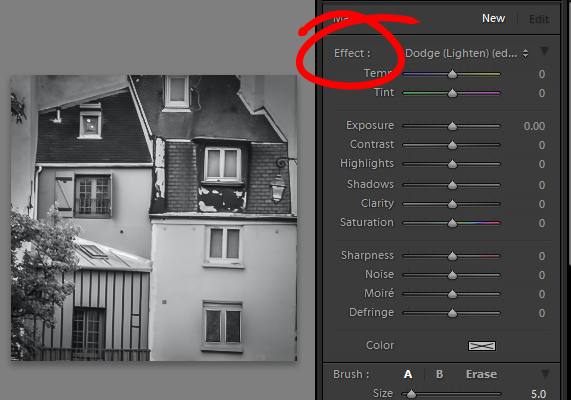
Double click Effect to reset all the Adjustment Brush sliders.

Double click Effect to reset all the Adjustment Brush sliders

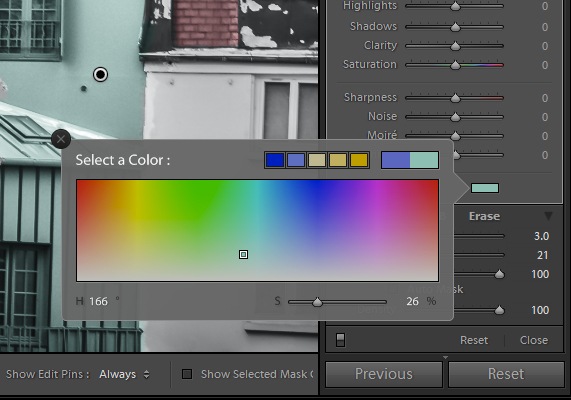
Click on the color sampler and choose a color to use.
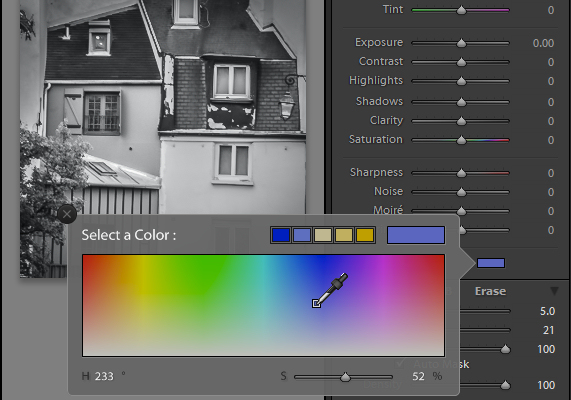
Select a color to tint the image with from the Color selector

Select a color to tint the image with from the Color selector as shown here

Now click on the area that you want to recolor to set an Edit Point. Paint over the area to apply the color to it. As you paint with the Adjustment Brush a layer of partially opaque color is applied to the image.

Select the Auto Mask checkbox if you are working on an area of the image that has distinct edges. Doing this makes it easier to limit the painting to only the desired area. The roof tops and buildings here are good examples of areas with distinct edges.
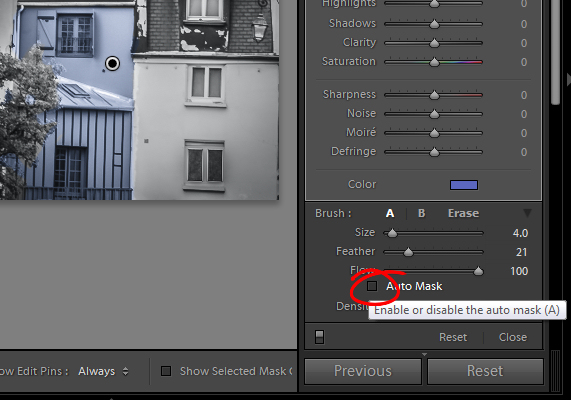
Selecting Auto Mask helps paint in areas with defined edges.

Selecting Auto Mask helps paint in areas with defined edges (stay within the “lines”)

When painting an area that is less defined, disable the Auto Mask checkbox. The tree in this image has less defined edges so you should disable Auto Mask when coloring this area.
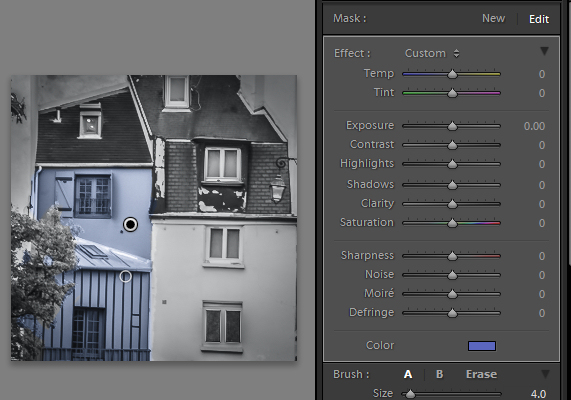
The buildings have defined edges so use Auto Mask when painting them. The tree does not, so disable Auto Mask when painting it.

The buildings have defined edges so use Auto Mask when painting them. The tree does not, so disable Auto Mask when painting it.

If you mistakenly paint over an area and want to undo the painting click the Erase brush link or hold Alt to select Erase and paint to remove the mistake.

To zoom into the image press Z on the keyboard and click on the image to zoom in or out. To move the image hold the spacebar so the mouse pointer turns into a hand and drag on the image.
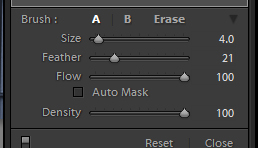
Size the brush using the Size slider

Size the brush using the Size slider

To resize the brush either use the [ and ] keys on the keyboard or adjust the size using the Size slider.

When you have finished working with the first color, click New to set a new Edit Point. Select a different Color and paint that onto the image.

Continue creating a new Edit Point for each color until the coloring is complete.

If desired, you can alter a color or adjust a painted area by selecting the Adjustment Brush and then click the Edit Pin for that adjustment. You can then change the color using the color picker.
Give a photo the look of a hand tinted image in Lightroom

Give a photo the look of a hand tinted image in Lightroom

Do you have some other tips:

If you have some other ways of doing this technique in Lightroom please share. Or share your images if you give it a try!

For more Lightroom tips and tutorials try these:

  • Processing an Image in Lightroom 5 – a Video Tutorial
  • 6 of Lightroom’s Hidden Treasures
  • Why Lazy Photographers Should Use Lightroom Smart Collections
  • 3 Uses for the Radial Filter Tool in Lightroom 5
  • Lightroom 5 Tips – Hidden Gems

The post How to Apply the Look of Hand Coloring in Lightroom by Helen Bradley appeared first on Digital Photography School.


Digital Photography School

 
Comments Off on How to Apply the Look of Hand Coloring in Lightroom

Posted in Photography


How to Apply the Look of Hand Coloring in Lightroom

23 Mar
Give a photo the look of a hand tinted image in Lightroom

Give a photo the look of a hand coloring in Lightroom

Before there were color photos there were black and white photos, colored by hand using paints or dyes. Today, courtesy of any good photo-editing program, you can apply your own hand coloring effect to your photos.

Here’s how to apply the look of hand coloring in Lightroom.

To get started, open the image in the Lightroom Develop module. You will want to make the usual basic edits to the image so it shows a good tonal range and contrast.

Before colorizing the image, make sure to adjust the tonal range and contrast.

Before colorizing the image, make sure to adjust the tonal range and contrast

Then convert the image to a black and white by clicking B&W panel and adjust how the underlying colors in the image are converted to black and white using the sliders. Lighter areas will show the color better and darker areas will show a more subtle tint.

Use B&W to create a black and white image.

Use the B&W panel to create a grayscale or monochromatic image

When you’re ready to add color to the image, click the Adjustment Brush and return all the sliders to zero by double clicking on the word Effect at the top of the panel (circle in red below).

Double click Effect to reset all the Adjustment Brush sliders.

Double click Effect to reset all the Adjustment Brush sliders

Click on the color sampler and choose a color to use.

Select a color to tint the image with from the Color selector

Select a color to tint the image with from the Color selector as shown here

Now click on the area that you want to recolor to set an Edit Point. Paint over the area to apply the color to it. As you paint with the Adjustment Brush a layer of partially opaque color is applied to the image.

Select the Auto Mask checkbox if you are working on an area of the image that has distinct edges. Doing this makes it easier to limit the painting to only the desired area. The roof tops and buildings here are good examples of areas with distinct edges.

Selecting Auto Mask helps paint in areas with defined edges.

Selecting Auto Mask helps paint in areas with defined edges (stay within the “lines”)

When painting an area that is less defined, disable the Auto Mask checkbox. The tree in this image has less defined edges so you should disable Auto Mask when coloring this area.

The buildings have defined edges so use Auto Mask when painting them. The tree does not, so disable Auto Mask when painting it.

The buildings have defined edges so use Auto Mask when painting them. The tree does not, so disable Auto Mask when painting it.

If you mistakenly paint over an area and want to undo the painting click the Erase brush link or hold Alt to select Erase and paint to remove the mistake.

To zoom into the image press Z on the keyboard and click on the image to zoom in or out. To move the image hold the spacebar so the mouse pointer turns into a hand and drag on the image.

Size the brush using the Size slider

Size the brush using the Size slider

To resize the brush either use the [ and ] keys on the keyboard or adjust the size using the Size slider.

When you have finished working with the first color, click New to set a new Edit Point. Select a different Color and paint that onto the image.

Continue creating a new Edit Point for each color until the coloring is complete.

If desired, you can alter a color or adjust a painted area by selecting the Adjustment Brush and then click the Edit Pin for that adjustment. You can then change the color using the color picker.

Give a photo the look of a hand tinted image in Lightroom

Give a photo the look of a hand tinted image in Lightroom

Do you have some other tips:

If you have some other ways of doing this technique in Lightroom please share. Or share your images if you give it a try!

For more Lightroom tips and tutorials try these:

  • Processing an Image in Lightroom 5 – a Video Tutorial
  • 6 of Lightroom’s Hidden Treasures
  • Why Lazy Photographers Should Use Lightroom Smart Collections
  • 3 Uses for the Radial Filter Tool in Lightroom 5
  • Lightroom 5 Tips – Hidden Gems

The post How to Apply the Look of Hand Coloring in Lightroom by Helen Bradley appeared first on Digital Photography School.


Digital Photography School

 
Comments Off on How to Apply the Look of Hand Coloring in Lightroom

Posted in Photography


High-Tech Pixelstick: Light Painting in the Palm of Your Hand

14 Nov

[ By WebUrbanist in Gadgets & Geekery & Technology. ]

animated rainbow art

A game-changing invention for the art of long-exposure illumination, Pixelstick takes light art to new levels, enabling beginner animators to participate and advanced artists to evolve their craft in amazing ways.

animated-street-art

animated-wall-art

animated-park-rainbows

Having already raised four times its $ 100,000 crowfunding goal on Kickstarter, the popularity of this incredible gadget speaks for itself – but no worries: you still have one month to back the project. Their short promotional video is a must-see illustration of the vast possibilities.

animated graffiti tags

The breadth of possibilities is breath-taking, from graffiti tags to animated rainbows (above), mesmerizing patterns to abstract compositions (below).

animated art patterns

The gadget’s creators point out that light painting dates back nearly 125 years yet the tools used to create it have evolved only on the side of cameras and not in terms of the actual methods of illumination.

animated light art stick

animated public stick art

The founders of Bitbanger Labs saw this market void as a worthy challenge and began experimenting with drafts and prototypes, slowly developing a handheld wonder with powerful features even they did not anticipate at the beginning.

Next Page – Click Below to Read More:
High Tech Pixelstick Light Painting In The Palm Of Your Hand

Share on Facebook


[ By WebUrbanist in Gadgets & Geekery & Technology. ]

[ WebUrbanist | Archives | Galleries | Privacy | TOS ]


WebUrbanist

 
Comments Off on High-Tech Pixelstick: Light Painting in the Palm of Your Hand

Posted in Creativity


50 Years, 1 Imagination: Man Draws 2000 Sq Ft Map by Hand

18 Sep

[ By WebUrbanist in Art & Drawing & Digital. ]

hand drawn world map

Long before Sim City, Minecraft or the MMPORG, there was Jerry Gretzinger, man using cards and spending decades to spawn his own self-contained imaginary game world.

Over 2600 sheets of 8.5-by-11-inch paper make up this strange and amazing fantasy world, largely unknown until this video began to spread slowly (then quickly) around the internet, gaining him almost overnight fame. Each frame is created when Jerry chooses from a deck that dictates his next move, be it destructive, creative over both.

handmade fantasy world map

It started with a single city, then sprawled into ever-vaster territories and entire countries connected by highways and high-speed rail, or or divided by defensive barriers and walls, all expanding panel by panel across standard-sized sheets.

handmade map custom paints

Attention to detail and daily ritual pervades the project, from a carefully-controlled color palette and archaic digital organization system to deployment based on semi-randomized cards, shuffled to reveal what direction he should take next.

handmade map creative process

At the same time, chaos is routinely added back into the system, through elements like ‘void cards’ that dictate the complete rebuilding of a section of the map, and can mean the entire destruction of cities that stand in the way.

handmade map shelf stacked

These pages are stacked by necessity on shelves rather than splayed out to form a contiguous map too big for any interior wall. Perhaps the most amazing aspect of the entire project is the fact that the entire work-as-such has never actually been on display until the documentary was being made about it. Even Jerry did not know its exact overall shape or form for the past decades, and, thanks to elements of chance and his own creativity, still does not know what future shapes it may yet take.

handmade map wall panels

As UpperCase reports: ”Jerry’s willingness to bend, adapt and break his own rules extends freedom to the map itself,” says filmmaker, Greg Whitmore, the creator of Jerry’s documentary trailer. “I should add that though Jerry is permissive and liberal when it comes to the process, he is dogmatic in one regard: that this ‘thing’ is, in fact, a map and he is responsible for it.”

Share on Facebook


[ By WebUrbanist in Art & Drawing & Digital. ]

[ WebUrbanist | Archives | Galleries | Privacy | TOS ]


WebUrbanist

 
Comments Off on 50 Years, 1 Imagination: Man Draws 2000 Sq Ft Map by Hand

Posted in Creativity


Artscape – Poets of Protest – Mazen Maarouf: Hand Made

20 Jan

Palestinian Mazen Maarouf was raised in Lebanon, and recently forced into a double exile in Iceland after criticising the Syrian regime. We follow him from Reykjavik to Paris as he works on the translation of his third poetry collection into French.
Video Rating: 5 / 5

Album: Panopticon [2004] Post-Metal, Atmospheric, Post-Rock, Sludge, Experimental, Avant-Garde 1. So Did We [0:00 – 7:30] 2. Backlit [7:30 – 15:14] 3. In Fiction [15:14 – 24:12] 4. Wills Dissolve [24:12 – 30:59] 5. Syndic Calls [30:59 – 40:39] 6. Altered Course [40:39 – 50:37] 7. Grinning Mouths [50:37 – 59:04] Panopticon is the third full-length album by Los Angeles, California based post-metal band Isis, released by Ipecac Recordings in 2004. The album’s title is derived from philosopher Jeremy Bentham’s panopticon prison ideal and philosopher/historian Michel Foucault’s later allegorical appropriation of the concept. The liner notes also include quotes from technology writer Howard Rheingold and futurist Alex Steffen; as a concept album, Panopticon’s focus is on the proliferation of surveillance technologies throughout modern society and the government’s role in that spread. Critical response to Panopticon was generally very warm; as it followed 2002’s critically acclaimed Oceanic, many reviewers were quick to hold the two in comparison. The consensus was that Panopticon represented a progression, of sorts. The album’s sound continued Isis’ departure from the strictures of sludge and metal — which had been the hallmarks of their earlier material — and continued along the trajectory of post-metal, achieved by heightened use of melody and clean vocals. Band members Jeff Caxide — bass guitar Aaron Harris — drums Michael Gallagher — guitar Bryant Clifford Meyer
Video Rating: 4 / 5


Street Art – Hand Painted Ceramic Tiles By Katie Holten

13 Dec

A few nice visual art images I found:

Street Art – Hand Painted Ceramic Tiles By Katie Holten
visual art
Image by infomatique
A NEW VISUAL arts exhibition has opened in Dublin which features over 90 artists from five continents.

Dublin Contemporary 2011 includes a range of talks, tours and special events in conjunction with a wide range of exhibits.

Four main galleries are participating in the event – the Douglas Hyde Gallery, the Hugh Lane, the National Gallery of Ireland and the Royal Hibernian Academy – and a major exhibition called The Office of Non-Compliance is housed in Earlsfort Terrace (I have obtained a press pass and hope to visit next week).

The Iveagh Gardens are being transformed into a sculpture garden throughout the six-week event.

Meanwhile, out on the city’s streets, artist Katie Holten has been leaving a series of hand-painted ceramic tiles bearing lines from On The Nature of Things by Lucretius.

 
Comments Off on Street Art – Hand Painted Ceramic Tiles By Katie Holten

Posted in Photographs


3d sticking my hand out of youtube

24 Nov

www.3dtv.com 3d video of me sticking my hand out of the youtube player.this video has the youtube 3d tag what that means is you can pick how to view the 3d.so if you have red and cyan 3d glasses or a 3d tv you can watch this video with anything except a Cookie.if you dont have 3d glasses pick cross eyed.at the end of this video i burn youtube down. 3D LINKS 3D Channel www.3dtv.com 3D SHOP: www.the3dshop.net FREE 3D Glasses www.3dn3d.com 3D Facebook: www.facebook.com View cool 3D Photos: www.3dn3d.com LIKE ME: www.facebook.com Follow ME: twitter.com BEST 3D EVER: www.youtube.com

Ritwika shares how she has made her 3D camera rig for shooting 3D video. This is part 2a of the ultimate guide to 3d videography tutorial series by Ritwika. Music: Kevin MacLeod (incompetech.com) Licensed under Creative Commons
Video Rating: 5 / 5

 
Comments Off on 3d sticking my hand out of youtube

Posted in 3D Videos


Fashion, Passion and History: Hand in Hand

25 Mar
Yves Saint Laurent and Model Karen Mulder. Photo by: Helmut Newton

All three of these are fundamentals needed in fashion photography. Yet these are often missed or overlooked by new photographers in the field or those fresh out of school. I’ll never forget my first photography class, we were asked to to give a reason why we decided to pursue fashion photography.  Many students couldn’t come up with a reason. The most common one was “oh fashion photography seems cool”, or “I get to shoot beautiful models and do whatever I want”. Needless to say after the first three weeks into our semester half the class dropped out after finding out that fashion photography isn’t all that meets the eye. A lot of hard work goes into making that ever so perfect image which master photographers make seem all too easy .


Photo by: Helmut Newton

To me it’s very important for young fashion photographers to be aware of the work of their predecessors and also study the impact that such work can have on our field today. Great artists and photographers often refer back to their mentors and famous images that helped shape their creative eye. Fashion is ever so changing and so is fashion photography,  many new photographers I talk to give me blank stares when I mention names such as Horst P. Horst, Avedon or Newton. It always baffles me when young photographers don’t know the work of such masters and the fact that their work helped shape the very field we all want to work in. Avedon brought movement to the pages of fashion magazines which were so posed and stiff before he came along and Helmut, well, Helmut brought out the kink and free spirit in everyday fashion. Being knowledgeable about such work and photographers in my opinion helps greatly in shaping and molding a brand new photographer. After all,  how can we move forward in a medium where everything has been done at least once already?


Photo by: Paolo Riversi

The historical aspect aside , fashion photographers should love fashion! Live it, love it, and dream about it. I mean why else would you want to be a fashion photographer? You can always find photographers such as Mario Testino and Patrick Demarchelier front row during fashion week. These photographers shoot countless fashion spreads and editorials, and they immerse themselves in every aspect of it and it shows in their work. Fashion photographers have to be aware of a lot of things; you’re photographing garments that need to grab the viewer’s attention, you need to know how to photograph them well and may even have to lend your eye in styling them to make an image. Even Paolo Roversi has occasionally styled his own editorials!  Obviously, a strong background in fashion is a must for this. It’s not something I wish on anyone, but there will always be one of those days where you need a stylist and the only person that can come through is you, so you better know how to put an outfit together !

Mario Testino at Burberry Fashion Show. Photo by: Chris Jackson

The point I’m trying to make here is that many new and upcoming photographers seem to lack a strong background in the history of and passion for fashion photography and it shows in their work. How else are you supposed to stand out in an industry where anyone who has access to a camera pretty much calls themselves a photographer?

This post was written by William David Walsh who is a Fashion Photographer based in San Francisco.


Fashion Photography Blog – A Resource for Fashion Photographers, Created by One.

 
Comments Off on Fashion, Passion and History: Hand in Hand

Posted in Uncategorized