RSS
 

Posts Tagged ‘Growing’

Organizers say Photokina 2020 is still set to go according to schedule, despite growing COVID-19 concerns

29 Feb

This week, representatives from Koelnmesse, the organization behind Photokina 2020, sat down for a press conference in Cologne, Germany to address, amongst other details, concerns surrounding whether or not Photokina 2020 will take place as cases of COVID-19 continues to spread across the globe.

At the press conference, Koelnmesse Vice President, Christoph Werner, said ‘At this time, there is no reason to halt a large-scale event like [Photokina 2020],’ according to translated text from DC Watch. This statement was made even after consulting with the World Health Organization (WHO), the German Federal Ministry of Health and local authorities, according to Werner.

‘At this time, there is no reason to halt a large-scale event like [Photokina 2020]’

Kai Hillebrand, Chairman of the German Association of Photography, further elaborated at the press conference, saying ‘As long as the health authorities do not announce that trade fairs should be stopped in Europe, [the decision to participate] will be at the discretion of the exhibitors.’

In mid-September, well before the rise of the COVID-19 virus, Leica, Nikon and Olympus were confirmed to have dropped out of the tradeshow. Three months later, on December 6, Photokina confirmed Canon, Panasonic and Sony would be present for the 2020 event. No more than ten days later it was confirmed by PetaPixel that Fujifilm, too, would be absent from the show.

Between the departure of four major brands and the ongoing Coronavirus concerns, it doesn’t look promising for the Photokina 2020, despite being three months out. That said, until further notice, it seems as though everything is still set to go according to schedule, even as WHO raises the global risk of COVID-19 from ‘high’ to ‘very high’

Articles: Digital Photography Review (dpreview.com)

 
Comments Off on Organizers say Photokina 2020 is still set to go according to schedule, despite growing COVID-19 concerns

Posted in Uncategorized


Some Kansas City hotspots ban photography over growing disruptions

20 Nov

A number of Kansas City metro hotspots are putting up “No Trespassing” signs that specifically state ‘No Photographers,’ according to local FOX affiliate WDAF. The restrictions were prompted by ‘a few bad apples’ who would set up props for photoshoots in lobbies, doorways, and places that block traffic, the report states.

Both commercial and Instagram photography is reportedly disrupting certain iconic regions and businesses in Kansas City. Brett Judson, owner of local business Coven KC, explained to WDAF, ‘Besides setting up their fake house in our lobby, in our front door, they will block all the traffic under the 12th Street bridge to get that, like, beautiful family photo or a wedding photo.’

Some local photographers are speaking up about the issue, stating a minority of individuals are giving the entire profession a bad name. One such photographer is Marsha Baylor, who will join colleagues in cleaning up litter in some of Kansas City’s hotspots to help make the point.

‘They’re not the norm,’ Baylor told the local news station. ‘We are the norm. We are the people that step up and say, “This is not OK. This is not how the majority of us run our businesses.'”

Kansas City currently requires photographers to get a permit when shooting in parks if the sessions will ‘impact others and/or the environment,’ which includes using ‘lots of props/equipment,’ according to city parks’ website. A city spokesperson speaking to WDAF pointed out that there are no laws restricting photographers from shooting while on public property, but that doing so on private property with posted signs can be a trespassing issue.

In addition, Missouri Department of Conservation spokesman Bill Graham stated that the agency is working on a new policy that will impact commercial photography and videography in all of the region’s conservation areas.

Articles: Digital Photography Review (dpreview.com)

 
Comments Off on Some Kansas City hotspots ban photography over growing disruptions

Posted in Uncategorized


Why Goal Planning Is the Key to Growing as a Landscape Photographer

09 Oct

“I invest so much time in my landscape photography, but can’t tell how much I’m improving or even where I’ll be in a year. I think I’m getting better, but slowly and haphazardly.”

Do you have a strategy for becoming a better photographer? What areas do you want to improve in over the next few weeks? Most of us learn passively, but what if you could get more out of every shoot and see progress in months instead of years?

It starts with being intentional – something we don’t often practice in the day-to-day.

Taking an active role can double your learning speed. And it starts by setting measurable goals and introspecting your photos – and yourself – often.

Sella Towers, Dolomites, Italy

Brunate Lago Di Como, Italy

A couple of years ago I wasn’t noticing much improvement in my photography. It was definitely there, but it happened slowly and I didn’t have a clear direction of how I wanted to improve in the future.

Fast forward to my last trip to Oregon, where I made a point of applying some goal planning and retrospectives before, during and after the shoot. I learned more in two weeks than I had in two years, and brought back some of my favorite photos to date.

Mt Bachelor, Cascade Lakes Bend, Oregon

Smith Rock Bend, Oregon

Maybe you’ve heard of objectives and key results (OKRs) or ‘being results-oriented’ from managers or personal trainers. They seem like fuzzy topics, but there’s nothing more empowering than charting your own course to improvement.

I couldn’t be happier with the improvement I noticed while peeking at photos from just two years ago. Whether it’s a cursory glance or a deeper artistic critique, I can see measurable improvement that directly correlates with intentional goal planning.

And it’s not just the keeper shots that have improved. I shoot noticeably fewer photos (more of which end up being keepers), and it takes less editing for me to finish them up.

Here’s how you can take an active role in charting your own improvement as a landscape photographer.

1. Document Your Objectives

Have you stopped to ask yourself why you’re a landscape photographer in the first place? Your “Why?” doesn’t have to be etched in stone, but it will guide how you invest your time and money into growing.

Here are some example objectives. “I invest time in my landscape photography because:”

  • “I love to travel.”
  • “I want to make a full-time living.”
  • “I want to capture unique locations.”
  • “I want to grow my local following.”
  • “I want to be the best in my craft.”

You probably have several objectives in mind, so the next step is to prioritize them. Which objective(s) trumps the others in the competition for your time? Objectives are critical because they help us identify conflicts of interest. Once you start formulating goals, you want to ensure they naturally support your objective.

For example, you may be a landscape photographer because you love traveling, but your goal is to sell prints to local condos. These may well clash with each other, as marketing your work to local businesses would mean less freedom to travel. You may need to find another way to support your wanderlust – even if it’s unrelated to photography.

2. Formulate Effective Goals

Setting a goal often has a disheartening tone. We’ve all made goals or resolutions that yielded no results other than self-reproach. “Oh, I didn’t lose 10 pounds.” “I didn’t write half as much as I wanted.”

Self-reproach is often a symptom of a poorly chosen goal. Effective goals aren’t about slapping yourself for missing them. They’re about deliberately deciding how you want to invest your time and resources. It’s about determining the trajectory you want to take instead of floating with the fluctuations of each day.

Here are two of my personal goals:

  1. Capture and produce better photography
  2. Expand my photography audience

But while these goals capture a general direction, they aren’t concrete. So I like to follow them up with more specific formulations for what success looks like.

  1. Expand portfolio with shots that have a compelling foreground, middleground and background.
  2. Write for two new publications.

3. Apply and Adapt Shoot Goals

Along with your general goals and results, set specific goals for each landscape photography trip. I often source my shoot goals from notes I took in the field, or frustrations I faced in post production.

On my last trip to Ireland and the UK, I set some goals that I reread during each shoot:

  • Create a sense of depth with fog and haze
  • Root the image with stronger foregrounds
  • Consciously identify shapes in the composition
  • Capture the energy in water and clouds with long exposures
  • Take 20% fewer photos with a higher ratio of winners
  • Shoot more verticals to emphasize height

Man-O-War Bay, Dorset, England

South Stack Lighthouse, Wales

Referencing these goals when I hit the field bumps me out of my status quo. Over the past two years, I’ve found that most of my measurable growth as an artist came from setting and intentionally applying shoot goals.

4. Break Goals into Results

Objectives give you direction. Goals give you outcomes. But neither tells you how to accomplish them or how much progress you’ve made towards them. That’s where results come in.

How will you accomplish your goals? You can’t. They’re too big, and say nothing about what actions you should take. To reach your goals, they need to be broken down into small, measurable steps called results – small tasks you can complete in no more than a day. A well-formulated result must measurably contribute towards the overall goal.

Results need to be carefully phrased so they reflect tangible outcomes. For example:

  • “Edit for one hour every day.”
  • “Spend 30 minutes writing about photography.”

These results are ineffective because they involve time. Who cares whether you spent 30 minutes editing or three hours? Instead, phrase them in terms of tangible outcomes:

  • “Finish a rough edit of three photos today.”
  • “Finish outlining my upcoming photography post.”

Each of these results produces something of value – edited photos and an outlined post – and can be completed in one sitting. And the faster you complete each result, the sooner you can move on to other things.

Breaking down goals into results is hard to do in any field, whether it’s productivity, photography or software development. And it’s the number one reason we fail to accomplish anything.

Don’t tackle a goal and plan as you go. Planning and execution are two different skills. And when we do them simultaneously we ironically spend the least time on the hardest part: planning. It sounds counterintuitive, but once I break the goal into results, executing them is usually the easiest part.

What about self-imposed deadlines? Personally I’ve had limited success with them because time is a poor measure of progress. I sketch out a rough timeline (“by this time next year”), but I keep those dates with my goals instead of my results. As long as my results are prioritized, deadlines are often arbitrary because I’m always working on the most valuable results.

How are you spending your time so each minute counts? Results are the answer, not time.

5. Do a Retrospective

The learning doesn’t end after a shoot. In fact, I learn the most by reviewing photographs from the shoot that didn’t quite work out. It sounds counterintuitive, but thanks to a cognitive bias called survival bias we tend to:

  • overestimate what we can learn from successful shots
  • underestimate what we can learn from shots that didn’t make the cut.

Consequently, we end up discarding our best source of learning material.

To beat survivorship bias, conduct a retrospective on some of your failed shots to understand why they didn’t work, and what you’ll do differently next time.

Slea Head, Dingle, Ireland

None of my shots from Slea Head on Ireland’s Dingle Peninsula worked out. But later in the trip I applied the lessons I learned about S-curve placement and busy water textures to capture a shot of Loch Garry in the Scottish Highlands.

Loch Garry, Scotland

Retrospectives are incredibly effective at distilling lessons that will set your next shoot up for success. And they often form my shoot goals for the next trip. On this year’s trip to Oregon, my goals changed to reflect the lessons I learned from Ireland and the UK:

  • Capture two stunning images per day for a total of 26 from the trip.
  • Identify the emotion of a scene, then highlight it with composition and light.
  • Spend 30% less time snapping photos, and instead spend it testing compositions.
  • Shoot exclusively at dawn and twilight, and spend the rest of the day trying compositions on my smartphone.
  • Use an ND filter for water without exception.
  • Identify a strong foreground, middleground, and background before snapping.
  • Don’t waste a second on angles filled with busy textures.

I would have forgotten many of these shoot goals if I hadn’t written them down and reviewed them before each shoot. Being intentional paid off. As I said earlier, I learned more in two weeks than I had in two years of shooting, and produced some of my favorite work to date.

Roads End, Oregon

Chart Your Course to Improvement Intentionally

While goal planning comes in many flavors and terminologies, they all share the goal of helping individuals connect desired outcomes with strategic actions. The key to accelerated growth is to learn intentionally, not passively.

Spend a few minutes over coffee today to document why you are a landscape photographer, what you want to become, and how you will accomplish it. Whether you’re in the field, post production, or an office crunching through tangential work, goal planning will ensure you’re investing your time well and learning as much as possible from your efforts.

The post Why Goal Planning Is the Key to Growing as a Landscape Photographer appeared first on Digital Photography School.


Digital Photography School

 
Comments Off on Why Goal Planning Is the Key to Growing as a Landscape Photographer

Posted in Photography


Report: Multi-camera smartphone segment growing at record pace

06 Sep

If you thought multi-camera modules on smartphones were nothing but a fad, think again. Two recent reports by analyst firm Counterpoint Research and The Korea Herald tell a different story.

According to the analyst report approximately 42% of all smartphones sold globally in July 2018 featured a dual or triple rear camera. The firm estimates that the adoption of multi-camera modules will grow to 60% by the end of the year and says that “while the megapixel war has almost peaked, multiple sensors in phones is the new battleground.

Graph: Counterpoint

Growth in the multi-cam segment has been fast paced, with penetration increasing from 15% to 42% in the last 12 months, and is highest in the price range from $ 200 to $ 599. In the “super-premium” segment ($ 800+) adoption has reached 100%.

The charge is lead by OnePlus, followed by Huawei and Apple. Google is the only premium manufacturer still betting on single-camera but is under increasing pressure to join the multi-cam movement.

A report by The Korea Herald confirms Counterpoint’s view of the market, stating that “Most major smartphone makers, including Samsung Electronics, Apple and LG Electronics, are reportedly preparing to roll out smartphones fitted with three rear-facing camera modules in a bid to step ahead in the premium segment.”

According to Samsung around 10% percent of its 2019 smartphones are likely to come with triple-camera technology. Unsurprisingly the performance increase through multiple cameras comes at a cost, though. At a manufacturing level the cost of a typical single-lens module is approximately $ 10. Dual- and triple-lens camera modules add $ 30 and $ 50, respectively, to the bill of material.

Articles: Digital Photography Review (dpreview.com)

 
Comments Off on Report: Multi-camera smartphone segment growing at record pace

Posted in Uncategorized


Photography Lessons I Learned Growing Up Around Ansel Adams

08 Aug

Ansel Adams was a young man of 14 when he first came to California‚ Yosemite National Park. The valley had a strong pull for him and he returned to work there in 1920 at the age of 18 to be the caretaker for the Sierra Club‚ LeConte Lodge.

Ansel became vigilant about protecting Yosemite and the Sierras from human impact while showing the world his view of this almost mystical place through his growing photography career. He met Virginia Best, the daughter of the gallery owner in Yosemite Valley. They married, and the gallery became a source of income for the young photographer and his wife. His complete works became the gallery best sellers. They continued to add products such as art books and other photographic services.

By 1940, his photographic workshops started as one of the first photographic education sources in the country. The workshops were usually a week long and for many, became a life changing experience.

ANSEL IN WAGON Photographic Lessons Learned from Ansel Adams

Image by Holden Higbee used courtesy of the Ansel Adams Gallery in Yosemite

That was the case for my father, Holden Higbee, who attended Ansel Adams’ photography workshop in 1965. He, along with my older sister (who was 12 at the time), attended a week long workshop of photographic bliss in beautiful Yosemite Valley with lectures by Ansel Adams himself. In 1965, Adams was a respected photographer, but not yet the photographic icon that he has become in the present day. At that point, his prints were selling for about $ 50 and he would gift his images to his favorite students. My sister received a copy of his “Mirror Lake” image for participating as a model in the workshop.

MEDIUM FORMAT Photographic Lessons Learned from Ansel Adams

Image by Holden Higbee used courtesy of the Ansel Adams Gallery in Yosemite

The Workshop with Ansel Adams

The workshop was held in the Wawona Big Trees area, the Yosemite Valley, and up into Tuolumne Meadows covering the basics of photography, Ansel’s Zone system, composition, and creativity. The students in Ansel’s classes were mostly young men, just honing their craft from the master, using their medium format and 35mm cameras. Their exuberance for learning photography was evident as they spread out to practice their lessons.

TOLUMNE MEADOWS - Photographic Lessons Learned from Ansel Adams

Image by Holden Higbee used courtesy of the Ansel Adams Gallery in Yosemite

This class stuck with my father, as the photography gene runs long and deep in my family. Holden, as an avid photographer and college professor, would drive across the country to document the countryside for his geography and geology classes and stop every 50 miles to take a picture, much to our dismay. He always had two or three cameras around his neck so he didn’t have to change lenses and he could easily document “how man uses the land”.

The Zone System

ANSEL ZONE SYSTEM - Image used courtesy of the Ansel Adams Gallery in Yosemite

Image by Holden Higbee used courtesy of the Ansel Adams Gallery in Yosemite

My father was particularly interested in The Zone System and how that would affect his photography. For many years after, my father would practice with the grey cards to set up the zone system. I am now the proud owner of his signed set of books from Ansel Adams; The Camera, The Negative, and The Print.

GREY CARD - Photographic Lessons Learned from Ansel Adams

Image by Holden Higbee

Visits with Ansel

On later visits to Yosemite Valley, we would see Ansel on a regular basis. I was a young girl but was impressed by his stature and his gray beard. In the evenings after dinner, we would all assemble in the lodge which had huge fireplaces, comfy 60s style couches, and tall vast windows with views of Yosemite Falls. My father and sister would play Backgammon, and watch the side door to see when Ansel would make his quiet entrance.

Our Dad would wave at Ansel and he would make his way over to our couch where the Backgammon board lay precariously on the cushions. Ansel would give my sister a tip or two on what her next move should be. Often he would sit awhile and watch them play before the Warren Miller Ski Film would start. Then Ansel would disappear as we became engrossed in the film.

ANSEL ZONE SYSTEM - Photographic Lessons Learned from Ansel Adams

Image by Holden Higbee used courtesy of the Ansel Adams Gallery in Yosemite

As children, we had no idea the impact that this nice bearded man would have on the world of photography and our lives as creative artists. We thought he was just another photographer and friend of my father’s.

ANSEL AT WORK - Photographic Lessons Learned from Ansel Adams

Image by Holden Higbee used courtesy of the Ansel Adams Gallery in Yosemite

Respect Nature

Even though I didn’t attend the workshops, Ansel Adams greatly influenced my life, my love of landscape photography and nature, as he did for millions of others. At 6 years old, my father put a 35mm camera in my hands and I was off and running. After that week with Ansel Adams, we would talk about photography and composition frequently at dinner. “When you are shooting landscapes” he would say, “never move a leaf or a flower, respect nature for what it is. Learn to create a composition from what is naturally there.” From that point on, I never put the camera down, it has always been an extension of my life and my personality and landscape photography became my love.

After 50 years of traveling in Yosemite, it continues to take my breath away. We now return to Yosemite three times a year to teach photography workshops. We visit the park mid-week to avoid the tourists and also when there is the greatest chance of changing weather.

“Yosemite Valley, to me, is always a sunrise, a glitter of green and golden wonder in a vast edifice of stone and space.” – Ansel Adams

Full circle

Late last fall, we had the great fortune of spending three weeks teaching workshops in the valley as it turned from fall to winter. Every day the light would change and the photographic options would take our breath away, but we felt like we were in sync with the ever changing conditions. We got into the rhythm of life there and found it an easy and wonderful experience.

Yosemite Fall - Photographic Lessons Learned from Ansel Adams

In January, we returned to the valley to do a private workshop and the forecast was for snow. As we drove into the park, the snow had started to come down and the roads were quite slushy. Little did we know, we were one of the last cars they would let into the valley for the next four days. As we arrived in the valley, it was covered in a thick coating of snow and was quickly adding up. I don’t know how many people were there that week in Yosemite, but it was a photographic wonderland.

We arrived and handed our client a pair of snow shoes and off we went on a winter photographic adventure. I would like to think that those few days of bliss might have been a bit like some days Ansel Adams experienced in Yosemite back in his day. An experience I won’t soon forget.

Yosemite Winter - Photographic Lessons Learned from Ansel Adams

“A great photograph is one that fully expresses what one feels, in the deepest sense, about what is being photographed.” – Ansel Adams

Conclusion

If you come to Yosemite, come in the off season when you can appreciate the beauty of the place without the throngs of tour buses and distracted selfie takers. Everyone that comes to the valley fancies themselves a photographer, so when you are in Yosemite, be sure to embrace the spirit of Ansel Adams.

Do you have any Ansel Adam’s stories to share? What lessons have you learned from his teachings? Please share in the comments below.

The post Photography Lessons I Learned Growing Up Around Ansel Adams by Holly Higbee-Jansen appeared first on Digital Photography School.


Digital Photography School

 
Comments Off on Photography Lessons I Learned Growing Up Around Ansel Adams

Posted in Photography


Urban Food Park: Scandinavia is Growing a “Silicon Valley for Agriculture”

03 Oct

[ By WebUrbanist in Architecture & Public & Institutional. ]

danish-food-park

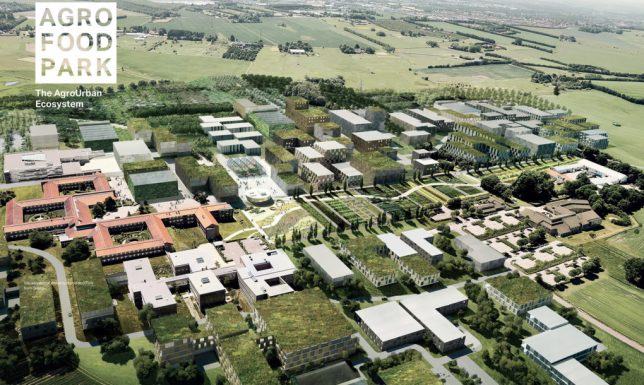
An expansive master-planned complex to facilitate urban agriculture and private/public collaboration, The Agro Food Park is Denmark’s version of “Silicon Valley” for food research and development. From experimental greenhouses to vertical farm prototypes, the park is bringing together academics and businesses to work on creating a sustainable future via global food security.

scandanavian-food-park

Co-designed by an array of architecture, engineering, technology and agriculture firms, the food park was first opened in 2009 and already hosts nearly 100 companies in 44,000 square meters of space. The newly-expanded plan, however, will grow the park by 280,000 square meters over the coming decades, requiring careful strategic planning reflecting environmental considerations.

food-park-master-plan

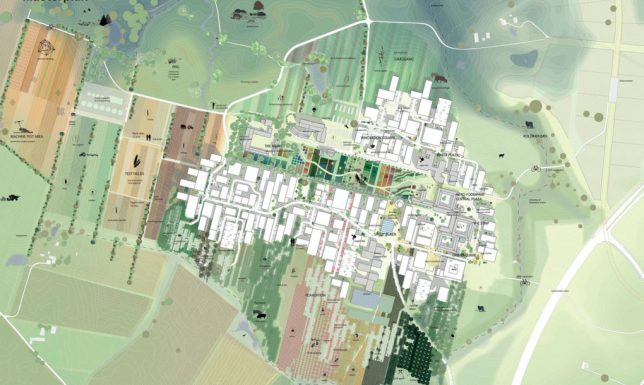
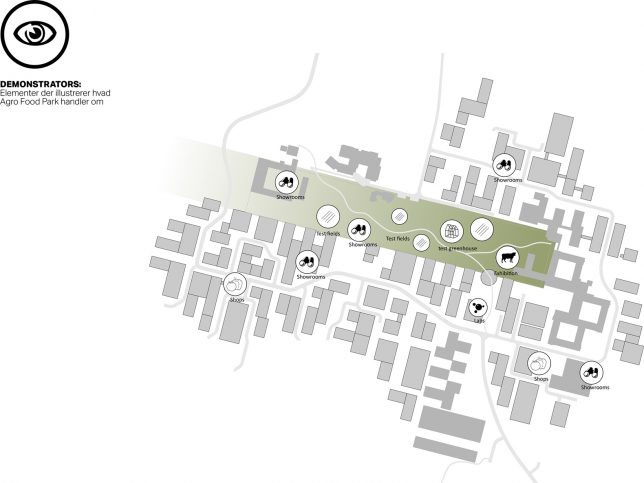
The long-term master plan features a communal Lawn showcasing experimental developments, a main-street Strip hosting various gathers and activities, and a series of Plazas to facilitate interactions between companies and researchers. The huge complex is also designed to recycle its own waste efficiently and minimize its footprint, a “practice what you preach” approach to ecological urban agriculture.

food-park-plan

“Innovation occurs best when knowledge is concentrated in clusters and cross-pollinate. By linking food production to urban life, we have tried to create an environment where people, knowledge and ideas meet. The dream is to create the framework for agriculture’s answer to Silicon Valley.”

food-park-systems

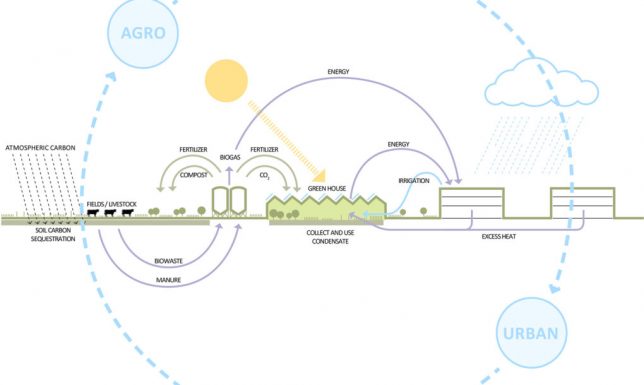
Though the plan is complex, the mission of the place is simple: to feed the world in a healthy way. The expressions of that mission, however, vary greatly, from initiatives to use clean energy and create biodiversity to facilitating healthy air and clean water. In short: it is not just about good food, but how best to produce edible goods in a sustainable way.

food-park-arrangement

“Embracing Agro-Urban Ecosystem Design, the AFP treats urban and agricultural development together as a unified, productive and restorative ecosystem,” said the project architects.

futuristic-silicon-valley-food

“By integrating the carbon cycle and other ecological processes into large scale urban systems and their surroundings – buildings and energy flows, water cycles and wastewater treatment, land use and food production – the AFP creates economic value within the urban and agricultural infrastructure.”

Share on Facebook


[ By WebUrbanist in Architecture & Public & Institutional. ]

[ WebUrbanist | Archives | Galleries | Privacy | TOS ]


WebUrbanist

 
Comments Off on Urban Food Park: Scandinavia is Growing a “Silicon Valley for Agriculture”

Posted in Creativity


Urban Human Habitats: 13 Compact Concepts for Growing Cities

07 Jun

[ By SA Rogers in Architecture & Cities & Urbanism. ]

compact cities coastal cliffs 1


How will various cities around the world adapt to rapid population growth while maintaining quality of life and responding to their unique environments and cultural context? In some cases, new ideas for maximizing urban density require building new cities from the ground up, while others reclaim industrial areas and depressed suburbs or simply keep building higher and higher into the sky. These proposals – some fanciful, others currently under construction or completed – represent a diverse variety of urban growth solutions, each with its own pros and cons.

Lush Pedestrian-Oriented Vision for Singapore

PARKROYALonPickering_Ext-ViewofSkyTerraceFromClubLounge02_(c)PatrickBingham-Hall

ParkRoyal_Dwg-GardenDown_(c)WOHA


PARKROYALonPickering_Ext-DistanceStreetViewFromAcrossUrbanPark_(c)PatrickBingham-Hall

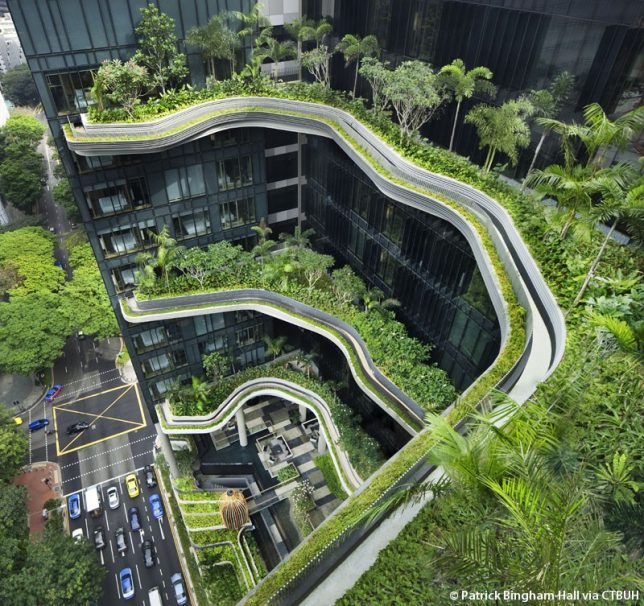
The ‘PARKROYAL on Pickering’ is a pedestrian-oriented elevated neighborhood for Singapore with lush greenery planted on nearly every level and a porous layout encouraging daylight, cross-breezes and free circulation between the various elements of the structure. The 2015 winner of the Urban Habitat Award by the Council on Tall Buildings and Urban Habitat (CTBUH), the Parkroyal was praised for being “intelligently influenced by both its environmental and cultural context.” A contoured podium draws inspiration from terraced landscapes like rice paddies, and a series of columns resembling trees makes the entire building seem to hover above the street, establishing a shaded pedestrian thoroughfare on the ground level. By stretching upward, the building design with all of its integrated greenery adds 215% new green space to the plot area, proving that increasing density in cities doesn’t have to mean losing parks and gardens.

Cities Carved Into Coastal Cliffs

compact cities coastal cliffs 1

compact cities coastal cliffs 2

copact cities coastal cliffs 3

The ‘Living on the Edge’ project imagines building new cities right into coastal cliffs around the world, forming new urban environments. While it would seem like expanding human developments into areas that are currently in their natural state isn’t exactly desirable (not to mention the threat of rising seas), the designers contend that making use of these spaces high above the water level would be better than allowing currently-existing cities to keep sprawling outside their urban boundaries into surrounding forests and agricultural land.

Shop-Top Neighborhood in Beverly Hills

compact cities MAD 1

compact cities MAD 2

compact cities MAD 3

As multiple functions compete for space in crowded cities, the answer is often to build tall structures full of apartments that sacrifice the classic suburban neighborhood feel for density and walkability. But what if we could have both? 8600 Wilshire by MAD Architects places a relatively traditional neighborhood complete with green spaces and trees right on top of a retail block in Beverly Hills. The clustered white glass villas offer 18 residential units in the form of a ‘hillside village,’ with the houses appearing opaque from the street but facing the inner courtyard with transparent facades.

High-Density Urban Development Inspired by Chinese Mountains

compact cities shanshui 1

compact cities shanshui 2

compact cities shanshui 3

Another MAD project “treats architecture as a landscape,” integrating waterfalls, trees and gardens into a high-density urban development with curvaceous structures mimicking traditional Chinese paintings of mountain ranges. ‘Shan-shui City’ is a concept that can be applied to all sorts of building projects, and MAD aims to make use of it in both all-new construction projects in China and as supplements to existing cities. They will apply it to a mixed-use urban development that’s half a million square meters in size, and new plaza development in Beijing’s central business district.

Next Page – Click Below to Read More:
Urban Human Habitats 13 Compact Concepts For Growing Cities

Share on Facebook


[ By SA Rogers in Architecture & Cities & Urbanism. ]

[ WebUrbanist | Archives | Galleries | Privacy | TOS ]


WebUrbanist

 
Comments Off on Urban Human Habitats: 13 Compact Concepts for Growing Cities

Posted in Creativity


Meal of Worms: Kitchen Farm for Growing Edible Insects at Home

22 Nov

[ By WebUrbanist in Design & Products & Packaging. ]

insect meal worms

Helping you grow and harvest edible mealworms right on your kitchen counter, the world’s first desktop-sized insect hive aims to aid a rebranding of an unpopular but nutrient-rich source of protein.

edible insect farm

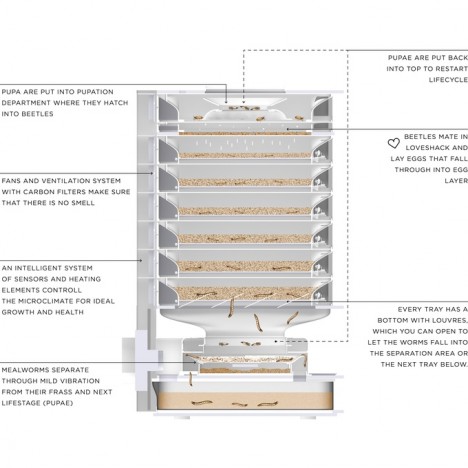
The Livin Farm by Katharina Unger and Julia Kaisinger is just a few two feet tall and contains eight shelves for housing mealworms at various stages of growth, from egg and pupae to beetle.

meal worm diagram

The pupae mature in the top drawer, turning into egg-laying beetles. The eggs in turn fall through holes in the floor and grow into worms.

insect feeding time

The key to the whole operation is a customized micro-climate within the case as well as a fan, filter and ventilation system. The insects themselves can subsist on vegetable scraps and other kitchen waste.

insect in salad

insect food protien

A button on the box vibrates the operation, separating insects from waste automatically rather than the conventional and less appealing way: sorting by hand. These are chilled in the bottom drawer for storage or can be frozen before being minced and boiled into meals.

meal worm benefits

Each harvest yields a few hundred grams with protein amounts roughly equivalent to similar weights of meat. The inputs are where the real savings is: less space, water and energy are needed for this system to work.

livin kitchen farm

insect kitchen counter

If the ‘yuck factor’ seems tough to overcome, consider for a moment the foods that have become popular over time across cultures, including the rise of sushi (raw fish and seaweed) in the United States and elsewhere.

Share on Facebook


[ By WebUrbanist in Design & Products & Packaging. ]

[ WebUrbanist | Archives | Galleries | Privacy | TOS ]


WebUrbanist

 
Comments Off on Meal of Worms: Kitchen Farm for Growing Edible Insects at Home

Posted in Creativity


Guide to Growing a Large Online Audience for Photographers

16 Jun

In this article, learn about how you can grow an online following that will enable you to profile your work, make important new contacts, and eventually monetize your photography.

TravelPhotographyMonetizedResized

Through growing my online following I have successfully monetized a career in travel photography, visiting amazing destinations like Quebec, Canada.

First, you need to decide on the best way to share your work. Is it a blog, a social media platform, or a combination of the two? Which social media platforms lend themselves best to photography? How many should you have? There are slight nuances between all social media platforms but the core ways to share remain the same.

Choosing your platform

The best advice for choosing your platform is to follow your heart. You should put your time and effort into the things that you enjoy. A great rule of thumb is to use a platform that you love, religiously, and then supplement it with one or two others. The best way to figure out what you love is to try everything, and I mean really try it. Give different platforms a few weeks each as you learn how to share content, how to engage with the community there, and how to navigate the different features. Look at how much momentum you can pick up in that time, how many users you connect with, and the sort of feedback you are receiving on your photography.

Some great platforms for you to try are Facebook pages, Instagram, Steller, Trover, Google+, Flickr, 500px, Tumblr, Pinterest, Ello and of course, your own blog. Each social media platform is different with its own benefits and limitations. Make some effort to learn about each as you try them and remember that social media is social! If you’re not sure of something, just ask someone that you follow.

ThePlatformILoveResized

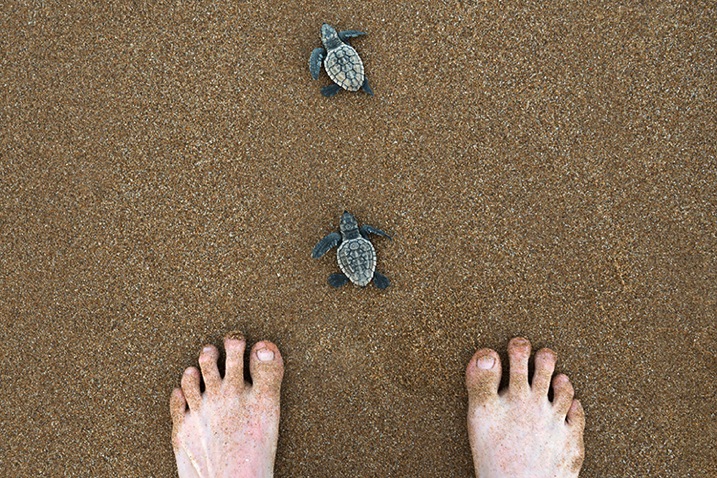
The platform that I love the most is Instagram because it lends itself well to the simple compositions I favor, plus users love uncomplicated images and subject matter such as these baby turtles in Bundaberg Australia.

Sharing content

Each platform is a little different, as are the ways of sharing your photographs, but despite subtle differences the core of sharing remains the same. Share your best work, network within the platform to get that work seen, and engage with the people who are engaging with you.

What is your best work? From any shoot or session that you do, whether it is landscape, portraiture, a family shoot, wedding, macro, food photography, etc., choose a handful of favorites and feed them out slowly, as opposed to all at the same time. Build a story into your posts and talk about the work. You might wish to share your camera settings, a gaff you made during the shoot, some information about the subject matter, or maybe even ask for feedback or advice. Again this comes down to online sharing being social. Put yourself out there and you will be amazed at what can happen.

ChooseTheBestResized

I must have taken 500 photographs of the icebergs in Jökursárlón but I only shared a coupe online, and I made sure they were perfect for my audience, uncluttered with my trademark simple composition.

Networking can be as easy as discovering photographers that you admire and commenting on their work, or using hashtag searches to find inspiration or even liking streams of images that you’re into. When another user receives a notification that you’ve engaged with their work they’re likely to come and check out yours. If they don’t, find others who will. Sharing your work online to grow an audience requires time and persistence as well as a genuine love and passion for what you’re doing. That’s why it’s important to use the platforms that you enjoy.

WhyIEnjoyResized

Another reason why I enjoy Instagram is because it is so populated. I can find any type of image, any destination, and many people with similar interests by sharing there. Reindeer fan anyone?

Engaging can be done in several different ways but one of the most important ways is to thank people that have commented on your work or reply to questions as they’re asked. You don’t need to dedicate your life to it, but you will find that a little effort will enable you to snare new followers and build new connections.

Over time, you may notice that you receive more likes and comments on a certain type of image. For example, if your macro photography is getting double the likes of your portrait photography then your followers are telling you what they really love. You can choose to give them more of what they love, or continue to diversify. In my experience the biggest social media accounts often have quite consistent subject matters. You will start to get people following you just for your macro photography, and perhaps you’ll notice a dip in engagement when you post anything else. It’s up to you how to manage this, but the best advice is to always stay true to your passions.

StarTrueResized

Although I am well known for travel photography and landscapes I also love portraiture, and despite the lower engagement I continue to post the work that resonates with me.

Networking

It’s a funny thing networking on social media; so many people do it badly. If you want to do well with people online then simply remember to be a person! You are not a faceless photographer pumping out uploads; you are a person with feelings, opinions, humor and personality, so you should let that shine through. Whatever platform you are using, you should have a profile photo that looks like you and a bio with a little information about yourself. Each time you upload a photograph you should write an engaging caption, and when people talk to you, talk back as you would in real life. You may be astonished at how many amazing people there are using social media, and they are all at your fingertips.

ProfileShotResized

A strong profile shot of you looking like yourself, doing something you love, in a scenic but uncluttered background, will help people engage with you.

Over time you may realize that brands you admire use the same platform you do, and you should treat them the same way you would treat others. Engage with the brand and offer real feedback on what they’re doing in that space. Share your personality and you may find them discovering you back. The same goes with potential clients if you are trying to break into a certain photography industry. Just be yourself, share great work, network, engage, and persist.

Monetize

If you ever get to the stage where you have a large online following on any platform, then the time may be right to monetize. There are various ways of doing so. This can be really dependent on the type of photographer you are, and the kind of work you are doing. You may be a wedding photographer you has stylists offering you money to promote them on your channels. You might love travel photography (like me) and find a way to promote destinations to your online followers. Maybe you’re into lifestyle photography and brands pay you to include their product in shots in exchange for a fee. With an audience you will find that the photography industry will open up to you as more and more businesses are hiring based on both photography style and online reach.

OnlineReachResized

It’s not a complicated image, perhaps any decent photographer could have taken it, but combine this image with a 400,000 strong audience and I get a foot in the door thanks to my online reach. (Follow Lauren on Instagram here)

If not the above, then having an online following will expose you daily to an audience that may one day need a photographer. Online sharing gives you a chance to be seen by everyone from businesses, to journalists, to tourism boards, and of course potential clients and friends. By finding the platform that you love and sharing great work; by putting your best foot forward and networking and by keeping an eye out for opportunity, you can definitely go places no matter the level of your photography.

WeAllStartSomewhereResized

We all start somewhere. Online sharing has enabled me to take my photography to places I never would have believed possible and having an audience makes me proud and accountable for every image I share.

googletag.cmd.push(function() {
tablet_slots.push( googletag.defineSlot( “/1005424/_dPSv4_tab-all-article-bottom_(300×250)”, [300, 250], “pb-ad-78623” ).addService( googletag.pubads() ) ); } );

googletag.cmd.push(function() {
mobile_slots.push( googletag.defineSlot( “/1005424/_dPSv4_mob-all-article-bottom_(300×250)”, [300, 250], “pb-ad-78158” ).addService( googletag.pubads() ) ); } );

The post Guide to Growing a Large Online Audience for Photographers by Lauren Bath appeared first on Digital Photography School.


Digital Photography School

 
Comments Off on Guide to Growing a Large Online Audience for Photographers

Posted in Photography


6 Steps to Growing Your Photography Business Using a Recommended Vendors List

26 Jan

In this article I talk about a technique used in all types of business, but of course will relate it to photography. To make it easy to understand, I am going to discuss the technique specifically for wedding photographers. But it is important to know that the technique you will learn in this article can work for any type of photography niche or genre.

Wedding cake

Utilizing a business partner vendor list to grow your business

How so? By creating something of value to offer website visitors, which will in turn get them to give you their name and email address. When someone offers you contact information in exchange for something of value, they are now considered a lead. From there you have the potential to convert that lead into a paying customer.

Let’s break it down piece by piece. I’ll start with a list and then talk about each individually:

  1. Create a PDF document that is attractive to your potential customers. This PDF is intended to act as a conversion tool – a free offer.
  2. The offer utilizes a business partner vendor list by recommending preferred and partner vendors. This helps add more value to the download and also improves the relationship between you and the vendor.
  3. Create a way for site visitors to enter their contact information on a landing page, a magnetic spot like blog sidebars, or a pop-up box.
  4. Capture emails of website visitors, which then turn into quality leads (because they downloaded something specifically for their intention of hiring a photographer).
  5. The vendors included in the document are also likely to further promote the document.
  6. You now have huge potential of converting those leads into customers, via phone calls and email marketing.

Now let’s get into the nitty-gritty of each of those points. As mentioned earlier, this is geared to wedding photography. So if you are not a wedding photographer, take all I am saying and relate it to the type of photography you do.

Step one – create a PDF

The first step is to come up with a PDF document which you can offer for free on your website. Ideally it will contain everything that your potential customer would need to know about planning a wedding. It’s important that the document is branded to your business, and has an attractive design overall. You can use your letterhead (with logo of course), or a pre-made design for the task at hand (which I have made available) or templates from Keynote or PowerPoint. The important part is that your branding is in the design and that it won’t turn people away by looking unprofessional.

Photographer free pdf

Step two – utilize your list

Inside the PDF categorize it for different types of vendors. You may have a page of florists, and another for wedding venues that you recommend. Ideally make each a two-page spread if possible. One page would provide the information on the vendors, and the other page would contain your photography examples related to the vendor. Think of it like a portfolio of your best work combined with your recommended vendor list.

The beauty of this is that you are getting your photographs in front of couples planning their wedding. Your brand is there as well vendors, which the couple might also hire.

Step three – create the opt-in

Next up is creating a way convert website visitors into leads. This is a bigger section due to the complexity. By this point you will have already created the PDF, which leads will download. But the process of gathering the email addresses confuses many people.

The first step is to use an email marketing service like Mailchimp or Aweber. Both are fantastic. I personally use Mailchimp for its ease of use and pricing.

Both services offer a feature, which can automatically send emails based on certain actions. In Mailchimp it is called Automation, in Aweber it’s called Follow Up Series. There you will set up an automated email, which will be sent to anyone who signs up for the “Free PDF” list that you will have created. Definitely name the list something you will recognize immediately when logging into your account.

These services allow you to attach a PDF to an email, which is what I recommend. But if you are using a service that does not allow attachments then create a Dropbox or Google Drive link and include that in the email.

This is where the fun part starts. There are many places where you can place what’s called an opt-in form. That means, a form which asks a website visitors for a name and email address, or any other information you want to request like a phone number.
Note that the less information you request the higher your conversion rate will be – meaning, the more people will fill it out. So I typically ask for email addresses only (you will see why later).

The first place you want to place the opt-in form is on a landing page specific to the free PDF. The benefit of having a unique page for the document is connected to SEO (search engine optimization). A dedicated page can be filled with additional text and image content optimized to rank well on search engines. It can also increase the conversion rate (percentage of people who sign up compared to number of page visits) for the opt-in because there are no distractions from blog articles or other content available only your website. Services like Mailchimp and Aweber offer embed codes for your opt-in forms. You use it like you were copying and pasting HTML from YouTube, Vimeo or 500px.

The second place you can have the opt-in form is on your blog’s sidebar, or in a pop-up form. These are called magnetic areas because they draw the attention of a visitor’s eye directly to them. There are a few ways you can do the magnetic opt-ins. For sidebars you can use the standard embed code. Some services offer pop-up codes as well. For WordPress sites I recommend services like OptinMonster or Pippity, which come with many design options as well as timing and split testing so you can see what converts the best. I have helped a many photographers with this method.

Optinmonster

Step four – leads versus quality leads

Now that you have the PDF done, and everything set up for visitors to convert into leads – it is important to note the difference between a lead and a quality lead.

A lead is anyone who contacts you about anything. An example of a standard lead is a couple who contacts you for a price list. They might be interested in your services, but there is no way of knowing how interested they really are, how far along they are in their wedding planning, or how serious they are about you.

A quality lead is someone who has taken specific actions to do research and wants valuable information. For example, a quality lead would be a couple downloading your free PDF because it contains information specific to their needs. They understand that it will contain every vendor they need to know about to plan their wedding.

Quality leads have a much higher chance of converting into paying customers over standard leads. That’s because a quality lead is already more interested in your services than a standard lead.

Step five – inform your vendors

If the couple books a venue listed on your PDF, then it is highly possible they will mention you as a referral. Your vendor partners will appreciate that. So, be sure to send a copy to your partners so they know what you are offering potential customers. Then they are also more likely to promote it, and promote you.

Your best sales people are your brand advocates. Those are your customers and your business partners.

Biz partners

Step six – converting to customers

You have your free PDF and are converting site visitors into leads. You are utilizing an email marketing service as recommended. Next is where it really comes into play.

I mentioned earlier that I typically only ask for email addresses. That is because with email marketing you can learn more about your leads, so names and phone numbers are NOT essential. In fact, you may find that through nurturing those leads via email marketing that you will have more people contacting you than you contacting them.

After doing some testing, I came to the conclusion that sending one email a week to my list is most effective. You may find yourself in a different situation. But having an email marketing service that tracks statistics will help you identify the optimal sending scenario – days and times.

One effective trick I find for converting leads into paying customers is to ask a question, which warrants a reply. Whatever the question might be, you will find people replying. That is where the conversation really takes off. Something like this perhaps:

As a wedding photographer I am always so curious what types of gowns brides pick.  Please reply with the type of dress you will be wearing at your wedding.  Or if you already picked it out, I’d love to see a photo!

What have you learned

To wrap-up this article, I want to restate what you learned here and what your first step should be.

Your business partner vendors are more important than ever to your business. You can foster those relationships online, and offline, by creating a free PDF as described here. That PDF will be used as leverage for converting website visitors into quality leads. Using email-marketing you can nurture those leads and convert them into paying customers. All with a little help from a simple PDF that includes super valuable information.

New family

Once again, I used wedding photography as an example, so if you are not a wedding photographer then be sure to think hard about your vendor list and what your clients would need. Then start creating that document.

Hop to it!

Disclaimer: dPS does not agree or disagree with any recommendations made by the author. The author receives no extra compensation for these referrals and benefits in no way. He only recommends them because these are the services he uses – do your own due diligence when selecting any service for your business.

googletag.cmd.push(function() {
tablet_slots.push( googletag.defineSlot( “/1005424/_dPSv4_tab-all-article-bottom_(300×250)”, [300, 250], “pb-ad-78623” ).addService( googletag.pubads() ) ); } );

googletag.cmd.push(function() {
mobile_slots.push( googletag.defineSlot( “/1005424/_dPSv4_mob-all-article-bottom_(300×250)”, [300, 250], “pb-ad-78158” ).addService( googletag.pubads() ) ); } );

The post 6 Steps to Growing Your Photography Business Using a Recommended Vendors List by Scott Wyden Kivowitz appeared first on Digital Photography School.


Digital Photography School

 
Comments Off on 6 Steps to Growing Your Photography Business Using a Recommended Vendors List

Posted in Photography