RSS
 

Posts Tagged ‘Grid’

Tips For Using a Grid in Off-Camera Flash Photography

15 Oct

An off-camera flash lets you create your own light, giving you new and powerful options for bringing your vision to life.

But one of the biggest challenges of striking out as an off-camera flash specialist isn’t getting the necessary equipment, or even learning how to properly expose a picture.

It’s learning how to control the light. You need to harness it, not to let it roam free.

Portrait taken using a grid

Firing a strobe into an umbrella or a softbox for the first time and instantly creating soft, even light you can use for flattering portraits is an awesome feeling. Unfortunately, the artificial light usually spills everywhere, including the places you don’t want it to go—all over your background, back into the camera to create lens flare, etc.

As we know from the inverse square law, light loses its intensity the further it travels. But if you’re lighting a portrait in a tight environment you may not have the luxury of the light falling off. Your carefully lit shot could be ruined by light bouncing here, there and everywhere.

Fortunately, a bevy of creative options are available for controlling and limiting how your flashes splash light across the image. And one of the more popular options is using a grid.

What is a grid?

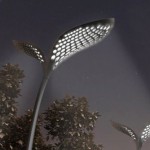
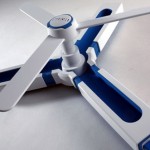
A grid fits over your flash and, using a series of honeycomb tubes, restricts the direction of the light output. Grids come in a variety of sizes to give you either a narrower beam of light or a wider spread. A 10-degree grid casts a narrower beam of light, while a 40-degree grid creates a wider beam.

A grid modifier for speed light flashes

With this level of control over your light you can create the precise lighting setup for the picture in your head.

A grid modifier fitted over top of a flash unit

While other options are available for restricting light (such as snoots), a grid provides the best balance between controlling the light and providing a pleasing effect with a gradual light falloff.

When is the best time to use a grid?

As I mentioned earlier, the challenge is to stop the light where you want it to. That perfectly placed light that’s highlighting your subject might also be throwing light over other parts of your picture, ruining the delicate balance.

Where a grid really shines is in providing a precise and restricted beam of light. You can use it to highlight a detail, create intrigue, or add drama in any other way you can imagine.

An image shot with an umbrella modifier on the flash

This shot is lit using an umbrella. The light is soft and covers a wide area.


Image taken with a bare flash

This shot is lit with a flash but no modifiers. The light is harsh, but narrower than the umbrella.


Image taken using a grid

Finally, this image is taken using a grid. The light is still quite harsh, but it’s restricted to bring more focus to the subject.

Using a grid on your key light

A grid is a fun way to create drama or heighten contrast. This is typical for low key images where a grid is used to purposefully show or hide key details.

For example, you can use a grid to mimic a shadowy and dark “film noir” image. The grid restricts the light, keeping it from spilling all over the scene and helping to maintain that dark, low key effect.

A Low Key portrait taken using a grid modifier

Using a grid on a secondary light

In a multi-light setup, you may need to use a grid on your secondary lights so you don’t ruin the balance provided by your key and fill lights.

Let’s say you already have the lighting you need on your model, but you want to emphasize a background detail. A bare flash would send a lot of new light careening around the image, whereas a grid lets you achieve the look you want with the precision you need.

Lens flare from secondary light

The light from the secondary light behind and to the left of the subject is causing lens flare. Putting a grid on the light would restrict the beam and stop it from happening.

Another useful application for a grid is where your rim light is pointed back towards the camera. You may need it to separate your model from the background. But if that light spills into your lens you’ll have to deal with lens flare and lowered contrast when editing later on.

The solution? Slap a grid on your rim light. The light will be directed only where you want it to go, potentially saving you hours of post-processing work.

Give it a shot

A grid is a handy tool in any off-camera flash photographer’s bag. Their simple design makes them an affordable option and, as I said earlier, they can be used creatively on either your key or secondary lights.

Making the most of a grid is an excellent step to take towards becoming the best flash photographer you can be.

The post Tips For Using a Grid in Off-Camera Flash Photography appeared first on Digital Photography School.


Digital Photography School

 
Comments Off on Tips For Using a Grid in Off-Camera Flash Photography

Posted in Photography


SLC-2L-04: Use a Tight Grid to Create Color

08 Oct

Normally, you might think of a grid spot for what it creates: a tight zone of light. But it also can be helpful to think of it in terms of the inverse: a grid also prohibits light from reaching everywhere else.

And the "everywhere else" part—that relative blackness you can create with a gridded key—is what can help you to amp the color palette in even a small room with light-toned walls.

Read more »
Strobist

 
Comments Off on SLC-2L-04: Use a Tight Grid to Create Color

Posted in Photography


Batteries and Backups: How to Shoot Off the Grid

30 Sep

Road trips, and other “off the grid” travel adventures are a time for slowing down, for finding the unexpected, and for reconnecting with the world around you. Unfortunately, for us photographers, they can also be a time of anxiety and frustration. How can you keep your camera charged so it’s always ready when inspiration strikes? How can you handle batteries and backups of your photos so they aren’t lost in the mix before you return home?

Batteries and Backups: How to Shoot Off the Grid - photographer shooting in a canyon

As a consummate road-tripper and photographer, I’ve spent many years fine-tuning how to keep my camera charged, and my photos safe, for weeks of off the grid travel. Here are some tips to help you do the same.

Charging 101

Many cameras, from point and shoots to DSLRs, are powered by lithium-ion (Li-ion) batteries. Li-ion batteries are small, lightweight, rechargeable batteries that can tolerate hundreds of charge and discharge cycles.

They are recharged by an external charger, which comes with your camera when you purchase it. That charger plugs into a wall via a two-prong plug and feeds off your house’s Alternating Current power (also called AC power).

Batteries and Backups: How to Shoot Off the Grid - external battery

Here’s where charging off the grid gets tricky. Unless you’re staying nightly in a hotel room, two-prong AC plugs (and the charging capacity to power them) are hard to come by. In order to keep your camera battery charged, you will need to adapt.

Batteries and Backups: How to Shoot Off the Grid - camper van

Essential Charging Gear

Start out by purchasing a universal Li-ion battery charger. Universal chargers can hold almost any kind of small Li-ion battery, and come with a two-prong plug as well as a 12-volt Direct Current (DC) adapter. This adapter is cylindrical and fits into your car’s 12-volt port (traditionally called a “Cigarette Lighter” charger).

Batteries and Backups: How to Shoot Off the Grid

If you plan to drive for long distances each day and are only looking to recharge a camera battery, this may be all you need. If you plan to charge other devices—tablets, phones, and laptops—or won’t be driving, you’ll need a power bank.

Power Banks

Power banks are essentially big batteries. They receive a charge, either from a wall outlet or an alternative source like solar panels, and hold onto that charge until you need it. Power banks vary greatly in size, weight, and capacity.

Batteries and Backups: How to Shoot Off the Grid - power bank

Small USB power banks are perfect for powering cell phones and tablets. Depending on their capacity, they can recharge a phone or tablet anywhere from two to eight times.

Though they are harder to find, some small power banks also have a two- or three-prong port for plugging in a Li-ion camera battery charger. For quick trips where a little backup is needed, these power banks are just right.

If a little backup isn’t what you’re looking for, it’s time to call in the big guns. Portable power stations range in size from 150 to 1250 watts and are designed to be a full-service power solution. Power stations offer three-prong ports for AC power, multiple USB ports, and a 12-volt port.

They can charge camera batteries, laptops, tablets, and cell phones with ease (charging capacity varies by model).

Batteries and Backups: How to Shoot Off the Grid

Portable power stations are relatively large, as well as heavy. To illustrate, they are great at a campsite but too bulky to hike comfortably into the backcountry. These power stations are recharged by plugging them into a wall outlet, or by connecting them to solar panels and allowing them to charge for 8-12 hours.

If you’re looking for serious charging power, or plan to be off the grid for long stretches, a portable power station is a wise investment.

Note: Portable power stations cannot be brought on airplanes, though smaller USB power banks often can.

Batteries and Backups: How to Shoot Off the Grid - battery in use at campsite

Photo Backups

Is there anything worse than returning from travel and finding your image files are corrupted or missing? A savvy photographer will avoid this scenario by doing daily backups of their images.

Batteries and Backups: How to Shoot Off the Grid - on the road

Backing up images online to the cloud is an option if you have fast, reliable Wi-Fi at your disposal. Set the backup to happen overnight, and you’ll wake up knowing your images are safe.

Fast Wi-Fi is hard to find. Hotel and coffee shop connections are often sluggish, so always be prepared with another backup plan. If you’re traveling with a laptop you can either back up the images directly to the computer or carry a rugged external hard drive. If the images are critical, such as a wedding gallery or a shoot for a client, back up the images to two different locations.

Batteries and Backups: How to Shoot Off the Grid

When traveling without a laptop, invest in a portable backup device like a Gnarbox. These small drives have an SD card slot and will copy and store all of the card’s images. Again, if the shoot is extra-important, be sure to back up the images to at least two locations.

Conclusion

Keeping your camera and other devices charged while on the road can be a challenge, but is made easier with a few pieces of essential gear designed to meet your charging needs. Together with regular backups, you can take images off the grid with ease and peace of mind.

The post Batteries and Backups: How to Shoot Off the Grid appeared first on Digital Photography School.


Digital Photography School

 
Comments Off on Batteries and Backups: How to Shoot Off the Grid

Posted in Photography


Instagram is testing a four-photo grid, and some users are freaking out

20 Sep

Facebook-owned image sharing behemoth Instagram (heard of ’em?) is testing a new change to its app, and the internet is collectively freaking out about it. According to some users, Instagram is already rolling out a new 4-across profile grid to replace the current 3-across setup that people know and (apparently) love.

Not a huge deal, you might think, but many photographers and casual users alike use that 3-across grid to create interesting mosaics that help their profile stand out. And those people are not reacting well to news of the test:

Of course, by now Instagram is used to these kinds of reactions—it seems like every change they make is met by a deluge of fear, anxiety and threats of abandonment. The algorithmic feed has been a boon for the company, but it set the community into a panic; and even smaller changes like the ability to block comments automatically or by keyword are usually met with at least some skepticism.

But for those photographers who have built their Instagram ‘brand’ in part by making creative use of the 3-across grid on their profile, this change would represent a swift kick to the mosaic.

Articles: Digital Photography Review (dpreview.com)

 
Comments Off on Instagram is testing a four-photo grid, and some users are freaking out

Posted in Uncategorized


Mobile Cabins: Go Off Grid in These 12 Rustic Modern Designs

03 Mar

[ By Steph in Architecture & Houses & Residential. ]

mobile cabins walden 2

Load up a prefab cabin on a truck and drop it virtually anywhere you want to be. Rustic lodgings in remote locations aren’t what they used to be now that modern mobile housing is available in so many forms and price ranges, from tiny houses on wheels costing just $ 11,000 to ultra-narrow habitable garden sheds to cabins shaped like actual logs to take the typology to its extreme.

Escape Vista
mobile cabin escape vista

mobile cabin escape vista

mobile cabin escape vista 3

mobile cabine scape vista 4

The Escape Vista is a 160-square-foot, cedar and cortex steel cabin on wheels that can be towed to the location of your choice to take advantage of its many large windows offering views of your surroundings. There’s room for one or two, and despite its small size, you’ll have a bed, kitchen, dining or work table, lounge area and bathroom. The open interior is finished with aspen wood, and luxury features include solid butcher block tops, designer faucets, integrated solar power, a washer/dryer combo and a pop-up flatscreen television. It starts at $ 39,900.

Pircher Oberland
mobile cabins hangar

mobile cabins hangar 2

mobile cabins hangar 3

mobile cabins hangar 4

Hangar Design Group created this prefabricated, mobile metal-clad cabin for Picher Overland to blend into rocky mountain environments. Vertical wooden siding on either end mimics tree trunks, and the interior is lined in natural wood flooring and synthetic stone-toned tiles.

Flake House by Olgga Architects
mobile cabin flake house

mobile cabins flake house 2

mobile cabins flake house 3

This nomadic dwelling by Olgga Architects is like a modern take on the log cabin, camouflaged on the outside by fully-round timber siding. It stands on the site of Frossay in France, open to anybody who needs a simple shelter overnight. The proposal is “based on the concept of the ‘foil’, where the wooden structure is broken in two halves establishing a radical spatial boundary while materializing an unexpected entry sequence. an object, recalling a broken branch, whose unconventional scale is the main idea of the project: to be built-up, taken down, moved, pt down, left behind or taken along, inhabited or left to its surrounding.”

The Wedge: Luxury Rolling Cabin
mobile cabin wedge 1

mobile cabin wedge 2

mobile cabin wedge 4

mobile cabin wedge 5

This 400-square-foot luxury turnkey cabin by Wheelhaus features a spacious bedroom with a king-sized bed, standard-sized bathroom, fireplace, large windows, high ceilings and a private deck. Base prices start at $ 89,500.

Next Page – Click Below to Read More:
Mobile Cabins Go Off Grid In These 12 Rustic Modern Designs

Share on Facebook


[ By Steph in Architecture & Houses & Residential. ]

[ WebUrbanist | Archives | Galleries | Privacy | TOS ]


WebUrbanist

 
Comments Off on Mobile Cabins: Go Off Grid in These 12 Rustic Modern Designs

Posted in Creativity


Grid Corrections: Rural Detours Reflect Curvature of the Earth

10 Feb

[ By WebUrbanist in Culture & History & Travel. ]

jefferson grid corrections

Driving along a straight highway in the American countryside, you may find yourself forced to turn right or left, then turn again just to keep moving ahead, all to compensate for a rectilinear planning system imposed on a spherical planet.

grid correction

Picture running two fingers along a globe from the equator to the North Pole, starting an inch apart but following parallel lines. Eventually, they will converge and ultimately they will touch. At smaller scales, the effect is all but invisible, but when tens of miles are involved, and as seen from the sky, it becomes quite pronounced.

brid broken road system

Dutch artist and photographer Gerco de Ruijter dug into the history of this phenomena after noticing these periodic “grid corrections” strange during an artist residency at the Ulrich Museum in Wichita, Kansas, that appeared to happen for no immediately apparent reason. They take various shapes and forms, including zigzags, angles and curves, and some are less obvious than others (except from above).

gridded geometry

The cause dates back centuries, to the egalitarian Jefferson Grid, designed to ensure equal and fair land distribution by carving up rectangular townships the undeveloped country west of the original 13 states. Each was six square miles, and framed by borders and roads running in straight lines, parceled for sale and development in part to pay off debts following the Revolutionary War.

grid correction adjustment highway

Those implementing Thomas Jefferson’s plan stumbled upon a flaw in its perfectly geometrical approach, analogous to the classic dilemma of fitting a square peg in a round hole.

gride correction rural america

“It did not take long for legislators to understand that a township could not be exactly six miles on each side if the north-south lines were to follow the lines of longitude, which converged, or narrowed, to the north,” explains landscape architect James Corner in Taking Measures Across the American Landscape. “The grid was, therefore, corrected every four townships to maintain equal allocations of land.”

grid curves

“This added up to a detour every 24 miles, from sea to shining sea,” writes Geoff Manaugh. “These particular doglegs are most clearly seen far from urban centers, in the agricultural countryside, where the regular, quilted appearance of rural land use makes them more visible.” There are perhaps larger lessons to be found in this geometric anomaly, about the best-laid plans and how they intersect with an imperfectly-aligned reality.

Share on Facebook


[ By WebUrbanist in Culture & History & Travel. ]

[ WebUrbanist | Archives | Galleries | Privacy | TOS ]


WebUrbanist

 
Comments Off on Grid Corrections: Rural Detours Reflect Curvature of the Earth

Posted in Creativity


Offbeat & Off the Grid: 15 Surprisingly Mobile Solar Gadgets

12 Aug

[ By Steph in Gadgets & Geekery & Technology. ]

Mobile Solar Main

Solar power projects go truly off-the-grid in mobile applications that range from practical if goofy solar panel-equipped Ray Bans to donkeys that stroll around with photovoltaics mounted to their backs. While some are just for fun, others have the (solar) power to bring electricity to remote places, or get around restrictions that hold back renewable energy progress.

Shrub Rover Solar-Powered Camouflaged Car
Mobile Solar Shrub Rover 1

Mobile Power Shrub Rover 2

It looks like an ordinary shrub. Then it starts inexplicably rolling along the ground as if it has gained sentience a la the plot of a particularly terrible horror movie from the 1950s. The Terrestrial Shrub Rover by Justin Shull is a solar-powered, foliage-covered vehicle that lets drivers explore new territories in disguise (as long as you wait to actually drive it until after dark.) Cameras on the outside display the car’s surroundings on screens within so you can see where you’re going.

Pop-Up Solar Power Station
Mobile Solar Pop Up Station

Solar installations can be costly and time-consuming to install, but load them into a shipping container so that they can pop right out when it’s opened and you’ve got a convenient mobile solar power station. The Ecos PowerCube is available in 10-foot, 20-foot and 40-foot ISO shipping container footprints with solar panels hidden within protective drawers. Batteries inside the container store power. Once unrolled, the panels increase the size of the array to three times the footprint of the shipping containers.

Solar-Powered Wheelchair
Mobile Solar Wheelchair

The winning entry in a competition for inventions that can make a significant difference to people with disabilities, this solar-powered wheelchair can run continuously on the power of the sun. Designed by students at the University of Virginia, the wheelchair features a custom-built 11-square-foot solar panel that doubles as a sun shade and enables the wheelchair to travel indefinitely at 1mph without drawing power from the battery.

Autonomous Solar-Powered Lawnmower
Mobile Solar Mower

The equivalent of a Roomba for your lawn, this open-source robotic lawn mower runs entirely on solar power so you don’t have to sweat it out on a hot summer day. No need to even control it via remote, since it’s totally autonomous. If you’re handy with electronics, you can try making one yourself – instructions are available at Open Electronics.

Freshwater Floating Solar Power Plant
Mobile Solar Freshwater Plant

The world’s largest freshwater solar power plant will be installed over reservoirs and lakes in India’s southern state of Kerala in a $ 72 million, 50 megawatt project. Using freshwater gets around the problem of landowners overcharging for solar developments, with projects paying rent to the owners of the bodies of water. The total cost will end up being around 15 percent lower than equivalent land-based projects.

Next Page – Click Below to Read More:
Offbeat Off The Grid 15 Mobile Solar Gadgets

Share on Facebook


[ By Steph in Gadgets & Geekery & Technology. ]

[ WebUrbanist | Archives | Galleries | Privacy | TOS ]


WebUrbanist

 
Comments Off on Offbeat & Off the Grid: 15 Surprisingly Mobile Solar Gadgets

Posted in Creativity


Street Smart: Solar Roadway Lights Up & Feeds Power Grid

21 May

[ By WebUrbanist in Conceptual & Futuristic & Technology. ]

solar roadway graphic design

Currently in crowdfunding, these hexagonal pavers can provide energy, melt accumulated snow and ice, light up with LEDs, all while being tough enough to support trucks weighing 250,000 pounds.

solar roadway parking sidewalk

Designed by American electrical engineer Scott Brusaw to work everywhere from roads, parking lots and driveways to sidewalks, bike paths and playgrounds, you can walk, drive or park on these hexagrams with ease. They have been extensively tested for load-bearing capacity as well as traction and impact resistance.

solar road test panels

solar roadway led lights

More about the project from IndieGoGo (graphics by Sam Cornett): “Solar Roadways is a modular paving system of solar panels that can … pay for themselves primarily through the generation of electricity, which [in turn] can power homes and businesses connected via driveways and parking lots.”

solar roadway rural highway

solar roadway system sketch

Current working prototypes are already powerful, as demonstrated above. Beyond existing capabilities there are many possibilities for further development, including mutual induction technologies that would allow charging while driving and more complex LED systems to create changing road displays on demand.

Share on Facebook


[ By WebUrbanist in Conceptual & Futuristic & Technology. ]

[ WebUrbanist | Archives | Galleries | Privacy | TOS ]


WebUrbanist

 
Comments Off on Street Smart: Solar Roadway Lights Up & Feeds Power Grid

Posted in Creativity


Making Sense of Lightroom’s Grid View

23 Oct

Using Lightroom's Grid View

In last week’s article about Lightroom you learnt how to use Collections and Smart Collections to organise your images. Today, I’m going to take a closer look at the Grid View (part of the Library module) and show you how to customise the display.

If you’re not in Grid view, just press the ‘G’ key. It’s a keyboard shortcut that will take you to the Grid view from any part of Lightroom.

The Grid View displays thumbnails of photos contained in the currently selected Folders, Collections or search results. Here, I used the Shift+Tab shortcut to remove the left-and right-hand panels, the filmstrip and the module picker button panels from the view:

Using Lightroom's Grid View

These are the three main sections of the Grid View:

Using Lightroom's Grid View

The Filter bar: marked in yellow. Press the backward slash (‘\’) key to reveal the Filter bar if you don’t see it. You can use the same key to hide it.

The Content window: marked in green. This is where Lightroom displays the image thumbnails.

The Toolbar: marked in blue. Press ‘T’ to reveal it if you don’t see it. The same key also hides the Toolbar.

The Toolbar

There are several items on the Toolbar of immediate interest:

Using Lightroom's Grid View

These icons represent the four view modes of the Library module. From left to right they are Grid View, Loupe View, Compare View and Survey view. The Grid view icon is highlighted to indicate that it is the active view mode (I will look at the other view modes in future articles).

Using Lightroom's Grid View

The Thumbnails slider is on the right-hand side of the Toolbar. Use it to set the size of the thumbnails in the Content window.

Using Lightroom's Grid View

Finally, if you click the white arrow on the very right of the Toolbar, you’ll see the above menu. Each menu item corresponds to an item on the Toolbar. The ticks indicate which items are displayed on the Toolbar. Click on any of the menu items to add or remove them.

The Content window

The Content window is where Lightroom displays thumbnails. Each thumbnail, plus the grey border around it, is called a cell. There are two types of display: Compact cells and Expanded cells.

Compact cells

This is what the Compact cell display looks like:

Using Lightroom's Grid View

I’ve numbered the important parts:

1. The filename of the photo.

2. The white flag indicates this photo has been flagged as a pick.

3. The big number 5 shows this image is the fifth in the sequence in the currently selected folders or Collections.

4. The light grey border means this photo is selected.

5. The yellow border shows that the yellow colour label has been applied to this image. This photo is selected, so Lightroom displays a thin border. If the image is not selected, Lightroom applies the colour label to the entire border. That is why the thumbnail on the right is surrounded by a thick green border.

6. These stars show that the image has a five star rating.

7. The yellow square also indicates the colour label.

8. There are two icons at the bottom right of the photo (you may see different icons depending on what you have done to the image). The icon on the left indicates that the photo has been added to at least one Collection. The icon on the right tells you that the photo has Develop adjustments.

Tip: If you hover the mouse over an icon and keep it still, Lightroom will display a label telling you what the icon means. It appears after about two seconds.

9. The grey circle in the top right indicates that the photo has been added to at least one Collection.

Tip: To see what Collections the photo has been added to right-click on the thumbnail and go to the ‘Go to Collection’ option. Click on a Collection name to open that Collection in Grid View.

Expanded cells

Here is the Expanded cell display. The cells are larger than the Compact cells, and contain a little more information. I’ve marked the parts that are different:

Using Lightroom's Grid View

1. The size of the number indicating that this is the fifth photo in the currently selected folders or Collections has changed.

2. These figures show the dimensions of the photo in pixels.

3. There is no flag here, indicating that this photo hasn’t been flagged as a pick or flagged as a reject.

4. The filename of the photo, with the file type (in this case, DNG) underneath.

5. The black flag indicates that this photo has been flagged as a reject. Lightroom fades out the thumbnail so you can see it has been rejected.

View Options

Lightroom lets you customise the layout of the cells so the display shows as much or as little as you wish. Go to View > View options (or use the keyboard shortcuts PC: Ctrl+J, Mac: Cmd+J) to bring up the Library View Options window. Again, I’ve marked some of the interesting menu options:

Using Lightroom's Grid View

1. Show Grid Extras. This is where you chose between Compact Cells and Expanded Cells. Untick the Show Grid Extras box if you want to simplify your display. Doing so removes the information displayed around the thumbnails in Grid View.

2. Show clickable items on mouseover only. If you untick this box every thumbnail is displayed with arrows in the bottom corners that you click to rotate the image, and a grey flag if the image is unflagged. With this box ticked, these icons are only displayed when you move the mouse over the image:

Using Lightroom's Grid View

3. If the colour labels annoy you, or you just don’t use them, untick this box to turn them off. The menu on the right lets you adjust the intensity of the colour tint.

4. The rest of the View Options let you customise what icons and information are displayed alongside the thumbnails.

Your thoughts

How do you customise Lightroom? I’d be interested to hear your thoughts, whether they are about the Grid View or another part of Lightroom. Leave a note in the comments if you have anything to share.

Mastering Lightroom Book One: The Library Module

Using Lightroom's Grid View

My latest ebook Mastering Lightroom Book One: The Library Module is a complete guide to using Lightroom’s Library module to import, organise and search your photo files. You’ll learn how to tame your growing photo collection using Collections and Collection Sets, and how to save time so you can spend more time in the Develop module processing your photos.

Post originally from: Digital Photography Tips.

Check out our more Photography Tips at Photography Tips for Beginners, Portrait Photography Tips and Wedding Photography Tips.

Making Sense of Lightroom’s Grid View

The post Making Sense of Lightroom’s Grid View by Andrew Gibson appeared first on Digital Photography School.


Digital Photography School

 
Comments Off on Making Sense of Lightroom’s Grid View

Posted in Photography


Drive & Live Off off Grid: Convertible Mobile Caravan Concept

01 Apr

[ By WebUrbanist in Conceptual & Futuristic & Technology. ]

convertible off grid car

Forget the trailer and start trailblazing – this emission-free and fully-electric vehicle can juice up just like its Tesla cousins, but can also use photovoltaics and solar sails to recharge well off the beaten path.

convertible trailer free home

Picture the three-wheeled Ecco as the latest in a long-standing series of streamlined and transforming vehicles for dwelling  in, starting with Dymaxion and continuing to Airstream and through Volkswagen. Except, for the first time, conventional fuel is not required.

convertible electric portable caravaan

A light aluminum-and-class frame unfolds, stretching fabric into place and expanding the living space when stationary. This action also allows the driver to tilt up the sun-gathering elements for maximum charging capabilities.

Share on Facebook


[ By WebUrbanist in Conceptual & Futuristic & Technology. ]

[ WebUrbanist | Archives | Galleries | Privacy | TOS ]


WebUrbanist

 
Comments Off on Drive & Live Off off Grid: Convertible Mobile Caravan Concept

Posted in Creativity