RSS
 

Posts Tagged ‘geotagging’

Jackson Hole Travel and Tourism Board is asking visitors to stop geotagging photos

08 Dec

In Wyoming, United States, the Jackson Hole Travel and Tourism Board has launched a campaign imploring visitors to stop the use of geolocation tags when sharing photos of their outdoor adventures online.

As Vox recently pointed out in a video titled What happens when nature goes viral, geotagged photos have become a major issue for landmarks around the world. When photos posted to Instagram, Facebook, and other social networks are geotagged, knowingly or otherwise, it makes it easier than ever for new people to seek out the exact same location and have their own turn at taking a photo, only adding to the problem.

While it might not seem like a problem, the influx of visitors to many of these locations has caused a dramatic change in the environment, physically and otherwise. In Vox‘s example, Horseshoe Bend outside of Page, Arizona, United States, has seen an increase in visitors it isn’t capable of sustaining — at least not without dramatic physical changes to improve the safety of the growing number of spectators.

It’s this same issue the Jackson Hole Travel and Tourism Board is trying to address with its new campaign. ‘Every time someone captures stunning scenery and tags the exact location, crowds follow,’ says the narrator in the above video. ‘The traffic causes unintended harm to pristine environments, plants, and animal habitats.’

To protect and preserve the two National Parks near Jackson Hole, the video implores visitors to use the new, vague location titled ‘Tag Responsibly, Keep Jackson Hole Wild.’ In addition to tagging the more general location, the Jackson Hole Travel and Tourism Board has also created a series of posters advising against using specific location tags.

$ (document).ready(function() { SampleGalleryV2({“containerId”:”embeddedSampleGallery_5031542318″,”galleryId”:”5031542318″,”isEmbeddedWidget”:true,”selectedImageIndex”:0,”isMobile”:false}) });

Sometimes users are completely unaware that their images are being tagged. Most phones nowadays feature automatic geotagging and although a number of image hosting sites and social networks strip the metadata, there are others that use it by default. If you feel called to be a part of the campaign, be sure to check whether or not the information is being automatically uploaded — and if it is, remember to use more general location tags when traveling around.

Articles: Digital Photography Review (dpreview.com)
 
Comments Off on Jackson Hole Travel and Tourism Board is asking visitors to stop geotagging photos

Posted in Uncategorized


Geotagging Photos in Lightroom in 4 Easy Steps

04 Feb

For travel photography, geotagging your photos has become fundamental. By geotagging your images, you’ll not only be able to remember the locations once you are back home, but also it will help on searches. If you intend to sell your photos at any time, adding the metadata pertaining to the location into the file is going to improve searches and make your photograph easier to find on the web.

Geotagging is a rather simple process and there are a couple different ways to do it. At the simplest level, you simply attach a GPS data-logger to your camera and the location will be recorded into the EXIF of the photo at the time you take it. That’s it. Now if you own multiple bodies, then you’ll need a different GPS device for each of them.

Bad_ElF_Geo_Tracker

The other option you have is to get an independent GPS tracker to record the data and then pair it with the photos. As I always carry at least two camera bodies, this is option I utilize. I have tried a couple of loggers and ended up with the Bad Elf 2200 GPS Pro. It is small, convenient and pro-rated, and it can be paired with up to five devices at the same time via Bluetooth. Of course there are other options on the market; all you need is to be sure that you’ll be able to obtain and export the recorded tracks from the device.

Working with Lightroom

Something that’s important before you start: to avoid headaches, is to always wise to check your camera clock. It should be set to the actual local time zone in which you are shooting, as once you import the data, Lightroom will try to synchronize the time of the EXIF data from the camera with the time of the recorded data from the GPS logger. If you forget to do this, there is a way to correct it later, but it will be much more seamless if you do it beforehand.

Once you do that, the process is fairly simple and can be done with the following steps.

1) Obtain your GPS file

Export the GPS data from your logger in the format .gpx. This is the standard for these type of files; save them as they can be useful for other applications as well in the future. As an example, in this recent post I have included a detailed map of my trek to illustrate a day in the field.

2) Import your files into Lightroom

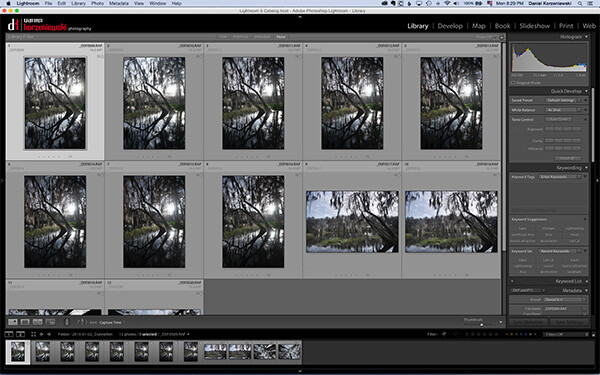
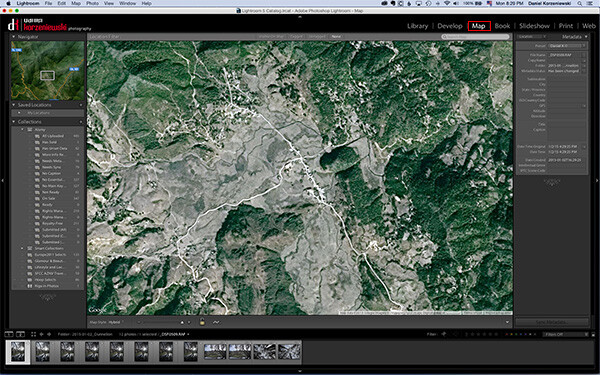
Import your files into Lightroom as you normally do and then go to the Map Module.

Import_Photos

Go_to_Map_Module

3) Load your tracklog file

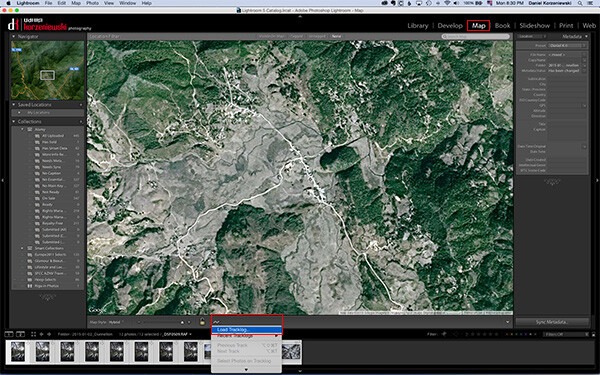
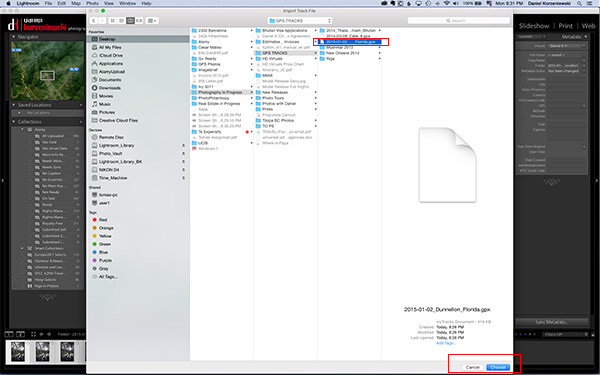
Select all the photos you want to add the GPS information to. This one is a bit tricky – you need to click on a menu down at the bottom close to the icon with the lock. From there, select “Load Tracklog” and navigate to the menu where you saved the file previously.

Load_Tracklog

Select_your_Track

4) Tag the photos with the GPS information

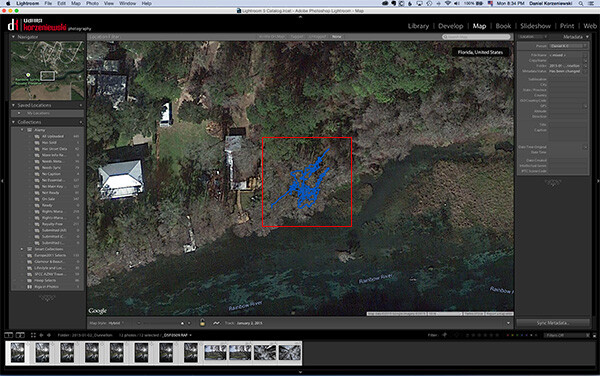
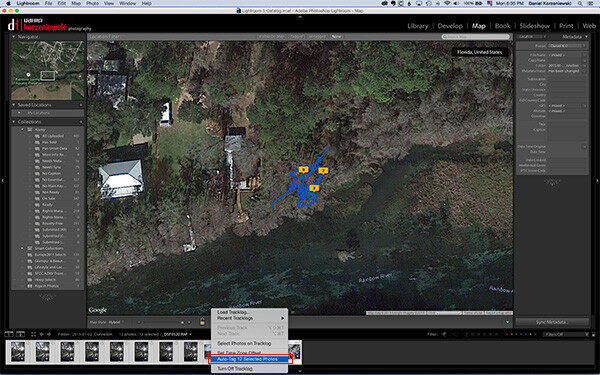
As soon as you import the file, you’ll see the track loaded into the map. Go to the same menu and select “Auto-Tag XXX Selected Photos.” That’s it – that should do it, and now you’ll also see a bubble over the track that indicates where the photos were taken. At this point the GPS coordinates have already been recorded in Lightroom.

Track_Loaded

Auto_Tag_Photos

GPS_Icon_Added

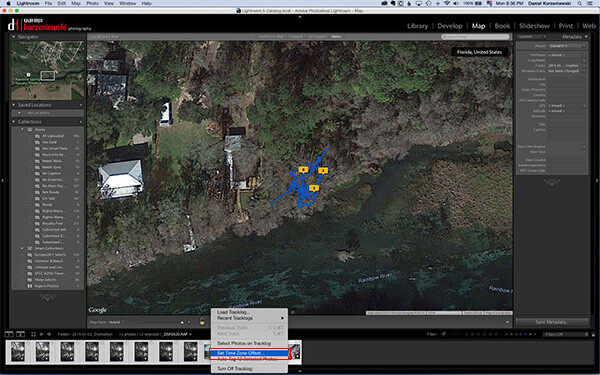
If for any reason you forgot to put the correct time on the camera, you can now adjust it by going to  “Set Time Zone Offset” from the same menu you were working.

Set_Time_Offset

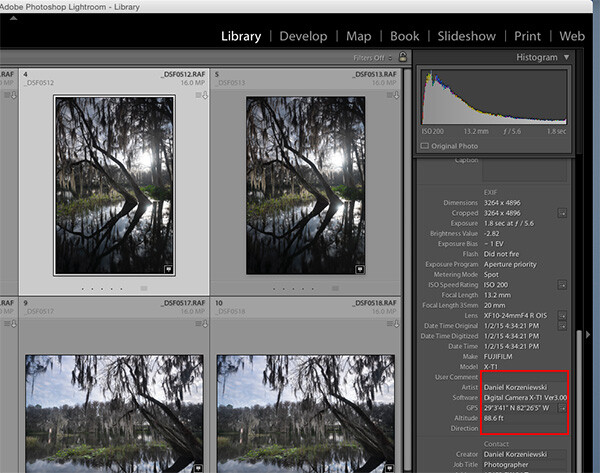
You can take a look at the photos’ meta data and you’ll find the exact GPS coordinates along with location information. As you can see, this process takes only a minute or two to complete and it is fairly easy.

GPS_Data_LR

If you are not already tagging your photos, I hope you can incorporate the process into your workflow soon. I believe it will be important in the long run and you’ll never forget again where that photo was taken, especially in unfamiliar places.

googletag.cmd.push(function() {
tablet_slots.push( googletag.defineSlot( “/1005424/_dPSv4_tab-all-article-bottom_(300×250)”, [300, 250], “pb-ad-78623” ).addService( googletag.pubads() ) ); } );

googletag.cmd.push(function() {
mobile_slots.push( googletag.defineSlot( “/1005424/_dPSv4_mob-all-article-bottom_(300×250)”, [300, 250], “pb-ad-78158” ).addService( googletag.pubads() ) ); } );

The post Geotagging Photos in Lightroom in 4 Easy Steps by Daniel Korzeniewski appeared first on Digital Photography School.


Digital Photography School

 
Comments Off on Geotagging Photos in Lightroom in 4 Easy Steps

Posted in Photography


What is geotagging – how to geotag photos with a GeoPic II a Nikon DSLR camera and Picasa

10 Nov

www.customidea.com What is geotagging? It’s a question we often get asked by Nikon camera owners yet this area of photography is becoming very popular. Geo tagging, more often called ‘geotagging’ is the process of adding geotags to your photos. Geo tags, or ‘geotags’ are extra tags of data which include latitude longitude and altitude and together define a specific location. Wouldn’t it be great if all your Picasa or Photobucket images included the exact location they were taken? Well fortunately your favourite DSLR, for example the D200, D700 or D3 and many others already support geotagging and now, instead of buying an expensive Garmin and a long adaptor cable you can buy a direct connect geotagger — the GeoPic II. This great geotagger will geotag your pictures direct on the Nikon camera and straight into the EXIF data. Once the tags are there you can use your favourite photo managing software, for example Picasa, or Adobe Photoshop, or other software like Opanda, KUSO EXIF viewer, Nikon ViewNX, Apple Preview and JetPhoto Studio to use the tags. Typically photographers use the software to see their photos overlaid on a map which is a great way to display your pictures. This HD video shows just how easy it is to connect a GeoPic II to your Nikon camera and start geotagging your photos. It also shows how to see and use the geotags later in Picasa and Google Earth.
Video Rating: 5 / 5

 
Comments Off on What is geotagging – how to geotag photos with a GeoPic II a Nikon DSLR camera and Picasa

Posted in Nikon Videos


Pentax launches O-GPS1 geotagging module

06 Jun

Pentax has launched an add-on GPS module for its recent DSLRs that allows simple geotagging of images. The O-GPS1 unit attaches to the camera’s hotshoe, allowing the camera to add latitude, longitude, altitude, UTC capture time and direction as image metadata. This data can be used to place images in mapping software such as Google Earth or as a means of file organization and retrieval. K-5 and K-r users also gain access to the ‘Astrotracer’ feature that predicts the movement of celestial objects and uses the sensor shift mechanism to track this movement to give astrophotographs with single points, rather than star-trails. The O-GPS1 unit will be available from mid June at a recommended price of $ 249.95/£229.99.
News: Digital Photography Review (dpreview.com)
 
Comments Off on Pentax launches O-GPS1 geotagging module

Posted in Uncategorized