RSS
 

Posts Tagged ‘Game’

Here’s what happens when you attach a 70-200mm F4 to a Game Boy Camera

05 Jun
Why? The better question: Why not?

There’s an unlikely vintage camera enjoying something of a resurgence these days: 1998’s 0.5MP Game Boy Camera. Attached to a game cartridge, Game Boy Camera brought digital photography to the youth 2 bits at a time. Lately, its legacy has continued to evolve as clever DIYers repurpose it for astrophotography and motorsports photography, and have even trained neural networks to convert the camera’s low-res monochrome images into photorealistic color.

Clearly, it was time for somebody to step up and work out how to attach EF lenses to the thing. And that’s just what Bastiaan Ekeler did. He’s a designer and self-proclaimed tinkerer, and feeling inspired by recent projects reviving the Game Boy Camera, saw an opportunity for a little fun. His 3D-printed adapter fits to a partially disassembled camera, and with a 1.4x teleconverter and 70-200mm F4 attached, produces an impressive 3026.8mm equivalent view.

With all of the parts in place he took a stroll on the beach to put the rig to use, and even managed a few photos of the full moon despite contending with a dim screen and a 1 fps refresh rate in low light.

Long Beach Bar “Bug” Lighthouse. (Canon 70-200 f4 + Canon 1.4x extender). Photo by Bastiaan Ekeler.
A Seagull at Norman E. Klipp Marine Park (Canon 70-200 f4 + Canon 1.4x extender). Photo by Bastiaan Ekeler.
The full moon on 2018-05-30 in Greenport, NY. (Canon 70-200 f4 + Canon 1.4x extender). Photo by Bastiaan Ekeler.

Head to Ekeler’s website for a full-write up of the project and more sample images. You can also follow him on Twitter and Instagram.

Articles: Digital Photography Review (dpreview.com)

 
Comments Off on Here’s what happens when you attach a 70-200mm F4 to a Game Boy Camera

Posted in Uncategorized


NiSi jumps into lens game, unveils five full-frame cinema prime lenses

07 Apr
Credit: NiSi

With NAB 2018 just a few days away, the video gear news is coming fast and furious. Atomos shared some exciting news for Panasonic EVA1 shooters, Apple revealed the new ProRes RAW format, Adobe’s video apps got some major updates, and now the more unexpected of them all: NiSi, the camera filter company, has released a set of cinema primes.

If this news had come out on April 1st, it would have been suspect. Alas, it’s April 6th, and the new NiSi F3 cinema lenses are very much real.

Designed to cover full-frame sensors, the NiSi F3 lenses will come with interchangeable PL, Canon EF, and Sony E mounts. There are five lenses in all—25mm T2.1, 35mm T2, 50mm T2, 75mm T2, and 100mm T2—and each is built within an identical housing for maximum convenience when fitting lens accessories. NiSi plans to add an 18mm lens to the lineup in mid-2018, but here’s a closer look at current lineup, followed by a detailed spec breakdown:

$ (document).ready(function() { SampleGalleryV2({“containerId”:”embeddedSampleGallery_2685281427″,”galleryId”:”2685281427″,”isEmbeddedWidget”:true,”selectedImageIndex”:0,”isMobile”:false}) });

Regarding the F3 lens line’s performance, NiSi promises that the lenses’ “apochromatic optical design […] results in excellent Axial aberration and Transverse aberration performance. It gives a natural and pure color with almost no purple/green fringing both within focus and in bokeh.”

The company also claims “the lenses contain a unique optical coating design which controls dispersion perfectly while retaining rich details.” This allegedly results in “stylized flare and contrast enhancement.”

Credit: NiSi

The lenses are currently live for pre-order on the NiSi website, where you’ll need to put in a deposit of $ 1,000 per lens. Shipping is expected to start on June 1st, and you can see the retail prices listed below:

  • NiSi F3 25mm T2.1 – $ 3,000
  • NiSi F3 35mm T2 – $ 2,500
  • NiSi F3 50mm T2 – $ 2,500
  • NiSi F3 75mm T2 – $ 2,500
  • NiSi F3 100mm T2 – $ 3,000
  • Full Set of Five Lenses – $ 12,000

Note that if you pre-order before April 30th, you can take advantage of a $ 500 discount on each individual lens, or the full set of five. That means that, for the next 24 days, it’s actually cheaper to buy all five lenses individually because of the $ 2,500 in total discounts you’d be getting.

To learn more about the Nisi F3 cinema prime lenses or pre-order a set for yourself, head over to the NiSi website.

Articles: Digital Photography Review (dpreview.com)

 
Comments Off on NiSi jumps into lens game, unveils five full-frame cinema prime lenses

Posted in Uncategorized


5 Ways to Ensure That You Stay Ahead of the Travel Photography “Game”

07 Jan

There’s no doubt about it, the business of travel photography has never been tougher. More competition, an oversaturated market, falling license fees and limited client budgets mean that travel photographers have had to work harder and change their business models. Here are five ways to ensure that you stay ahead of the travel photography “game”.

5 Ways to Ensure That You Stay Ahead of the Travel Photography “Game”

1- Embrace Social Media

It’s hard believe that there was a time before social media. While some of us remember that time and have fond memories, there’s no doubt that social media has become a necessity for any business wanting to market itself. The opportunities to be able to speak to such a huge audience has meant that any brand that hasn’t embraced social media has been left behind.

Like a lot of other people, I was skeptical at first and didn’t really see the point or need for the likes of Instagram and Twitter. But slowly I have come to realize that it really isn’t an option and every photographer needs to embrace social media and maximize its potential.

So if you haven’t already started to do so, begin to learn about how to maximize the different social media channels available. It is integral to the success of your business.

5 Ways to Ensure That You Stay Ahead of the Travel Photography “Game”

2 – Think About ROI

One of the things that I always find interesting when I speak to people wanting to break into travel photography is their expectations of the industry versus the reality. Unfortunately, travel photography is an incredibly oversaturated market. That means there are more photos available than buyers actually need.

This, coupled with a few big stock agencies reducing prices over the years, has meant that the fee paid to photographers for a stock image is lower than it has ever been. The knock-on effect of this has also meant that the majority of clients who previously might have commissioned photographers are now turning to stock photos as it’s cheaper than hiring a photographer.

This means that as a travel photographer, you now have to really evaluate if a destination is worth the investment required. For example, a few years ago I headed to the Orkney Islands off Scotland (somewhere that had been on my bucket list for a while) and captured some great photos. But to this day I have not made enough sales from that trip to cover the cost of it, whereas somewhere like Abu Dhabi has paid for the cost of the trip a few times over. Clearly, a location like Abu Dhabi is a much more popular destination and so it is also more likely to be in demand for photos.

5 Ways to Ensure That You Stay Ahead of the Travel Photography “Game”

Obviously, this doesn’t mean you should never go anywhere like the Orkney Islands. But if you are building your business around those far-flung destinations you may find that you are simply not selling as many photos as you need to cover the cost.

3 – Expand Your Skills

DSLRs changed photography forever. Then smartphones came along and changed the whole industry. The explosion in digital photography has also meant that there is now, even more, an opportunity for unique photographs, but also more competition than ever.

So as a travel photographer, you have to be looking for ways to always expand your skills and repertoire. These days that might be by branching out into video, time lapse, or even drone photography. Whether we like it or not, these new innovations offer a completely new way of looking at the world and if you want to stay ahead of the game you need to try and expand your skills accordingly.

5 Ways to Ensure That You Stay Ahead of the Travel Photography “Game”

4 – Move With The Current Trend

Like most things, photography styles and trends move with the times. While it’s important to always keep your own style if you want to earn a living from photography you also need to ensure that you sell photos.

For example, these days more and more picture editors are looking for travel images that convey an experience or story rather than just a generic tourist type photo. In fact, I recently spoke to one of the stock agencies I work with and they said that their clients are now looking for more lifestyle type of travel shots that almost look like they have been taken with a smartphone rather than in a studio.

The key, as in any other industry, is to stay up to date with the current trends. Sign-up to newsletters, look at magazines and read industry news to ensure you know what is going on and where the trends are going.

5 Ways to Ensure That You Stay Ahead of the Travel Photography “Game”

5 – Re-evaluate Your Business Model

The biggest difference that amateur photographers notice when then move to being a professional is that they have to start treating photography as a business where every dollar is accountable. Like any business, every few years you need to evaluate where you are and where you want the business to go.

That means you might have to change your strategy, your marketing, and even as mentioned above your offering as a business (like video or time-lapse). No business can ever survive forever without changing with the times and photography is no different.

So if you haven’t done so already, think about your business and where it is and where it needs to go to to stay in the game.

5 Ways to Ensure That You Stay Ahead of the Travel Photography “Game”

Photographers are often some of the most creative people in the world. But very few often evaluate and relaunch their business to move with the times. Whether we like it or not, change is constantly happening in every industry and photography is no different. Unless you are willing to ensure your photography business can and will evolve, you might be left behind.

The post 5 Ways to Ensure That You Stay Ahead of the Travel Photography “Game” by Kav Dadfar appeared first on Digital Photography School.


Digital Photography School

 
Comments Off on 5 Ways to Ensure That You Stay Ahead of the Travel Photography “Game”

Posted in Photography


Not Your Dive Bar’s Pool Table: 13 Modern Game Furniture Designs

12 Oct

[ By SA Rogers in Design & Fixtures & Interiors. ]

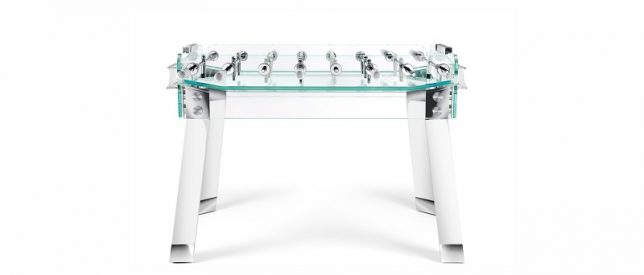
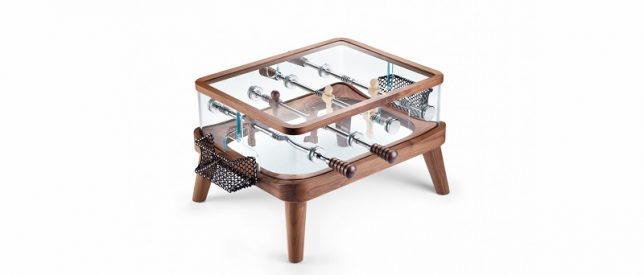
Most game furniture looks like it belongs in a musty basement smelling of spilled beer and body odor, but high end tables for billiards, foosball, ping pong, shuffleboard and other popular indoor games are made to fit right into luxury environments, sometimes even complete with plated gold details. Some are even works of art in their own right, doubling as sculpture, while others bring games that haven’t changed much in decades a little more firmly into the current century.

Ping Pong FM Interactive Table Tennis Jukebox

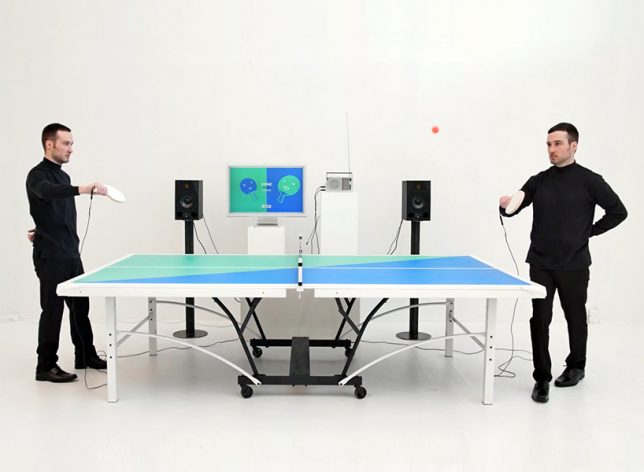
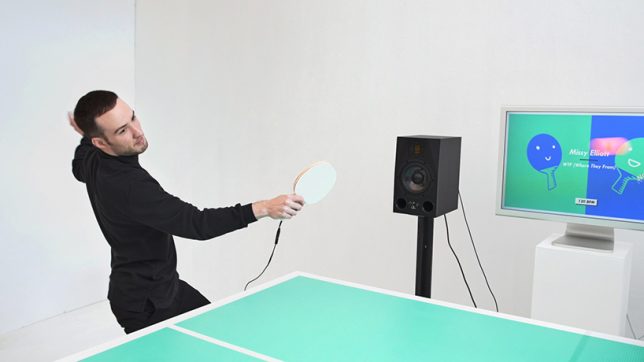
This ‘fun musical take’ on table tennis by English designer Mark Wheeler lets you choose a song to set the tempo of your game, and the song only keeps playing as long as you manage to keep the ball in play. Drop it, and your game is over. “Usually music listening experiences are strictly about being as true to the original recording as possible. But why can’t listening to a record be as playful and interactive as a live performance?” says Wheeler.

Luxury Game Tables by Adriano Design

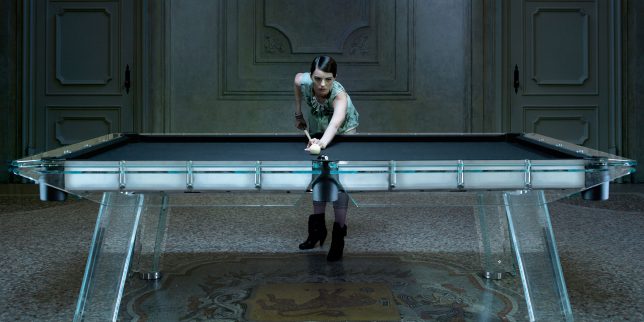
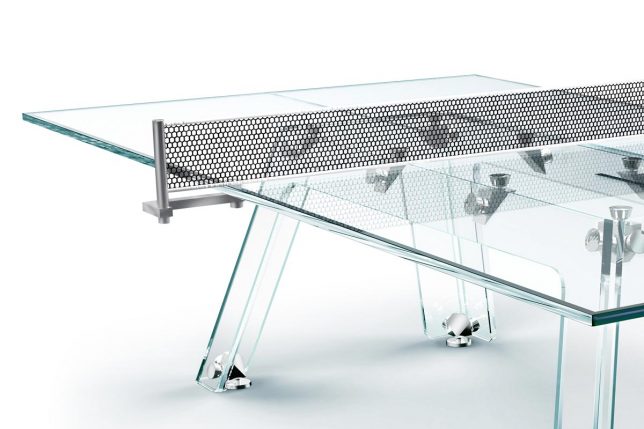
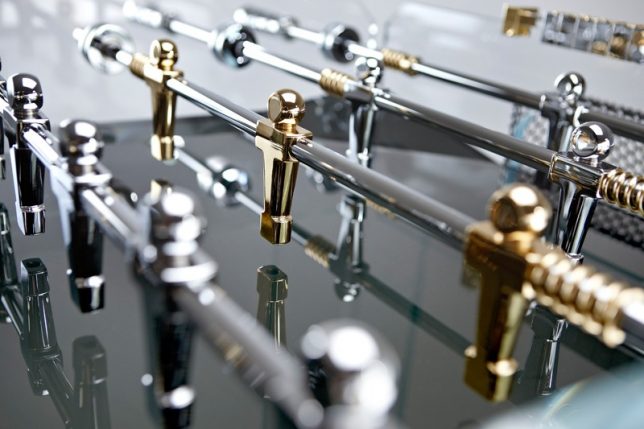
A gold-plated crystalline foosball table is among the ‘luxury’ game options offered by Adriano Design, an Italian-based company operating as both ‘Calma e Gesso’ and ‘TECKELL.’ The Cristallino comes complete with 24-karat-gold plated players – because what else would the owner of a $ 10 million estate put in their game room? Other offerings include the ‘Filotto’ pool table and the Lungolinea ping pong table, all made in the company’s signature crystal-clear glass. They even produce child-sized ‘Angolo’ foosball table models for kids, which spare no stylish details.

Isamu Noguchi Chess Table

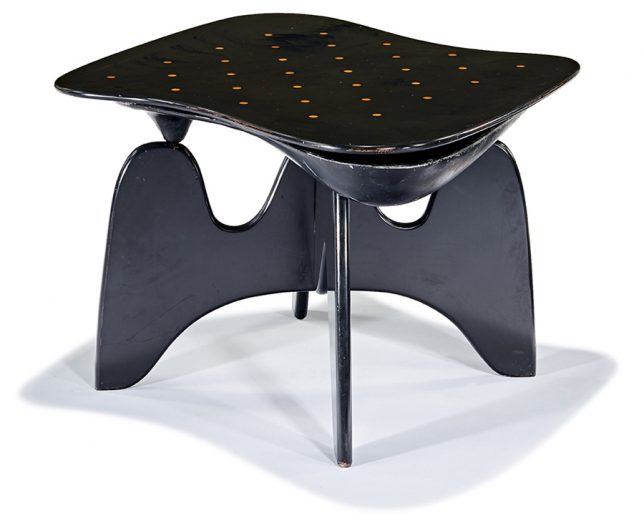
Considered a seminal work of early organic modernism, Isamu Noguchi’s chess table is technically a functional sculpture, presented along with a set of game pieces Noguchi also designed. It debuted at ‘The Imagery of Chess’ in 1944, a show organized by Marcel Duchamp and Max Ernst. The table was put into production in 1947, but only a few dozen examples exist. One was auctioned in Los Angeles in 2016, selling for over $ 100,000.

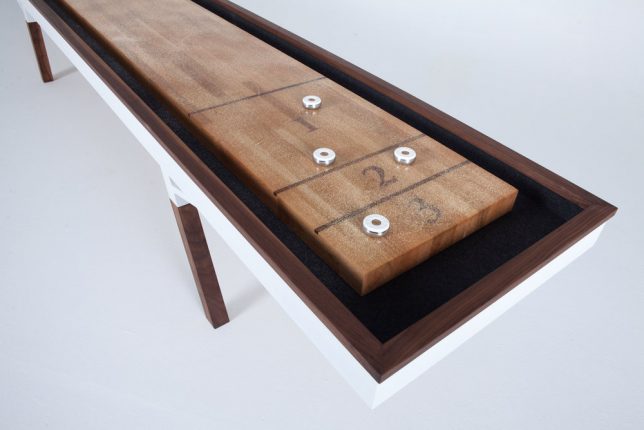
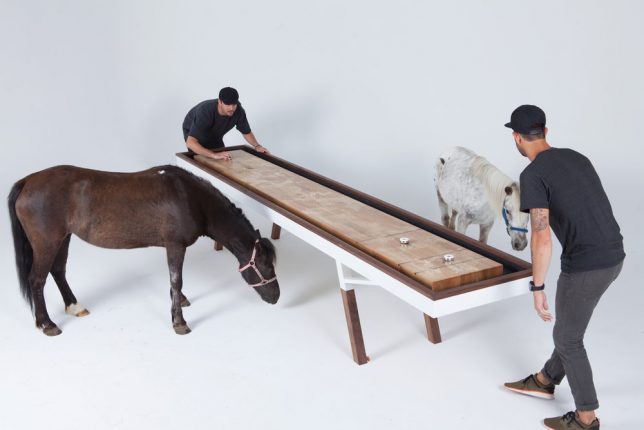
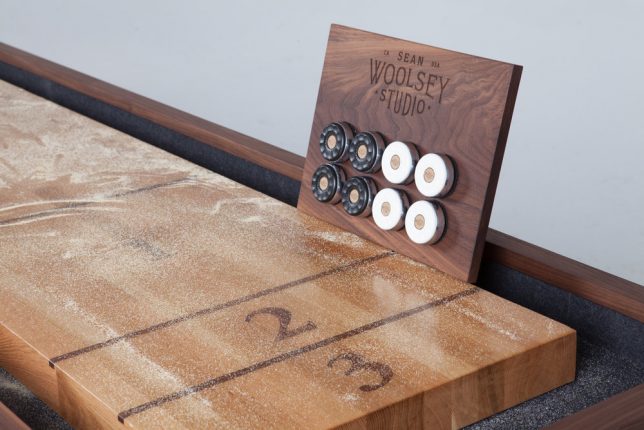
Woolsey Shuffleboard Table by Sean Woolsey

Long, narrow and sleek, the Woolsey Shuffleboard Table by designer Sean Woolsey features a rift-sawn white oak top finished with epoxy resin and solid black walnut legs, which hide leg levelers. The table comes with 4 white and 4 black pucks, lots of shuffleboard salt and a magnetic wall mount for the pucks when not in use. Prices, unsurprisingly, start at $ 10K.

Next Page – Click Below to Read More:
Not Your Dive Bars Pool Table 13 Modern Game Furniture Designs

Share on Facebook


[ By SA Rogers in Design & Fixtures & Interiors. ]

[ WebUrbanist | Archives | Galleries | Privacy | TOS ]


WebUrbanist

 
Comments Off on Not Your Dive Bar’s Pool Table: 13 Modern Game Furniture Designs

Posted in Creativity


This video game offers an in-game photo studio for shooting exotic cars

08 Aug

Players of the next version of PlayStation’s Gran Turismo Sport will be able to create professional looking photographs of their cars using a new feature that offers a surprising amount of ‘photographic’ control over the way the images turn out. For us mere photographic mortals, it might be the closest we’ll ever get to shooting a $ 2.5 million car with a $ 50,000 camera…

The Gran Turismo features is called ‘Scapes’, and it lets players place their favorite cars in a wide range of scenes—from landscapes to city streets and interiors—and adjust their camera ‘controls’ to dial in things like depth of field.

A control panel down the side of the screen has software-like sliders for exposure compensation, aperture, shutter speed and focus. The car can be turned and parked where you like, the lights switched between beam settings, and the color temperature of the whole scene can be adjusted to create warm and cool effects.

More than a passing thought has gone into creating the Scapes mode, and the control of the images really seems extensive.

Users can alter the color balance of shadows, mid-tones and highlights using RGB sliders, while grain effects can be added along with vignetting and distortion corrections. And if that’s not enough, you can even blur the background using a panning effect, to deliver a race day atmosphere in one of around 1000 scenes.

For more information, check out the Gran Turismo website.

Information from PlayStation:

‘Scapes’, the New World of Photography

Go on a photography trip with your favorite car.

The ‘Scapes’ feature is a new format of photography, borne from a True HDR workflow and physics based rendering technologies. Each photo spot contains all the light energy information of that scene as data. Even the incredible brightness of the Sun is physically recorded and contained in each of these photos; and because each image also contains spacial information for that scene, it is now possible to ‘place’ cars into real world photographs.

Articles: Digital Photography Review (dpreview.com)

 
Comments Off on This video game offers an in-game photo studio for shooting exotic cars

Posted in Uncategorized


6 Tips for Improving Your Food Photography Instagram Game

27 Jul

Interest in food photography is on the rise thanks to platforms like Instagram and the ability to snap a quick photo of every meal thanks to smartphones. If you’re seeking to one-up your food photography game, you may not need much to make an impact. Keep the camera you have and don’t add any gear to your toolbox. Instead, adjust your perspective and add simple elements to make your dish more natural-looking.

Here are six tips for different food photography angles that you can capture of a dish to get unique shots. All the photos were taken using a DSLR camera and natural light.

1. 45-Degree Angle Shot

This is the most common food photography shot out there: the 45-degree angle shot taken from the perspective of someone sitting at the table. There’s nothing wrong with this shot, as it’s the common view of a dish that most diners can associate with. But it’s a little boring in the sense that almost everyone with a camera will automatically snap this angle.

6 Tips for Improving Your Food Photography Instagram Game

2. Top-Down-Shot

Another food photography angle that is becoming increasingly popular, but can be a little more difficult to achieve is the top-down shot. It’s a bird’s eye view of the dish that can be hard to do from high tabletops or without a wide-angle lens.

This also may or may not be a flattering angle for your food (for example, typically not the best angle to photograph sandwiches or burgers). However, this shot is most effective for showing off a dish with lots of components that can’t be easily seen from the 45-degree angle. It also works very well for displaying a full table spread with many dishes.

6 Tips for Improving Your Food Photography Instagram Game - overhead shot

3. Macro Shot

Now we’re treading into slightly more advanced food photography territory. The macro shot is an extreme close-up image that often reveals fine details that aren’t easily seen by the naked eye. Historically, this type of photo was difficult to achieve without a proper camera and macro lens.

However, many smartphones and even entry-level cameras come equipped with a macro mode that enables you to capture close-up shots. Use that mode to get a new view of your food. Below is a sous-vide egg covered in caviar and flecks of gold. Given its small size, it is best photographed in macro mode to show off those small details.

6 Tips for Improving Your Food Photography Instagram Game - macro

6 Tips for Improving Your Food Photography Instagram Game - macro egg

4. With Another Dish

Don’t just photograph the dish by itself. Instead, show some scale or just add an extra element to the background by sliding in another dish. When possible, make that extra dish complimentary to your main subject. For example, a burger with fries, or a Caesar salad with entrees.

6 Tips for Improving Your Food Photography Instagram Game - other plates

5. Incorporate Restaurant Interior

Besides focusing on the food, take a look at your surroundings and see if there are any interesting elements in the restaurant that might make for a good photography background. The examples below utilize a restaurant’s unique wallpaper and a patio wall of ivy as makeshift photo backgrounds.

6 Tips for Improving Your Food Photography Instagram Game - ice cream

6 Tips for Improving Your Food Photography Instagram Game - background

6. Use Your Hands

After you’re done capturing beauty shots of a perfectly composed dish, take it apart! By adding hands or even utensils pulling food apart, this adds authenticity, as it shows someone actively engaging with the dish. In some instances, this action is almost essential for showing food in its best light. Consider pasta or noodles. Oftentimes, it is covered in sauce or garnishes, making it difficult to see the noodles underneath. This is easily addressed by having a fork or chopsticks dig in there and pull up a bunch of noodles. The same goes for burgers and sandwiches. Photograph it whole, but then slice it in half to show a more organic side to the dish.

In some instances, this action is almost essential for showing food in its best light. Consider pasta or noodles. Often pasta is covered in sauce or garnishes, making it difficult to see the noodles underneath. This is easily addressed by having a fork or chopsticks dig in there and pull up a bunch of noodles. The same goes for burgers and sandwiches. Photograph it whole, but then slice it in half to show a more organic side to the dish.

The same goes for burgers and sandwiches. Photograph it whole, but then slice it in half to show a more organic side to the dish.

6 Tips for Improving Your Food Photography Instagram Game - noodles

A noodle soup dish served as-is, where the noodles are very hard to see.

6 Tips for Improving Your Food Photography Instagram Game - noodles and hand

The above noodle dish being pulled apart by chopsticks.

6 Tips for Improving Your Food Photography Instagram Game - burger

A burger by itself.

6 Tips for Improving Your Food Photography Instagram Game - burger sliced

That same burger sliced in half and held up by a hand.

In Conclusion

Food photography needn’t be super complicated with tons of lighting and food styling. Instead, you can create beautiful and unique food photos by just changing your perspective and adding a few simple elements to give your photos a more natural feel.

Do you have any food photography tips of your own? Feel free to add them in the comments below!

The post 6 Tips for Improving Your Food Photography Instagram Game by Suzi Pratt appeared first on Digital Photography School.


Digital Photography School

 
Comments Off on 6 Tips for Improving Your Food Photography Instagram Game

Posted in Photography


5 Hacks and Tricks to up your Landscape Photography Game

05 May

Landscape photography is something that most photographers do. You may be a beginner or an advanced landscape photographer, you may have your own style, or you prefer certain subjects, but there’s always room for something more, something different.

This article is meant to show you five ways in which you can experiment with landscape photography. The techniques will force you to think differently about the surrounding landscape and will uncover new potential shots in places or situations where you might not have considered even getting your camera out.

Let’s see what these five landscape photography hacks that will up your game:

#1 – Long exposures in unusual places

When you think about long exposures you may be thinking of water flow, night photography, or everything that is in low light. The thing is, you can do a long exposure on anything that moves or changes over time. If something is still, then there is no point of doing this technique.

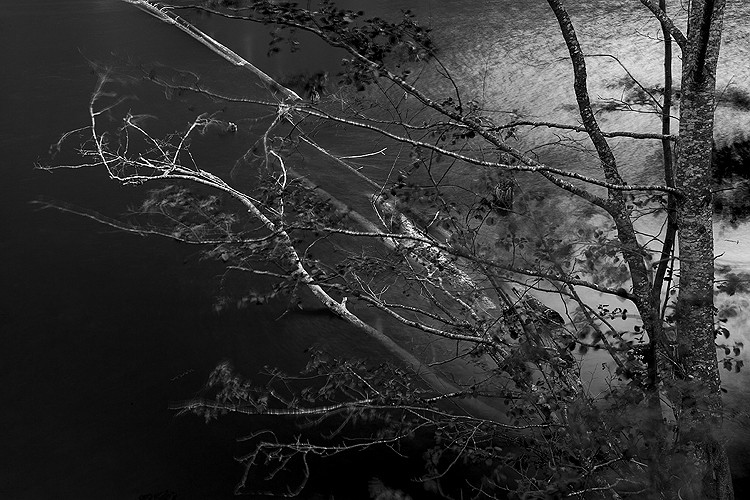
Sometimes you’ll need a Neutral Density filter of 6-stop or maybe even 10-stops if you want to do this during the day when the light is bright. In this case, you would need an ND to dim it down. The idea is to seek subjects that are moved by the wind for example; it works better if some elements of are still and some are moving. Maybe leaves or some thinner branches are moving and the thicker tree trunk is still.

5 Hacks and Tricks to up your Landscape Photography Game

5 Hacks and Tricks to up your Landscape Photography Game

Place your camera on the tripod, use the ND filter if necessary, and take the shot. You’ll get a simple, yet powerful image that represents not only a glimpse of time but few seconds. You can also try this with crops blown by the wind.

#2 – Move your camera while shooting

You usually try to stay still when you shoot so that’s why, as a landscape photographer, you use a tripod. But sometimes it’s interesting to bend the rules and see what the unexpected offers. You can try and move the camera while shooting. Move it from up to down or maybe you can rotate it slightly while the shutter is pressed.

This technique will produce more of an impression of what you see and certain movements work better with certain types of subjects; for example, move your camera up and down if you have straight tall trees. It also helps to have an exposure time of about one second.

5 Hacks and Tricks to up your Landscape Photography Game

5 Hacks and Tricks to up your Landscape Photography Game

5 Hacks and Tricks to up your Landscape Photography Game

5 Hacks and Tricks to up your Landscape Photography Game

5 Hacks and Tricks to up your Landscape Photography Game

#3 – Zoom your lens

Another element that usually stays the same while you press the trigger is the focal length. But what would happen if you changed it during the exposure? Of course, it helps a lot if you have longer exposure time so that you’ll have time to actually zoom.

You have two options with this technique. You can just zoom in or out and you get an interesting effect like everything is “running” to the edges of the photo.

5 Hacks and Tricks to up your Landscape Photography Game

Or you can first zoom your lens in all the way and hold the zoom ring. While you press the shutter button keep the zoom ring fixed and rotate the camera so that the lens zooms out. Don’t forget to keep the hand that is holding the zoom ring still; you are actually zooming out by moving the camera. You’ll get a twisted effect that I find it works better on pines or similar trees.

5 Hacks and Tricks to up your Landscape Photography Game

5 Hacks and Tricks to up your Landscape Photography Game

5 Hacks and Tricks to up your Landscape Photography Game

#4 – Use graduated filters in unusual ways

As a landscape photographer, you likely know how to use graduated ND filters to balance the brightness of the sky with the foreground, but you can do so much more with them too.

In the old days, photographers used to dodge and burn certain areas of a photo to lighten or darken those spots. The technique is still used today in post-processing.

But what if you could do this right in the camera using two graduated ND filters to darken the margins of an image. You only need to place the grad ND filters at a 90-degree angle, one facing left and the other facing right. You don’t even need to have the same filters; you can use a 2-stop and a 3-stop, for example. This will create a light beam effect.

5 Hacks and Tricks to up your Landscape Photography Game

#5 – Create Cinemagraphs

Cinemagraphs are the new thing, and they look cool. You may be wondering what is a Cinemagraph? Well, it’s a combination of still photography and video. The result is a video, but because of this combination, I included this idea here. Here’s an example of what they look like:

In short, the technique requires you to record a video, preferably with the camera on a tripod, freeze one of the frames and make it a photo, and then creating a mask that reveals only one element that moves. It looks better if you make the video loop-able but that is not absolutely necessary. The effect plays with your mind because everything is still apart from one element that moves.

Conclusion

I hope you’ll find these ideas interesting and you’ll use them to open new horizons and explore new techniques. I think experimenting plays a big part in photography and landscape photography is no exception.

Share your landscape tricks and tips in the comments below.

The post 5 Hacks and Tricks to up your Landscape Photography Game by Toma Bonciu appeared first on Digital Photography School.


Digital Photography School

 
Comments Off on 5 Hacks and Tricks to up your Landscape Photography Game

Posted in Photography


Opinion: Shooting DNG on the Sigma sd Quattro H is a game changer

09 Apr

Introduction

With the changing of the seasons comes a big change in how I shoot Sigma cameras.
ISO 100 | 1/1600 sec | F5.6
Photo by Carey Rose

Fifteen years.

That’s how long it’s been since the release of the SD9, Sigma’s first digital camera, which was also the first camera to use the layered Foveon sensor design. From then on, for better or for worse, Sigma has continued to refine its unique layered sensors. While no one will argue that their cameras are capable of insanely sharp output, you still have to put up with an awful lot of shortcomings.

Early on, there was the low pixel density. And there’s still poor battery life. And Huge file sizes. Long card write times. Heat. Lots of heat. (And there’s plenty of other image quality concerns, as well).

But significantly, fifteen years is also the length of time we’ve had to use Sigma’s Photo Pro software to get any sort of decent results from these cameras. In the early days, you were almost forced into it, as the SD9 didn’t shoot JPEGs and Adobe Camera Raw support that was present up until the Merrills was laughable or simply non-existent. So until now, if you wanted to shoot Raw on a Sigma digital camera, you’d have to fire up Sigma Photo Pro and wait. And wait. And wait some more. And then relaunch it once it crashes, because crashing was a foregone conclusion (though to be fair, it is far less stable on Mac OS than Windows).

We as a staff collectively find, even above and beyond all of Foveon’s shortcomings, that the biggest hurdle to using Sigma cameras is their very own software. Even now, in the year 2017, Sigma Photo Pro is just painfully slow and unstable.

But Sigma is that rare company that listens to its customers. Last year while at CP+ in Japan our Technical Editor Rishi Sanyal was afforded a rare opportunity to sit down with the ever-charming, warmly receptive and almost unusually frank Sigma CEO Kazuto Yamaki and talk all things camera and optics. One of the topics covered was the usability of Sigma cameras, where we re-stressed the common request for wider Raw support of Sigma cameras but, more importantly, outlined what might go into making the most flexible DNG possible from Foveon Raw data. Just a short year later, the new sd Quattro interchangeable lens cameras can shoot DNG format Raw files straight out of the camera.

A hearty thank you.

And this just might be what Sigma needed to do to bring Foveon tech to the mass market – a place it really hasn’t been before.

Sigma + DNG = <3

The sd Quattro cameras’ ability to shoot in DNG means is that you can finally edit your Foveon Raw files using a converter other than Sigma Photo Pro. As you might expect, there’s a few caveats. When you enable DNG capture on the Quattro H, you don’t have an option to simultaneously capture a JPEG (although there is a whopping 13MB JPEG embedded in every DNG, should you want to dig it out).

The highest resolution output you can get from these is 25.6MP, which is the same resolution as the top sensor layer, as opposed to the upscaled 51MP files that are possible when shooting JPEG in-camera or using Sigma Photo Pro with an X3F file (but if you think you might want those files, check out the comparison at the end of our samples gallery). And while upscaled 51MP may sound suspect, the pixel-level sharpness of the Foveon files means it may not be as gimmicky as it initially sounds (we’ll reserve final judgement until after our in-depth testing).

Lastly, you’d better have a big memory card – the DNG files weigh in at around ~150MB each*. For comparison, uncompressed Raw files from the Nikon D810, Sony a7R II and Fujifilm GFX 50S weigh in at around 70MB, 85MB and 110MB, respectively (and two out of those three offer lossless compression to bring those sizes down anyhow).

Out-of-camera white balance Adjusted in Adobe Camera Raw
Despite setting the white balance manually in-camera, the default DNG output was too yellow for my taste, but adjustments in ACR were a breeze. Click through to see the crazy sharpness.

Okay, enough with the caveats. Opening these DNG files in Adobe Camera Raw is an almost surreal experience. You still get the absolutely astounding crystalline sharpness Sigma’s cameras are known for, but now you can make any adjustment you’d ordinarily make to a Raw file, and with a decently powerful computer, it all happens in real time. No more making a small adjustment and waiting ten seconds (or thirty) for a full re-render.

So far, the files appear as flexible as one would expect from Raw: white balance works wonderfully, and you can turn all noise reduction and sharpening off. We’re still examining if the 12 bit DNGs are losslessly gamma compressed 14-bit data as we’d asked for, but it’s not clear this would matter anyway: 12-bit DNGs and 14-bit X3Fs show similar flexibility thus far, which makes sense given the comparatively lower base ISO dynamic range of these cameras.

The fun factor

So editing the DNG files is great, even if you need to pick up a couple extra hard drives to store them. But the real kicker for me is that it changed the way I shoot this camera relative to previous Sigmas. It’s just more fun.

ISO 100 | 1/500 sec | F4
Photo by Carey Rose

I ended up using the camera more and taking more photos just to see how the camera would render various scenes – and I was regularly blown away. I no longer had to worry about living with the JPEGs and poor white balance, and I didn’t have to go through a whole batch of X3F files over the span of an entire evening with Sigma Photo Pro.

Previous Foveon cameras I’ve used were good for some quirky fun, but I never really considered picking them up off the shelf after we’d put the wraps on our older sample gallery. But now, without the workflow woes of the past, the sd Quattro H is something I’m going to be using a lot more often. If you’ve never tried a Sigma camera before, now is the time to pick one up and have a go for yourself.

See our Sigma sd Quattro H sample gallery

$ (document).ready(function() { SampleGalleryStripV2({“galleryId”:”4388344015″}) })

Sample photoSample photoSample photoSample photoSample photo

*Foveon sensors don’t directly capture red, green and blue information, nor do they require the demosaicing process required by Bayer sensors, so they require totally different processing (hence the historic lack of good Raw support). The Quattro H performs the necessary deconvolution and interpolation process required to derive red, green and blue information for each pixel, so that the Raw processing software doesn’t need to. Unfortunately that means having to save three 12-bit values for every pixel (which, given the lower resolution of the camera’s lower two layers, means storing twice as much data as was actually captured), resulting in 150MB files.

Articles: Digital Photography Review (dpreview.com)

 
Comments Off on Opinion: Shooting DNG on the Sigma sd Quattro H is a game changer

Posted in Uncategorized


Neural network converts Game Boy Camera images into color photos

21 Feb

We’ve seen a lot of research lately that uses neural networks to upsample low resolution images and the results have been impressive – even a little creepy. Google recently showcased a system that can turn a low resolution 8×8 input image into a 32×32 sample that’s remarkably close to the original image. Inspired by recent breakthroughs, research engineer Roland Meertens found another application for neural networks – one that’s highly relevant to our interests. He created an application that turns low-res, monochrome Game Boy Camera images into photorealistic color images.

Original images in the center, Game Boy-ified images on the left and image generated by neural network on the right


A network must be trained, and training means feeding it input images. To create a training data set, Meertens gave some ‘real life images’ a Game Boy Camera treatment by re-creating them in four shades of black. By comparing the Game Boy-ified images with the originals, the network is ‘taught’ how to convert the images to color. With the network trained and ready, Meertens began testing it on celebrity photos as well as images from the Game Boy Camera (including the game’s mysterious character at the top of the page).

Finally, Meertens uses the application on an image taken with the Game Boy Camera. Naturally, it should be a selfie, as it is here. If you have all of the necessary components, taking a photo with the Game Boy camera is easy. Getting it onto your computer is another story. Lacking a specialized cable, Meertens did his best to photograph the Game Boy screen. As a result the lighting is slightly uneven, which affects the output from the network, but the re-creation is still pretty darn cool. Our hats are off to him.

Articles: Digital Photography Review (dpreview.com)

 
Comments Off on Neural network converts Game Boy Camera images into color photos

Posted in Uncategorized


Video: Game Boy Camera revisited

28 Oct

Some of us were thrilled to be reunited with the Game Boy Camera of our childhood. Others? Less thrilled. Watch as DPR staff revisit the Game Boy Camera – or in some cases, pick it up for the very first time. 

Read more about the Game Boy Camera

Articles: Digital Photography Review (dpreview.com)

 
Comments Off on Video: Game Boy Camera revisited

Posted in Uncategorized