RSS
 

Posts Tagged ‘Framing’

How to Use Framing in Your Compositions to Improve Your Photography

05 Nov

The post How to Use Framing in Your Compositions to Improve Your Photography appeared first on Digital Photography School. It was authored by Simon Bond.

Photos look great when framed on the wall, but that is not the only way to use frames in photography. The world is full of frames, and they can be used in your photos to make the composition stronger.

In this article, you’ll learn how to find frames. You’ll also learn how you can work with frames to enhance your images. So let’s use framing in your compositions!

a paper frame in the composition
For this photo, traditional Korean paper, called Hanji, was held in front of the camera and used as a frame. The person in the photo is making this traditional paper, so the frame adds context to the image.

What is framing?

Framing, as the name suggests, is when you surround your main subject with a border of some kind.

The frame could literally be a picture frame you hold up in front of the camera. However, there are lots of other ways you can create frames in your compositions. For instance, you can photograph through a window frame, a doorway, or a gap in a wall. And you can always create your own frame, which you’ll learn about in a moment.

Why add a frame?

A frame is used in your image to draw the eye to your main subject. The subject could be a model standing in a doorway or architecture framed through a window.

Plus, a frame can add to your image. The right frame can add context, which creates a further narrative element.

framing in your compositions architecture
Architecture can provide strong framing opportunities for your photos.

Where to find frames

Here’s the next question:

Where can you find a frame that will work for your photo? I’ve already mentioned a few classic ideas, but let’s look at those (and others!) in more detail below:

  • Doorways: One of the easiest frames to find is a doorway. You can position your main subject in front of the door and use it as a frame. Alternatively, you can photograph through the door and use it as a frame for the background scene.
  • Picture frames: Hold a frame in front of your camera or ask someone else to hold it for you. Then use this to frame something interesting.
  • Windows: This is similar to a doorway, but doesn’t run to the ground.
  • A wall: Here, you need to look for a gap in the wall to use as a frame. This can work well when the foreground (the wall) complements the background behind it.
  • Lensballs: One of the reasons a lensball is an effective photography tool is because it always provides a natural frame, with the outside of the ball framing the inside.
  • Photograph through: Look for objects you can photograph through, such as a plant pot or a tube. These will give your photo a circular frame.
  • Nature: There are plenty of natural frames. A cave entrance or a tree tunnel can work well.
framing in your compositions archway
A wide-angle lens was used to capture the archway in front of this temple, which created a great frame.

How to photograph with a frame

On the face of it, photographing with a frame is easy:

Simply compose a photograph in front of something like an arch or window.

However, you need to consider some key compositional and technical questions. For instance, what’s the subject in the frame? And how large or small should your frame appear?

  • Focal length: The focal length you choose will depend on how much you want to compress the area surrounding your frame. It will also depend on how far back from your frame you’re able to stand. For instance, when photographing indoors, a wide-angle lens may be needed to fill the photo with the frame of a window or doorway.
  • Subject: Just because you have a natural frame does not mean you have a good photo, especially if the subject behind it is uninteresting. Look first for your main subject, and then look for available framing options. If you’re taking portrait photos, this will be easier than if you’re photographing a landscape; you can, of course, always ask your model to stand within the frame.
  • Narrative: What will your frame tell the viewer about the rest of the photo? Is it possible to adapt the frame in some way so it better suits the scene behind it? How much of the area surrounding the frame will you include, and how will that affect the story you’re trying to convey?
framing in your compositions light painting frame
There was no frame for this photo until the light was painted in!

Creative framing in your compositions

When a frame isn’t available, you have another option:

Create your own!

This creative approach to framing in your compositions can lead to the best results. That’s because you’ll have more control over the frame itself. You can control the size and shape of the frame. You’ll also be able to precisely match the frame to the image you are trying to create.

The following are some possible ideas for more creative framing:

  • Card or paper: Choose the color, cut out the appropriate shape, and make your own custom frame.
  • Copper piping: Placed close to the lens, this will create a flare-like effect when the sun shines off the metal, and this flare can be used as a frame.
  • Plant pot: Cut out the bottom of a plant pot and use it to photograph through. A wide focal length will likely be needed to catch the edge of the pot as you photograph through it.
framing in your compositions net
Always look to see how a frame can add more of a story to your photo. In this image, the fishing net is used to frame the fisherman.

Get framing!

Now that you know all about framing in your compositions, it’s time to get out and practice what you’ve learned.

Do you enjoy using frames in the photos you take? Is there another approach you use when looking for frames? Have you ever tried creating your own frame so that it matches the photo you’re taking?

Share your thoughts in the comments! And if you have photos with frames, please share them, too!

The post How to Use Framing in Your Compositions to Improve Your Photography appeared first on Digital Photography School. It was authored by Simon Bond.


Digital Photography School

 
Comments Off on How to Use Framing in Your Compositions to Improve Your Photography

Posted in Photography


Friday Feature: Framing, timing bring juxtaposed beach scenes to life

10 Nov

Friday Feature: Framing, timing bring juxtaposed beach scenes to life

Three Men © Moises Levy

Framing and composition are two of the most basic tools in every photographers arsenal, but they can also be some of the most powerful.

In his recent of photographs, Mexico City photographer Moises Levy shows how simple black and white photographs on the beach can be turned into wonderfully juxtaposed images with the help of perfect timing, great composition, and clever framing.

In speaking with DPReview about the ongoing series, Levy said “Human condition is the main subject of my photography. I use several resources to express my ideas in photography like perspective and scale. My images are intimate too — I believe being close to my subject helps me to create powerful images.”

Levy says he works with only one camera and one lens at a time — either his Leica or Fujifilm with a 28mm r 35mm lens.

“I prefer to create anonymous subjects and for that I like to work with backlight to create high contrast black and white images in a more graphic sense,” Levy tells DPReview. “I also like to shoot very minimal and clean images and for that I use very low angles in places with almost no distractions, like beaches and open spaces.”

You can keep up with Levy’s work by checking out his website or following him on Instagram, Flickr, and Facebook.


Photographs by Moises Levy, used with permission.

Friday Feature: Framing, timing bring juxtaposed beach scenes to life

5 Guys © Moises Levy

Friday Feature: Framing, timing bring juxtaposed beach scenes to life

Action 5 © Moises Levy

Friday Feature: Framing, timing bring juxtaposed beach scenes to life

Action 8 © Moises Levy

Friday Feature: Framing, timing bring juxtaposed beach scenes to life

Action 11 © Moises Levy

Friday Feature: Framing, timing bring juxtaposed beach scenes to life

Arch © Moises Levy

Friday Feature: Framing, timing bring juxtaposed beach scenes to life

Ave en tres palos © Moises Levy

Friday Feature: Framing, timing bring juxtaposed beach scenes to life

Beer Man © Moises Levy

Friday Feature: Framing, timing bring juxtaposed beach scenes to life

Chapuzon © Moises Levy

Friday Feature: Framing, timing bring juxtaposed beach scenes to life

Communication © Moises Levy

Friday Feature: Framing, timing bring juxtaposed beach scenes to life

Fisherman Net © Moises Levy

Friday Feature: Framing, timing bring juxtaposed beach scenes to life

Fly © Moises Levy

Friday Feature: Framing, timing bring juxtaposed beach scenes to life

Ghost © Moises Levy

Friday Feature: Framing, timing bring juxtaposed beach scenes to life

Giraffes 1 © Moises Levy

Friday Feature: Framing, timing bring juxtaposed beach scenes to life

Horses 2 © Moises Levy

Friday Feature: Framing, timing bring juxtaposed beach scenes to life

Horses 1 © Moises Levy

Friday Feature: Framing, timing bring juxtaposed beach scenes to life

Jump 1 © Moises Levy

Friday Feature: Framing, timing bring juxtaposed beach scenes to life

Jump 2 © Moises Levy

Friday Feature: Framing, timing bring juxtaposed beach scenes to life

Kid © Moises Levy

Friday Feature: Framing, timing bring juxtaposed beach scenes to life

Kiss © Moises Levy

Friday Feature: Framing, timing bring juxtaposed beach scenes to life

Looking For Turtles © Moises Levy

Friday Feature: Framing, timing bring juxtaposed beach scenes to life

My Dog And I © Moises Levy

Friday Feature: Framing, timing bring juxtaposed beach scenes to life

On Place 1 © Moises Levy

Friday Feature: Framing, timing bring juxtaposed beach scenes to life

Perro Garza Y Hombre © Moises Levy

Friday Feature: Framing, timing bring juxtaposed beach scenes to life

Play © Moises Levy

Friday Feature: Framing, timing bring juxtaposed beach scenes to life

Resting © Moises Levy

Friday Feature: Framing, timing bring juxtaposed beach scenes to life

Running 1 © Moises Levy

Friday Feature: Framing, timing bring juxtaposed beach scenes to life

Shadow And Fisherman © Moises Levy

Friday Feature: Framing, timing bring juxtaposed beach scenes to life

Soul © Moises Levy

Friday Feature: Framing, timing bring juxtaposed beach scenes to life

Trapped 2 © Moises Levy

Friday Feature: Framing, timing bring juxtaposed beach scenes to life

Volley © Moises Levy

Friday Feature: Framing, timing bring juxtaposed beach scenes to life

Ball Head © Moises Levy

Friday Feature: Framing, timing bring juxtaposed beach scenes to life

Game 1 © Moises Levy

Articles: Digital Photography Review (dpreview.com)

 
Comments Off on Friday Feature: Framing, timing bring juxtaposed beach scenes to life

Posted in Uncategorized


5 Framing Tricks to Help You Capture Better Landscape Photos

05 Jun

Landscape photography is one of the most popular genres of photography and for good reason. A great landscape photo has the power to wow the viewer and captures the beauty of the incredible planet that we live on. But landscape photography is also difficult to master as not only are you often at the mercy of the elements, but you are also fighting against the limitations of digital cameras versus the human eye.

As advanced as digital cameras are, they are still no match for your eyes and that sometimes means you feel let down when you look at photos you’ve taken. A big part of this could be as simple as framing your shot correctly. So here are 5 framing tricks to help you capture better landscape photos.

sunset over a valley - 5 Framing Tricks to Help You Capture Better Landscape Photos

1. Add a Sense of Scale

Think about that feeling you get when you first see an amazing landscape in front of you. It’s often the sense of feeling really small compared to those towering mountains or that deep valley. But capturing that feeling in a photo isn’t as straightforward as just taking a shot of the scene. To be able to convey that sense of scale you need to help the viewer by showing them a comparison with something they can relate to.

For example, photograph a large boulder and it will be difficult for someone looking at the photo to know how big it is in reality. But put a person next to the boulder and suddenly there is an instant sense of scale. This is a great way to really make your landscape photos jump off the page and captivate the viewer.

mountain scene - 5 Framing Tricks to Help You Capture Better Landscape Photos

2. Point of Interest

A good landscape photo should lead the viewer’s eyes around the image. Sometimes to achieve this you need to add a point of interest to your image. This is especially true if you are photographing a scene where there is a vast empty area where nothing is happening.

Without a clear point of interest, the viewer’s eyes will get lost in the photo and it won’t work. For example, the photograph below would be pretty uninteresting without the people in it. But by including people not only does it add that point of interest but it also tells a much more intriguing story.

A point of interest could be anything. It can be a rock, person, animal, a tree, or a building. So next time you are evaluating a scene, think if it will benefit from having a point of interest. If so, try to frame your photo using the rule of thirds to capture this in the composition.

2 small people on large sand dunes - 5 Framing Tricks to Help You Capture Better Landscape Photos

3. Zoom In

In landscape photography, it’s really easy to try and capture everything in front of you. After all, that amazing vista is what usually wows people. But sometimes a wide-angle shot of a scene just doesn’t work because there is too much for the viewer to process. On those occasions, you need to zoom into your scene and try to capture a small section rather than the whole thing.

Think about the small section in the same way as if it was a wide-angle shot and frame up your image with the same thought process. The key is to not be afraid to forego the “big wide-angle shot” for the smaller zoomed in section. Remember that you can always try a few different crops and then decide on the best one later in post-production.

But don’t make the mistake of just capturing wide-angle shots and relying on cropping in post-production as the more you crop an image, the more pixelated it will become if you want to print it at really large sizes. Try to actually capture some photos zoomed it with your camera instead.

green landscape scene - 5 Framing Tricks to Help You Capture Better Landscape Photos

4. Sky or Land?

One of the best ways to ensure that your landscape photos look dramatic and stunning is by focusing as much of the photo on the part that is going to give you impact. That means really considering where to put the horizon line. If you have a dramatic sky with lots of clouds, beautiful dramatic sunsets or even moody stormy weather, then place your horizon line in the lower third of the image, so you are showing more of the sky.

If on the other hand, your foreground is interesting with a good point of interest, then place your horizon in the top third of the image. Thus maximizing the area showing the foreground in the image. Just try to avoid placing your horizon line in the middle of the image where possible as it can make your photo seem uninteresting.

So always remember, sky or land? Whichever it most important to your image, show more of that part of the scene.

beach sunset - 5 Framing Tricks to Help You Capture Better Landscape Photos

5. Extreme Angles

Most people see landscapes from one particular view only – eye level view. The great thing about photography is that it allows you to capture a photo at a completely different point of view to what most people see. You don’t need to dangle yourself off a cliff to capture unique views, sometimes just being slightly lower or more elevated can have incredibly dramatic results.

For example, set your camera really low (almost on the ground) and you will capture a unique angle from a worm’s eye viewpoint. Put your camera on a tall tripod and lift it up so that it’s higher than normal eye level and again you’ll capture a unique shot.

There’s also the option of using drones these days which can give you even more stunning photos of landscapes. But make sure you always check local laws regarding drone usage. As with any type of photography, the key is to experiment.

seascape and castle on a hill - 5 Framing Tricks to Help You Capture Better Landscape Photos

Conclusion

Capturing the perfect landscape takes time, effort and usually some luck a well.

You need so many factors to be working together to capture stunning photos and even then you still need to think about how to frame all of those elements into a photograph that will do the scene justice. But once you have a great location, an interesting subject, and the perfect light, follow these framing tricks and you may well capture some stunning landscape photos.

The post 5 Framing Tricks to Help You Capture Better Landscape Photos appeared first on Digital Photography School.


Digital Photography School

 
Comments Off on 5 Framing Tricks to Help You Capture Better Landscape Photos

Posted in Photography


3 Simple Ways to Use Framing and Layering in Portraits

06 Feb

I love using framing in my images with a layering technique. Layering is simply incorporating not just your subject and background, but adding a foreground and other levels if possible as part of the elements you use to frame your overall image. It’s not always the most straightforward setup to do but it excites me because I love an image that invites the viewer in to explore the image through many levels. Your eyes travel around the image because there is so much to see.

3 Simple Ways to Use Framing and Layering in Portraits

This does not mean there are many objects to see but rather there are layers of varying depths of field making the image more compelling. I’ve been shooting for nine years now and I still strive to improve the composition of my images.

As I’ve said, it’s not always the most obvious and quickest thing to do. Sometimes, I choose a location that I know will give me a variety of choices for layering. Or we will do a “walk” during the photoshoot as part of the experience, exploring spots that would give us layering opportunities. I’d like to share with you three simple ways you can use framing in your images with this layering technique.

#1 – Shoot through glass

3 Simple Ways to Use Framing and Layering in Portraits

I love shooting through glass. In fact, when I do engagement sessions, I always suggest we either start or end the session with a planning meeting or a chat in a cafe. Look for a window table and shoot from the outside. This is a good way to get some funky compositions, colors, and patterns on the images as well as a reflection and layering.

Shooting through glass allows you to capture different layers of details and you can play around with these details and where you place your focus to achieve a fresh or unusual image. Pictures through glass also provide that extraordinary look and feel, sometimes ethereal, that we often don’t notice in our day-to-day lives unless we purposely stop to see them.

You may need to move around a bit to get the composition right. Or have to wait until a passerby in a white shirt walks past behind you, for example, and provides that needed white blur in the foreground to get your composition right.

3 Simple Ways to Use Framing and Layering in Portraits

#2 – Shoot through foliage

When shooting at a park, position yourself behind trees, leaves, bushes, etc., to achieve that “observer” feeling. Make sure you provide clear instructions to your couple so they know what is expected of them before you go hide.

For example, as I am shooting from a distance and obscured by foliage, I instruct my subjects to look a little towards my direction so I can see at least a part of their faces. I ask them not to talk to each other but to communicate via looking into each other’s eyes and smiling a lot. If they feel awkward, that’s all the better because then they can laugh it off and that sort of natural expression is what I’m after.

3 Simple Ways to Use Framing and Layering in Portraits

Gently direction them

Tell them not to leave big gaps in between each other. For example, lean their heads towards each other with a very small gap between their faces, or to slightly touch each other’s faces but not squish their cheeks together. Get them to always be in a V position towards you or facing each other directly but never fully turned away with their backs facing you.

The only exception I make for this is when they are on a bench and I shoot from the back for a romantic shot with their heads leaning against each other. Being physically a lot closer than what is normally comfortable can feel unnatural because you are right in each other’s spaces and in reality, you don’t talk to a person with your faces too close to theirs.

But the connection between them is important and sometimes you have to exaggerate things to communicate that connection in photographs well.

3 Simple Ways to Use Framing and Layering in Portraits

You don’t have to be at a park or somewhere green to achieve the look of layering by using foliage to frame your images either. I often just pick some leaves, put them in front of the camera, and shoot through them.

I have also shot with a piece of cellophane wrapped around the side of my lens but not obscuring my lens altogether. That makes the look of shooting through something, thereby creating a foreground, middle ground and background. This makes for a more interesting perspective and composition having more than two layers to look through in your images.

3 Simple Ways to Use Framing and Layering in Portraits

#3 – Shoot through structure

I love hiding behind buildings and walls and using these large solid structures as part of my composition and adding framing. This not only makes me a little more invisible but I feel the distance makes the couple feel more at ease with the camera not being in their face and me, not in their immediate space.

dps-photography-tutorial-tips-layering-framing_0000

When I want to incorporate a geometric element in my image, I often hide behind some large building, columns or any solid structure and use that to frame my couple. This is a really fun way of trying out more abstract compositions, perspectives and lines, patterns and some foreground blurring to accentuate the focus on your couple.

3 Simple Ways to Use Framing and Layering in Portraits

However, sometimes there are no buildings or structures you can easily hide behind. My advice is to make one yourself! For this photo below, I asked the maid of honor to stand just to the left so I could use her silhouette to frame my bride in an interesting composition. This is one of my all-time favorite wedding images.

3 Simple Ways to Use Framing and Layering in Portraits

In the photo below, I used the long veil to create a foreground element giving the impression that I was hiding behind a big boulder and that there was continuity between the foreground and the bride’s veil.

So be creative and find ways to achieve your intended outcome. As the saying goes, “When there’s a will, there’s a way!”

3 Simple Ways to Use Framing and Layering in Portraits

Your turn

Do you have any other tips for framing your images using layering or any other techniques? Do share them here in the comments below!

The post 3 Simple Ways to Use Framing and Layering in Portraits by Lily Sawyer appeared first on Digital Photography School.


Digital Photography School

 
Comments Off on 3 Simple Ways to Use Framing and Layering in Portraits

Posted in Photography


Weekly Photography Challenge – Framing

02 Dec

There are many ways to compose or images and many different elements you can use for effective composition. Framing is one such element of composition that can be very powerful for leading the viewer’s eye when done well.

Eastman Kodak House (the home of George Eastman who founded Kodak) framed by the trees in the front garden.

Weekly Photography Challenge – Framing

Framing isn’t just about finding an archway, window, or doorway to shoot through though. You need to have a strong and interesting subject inside the frame. An empty parking lot framed with a stunning doorway is still a boring, empty parking lot.


Here some tips if you need help with your framing:

  • How to Use Framing in an Urban Environment
  • Tips for Framing your Images to Tell a More Compelling Story
  • How to Use Framing to Create a Sense of Scale
  • Tips for Using Natural Framing to Improve Your Composition
  • How to Use Framing for More Effective Compositions

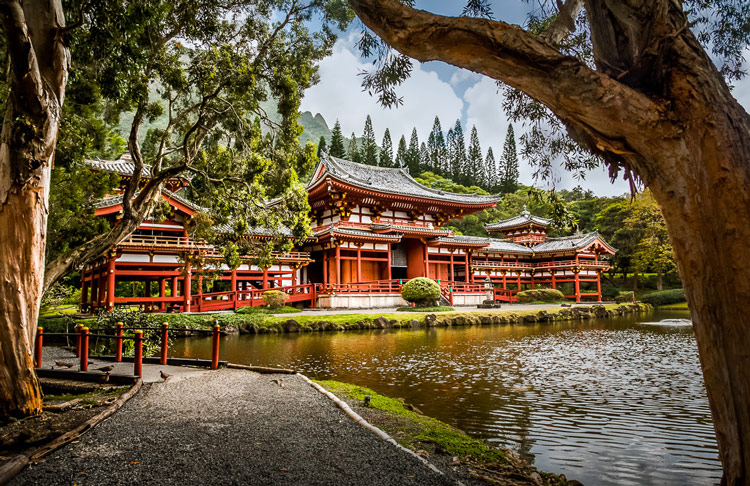
I shot this Japanese style pagoda closer up, but it was lacking something. So after walking down the path, I turned around and shot it again, this time using the large trees as framing elements.

Simply upload your shot into the comment field (look for the little camera icon in the Disqus comments section) and they’ll get embedded for us all to see or if you’d prefer, upload them to your favorite photo-sharing site and leave the link to them. Show me your best images in this week’s challenge. Sometimes it takes a while for an image to appear so be patient and try not to post the same image twice.

Share in the dPS Facebook Group

You can also share your images in the dPS Facebook group as the challenge is posted there each week as well.

The post Weekly Photography Challenge – Framing by Darlene Hildebrandt appeared first on Digital Photography School.


Digital Photography School

 
Comments Off on Weekly Photography Challenge – Framing

Posted in Photography


How to Use Framing in an Urban Environment

20 Nov

Photographers have long developed different classifications to pair with the design and execution of a photograph – lines, shape, texture, light, framing, contrast, just to name a few. For example, leading lines appeal to a viewer’s natural tenancy to trace line into a photograph. Sharp lines are used to grab attention and organic lines create a peaceful atmosphere.

Other composition techniques like the Rule of Thirds require a photographer to mentally break down an image to evaluate balance. Low and high perspective alter the way a viewer sees the world and symmetrical/asymmetrical elements highlights the quirky beauty of life. The technique we’ll have a quick look in this article, demonstrates the power of framing, especially in an urban environment.

How to Use Framing in an Urban Environment

What is framing?

Framing in photography creates a self-contained image, like a photo-within-a-photo effect. As photographers, we are used to seeing the world through the frame of a viewfinder. We constantly evaluate what we’ll keep in an image and what we’ll exclude. We deliberately apply perspective, aim, zoom and positioning techniques to construct our photographs – sometimes without even noticing.

By cradling the subject in a balance of space and line, a frame is created, not dissimilar to the photo frames you’d find on your shelf at home.  Essentially, you are crafting a frame within a frame to deliberately bring focus to a subject, adding narrative and the unique experience of voyeurism that photography affords.

How to Use Framing in an Urban Environment

How do I frame a photograph?

For such an effective technique, framing has plenty to offer. It makes use of strong design skills, adding an extra layer to an image to create more depth.  Framing can also be used to obscure more mundane areas of a scene, boosting the efficacy of a photograph when viewed by others.

Composing an image by making use of framing is fairly straightforward. Start out searching for windows and doors as they are the most abundant frames in an urban environment. You’ll find that windows and doors, when photographed, contain their own little ecosystem within the one image. This is great for capitalizing on both content and narrative, almost like reading a window in a comic strip!

Frame shapes

Square or rectangular frames are probably the first things that leap to mind when someone considers framing. Doorways and windows are a great way for emphasizing a subject or depth, but they are not the only options and framing is not limited to squares or rectangles.

The image below proves how versatile the urban environment can be for artificial framing. The image was taken from the floor of a train station, lens pointed to the floor above. The darkness of the building structure is silhouetted against the blue sky, forming a crescent shape. The frame draws attention to the contrast of the architecture against the sky but also cradles the form of a human passing by.

How to Use Framing in an Urban Environment

How to Use Framing in an Urban Environment

This photo was taken by chance in a late night shopping district. The framing of the man emphasizes his presence but also isolates him from the rest of the landscape.

How to Use Framing in an Urban Environment

For this image, I aimed to align a gap in the cage with the cat’s face. The slight distortion caused by the lens draws the center square closer to the viewer’s eye. Framing isn’t always a split-second discovery, taking the time to assess a situation and respond creatively can be just as effective as shooting from the hip.

How to Use Framing in an Urban Environment

Shattered windows in rundown urban landscapes offer beautifully detailed landscapes complemented by an informed framing technique.

Keep it real

Framing can be really effective for highlighting specific areas of a photograph. However, it’s important to keep in mind that not every photograph needs framing. Some images are much more effective when they stand alone. Like most photography, you need to be versatile and trust your instincts.

While lining up a perfect shot through a fence can be effective, make sure to be aware of your surroundings too. Don’t focus so heavily on framing that you sacrifice other photographic opportunities. You don’t need to force a frame on an image, so don’t overthink it. You want natural images that are enhanced by a frame, not poor images that require a frame to garner interest.

Just stay open to the idea of framing and gather enough experience to recognize a framing opportunity when one presents itself. This way, opportunities tend to reveal themselves rather than you having to force them out of hiding.

How to Use Framing in an Urban Environment

How to Use Framing in an Urban Environment

The branches of these trees act as a natural frame, sectioning up the image to draw attraction to the cute little bunnies within.

The post How to Use Framing in an Urban Environment by Megan Kennedy appeared first on Digital Photography School.


Digital Photography School

 
Comments Off on How to Use Framing in an Urban Environment

Posted in Photography


7 Ideas for Low-Cost Printing and Framing Options for Your Images

03 Nov

Photography has changed an awful lot over the last 100 years. Heck, it’s changed immensely over the last 20 years. Who am I kidding? With the rise of the cell phone, digital photography and social media have changed the industry in countless ways.

Images matter

I would argue that one thing in photography hasn’t changed. Everyone loves looking at pictures whether it’s scanning images on Instagram or flipping through old photo albums, something is mesmerizing about viewing an image. This simple fact will never change. Everyone loves looking at pictures.

My kids will sit for an hour and check out an old photo album. They learn about their family and their history from those images. They like to share their lives through images on social media. Humans are obsessed with the visual.

“Photography is a way of feeling, of touching, of loving. What you have caught on film is captured forever… It remembers little things, long after you have forgotten everything.” — Aaron Siskind

7 Ideas for Low Cost Printing and Framing Options for Your Images

If this image had not been printed I would have forgotten just how much my son has grown in 9 years. It doesn’t matter that it’s a little soft. It’s the memories involved that matter.

So let’s get them off the computer

What could be better than a visual record or our lives? So why then are people so hesitant to print those images and display them? In the days of film, people used to take photos and leave the rolls lying around for years. Today we take photos on our phone and leave them there. Sure they get shared on Facebook or Instagram, but then we forget about them. Why? Why do we do this?

One excuse I’ve heard is, “It’s expensive to print and frame images.” Well okay, that’s valid. It can be pricey, I agree, but with a little ingenuity you can print out those images and share them easily. There’s something wonderful about handling a printed photograph. We shouldn’t lose that part of the industry. We should always print our photographs.

So without further ado here are some tips and tricks for printing and framing photographs in a way that doesn’t cost an arm and a leg.

1) Print in bulk

Every print company gives discounts for mass amounts of printing. Save up a whole bunch of images and print them all at once. You can drag and drop your favorite images into a folder and then when you have enough to meet their bulk prices you can upload and save (try Shutterfly). Just remember to print all the images at the same size. Even for large art prints, you can find savings by printing in bulk.

If you use an online lab, the shipping can be a real burden, but you can save money on shipping by ordering a lot at once. The larger the package, the cheaper it can be to get it shipped. A lot of companies also offer free shipping over a certain price. Take advantage of these offers and get your prints delivered in a cost-efficient manner.

2) Buy frames in bulk

If you’re like me and you love to fill your walls with images of your family, then it’s time you started buying frames in bulk. Go to your local framing store and talk to them about purchasing large quantities. Most stores will give a discount if you buy five frames of the same size.

Even for custom built frames, you can get a good discount by ordering several of the same size and style at one time. I use this strategy for framing art for galleries. I will print five images the same size and then frame them in the same way. It saves me a great deal of money, and the work looks very cohesive hanging on the gallery wall.

You can also check out online framing supply stores. Sites like Matshop offer great prices on frames, free shipping on orders over a specific amount and the ability to buy frames in bulk. You can also purchase bulk mat kits which are very useful. Purchase frames from your local framing store or pick them up at flea markets and add your mats and images.

7 Ideas for Low Cost Printing and Framing Options for Your Images

Here’s a collection of the frames and mats I purchased through bulk ordering.

3) Recycle old frames

For that crafty look visit garage sales or flea markets and pick up some old frames. Pop your matted images into these frames, and you’ve got a truly unique look for your work. It’s easy to find old frames for a few dollars if you know where to look.

4) Create magazines or photo books

It’s easy to upload your photos and use online printing services like Blurb to make photo books. Lightroom comes equipped with an interface for creating photo books and ordering from Blurb. It’s not very hard to create them and it’s very cost-effective.  Plus you get to maintain some of the nostalgia of flipping through photo albums. Remember those days?

7 Ideas for Low Cost Printing and Framing Options for Your Images

A printed book to show off family pictures from a trip to Iceland. My boys take it off the shelf and read it occasionally.

5) Buy a cork board

No seriously, purchase a few cork boards and pin prints to them. When you get tired of the images you’ve displayed, print out a few more and pin them up. You’ll get lots of comments from friends and family. They often stop to look at my corkboard. Sometimes I get comments like, “You know this is a cheap way of showing off pics. I need to do something like this.”

I usually switch up my images every season. The prints might be curled a little at the end of four months, but I put them in a labeled box, and I will recycle images pulling a few from an old box each season. It’s completely random which images end up on the corkboard.

7 Ideas for Low Cost Printing and Framing Options for Your Images

This cork board sits in my kitchen. I change the images up every few weeks.

6) Subscribe to printing company newsletters

I know it’s annoying to receive promotional emails, but honestly, most companies send out promo codes in their newsletters, and these codes can save you loads of money. Take advantage of 40% off codes to print out large canvases of your travel images.

Sites like Posterjack and 44 Wide often have sales that reduce the cost of printing. It means you can get a 100$ canvas for 60$ . That makes for a cost-effective gift idea for a family member.

7) Turn them into coloring pages

My kids love it when I take their photos and turn them into something they can contribute to. There’s a very simple process using Photoshop that allows you to create outlines of your images. If you own Topaz you can use that plugin to create line drawings. There are lots of options available, give the process a try.

Print them out and let your kids decorate the fridge. You will always have the digital print you can use for more serious purposes. So let your kids go crazy, they can give Grandma orange hair or make your dress polka dotted. The images will become stronger memories when they can be seen on a daily basis.

7 Ideas for Low Cost Printing and Framing Options for Your Images

It only takes a few minutes to turn photos into coloring pages and then print them out at 8.5 x 11 size. Perfect for artistic renditions.

Conclusion

There are lots of amazing and cost-effective ways to print and display your photographs. Be creative, think a little outside the box and try a few ways to incorporate your images into your daily life.

It doesn’t have to be expensive or time-consuming. If you’ve got little kids, you can even find fun ways to create an art project involving photographs. We’d love to hear your tips and tricks for printing images. Please share your ideas with us in the comments below.

Let’s all get into the habit of putting photographs on our walls not just our Facebook page.

The post 7 Ideas for Low-Cost Printing and Framing Options for Your Images by Erin Fitzgibbon appeared first on Digital Photography School.


Digital Photography School

 
Comments Off on 7 Ideas for Low-Cost Printing and Framing Options for Your Images

Posted in Photography


Apple acquires AI startup that scores your photos’ framing, composition and more

03 Oct

Apple has reportedly acquired a small computer vision startup called Regaind, according to TechCrunch, who is citing ‘multiple sources.’ The acquisition falls onto our radar because of what Regaind’s technology is designed to do, namely: score photographs based on their composition, lighting, perspective, and other aesthetic qualities.

In other words, the company’s computer vision algorithms can tell how ‘good’ your photo is, insofar as such things can be analyzed objectively.

TechCrunch reports that the acquisition happened ‘earlier this year’, and while Apple hasn’t confirmed the news, the statement it sent to TechCrunch doesn’t deny it either. In fact, it’s about as close to ‘confirmation’ as Apple ever gets in such matters:

Apple buys smaller technology companies from time to time, and we generally do not discuss our purpose or plans.

A quick look at Regaind’s website will give you a look at the kind of information the company can ‘see’ in your photographs. This more professional portrait, for example, scores high in the areas of Aesthetics, Sharpness and Exposure, with multiple positive ‘Properties’ highlighted such as ‘Subject Well Framed’ and ‘Pleasant Blur.’

This birthday snapshot, however, scores much lower and suffers from ‘Dull Colors’ and an ‘Annoying Background.’

How Apple intends to use this technology (or already is?) may never be explicitly stated, but Regaind’s technology will no doubt make it into Apple’s Photos app on both macOS and iOS, and may even help future iterations of the iPhone camera prompt you to frame your subject better, seek better lighting, or get rid of that ‘Annoying Background’.

Your guess is as good as ours, but if you want to learn more about this company Apple almost certainly acquired, head over to the Regaind website by clicking here.

Articles: Digital Photography Review (dpreview.com)

 
Comments Off on Apple acquires AI startup that scores your photos’ framing, composition and more

Posted in Uncategorized


How to Use Framing to Create a Sense of Scale

02 Aug

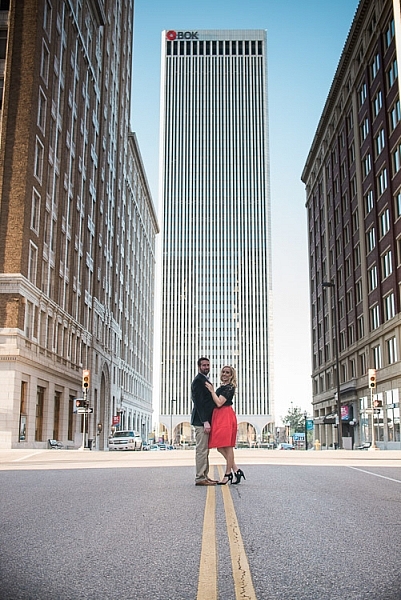
One thing that can be difficult to get across when taking pictures is a true sense of how large something is in real life. A skyscraper that appears towering and imposing in person, can come across as unimpressive, or stripped of its majesty when photographed. Natural formations that inspire awe and self-reflection, often seem puny and insignificant when we go through our photos later at home or on our phones.create-sense-of-scale-bok-center

This is something I have had happen many times in my own journey as a photographer, and while it can be tricky to create a sense of scale, there’s a way to use the concept of framing to capture the massive size of things in the world around you.

What is framing?

Framing has to do with the way the elements in a picture are positioned, in relation to one another. I struggled with the concept of framing for scale for a long time, before I really got the hang of it. But if you really want to show how big something is, it helps to put something else in the picture with it. This concept might seem a little counterintuitive, but adding elements to the foreground, background, or image sides, helps to not only give the viewer a sense of scale by showing how big the object is in relation to something else, but often it helps make the picture more compelling from a compositional perspective.

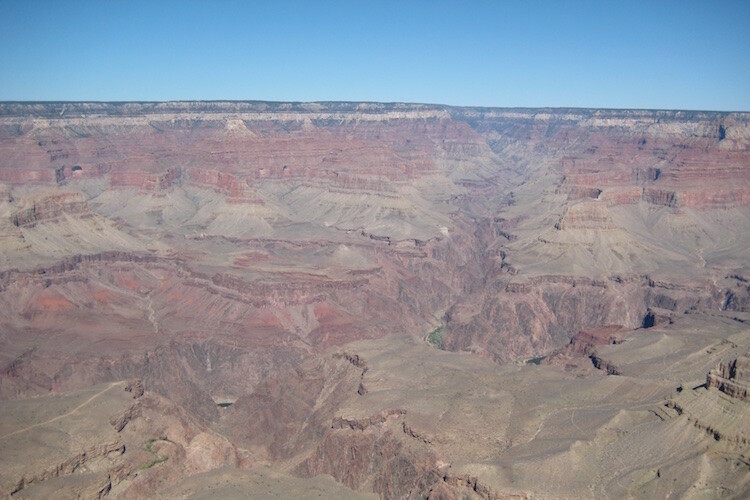
As an example, here’s a picture I took when I visited the Grand Canyon a few years ago. I really wanted to capture the sheer size of this natural wonder, so naturally I pointed my camera out from a precipice and took a few pictures. Sadly, the resulting images look flat, muddy, and downright boring – almost the polar opposite of the Canyon itself.

An incredibly boring picture of one of the most amazing natural formations I have ever seen.

An incredibly boring picture of one of the most amazing natural formations I have ever seen.

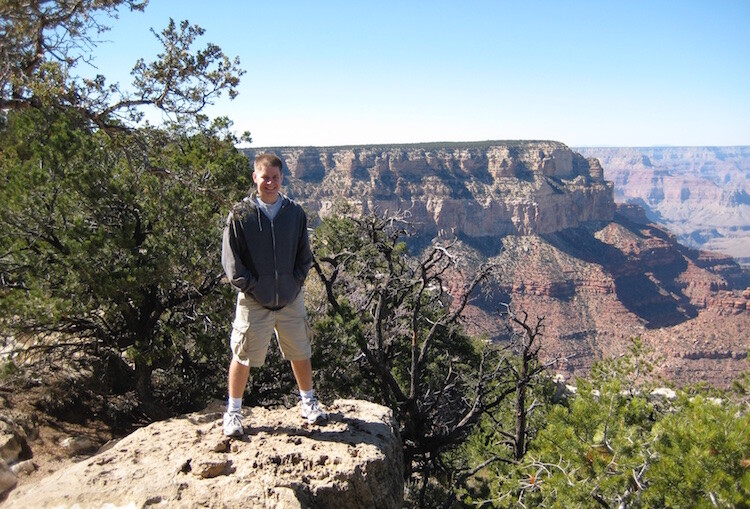
The problem with this image is it does nothing to impart a sense of scale to the viewer. In order to truly appreciate how big the canyon is, we need other visual information in the frame, to which we may compare the background elements. Fortunately, one of my friends took a much better picture that includes a few foreground elements, which although they block out some of the Canyon, help to capture the grandeur of this natural wonder.

create-sense-of-scale-grand-canyon-foreground

A much better picture, even though part of the Grand Canyon is blocked out.

The second picture works because it contains several layers: me, the trees, the plateau, and a glimpse of the rest of the Canyon. Of course this concept, like much in the world of photography, is quite subjective and some might think the top picture looks better because you can see more of the canyon itself. However, in my opinion the bottom image is more interesting because of the multiple compositional layers, while at the same time helping the viewer understand just how big the Grand Canyon really is.

How to apply framing to show scale

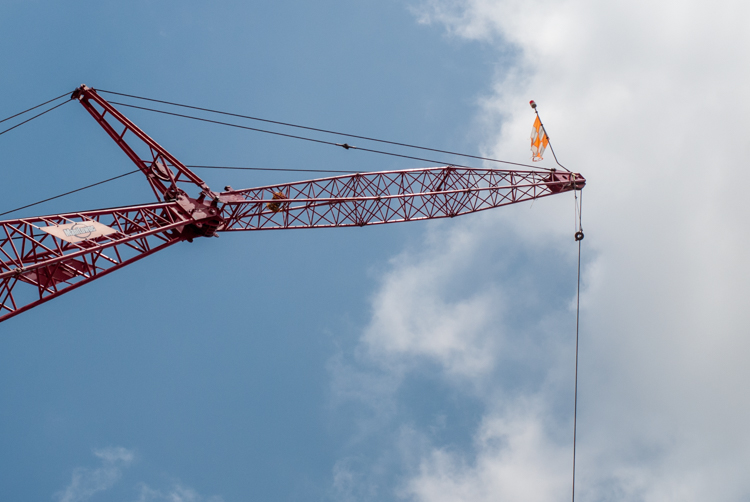
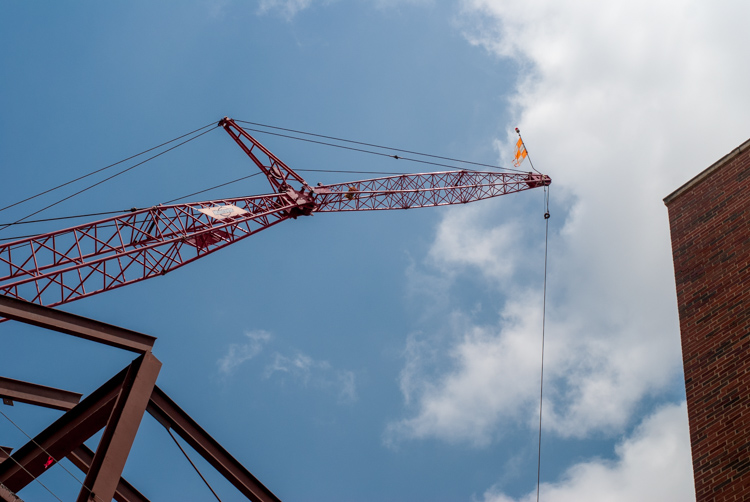
You can see the same principle at work in the following pair of shots as well. The first one was zoomed in a little and focused just on the crane, which is fine, but it doesn’t really tell the story of how big the crane is, or how much it towers over the surrounding buildings.

create-sense-of-scale-crane-unframed

To adequately capture the size of this piece of construction equipment I stood in the same place, but zoomed out a little bit, in order to frame the crane between two of the surrounding buildings. The result is a picture that adds a great deal of additional context, which helps the viewer to understand the size of the subject in the photo.

create-sense-of-scale-crane-framed

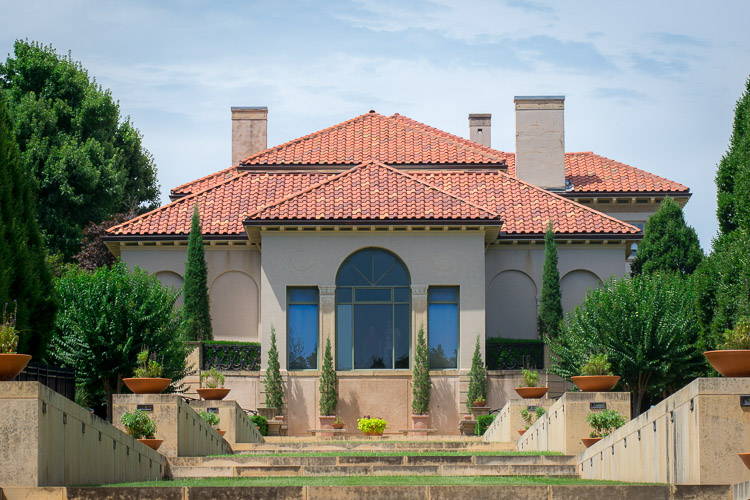
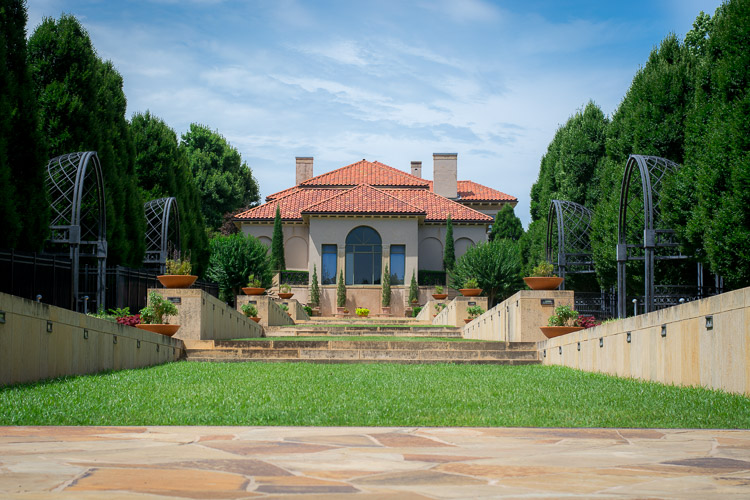
Often these types of framing decisions are not all that complicated. It can be as simple as stepping a few meters in any direction, or zooming in and out with your camera. Another example is this set of two images taken at the Philbrook Museum in Tulsa, Oklahoma. It’s a grand building with a rich history, but unless the building is properly framed it can look like any other house.

create-sense-of-scale-philbrook-unframed

Looking at the above image you might get the idea that this dwelling is somewhat old, with a bit of a terrace in front. But, it doesn’t really capture a true sense of the scale, not only of the house, but its surrounding gardens.

create-sense-of-scale-philbrook-framed

In the second image (above), the size of the mansion is smaller in the image, yet it seems much larger because it is framed on the sides by rows of trees, as well as the lower portion of the photo which shows many distinct levels of the terrace. It’s somewhat ironic that stepping back and re-framing a shot like this, so that the subject is smaller in the frame, can actually make it appear larger. But, you will find this phenomenon to be true across a wide range of photographic situations in which you want to convey the true size of something.

Don’t overdo it

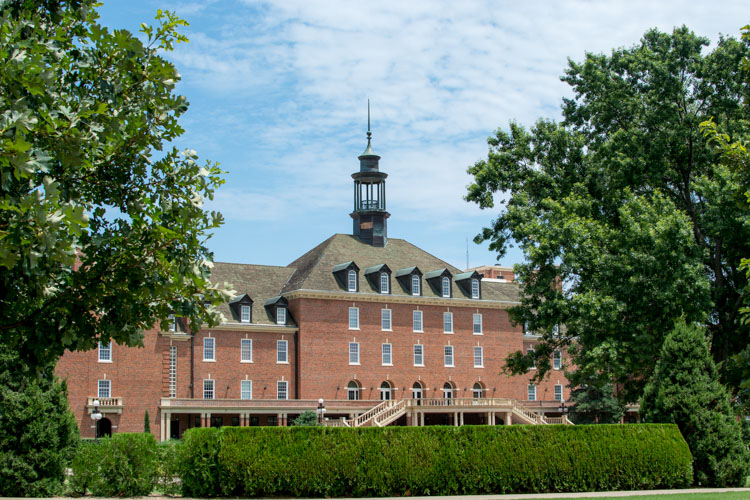
Of course, just as important as knowing how to frame your subjects is knowing when to hold back a little bit. The picture below shows the student union of Oklahoma State University, one of the largest student unions in the country. Yet when it is framed between two trees on the sides and a hedge in the foreground, it almost gets dwarfed and seems somewhat diminutive in size.

create-sense-of-scale-student-union-framed

One reason the framing is not useful here is because it actually covers up part of the building, whereas in the previous example the technique was used enhance the large subjects. There are also several visual cues, such as windows and stairs, that on their own do a good job of imparting a sense of size to the viewer. To properly showcase how big this structure is, it’s enough to simply show it on its own.

create-sense-of-scale-student-union-unframed

The above examples are just a few illustrations of how you can use the idea of framing to capture a sense of scale, but I’m curious about your own personal approach. How do you use various photographic techniques to truly capture the size of your subject? Leave your thoughts and images in the comments below.

googletag.cmd.push(function() {
tablet_slots.push( googletag.defineSlot( “/1005424/_dPSv4_tab-all-article-bottom_(300×250)”, [300, 250], “pb-ad-78623” ).addService( googletag.pubads() ) ); } );

googletag.cmd.push(function() {
mobile_slots.push( googletag.defineSlot( “/1005424/_dPSv4_mob-all-article-bottom_(300×250)”, [300, 250], “pb-ad-78158” ).addService( googletag.pubads() ) ); } );

The post How to Use Framing to Create a Sense of Scale by Simon Ringsmuth appeared first on Digital Photography School.


Digital Photography School

 
Comments Off on How to Use Framing to Create a Sense of Scale

Posted in Photography


Tips for Using Natural Framing to Improve Your Composition

14 Jul

To help you compose more exciting and beautiful photographs, there are certain key composition techniques that you can use. Natural framing is one that is widely known, but needs careful and thoughtful application. Using framing can create extremely impressive and elegant images when done right. Here are some tips to help you.
natural-framing-tips--10

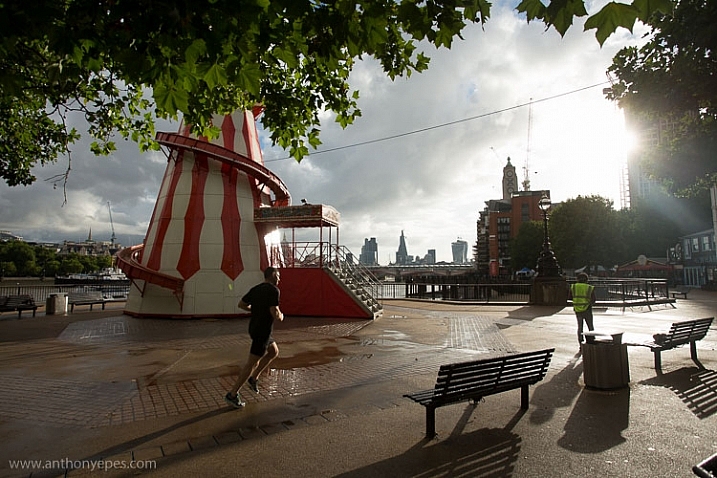
Natural framing is when you use an element within your image to frame the subject. This draws the eye into the photo and highlights the actual subject.

This internal frame can be constructed using a multitude of things you’ll find anywhere – branches, archways, tunnels, door frames etc., as well as things that aren’t solid like light, shadows, rain, fog, etc. – it doesn’t matter what you use.

Framing is a technique to use sparingly – but when it’s totally right, it looks natural. So few people use it well that if you can master it, you can create some fantastic shots.
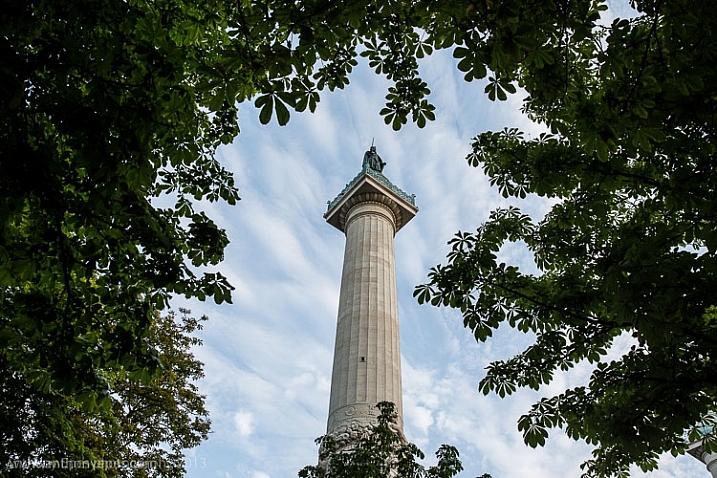
natural-framing-tips--2
Why you should use natural framing:

  • It easily draws your viewer’s eye into the photo and emphasizes the subject.
  • It isolates and separates your subject from what’s around it.
  • It brings a sense of order and structure to a photo – and the eye loves order.

When to use natural framing

  • To obscure boring sky (my favourite).
  • To add depth to an image – especially when the item acting as the frame is not in focus.
  • To bring contrasting elements into the photo without detracting from the subject.
  • To create structure.
  • To create a feeling of a self-contained image, particularly if you are photographing something quite ordinary and simple, a frame will help give depth to the subject.
natural-framing-tips--12

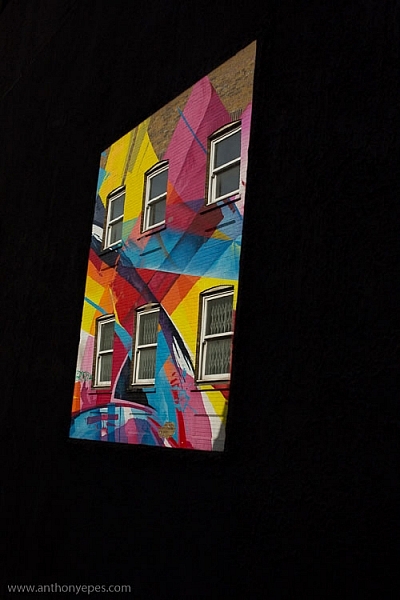
Traditionally the frame should be distinctly separate from the subject, so that it’s not confusing to the eye. But I will also show you where I haven’t done that, and the photo still works. I will show you both how to use this technique as well as where else you can take it – how to let it inspire you to develop your images.

Rules are made to followed, bent and broken

Like anything that is considered a technique or rule, people can feel very passionately for or against their use.

“Consulting the rules of composition before taking a photograph, is like consulting the laws of gravity before going for a walk.” Edward Weston

But for me, it comes down to not using any of the rules so much, that your photos end up all looking the same. Don’t let rules keep you stuck in a box. They are a great springboard for your photography, or a way to help refresh your vision, so that you start composing in a different way.
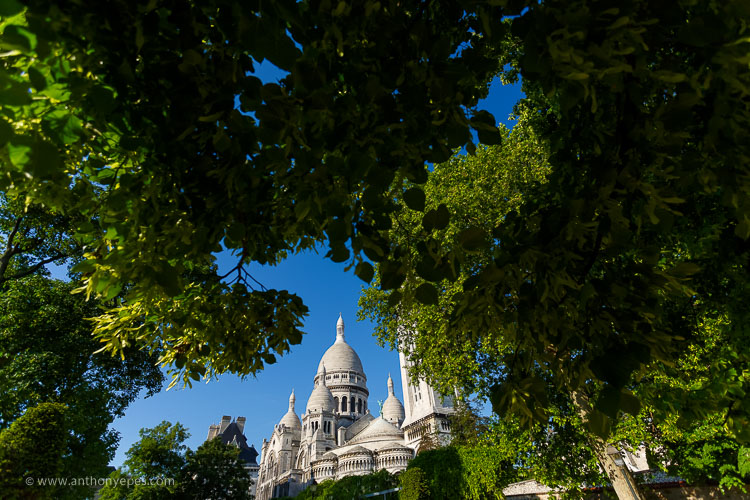
natural-framing-15

When I was starting out, I worked hard to get really familiar with the key compositional techniques, but then after a while, once I’d embedded them, I started to develop my own way of using these techniques, my own style.

I also encourage you to think of all these techniques and rules as opportunities to see and learn to organise the elements within your photos differently. In my workshops I’ve noticed that one of hardest things for people is to break the world down into elements, and then learn how to organise these elements to create striking compositions.

Natural framing isn’t an add-on

Natural framing is one of the harder rules to pull off well. I think many people use it to make a boring landscape or scene more interesting. But to me, if your subject is boring, no technique is going to liven it up. Framing should be used as an additional interesting element – not as an overlay to a mundane scene (just search: “natural framing” on Google images and you’ll see what I mean).
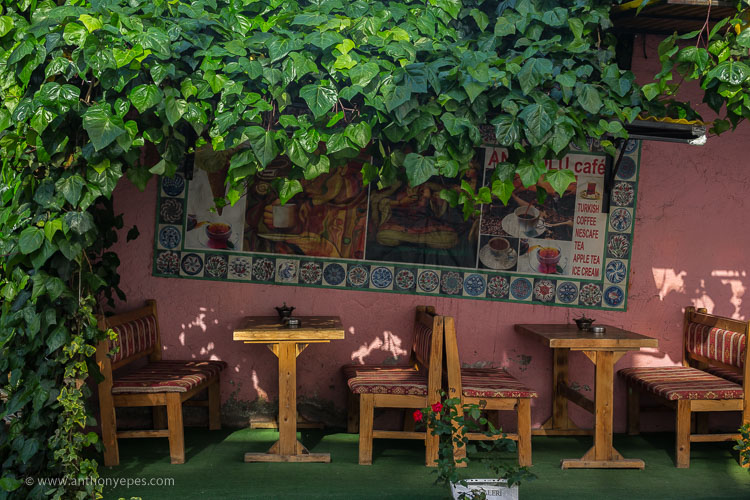
natural-framing-tips--3

I find natural framing is most interesting when used in the loosest possible interpretation. It has to be employed in a way that enhances the photo, and feels like it is a natural part of the composition.

“There is no better time to crop a bad composition than just before you press the shutter release.” Bryan Peterson

With those caveats – now it’s time to relax, have fun, and play with it!

Creating your frame
natural-framing-20

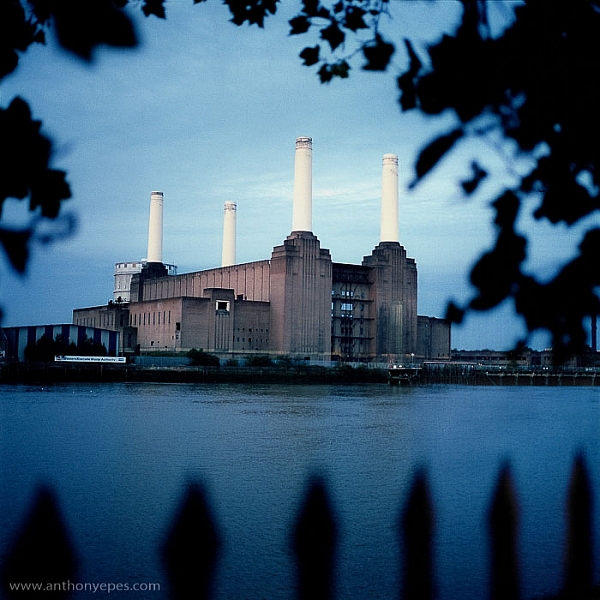
You don’t need to have a frame around all four sides of your photo for it to work – in fact I’d encourage you not to do that. I think more often than not, it looks more natural and pleasing to the eye for the frame to take up just two or three sides of the image. But like every recommendation – use your own personal judgement.

The photo above of Battersea Power station is probably one of my most traditional interpretations of natural framing. I have framed the building with the branches and leaves at the top, and the outline of a fence at the bottom. Two important things to point out in this photo:

  • When the frame is out of focus it create a sense of depth to the image.
  • The frame can be made from different elements: I’ve used two different elements but their colour is the same, and they are both interesting shapes – so they have some common qualities.

Obscuring boring sky
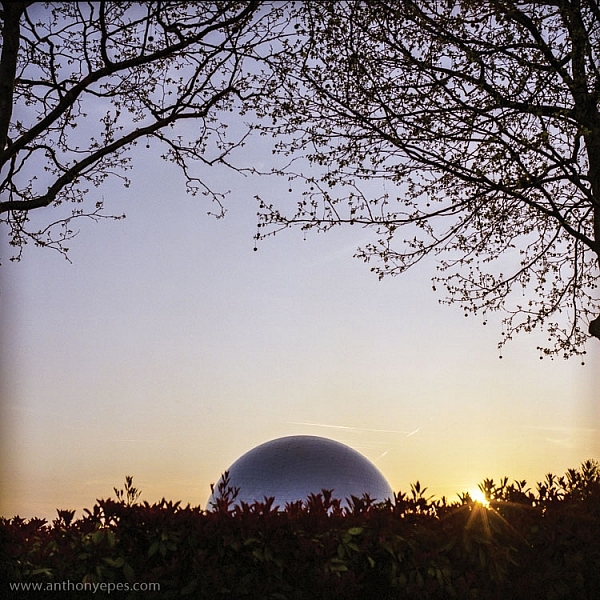
natural-framing-tips--7

In the photo above, I wanted to capture the shiny dome and the rising sun. But that wasn’t enough to make an interesting photo. There was some pretty endless sky, so I added a silhouette of the bare branches above. I seem to use a lot of tree branches in my natural framing compositions. In this case, I love how they create this beautiful, wild, chaotic pattern, above the very clean and shiny dome. Then I’ve added this little almost tuft of leaves below, which balances the photo out.

I love using framing elements that have great texture – again they add depth. Just remember to keep it well organized and clear so people can see what you are trying to do. This photo is really about the simple contrasting shapes – and by using natural framing it creates a nicely ordered photo, constructed from the available elements.
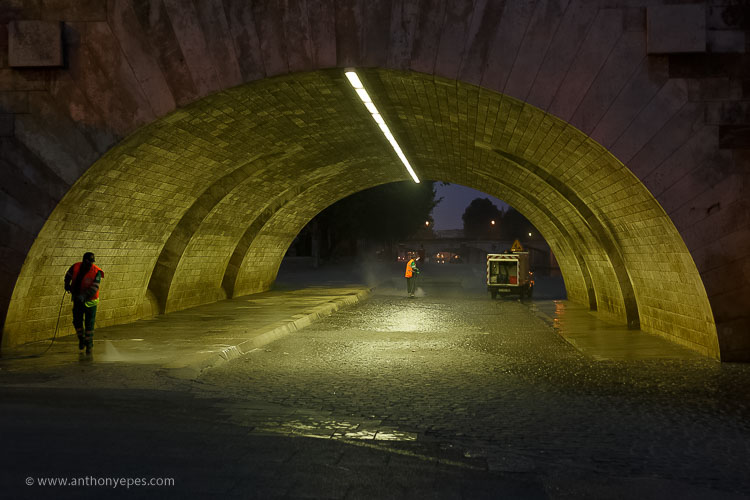
natural-framing-17

So once you’ve got a grasp of the concept you can start using the technique in other ways – have fun!

You are in control of how the viewer sees the image

Naturally framing is a very good way to remember that you are in control of how the viewer’s eye will go around the image. It doesn’t matter how big the photo is, the eye won’t see the complete image all at once. The eye will be drawn to one part and then move around the image depending on where the elements are placed. Your job as a photographer is to direct the eye.
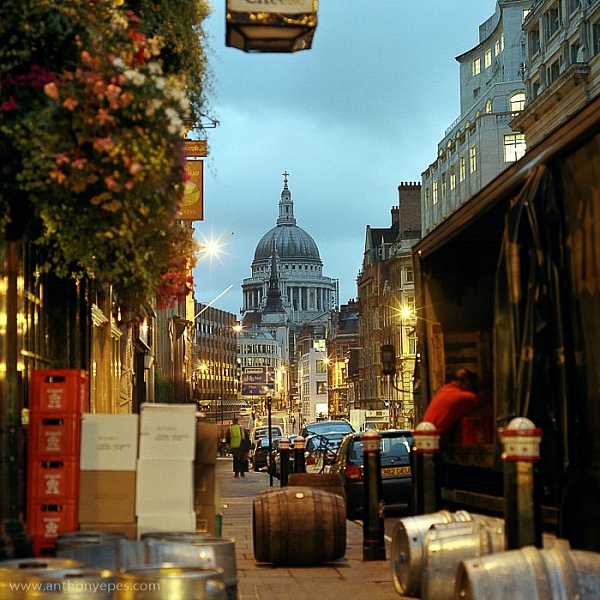
natural-framing-tips--4

Here the subject is St Paul’s Cathedral, bang in the centre of the image. But all around it there are buildings, streets, cars, etc. When you first see the image, all of that other detail bleeds into one, creating a natural frame for the cathedral. But then gradually you start to see the details, so the image becomes something quite different.

This photo is a good example of how you can use framing to create order to a very busy scene, and give the viewer a way into the photo. It’s also a good example of how your eye moves around an image.

The one-sided frame

It is possible to do a one-sided frame, and it works! Below, even though the foliage is only running along the bottom, it creates a great grounding effect, and pushes the eye up toward the moon and the Statue of Liberty. Therefore, in my book, it adheres to the principal of drawing your eye towards the real subject of the photo. This isn’t even a strong line that’s creating the framing element – it’s simply the power of suggestion.
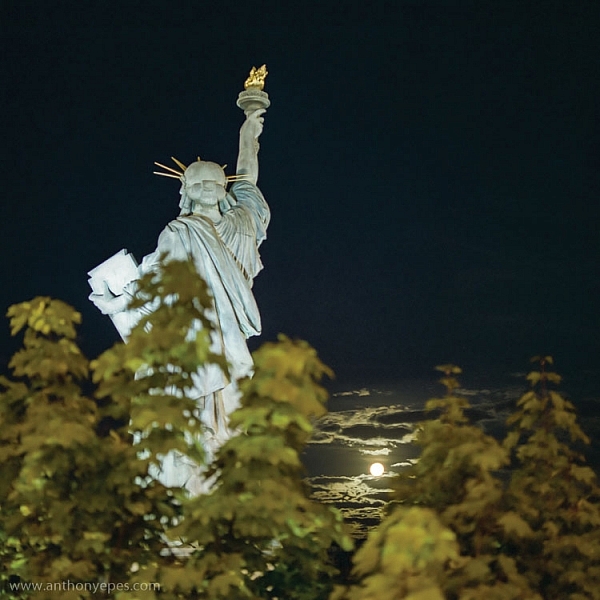
natural-framing-tips--6
In the photo below you’ll see some framing which is going across the corner of the photo. So it’s still drawing your eye to the subject – which is the rising sun and Tower Bridge – but it’s quite subtle. I would perhaps suggest that the bottom elements are creating a second framing element, grounding the photo, and framing the sun. What do you think?
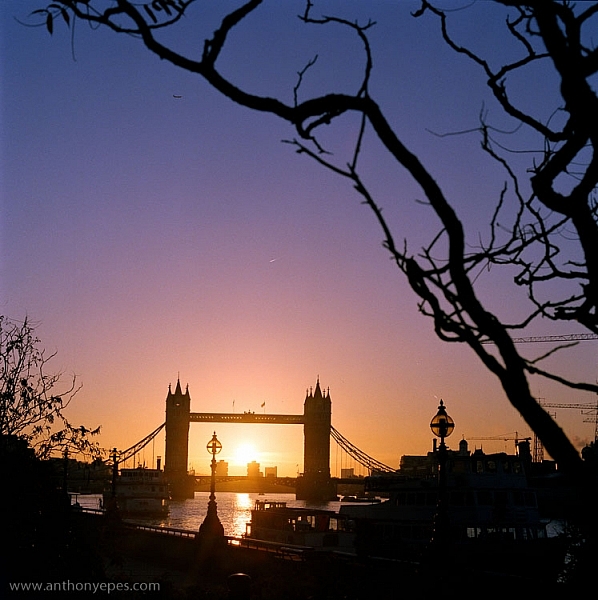
natural-framing-tips--8

When I am shooting photos with big sky – which is favourite subject of mine – what I often do is shoot when small objects appear in the sky, like above. If you look closely you can see a very small plane. Or sometimes a tiny bird appears, or some other random object. People often ask me why I don’t Photoshop it out because it can look like a piece of dust or a mistake, but I love these little surprising elements. It’s great if there can be tiny details that create layers of interest in your shots, so your viewers don’t see everything all at once. (Or as Henri Cartier-Bresson said, “The little, human detail can become a Leitmotiv.”)

Here is another photo that is truly on the edge of being framing. But I think it shows how you can play with the idea (and there is nothing more fun than playing with all these different concepts and ideas, and making them your own).
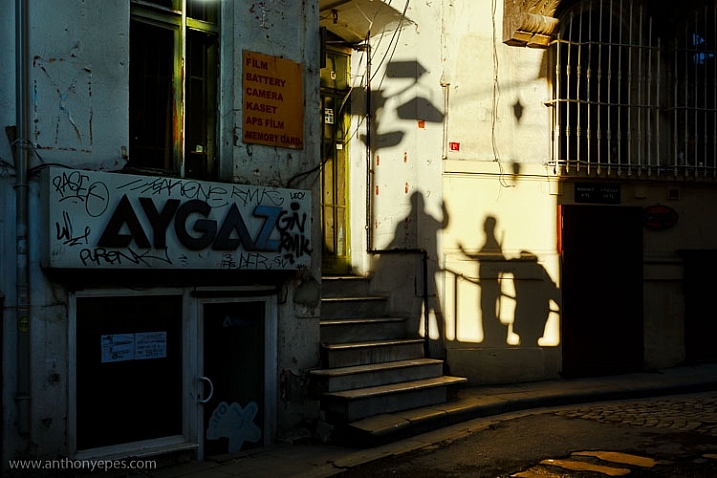
Greeting Shadows

I looked at this photo and thought – wow, I’ve framed the image of the shadows of the people with the surrounding dark shadow. It is doing what natural framing tells us to – which is use a frame to draw attention to the real subject of the photo, so I think it fits.

Use multiple frames within one image

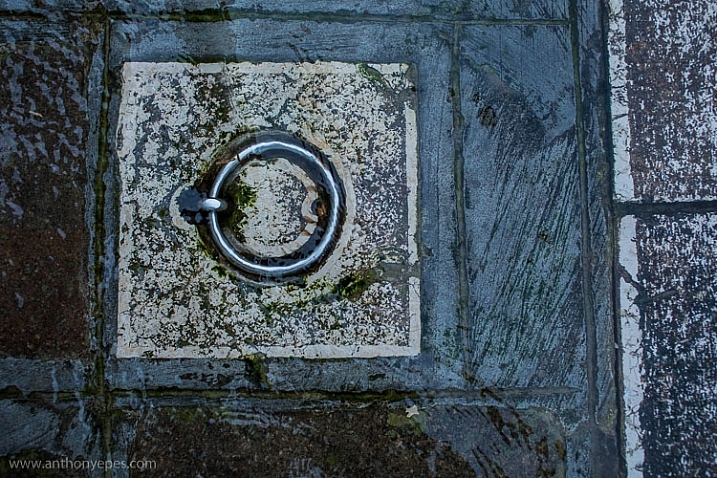
I am a little bit obsessed with photographing things I find on the street. I love photographing very ordinary things – like chewing gum or lines on the road, disconnecting them from their wider context, and just playing with their shapes. This is also another way to help train you to practice breaking the world down into elements, so that you can then start to organize them in a more constructive way.

You can go further still by making the frame within your image just a part of the image, and not the whole thing. It could even be just a suggestion of a frame, like I did here.
natural-framing-tips--5

I love using very simple backgrounds with strong colours for my portraits. This is because firstly, I want the background to not distract from subject, so a simple background is usually best. The camera can’t easily recreate the layers that we see with our awesome 3D eyes. So if, for example, you put a subject in front of a crowd, you will get a flat image without depth.

Homeless World Cup Hasselblad Portraits

Plus, I like to have the colour and texture of the background really fit with the subject – maybe with their clothes, their posture, their expression, etc. This photo is a good example of my philosophy on this point.

Now back to framing! One key reason the photo above works is the added dimension of some framing. Yes, again not a totally traditional use of it, but you can see that the yellow arch shape and the blue strips either side are adding some great structure and form to the image. You’ve also got a sense of them confining the subject, which gives a nice balance to his strong, proud posture. That feeling of being confined is something you can do well with natural framing, and adds a curious feeling to the photo (since the posture of the subject is so proud and strong, you can’t imagine him being confined, right?).

Everything within your frame has a message
natural-framing-19

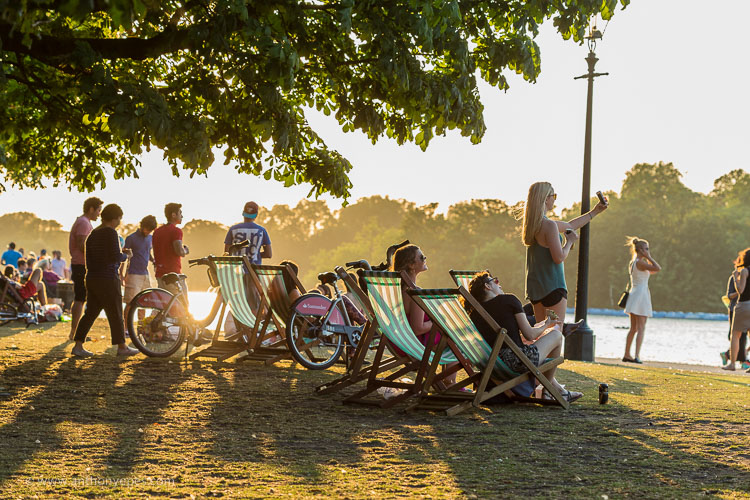
As the photographer, you need to make sure that everything you put in the frame is saying something that you want it to – that the elements are all working together to form the idea and feeling that you seek. If you don’t know what that’s supposed to be – just ask yourself:

  • What am I feeling here?
  • What is interesting to me in this scene?
  • Why is this important?

It’s these feelings that you will be communicating through your images, if you’ve done it well and created a strong photograph.

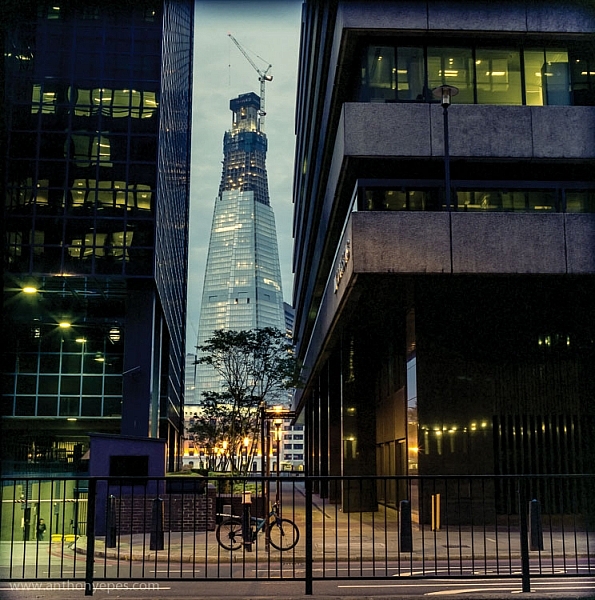
In the image below I framed the Shard, with buildings on the side and a fence along the bottom. There is a risk that it could all have blended in together, but that bright blue sky has created a natural space around the subject.
natural-framing-tips--1

If this is all feeling like a bit too much, don’t worry, as it all becomes instinctive after a while. As a final note, I like this thought from Henri Cartier-Bresson:

“You just have to live and life will give you pictures.”

It’s a great way to live.

I’d love to know what you think of natural framing – do you use this technique? What do you think of the examples I’ve given here? Have you been inspired to try this out if you’ve never used it before? If you have any photos you’d like to post here I’d love to see them.

googletag.cmd.push(function() {
tablet_slots.push( googletag.defineSlot( “/1005424/_dPSv4_tab-all-article-bottom_(300×250)”, [300, 250], “pb-ad-78623” ).addService( googletag.pubads() ) ); } );

googletag.cmd.push(function() {
mobile_slots.push( googletag.defineSlot( “/1005424/_dPSv4_mob-all-article-bottom_(300×250)”, [300, 250], “pb-ad-78158” ).addService( googletag.pubads() ) ); } );

The post Tips for Using Natural Framing to Improve Your Composition by Anthony Epes appeared first on Digital Photography School.


Digital Photography School

 
Comments Off on Tips for Using Natural Framing to Improve Your Composition

Posted in Photography