RSS
 

Posts Tagged ‘Forest’

5 Tips for Better Forest Bird Photography

25 Feb

The post 5 Tips for Better Forest Bird Photography appeared first on Digital Photography School. It was authored by Samuel Bloch.

Birds are a delight for the eye, and it’s natural you want to capture them with your camera. However, when you start shooting more and more, you’ll realize that each environment offers challenges, and therefore each requires a unique approach.

Red-Crowned Parakeet © Samuel Bloch

Birds are often found in good numbers in the forest, but you’ll find them moving fast into dark places, making photography there truly difficult. Here are a few tips I gathered during my time in the woods; I hope they can help you make the most of your trips there.

1. Wait for cloudy days

Light is everything in photography, and bird photography is no exception. Ideally, you’ll want to shoot birds during the golden hour (at sunrise or sunset). However, you’ll face two main obstacles shooting at this time. Firstly, sunrise and sunset may not reach inside the forest, especially if you are in a valley that opens to the north or south. By the time the morning light reaches the bottom, it may be harsh and unflattering. Secondly, forest birds might not be as predictable as, say, waterfowl, and you’ll need much luck to find a bird in the right spot at the right time before light becomes harsh.

On the other hand, shooting during a sunny day creates too much contrast: leaves catching sunlight turn into bright spots, branches cast ugly shadows on your subject, and in general, all the generic issues with shooting during the day apply in the forest as well…unless you go on an overcast day.

If it’s a cloudy day, contrast reduces, light softens, and the overall atmosphere will be much more flattering for your subject.

As an example, here are two pictures of the same bird; a New Zealand Bellbird. The first one was taken on a sunny day and exemplifies all the issues described above. Notice the branch’s shadow over the bird’s face and the bright spots on the tree to the right. I photographed the second image on a cloudy day when the light was softer and more homogenous.

New Zealand Bellbird on a sunny day © Samuel Bloch

New Zealand Bellbird on a cloudy day © Samuel Bloch

2. Embrace high iso

Under the canopy, it’s darker than in an open area. If you’re shooting on an overcast day, it will be darker than on a sunny day. Therefore, as in every situation, you’ll have to adapt your camera settings.

The first thing to mention is that you don’t need as high a shutter speed as you think, especially if you have a stabilized lens. If you shoot handheld, the general guideline is to use a shutter speed no lower than the inverse of your focal (i.e., if you’re shooting with a 400 mm focal length, you shouldn’t go below 1/400s). While this is good to keep in mind, you can go down to 1/250s or even 1/200s and still make great photographs! This requires practice, as you need to be very stable, but it’s possible. Birds move fast, but when they perch on a branch, they stay still for only a short time; trigger a burst of shots at the right moment, and you should come up with good frames.

The other aspect I’d like to focus on is ISO. Again, you can push your ISO much further than you think. I’ve found that if your bird is well in focus, grain is a problem only in the background, where you can easily remove it (with Photoshop for instance).

As an example, I shoot with a cropped-sensor camera (Canon 7DII), and I’ve heard people with the same equipment tell me they won’t go over ISO800. In the forest, I’m happy to go as high as ISO3200. Of course, you should not expect the image quality to be the same as ISO100, but you can still produce images you’ll like. Full-frame users have more flexibility in that regard.

Stitchbird shot at ISO3200 with a Canon 7DII © Samuel Bloch

3. Shoot Aperture Priority with auto ISO

Birds, especially songbirds, move quickly. You won’t have time to use Manual mode.

I make the majority of my bird photography with Manual mode, but there’s no shame in using a semi-automatic mode if it helps you create amazing shots! However, you’ll need to help your camera. Let it decide what ISO it wants to use (Auto ISO), but if you can, set a maximum ISO number that the camera won’t overrun (I use ISO3200 on a Canon 7DII). You can also set a minimum shutter speed, to prevent your camera from going too low there.

The aperture is the only thing you need to decide. Personally, with a Canon 100-400mm II, I prefer to shoot at f/6.3 because I find it sharper than when it’s wide open. However, in very dark conditions, I go down to f/5.6 (the minimum at 400mm). Remember the wider, the brighter.

North Island Saddleback © Samuel Bloch

North Island Robin © Samuel Bloch

Once you’re set up, start shooting and keep an eye on your screen. You can play with Exposure compensation to adjust your exposure; I often like to underexpose by one or two-thirds of a stop, but it depends on the conditions.

4. Mind your background

Because you’re shooting in Aperture priority mode, you have more time to work on composition. Your image has more impact if you can draw the viewer’s eye directly to your subject (the bird), so it is good to limit distracting elements. A clean, smooth background is one way to achieve that. It doesn’t have to be uniform. Some color patterns can be pretty, but branches and foliage should not be recognizable (at least, not too much!) The best way to create such a background is to be close to your subject while the background is far away. The further the bird, the harder it will be to obtain this clean background.

New Zealand Bellbird © Samuel Bloch

The other trick you can use for composition is framing: use out-of-focus branches and leaves to surround the bird and direct your viewer’s eye. Again, on an overcast day, these elements look soft and pleasant, while they can be harsh and distracting on a sunny day, as they catch the sunlight.

Juvenile New Zealand Bellbird © Samuel Bloch

5. Anticipate

Forest birds move fast. You can’t expect them to stay on a perch for ten seconds for you to fine-tune your shot. One second, maybe two, and they are gone.

Therefore, you need to anticipate. Keep your camera up, at the ready. When you spot a bird, try to guess in which direction it will move next, and position yourself to maximize opportunities there. Study the possible perches, and choose those with the most favorable background. Prepare yourself to shoot when the bird lands on these perches.

The approach above can be a gamble, especially if you don’t know the birds. It pays to regularly watch birds to learn their habits. It also pays to visit a place time and again, to learn it, to know where to find each bird, what area they like, and what perches they favor.

Rifleman © Samuel Bloch

You may want to set up a hide, but it is also valuable to stay mobile. Forest birds are not necessarily shy. Move slowly, and they may grace you with fantastic encounters. Then, it’s up to you to make the great pictures happen! Good luck!

Conclusion

If you can’t find birds at sunrise or sunset, elect to shoot on a cloudy day. It will be dark, so you have to adjust your settings – don’t fear high ISO! Aperture Priority mode gives you more time to work on your composition (mind the background!), and if you take time to observe the birds, you will be rewarded with fantastic photo opportunities.

The post 5 Tips for Better Forest Bird Photography appeared first on Digital Photography School. It was authored by Samuel Bloch.

Digital Photography School

 
Comments Off on 5 Tips for Better Forest Bird Photography

Posted in Photography


Tips for Better Forest Photography

24 Oct

Humans have always been drawn to forests. We have found food, building and clothing materials, and inspiration in forests. There are innumerable stories told about them, the creatures that live there, and the dangers that lurk inside them. But it’s not all mythology and ancient history. Peace, adventure, colour, that perfect light – whatever you’re looking for, you can find in a forest.

Are you yearning for a place that will offer you something new to photograph? Let’s take a look at the opportunities these magical places can offer an open-minded photographer!

Forest photography 01

So what exactly is a forest?

Once a student told me that there are no threats to forests in Finland (where I was teaching) because they have so many trees. It might seem like a logical conclusion, but it’s sadly wrong. As anyone who has spent time in forests will tell you, they’re much more than just an aggregation of trees; each forest is a collection of innumerable organisms and interactions. Sure, trees are an essential part of a forest, but the whole is much more than that.

Forest photography 02

Without microbes, earthworms, and plants there would be no nutrient-rich soil for trees to grow in. Without insects, birds, and mammals there would be no one to spread their seeds – without everything else, a collection of trees is not a forest, it’s a plantation. And that richness is what makes forests such a fantastic place for photography.

Forest photography 03

For some humans, forests are also places for recreation and the creation of fond memories. What a forest is might seem like a silly question, but it’s not as easy to answer as one might initially think.

What is there to do in the forest?

So let’s cut to the chase: what does all of that have to do with you as a photographer? Well, forests offer opportunities for many different kinds of photography, thanks to their unique light, animal and plant life, and atmosphere. Nature will always be present in whatever photo you take in a forest, but as you will see, it doesn’t have to be the only thing. Let’s begin.

Forest photography 04

The big picture

The most obvious photos to take in a forest are wide-angle shots of the forest itself. Ones which give an overview of the kind of forest it is, what kinds of creatures live there, what season it is, what state the forest is in, and so forth. But obvious, doesn’t have to mean boring. Try to find an angle that tells a story, has unique atmosphere or mood, or can surprise the viewer. Don’t just point and shoot, but think, plan, and frame your photo (as always).

Forest photography 05

Photographing trees is also a pretty self-evident thing to do in a forest. The longer one looks at trees, the more personality they seem to have, and the more impressive they seem to be. If a particular tree catches your fancy, observe it, let your imagination roam free, and then try to find a way to capture that in a photograph.

Forest photography 06

Large wildlife is another wonderful thing that forests offer eager photographers. The tricky thing here, apart from coming across such wildlife (remember to be careful) and not having it run away right when you’re bringing the viewfinder to your eye, is that forests are often quite dark.

If you have something exciting and highly mobile in your view, don’t hold back on the ISO so you can make that shutter speed as fast as possible. Otherwise, you’ll end up with just a blur and disappointment (unless a blur is what you were aiming for).

Forest photography 07

The smaller picture

For those more interested in detail and the richness of life in the undergrowth, forests are an unending source of treasure. A plethora of wildlife can be found on this scale: small mammals, amphibians, insects, spiders, worms, reptiles, millipedes, centipedes, and so forth. And those are just the animals! If you’re willing to look a bit closer, maybe lie down in the moss, you’ll also find stunning mushrooms, intriguing plants, handsome lichens, and yes, all that moss you’re lounging on.

Forest photography 08a

Forest photography 08b

Don’t forget the beautiful leaves, especially in the fall. In short, forests are marvelous for macro photography.

Forest photography 09

Experimental photography

If you’re not actually interested in nature photography and you were dragged out to a smelly forest full of biting insects and other nuisances, don’t despair. There’s something to do, even for you.

Forest photography 10

Forests offer great opportunities for trying out different kinds of experimental photography. The generally low light conditions and diverse scenery work well for techniques that require long shutter speeds, such as ICM (Intentional Camera Movement) and light painting. Give it a shot!

Forest photography 11

Portraiture

Last, but in no way least, forests provide plenty of possibilities for portrait photography. It’s easy to find a flattering background in a different kind of setting. With patience, the light, albeit difficult at times, can be used to your advantage. You might be able to create some beautiful bokeh, interesting light patterns on your subject, or just have pleasant, diffuse light fall through the treetops.

Forest photography 12a

Forest photography 12b

If you don’t have a willing model to photograph, do not despair – pet portraits are also fun, as are creative self-portraits.

Conclusion

What does the forest mean to you? Do you have a special relationship with forests and do you like photographing them? I’d love to see your photos and hear your thoughts in the comments below.

The post Tips for Better Forest Photography by Hannele Luhtasela-el Showk appeared first on Digital Photography School.


Digital Photography School

 
Comments Off on Tips for Better Forest Photography

Posted in Photography


Where Gods Live: Forest Environment Enhanced by Live Digital Projections

01 Aug

[ By SA Rogers in Art & Installation & Sound. ]

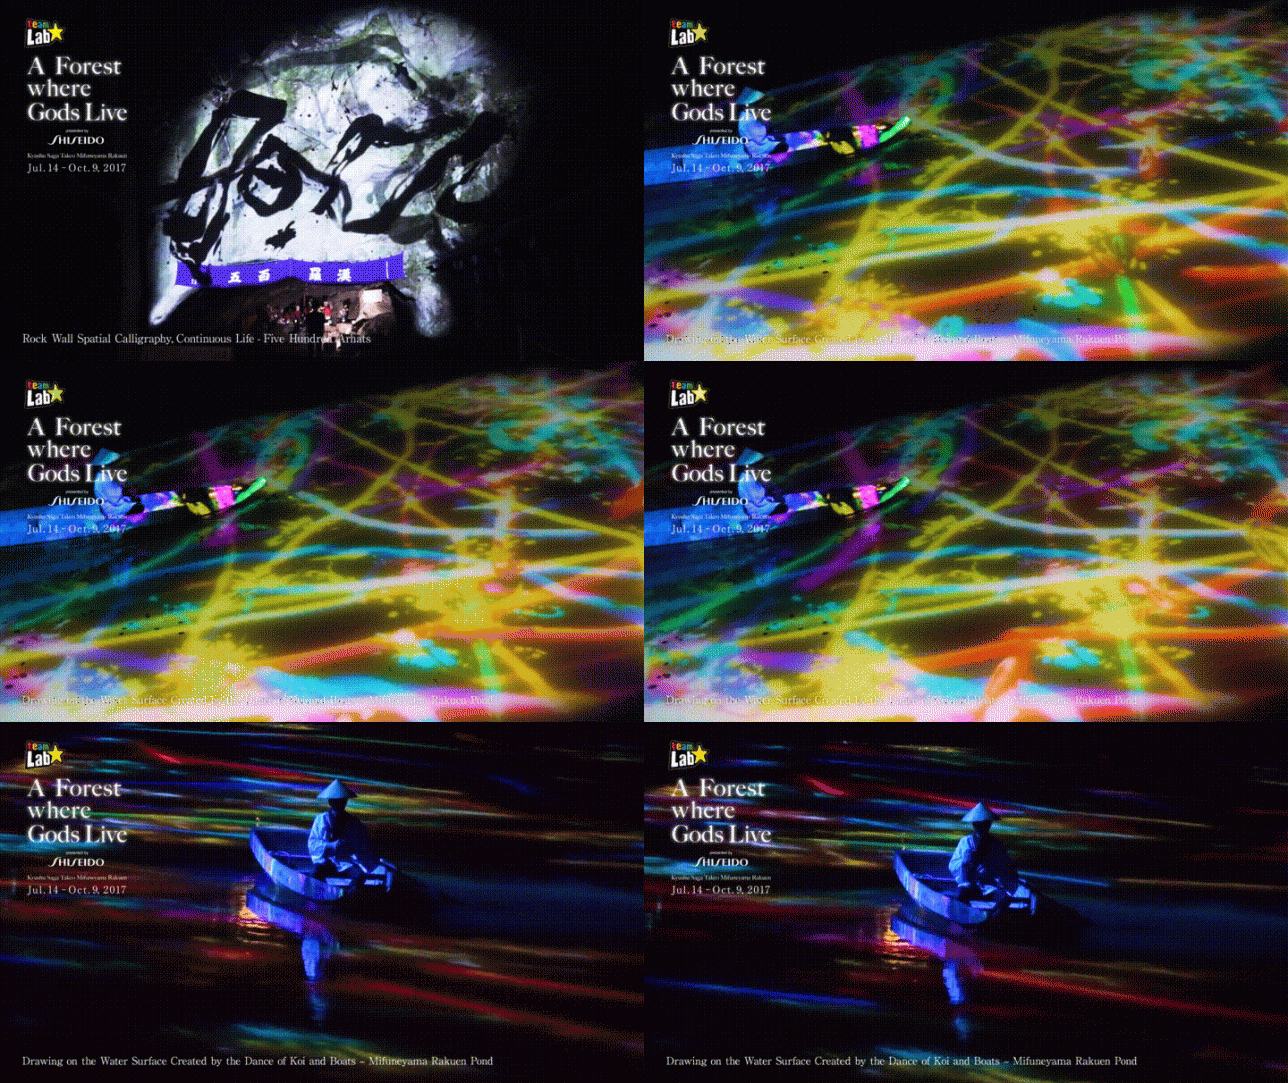
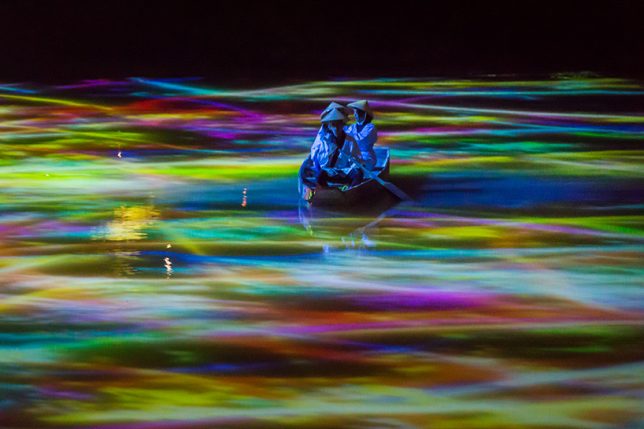
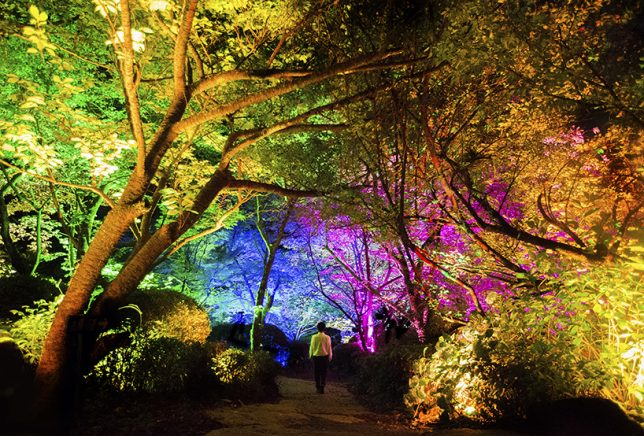
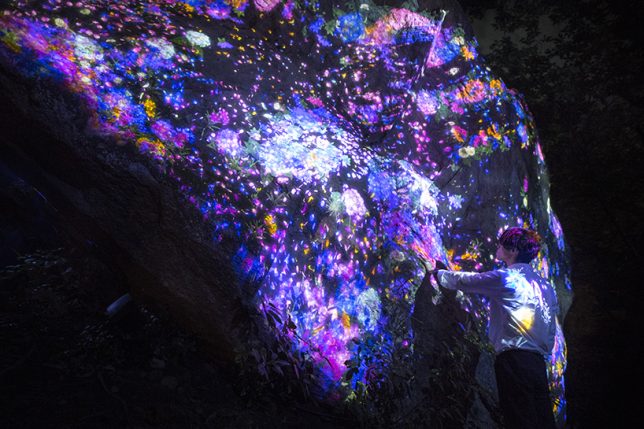
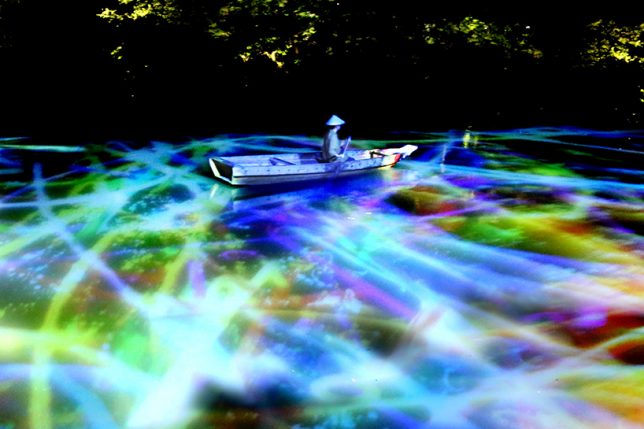
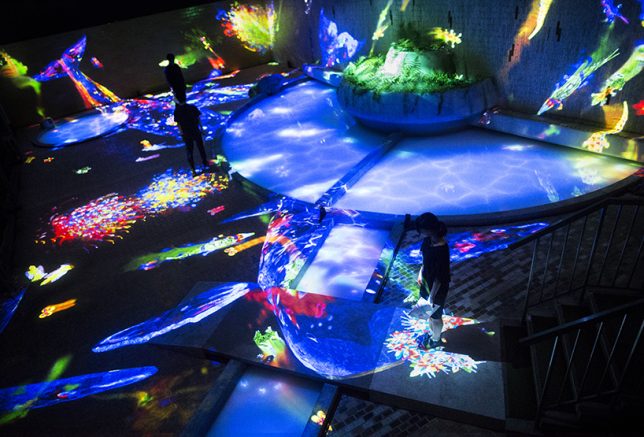
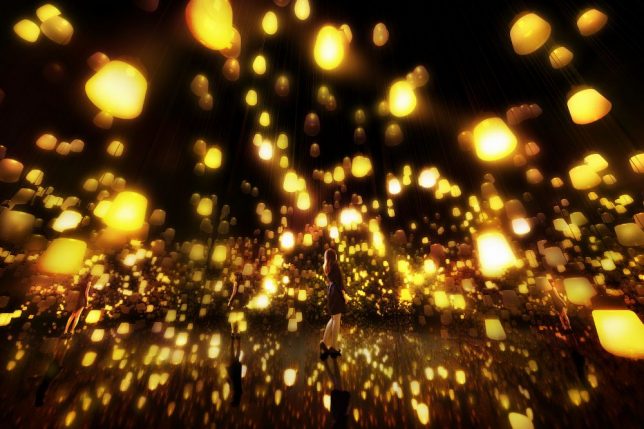
As if forests aren’t magical enough already, the Japanese art/technology collective Teamlab will be live-projecting their signature transforming visuals onto the surfaces of Mifuneyama Rakuen Park, giving visitors the feeling of being on an alien planet. ‘Forest Where Gods Live’ is a collection of individual installations with names like ‘Ever Blossoming Life Rock,’ Drawing on the Water Surface Created by the Dance of Koi and Boats,’ ‘Memory of Continuous Life’ and ‘Resonating Forest.’

“TeamLab is executing an art project called ‘Digitized Nature’ where ‘Nature Becomes Art.’ The concept of the project is that non-material digital art can turn nature into art without harming it. We exist as part of a process of eternal continuity of life and death, a process which has been continuing for an overwhelmingly long time. It is hard for us, however, to sense this in our everyday life. It was when we were wandering through the woods that we realized the shapes of those giant rocks, caves and forests, that have been formed over an infinite amount of time, are the continuous cycle of life itself.”

“By applying digital art to this unique environment, the exhibition celebrates a massive chunk of life that nests on such continuity. In Mifuneyama Rakuen, we got lost in the ambiguous border of garden and forest, and finally, we have come to realize we exist on the borderless continuity between nature and humans.”

Sponsored by Japanese beauty brand Shiseido, the awe-inspiring installation will be in place throughout the 500,000-square-meter garden located in the Saga prefecture July 14th through October 9th, 2017. If you can’t make it out there in person to experience the immersive exhibit firsthand, taking some time to delve into the individual pieces on the teamLab website is well worth it. The collective has produced a number of videos showing their projections in action, with descriptions of their inspiration behind each one.

Share on Facebook


[ By SA Rogers in Art & Installation & Sound. ]

[ WebUrbanist | Archives | Galleries | Privacy | TOS ]


WebUrbanist

 
Comments Off on Where Gods Live: Forest Environment Enhanced by Live Digital Projections

Posted in Creativity


CityTree: High-Tech Green Wall Cleans as Much Pollution as a Forest

27 Jun

[ By SA Rogers in Conceptual & Futuristic & Technology. ]

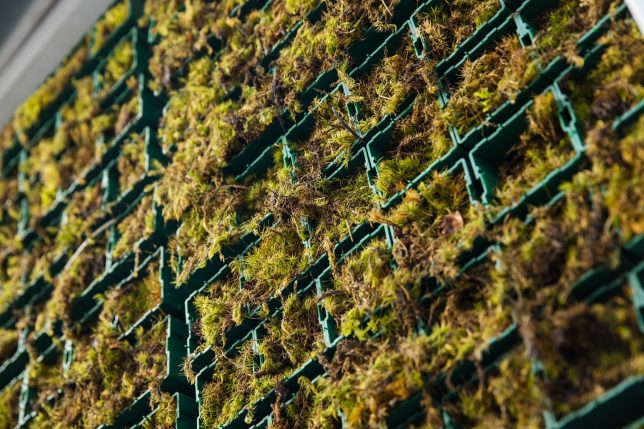
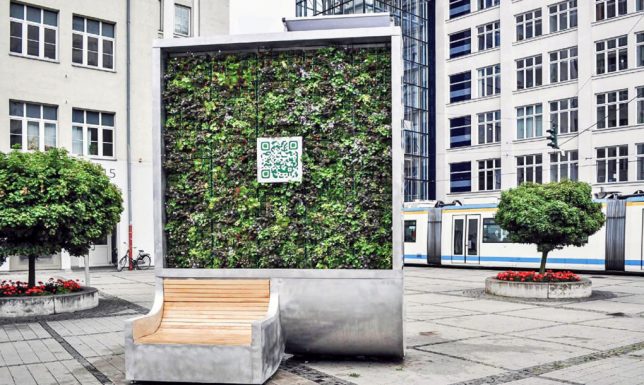
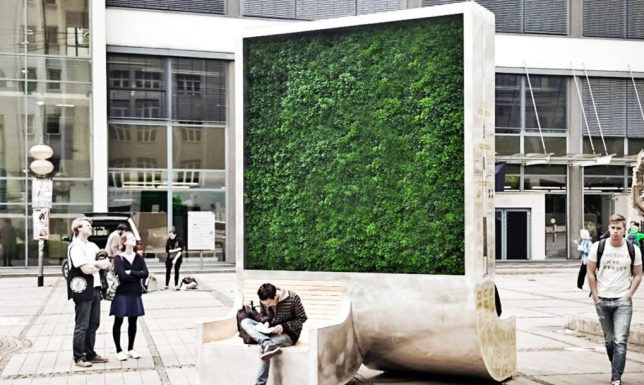
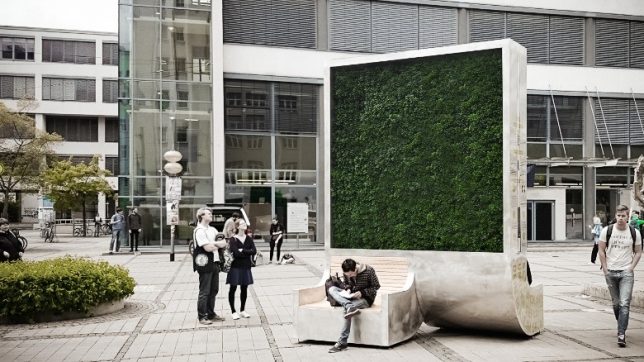
A 13-foot-tall high-tech green wall encased in a concrete frame is capable of cleaning as much polluted air as an entire forest, combining the Internet of Things and biotechnology to collect data while it improves the urban environment. Created by Green City Solutions, the ‘tree’ isn’t really a tree at all, but rather a moss culture that removes dust, nitrogen dioxide and ozone gases from the air while also collecting weather data, providing electricity via solar panels and filtering its own rainwater.

Wifi sensors measure factors like temperature, water quality and soil humidity that help each CityTree self-regulate while also allowing the creators to measure how efficient it is at its job. Over a period of a year, each one can remove up to 240 metric tons of climate change-inducing CO2 from the air. Each one features a display for information or advertising. It also features optional benches on either side, and can be vandalism-proofed and customized according to a city or company’s needs. Green City Solutions takes care of the maintenance, and there’s a slim-line version measuring one square meter for smaller spaces.

Asia’s first CityTree went up in Hong Kong last summer, and around 20 others have been installed in cities like Oslo, Paris and Brussels. More are planned, but red tape tends to get in the way, stalling its growth to additional cities. The German-based company plans to introduce the CityTree to lower-income countries like India as well. While it’s definitely not enough to combat urban air pollution on its own, it’s an interesting element to integrate into a more comprehensive strategy.

Share on Facebook


[ By SA Rogers in Conceptual & Futuristic & Technology. ]

[ WebUrbanist | Archives | Galleries | Privacy | TOS ]


WebUrbanist

 
Comments Off on CityTree: High-Tech Green Wall Cleans as Much Pollution as a Forest

Posted in Creativity


Forest Cities: Tree-Covered Urban Architecture to Combat Smog in China

03 Mar

[ By WebUrbanist in Architecture & Cities & Urbanism. ]

forest city

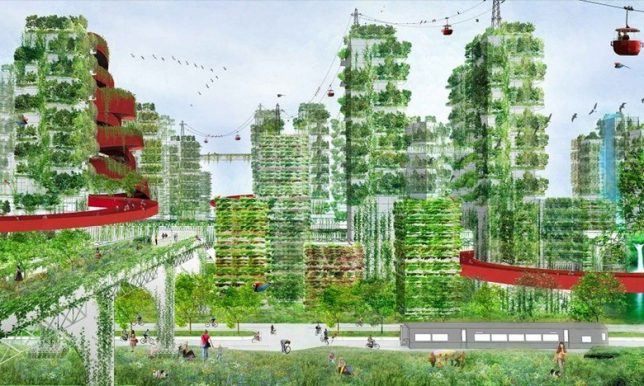
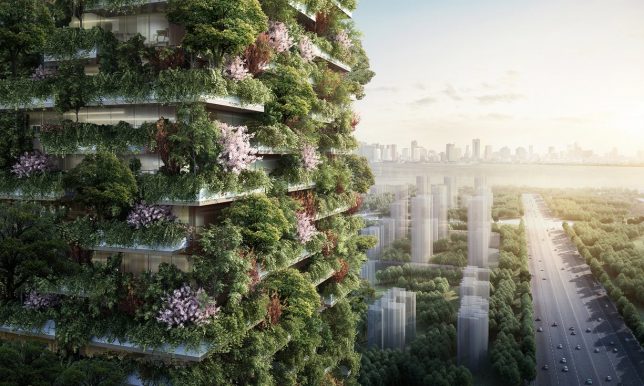
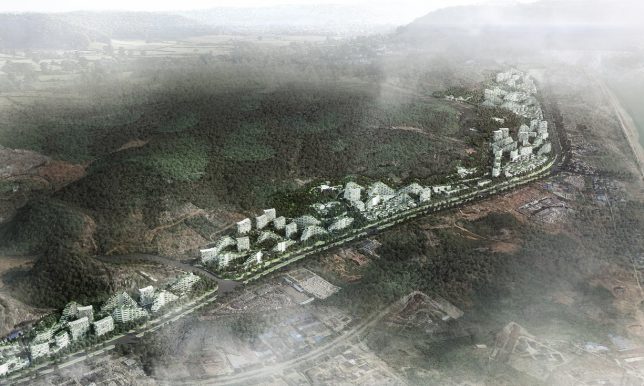
A new series of treescrapers designed for Nanjing, China, aim to combat air pollution with plant-covered towers, but this bold vision may represent hubris more than hope.

Architect Stefano Boeri’s Bosco Verticale (Vertical Forest) project in Milan was an impressive but small-scale version of this vision to turn Chinese cities into greenery-covered cityscapes. “Two towers in a huge urban environment [such as Nanjing] is so, so small a contribution – but it is an example. We hope that this model of green architecture can be repeated and copied and replicated.”

forest city project

And the figures put out to the press are impressive: these new buildings could, according to estimates, remove 25 tons of carbon from the air annually and produces a lot of oxygen in the process. Still, embedded carbon in plants has to go somewhere eventually — leaves and branches that break off of these vertical treescapes will eventually fall to the ground, adding to street-level pollution.

Projects like this face downsides and challenges, too. A lot of embedded energy (and thus: carbon) comes with retrofitting buildings to support plants. There are intensive structural requirements (for soil and trees) but also active system demands, too, that add to inputs and costs. As plants grow, they also have to be maintained — a lot more challenging than just sending window washers up and down the sides of a skyscraper.

forest city village

Ultimately, it makes sense to think about how cities can go green, but adding thick and lush greenery to the sides of buildings risks being an act of greenwashing more than one of sustainable design. The ground is a much easier place to plant greenery, plus an easier space for everyone to access and enjoy. Even the above rendering of one of these planned communities makes this point indirectly: there are a lot more trees on the ground than there are on the buildings in the image.

Share on Facebook


[ By WebUrbanist in Architecture & Cities & Urbanism. ]

[ WebUrbanist | Archives | Galleries | Privacy | TOS ]


WebUrbanist

 
Comments Off on Forest Cities: Tree-Covered Urban Architecture to Combat Smog in China

Posted in Creativity


The Crying Forest: Faces of Indigenous Brazilians Fill the Amazon Rainforest

11 Nov

[ By SA Rogers in Art & Installation & Sound. ]

crying-forest-main

Many times larger than life, the faces of indigenous Brazilian people illuminate the darkened Amazon Rainforest, projected directly onto the trees as a symbolic representation of their connection to the land. The Suruí Tribe, led by chief Almir Surui Narayamoga, are being displaced by massive deforestation that has already destroyed nearly 20% of the forest over the past 40 years, with another 20% projected to be lost within the next 20 years.

crying-forest-3

crying-forest-1

The chief invited French photographer and street artist Philippe Echaroux to bring attention to the plight of the tribe through land-based art. Capturing portraits of individual members of the tribe, Echaroux enlarged the images and projected them onto trees in the village’s section of the rainforest in strikingly beautiful and often eerie compositions.

crying-forest-2

crying-forest-4

“Victims of massive deforestation and gold washers who did not hesitate to violate the Surui’s territory to seize deposits of precious stones, the Surui people want to raise awareness of this horrible and greedy slaughter that endangers a territory and its people,” says Echaroux.

crying-forest-5

crying-forest-6

The installation, entitled ‘The Crying Forest,’ was never meant to be seen in person by the public. It’s almost like a private ceremony just for the forest and the people who know it so intimately – but photographs of the display will be on exhibit at the Taglialatella Gallery in Paris from November 10th through December 15th 2016. You can catch more of Philippe Escharoux’s work on his Instagram.

Share on Facebook


[ By SA Rogers in Art & Installation & Sound. ]

[ WebUrbanist | Archives | Galleries | Privacy | TOS ]


WebUrbanist

 
Comments Off on The Crying Forest: Faces of Indigenous Brazilians Fill the Amazon Rainforest

Posted in Creativity


Virtual Reality Nature: Helmet Lets Humans See the Forest Like Animals Do

05 Nov

[ By SA Rogers in Conceptual & Futuristic & Technology. ]

virtual-reality-forest-1

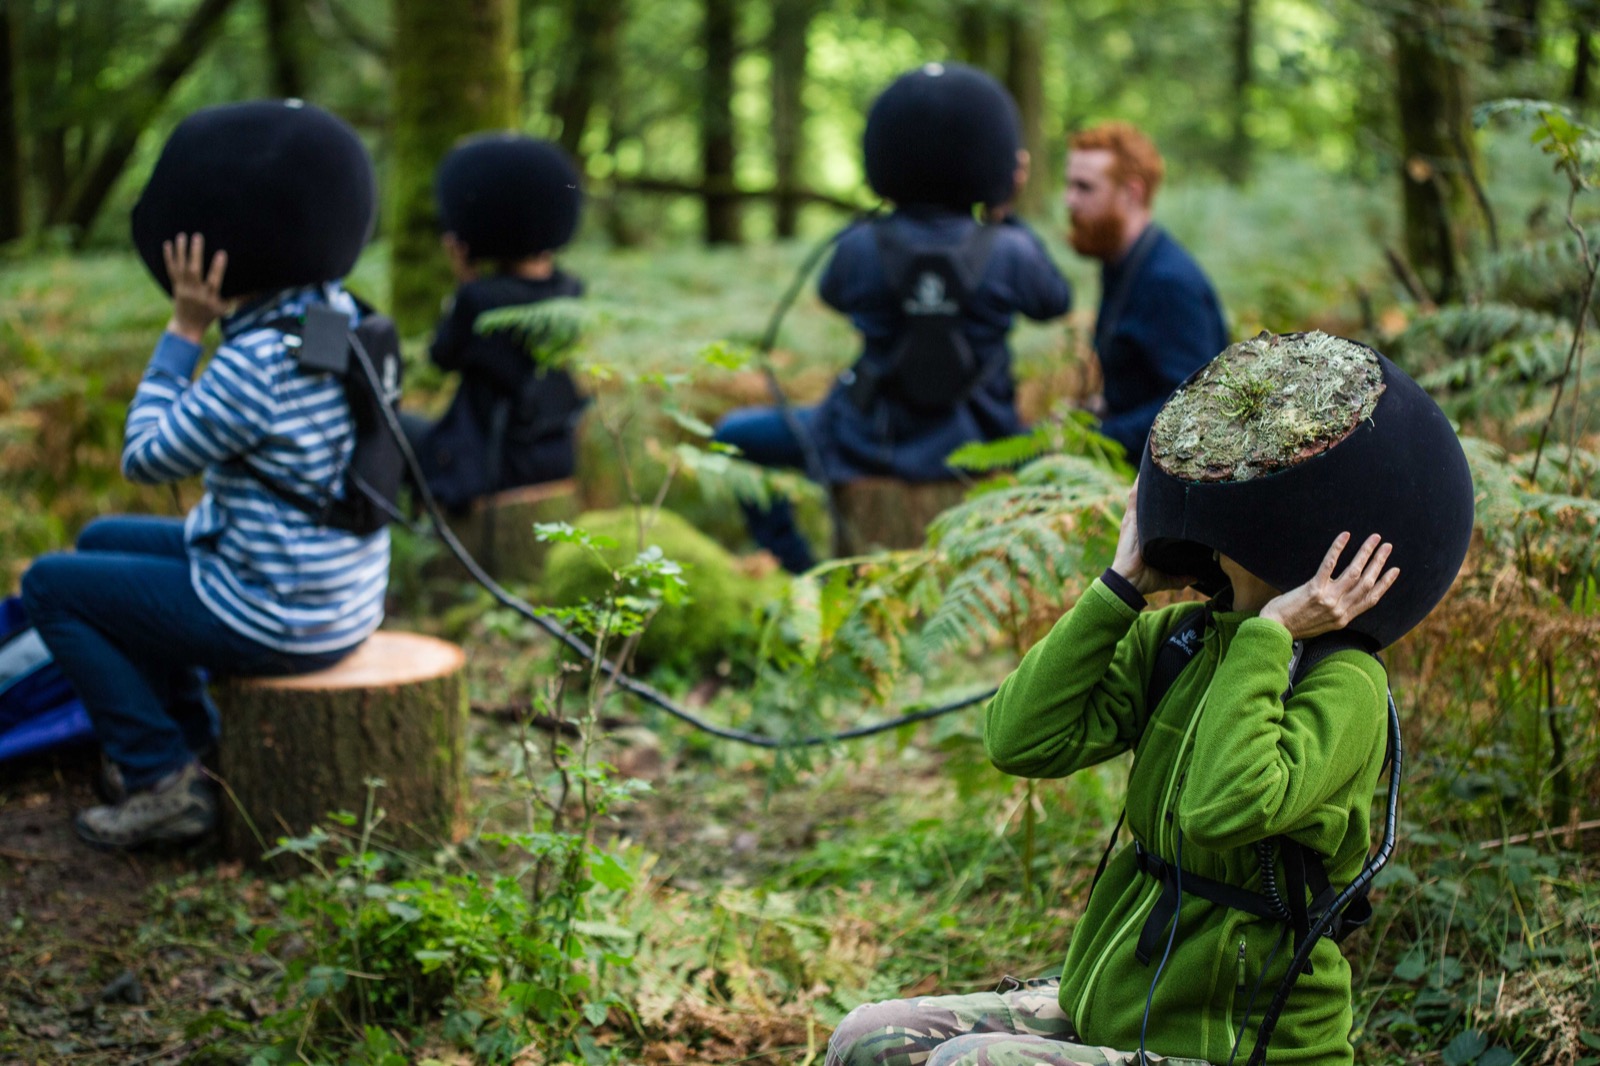
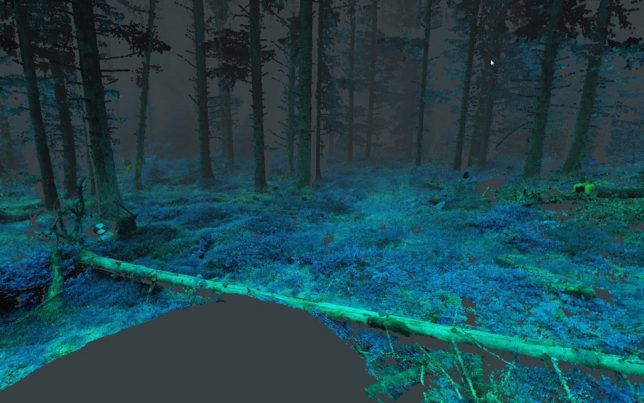
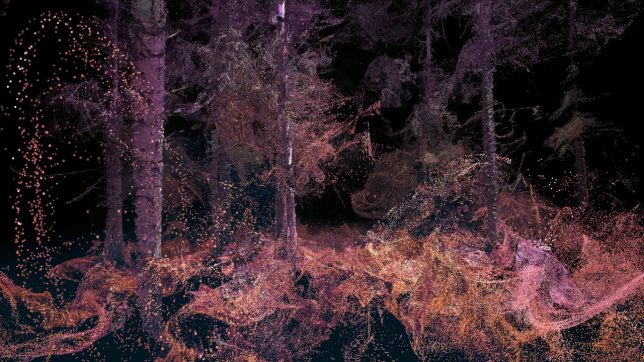
Dragonflies experience their brief lives on this planet 10 times faster than humans, and in 12 color wavelengths as compared to our three, a viewpoint that’s been impossible to comprehend prior to the arrival of virtual reality tech. Thanks to a project called ‘In the Eyes of the Animal’ by the creative studio Marshmallow Laser Feast, we can see the world the way super-sighted creatures do in a feat that’s being called ‘sense hacking.’

virtual-reality-forest-2

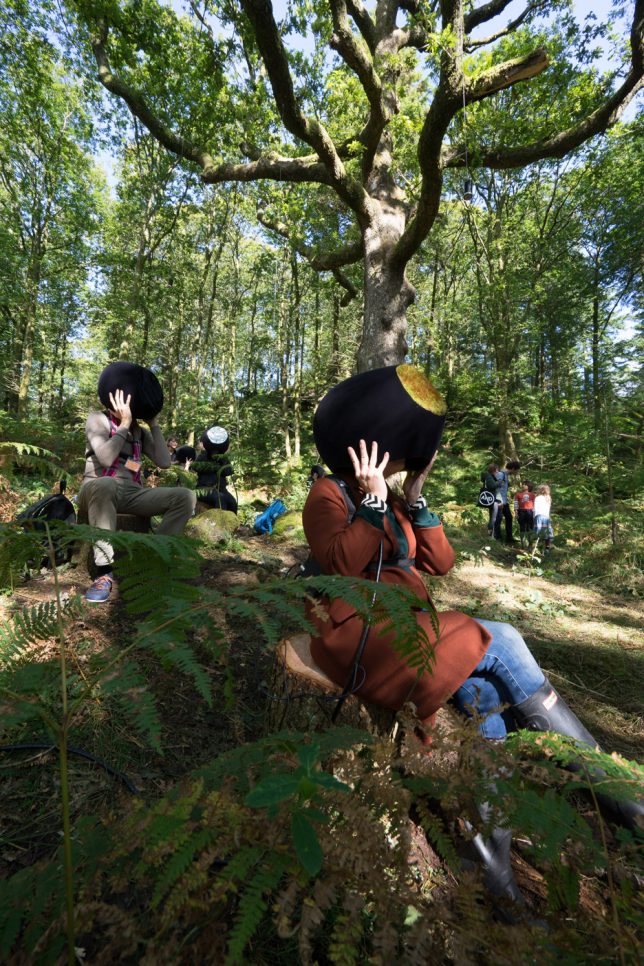
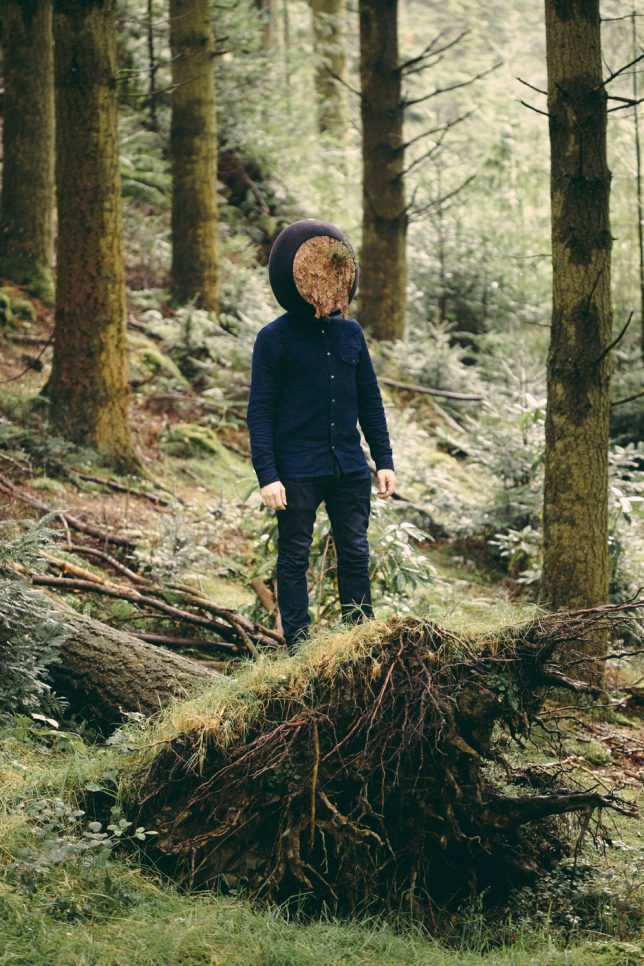
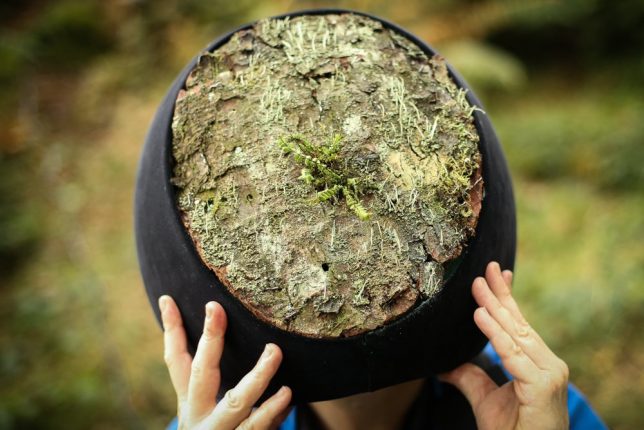
Aerial drone footage, CT scans and LiDAR remote sensing technology taken from the Grizedale forest in the UK gives the team 800 million data points upon which to render a hyper-rich environment in tandem with a real-time visual and audio engine. Visitors to the real, actual forest put on virtual reality headsets obscured with moss to take it all in.

virtual-reality-forest-3

virtual-reality-forest-4

virtual-reality-forest-5

“Visual engine generates and renders whole environment in realtime with certain generative elements which makes each experience unique,” explains Creative Applications Network, . “Visual engine communicates with 3D Audio Engine via OSC [OpenSound Control] to provide positional data as well as head tracking data from the Inertial sensors of the VR headset. The sound uses Binaural audio, a technique mimicking the natural functioning of the ear by creating an illusion of 3D space and movement around the head of a listener as immersive as reality can be.”

virtual-reality-forest-6

virtual-reality-forest-7

The result is an immersive experience at the intersection of science and digital art, and the images of the helmets in use in Grizedale Forest are pretty incredible, like something from a film. If you didn’t get a chance to see it yourself during the installation’s tour of festivals, you can watch the video to see an approximation of what it looks like.

Share on Facebook


[ By SA Rogers in Conceptual & Futuristic & Technology. ]

[ WebUrbanist | Archives | Galleries | Privacy | TOS ]


WebUrbanist

 
Comments Off on Virtual Reality Nature: Helmet Lets Humans See the Forest Like Animals Do

Posted in Creativity


Forest of Resonating Lamps: Brilliant Interactive Illuminated Installation

06 Sep

[ By SA Rogers in Art & Installation & Sound. ]

teamlab maison 4

Dangling from a darkened ceiling like strange bioluminescent blooms, hundreds of high-tech lamps respond to the movements of people in the room, glowing in a particular color that resonates outward, spreading to more and more lamps. This chain reaction shifts as observers navigate the space, contrasting with the patterns created by others. ‘Forest of Resonating Lamps’ is an immersive installation by Japanese collective Teamlab, created for Maison et Objet 2016.

teamlab maison

teamlab maison 12

Occupying the junction of art and technology, the installation is not just about a single decorative object, beautiful as it may be. The lamps themselves are made of Murano glass and equipped with LED bulbs, hung from the gallery ceiling in a space with mirrored walls that multiply them so they seem to go on forever, a la Yayoi Kusama’s Infinity Room installations.

teamlab maison 2

teamlab maison 3

teamlab maison 5

As an observer approaches a lamp, it shines brightly, emitting a color tone that is transmitted to lamps nearby. If you’re the only person in the room, the light is entirely centered upon you, but as soon as someone else enters, you become aware of the ripple effect created by their own movements. While the lamps seem to be scattered randomly throughout the space, they’re actually placed to form a continuous line from select lamps that act as starting points.

teamlab maison 6

“The planar arrangement of the lamps is staggered in zigzag to fill a space, staying in a perfectly ordered grid,” says Teamlab. “This is the first constraint. The second constraint is the height and width of the room and the pathway that people walk through, thus creating a ‘boundary condition.’ The third constraint is that all the lamps, when connected to its two closest lamps three-dimensionally, form a unicursal pattern with the same start and end points.”

teamlab maison 7

teamlab maison 8

“The arrangement of the lamps thus created is beautiful not only in an immobilized, static kind of way, but more so in a dynamic way caused by people approaching these lamps. It demonstrates the space of new era: the space freely designed through digital technology, and adapting the change and movement made by people’s existence in it.”

Share on Facebook


[ By SA Rogers in Art & Installation & Sound. ]

[ WebUrbanist | Archives | Galleries | Privacy | TOS ]


WebUrbanist

 
Comments Off on Forest of Resonating Lamps: Brilliant Interactive Illuminated Installation

Posted in Creativity


8 Quick Tips to Produce Better Forest Photography

21 Jul

As my nation (USA) celebrates 100 years of the National Park Service, renewed interest in our untouched landscapes is growing, and that’s a great thing. Even with the selfie-crazed tourists crowding our parks and national monuments, it’s a positive point that more of us are getting out into the great outdoors and connecting with this land of ours.

A side benefit of this movement is a renewed interest in nature and the outdoors in general. Even 58 national parks in the U.S., it may not be possible for all of us to get to them as often as we’d like. Luckily, we can enjoy nature in our own backyards, as there are state parks, forests, and trails for us to explore almost everywhere you turn in America (and likely wherever you live also).

040916_-2

As with any environment, forest photography brings its own unique challenges to the table, but at the same time offers an almost unlimited array of subject matter, due to the variety of flora and fauna in these locations. Add in the side benefits of experiencing the fresh air and sunlight of the outdoors (which our bodies were built for), and you have all the reasons you need to snap some photos in the woods!

Let’s cover a few tips and recommendations when heading for the trails, then get out there and enjoy!

1 – Safety first

As with any outdoor photography project, you need to consider the environment you’re going into. Be sure to bring a camera bag or backpack to store items in, and to keep your extra gear and accessories out of the weather. Items to bring could include snacks, a compass, a map (a topographical map is always best if available), sunscreen, bug spray and a dry towel or rag to remove moisture, dirt, or rain from any exposed gear.

2 – Gear up

As always with shooting landscapes, a tripod is a must. Both wide-angle and narrower primes lenses, such as a 50mm can come in handy. I personally use a 24mm prime lens to capture wider forest shots, to get many trees in the frame at once, but then switch to my 50mm to get closeups of things like leaves, insects, or flowers.

HauntedWoods

Though there are cases for and against using them, a clear ultraviolet (UV) filter can be useful to keep dirt and grime off of your lens element. I don’t use them myself, and find if I’m careful with my lenses I can keep them clean without needing a protective filter. Always use a microfiber cloth for cleaning your lenses, not rags or towels of any type, especially if you take one for other purposes while you’re out in the forest.

Finally, a polarizing filter can come in handy, as it will help cut reflections in any body of water such as a river or stream, and also deepen and enhance colors in the scene. Keep in mind that you’ll be reducing the amount of light coming into your camera when using a filter like this, so plan accordingly (just bring your tripod).

3 – When to get out there

As outdoor or natural light photographers, we know that the best times to shoot are early mornings or late evenings, and to do our napping at noon. But forest environments are one of those places that can still work well during bright, more direct sunlight.

This is due to the canopy above that you’ll usually have, which filters out some of the harsh light, and gives you more of a lighting situation you’d expect to find at the edges of the day. As in many situations, if you can’t avoid the light from directly overhead, you can always switch over to black and white, and take advantage of the sharper shadow edges, and higher contrast.

062814_

With that being said, your subject will almost always be more magical if you head out during the early hours of the morning, or late in the evening. If you’re near water, you may experience some ground fog, which can add serious mood to your images, and the sunlight will be dramatically cooler or warmer than in the middle of the day, depending on what time you decide to go.

In short, plan your excursion for the first two or three hours after sunrise, or before sunset, for the best results.

4 – Try vertical orientation

Primeval

Landscape shooters are used to primarily using horizontal or landscape orientation for the majority of their images, but when you’re in the forest, portrait orientation can sometimes work better. Since you’re dealing with tall trees as your primary environment, wide-angle shots can capture more of a scene when shooting vertically, and give the image a sense of grandiose scale and height.

5 – Color contrast is key

One drawback to shooting in a forest environment (unless you’re in the northeast United States during the fall, or any area where foliage changes near the end of the year) is the lack of color contrast. The majority of your environment will most likely be composed of green leaves and brown tree trunks.

Flora can help break up the monotony by adding color to the scene. Look for patches of brightly colored flowers of yellow or red; even white flowers can change the contrast profile within the frame.

040916_

Playing the sun off of the environment can also add color, without needing a physical object. Golden-hour light and sun glare placed in your photo by composition, can inject the warmth of oranges and reds, and give your image a more vibrant look.

6 – Use Black and White

Sometimes when you’re shooting, nothing seems right. The light isn’t hitting the way you’d like, colors are off, or you just don’t get a sense of drama from your photo. This can happen in a forest environment, sometimes due to the general consistency of color from scene to scene; a lot of greens and browns can make it hard to highlight a subject.

Shooting in black and white (or processing the images later as monochrome) can let you concentrate on what the light is doing in your scene, by removing the element of color that can sometimes distract you from how varying levels of light affect the image.

Forest

If you’re going to shoot the photo itself in black and white in-camera, be sure to switch over to RAW + JPEG in your camera settings, that way you’ll have an unprocessed RAW file and a black and white JPEG for each frame you take. Or simply shoot in RAW mode so you’ll still have the full range of color data, in case you’re not happy with the results. But you’re shooting in RAW anyway right?

7 – Post-Processing the results

Photos taken in wooded areas benefit from many of the same post-processing workflow you’d normally do with other images, but there are some additional things you can do to give these images a bit more pop.

Lighting tends to be a little more dramatic in the forest, since you usually have a canopy of trees to filter some of the sun, and can result in gorgeous rays hitting the forest floor, or leaves and plants highlighted by shafts of light. You can enhance these by using a bit of contrast, specifically on these areas. You can also add a bit of vibrance to the image overall, and play around with the hue/saturation of the individual colors of green and brown, to bring out the natural feel of the shot.

040916_-3

For my own images, I like to soften the image overall via the Clarity slider in Lightroom (to give it a dreamy or magical feel), and then target the subject or other important areas of the photo and add clarity and sharpness back in with a local adjustment (+Clarity plus -Clarity balances out, for example:  -30 Clarity plus +50 Clarity equals net +20 Clarity on the area targeted, use the Adjustment brush tool to apply this).

8 – Leave the forest as you found it

I love the planet we’re on, and it angers me to no end when I see evidence of people not caring about the effect they have on the natural surroundings. Beer can rings and cigarette butts at beaches, plastic bags on roads near the forest, and the list goes on.

We should consider it a privilege to document this incredible world we live in, and the most important thing we can do is also the simplest; leave the area as you found it. This means many things including; not littering the woods or forest with any traces of man-made products such as trash, as well as not interfering with nature by getting too close to wildlife, or disturbing sensitive plants or trees.

030616_

Little things like this may seem trivial, but if we all participate in this practice, we could have a positive effect on our natural world and keep it a little more serene for generations to come. As photographers, we have an even greater responsibility to be conscious about what impact our actions might have on our environment.

Conclusion

Most of us have access to forest areas, fortunately, so it’s easy to try out this kind of photography. While this type of nature photography presents a few challenges, as long as you’re prepared with the right gear and a little knowledge, it can be an enjoyable experience, will help connect you with our natural world, and maybe even enlighten you a bit.

Do you have any stories or images of your adventures in the wild woods or forest that you’d like to share? Engage with us by commenting below, and get out there and have fun!

This week we are doing a series of articles to help you do better nature photography. See previous articles here:

  • 3 Habits Every Outdoor Photographer Should Develop to Avoid Missing Shots
  • 5 Tips for Better Nature Photography
  • 27 Serene Images of the Natural World
  • Weekly Photography Challenge – Nature
  • 10 Ideas for Photographing Nature in your Backyard
  • 6 Tips for Capturing Character and Personality in Wildlife Photography
  • 5 Tips for Setting the Focus in Your Landscape Photography
  • 7 Tips for Better Marine Wildlife Photography
  • Tips for Processing Landscape Photos – from Basic Edits to Artistic Interpretation
  • 5 Tips for Avoiding Boring Photos of Mountains

googletag.cmd.push(function() {
tablet_slots.push( googletag.defineSlot( “/1005424/_dPSv4_tab-all-article-bottom_(300×250)”, [300, 250], “pb-ad-78623” ).addService( googletag.pubads() ) ); } );

googletag.cmd.push(function() {
mobile_slots.push( googletag.defineSlot( “/1005424/_dPSv4_mob-all-article-bottom_(300×250)”, [300, 250], “pb-ad-78158” ).addService( googletag.pubads() ) ); } );

The post 8 Quick Tips to Produce Better Forest Photography by Tim Gilbreath appeared first on Digital Photography School.


Digital Photography School

 
Comments Off on 8 Quick Tips to Produce Better Forest Photography

Posted in Photography


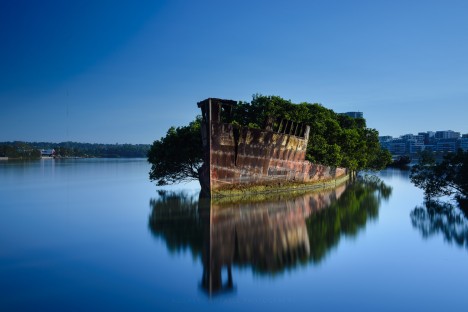
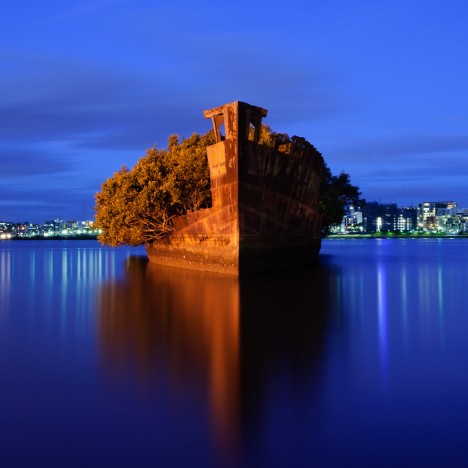
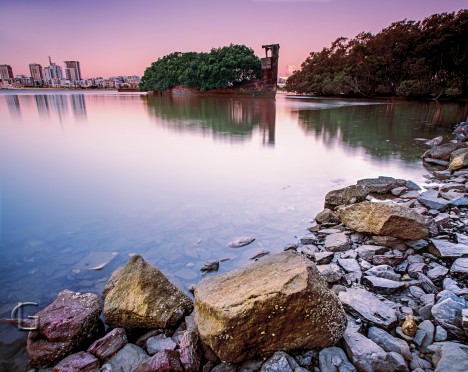
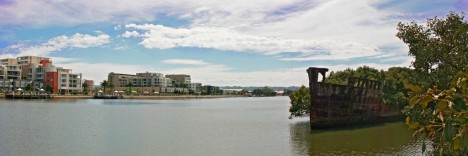
Floating Forest: Trees Rise From Corpse of Abandoned Ship

29 Oct

[ By Steph in Abandoned Places & Architecture. ]

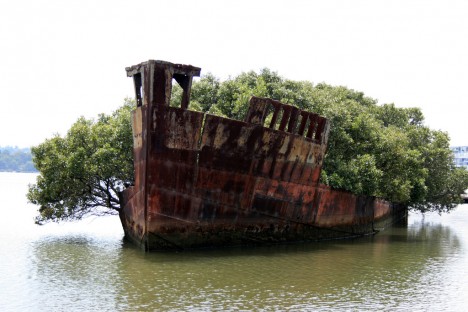
floating forest 6

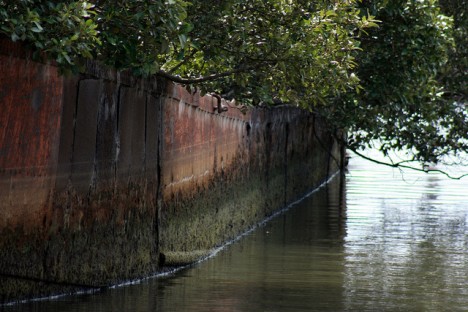
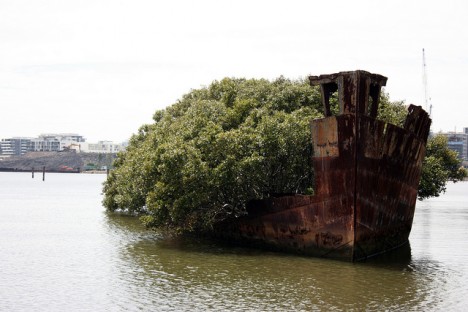
Rusted and half-sunken yet still somehow afloat on the waters of Sydney’s Homebush Bay, the remains of a century-old ship have become fertile ground for a thriving forest. Located on the south bank of the Parramatta River on the inner west side of the city, the bay was a hub for industrial activity in the mid-20th century and became a dumping ground for unwanted materials of all kinds, from busted ships to toxic waste.


floating forest 7

floating forest 4

The bay was ultimately rehabilitated, but many of the ships remain, lurking among a tangle of mangrove trees. Among them is the SS Ayrfield, which the mangroves clearly found quite hospitable, transforming it into a sort of artificial floating island. In its former life, the Ayrfield was used to transport supplies to American troops stationed in the Pacific during World War II before operating as a collier. It was sent to Homebush for disposal in 1972 after sixty years of service.

floating forest 1

floating forest 2

floating forest 3

floating forest 5

Awash in brilliant hues of red and orange, the hull of the 1,140-ton SS Ayrfield pokes up from the surface of the water, the Sydney skyline looming in the distance. Other ghostly ships in the bay include the steam tugboat SS Heroic and the steel boom defense vessel HMAS Karangi, which helped defend Darwin Harbour from Japanese attack in 1942.

Photos: Jason Baker, gerryligon, rodney campbell / Flickr Creative Commons

Share on Facebook


[ By Steph in Abandoned Places & Architecture. ]

[ WebUrbanist | Archives | Galleries | Privacy | TOS ]


WebUrbanist

 
Comments Off on Floating Forest: Trees Rise From Corpse of Abandoned Ship

Posted in Creativity