RSS
 

Posts Tagged ‘Focusing’

Zone Focusing: How to (Always) Capture Sharp Street Photos

02 Aug

The post Zone Focusing: How to (Always) Capture Sharp Street Photos appeared first on Digital Photography School. It was authored by James Maher.

zone focusing: how to capture sharp street photos

Do you struggle to capture consistently sharp, in-focus street photos? You’re not alone.

In street photography, consistently nailing focus, especially if you don’t have the opportunity to look through your camera’s viewfinder, can be insanely difficult (and often seems impossible).

That’s where zone focusing comes in.

You see, zone focusing lets you set your focus in advance. And then, when your subject steps into the frame, snap – you get the shot.

Not every street photographer zone focuses, but the ones who do swear by it. And while I use autofocus when I can, I swear by zone focusing, too.

So what, specifically, is zone focusing? How does it work? And how can you learn to do it for sharp photos?

All will be revealed in this article! Let’s get started.

zone focused composition of boy in a crowd
Canon 5D Mark II | 17mm | f/11 | 1/320s | ISO 1800

What is zone focusing?

Zone focusing is a technique where you manually prefocus your lens to a certain distance and adjust your aperture for a deep depth of field. Then, when you’re confronted by an interesting subject, you don’t need to focus through your viewfinder; instead, you wait for your subject to enter your acceptable zone of focus and capture the photo.

Note that zone focusing is very flexible. If you like to shoot intimate portraits, you can zone focus just a few feet in front of your lens. And if you prefer wider shots with more distant elements, you can zone focus 10+ feet away.

Why is zone focusing so useful?

Zone focusing works to varying degrees in plenty of photography genres, but it’s most commonly used by street photographers for two major reasons:

  1. When shooting on the streets, the world happens fast. Gorgeous photo opportunities slide by in the blink of an eye. If you take the time to focus, you’ll often miss the shot.
  2. In street photography, putting a camera to your eye often makes your subject (and you) uncomfortable. So if you can focus without looking, you’ll be able to keep discomfort to a minimum while capturing more honest scenes.

In other words, if you’re a street photographer, zone focusing is an easy way to increase your keeper rate while keeping your photos perfectly candid.

Zone focusing and depth of field (dof)

woman walking along outside the subway
Canon 5D Mark II | 28mm | f/4 | 1/250s | ISO 3200

Before I explain how to zone focus, it’s important that you understand the factors that go into creating a zone of sharp focus, also known as a deep depth of field.

As you may already be aware, depth of field refers to the zone of acceptable sharpness in a scene. So when you focus on a subject and you create a deep depth of field (more on how to do that in a moment!), your subject will turn out sharp – but so will a certain area in front of and behind your subject.

For instance, if you focus on a subject that’s 10 feet away, a deep depth of field would ensure sharp focus from around 8 feet to 14 feet, depending on your specific camera settings. Keep in mind that the area behind your subject that is acceptably sharp will always be greater than the area in front of your subject, and in many cases, it will be much greater.

What affects your depth of field? Three simple factors:

  1. Aperture. The smaller your aperture, the greater the depth of field. So if you’re shooting at f/16, you’ll have far more in focus than if you shoot at f/2.8.
  2. Focal length. Wider focal lengths create a deeper depth of field. So if you are shooting at 28mm, much more of your scene will be in focus than if you are shooting at 100mm. (This is why I rarely zone focus with lenses longer than 35mm.)
  3. Distance to the subject (or point of focus). The further away you focus, the more depth of field there will be in a scene. So if you focus on a person 10 feet away, then you’ll have a deeper depth of field than if you focus on a person 3 feet away.

If you want to test out these different factors and see how they affect the depth of field in real life, check out this website, which offers a handy depth of field calculator.

How to zone focus: step by step

man walking with hat and suitcase zone focused
Canon 5D Mark II | 17mm | f/8 | 1/400s | ISO 1600

You can zone focus in three simple steps:

  1. Adjust your camera settings for a deep depth of field
  2. Prefocus your lens in the right area
  3. Hit the shutter button when your subject moves into range

Let’s take a look at each step in greater depth:

Step 1: Adjust your camera settings for a deep depth of field

When zone focusing, you want the range of sharpness (i.e., the depth of field) as large as possible. That way, you have the most room for error, and you’ll end up with the most keepers. Plus, a deep depth of field will allow you to keep multiple subjects sharp, which is useful if you’re capturing a more complex, layered shot.

First, you’ll need to choose a wide-angle lens, such as 24mm, 28mm, or 35mm. My personal go-to focal length is 28mm, but any of these options work for zone focusing. Unfortunately, if you zoom any closer (50mm, for example), you’ll struggle to get a usable depth of field range.

Next, make sure your camera is set to Manual mode, and dial in a narrow aperture. I’d recommend working at f/8 and beyond – so depending on the light levels, you might use f/8, f/11, f/13, or even f/16.

Because zone focusing is often done with moving subjects (and you might be moving, too!), make sure your shutter is at least 1/250s, though higher is better, if you can afford it. And adjust your ISO to keep your exposure sufficiently bright.

Really, it’s the combination of the wide focal length and narrow aperture that’ll give you the deep depth of field you need, but it’s important not to neglect your other settings.

Step 2: Prefocus your lens in the right area

Now that you have your camera settings dialed in, it’s time to determine where you want to focus your lens.

Part of this should be personal preference and may depend on the context. For instance, if you prefer more intimate street portraits, you’ll want to focus a few feet in front of you. Or if you’re shooting in an environment where people are passing at a distance, you’ll want to focus farther away.

But it’s not just about artistry. Recalling the discussion of depth of field, you know that a closer point of focus decreases the range of acceptable sharpness. So if you want to maximize the chances of a sharp shot, it’s a good idea to focus far off in the distance.

Regardless of where you plan to focus, a lens with a manual focus display is a huge benefit here. I’m talking about something like this:

manual focus display on a 24-105mm lens

That way, you know exactly where your lens is focused (and you can consistently prefocus in the same spot).

If your lens doesn’t include a manual focus display, that’s okay, but you’ll need to spend extra time learning to estimate distances.

Step 3: Hit the shutter button when your subject moves into range

You’ve got the right settings, and you’re prefocused in the right spot.

Which means that all you need to do is take the photo.

Keep an eye out for interesting photo opportunities. Estimate your range of focus.

Then, when something interesting happens, wait until the subject comes into your focusing zone, then take a photo. The closer your subject gets to the center of your range of focus, the better (and don’t be afraid to capture multiple photos to maximize your chances of nailing a sharp shot).

A zone focusing tip: learn to guess distances

Zone focusing works really well, and if you’re shooting in bright light with a narrow aperture, you’ll have a lot of leeway.

But if you’re like me, then you often do street photography in less than ideal lighting, such as on the subway. And thanks to the poor light, you’ll need to widen your aperture – to f/2.8 and beyond.

What does this mean? Well, even with a wide-angle lens and a relatively distant subject, you’ll need to be very careful; your range of sharpness will be quite small.

man standing by the subway tracks
Fujifilm X100 | 35mm | f/2 | 1/250s | ISO 3200

For this reason, you must learn to estimate the distances away from your camera’s lens, all the way up to around 12 feet. I suggest using a tape measure and measuring out the distances. Then just go out and practice.

Find different objects and try to guess their distance. Then, before you head out to shoot, pick an object at a known distance, focus on it, and use it as a sort of “calibrator” for all your future photos.

The other reason to get good at guessing distances? People move and scenes develop. You might want to capture a person walking toward you at 10 feet, then again at 5 feet. To nail both those shots, you’ll need to have one hand on the focusing ring, and practice manually focusing back and forth, from 10 feet to 8 feet to 6 feet and so on.

Eventually, you’ll be able to capture someone walking toward you at both 10 feet and 6 feet, without even having to look through the viewfinder. It’s an incredibly effective technique, and you can use it for some gorgeous results.

couple walking together zone focused
Canon 5D Mark II | 28mm | f/5 | ISO 1600

How to zone focus: final words

Now that you’ve finished this article, you should be a capable zone focuser – though I certainly recommend you spend some time really getting to know different distances (and how to accurately prefocus at those distances, too).

So head out with your camera. Have some fun with zone focusing. You’ll love the results!

Now over to you:

Have you tried zone focusing? What do you think? Do you like it? Share your thoughts in the comments below!

Table of contents

Street Photography

  • GENERAL
    • 10 Tips for the Aspiring Street Photographer
    • 7 Street Photography Rules That Should Be Broken
    • How to Approach Street Photography in 12 Easy Steps
    • 50 Things I Try to Avoid in Street Photography
    • 5 Questions to Ask Yourself to Help Improve Your People Photography
    • 5 Exercises to Improve Your Street Photography
  • PREPARATION
    • 7 Steps to Get Over Your Fear of Street Photography
    • How to Plan a Street Photography Shoot When Traveling
  • SETTINGS
    • Zone Focusing: How to (Always) Capture Sharp Street Photos

    • What are the Best Street Photography Camera Settings and Why
  • LIGHTING
    • There is No Bad Light for Street Photography
    • Make the Most of High Contrast Lighting for Dramatic Street Photos
  • COMPOSITION
    • The Importance of Capturing Gesture and Emotion in Street Photography
    • Seeing and Street Photography
      • 13 Great Subjects for Urban Night Photography
    • How to Avoid Distracting Backgrounds in Street Photography
    • How the Square Format Can Enhance Your Street Photography
    • Tips for Minimalist Photography in an Urban Environment
    • How to Improve the Impact of Your Urban Images Using Lines
    • How to Use Framing in an Urban Environment
  • GEAR
    • 5 Reasons Why Shooting With a Rangefinder Will Make You a Better Street Photographer
    • Pros and Cons of a Telephoto Lens for Street Photography?
    • The Five Key Features on any Street Photography Camera
    • Which Street Photography Lens is Right for You?
    • 6 Reasons Why You Should Use a Standard Lens for Street Photography
    • A Look at the Fujifilm X100V in Action for Street Photography (video)
    • How to Use a Wide-Angle Lens for People Photography
    • Street Photography with $ 10 Ilford HP5 Film Camera
  • ADVANCED GUIDES
    • 8 Advanced Street Photography Tips to Get You to the Next Level
    • Getting Close and Personal: 11 Tips for Close-up Candid Street Photography
    • 7 Tips for a More Anonymous Approach to Street Photography
    • A Cowards Guide to Street Photography
    • 6 Tips for Aiming Low and Going Unnoticed in Street Photography
    • 9 Tips for Creating Great Street Portraits
    • Street Portraits vs Street Photography: What is the Difference?
    • 17 Tips for Shooting Better Urban Portraits
    • What Makes A Great Street Photograph and How Do We Create Them
    • How to Tell a Story With Your Street Photography
    • In the Dark: 10 Tips for Street Night Photography
    • 7 Tips for Urban Landscape Photography
    • A Street Photographer’s Guide to New York City
    • Urban Exploration Photography – Urbex
    • 7 Tips for Capturing the Decisive Moment in Street Photography
    • A Common Misconception About Street Photography – Just Take Photos of People Walking
    • What do I look for on a Photo Walk? Part 1 – City Walk
    • 8 Things You Should Know if You are Dating a Street Photographer
    • 7 Ways to Become More Spontaneous with Your Street Photography
    • 5 Essential Shots You Need to Get for Street Market Photography
    • Using Humor In Street Photography
    • Watch a Street Photographer Going about a Shoot [VIDEO]
    • Using Street Photography to See Beyond the Ordinary
  • CREATIVE TECHNIQUES
    • 5 Tips for Shooting Glass to Enhance Your Street Photographs
    • Window Street Photography ~ Try Something New And Grow!
    • The Pros and Cons of Black and White Versus Color for Street and Travel Photography
    • 4 Ways to Add a Sense of Motion to Your Urban Photography
    • 7 Steps to Create Street Photography Silhouettes
  • POST-PROCESSING
    • How to Enhance Urban Night Photographs Using Luminosity Masks in Photoshop
    • 13 Steps for Editing Street Photography in Lightroom from Start to Finish
    • How to Turn Day to Night Using Photoshop for Urban Landscapes
  • BUSINESS
    • Model Releases: Working with People on the Streets
  • INSPIRATION
    • 20 Beautiful Examples of Urban Decay Photography
    • 30 Street Photography Images to Inspire You
    • 33 Gritty Photos of Graffiti Street Art
    • 28 Diverse Images That Showcase People Photography
    • 39 Street Photography Images That Have Common Threads
    • Focus on Thomas Leuthard – Street Photographer
    • Focus on Street Photographer Eric Kim ~ In your face with a smile!
    • Focus on Chris Porsz ~ It’s All About The People
    • Focus on Scott Frederick – Urban Explorer
  • OPINION
    • The Uncomfortable Truth About Street Photography
    • Street Photography: Exploitative vs Respect
    • To be or not to be a Street Photographer
    • Consent in Photography – What to Think About When Photographing People

var dpsTopics = {
id: 38294,
titles: [{“id”:”what-is-zone-focusing”,”permalink”:”https:\/\/digital-photography-school.com\/ultimate-guide-to-zone-focusing-for-candid-street-photography\/”,”title”:”What is zone focusing?”},{“id”:”why-is-zone-focusing-so-useful”,”permalink”:”https:\/\/digital-photography-school.com\/ultimate-guide-to-zone-focusing-for-candid-street-photography\/”,”title”:”Why is zone focusing so useful?”},{“id”:”zone-focusing-and-depth-of-field-dof”,”permalink”:”https:\/\/digital-photography-school.com\/ultimate-guide-to-zone-focusing-for-candid-street-photography\/”,”title”:”Zone focusing and depth of field (dof)”},{“id”:”how-to-zone-focus-step-by-step”,”permalink”:”https:\/\/digital-photography-school.com\/ultimate-guide-to-zone-focusing-for-candid-street-photography\/”,”title”:”How to zone focus: step by step”},{“id”:”step-adjust-your-camera-settings-for-a-deep-depth-of-field”,”permalink”:”https:\/\/digital-photography-school.com\/ultimate-guide-to-zone-focusing-for-candid-street-photography\/”,”title”:”Step 1: Adjust your camera settings for a deep depth of field”},{“id”:”step-prefocus-your-lens-in-the-right-area”,”permalink”:”https:\/\/digital-photography-school.com\/ultimate-guide-to-zone-focusing-for-candid-street-photography\/”,”title”:”Step 2: Prefocus your lens in the right area”},{“id”:”step-hit-the-shutter-button-when-your-subject-moves-into-range”,”permalink”:”https:\/\/digital-photography-school.com\/ultimate-guide-to-zone-focusing-for-candid-street-photography\/”,”title”:”Step 3: Hit the shutter button when your subject moves into range”},{“id”:”a-zone-focusing-tip-learn-to-guess-distances”,”permalink”:”https:\/\/digital-photography-school.com\/ultimate-guide-to-zone-focusing-for-candid-street-photography\/”,”title”:”A zone focusing tip: learn to guess distances”},{“id”:”how-to-zone-focus-final-words”,”permalink”:”https:\/\/digital-photography-school.com\/ultimate-guide-to-zone-focusing-for-candid-street-photography\/”,”title”:”How to zone focus: final words”},{“id”:”what-is-zone-focusing”,”permalink”:”https:\/\/digital-photography-school.com\/ultimate-guide-to-zone-focusing-for-candid-street-photography\/”,”title”:”What is zone focusing?”},{“id”:”why-is-zone-focusing-so-useful”,”permalink”:”https:\/\/digital-photography-school.com\/ultimate-guide-to-zone-focusing-for-candid-street-photography\/”,”title”:”Why is zone focusing so useful?”},{“id”:”zone-focusing-and-depth-of-field-dof”,”permalink”:”https:\/\/digital-photography-school.com\/ultimate-guide-to-zone-focusing-for-candid-street-photography\/”,”title”:”Zone focusing and depth of field (dof)”},{“id”:”how-to-zone-focus-step-by-step”,”permalink”:”https:\/\/digital-photography-school.com\/ultimate-guide-to-zone-focusing-for-candid-street-photography\/”,”title”:”How to zone focus: step by step”},{“id”:”step-adjust-your-camera-settings-for-a-deep-depth-of-field”,”permalink”:”https:\/\/digital-photography-school.com\/ultimate-guide-to-zone-focusing-for-candid-street-photography\/”,”title”:”Step 1: Adjust your camera settings for a deep depth of field”},{“id”:”step-prefocus-your-lens-in-the-right-area”,”permalink”:”https:\/\/digital-photography-school.com\/ultimate-guide-to-zone-focusing-for-candid-street-photography\/”,”title”:”Step 2: Prefocus your lens in the right area”},{“id”:”step-hit-the-shutter-button-when-your-subject-moves-into-range”,”permalink”:”https:\/\/digital-photography-school.com\/ultimate-guide-to-zone-focusing-for-candid-street-photography\/”,”title”:”Step 3: Hit the shutter button when your subject moves into range”},{“id”:”a-zone-focusing-tip-learn-to-guess-distances”,”permalink”:”https:\/\/digital-photography-school.com\/ultimate-guide-to-zone-focusing-for-candid-street-photography\/”,”title”:”A zone focusing tip: learn to guess distances”},{“id”:”how-to-zone-focus-final-words”,”permalink”:”https:\/\/digital-photography-school.com\/ultimate-guide-to-zone-focusing-for-candid-street-photography\/”,”title”:”How to zone focus: final words”}] };

The post Zone Focusing: How to (Always) Capture Sharp Street Photos appeared first on Digital Photography School. It was authored by James Maher.


Digital Photography School

 
Comments Off on Zone Focusing: How to (Always) Capture Sharp Street Photos

Posted in Photography


Focusing Tips for Beginners – Ways to Achieve Spot-on Focus in Photography

06 Mar

The post Focusing Tips for Beginners – Ways to Achieve Spot-on Focus in Photography appeared first on Digital Photography School. It was authored by Kevin Landwer-Johan.

focusing-tips-for-beginners

Focus is vital. Capturing your subject in crisp, sharp focus requires skill and practice. You need to understand the various auto-focus controls on your camera. Here are some focusing tips for beginners to help you get sharp photos more consistently.

Focusing Tips for Beginners, Thai models

© Kevin Landwer-Johan Nikon D800, Lens 105mm f/2.8, 1/400 sec., f/3.2, ISO 500

There’s no fixing an out-of-focus photo

Many digital photographers like to use the various sharpening options available in software. Don’t be tempted. I have never known an out-of-focus photo to be well improved with post-production manipulations.

Sharpening in post can, however, help images that are a little soft. This is often due to lens quality rather than poor focusing. Either your photos are in focus or they are not. Focusing tips for beginners are important to understand. There is no fixing an out of focus photo with your computer.

Focusing Tips for Beginners Asian Photographer

© Kevin Landwer-Johan Nikon D800, Lens 35mm f/1.4, 1/400 sec., f/2, ISO 100

Focus on your subject

Pick your point and focus on it. Having the wrong part of your composition in focus will not result in a good photograph. You must decide what’s in your frame that’s most important and focus on it.

Focusing tips for beginners often contain information about operating your camera better. I will include these tips here also. But first, it’s important to know what you want to focus on. This is something I prefer not to let my camera choose for me.

As you are composing your photo, be mindful of your main subject. Consider it’s depth. Is most of your subject the same distance from your camera? Or is some of it closer to you than other parts?

Photographing a bicycle that’s side on to you, most of it is about the same distance from your camera. Taking a photo of the bike as it faces the camera will mean you need to choose whereabouts on it to focus. If you focus on the back wheel, the front wheel may be out of focus.

One rule of thumb I use most of the time is, if your subject has eyes, focus on them. If one eye is closer to your camera than the other, focus on the closest one. Subjects with eyes that are out of focus rarely look good in photos.

Young girl looking up at the camera

© Kevin Landwer-Johan Nikon D800, Lens 35mm f1.4, 1/800 sec., f/1.4, ISO 400

Multi or single point auto-focus?

Digital cameras usually have various setting options for choosing your focus point. You can set your camera to only focus on a single point. Or you can set it to choose from multiple points. More advanced cameras allow you to set the area and number of focus points.

I prefer to have my camera set to single point auto-focus. This allows me to be precise and in control of what I focus on. Having your camera set to multi-point auto-focus means your camera chooses what part of your composition to focus on.

Some camera models allow you to move the single focus point to position it where you want in the frame. In other cameras, the single point for auto-focusing is central in the frame and you cannot move it. To use the single point on these cameras, you must shift your camera to focus where you want and then re-compose. I would find this frustrating. It will not always provide correct focus when you are using a very wide aperture setting.

Iron Bridge at night in Chiang Mai, Thailand

© Kevin Landwer-Johan

Using a camera where you can precisely control the single point the camera will auto-focus on, gives you control. You can move the point to the portion of the frame where you want to focus easily. This may take some practice to become quick at it, but it’s worthwhile when you want to be in control.

About the only time I use multi-point auto-focusing, is when I am tracking a moving subject that is constant. The camera will often be able to lock on and keep with a subject unless the subject is moving erratically. Accuracy when using this mode can also depend on how fast your subject is moving. Your subject will be easier to track when it’s slow-moving.

Focusing Tips for Beginners Asian photogrpaher and her camera

© Kevin Landwer-Johan Nikon D700, Lens 105mm f/2.8, 1/640, f/3. ISO 400

Continuous or single-servo auto-focus?

Choosing continuous or single-servo auto-focus is another important decision. When you choose continuous focus, your camera will always be refocusing while you have the focus button activated. With single-servo auto-focus, pressing the focus control, it will focus once and remain set on that point – even when your subject or camera moves.

Continuous-servo focusing is most useful when you have a moving subject, or you are moving with your camera. If I am using continuous-servo focus, I am often also using a multi-point setting. However, most of the time, I use single-servo focusing.

Focusing Tips for Beginners Tricycle taxis in Chiang Mai

© Kevin Landwer-Johan

Back button focus

By default, cameras are configured to use the shutter release button to focus. You will half depress the shutter button to focus. Some cameras allow you to turn off focusing on the shutter button and assign the focus function to another button.

Many photographers like to change the focus function to be controlled by one of the buttons on the back of the camera. Hence the name, back button focus.

Doing this allows you to focus independently from taking a photo. Assigning a button other than the shutter release to control focus, gives you more flexibility. You can focus and take photos independently when different buttons control these functions.

Back button focus can take a little getting used to, but I have found it well worthwhile because it gives me more control of my focus.

There are many situations where you might want to take a photo without refocusing, and back-button focusing allows you to do this.

rice fields and blue sky

© Kevin Landwer-Johan Nikon D800, Lens 55mm, 1/500, f/11, ISO 400

Using manual focus

Another of the focusing tips for beginners is manual focusing. Some may think that manual focusing is too slow or difficult, but it’s not if you practice it.

You can become proficient in a short space of time if you commit to learning. Once you know how you will be surprised at how often manual focus skills come in handy.

Auto-focus is a wonderful technology, but it’s not always perfect. When you find your lens searching for a focus point and struggling to find one, it pays to switch over to manual if you know what you are doing.

Manually controlling your focus in low light can often be faster and more precise than your camera’s auto-focus. Learning to focus manually is also a lot cheaper than upgrading to a higher quality camera that has better auto-focus.

Portrait of a Karen man in northern Thailand

© Kevin Landwer-Johan Nikon D800, Lens 105mm f/2.8, 1/200 sec., f/6.3, ISO 400

Focus technique

I hope you have found these focusing tips for beginners useful. Remember, don’t leave it all to your camera. Getting well-focused images is not all about managing your camera’s auto-focus system. You need to work on your focus techniques and know what to do when you are photographing different subjects. This is particularly important when your subject is moving.

Sometimes you’ll want to track focus. At other times you’ll want to pre-focus and wait for your subject to enter your frame. When doing macro photography, it can be useful to set your focus and then move your camera or subject forwards or back a little to fine-tune.

Practice, as always, will make you sharper, and your images too.

Do you have any other focusing tips for beginners that you’d like to share? If so, please do so in the comments.

The post Focusing Tips for Beginners – Ways to Achieve Spot-on Focus in Photography appeared first on Digital Photography School. It was authored by Kevin Landwer-Johan.


Digital Photography School

 
Comments Off on Focusing Tips for Beginners – Ways to Achieve Spot-on Focus in Photography

Posted in Photography


Canon’s RF 70-200mm F2.8L IS USM will get a firmware update to fix the focusing issue next month

27 Dec

Next month, Canon will release a firmware update that fixes an autofocus problem reported by RF 70-200mm F2.8 L IS USM telephoto lens owners. The company says it’s confirmed this lens may produce a ‘slightly front-focused’ image when the photo is captured at close range with the focus distance set to around the 200mm end of the scale.

Canon will release the firmware with a bug fix for this problem in January 2020, the company revealed on its US website. The new firmware will be intended for RF 70-200mm F2.8 L IS USM lenses running firmware version 1.0.5 or earlier, something that can be checked within the camera’s menu.

The Canon RF 70-200mm F2.8L IS USM telephoto lens is available from B&H Photo and other retailers for $ 2,699.

Articles: Digital Photography Review (dpreview.com)

 
Comments Off on Canon’s RF 70-200mm F2.8L IS USM will get a firmware update to fix the focusing issue next month

Posted in Uncategorized


Ricoh GR III gets firmware update to improve low-light focusing, add Wi-Fi Image Sync option

24 Apr

The Ricoh GR III is far from perfect, but it’s won over the heart of at least one DPReview writer. Many of the imperfections it has can’t be fixed with a firmware update, but Ricoh is still attempting to address at least a few problems with the camera in the form of a new firmware update — version 1.10.

The updated firmware improves the autofocus performance of the camera in dark scenes and low-contrast environments, a complaint note by Barney in the aforementioned article. It also adds a Wi-Fi option for Image Sync (version 2.0.4 or later) and fixes a number of under-the-hood issues to improve the overall stability of the camera.

Firmware version 1.10 for the Ricoh GR III will be available to downloaded for macOS and Windows on Ricoh’s website by the end of the day, according to a Ricoh spokesperson. If you can’t wait, you can download it from Ricoh Japan’s English-translated website.

Articles: Digital Photography Review (dpreview.com)

 
Comments Off on Ricoh GR III gets firmware update to improve low-light focusing, add Wi-Fi Image Sync option

Posted in Uncategorized


Lexar confirms XQD development being “held up by multiple parties,” focusing on CFexpress

29 Oct

Last week, Nikon Rumors reported Lexar will no longer make any XQD cards, citing a press release from Polish Lexar distributor My Adventure. DPReview has since independently confirmed this report with Lexar.

“While Lexar is eager to pursue the XQD technology, the product availability of XQD has been held up by multiple parties including Sony (who owns the IP) which has prevented us from moving forward,” said a Lexar spokesperson to DPReview. “In addition, we are diligently working on the future standard of CFexpress through our efforts in the Compact Flash Association and partnerships with key camera manufacturers.”

The move echoes ProGrade Digital, a memory card brand founded by former executives of Lexar, who recently said it too will skip developing XQD cards in favor of CFexpress.

Articles: Digital Photography Review (dpreview.com)

 
Comments Off on Lexar confirms XQD development being “held up by multiple parties,” focusing on CFexpress

Posted in Uncategorized


Adobe AI spots tampered images by focusing on noise and artifacts

26 Jun

Adobe researchers have developed a neural network that can identify Photoshopped images. The technology was detailed in a newly published study [PDF], which points out that it is often difficult for humans to notice altered parts of an image. However, differences between the original image and edited elements typically persist despite any attempts to obfuscate them, such as applying a Gaussian blur, and machines can be trained to spot those discrepancies.

Various differences may exist between original and edited image elements, such as different noise patterns and contrast levels. Manual adjustments to these edited elements can make them virtually indistinguishable to the human eye. Adobe’s neural network, however, can not only identify these changes, but also determine the type of tampering technique used to edit the image.

The system involves a two-stream Faster R-CNN network with end-to-end training in identifying manipulated images. The first, called an RGB stream, looks for various tampering artifacts, including big contrast differences and altered boundaries. The second, called a noise stream, looks for inconsistencies in the image’s noise to identify edited elements.

In the study, researchers explain:

We then fuse features from the two streams through a bilinear pooling layer to further incorporate spatial co-occurrence of these two modalities. Experiments on four standard image manipulation datasets demonstrate that our two-stream framework outperforms each individual stream, and also achieves state-of-the-art performance compared to alternative methods with robustness to resizing and compression.

Such technology could prove useful for verifying the authenticity of images used in photojournalism, photography contests, and similar situations.

Via: CNET

Articles: Digital Photography Review (dpreview.com)

 
Comments Off on Adobe AI spots tampered images by focusing on noise and artifacts

Posted in Uncategorized


Sony a7R III promises faster bursts, better focusing and longer battery life

25 Oct

$ (document).ready(function() { SampleGalleryV2({“containerId”:”embeddedSampleGallery_9128455414″,”galleryId”:”9128455414″,”isEmbeddedWidget”:true,”standalone”:false,”selectedImageIndex”:0,”startInCommentsView”:false,”isMobile”:false}) });

Sony has announced the a7R Mark III, a 42.4MP mirrorless camera built around the lessons learned from its flagship a9 sports camera. The result is a high-res full frame camera capable of 10 fps shooting with more tenacious autofocus and many of the improvements existing a7R II users had hoped for.

The camera features essentially the same body as the a7R II, but Sony has found room for a focus point selection joystick, AF-On button, twin SD card slots, flash sync socket and, most importantly, the higher-capacity battery of the a9. The new camera also gets the 3.69M-dot OLED viewfinder from the a9, providing a 1280 x 720 resolution view. This gives you highly detailed images with high contrast and deep blacks through the EVF, particularly during playback.

Speed

The sensor is the same 42.4MP BSI CMOS chip as before, but a series of hardware and processing changes act to get more out of it.

A faster ‘Bionz X’ processor, along with the front-end LSI processor featured in recent Sony models, allows the camera to process more data, faster. This, in conjunction with a redesigned, low-vibration shutter mechanism, allows the new camera to shoot at 10 frames per second, with full autofocus, in either mechanical or electronic shutter mode. It can also do a6500-style ‘live view’ continuous shooting at up to 8 fps. It’s not the blackout-free shooting of the a9, but the instantaneous ‘live’ frames at 8 fps can help you keep up with the action despite this being, in practice, simply 8 live frames per second with black frames inserted in between (if the behavior is anything like the a6500 we tested).

Sony says the faster processing will give “more tenacious” subject tracking and Eye-AF than the existing a7R models

Continuous shooting bursts can last for 87 compressed or 28 uncompressed Raw files.

Sony claims 15 stops of dynamic range and 14-bit Raw capture across more of its shooting modes (including continuous shooting and e-shutter mode, which prompted the previous camera to drop to 12-bit capture), though it still drops to 12-bit when shooting 10 fps uncompressed Raw. At the pixel-level, we’re skeptical of the 15 EV claim and expect something more along the lines of the ADC bit-depth: 14 to 14.5 EV at best.

So, although the Mark III doesn’t have the super-high throughput stacked CMOS design that we saw in the a9, Sony says the faster processing will give faster shooting speeds and even offer AF benefits: “more tenacious” subject tracking and Eye-AF than the existing a7R models to name a couple, even if not up to a9 standards. So how does AF stack up?

Autofocus

The a7R III retains the 399 point on-sensor phase-detect AF system of its predecessor, ensuring accurate and precise autofocus at the image sensor plane with no calibration whatsoever. Like with the a9, Sony has updated its low light AF rating, ensuring focus down to -3 EV with F2 lenses. Indeed, we’ve found Sony’s ratings to be relatively accurate, with a F1.4 lens offering 1 stop faster performance (down to -4 EV), but slower lenses offering worse performance (-1 EV for F4 lenses). The a7R II predecessor focused down to -3 EV with F1.4 lenses, and reliably to -2 EV with F2 lenses.

Importantly, though, Sony claims twice as good face and eye detection and tenacity. That would be welcome, as we found Eye AF-C to be very jumpy, readily hopping between detected faces in the scene, on the a7R II. The a7R II particularly struggled in continuous drive modes. The a9 remedied this issue quite a bit, more tenaciously sticking to your original intended subject as you can see below, and even functioning jaw-droppingly flawlessly even in 20 fps bursts. We hope the a7R II’s algorithms allow for at least somewhat similar behavior. See how the a7R II and the a9 compare, above.

Official Sony a7R III sample images

$ (document).ready(function() { SampleGalleryV2({“containerId”:”embeddedSampleGallery_4337610895″,”galleryId”:”4337610895″,”isEmbeddedWidget”:true,”standalone”:false,”selectedImageIndex”:0,”startInCommentsView”:false,”isMobile”:false}) });

Stable high resolution

As well as the more powerful processors, the a7R Mark III gains some of its capabilities from a completely new shutter mechanism. This is designed to be both fast and low vibration, with a braking mechanism designed to reduce the risk of shutter shock, to maximize image sharpness (although for shutter speeds longer than 1/1000s, electronic front curtain makes this entire issue moot). Sony says it will offer professional levels of durability, too, though hasn’t put a number on its expected lifespan.

The camera’s IS mechanism also gets a boost with the 5-axis system upgraded to receive a 5.5 step rating, by CIPA standard testing. The full capabilities of the system remain available in video shooting, too, though we would’ve liked to see the option for additional electronic (‘digital’) stabilization for glide-cam like footage as well, as is offered on the RX100-series of cameras and some smartphones today.

10 fps high-resolution shooting, with flash

A potentially huge benefit of the 10 fps mechanical shutter is 10 frames-per-second shooting with flash, assuming your strobes can keep up. That puts the a7R III ahead of even the a9 in this respect. This is another example of Sony not afraid to cannibalize itself: it’s offering technology advanced compared to its flagship, at a lower model-level.

For some users, like strobe dance photographers, this may be an immensely important consideration.

Ergonomics

Although the body is essentially that of the a7R II, the Mark II gains some of the ergonomic improvements of the a9. This includes an AF-On button and joystick/multi-controller for positioning the camera’s AF point. The camera’s 3″ touchscreen can also be used as an ‘AF touchpad’ when the camera is held to your eye.

The touchscreen can also be used to perform a controlled rack focus during video capture. Perhaps most importantly, the a7R III gains the new menu system of the a9, including the button customization of that model.

Video

As with its predecessor, the a7R Mark III can shoot UHD 4K from the full width of its sensor but gets better results in Super 35 (essentially APS-C) crop mode. In crop mode the camera shoots using a 5176 x 2924 pixel region, which it down-samples to produce highly detailed 3840 x 2160 UHD 4K footage. Sony says the image quality of both types of footage is improved but that the quality differential between full frame and Super 35mm modes will remain. In other words, Super 35 will continue to (ironically) offer higher resolution, better dynamic range and low light performance than full-frame mode in 4K.

The a7R III gains the Hybrid Log Gamma feature we first saw in the Panasonic GH5, which essentially captures Log footage along with metadata that allows HLG-compatible HDR displays to correctly present the footage, without the need for post-processing. Display Assist, which gives a ‘normal,’ corrected preview while shooting in Log mode, is available when shooting HLG footage. SLog-3 has also been added to maximize dynamic range for users who do expect to grade their footage.

What’s this ultimately mean to you? You’ll be able to immediately capture high contrast footage while preserving both highlight and shadow detail, and then display this wide range of tones on a HDR display without needing to ‘flatten’ the output to fit into the display range of traditional monitors. It’s all the benefits of HDR without all the flat-looking downsides of traditional HDR approaches.

In crop mode the camera shoots using a 5176 x 2924 pixel region, which it down-samples to produce highly detailed 3840 x 2160 UHD 4K footage

The a7R III also gains the 1080p120 (100 in PAL mode) video capability that Sony has developed since the launch of the Mark II, along with the fast and slow-motion modes that stem from the feature. It also shoots XAVC-S Proxy, with the camera capturing both a high quality and a small, more easily editable proxy stream, simultaneously (a feature we first saw on the RX10 IV).

Multi-shot resolution mode

New to the a7R III is a multi-shot resolution mode that, much like the system in recent Pentax DSLRs, shoots four images and moves the sensor between each shot, so that each pixel position in the final image is captured with a red, a blue and two green pixels. This cancels out the side-effects of the Bayer color filter array, meaning that full color information is captured for every pixel. This has a noise benefit both from capturing multiple shots of the same scene, which helps average out the noise, while also reducing the additional softness and noise that usually comes from the demosaicing process.

However, unlike the system Pentax uses or the earlier, 8-shot process used by Olympus, the a7R III cannot assemble the final images in-camera. Instead four Raw files must be processed using a freely downloadable image processing application for PCs that Sony will offer. The camera must also wait either 0.5, 1, or 2 seconds between shots for the sensor to settle, which is likely to exacerbate the problems of subject movement between the first and last shot.

Other features

As well as all these there are a series of smaller additions. For a start, the a7R III also gains an anti-flicker mode that monitors the strobing of artificial lights and shoots at the peak intensity, to avoid dark or inconsistently exposed photos. Unfortunately though, since sensor readout speeds aren’t improved, we’re not expecting any decrease in banding during full-silent shooting (e-shutter) under artificial lighting.

There are also twin USB sockets, a USB 3.1 type C connector and the microUSB port that is found on most cameras. The a7R III can be operated when charging over either of these sockets, meaning the camera can charge over a microUSB cable while also shooting tethered via USB-C.

As per the a9, the a7R Mark III has twin card slots, one of which is UHS-II compatible, while the other is the lower-bandwidth UHS-I standard.

Battery life

Use of the larger NP-FZ100 battery increases the battery life by 2.2x, meaning a CIPA rating of 650 shots per charge when using the rear LCD or 530 shots per charge with the EVF. This can be increased another two-fold (or 4.4x extra life) using the optional VG-3EM battery grip, which it shares with the a9. We’re eager to see how Sony fit this larger battery into a similar body size, as it’s nothing short of impressive.

The a7R Mark III will be available from the last day of November at a recommended selling price of $ 3199.

Press release

Sony’s New Full-frame ?7R III Interchangeable Lens Camera Delivers the Ultimate Combination of Resolution and Speed

Innovative Full-frame Mirrorless Model Offers 42.4 MP High-Resolution, 10 fps Continuous Shooting, Fast and Precise AF Performance in a Compact Body

  • 35mm Full-Frame 42.4 MP1 Back-Illuminated Exmor R™ CMOS Image Sensor with Evolved Image Processing
  • Continuous Shooting at up to 10 fps2 with either Silent Shooting or Mechanical Shutter and full Auto Focus/Auto Exposure tracking
  • 399 phase-detection AF points covering 68%3 of image area, 425 contrast AF points and approximately 2 times more effective Eye AF4
  • 5-axis optical in-body image stabilization with a 5.5 step5shutter speed advantage
  • High Resolution 4K6 Movie Shooting with full pixel readout and no pixel binning7
  • Completely redesigned for professionals, including upgraded Auto Focus, Dual SD Card Slots, Extended Battery Life, SuperSpeed USB (USB 3.1 Gen 1) USB Type-C™ Terminal and more
  • Compact, Lightweight body at only 23 oz8

NEW YORK, Oct. 25, 2017 – Sony Electronics, a worldwide leader in digital imaging and the world’s largest image sensor manufacturer, has today introduced an impressive addition to their full-frame mirrorless camera lineup, the ?7R III (model ILCE-7RM3).

Thanks to an evolutionary leap in image processing power and efficiency, the new ?7R III combines a high-resolution 42.4 MP1 back-illuminated Exmor R CMOS image sensor with impressive shooting speeds at up to 10 fps2 with full AF/AE tracking, as well as beautiful image and 4K6 video quality, wide 15-stop9 dynamic range, high sensitivity with noise reduction of almost a full stop4 and more. With these immense capabilities and a compact, lightweight body, it’s an extremely versatile tool for photographers, videographers, multi-media creators and all other types of professionals that demand reliability, flexibility and versatility.

“We’re continuing to raise the bar for innovation in the imaging marketplace, in particular with our full-frame camera lineup,” said Neal Manowitz, Vice President of Digital Imaging for Sony Electronics. “As an industry, we are now entering the true digital age of imaging. The capabilities of the ?7R III camera – silent shooting at 10 fps at full 42.4 MP resolution, extreme AF coverage and speed for both video and stills – exceed anything that is physically possible with a DSLR, making it an excellent symbol for this paradigm shift” He added, “It offers a level of customization, speed and stamina that will satisfy even the most demanding professionals, and ensures that they can take full advantage of this impressive tool to capture and create in ways they never could before.”

A New Level of Image Quality
The 42.4MP high-resolution, back-illuminated Exmor R CMOS image sensor utilizes a gapless on-chip lens design and AR (anti-reflective) coating on the surface of the sensor’s seal glass to dramatically improve light collection efficiency, resulting in high sensitivity with low-noise performance and wide dynamic range.

Sony’s new ?7R III also features a new front-end LSI that effectively doubles4 the readout speed of the image sensor, as well as an updated BIONZ X™ processing-engine that boosts processing speed by approximately 1.8 times compared to the ?7R II. These powerful components work together to allow the camera to shoot at faster speeds while also enabling its impressive ISO range of 100 – 32000 (expandable to ISO 50 – 102400 for still images) and massive 15-stop9 dynamic range at low sensitivity settings. This ensures outstanding overall performance at all settings and in all shooting conditions.

This new full-frame model was built without an optical low pass filter to maximize resolution, while also having the ability to output 14 bit RAW format even when shooting in silent or continuous mode. The camera is equipped with an innovative 5-axis optical image stabilization system that has been fine-tuned to support its high-resolution shooting capacity, resulting in a 5.5 step5 shutter speed advantage, the world’s highest10 compensation performance for an image stabilization system. There is also a new low-vibration shutter that reduces vibration and image blur in all modes, including the high speed 10 fps shooting, as well as several advancements in accurate color reproductions of skin tones.

High-Performance AF and AF/AE Tracking at up to 10 fps2
The innovative new ?7R III full-frame mirrorless camera is equipped with a refined image processing system that allows it to shoot full 42.4MP images at up to 10 fps with continuous, accurate AF/AE tracking for up to 76 JPEG / RAW images or 28 uncompressed RAW images11. This high speed 10 fps mode is available with either a mechanical shutter or a completely silent shooting12, adding to the immense flexibility of the camera. The camera can also shoot continuously at up to 8 fps13 in live view mode with minimal lag in the viewfinder or LCD screen. These high speed options ensure that fast moving subjects can be captured with extreme accuracy and incredible image detail.

For added convenience, while large groups of burst images are being written to the memory card, many of the cameras key functions are operable, including access to the ‘Fn’ (Function) and ‘Menu’ buttons, image playback and several other menus and parameters14 including image rating and other functions that facilitate on-location image sorting.

Additionally, if there is fluorescent or artificial lighting present in a shooting environment, users can activate the Anti-flicker15 function to allow the ?7R III to automatically detect frequency of the lighting and time the shutter to minimize its effect on images being captured. This minimizes any exposure or color anomalies that can sometimes occur at the top and bottom of images shot at high shutter speeds.

The upgraded focusing system of the ?7R III is comprised of 399 focal-plane phase-detection AF points that cover approximately 68% of the image area in both the horizontal and vertical directions. There is also 425 contrast AF points, an increase of 400 points compared to the ?7R II. This advanced system delivers AF acquisition in about half the time as the ?7R II in low-light conditions, with tracking that is approximately 2 times more accurate as well. The acclaimed Eye AF feature is also approximately 2 times more effective, and is available when utilizing Sony’s A-mount lenses with an adapter16.

Additional improvements in focusing flexibility include AF availability in Focus Magnifier mode, focal-plane phase-detection AF support when using A-mount lenses17, an ‘AF On’ button, a multi-selector or ‘joystick’ for moving focusing points quickly, flexible touch focus functionality and much more.

High Quality 4K for the Video Professionals
The new ?7R III is exceptionally capable as a video camera, offering 4K (3840×2160 pixels) video recording across the full width of the full-frame image sensor. When shooting in Super 35mm format, the camera uses full pixel readout without pixel binning to collect 5K18 of information, oversampling it to produce high quality 4K footage with exceptional detail and depth.

A new HLG (Hybrid Log-Gamma) 19 is available on the ?7R III that supports an Instant HDR workflow, allowing HDR (HLG) compatible TV’s to playback beautiful, true-to-life 4K HDR imagery. Further, both S-Log2 and S-Log3 are available for increased color grading flexibility. The camera can also record Full HD at 120 fps at up to 100 Mbps6, allowing footage to be reviewed and eventually edited into 4x or 5x slow motion20 video files in Full HD resolution with AF tracking.

Build, Design and Customization for Professionals
Sony’s newest full-frame camera is equipped with a variety of enhanced capabilities that give it a true professional operational style. These include dual media slots, with support in one slot for UHS-II type SD memory cards. Users have a variety of options for storing their content, including separate JPEG / RAW recording, separate still image / movie recording, relay recording and more. Battery life has been greatly extended as well, as the new camera utilizes Sony’s Z series battery that have approximately 2.2 times the capacity of the W series battery utilized in the ?7R II.

The ?7R III features an upgraded high-resolution, high-luminance Quad-VGA OLED Tru-Finder™ with approximately 3,686k dots for extremely accurate, true-to-life detail reproduction. The Tru-Finder, also found in the acclaimed Sony ?9 camera, utilizes a ZEISS® T* Coating to greatly reduce reflections, and has a fluorine coating on the outer lens that repels dirt. It also has a customizable frame rate, with options of either 60 fps or 120 fps21 to best match the action. The LCD screen has been upgraded as well, with a resolution of 1.44M dots and WhiteMagic™ technology that improves viewing in bright, outdoor conditions. “Standard” or “High” display quality settings are also available for both the viewfinder and monitor as well. “High” takes advantage of the large amount of data read from the 42.4MP sensor to provide extra fine viewfinder and monitor displays for a more natural view. The new camera also offers a multi-selector joystick that provides a fast, efficient way to shift focus points, as well as an ‘AF ON’ button to activate autofocus when shooting stills or movies.

The new ?7R III allows for convenient transfer of files to a smartphone, tablet, computer or FTP server via Wi-Fi®, while also including a sync terminal, enabling external flash units and cables to be connected directly for convenient flash sync. A SuperSpeed USB (USB 3.1 Gen 1) USB Type-C™ Terminal is also available for increased flexibility in power supply or connected accessories, as well as a faster image transfer speed when connected to a PC.

New “Imaging Edge” Software Suite and Pixel Shift Multi Shooting Mode
New with the ?7R III is a software suite called “Imaging Edge” that extends the creative capabilities of the entire shooting process – from pre-processing to post-processing. “Imaging Edge” provides three PC applications called ‘Remote’, ‘Viewer’ and ‘Edit’, available for free download, which support live-view PC remote shooting and RAW development.

Also making its debut on the versatile ?7R III is a new Pixel Shift Multi Shooting mode, which takes full advantage of the advanced 5-axis optical in-body stabilization to create beautiful true-to-life, super-high resolution composite images. In this mode, the camera precisely shifts the sensor in 1-pixel increments to capture four separate pixel-shifted images containing a total of approximately 169.6 MP22 of image data. These four images can be composited together and processed utilizing the new “Imaging Edge” software suite. This ultimately results in a still image with overwhelming resolution and an unprecedented level of color accuracy, and is ideal for photographing architecture, art or any other still life photography subject with many intricate details and colors.

Pricing and Availability
The Sony ?7R III Full-frame Interchangeable Lens Camera will ship this November for about $ 3,200 US and $ 4,000 CA. It will be sold at a variety of Sony authorized dealers throughout North America.

A variety of exclusive stories and exciting new content shot with the new ?7R III camera and other Sony ? products can be found at www.alphauniverse.com, a site built to educate and inspire all fans and customers of the Sony ? brand.

The new content will also be posted directly at the Sony Photo Gallery and the Sony Camera Channel on YouTube. Detailed information pages within Sony.com for the new products can be found at:
· (US) – ?7R III Full-frame Interchangeable Lens Camera
· (CA) – ?7R III Full-frame Interchangeable Lens Camera

1. Approximately, effective
2. Up to 10 fps in continuous “Hi+” mode, and up to 8 fps in continuous “Hi” mode. Maximum fps will depend on camera settings
3. Approximately 68% of the image area in both the horizontal and vertical directions
4. Compared to the a7R II, according to Sony testing
5. CIPA standards. Pitch/yaw shake only. Planar T* FE 50mm F1.4 ZA lens. Long exposure NR off
6. A Class 10 or higher SDHC/SDXC memory card is required for XAVC S format movie recording. UHS speed class 3 or higher is required for 100 Mbps recording
7. In Super 35mm mode.
8. Approximately
9. Sony test conditions for still images
10. Among digital cameras with a full-frame image sensor. As of October 2017 press release, based on Sony research
11. “Hi+” continuous mode with UHS-II compatible SDXC memory card. Sony test conditions.
12. Some distortion may occur with fast-moving subjects of if the camera is moved sideways rapidly
13. “Hi” mode. Maximum fps will depend on camera setting.
14. Not all menu parameters can be edited while data is being written to the memory card
15. Only 100 Hz and 120 Hz flicker is detected. Continuous shooting speed may decrease. Flicker-free shooting is not available during silent shooting, BULB exposure, or movie recording
16. With SSM or SAM lenses only. Eye AF not supported for movie recording. AF-C can only be used when the “Phase detection” AF system is selected, but focus is fixed at the first frame during continuous shooting in any mode other than “Continuous: Lo” (Hi+, Hi, Mid).
17. With SSM or SAM lenses only. With the LA-EA3 mount adapter. Focal plane phase-detection AF not supported for movie recording. AF-C can only be used when the “Phase detection” AF system is selected, but focus is fixed at the first frame during continuous shooting in any mode other than “Continuous: Lo” (Hi+, Hi, Mid).
18. 15-megapixel
19. Connect this product to an HDR (HLG) compatible Sony TV via a USB cable when displaying HDR (HLG) movies
20. Sound not recorded. Class 10 or higher SDHC/SDXC memory card required
21. In NTSC. 50fps or 100fps in PAL
22. Image size after compositing is approx. 42.4 million (7952 x 5304) pixels.

Articles: Digital Photography Review (dpreview.com)

 
Comments Off on Sony a7R III promises faster bursts, better focusing and longer battery life

Posted in Uncategorized


Canon warns of defective focusing in some EF 24-105mm F4L IS II lenses

19 May

Canon has issued a service notice for a collection of lenses with specific serial numbers that need to be checked for faulty focusing systems. The lens affected is the EF 24-105mm F4L IS II USM standard zoom, but users are advised that only particular production batches have the problem.

Canon says that some units with serial numbers beginning with 48, 49, 50 or 51 suffer from poor focusing when used with an AF point close to the edges of the host camera’s focusing array. The fault is only apparent when the lens is used at wide-angle focal lengths.

All defective lenses will be taken back for testing and repair at no cost to the owner, the company says. The Canon website carries a service section that allows owners of the lens to type in the serial number of their lens to check whether it will need to be returned.
For more information see the Canon USA, Europe or Asia service pages, or those for your local area.

Manufacturer’s information

Service Notice: EF 24-105mm f/4L IS II USM Lens

Thank you for using Canon products.

We have determined that some EF 24-105mm f/4L IS II USM lenses exhibit an AF operation-related malfunction. The details of the phenomenon and Canon’s service policy are described below.

We would like to offer our sincere apologies to users who have been inconvenienced by this issue. Going forward, we will spare no effort in our quality management to make sure our customers can use our products with confidence.

Phenomenon
At the wide-angle end, focus is not achieved properly when a peripheral AF points are selected, regardless of the AF area selection mode.

Affected Lenses
If the first two digits in the serial number (see the image below) of your lens are ”48”, ”49”, ”50” or ”51”, then your lens MAY POSSIBLY be affected.

How to check if your lens is affected:
1. Click the search button below to display the serial number input screen.
2. Input your lens’ serial number (10 digits) and then click the [Submit] button.
* Please double check the serial number you entered before you click the [Submit] button.
3. One of the following three messages will be displayed.
“Your lens is NOT an affected product”?
“Your lens is an affected product”
“Invalid number”

Support
As soon as preparations have been completed, we will inform users about the start date for accepting support requests for lenses affected by this issue.

Potentially affected products will be inspected and repaired free of charge. If you own one of the potentially affected products please contact our Customer Support Center

Articles: Digital Photography Review (dpreview.com)

 
Comments Off on Canon warns of defective focusing in some EF 24-105mm F4L IS II lenses

Posted in Uncategorized


Fotodiox launches soda-can sized LED lights with Fresnel focusing

08 Mar

Accessory manufacturer Fotodiox has introduced a battery-powered LED lighting head that uses a Fresnel lens to create a focusing spot function – and the whole thing is as small as a can of soda. The new PopSpot J-500 comes with removable barn doors and can run via the supplied AC adapter or with a NP-F750 video camera battery.

Using only white LEDs the head has a color balance of 5600k (+/- 300) but will accept filters for matching to tungsten or other light sources. The focusing spot allows the beam of light to be varied between 25° and 55° as the lens is rotated, and the output of the light can be controlled using a 0-100% dimmer switch. A fully charged battery can run the light for up to an hour and twenty minutes at 100% power, or three hours and forty five minutes at 50%. The company says that the emittance at the 55° spot is 2258lx, and is 5400lx at the 25° position.

The head measures 3¼ x 3¼ x 8¼ inches (8 x 8 x 21cm) without the battery and weighs 2 lbs / 0.95kg, and is available on its own in a three-head kit. The single head costs $ 274.95 without the battery module and $ 399.95 with it, while the three-head kit costs $ 1099.95 including two batteries of each head. For more information see the Fotodiox website.

Press release

Compact LED Light Delivers Power, Control and Dramatic Looks for Photo and Video Projects

Fotodiox Pro, creator and distributor of several lines of specialty solutions for videography, cinematography and photography, has announced the PopSpot Focusable Fresnel – a mighty Fresnel LED light in a tiny package. Roughly the size of a soda can, the PopSpot allows photographers and videographers to focus its powerful beam for fantastic precision, strong contrast and dramatic shadows. It is available now on FotodioxPro.com in three configurations: the PopSpot Focusable Fresnel, the PopSpot Focusable Fresnel + Battery Module, and the PopSpot Focusable Fresnel 3-Light Kit with Rolling Carrying Case.

“The problem with most Fresnel lights is they’re typically quite bulky, heavy and fragile, and they get screaming hot to the touch,” said Bohus Blahut, marketing director for Fotodiox Pro. “But our new PopSpot Focusable Fresnel does away with those pitfalls by combining power and control in a form factor about the size of a pop can. A simple twist focuses the PopSpot’s output from a 55° to 25° beam angle, and removable barn doors offer further control of the shape and direction of the light. We’ve even included a slot for a slide-in tungsten filter.”

Not only is the PopSpot an ideal light for tabletop shooting or as a rim or hair light, it can be used as a primary light in many shooting scenarios. Its compact size and lightweight build offers flexibility in mounting, positioning, and concealing, and allows it to travel virtually anywhere. The PopSpot runs off either conventional AC power or an optional battery module for on-the-go lighting, and remains cool throughout use.

To learn more about the PopSpot Focusable Fresnel and other photography and videography accessories from Fotodiox Pro, please visit FotodioxPro.com.

Articles: Digital Photography Review (dpreview.com)

 
Comments Off on Fotodiox launches soda-can sized LED lights with Fresnel focusing

Posted in Uncategorized


3 Reasons Why Mirrorless Cameras are Better than Digital SLRs for Focusing

30 Mar

Mirrorless cameras and focusing

A lot has been written about the drawbacks of autofocus performance from mirrorless cameras. Most of this focuses on the tracking of moving subjects – an area where the phase detection autofocus found in digital SLRs is still superior (although the gap is closing).

But when it comes to focusing on still subjects, the mirrorless camera is a better tool. Surprised? If you’ve never used a mirrorless camera, you may be. Let’s take a look at the reasons why.

1. Phase detection versus contrast detect autofocus

Mirrorless cameras have a different autofocus system than digital SLRs.

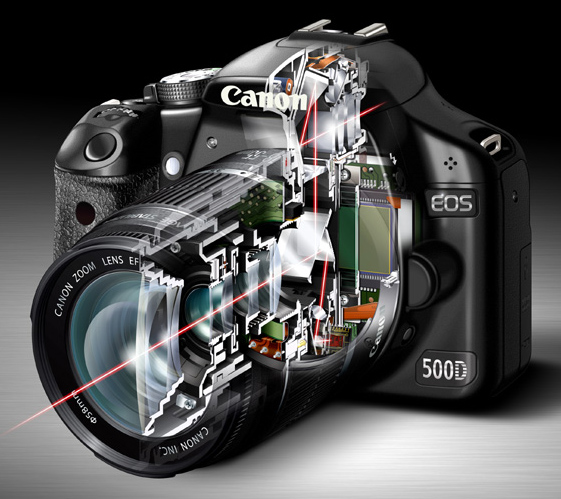
In a digital SLR most of the light coming through the lens is reflected up by the mirror, into the pentaprism and through the viewfinder. A small part is deflected downwards to a dedicated autofocus sensor. It uses a system called phase detection autofocus to calculate the camera to subject distance, and tell the lens where to focus.

Mirrorless cameras and focusing

The red lines in this diagram show the path that light takes through an SLR camera with the mirror in the down position. Most of the light is reflected into the pentaprism and the viewfinder. Part of it is reflected downwards towards the autofocus sensor.

The advantage of phase detection autofocus is that it’s fast (generally speaking – but it also depends on which camera you have) and very good at tracking moving subjects. It’s the best system anyone has managed to come up with for an SLR camera.

However, phase detection autofocus has a significant weakness – lack of accuracy.

There are two main reasons for this. The first is that most digital SLRs have a combination of cross-type and single line autofocus points. Cross-type autofocus points are the most accurate, and should always be used when focus is critical (for example, when using a prime lens at its widest aperture), otherwise the camera may not focus where it is supposed to. Your camera’s manual will tell you which of its AF points are cross-type.

Whenever you use a non cross-type autofocus point, you cannot rely on the camera to focus accurately. This is fine when using small apertures, which give you plenty of margin for error, but not when focus and accuracy is critical.

The second reason is to do with camera and lens calibration. Even when you use a cross-type autofocus point your camera may not focus exactly where it is supposed to. For accurate focus, every part of your camera setup – from the autofocus sensor, to lens and autofocus motors that tell the lens where to focus – must be working in perfect harmony. It only takes a small degree of misalignment to throw the accuracy of the system out.

Most of the time you won’t notice, because there is sufficient depth-of-field to make the focusing inaccuracies irrelevant. But if you use a wide aperture, especially with a telephoto lens, then depth-of-field is measured in millimetres, and accurate focus is essential.

For example, if you are taking a portrait then it is conventional to focus on the model’s eyes. If you miss focus, and her eyes are soft, then people will notice and the portrait will lose its impact.

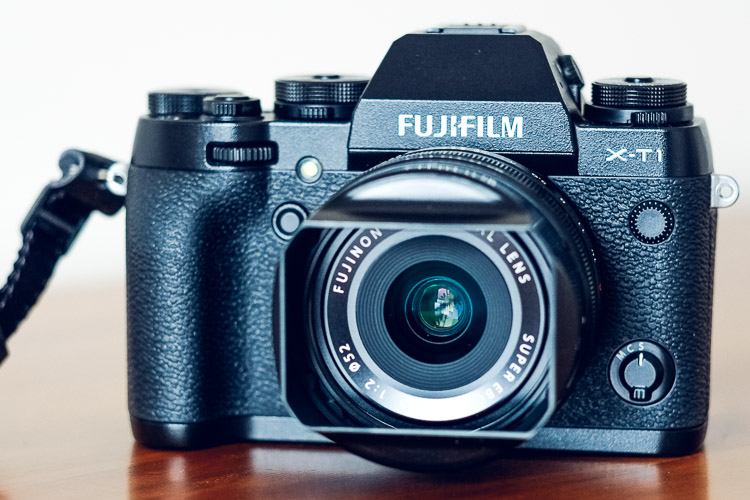
Mirrorless cameras and focusing

I made this portrait with an EOS 5D Mark II and 85mm lens set to f1.8. With this camera it is necessary to measure and calibrate the autofocus system to ensure accurate focus at wide apertures.

Most mid-range and high-end digital SLRs have a feature that allows you to measure and compensate for inaccurate focusing. Manufacturers have different names for this – Canon and Sony use the term Autofocus micro-adjustment, Nikon calls it Autofocus fine tune, Pentax uses the term Autofocus adjustment and Olympus Autofocus focus adjust. It’s bit of a long winded process – you have to test your lenses by focusing on a ruler, or a purpose made scale, to see if the focus is accurate, and make adjustments if it isn’t.

You can also get your camera and lenses calibrated at a service centre. This is the only way to calibrate an SLR camera that doesn’t have the above feature built-in.

That was bit of a long explanation, but crucial if you are to understand why phase detection autofocus is not as accurate as it should be.

How are mirrorless cameras different?

So, how do mirrorless cameras differ? As they don’t have a mirror, there is no way of deflecting light to a dedicated autofocus sensor. The solution is to take a reading from the sensor. The camera looks at the point on the sensor which is meant to be in focus, and adjusts the lens until maximum contrast is achieved. This is called contrast detect autofocus.

This system is slower, because the camera has to move the lens first one way, then the other, to find the sharpest point. But, it is much more accurate (for still subjects).

With a mirrorless camera autofocus micro-adjustment is redundant. You don’t need it, and you will never have to measure or calibrate the camera’s autofocus system. It also doesn’t matter which autofocus point you use, as they all work equally well. That is why, for still subjects, autofocus in mirrorless cameras is superior to that of digital SLRs.

Mirrorless cameras and focusing

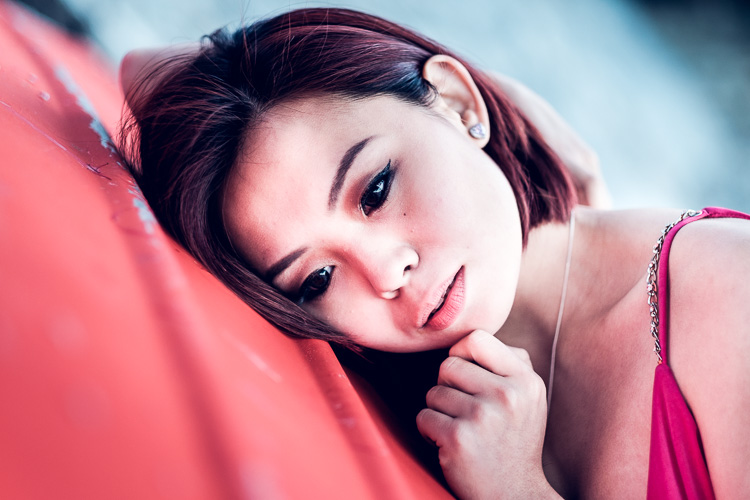
I made this portrait with a 56mm lens at f/1.2 with my Fujifilm X-T1 mirrorless camera. With this camera it is easy to focus on the model’s eye. There is no need to calibrate the camera’s autofocus system.

2. Manual focusing

Mirrorless cameras are also a better tool for utilizing manual focus lenses.

Modern digital SLRs are not designed to be helpful with manual focus lenses. The split prism focusing screens of the past are gone, and assistance is limited to a light that comes in the viewfinder when the subject underneath the selected AF point comes into focus.

Mirrorless cameras are different. They have a tool called focus peaking, which is specifically designed to help you manually focus a lens. The camera highlights the parts of the scene that are in focus, so that you can see which areas are sharp. You can also magnify the image at the touch of the button, making it even easier to see whether the subject is sharply focused.

This feature works best when using lenses at wide apertures. Both tools take advantage of the camera’s electronic viewfinder, a feature that most digital SLRs don’t have.

Mirrorless cameras and focusing

This mock up shows how focus peaking works. I made the portrait with a Helios 58mm manual focus lens at its widest aperture setting of f/2. The red lines indicate how focus peaking shows you what is in focus.

3. Hyperfocal distance

Fujifilm cameras have another tool that will be of interest to landscape photographers as it helps you instantly find the hyperfocal distance without referring to tables or smartphone apps.

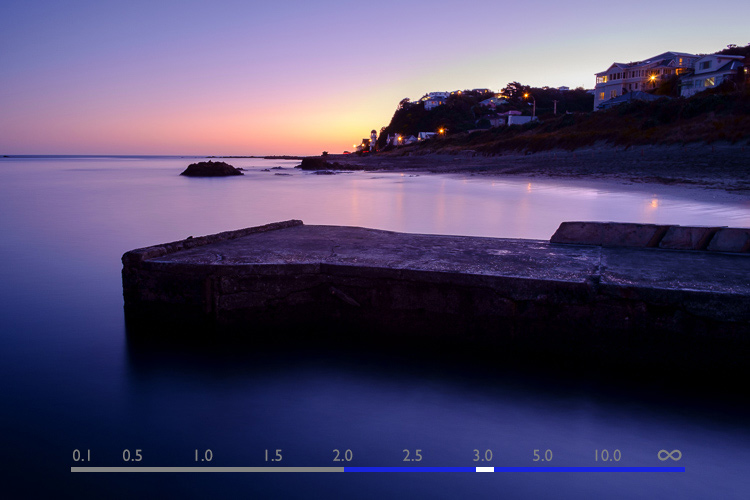
The viewfinder has a depth-of-field scale that shows you the point you are focused on and the area in focus on either side, according to the selected aperture. If you move the focusing ring until the depth-of-field scale touches the infinity mark at one end, you have found the hyperfocal distance point. It’s quick and easy.

To be honest, I don’t know if this feature is available in any brand of mirrorless camera other than Fujifilm. I’d be grateful if Sony/Olympus/Panasonic, etc., owners would let us know.

Mirrorless cameras and focusing

This diagram shows how the depth-of-field scale works. The bar shows the point the lens is focused on (white), and how much of the scene is in focus (blue). The lens is focused on the hyperfocal point in this made-up example.

Since buying my first Fujifilm camera a little over 18 months ago, I’ve been pleasantly surprised by what a great tool mirrorless cameras are for photography. They are much better than my old digital SLR for focusing on still subjects, or for using manual focus lenses.

The difference is so great that I predict that one day most photographers will use mirrorless cameras, and digital SLRs will be a niche item built for photographing sports and wildlife.

But what do you think? Please share your thoughts, or ask any questions about focusing, in the comments below.


Mastering Lenses

If you want to know more about lenses and autofocus check out my ebook Mastering Lenses: A Photographer’s Guide to Creating Beautiful Photos With Any Lens.

googletag.cmd.push(function() {
tablet_slots.push( googletag.defineSlot( “/1005424/_dPSv4_tab-all-article-bottom_(300×250)”, [300, 250], “pb-ad-78623” ).addService( googletag.pubads() ) ); } );

googletag.cmd.push(function() {
mobile_slots.push( googletag.defineSlot( “/1005424/_dPSv4_mob-all-article-bottom_(300×250)”, [300, 250], “pb-ad-78158” ).addService( googletag.pubads() ) ); } );

The post 3 Reasons Why Mirrorless Cameras are Better than Digital SLRs for Focusing by Andrew S. Gibson appeared first on Digital Photography School.


Digital Photography School

 
Comments Off on 3 Reasons Why Mirrorless Cameras are Better than Digital SLRs for Focusing

Posted in Photography