RSS
 

Posts Tagged ‘Flower’

10 Flower Photography Tips for Gorgeous Results

30 May

The post 10 Flower Photography Tips for Gorgeous Results appeared first on Digital Photography School. It was authored by Anne McKinnell.

10 tips for improving your flower photography

Are you looking to capture stunning flower photography? You’ve come to the right place!

In this article, I’m going to take you through plenty of tips and tricks for gorgeous flower shots. Specifically, I’ll explain:

  • The best light for flower photography
  • A simple way to create a beautiful soft-focus effect
  • My secret for amazing foregrounds
  • Much more!

So if you’re ready to improve your photos, then let’s get started.

1. Photograph flowers on an overcast day

Did you know that overcast skies are perfect for photographing flowers?

It’s true. The soft light of an overcast day complements the delicate petals – plus, there are no shadows and no harsh bright spots, so you can get a nice, even exposure.

You need to be careful, however. Toward the beginning and end of a cloudy day, the light gets pretty limited, which leads to unwanted blur (especially when shooting at high magnifications). So aim to photograph at midday, then pack up before the sky gets too dark.

Flowers in soft light

2. Backlight will make your flowers glow

As you learned in the previous section, clouds are great for flower photography. But what about clear days? Can you shoot when the sky is bright and cloudless?

Absolutely!

You see, another type of light that is excellent for flower photography is backlight. You get nice backlight when the sun is directly in front of you, lighting your flower from behind.

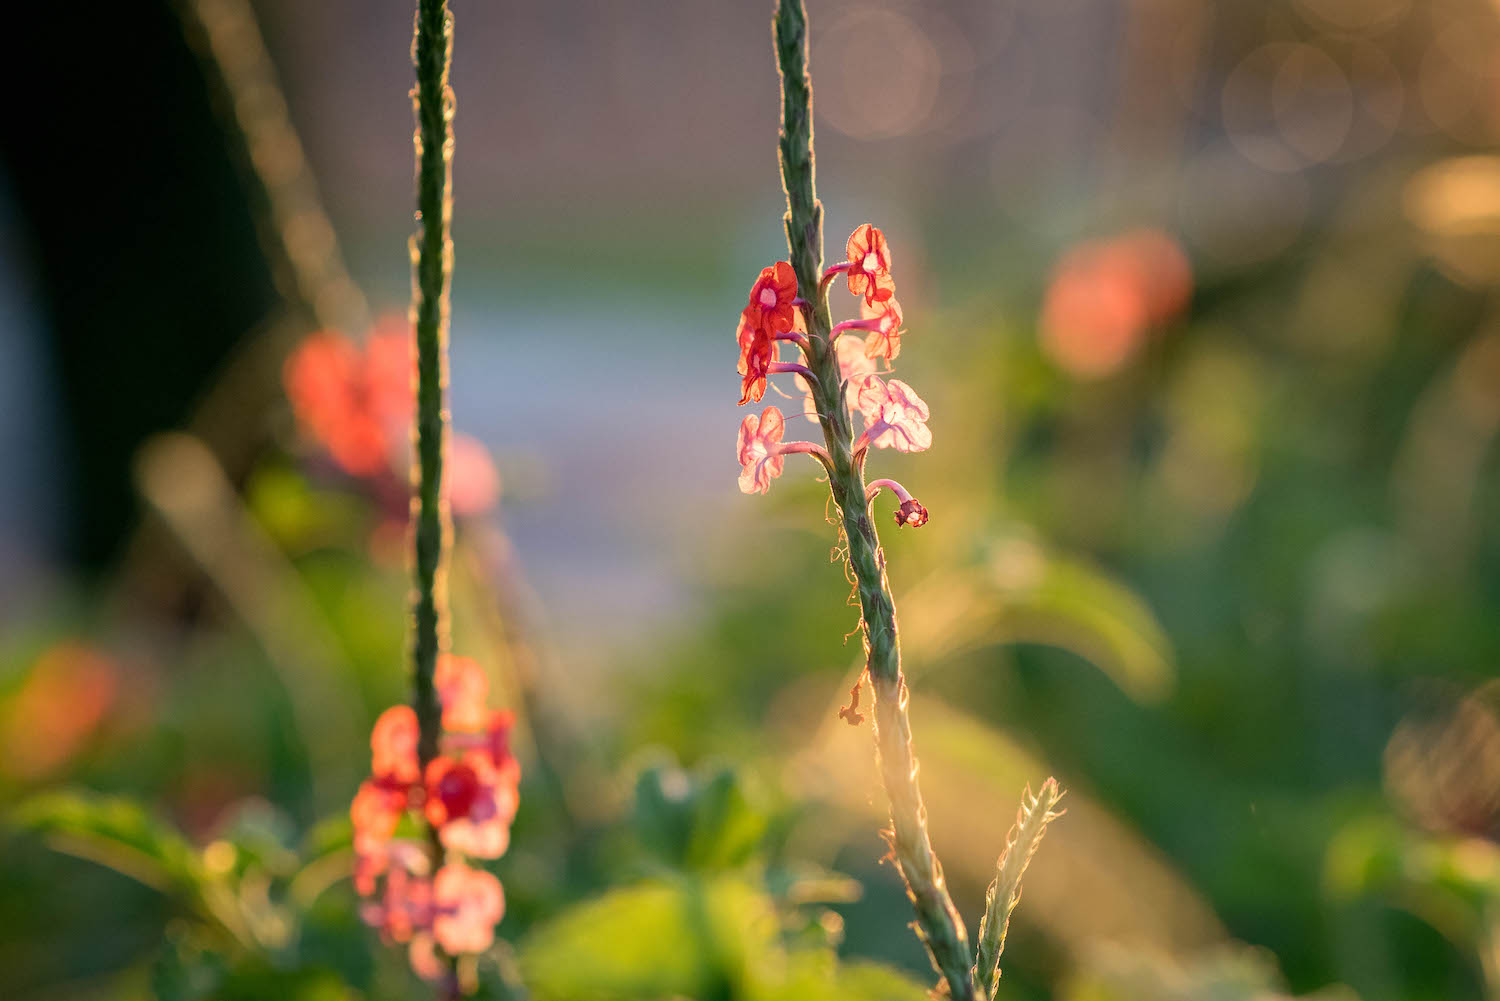
Because petals are translucent, backlight makes flowers glow, like this:

backlit flower photography

Try to photograph late in the day when the sun is close to the horizon; that way, the backlight will hit your flower petals directly, plus it’ll cast a nice, warm light over the rest of your image.

(You might even be able to catch some rays of light filtering through the trees!)

3. Watch out for wind

When photographing flowers, wind is your enemy. It’ll blow your subjects in every direction, which makes it annoyingly difficult to focus (and if you’re shooting with a slow shutter speed, it’ll introduce plenty of blur).

The easiest way to avoid wind? Do your photography early in the morning when the weather is still calm. And a little wind is manageable; just bring a piece of cardboard or a reflector, then hold it up next to your flower.

If you prefer not to get up early, or if you need to take photos on a windy day, you do have a second option:

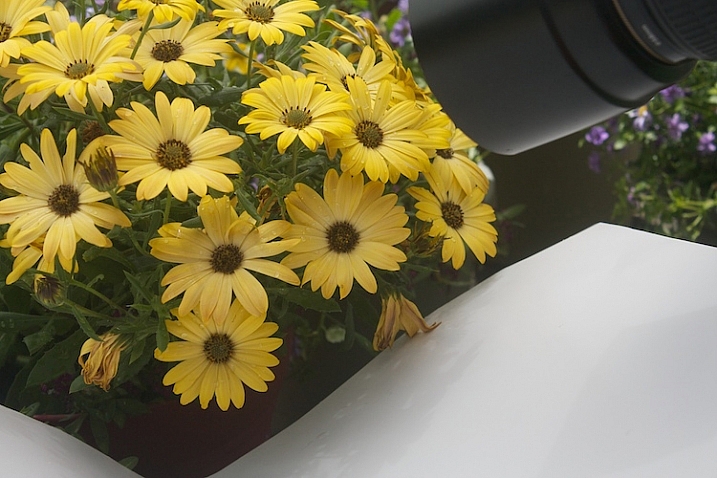
Bring your flowers inside. You don’t need a complex studio setup to get beautiful shots indoors – just put the flowers near a window and find a solid backdrop to set behind them. I photographed the flower below by taking it inside and placing it in front of a white sheet:

close-up of gerbera

4. Get closer

Here’s one of the easiest ways to create stunning, unique flower photos:

Get as close as you can.

You can do this a number of ways:

First, you can use a telephoto lens and zoom in on the flower. You’ll want to pay attention to the minimum focusing distance (MFD) of the lens because some lenses just can’t focus especially close. (The MFD is usually marked on the outside of the lens, though you can also look it up online.)

If you’re lucky, your telephoto lens will focus close, and you can use it for beautiful flower shots. But what if you can’t get as close as you’d like?

You have a couple of choices. You can use extension tubes, which mount on your camera and let the lens focus closer. Or you can use a close-up filter, which attaches to the end of your lens and works like a magnifying glass.

Honestly, both of these options come with pretty significant drawbacks; extension tubes are inconvenient, while close-up filters reduce image quality. Sure, they work, and if you’re just getting started with flower photography, either method will help you take interesting close-up shots. But if you want to really improve your images, I’d recommend a dedicated macro lens, which will let you capture intimate images without the need for accessories.

tulips with beautiful background

5. Use a reflector

Here’s a quick tip:

Shaded flowers can make for some stunning photos (especially when you combine a shaded subject and a well-lit background!).

But you’ll need to keep your flower relatively bright. So if your subject is in the shade, use a reflector to bounce some light (this will also make your flower more vibrant!).

6. Avoid a cluttered background

Here’s another quick piece of advice:

In flower photography, the background can make or break the image. A uniform background can look great – whereas a cluttered, distracting background will draw the eye and prevent the viewer from appreciating your main subject.

Before you hit the shutter button, ask yourself:

Does my background complement the flower? Or does it distract?

And if it does distract, try to change your position until the distractions are gone, and you’re left with nothing but a beautiful wash of color.

7. Use a shallow depth of field

Shallow depth of field flower photos can look great – but what is a shallow depth of field, and how do you achieve it?

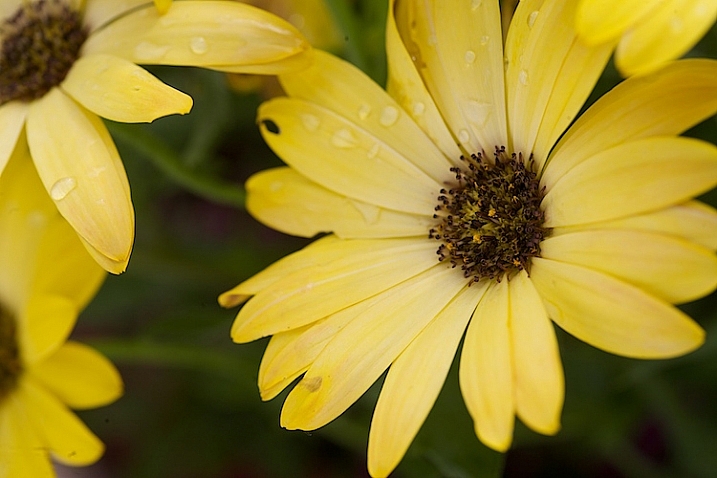
A shallow depth of field features only a sliver of sharpness. So the flower stays sharp, but the background is blurred, like this:

flower photography tips blue flowers with water droplets

To get a shallow depth of field, make sure to use a wide aperture (i.e., a low f-number) such as f/2.8 or f/4. And get as close as you can to your subject while also increasing the distance between the subject and the background.

8. Keep a part of your flower sharp

A shallow depth of field effect is great – but you’ll still need to keep at least part of the flower sharp so that your viewer’s eye has an anchor point.

So do what’s necessary to get a crisp image. If you’re shooting in good light, raise your shutter speed and focus carefully. If you’re shooting in poor light, use a tripod and a remote release to avoid camera shake.

Remember: Even if there doesn’t seem to be wind, flowers always move a little. So if your flower isn’t sharp, try raising the shutter speed a stop or two.

Finally, check your focus. If necessary, focus manually. Make sure you’ve nailed the most important parts of the flower, such as the petals and the flower center.

9. Change your point of view

If you’re after unique flower photos, don’t just take a standard shot. Instead, move around and try some different angles and focal lengths.

For instance, shoot the flower from behind or from below to capture an interesting point of view. You might also try shooting down from above, getting unusually up close and personal, or zooming out for a wider environmental image.

Morning Glory flower

10. Focus through another flower

“Focusing through” is a popular technique among professional flower photographers, and for good reason:

It looks really, really cool, especially when you get a lot of colorful foreground blur.

Like this:

flowers photographed with the shoot-through technique

But how can you create such a compelling image? How do you get a nice foreground blur?

You simply find a flower you want to photograph, then adjust your position until another flower sits between the lens and the flower. (The closer the foreground flower is to the lens, the better the look.)

Ultimately, the secondary flower will become a blur of color, and your final image will have a more professional feel.

Tips to improve your flower photography: conclusion

Well, there you have it:

10 easy tips to take your flower photos to the next level.

Hopefully, at least one or two of the tips speaks to you – and you feel inspired to get out and start shooting!

Now over to you:

Do you have any flower photos you’re proud of? Which of these tips do you like the most? Share your thoughts (and images!) in the comments below.

The post 10 Flower Photography Tips for Gorgeous Results appeared first on Digital Photography School. It was authored by Anne McKinnell.

Digital Photography School

 
Comments Off on 10 Flower Photography Tips for Gorgeous Results

Posted in Photography


A Step-by-Step Guide to Using Light in Flower Photography for Awesome Photos

23 Oct

The post A Step-by-Step Guide to Using Light in Flower Photography for Awesome Photos appeared first on Digital Photography School. It was authored by Simon Ringsmuth.

using-light-in-flower-photography

Flowers are brilliant subjects for photography. They are bright, colorful, and are stay perfectly still for you as long as the wind is calm. You don’t need any special equipment or lenses to take great photos of flowers either. You can get great photos with just a mobile phone or a basic DSLR with a kit lens. If you really want to elevate your flower photography to the next level, you need to pay very close attention to one thing – the sun – because the light in flower photography is everything.

Image: 85mm, f/2.8, 1/3000 second, ISO 2200

85mm, f/2.8, 1/3000 second, ISO 2200

Of course, there are other sources of light besides the sun, but this is the most obvious and easily-accessible one when considering flower photography. Unfortunately, you can’t position the sun exactly where you want it, but you can position yourself to make the best use of it. You can also take note of the lighting conditions when you go out to shoot flower pictures. Understanding how the sunlight, and your angle of view, affect the finished product is key to getting great shots.

Don’t let anyone tell you that if you want to get good pictures of flowers you have to do it in certain conditions like a cloudy day or the evening. In truth, you can get great flower photos almost any time as long as you pay attention to the sun and the shot you are trying to get. Let’s take a look at some different scenarios and see how they affect flower photography.

Time of day

The time at which you shoot, such as early morning or mid-afternoon, can have a huge impact on your flower photos. In addition to altering the amount of light available, shooting in the morning or evening changes the type of light. It also changes the angle at which it hits your flowers and the surrounding area.

I shot the picture below just as the sun was coming up. The blurry triad in the background is a street lamp that had not yet turned off. It added a nice background touch to the picture. This would have looked entirely different had I taken the picture a few hours later.

Image: 50mm, f/1.8, 1/180 second, ISO 400.

50mm, f/1.8, 1/180 second, ISO 400.

If you want your flowers gently illuminated for a soft, almost hazy appearance, then early morning or late evening is going to work great. However, if you want your flowers bright, sharp, and punchy, then harsh overhead lighting is ideal.

It all depends on the type of picture you want to take and knowing how the lighting conditions affect the final image.

using-light-in-flower-photography

50mm, f/2.8, 1/1500 second, ISO 200

A monarch butterfly joined me as I was taking the above picture in the afternoon. The bright overhead sun made the reds, yellows, and greens bright and crisp, which doesn’t happen in the early morning or late in the day.

The sun was directly overhead when I took the picture below. This caused each of the colors in this picture to shine. It turned out I wasn’t the only one interested in this particular magnolia flower.

using-light-in-flower-photography

50mm, f/1.8, 1/6400 second, ISO 200

You can get great pictures of flowers at any time of the day. Just make sure you know where the sun is and how it will impact your pictures. Armed with that knowledge, you’ll be able to make better choices about the pictures you are going for.

Types of light in flower photography

Backlighting vs. front lighting

Backlight is when the main source of light comes from behind your subject. This can lead to some creative scenarios, especially when used to shoot subjects with rim lighting. Conversely, front light is when the main source of light comes from the front of your subject, usually behind the photographer.

Either one of these types of lighting works great for flower photography. However, you need to understand how backlighting and front lighting affect your flower pictures, so you know which one to use. I photographed the flower below with front lighting. The sun was behind me as I took the picture.

using-light-in-flower-photography

85mm, f/1.8, 1/3000 second, ISO 100

Front lighting makes the purples really stand out, especially against the background. There are also some prominent shadows along the left-hand side and at the base. These are neither good nor bad, just a result of using front lighting.

A similar flower, shot in the same location a few minutes later, reveals a much different image when employing backlighting.

Image: 85mm, f/2.8, 1/500 second, ISO 560

85mm, f/2.8, 1/500 second, ISO 560

Notice how the petals almost look like they are glowing as the sun shines through them. The shadows are more diffused, which is also due to the late hour of the day at which this was shot. Both pictures are good but in different ways. If you traditionally shoot flowers with front lighting, try doing some backlit shots and see if you like the results.

Image: Another backlit flower, where the shining sun made the yellow flower appear bright and radian...

Another backlit flower, where the shining sun made the yellow flower appear bright and radiant.

Sunny vs. overcast

There’s a common perception among photographers that cloudy, overcast skies make for some of the best lighting conditions. While I certainly enjoy shooting on days like that, the truth is, you can make any lighting condition work for flower photography. You just need to know how the light will affect your images.

One of my favorite flower photos I have ever taken was in the middle of the day just after a bit of rain. It’s a few coneflowers low to the ground. The overcast sky led to even lighting across the entire frame and rich, deep colors. There are no harsh shadows, no translucent petals, and no bright spots in the background. Instead, the frame is a mix of saturated greens, purples, and reds that I really like.

using-light-in-flower-photography

50mm, f/1.8, 1/640 second, ISO 200

Another example of this is the following picture, which I took in the morning after a night of thunderstorms. The clouds overhead dispersed the sunlight into all directions, which gave me an evenly-lit scene that worked great for this particular show.

Image: 85mm, f/1.8, 1/200 second, ISO 125

85mm, f/1.8, 1/200 second, ISO 125

However, these two pictures don’t mean you can’t take great flower pictures in bright sunlight. Far from it! Just know that flower images in bright sunlight will look much different than their cloudy-skied counterparts. The picture below is similar to the one above, but I took it on a bright sunny day.

using-light-in-flower-photography

50mm, f/1.8, 1/8000 second, ISO 360

This picture is neither better nor worse than the one above it, just different. Bright sunlight makes the red petals leap out of the frame. The rich blue sky and deep shadows of the grove of trees add a sense of space and depth that is missing in this picture’s counterpart.

Similarly, I photographed the purple magnolia flower below on a bright sunny day, but with just a bit of cloud cover. It’s kind of a cross between sunny and overcast and yields an interesting picture.

using-light-in-flower-photography

85mm, f/1.8, 1/200 second, ISO 140

The sun was off to the left, making the white inside of the flower petal shine out and compete with the purple in the foreground for the viewer’s attention.

I show all these examples as an illustration that you can get great shots of flowers in a variety of lighting conditions. The key is to use the sunlight (however it happens to be at the moment) to your advantage by knowing how it will affect your flower photos.

A comparison

If you can’t control the light in your flower photography, you can still control the angle from which you shoot your pictures. This has an amazing impact on how your flower photos turn out.

I shot the three photos below on a bright sunny day in about three minutes. The same flower is in each shot, and I used a 50mm lens with an f/2.8 aperture. The only difference is the angle from which I took each photo but that one simple thing changes each picture a great deal.

In this first picture, the flower is front-lit, meaning the sun was behind me and almost directly overhead as I took the photo. Notice the bright orange colors and stark shadows, which create a sense of depth and isolation. The background is shrouded in shadow because of the overhead light and the angle from which I took the picture. I see a lot of pictures similar to this online, especially on social media sites.

Image: 50mm, f/2.8, 1/2000 second, ISO 100

50mm, f/2.8, 1/2000 second, ISO 100

For this next photo, I stood in the exact opposite spot, looking up from below into the sun. Notice how the petals have become brilliantly translucent, and the greenery on the left is bursting with blurry bokeh.

It’s an entirely different version of the same flower and didn’t require anything on my part other than a simple perspective change.

Unlike the first picture, I don’t often see flower shots like this on social media. This is most likely because it’s just not something a lot of people think about doing.

Image: 50mm, f/2.8, 1/2000 second, ISO 100

50mm, f/2.8, 1/2000 second, ISO 100

I photographed this final image from the side, and what’s interesting here isn’t necessarily the flower but the background. From this angle, the background was entirely green, making the oranges and reds of the flower scream out by comparison. The lighting is similar to the first image, but this one is a lot more interesting to me because it’s a mix of colors instead of a flower against a mostly black background.

using-light-in-flower-photography

50mm, f/2.8, 1/2000 second, ISO 100

I really want to stress that none of the pictures in this tutorial are objectively better than any others. What I hope to have illustrated is that paying attention to the light in flower photography, as well as considering alternative viewpoints from which to shoot, can dramatically impact your flower photos.

Image: 23mm, f/5.6, 1/160 second, ISO 200. I had to hold my camera high above my head and fire off a...

23mm, f/5.6, 1/160 second, ISO 200. I had to hold my camera high above my head and fire off a series of shots hoping one of them would turn out. It did, and I’m so glad I didn’t just shoot a single sunflower from my normal eye level.

If you enjoy taking pictures of flowers, hopefully these images will give you some new ideas to consider. And if you haven’t spent much time out in nature capturing the beauty of blossoms like this, I hope you can find some time to go out, look at the lighting in flower photography and give it a try. You might be surprised at what you can get!

I’d love to see some of your shots – please share them with us in the comments below.

The post A Step-by-Step Guide to Using Light in Flower Photography for Awesome Photos appeared first on Digital Photography School. It was authored by Simon Ringsmuth.


Digital Photography School

 
Comments Off on A Step-by-Step Guide to Using Light in Flower Photography for Awesome Photos

Posted in Photography


How to take Great Flower Photos without a Macro Lens

27 Aug

The post How to take Great Flower Photos without a Macro Lens appeared first on Digital Photography School. It was authored by Ana Mireles.

Are you interested to try some flower photography but you get discouraged by guides telling you to get a macro lens? I was too at first, but macro is not the only way to get some amazing pictures. Keep reading for some tips on how to take great flower photos without a macro lens or buying any new equipment or accessory.

How-to-take-Great-Flower-Photos-without-a-Macro-Lens

Flower Photography Detail Close Up

Detail and depth of field

One of the reasons photographers recommend a macro lens is to capture small details with shallow depth of field. Some offer alternatives like extension tubes or reverse rings that allow you to focus while being very close to your subject. This is, in fact, a nice look for flower photography, but if you’re not ready to invest in new gear, there are other ways to get it.

How-to-take-Great-Flower-Photos-without-a-Macro-Lens

Focal Distance: 55mm, f/13, 1/400th, ISO 640

I shot this image using a 55mm lens with f/13, 1/400th shutter speed and 640 ISO. As you can see, I managed to get reasonably close, so never let the lack of equipment prevent you from practicing.

You can start by using a wide aperture and the longest focal distance you have to experiment from there. In order to make the best out of the equipment you have, check out the article How to Control Depth of Field in Your Photography.

Draw inspiration from nature

Now that we’ve covered the macro effect, let’s broaden the horizon and think big. There’s much more to flower photography than just the details. Flowers come in all shapes and colors, so include all those natural elements and use them to your advantage.

Flower Photography in Nature

Composition

There are many rules that you can use as guidelines to create interesting images. To learn more about them I recommend the article How to Apply Compositional Theory to Still Life Photography.

In this photo below, I lowered my point of view so I could create three different segments following the rule of thirds: flowers, trees, and the sky.

How-to-take-Great-Flower-Photos-without-a-Macro-Lens

The Rule of Thirds and point of view help your composition.

Color contrast

Using color as a compositional element is very easy to do when photographing flowers. Because they are so vibrant, you’ll always find one that stands out. You can put contrasting colors next to each other to make elements stand out while still being in harmony. You can start by isolating a subject against the background and work your way up to include more elements.

How-to-take-Great-Flower-Photos-without-a-Macro-Lens

Tones or patterns

Another way to use color in your images is to use only one to dominate the image. It may sound easy and perhaps dull, but in reality, if you incorporate different tones of the same color or a pattern, it can become a subject in itself. Megan Kennedy wrote a number of articles here on DPS called Master Colors Series covering the psychology and evolution of each color. Check them all out for inspiration!

Hues and tones from the same color

The cultural aspect

Now that we’ve passed aesthetics and are into content let’s say that flowers are much more than just pretty subjects. They speak their own language as we have given them all sorts of cultural meanings. The color, the season, and even the presentation change our perception. We use them in joyous celebrations and on the occasion of grief, passing through all other kinds of events. When you incorporate this matter on top of the visual aspect, things can become really interesting.

Still life

Defining the line between photography genres is always a tricky subject. Are all flower photography images a still life? No. Are all still life images flower photography? Also, no. But the two genres often intersect, so play within that field to stage your images. You can use different elements, adjust the lighting and even some post-production. To get you started here are some Simple Methods for Creating Better Still Life Images.

Still life is great for flower photography

Still life is great for flower photography

Conclusion

I’m not suggesting you shouldn’t buy a macro lens or any other gear and accessories, especially if you are planning on becoming a professional. However, there’s much versatility in flower photography so you can do without them. Of course, you can also look into many creative techniques like double exposure, light painting, or dynamic zoom.

Do you have other ideas to take flower photos without a macro lens? Share in the comment section!


How-to-take-Great-Flower-Photos-without-a-Macro-Lens

The post How to take Great Flower Photos without a Macro Lens appeared first on Digital Photography School. It was authored by Ana Mireles.


Digital Photography School

 
Comments Off on How to take Great Flower Photos without a Macro Lens

Posted in Photography


How to Shoot Abstract Flower Photography using Close-Up Filters

08 Aug

The post How to Shoot Abstract Flower Photography using Close-Up Filters appeared first on Digital Photography School. It was authored by Charlie Moss.

Shooting flowers is a passion for many photographers. Time spent out in the garden with your camera can become almost a form of meditative practice as you compose images surrounded by nature. It’s no wonder that so many photographers long to shoot beautiful flower images. But shooting close-up images of flowers can be an expensive business. Many tutorials will tell you that you need specialist macro lenses, proprietary macro extension tubes, or converters to reverse a lens that you already own. However, using close-up filters are a great alternative.

using-close-up-filters-for-flower-photography

Close-up filters are an option for macro photography that rarely makes it into the tutorial list. Many will tell you that they degrade the final image too much; they cause distortion and focus issues. However, in this article, I’m going to make the case that these filters can enable you to think in a more abstract way as you embrace their unique and imperfect properties!

What are close-up filters?

Close-up filters can also be called close-up lenses or macro filters. They are essentially a magnifying glass that screws into the filter thread on the front of your lens.

using-close-up-filters-for-flower-photography

When you buy a set of close-up filters, you need to know what lens you’re going to use them on. This is because you buy them according to the filter size of that lens. I suggest picking either a standard zoom or a prime lens in the 50mm to 100mm range and purchasing your filters for the thread size of that particular lens.

Close-up filters differ to budget extension tubes in one key way – you don’t lose electronic control of your lens. That means the autofocus will (just about) still work, and the aperture control in your camera settings will still work. Because budget extension tubes do not carry an electronic signal between your camera and your lens, you have to use it manually. For that reason I prefer close up filters – it makes changing your settings on the fly much easier!

using-close-up-filters-for-flower-photography

The image on the left was shot with just the Fujifilm 35mm f1.4 lens. The image on the right had a +10 close-up filter screwed onto the front of the lens.

The last thing to know about close up filters is that they have different magnification strengths – just like buying a magnifying glass. The higher the number, the more you will magnify your subject and the closer you can get. All of the images in this article have been shot using a +10 close-up filter on a Fujifilm 35mm f1.4 lens (roughly equivalent to a 50mm lens on a full-frame camera).

Why shoot abstract photos?

Abstract photos can really help to free you up from the common “rules” of photography. You can start to think outside of the box without wondering if an image is sharp enough all over, or if the colors are perfectly rendered.

How to Shoot Abstract Flower Photography using Close-Up Filters

That’s not to say that abstract photography is a way to “save” a bad photograph. As much thought and consideration should go into an abstract as it would a more traditional image.

Once you’ve learned to let go of the rules you might find that expressing yourself through color, shape, and texture can be relaxing. Experimenting with abstract photography can bring a whole new dimension to your work. It can even make you think about other kinds of photography differently. You’ll be much more careful when placing colors and lines in images in the future if you spend some time creating abstract compositions.

Tips for photographing flowers

Once you’ve got your close-up filter screwed to the front of your lens, head outside for a play. You won’t need a tripod at first – bump up your ISO and try handholding some close-up shots on a day with bright but overcast light (or shoot in the shade, of course).

Get the shot in focus

I recommend turning your autofocus off. We’re going to be working with some really shallow depth of field and that means your camera will often lock the focus on to something you don’t want it to.

How to Shoot Abstract Flower Photography using Close-Up Filters

Instead, you can use your body to move the subject in and out of focus. Carefully lean a fraction closer or further away, and you’ll see different parts of the images go in and out of focus. It takes some practice to get the hang of, but after a while, it’ll feel really natural.

If you’re a little unsteady and struggle to get the right part of the image in focus, try shooting a burst of three or five images and select the best one later. You can also use a tripod if you want to (if it is a very still day with no wind). However, I find that a tripod can often hinder creativity when you’re trying to think fast and look for new and fascinating angles and compositions.

Select an aperture

The aperture setting that you choose can change the whole feeling of an image. When you’re working this close to a subject, the depth of field can be as thin as a few millimeters.

using-close-up-filters-for-flower-photography

By using a very shallow depth of field, you can draw attention to just one part of a scene and throw the background and foreground completely out of focus. However, when shooting close up, it does mean that the whole flower or object might not be all in focus. That doesn’t mean it’s a bad thing – just picking a small part of the flower to be in focus can be a stylistic choice.

What can be interesting though is the way that the close-up filters interact with a wide-open lens. You begin to get these hazy, dreamy images that are somewhat unpredictable. It’s almost like a Lensbaby Velvet in some respects – or possibly a bit like smearing vaseline on your lens!

Composition is key

Since abstract photography often takes a subject and then makes it unrecognizable, all you have left is the composition and colors. That means you need to start thinking about how to mix shape, lines, form, textures, and colors to express emotions or tell stories. You cannot rely on recognizable and familiar objects anymore.

There are many compositional rules out there to study and put into practice. I have always found it helpful to spend as much time as possible looking at other peoples art (both in galleries and online) and trying to understand what makes a composition pleasing. You don’t have to know all of the rules of composition by name. But having a sense of how the position of elements in the frame and the color wheel work together to create interesting compositions can be a huge help when shooting abstracts.

using-close-up-filters-for-flower-photography

If you are shooting digital, don’t be afraid to shoot multiple images of the same scene and resist subjects. Try placing the main focus on different parts of the image, (including blurry foreground elements), and seeing how different aperture settings look.

You can also think about editing your photographs afterward to change the colors in the image. A slight shift in color, some noise added, or a touch of contrast on the focal point can really change the mood of the shot.

So for a very small investment (certainly compared to the rest of your camera gear), you can open up a new world of artistic abstract photography by using close-up filters. Also, better than that, it can happen entirely in your front garden!

Let us know if you shoot any images inspired by this article – post the results in the comments below!


using-close-up-filters-for-flower-photography

The post How to Shoot Abstract Flower Photography using Close-Up Filters appeared first on Digital Photography School. It was authored by Charlie Moss.


Digital Photography School

 
Comments Off on How to Shoot Abstract Flower Photography using Close-Up Filters

Posted in Photography


A Beginner’s Guide to Abstract Flower Photography

30 Sep

Abstract flower photography can stop you in your tracks. But unfortunately, when it comes to abstract flower photography, you probably don’t know where to start. What equipment do you need? What techniques do you use?

The world of abstract flower photography can seem distant and difficult.

abstract flower photography aster

Actually, it is no harder than any other genre of photography. It can be a lot more rewarding, though. You just need to know how to get started.

In this tutorial, you’ll learn the fundamentals of abstract flower photography. You’ll learn about the required equipment, as well as several key techniques for getting powerful abstract images. When you finish, you’ll be ready to go out and start applying these tips immediately.

Sound good? Read on.

What is abstract flower photography?

I’m going to define abstract flower photography simply as this – photographing flowers in a way that the viewer doesn’t immediately see the flower.

abstract flower photography swirls

That is, an abstract floral focuses not so much on the flower itself, but on parts of the flower: the curve of the petals, the color of the flower center, the play of light on the stamens.

To do powerful abstract flower photography, you have to stop thinking in terms of flowers, and start thinking in terms of shape, color, and light. This isn’t complicated. It’s easy to do, once you get the hang of it. The tips I share below will help you to do just that, so keep reading.

Equipment

To get beautiful abstract flower images, you need two things: a camera and a macro lens.

The type of camera doesn’t matter. These days, essentially all cameras are capable of capturing stunning images. In abstract flower photography, it’s the lens that counts.

So what lens do you need?

Any sort of macro lens will do. I’ve taken excellent abstract flower images with cheap, sub-300 dollar lenses. I’ve also used my much more expensive Canon 100mm f/2.8L lens.

The thing is, abstract flower photography isn’t really about sharpness and perfectly rendered detail. It’s about composition, light and color.

abstract flower photography daisy

A tip worth mentioning is that the shorter the focal length of a macro lens, the closer you need to be to your subject to get life-size images. So, for instance, 60mm macro lenses can be a problem when you’re trying to get a close-up of a rose and you keep casting your shadow on the petals by accident.

You may have also heard that for abstract flower photography you need a tripod.

abstract flower photography silhouette

I would disagree. I don’t use a tripod for abstract flower photography, myself because I find that it’s too limiting. I need to explore the flower through the lens, change my composition, take a few photographs, and change my composition again. You can’t do that with a tripod.

Have you got your camera and a macro lens? If so, you’re ready for the bulk of this tutorial on quick and easy tips for stunning abstract flower photography.

Tip 1: Shoot on cloudy days

If you’ve done natural light macro photography before, you’ll know that you can get beautiful macro photographs at a few different times of the day. First, when it’s cloudy. Second, during the golden hours: just after sunrise and just before sunset.

abstract flower photography tulip

I photographed this tulip on a cloudy spring day.

For abstract photography, I recommend that you only shoot on cloudy days.

On cloudy days, the light is even, resulting in colorful, deeply saturated images. And in abstract photography, color is key. In fact, out of all the images featured in this article, all but one were taken on a cloudy day.

abstract flower photography tulip

Once you become a more experienced abstract flower photographer, you can start to experiment with other types of light. But until then, stick to cloudy days. Your results will speak for themselves.

Tip 2: Get close. Really, really close!

In abstract flower photography, you cannot just take a snapshot of your subject. Your goal must be to show the viewer something new, something unexpected.

The way to do this is to get close. Really, really close.

abstract flower photography pink

As I said above, you must think in terms of shapes, color, and light. The way to start is to magnify your subject.

Take that macro lens and crank it up to its highest magnification setting (which should be 1:1, if you have a true macro lens). Then get close to a flower. Look through the viewfinder of your camera, and just move the lens around.

abstract flower photography tulip center

What do you see?

You probably won’t immediately notice a stunning composition. I spend a lot of time looking through my lens without taking any pictures. There’s a lot of experimentation involved, and that’s okay. Which brings us to Tip 3…

Tip 3: Use a shallow depth of field

The depth of field is the amount of an image that is actually in focus.

Images with only a small amount of the subject in focus have a shallow depth of field. Images with a large amount of the subject in focus have a deep depth of field.

Depth of field is controlled by your camera’s aperture setting, also known as an f-stop. A low f-stop (f/1.4 to f/5.6) gives you a nice, shallow depth of field.

On most cameras, you will be able to choose your f-stop. For abstract flower photography, I usually keep it in the f/2.8-3.5 range but feel free to experiment a bit depending on your creative vision. Just keep that depth of field nice and shallow.

abstract flower photography black-eyed susan

Why do I recommend having so little of the image in focus?

In abstract photography, you must photograph flowers so that the viewer doesn’t immediately see the flower. You must work in terms of light, color, and shapes.

By using a shallow depth of field, you emphasize those elements and take the focus off the flower itself. You shift the focus to the shape of the flower, the color of it, and the light falling on the flower.

abstract flower photography aster

This is what I focus on in my final tip.

Tip 4: Look at the shape of the flower

As I mentioned above, it’s essential that you think about light, color, and shape.

Out of these three elements, I think that shape is most important in abstract flower photography. This is because flowers have naturally interesting shapes: sinuous curves, perfect circles, radiating lines.

The photographs are there. You just have to find them.

abstract flower photography coneflower

For instance, flowers tend to have such beautiful, soft petals. You can use these to your advantage in your photography. Think about the petals, not as parts of a flower, but as twisting lines. Try to see these shapes moving about through the flower.

Carefully set up a composition that uses these lines. Keep it simple—one or two lines is all you need.

Only once you’ve composed deliberately, keeping the shape of the flower at the forefront of your mind, should you take the image.

abstract flower photography black-eyed susan

Conclusion

Capturing beautiful abstract photographs can be an intensely rewarding experience.

Make sure you have the right equipment. Then, if you shoot on cloudy days, get super close, use a shallow depth of field and, above all, think in terms of the flower’s shape, you’ll be well on your way to taking stunning abstract flower photographs.

Have any more tips for abstract flower photography? Share them in the comments!

abstract flower photography orange

The post A Beginner’s Guide to Abstract Flower Photography appeared first on Digital Photography School.


Digital Photography School

 
Comments Off on A Beginner’s Guide to Abstract Flower Photography

Posted in Photography


Guide to Choosing Subjects and Compositions for Flower Photography

09 Jul

How does the budding flower photographer go about selecting subjects and choosing compositions? In this article, I will give a detailed answer to this question. First, I will discuss the different types of flower photography subjects. Then I will give guidelines for creating stunning compositions.

All throughout this article, I will emphasize producing clean, dynamic images.

flower photography macro tulip

Subjects

Choosing a subject in flower photography may seem easy – flower photographers shoot flowers, right?

While this is true, it’s important to consider several factors about any particular flower. Among these is the color of the flower, the condition of the flower (is it dying and/or dirty?), and the shape of the flower.

flower photography macro yellow orange abstract

Color

Considering color is simple. The more colorful the flower, the more interesting the image is going to be (generally speaking, of course). I like to use bright colors, placed before a brightly colored background.

flower photography macro tulip abstract

It can also be useful to think in terms of complementary colors. These are the red/green, blue/orange, and yellow/purple combinations. When they are placed together in the same frame, the results can be powerful.

Condition

Another important consideration is the condition of the flower. Before taking your photograph, you should inspect your potential subject carefully.

flower photography macro backlit

Ideal flowers are at peak bloom: petals spread wide, edges crisp and unblemished. I try to avoid photographing flowers that are on their way out because more often than not I’m disappointed with the resulting images.

The best flowers are also free of dirt. I often wipe dirt off carefully with my finger. If there are insects, I gently blow them away from the flower center. Another tactic is to obscure the blemishes or dirt by shooting soft-focus images or silhouettes.

flower photography macro silhouette

This flower wasn’t in peak condition, so I chose to shoot a silhouette, emphasizing the shape over the condition.

Shape

This final aspect of flower photography is more difficult to explain, but it is important, so I’m going to give it a shot. Certain flower shapes are better than others for flower photography.

More specifically, the flowers that will get you the most pleasing images are often those with clear patterns and bold, dynamic shapes.

Consider the rose. It is one of my favorite flowers to photograph. Why? The petals are dynamic, flowing and changing. They also have a clear pattern, and therefore imbue your images with a sense of organization.

flower photography macro rose

Another flower that I love to photograph is the tulip. Its structure is simple but bold, and it has large petals that curve slightly. It isn’t chaotic or messy. The viewer’s eye can easily trace its shape without getting lost.

flower photography macro tulip

The rose and tulip sit in contrast to flowers such as zinnias, which are rather chaotic and therefore difficult to pin down in an image. Which is not to say that a good zinnia image is impossible; it’s just a lot more difficult.

Compositions

When composing flower photographs, it is a good idea to keep a checklist in the back of your mind. In every flower photography image, try to incorporate at least a few of the guidelines provided below.

Simplify

My first tip is the most important – simplify!

Figure out what it is about the flower that you like, and focus on that, removing any extraneous elements, be they extra flowers, stems, petals, etc. Make sure that any distracting elements are not present.

flower photography macro pattern abstract

Use Symmetry

While you shouldn’t always strive to use symmetry in your flower images, it can be a good starting point. Flower centers are often symmetrical or nearly symmetrical. This is something that you can use, composing with the flower smack-dab in the center of your image, anchored by its center point.

flower photography macro symmetry

I used this flower’s symmetrical center to create a bold composition.

Have a Clear Point of Focus

Without a clear point of focus in your images, the viewer will be lost. Their eyes will wander from place to place without really being drawn into the image.

How do you create a point of focus? You ensure that at least one part of your image is sharper than the rest. You also compose with this point of focus in mind, making sure that the rest of your image merely complements this point of focus (rather than dominating it or detracting from it).

flower photography macro abstract

Here, the eye is drawn straight to the in-focus petals of this flower.

Use a Clean, Pleasing Background

Above, I discussed the importance of colorful subjects. But the subject isn’t the only thing that should be colorful. It’s also important to have a colorful background, or at least a pleasing one.

This can be a bit of a balancing act because you don’t want the background to overpower the subject. White and black backgrounds can work well, as can backgrounds that are a colorful but uniform wash.

macro photography flower trout lily

I aimed for a uniform, calming background when taking this trout lily photograph.

Tilt the Camera

One last tip for creating dynamic compositions is to try tilting the camera.

Rather than having the flower sitting statically within the frame, by tilting the camera, you communicate a sense of movement. The flower seems to be emerging from the frame in a very pleasing way.

flower photography macro black-eyed susan

Notice how tilting the camera to shoot this Black-Eyed Susan resulted in a more energetic image.

Conclusion

When doing flower photography, it is important to carefully consider both the subject and your composition. By keeping your subjects colorful and clean, and by aiming for simple, clean compositions, your flower photography will instantly improve.

The post Guide to Choosing Subjects and Compositions for Flower Photography appeared first on Digital Photography School.


Digital Photography School

 
Comments Off on Guide to Choosing Subjects and Compositions for Flower Photography

Posted in Photography


8 Ways to Create More Dramatic Flower Photos

27 May

Do you think flower photography is boring? Or even too easy and obvious? I mean, of course, when you point your camera at a pretty flower you’re going to get a pretty photograph. Right?

But a subject that you feel is boring and easy is actually the perfect one to challenge yourself with. Can you make a flower image that is creative and dramatic somehow?

Here are a few ideas to get you started making more dramatic flower photos.

1. Dramatic light

Often flower photos are made under soft lighting conditions, either in the shade or on an overcast day. This is because of the soft and delicate nature of a flower which lends itself to that type of light.

But it doesn’t have to be that way. For a more dramatic image, try to find a flower that has direct light on it and shade behind it. High contrast scenes feel more dramatic and your flower will stand out against a darker background.

Flowers in the Light - 8 Ways to Create More Dramatic Flower Photos

2. Change your perspective

Most flower photos are made from a perspective looking right into the open flower. Try other perspectives for more interesting compositions. You can look at the flower from above, from the side, or from underneath.

To make the image below, my camera was on the ground looking directly up at the flower. Because the sky was so much brighter than the flower, it created a more high-key type of image with light shining through the petals making them appear to glow.

Looking Up flower - 8 Ways to Create More Dramatic Flower Photos

When I made the next image, I was interested in the lines created by the petals of a dahlia the size of a dinner plate. Most photos would include the whole flower, but I only included a small portion of the huge flower taken from a side angle.

Giant Dahlia - 8 Ways to Create More Dramatic Flower Photos

3. Focus through

In one of my favorite techniques for flower photography, I use a telephoto lens and focus on a flower that is around five feet away. Then I position the lens so that another flower is right in front of it. Because the close flower is extremely out of focus, it creates a soft area of color in front of the main subject.

This is especially effective if you can find two flowers that are complementary colors (opposite) on the color wheel.

Focus Through Poppy - 8 Ways to Create More Dramatic Flower Photos

4. Let the wind blow

One of the most frustrating things you encounter when photographing flowers is wind. A little bit of wind you can handle with a faster shutter speed, but sometimes the wind is just too much and your flower is blowing all over the place.

When this happens, just go with the flow! Instead of trying to get a sharp image, go with a slow shutter speed and capture the motion of the flower moving in front of your lens.

Flowers in the Wind- 8 Ways to Create More Dramatic Flower Photos

5. Environmental portrait

Most flower photos contain only the flower with no context. But you can also make an environmental portrait that shows the flower and its surrounding environment, like the one below.

Storm Flowers - 8 Ways to Create More Dramatic Flower Photos

6. Echo

Another of my favorite techniques I refer to as an echo. For your main subject, find a flower that has another virtually identical flower behind it. Use a shallow depth of field and focus on your main subject letting the flower behind fall out of focus. This creates a sort of echo of the main subject.

Yellow flowers - 8 Ways to Create More Dramatic Flower Photos

7. Less than perfect flowers

When photographing flowers, most photographers search for perfect specimens to be the main subject. But perhaps more interesting subjects are the less than perfect flowers. They can be dead flowers, ones with flaws, or even flowers that have fallen over.

In the image below, I was attracted to the raindrops that were on the side of this fallen tulip. Flowers with raindrops are not uncommon, but the tulip on its side is a bit more unusual.

Fallen Tulip - 8 Ways to Create More Dramatic Flower Photos

8. Emphasize edges in post-processing

You can also introduce effects in post-processing to make unique and dramatic flower photos. Try experimenting with textures or edge effects.

For the image below, I added an edge effect in post-processing to draw the viewer’s attention to the shape of the petals.

pink Dahlia - 8 Ways to Create More Dramatic Flower Photos

What else can you think of? Flower photography doesn’t have to be boring or predictable. In fact, any subject that you find boring and predictable is a challenge waiting for you to unleash your own unique perspective. How do you make more dramatic flower photos?

The post 8 Ways to Create More Dramatic Flower Photos appeared first on Digital Photography School.


Digital Photography School

 
Comments Off on 8 Ways to Create More Dramatic Flower Photos

Posted in Photography


Spiky Shipping Container Home Blooms Like a Flower in the Joshua Tree Desert

30 Sep

[ By SA Rogers in Architecture & Houses & Residential. ]

Since shipping containers are made to be stacked, that’s how they’re usually arranged when reclaimed for architectural projects. It just makes sense, right? They fit together in a certain way. But architecture firm Whitaker Studio just smashed that convention in spectacular fashion with one of the most bonkers shipping container projects we’ve ever seen, and the results are as beautiful as they are unusual.

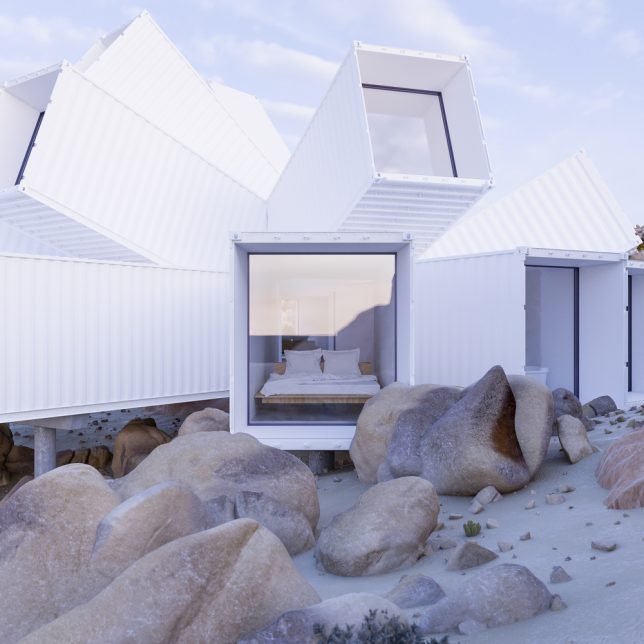
Rising from the rocky Joshua Tree desert in California like a rare flower, this all-white residence is laid out in a starburst shape with several shipping containers pivoted up toward the sky. Each container is capped with glass and oriented to take advantage of a certain view, whether of the sky, the distant mountains, or the adjacent boulders.

Each individual container either serves as a small room for the interior, or as a giant skylight bringing natural light into the core. Dining tables and beds can be spotted through the glass from outside, wedged into the narrow spaces. In some areas, several containers are combined with their walls removed to create larger rooms. The layout is hard to determine from the exterior, but once you see images of the 2,150-square-foot interior, it makes more sense.

Though these renderings are pretty convincing, construction on the Joshua Tree residence is not set to start until 2018 on a 90-acre plot owned by a film producer. Architect and studio founder James Whitaker told ArchDaily that the client and his friends were visiting the plot of land, imagining what should be placed there, when someone pulled out their laptop and showed the group an image of a structure he’d designed several years prior, but that had never been built.

The containers are arranged to fit within the topography of the site, angled wider in some areas to accommodate the hills and rocks, creating sheltered outdoor areas for decks and hot tubs. The site is set on a natural gully created by stormwater, so the containers are raised off the ground, allowing water to pass underneath.

Share on Facebook


[ By SA Rogers in Architecture & Houses & Residential. ]

[ WebUrbanist | Archives | Galleries | Privacy | TOS ]


WebUrbanist

 
Comments Off on Spiky Shipping Container Home Blooms Like a Flower in the Joshua Tree Desert

Posted in Creativity


This flower bloom time-lapse took three years and 8TB of raw footage to create

09 May

You can pick your favorite symbol of springtime from any number of familiar images. In Seattle, the local favorite is a rain-soaked figure clutching a latte with a cold, dead look in their eyes. But it’s hard to beat the natural beauty and optimism of a blooming flower. That’s the imagery that dominates filmmaker Jamie Scott’s recent time-lapse titled ‘Spring,’ a follow-up to his popular video ‘Fall’ of a couple of years ago.

He gives FStoppers a fascinating look at what it takes to create a time-lapse of this scope. Not surprisingly, a lot of patience and hard drive space were involved. Watch the video, check out the behind-the-scenes and let us know what you think in the comments.

Articles: Digital Photography Review (dpreview.com)

 
Comments Off on This flower bloom time-lapse took three years and 8TB of raw footage to create

Posted in Uncategorized


How to Use a Reflector and Diffuser to Enhance Flower Photographs

26 Jun

Photograph Flowers 2016-05-11at15-41-06

cover-fill-card

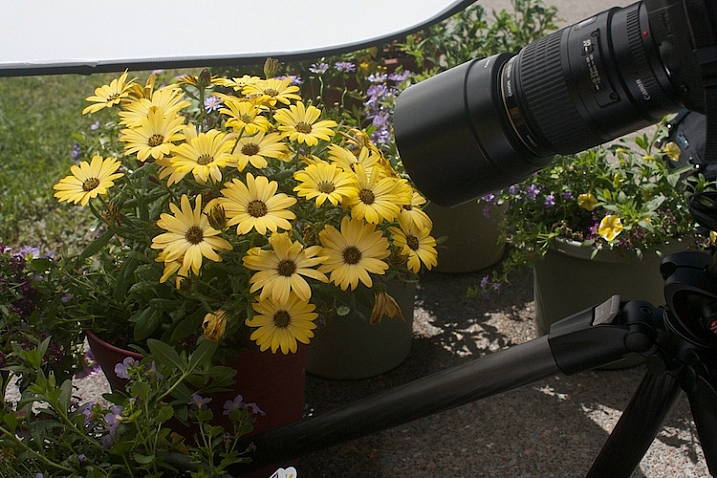
Learning to see and use light is one of the most important steps to creating great photographs. As you become more aware of what nice light really looks like, you can start to manipulate even the harshest conditions with some simple tools. The photo above was shot in bright sunshine using both a diffuser and a reflector.

full-sun-overview

Practice

To practice this exercise, find some flowers in bright sun. You can photograph flowers that are planted in your garden, or in pots.

Photograph-Flowers-in-sun-3

Photograph-Flowers-in-sun-2

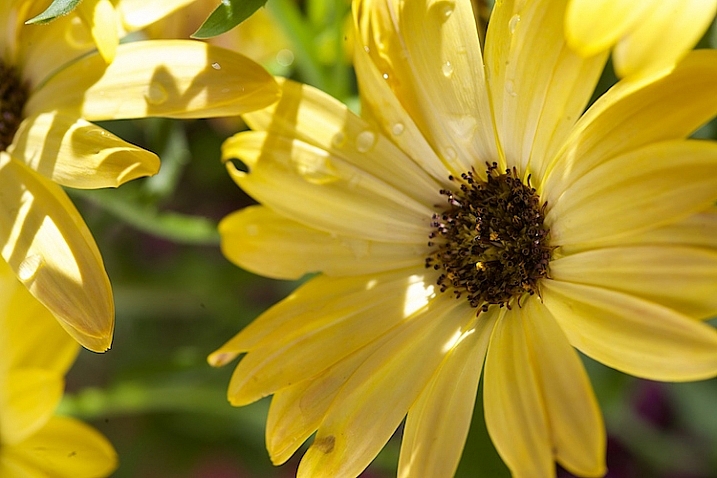
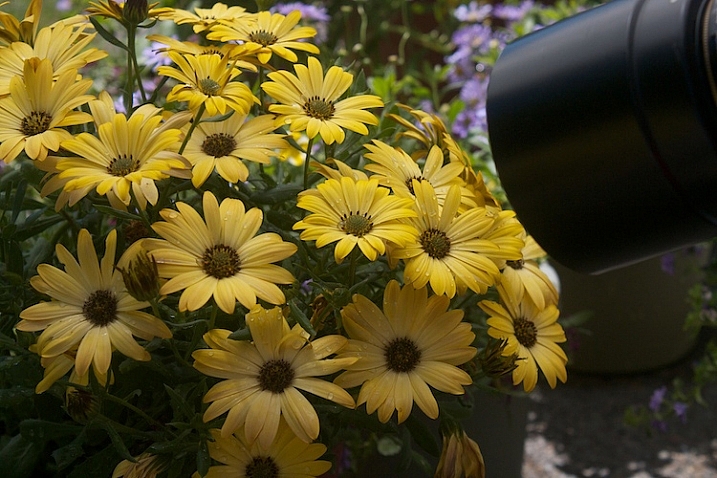
Notice the quality of light on the flowers. In bright sun, there are strong highlights and deep shadows. There is lot of contrast, which comes through in the image.

Photograph-Flowers-2016-05-11at15-34-44

Notice how you lose detail in the highlights. The bright spots caused by the sun don’t add anything to the photograph, in fact, they are very distracting. Our eyes tend to go toward the brightest spots in a photograph and in this situation, the highlights are drawing our eyes away from the center of interest – the flower.

Photograph-Flowers-2016-05-11at15-09-23

Add a reflector

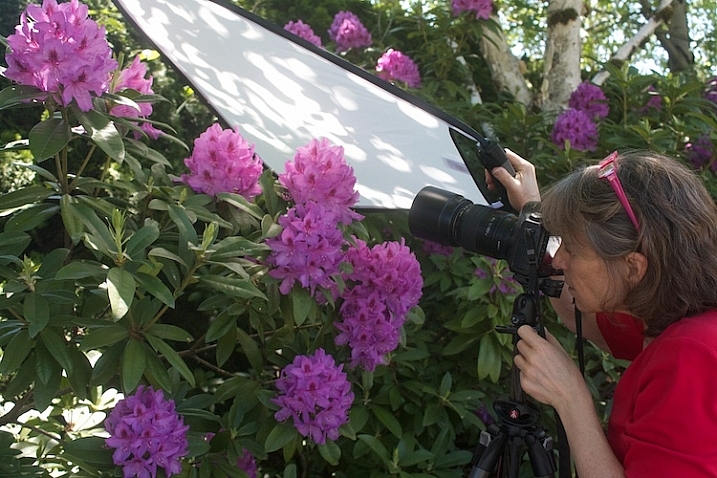
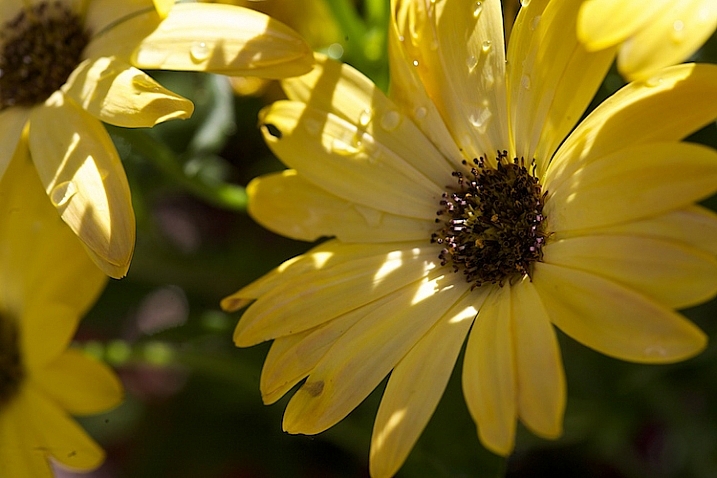
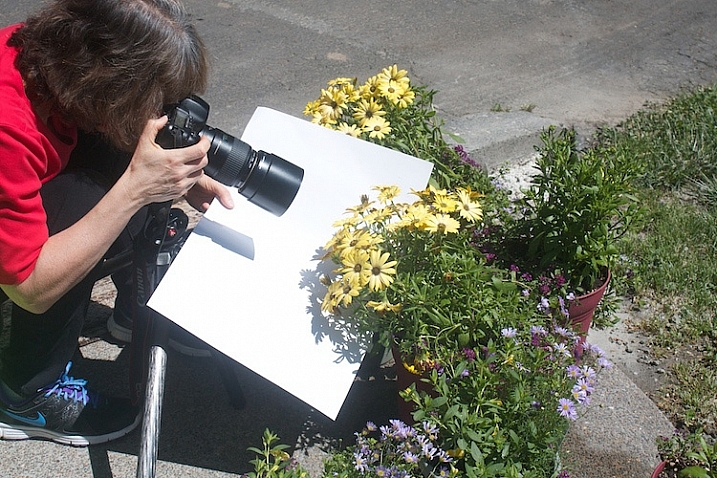
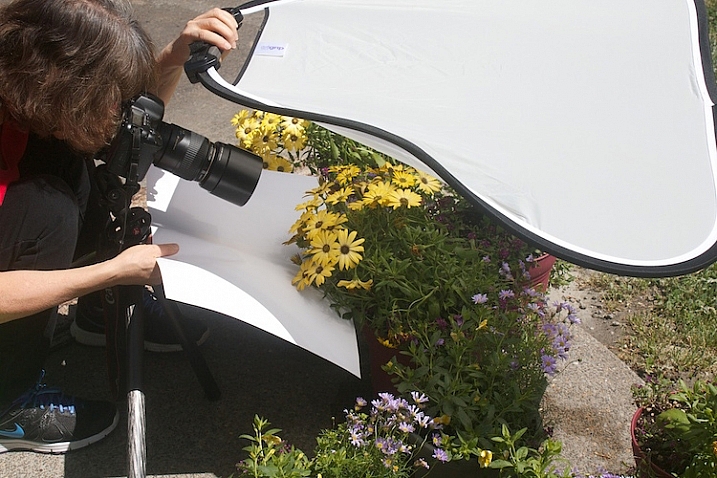
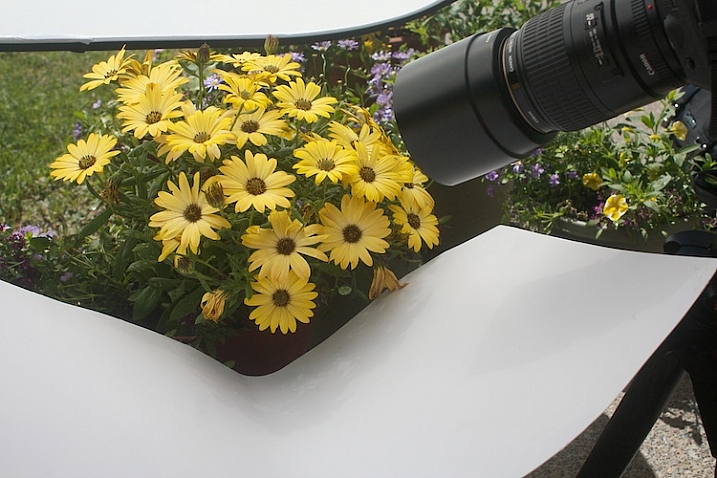
Now, try using a reflector. Light bounces just like a billiard ball. By placing a light colored, reflective surface opposite the light source, you can bounce light back into the subject. In this instance, our light source is the sun, so I placed the reflector under the leaves to bounce the light back into the shadows. You can use almost anything as a reflector. In this example, I’m using a piece of white poster board.

Read DIY How to Build and Use a Reflector to Take Better Portraits and 10 Ways to Use a 5-in-1 Reflector for more help on using reflectors.

Just-below-full-sun-using-fill-cards

Notice the difference in the image above, compared to the one without the reflector. Can you see how bouncing the light back in brightens up the flower? The exposure settings haven’t changed. The only difference is the reflector (also called a fill card) in the second shot.

Photograph-Flowers-2016-05-11at15-08-06

Diffuse the light

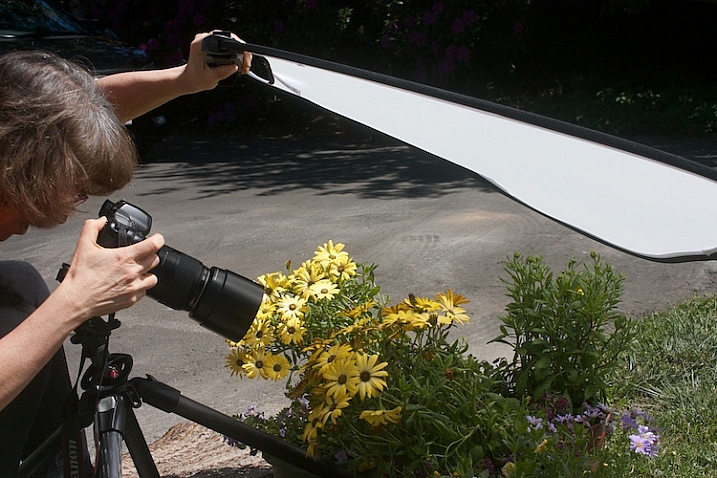
Now, we are going to use a diffuser to soften the light.

Photograph-Flowers-reflector-above-better2

Here we are starting to see some really beautiful, soft light. Notice how even the light is and how much softer the flowers feel. The highlights and shadows are not as severe and harsh, and more detail is retained in both areas.

Photograph-Flowers-reflector-above

Use a reflector and diffuser

Take it a step further.

Photograph-Flowers-2016-05-11at15-09-41

Let’s use a diffuser with a reflector, and see how that looks. Here’s a tip for you: If you can’t prop up your reflectors and diffuser and press the shutter button, you can use the 2-second self-timer on your camera to free up an extra hand.

Photograph-Flowers-reflector-above-and-below

With the diffuser above and a reflector below, the flowers start to take on a magical feel.

Photograph-Flowers-2016-05-11at15-12-20

fill-card-reflector-top-and-bottom

cover-fill-card

Now you can see how using a reflector and diffuser can drastically improve your flower photographs. I also want to add that none of these photographs were manipulated in Lightroom or Photoshop in any way, other than a little sharpening. The dramatic difference in the photographs was created entirely by manipulating light.

Please share you comments and questions below, then try this exercise at home and post your photos in the comments below. I’d love to see them!

googletag.cmd.push(function() {
tablet_slots.push( googletag.defineSlot( “/1005424/_dPSv4_tab-all-article-bottom_(300×250)”, [300, 250], “pb-ad-78623” ).addService( googletag.pubads() ) ); } );

googletag.cmd.push(function() {
mobile_slots.push( googletag.defineSlot( “/1005424/_dPSv4_mob-all-article-bottom_(300×250)”, [300, 250], “pb-ad-78158” ).addService( googletag.pubads() ) ); } );

The post How to Use a Reflector and Diffuser to Enhance Flower Photographs by Vickie Lewis appeared first on Digital Photography School.


Digital Photography School

 
Comments Off on How to Use a Reflector and Diffuser to Enhance Flower Photographs

Posted in Photography