RSS
 

Posts Tagged ‘flare’

Zeiss announces Radiance Prime lenses with controlled flare effects for cinematographers

09 Nov

Optical manufacturer Zeiss has announced a new set of lenses based on its Supreme Prime range but which are designed to produce attractive flare easily and in a controlled manner. The Zeiss Supreme Radiance Prime lenses will only be available as a set of seven focal lengths and can only be ordered between now and the end of March 2020.

The lenses have been created to enable cinematographers to introduce a controlled amount of flare into their productions without losing optical quality. The company claims the Supreme Radiance lenses will provide consistent effects and won’t compromise contrast or light transmission. A new T*Blue coating has been used to generate the flare in the lenses, which are otherwise exactly the same as the existing Supreme Primes.

The flare from the lenses has a blue tone, and those quoted as having used the lenses talk of a look that is sharp but soft at the same time and highlights the glow. The coating also lends a slightly warmer tone to the footage.

The set of seven lenses will cover focal lengths from 21mm to 100mm, and a wide covering circle means they are suitable for large format sensors. All are compatible with the ZEISS eXtended Data metadata system and Cooke’s i/Technology for recording shooting information on along with each frame to help special effects teams integrating additional content into the picture.

Zeiss hasn’t yet announced a price for the lenses but says they will start shipping April 2020. For more information see the Zeiss website.

Press Release:

ZEISS Unveils New High-End Cinematography Optics: ZEISS Supreme Prime Radiance Lenses

A Modern Lens, based on ZEISS Supreme Prime lenses, with Controlled Flares – orders possible by 31st March 2020!

ZEISS has unveiled the ZEISS Supreme Prime Radiance lenses, an exclusive new set of seven high-end cinematography lenses. The lenses are based on the high-speed ZEISS Supreme Prime lens family with the benefit of the new T*blue coating, which offers a distinctive look and consistent flares without any compromises.

“The ZEISS Supreme Prime Radiance lenses deliver stunning, consistent flares across all focal lengths that cinematographers can create at will,” says Christophe Casenave, Product Manager for Cinema Products at ZEISS. “The new lens family has been infused with ZEISS’s experience and passion for premium-quality cinematography lenses – combined with its aspiration to support filmmakers throughout the creative process,” says Casenave.

ZEISS Unveils New High-End Cinematography Optics: ZEISS Supreme Prime Radiance Lenses

Controlled images that exude artistic flair
The ZEISS Supreme Prime Radiance lenses are available as a set of seven focal lengths of between 21 and 100 millimeters, all with a maximum aperture of T1.5. This makes it possible to capture subtle nuances, even in poor light.

“When we spoke to filmmakers and industry experts, we took a close look at the appeal of flares and their unique impact on the atmosphere of a movie,” says Casenave. He describes how ZEISS is responding to users’ needs to integrate flares to ensure greater creative freedom with the lenses: “We didn’t just want to reproduce the effects, but to create tools that would allow this effect to be achieved at any time and in a controlled manner, and so the T* blue coating was born.” The new coating allows users to create flares in the right light without any losses in contrast or transmission – and in the high quality that customers have come to expect from ZEISS.

The versatility of the lenses can be used to create this visual look, which is due to the smooth depth of field and elegant bokeh, thus meeting users’ every artistic wish – from a blockbuster to a high-end commercial or a film d’auteur.

Compact, lightweight full-frame lenses

In addition to their flare behavior, the new lenses offer all the benefits of the ZEISS Supreme Primes. Thanks to their image circle diameter of 46.3 millimeters, they cover the current large-format cinematography sensors and are as such compatible with the latest camera models, such as the Sony Venice, ARRI Alexa LF, and Mini LF and RED Monstro. Moreover, they feature a front diameter of 95 millimeters with consistently positioned focus and aperture rings. They weigh around 1,500 grams on average.

The lenses are equipped with the ZEISS eXtended Data metadata technology launched in 2017, providing frame-by-frame data on lens vignetting and distortion in addition to the standard metadata provided using the Cooke /i technology1 protocol. This simplifies and speeds up workflows, particularly for VFX and Virtual Production.

Limited availability

The ZEISS Supreme Prime Radiance lenses are available to order from announcement until March 31st, 2020. The seven focal lengths – 21 mm T1.5, 25 mm T1.5, 29 mm T1.5, 35 mm T1.5, 50 mm T1.5, 85 mm T1.5 and 100 mm T1.5 – are available exclusively as a set from ZEISS Cinema dealers. The lenses will be delivered from April 2020 after the end of the ordering period.

From November, 9th -16th ,2019, ZEISS will be unveiling its ZEISS Supreme Prime Radiance lenses for the first time before a large audience at the CAMERIMAGE International Film Festival in Toru?, Poland. The short film R&R by Rodrigo Prieto (DOP of movies like The Irishman, The Wolf of Wall Street and Brokeback Mountain) shot with ZEISS Supreme Prime Radiance lenses, will also be shown at the festival. After CAMERIMAGE, ZEISS will be running a series of events at various rental houses around the world to give cinematographers the chance to try out the new lenses.

To find out more, please visit: www.zeiss.com/cine/radiance.

Articles: Digital Photography Review (dpreview.com)

 
Comments Off on Zeiss announces Radiance Prime lenses with controlled flare effects for cinematographers

Posted in Uncategorized


Prism Lens FX launches three lens filters with built-in prism and flare effects

02 Apr

Prism Lens FX has launched a new line of lens filters that have built-in prism effects. The Variable Prism Filters are being sold as a three-filter bundle and individually with three different filter options: Prism, Chromatic Flare, and Split Glass. Each product is offered as a 77mm rotating filter alongside an optional 82mm to 77mm step down ring.

The Variable Prism Filters offer unique effects without the need to hold items in front of the lens. All three products are recommended for use with 50mm or greater telephoto lenses and a 1.4 / 2 / 2.8 aperture. The Prism filter is designed to add bokeh and flares to images, while the Chromatic Flare filter adds streak / anamorphic flares and the Split filter adds fractal / light leak effects. Below is a gallery of sample images captured with the filters:

$ (document).ready(function() { SampleGalleryV2({“containerId”:”embeddedSampleGallery_8301677427″,”galleryId”:”8301677427″,”isEmbeddedWidget”:true,”selectedImageIndex”:0,”isMobile”:false}) });

Preorders are now available with each filter priced at $ 75 and the three-filter bundle at $ 195. Shipments are expected to start in mid to late April.

Articles: Digital Photography Review (dpreview.com)

 
Comments Off on Prism Lens FX launches three lens filters with built-in prism and flare effects

Posted in Uncategorized


How to Make a DIY Lens Hood to Eliminate Lens Flare

12 Oct

Not all lenses come with lens hoods, and that can mean you can suffer the effects of lens flare. This occurs when light is scattered across the glass elements of a lens, often caused by bright sunlight at a particular angle, and it produces coloured spots around your image. Lens hoods shade the lens, almost entirely stopping lens flare in the majority of situations.

Sometimes this can be used to creative effect, but for the majority of the time you’re going to want to get rid of it. Building your own DIY lens hood is a way around this problem, and this 2-minute tutorial from COOPH shows you how to do just that.

By recycling an old plastic bottle, whilst using some black spray paint, you can create your own “foldable” lens hood to work with whatever lens you need.

For more tips about handling lens flare, check out some of our tutorials:

  • How to use Lens Flare to Your Advantage
  • 5 Tips for Achieving Artistic Lens Flare: How To
  • How to Prevent Lens Flare
  • How to Eliminate Lens Flare

The post How to Make a DIY Lens Hood to Eliminate Lens Flare appeared first on Digital Photography School.


Digital Photography School

 
Comments Off on How to Make a DIY Lens Hood to Eliminate Lens Flare

Posted in Photography


How to Add a Lens Flare Effect in Photoshop

13 Mar

Do you put a hood on your lens to avoid lens flare? Are you always moving and reframing so that the light source is behind you? Then you have missed out on some great creative opportunities. But not to worry, in this tutorial you can learn how to add a lens flare effect in Photoshop.

Before after lens flare effect tutorial

What is lens flare?

A lens flare usually occurs when you have an intense light source hitting the camera either directly or by reflection. This light then gets scattered inside the lens and creates visible marks on your photo like colored circles, starbursts or a haze that covers the image.

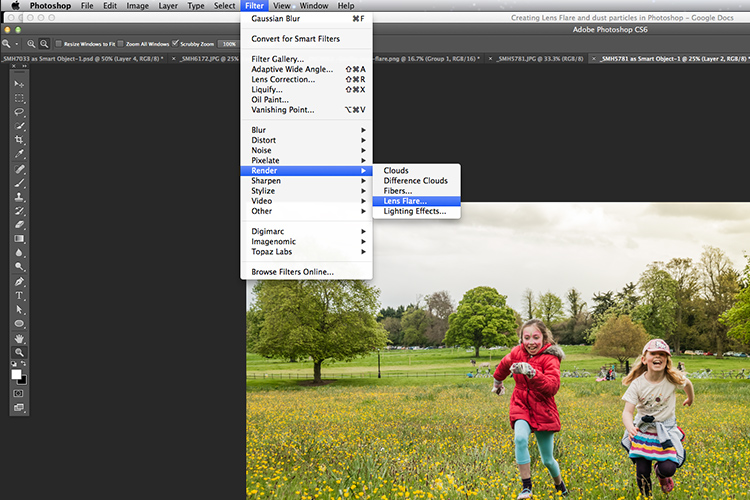
How it’s manifested and how big the flare is depends on the intensity of the light, the angle at which it hits the camera, and also the elements inside the lens that cause the refraction. You can recreate a lens flare in Photoshop by going to Menu > Filter > Render > Lens Flare.

Photoshop Lens Flare Filter Tutorial -

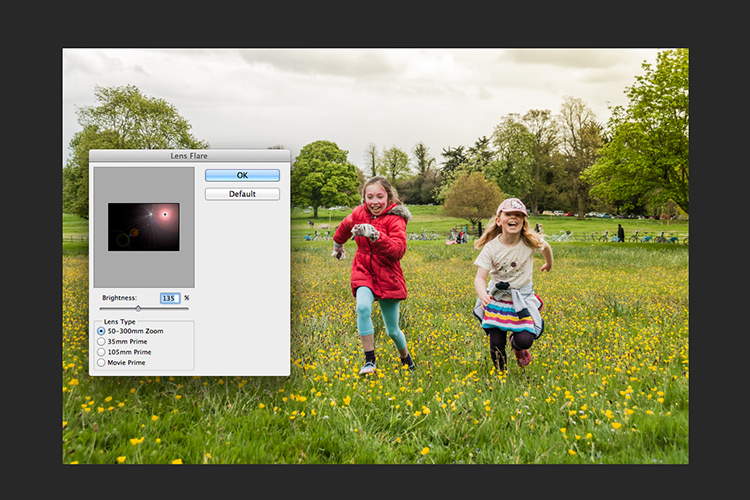
A window will pop up where you’ll see a thumbnail of the picture, just click on the area where you want to place the source of the flare, typically in the brightest point. You can also adjust the brightness of the flare, just by dragging the slider.

Finally, you can choose the type of lens. As I mentioned at the beginning, lens flare is caused by the scattering of light inside the different parts of the lens and therefore lenses with different components will cause different kinds of flares. When you are done just click OK.

Photoshop Lens Flare Filter Tutorial Menu

That’s pretty straightforward right? But the result is pretty basic.

35mm Prime lens flare effect Photoshop tutorial

Well, there’s a bit more to it in order to really make the most of this effect. You probably noticed that you set up your flare only with a thumbnail preview, therefore you would probably want to go back to it for adjustments after you see it in the full-size screen, but this is not possible.

So the first trick to mastering the lens flare effect is to turn it into a Smart Filter.

What is a Smart Filter?

Smart Filters is a tool to apply filters in a non-destructive way, so you can adjust, remove, or hide it as many times as you like. To do this go to Menu > Filter > Convert for Smart Filters. A warning window pops up to tell you that in order to make your filters Smart, it needs to convert the layer into a Smart Object, click OK.

To learn more about Smart Objects you can read about them in my previous tutorial How to Create with a Good Workflow Using Smart Objects in Photoshop.

Now you can now go back to apply the filter as you did before: Menu > Filter > Render > Lens Flare. Each time you want to go back to change anything you just have to double-click on the filter.

Photoshop Lens Flare Smart Filter Tutorial

You can now go back and adjust the brightness, type of lens and re-position the light source. That’s better don’t you think?

50 300mm zoom lens flare effect Photoshop tutorial

Map out where to put your flare using coordinates

However, you still have to do this in the small thumbnail which can be difficult to do if you want to place the flare in a really specific spot. To overcome this problem, there is a simple way to get around it.

Before you open the filters, decide where you want to put the source, zoom into the image and check the coordinates. If your Info tab is not already opened, you can get to it by going to Menu > Window > Info or just pressing F8. There you will see all the color information for each pixel but also the exact coordinate of it in the spaces called X and Y.

Just hover over the place where you want to place your source and take a note of the coordinates.

Info Coordinates Photoshop Lens Flare Filter Tutorial

Now that you know where you want to put your lens flare you can go ahead and do your filter normally. Setup the filters as Smart Filters and then go to Render > Lens Flare filter. Adjust the brightness and type of lens that you want.

To position the source this time though, hold the Alt key when you click on the thumbnail and a new window will open. You can then enter the exact coordinates you selected before.

Position Photoshop Lens Flare Filter Tutorial

In the end, just process the image as you would normally for exposure and color and you’re done!

105mm Prime lens flare effect Photoshop tutorial

One last trick!

When you want to change the direction of the flare, you won’t find this as an option offered in the adjustments of the filter. What you can do is apply it separately and then move it.

First, create a new layer by going to Menu > Layer > New Layer and fill it with black. You can do this by going to Menu > Edit > Fill and choose to use Black as Content. This new empty black layer is where you’re going to apply your Lens Flare without turning it into a Smart Filter because there’s no information to protect in this layer.

Photoshop Lens Flare Filter Tutorial New Layer

With the Lens Flare being independent of the main image, you can move it around as you want. Just select the layer by going to Menu > Edit > Free Transform and then you can rotate and move it until you’re satisfied.

Photoshop Lens Flare Filter Tutorial New Layer Free Transform

There you have it, three tips to really master the Lens Flare in Photoshop. Please show us your best results in the comments section below.

Lens flare effect tutorial Photoshop

The post How to Add a Lens Flare Effect in Photoshop by Ana Mireles appeared first on Digital Photography School.


Digital Photography School

 
Comments Off on How to Add a Lens Flare Effect in Photoshop

Posted in Photography


How to Add a Sun Flare to Your Images Using Photoshop

29 Oct

If you read my previous article where I give you some tips for doing more spectacular sunset photography, you’ll understand that I love taking photos during the magic hour. For my portraits, I also book my sessions during that time because the light is very soft and flattering. There is one thing I particularly like to do when I process my images and that’s adding a sun flare to my portraits and landscapes. I love to use Photoshop to recreating a scene that would have ideally been there in real life.

How to Create a Sun Flare in Photoshop

I added sun flares to this portrait to add depth.

It’s difficult to not underestimate the effect of a sun flare but it really does make a big difference, especially if you like cinematic results to your images. They’re a great way to add color and depth to your images.

Analyze your image first

The process of adding sun flares is actually quite easy, it only takes two steps and a few minutes. The most difficult thing however is to get a realistic result. You need to analyze your image before doing anything. Start by looking at the position of the sun, how the shadows and highlights are wrapping around your subject.

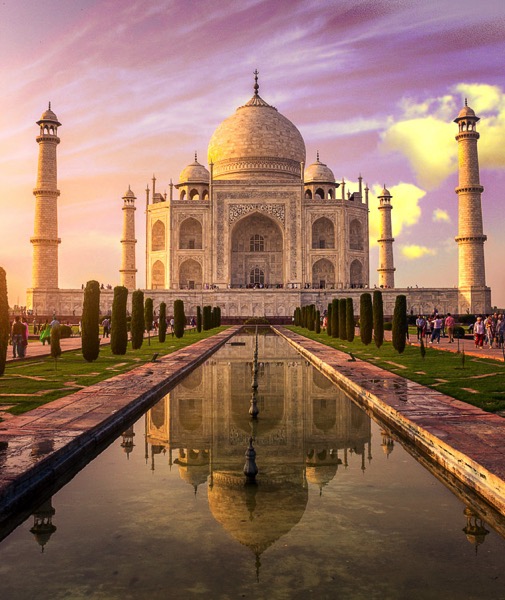
In the image below, I added a sun flare on the left, but before doing that I noticed that the highlights were hitting the Taj Mahal from the left and the shadows were in the right side of the monument. If I were to position the sun flare on the right side of the image, the results wouldn’t be realistic because the highlights and the shadows wouldn’t correspond to the direction of the light of my sun flare. Try to consider the position, direction and intensity of the light.

How to Create a Sun Flare in Photoshop - Taj Mahal

This is another example of a GoPro image I took. I added a sun flare on the right side of the image because the sun was positioned there in real life. We’re not trying to create another sun, we’re just enhancing it with more colors and more intensity.

How to Create a Sun Flare in Photoshop

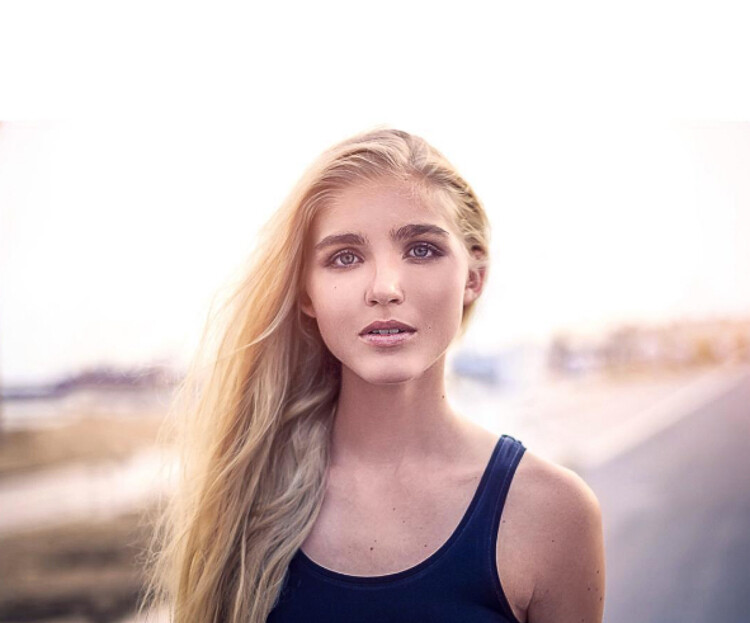
In this portrait, I added a sun flare to the left of the model. The result looks realistic because you can see the orange flair spreading and lightning the hair of the model but her face isn’t affected.

How to Create a Sun Flare in Photoshop

How to create and add a sun flare in Photoshop

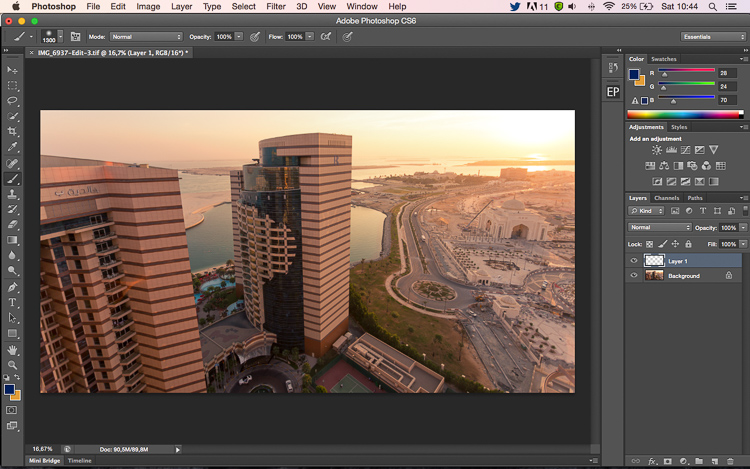
It’s actually quite easy to add a sun flare in Photoshop. Start by opening your file in Photoshop and creating a new empty layer. The next step is to analyze where you want to place your sun flare and how strong do you want the effect to be. In this case, I want to place my sun flare in the top right of the image and make it pretty big. The sun was actually setting in that position but I am not completely satisfied with how it looks. I want to make the flare more vivid and more intense.

How to Create a Sun Flare in Photoshop

Select the Brush Tool and pick a color

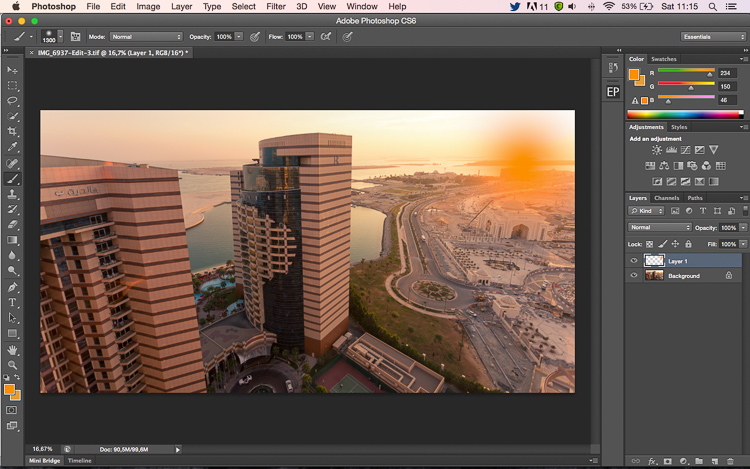
The next step is to select the Brush Tool with an opacity and flow of 100%. Make sure to select a soft brush with a hardness of 0%. I usually like to pick my own color of the sun flare, the color code I use is #fd9424, but there are different ways to pick a color for the sun flare.

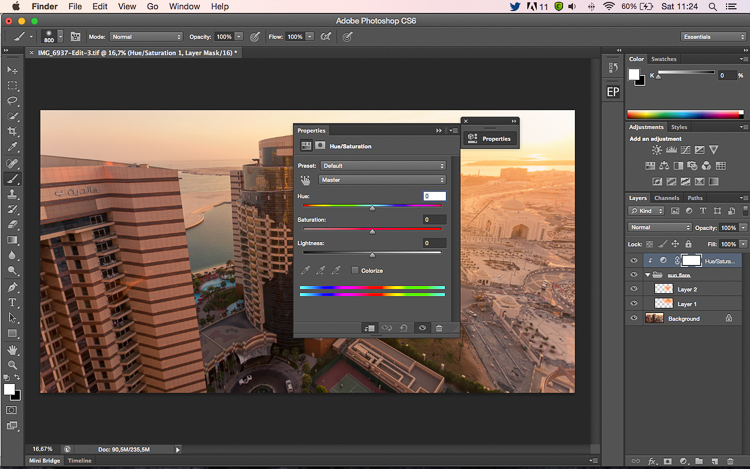
You can use the Eye Dropper Tool and select a color from the image by pressing I on your keyboard or by selecting it in the tool box on the left (the chosen color will automatically be set in your palette). Or after you have created the flare, you can create a hue/saturation adjustment layer only affecting that layer and just playing around until you find a color you like.

How to Create a Sun Flare in Photoshop

Adding your flare

To create the sun flare, the first step is to simply create one brush stroke (you just have to press once). Make sure your brush is quite big. So far your image should look something like this:

How to Create a Sun Flare in Photoshop

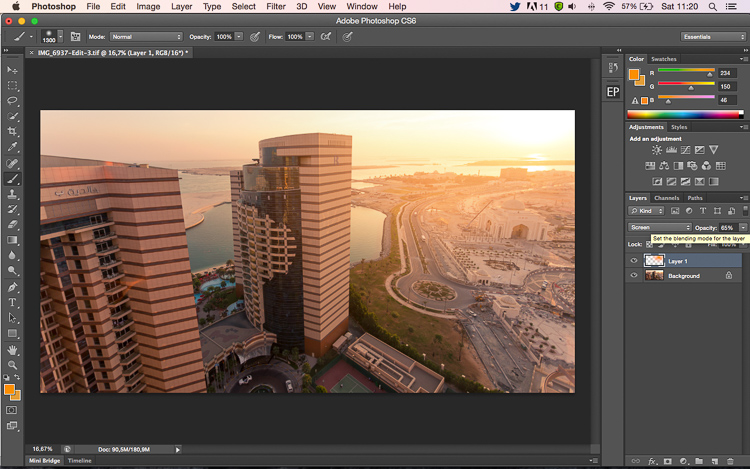
The next step is to go to blending modes for your current layer (the layer with the brush stroke). The default blending mode is normal, you need to change it to Screen. The screen blending mode by definition will invert both layers, multiply them, and invert the result. Your sun flare is going to get brighter and blend in with the sky after you do that.

How to Create a Sun Flare in Photoshop

Transform

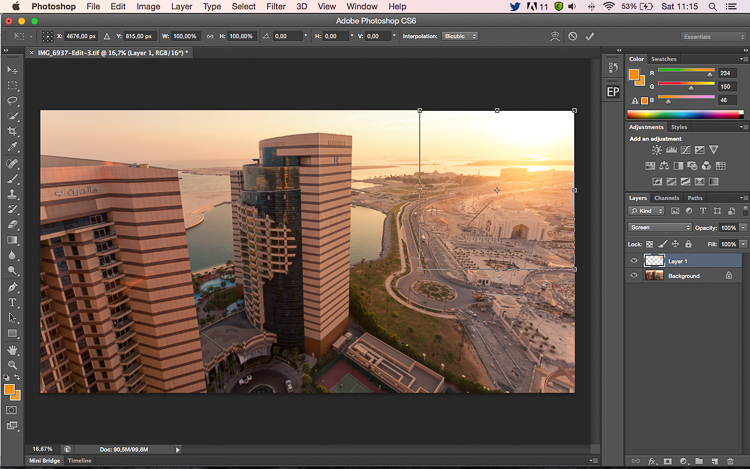
The next step is to select your layer with the sun flare and press CTRL/CMD+T to transform (resize) it. A little box will appear, you want to drag the corners to make it bigger. How big you want to make it depends on your image and your desired effect. The sun flare will affect the whole image if you make it too big and will brighten up the shadows.

Using a brush tool on a new layer is really helpful because you have full control. You can change the position, color, brightness, or saturation of your flare whenever you want by creating new adjustment layers that only affect that layer.

If you think that your effect if too strong, you can reduce the opacity of the layer, if it is not strong enough, you can duplicate the layer. Always remember that the effect should be subtle otherwise if will look quite unrealistic. We are just trying to create a scene taking in consideration how light works.

How to Create a Sun Flare in Photoshop

 whenever you want

Your turn

Now you try you hand at adding a sun flare to one of your images using Photoshop. Please share your images and any questions in the comments below.

googletag.cmd.push(function() {
tablet_slots.push( googletag.defineSlot( “/1005424/_dPSv4_tab-all-article-bottom_(300×250)”, [300, 250], “pb-ad-78623” ).addService( googletag.pubads() ) ); } );

googletag.cmd.push(function() {
mobile_slots.push( googletag.defineSlot( “/1005424/_dPSv4_mob-all-article-bottom_(300×250)”, [300, 250], “pb-ad-78158” ).addService( googletag.pubads() ) ); } );

The post How to Add a Sun Flare to Your Images Using Photoshop by Yacine Bessekhouad appeared first on Digital Photography School.


Digital Photography School

 
Comments Off on How to Add a Sun Flare to Your Images Using Photoshop

Posted in Photography


Google acknowledges lens flare issue on Pixel camera, promises software fix

27 Oct

Since the Google Pixel and Pixel XL smartphones have become available for purchase, there have been several reports about the camera of the devices, despite stellar scores in the DxOMark ranking, being very prone to lens flare with the sun at a certain angle to the camera lens. Now a group of affected Reddit users has described the problem in the Google Product Forum and got a quick reply from a Google employee:

‘First, for some background — flare is a property of ALL camera lenses. It comes in a ton of different shapes and sizes and can even be used for creative effect — good and bad :-). The shape, color, amount, etc. of flare is related to dozens of different parameters of the lens structure and inclement light. However, we have seen reports about this “halo/arc flare”. This is the specific kind of flare that appears as a bright/low-contrast arc in the corners of the frame.
 
You can expect a software update in the next few weeks that will improve the effects of this issue. We’re working on some algorithms that recognize the halo/arc flare, characterize it mathematically, and then subtract it from the image. 🙂 You will need to use HDR+ to see the benefits of this software.’
 
So it appears Google is planning to solve a hardware problem with a software solution and bake an algorithm, that mathematically removes the flare from the image, into the Pixel camera’s HDR mode. This means the measure will only be effective when shooting in this mode and it remains to be seen if there is any impact on noise and/or image detail in the affected areas of the image. We will certainly have a closer look at the Pixel’s flare behavior in our own test of the device.

Articles: Digital Photography Review (dpreview.com)

 
Comments Off on Google acknowledges lens flare issue on Pixel camera, promises software fix

Posted in Uncategorized


Creating a Lens Flare Effect and Dust Particles in Photoshop

07 May

This article isn’t about how to magically transform your images using Photoshop. The real magic of Photoshop is trying to convince the viewer that no effects were added at all, and that the image was captured in camera. Photoshop can add that little extra to your imagery. Conversely, it can also ruin an image if it’s overdone.

I shoot to capture the best possible image as I can get at the time, but more often than not, time is not on my side. If I am shooting for a client, time is money. Deadlines and strict schedules are uppermost when dealing with a client. When shooting outdoors, I am dealing with natural light which is constantly changing and weather conditions, which may force me to shoot faster or abandon the shoot completely.

So, when I get to look at my image(s) on the computer, I take the time to critically review them. As I shoot RAW, I need to apply basic post-processing to all my images. In some cases, I may need to add an extra enhancement, but that will depend on the image and what I need it to say.

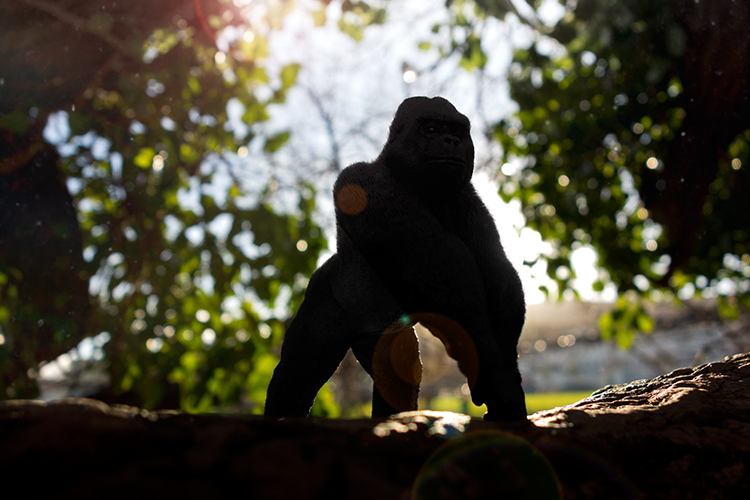
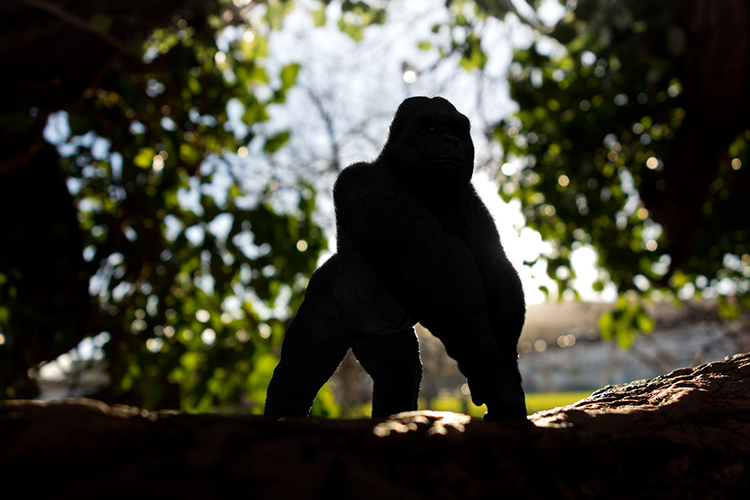
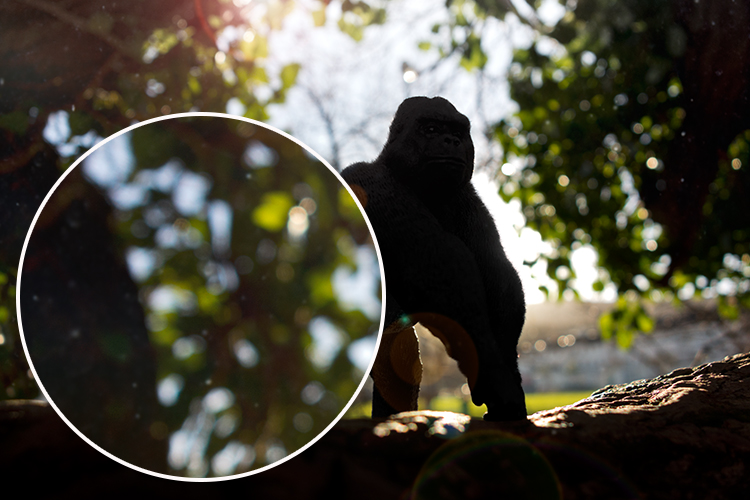
Gorilla-with-lens-flare-and-dust-particles

Lens Flare and dust particles added using Photoshop

This is the power of post editing. To be able to add an enhancement to the image, to give it that extra drama or a desired effect that you wanted to convey in your image in the first place. It can be as subtle as adding dust particles, or a bit more dramatic such as a lens flare effect. Both of these effects, whether you use one or both together, can add that little bit of oomph!

When applying any Photoshop effects, It’s not just about technique, although the know-how is important, but it is the application which is key:

  • How to execute the technique – different methods to achieve the same end result
  • When to use it – some images suit this technique over others
  • By how much?
Before

Before

After

After

The above may sound quite obvious and fundamental, but I can’t stress it enough, especially if you are new to creating effects in Photoshop.

  • HOW = the technique. I will demonstrate how to create a lens flare effect non-destructively in Photoshop using the Lens Flare filter. I will also describe how to create your own simple custom dust particle brush. Plus, I’ll show you my own unique in-camera method to capture dust particles.
  • WHEN = you deciding if this technique will work on the particular image in question. Just because you know how to use a technique doesn’t mean you have to apply it to every image. Yes, by all means practice on your images until you have refined the process.
  • HOW MUCH = knowing how little of the technique to apply – less is more. Don’t be afraid to reduce the opacity on the layer that you have applied the technique on.

This is where beginners can get carried away when learning post-processing techniques in Photoshop, for the first time. As tempting as it is, you want to show off your new skill and see the effect on your image in a dramatic way, try and keep it subtle.

What is Lens Flare?

Flare is particularly caused by a very bright light sources either in the image – which produces visible artifacts – or shining into the lens but not in the image – which produces a haze. Most commonly, this occurs when shooting into the sun (when the sun is in frame or the lens is pointed in the direction of the sun), and is reduced by using a lens hood or other shade. – as seen in Wikipedia

If applied well, the lens flare effect really does convey that good-feeling summer shot.

The Lens Flare Filter in Photoshop

Filter-render-lens-flare

The Lens Flare filter is found under Filter > Render > Lens Flare.

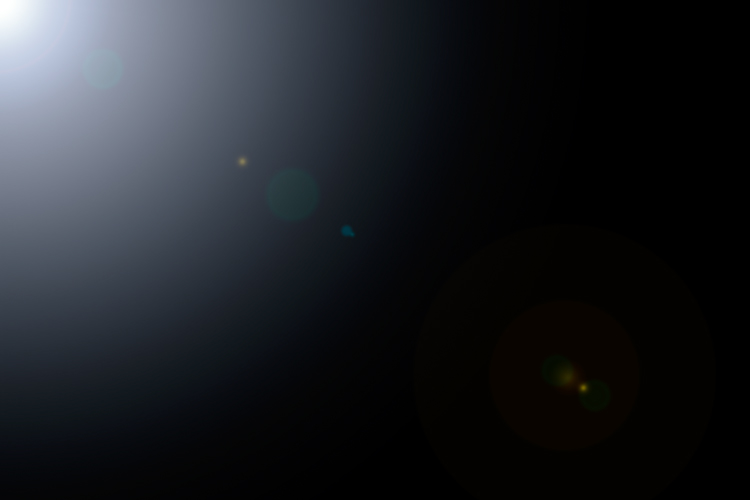
The Lens Flare is found under Filter>Render>Lens Flare. However, this doesn’t work in the same way as an Adjustment Layer, as in non-destructively. The effect works directly on the image itself. It also won’t work on an empty layer. So, create a new layer above the image and fill it with black. Change the blend mode to Screen. Go up to the Menu Bar and go to Filter > Render > Lens Flare.

As you can see in the image below, a small pop up dialog box appears with a preview window, and shows the four different types of lens flare available. Click inside the preview window to move the Lens Flare to whatever position you want.

Filter-render-lens-flare

The Lens Flare dialog box.

50-300mm-zoom-lens-flare

This is the 50-300mm zoom Lens Flare effect on a layer filled with Black.

105m-prime-lens-flare

This is the 105mm Lens Flare effect on a layer filled with Black.

Becky-and-Amy-with-lens-flare-applied

Lens flare applied

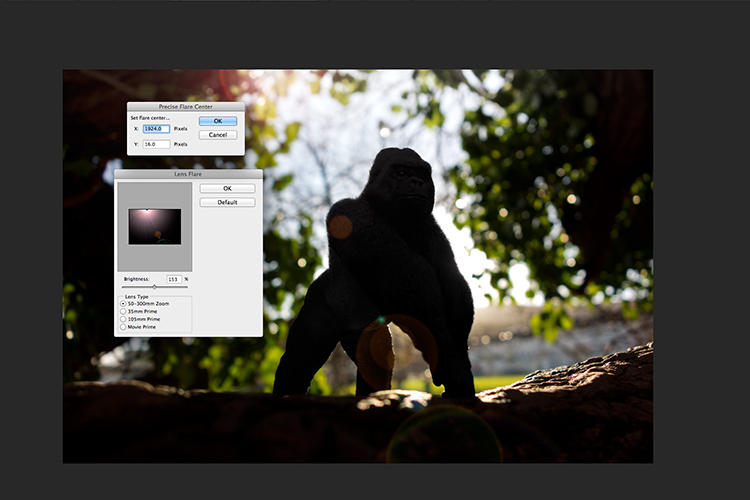
Tip: To get a more precise position for the lens flare, bring up the Info Panel, and move your cursor over the spot on your image where you want the flare to be positioned. The x and y coordinates tell you the exact position in pixels. When you have the Lens Flare dialog box open, click on the preview window while holding down the Alt/Option button, and the precise Flare Center dialog box appears. Type in the x and y coordinates and click OK.

Gorilla-precise-flare-center

The precise Flare Center dialog box appears when you click on the preview window of the Lens Flare while holding down the Alt key on a Mac (Option on PC).

How to create your own custom dust particle brush in Photoshop

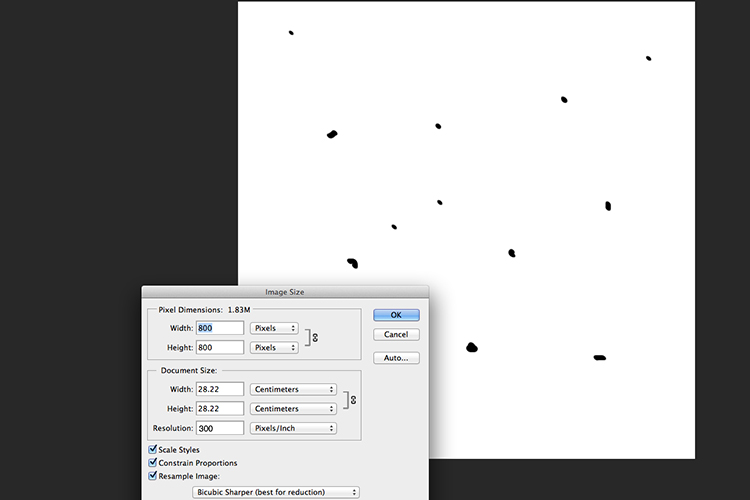
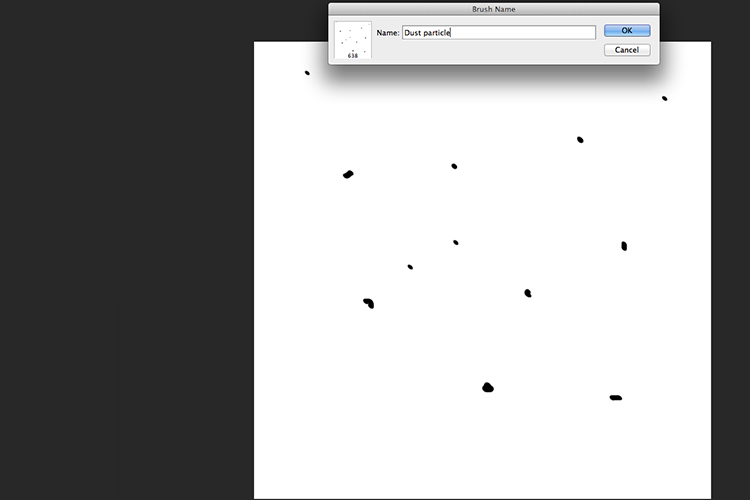
To create your own custom dust particle brush in Photoshop is relatively simple. Open a new document in Photoshop, I made mine 800×800 pixels on a white background, set the dpi to 240 or 300. Use a small brush, hardness set to 25%, and use the color black. Create random small dots on the canvas. Not too many. Go up to the Menu Bar > Edit > Define Brush Preset. Type the name of your new brush and click OK.

creating-new-document-custom-dust-particle-brush

Create a new document with a white background 800px x 800px.

naming-dust-particle-custom-brush

Go to Edit > Define Brush Preset and name your new custom brush.

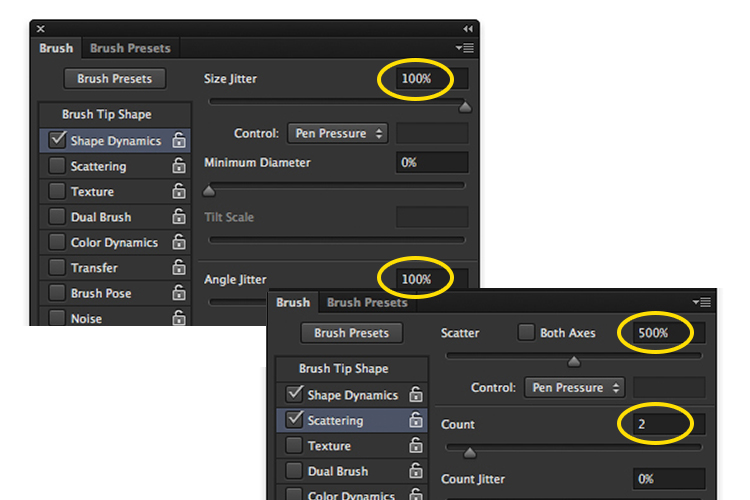
Before you start using your brush, you need to change a few properties of the brush so that it behaves like dust particles. Go up to Window > Brush. This brings up the brush dialog box. Use the following brush settings (see below screenshots also) Change the spacing to 100%, click on the Shape Dynamics box and move the Size Jitter and the Angle Jitter sliders to 100%. Next click on the Scattering tick box. I moved the Scatter slider over to 500%. Tick on Both Axes. Keep the Count Jitter at 2.

custom-brush-settings

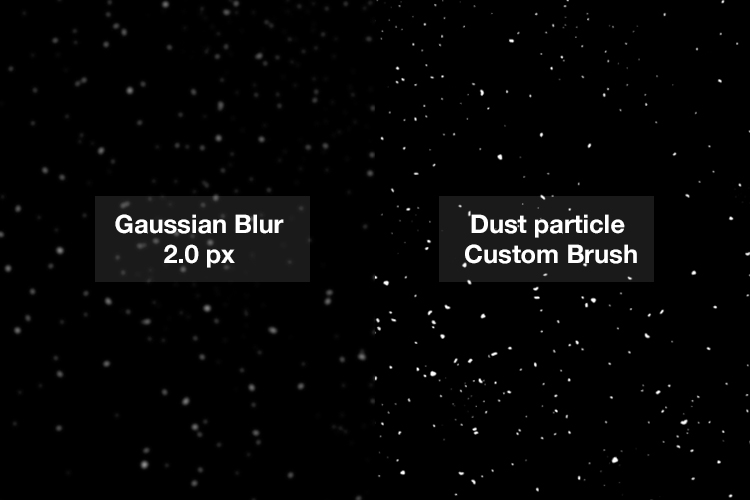
Create a new blank layer over your image and fill it with black. Using the custom brush, set to white, start creating dust particles across the canvas. Change the blend mode to Screen and now you can see the dust particles as white specks. Add some Gaussian Blur and reduce the opacity down to around 75%. You can always add a new layer to build up the effect too.

Dust-particles-with-custom-brush

How to create dust particles in-camera

I have to admit, this technique made me smile. I had been wracking my brains for a while for a possible solution to capture dust in-camera. The other morning, I got up early, as usual, to get my girls off to school. I looked out the kitchen window, the skyline was a lovely orange from the sun.

I then noticed all the specks (dirt) on the window and I had an eureka moment, I grabbed my camera and I focused on the specks using an aperture f/4. I also underexposed it by two stops. I wanted the specks to show through a dark background. I brought this image into Photoshop and applied a Levels Curve Adjustment to darken the image even more. I placed this image on the photo of the Gorilla. I then changed the blend mode to screen. I added some Gaussian Blur and reduced the opacity. Not bad for what is essentially dirt on a window.

Dust-particles-on-a-window

Dust and dirt particles on a window.

small-toy-plastic-gorilla

The image of the Gorilla without the Lens Flare effect and dust particles.

zoomed-in-dust-particles

Zoomed in area to show the dust particles I took of my own window!

Disclaimer: I had to persist with dirty windows for weeks in the name of photography. That’s my story and I am sticking with it!

Have you got a technique for creating your own flare or dust particles in Photoshop? If so, please share in the comments below.

googletag.cmd.push(function() {
tablet_slots.push( googletag.defineSlot( “/1005424/_dPSv4_tab-all-article-bottom_(300×250)”, [300, 250], “pb-ad-78623” ).addService( googletag.pubads() ) ); } );

googletag.cmd.push(function() {
mobile_slots.push( googletag.defineSlot( “/1005424/_dPSv4_mob-all-article-bottom_(300×250)”, [300, 250], “pb-ad-78158” ).addService( googletag.pubads() ) ); } );

The post Creating a Lens Flare Effect and Dust Particles in Photoshop by Sarah Hipwell appeared first on Digital Photography School.


Digital Photography School

 
Comments Off on Creating a Lens Flare Effect and Dust Particles in Photoshop

Posted in Photography


9 Tips for Adding a Warm Sun Flare to Your Image

21 Oct

Photography, as an art form, is simply the capture of light on either a sensitive physical medium or, in more recent times, an electronic sensor.

What makes a photograph unique and attractive to the eyes is the distribution of that light. Shadows, highlights, and varying levels of warmth and tone evoke emotion when viewing them, emotionally investing you to the picture you’re viewing.

One of the most dramatic instances of light that can occur in a photo is flare, and more specifically, a sun flare. You’ve no doubt seen spectacular images with beams of light radiating through the photo, giving you a wonderful sense of warmth and brilliance.

21474625629_1dd03156ae_k

I remember about three years back, a friend asked me to how to produce the warm flares that were visible in many of my photographs. I tried to explain, but realized I really didn’t know the exact combination of properties that worked. I just knew the sunlight coming through a camera lens at the right angle created a beautiful artifact, and that I was able to achieve it pretty consistently in my beach, landscape, and nature shots taken at sunset.

Over time, I learned the details of what it takes to incorporate this effect, and how to use it to my advantage to get a warm, dreamy feel that amps up the viewer’s connection with the photo. This is what I’d like to share with you, as it’s one of the easiest ways to inject emotion into your photography.

In this article, we’ll cover what flare is, what artistic and aesthetic benefits you can derive from it, and finally, how to produce and use it effectively in your photography.

What is sun flare?

Lens flare, as described in its most basic form, is the result of a bright light source entering the lens and producing artifacts, shapes, and effects in the resulting image.

Technically, lens flare and sun flare are different entities, but for the purpose of this article, we’ll treat them the same. We will be talking about the effect created in-camera by having bright sun as a light source in, or near, the edge of the frame.

21629871846_47b2c9c4fa_b

On many occasions this is an unwanted effect. For this reason a lens hood is often used to prevent flare, when bright light shines on the lens opening from outside the frame. Flare often reduces cleanliness and clarity in a scene that requires it, such as with architectural or commercial photography.

But flaring has a beautiful side as well, as you know. Some of us strive for the warmth and haziness that flared light from the sun can provide. Environmental portraiture is an example of an area that utilizes this effect. So how can we create and use flare to our advantage?

21036819798_41e380f648_h

Creating the flare

1. Don’t try this on a cloudy day

The main requirement to create flare is of course, the sun. If you’re shooting on an overcast day and there isn’t any sun poking through, you won’t be able to create a flare.

2. A low angle is best

Although you can create flare at any time during the day, it’s much easier, and much more dramatic, to shoot the sun when its low on the horizon – in other words, at sunrise or sunset, during the golden hours.

This is because you’ll need the sun in the frame, or just outside the frame, and this will usually coincide with your subject positioning.

21469116409_265a1699e2_k

3. Drop the lens hood and pick your lens

If you’re using a lens hood, remove it. Lens hoods are intended to reduce glare and flare from light sources outside the frame, which is exactly opposite of what you’re looking for in this case..

To amplify the chances of getting a good flare, try using a zoom lens, as opposed to a prime. The additional spaces and mechanical parts inside the zoom give the sunlight more room to bounce around and do its thing.

4. Shoot in Manual Mode

This particular discipline is based on the principle that the slightest change in orientation, composition, or aperture can make a pretty big difference in the end result. Shooting manually will allow you to have finer control over these factors and make things much easier for you.

Shooting with Live View can help even more, as you’ll be able to monitor changes in your scene in real time.

5. Settings: Aperture and more

You can use any aperture you wish when creating flare effects, but the look will differ depending on what setting you choose. At smaller apertures (f/11 and smaller), any visible part of the light source will create more of a starburst effect, while a larger aperture (f/8 and larger) will diffuse and disperse the effect, and you’ll end up with a much smoother distribution of the light.

Shutter speed also affects the final result, as more light streams into the lens when using slower speeds; therefore, you’ll have more of a flaring effect.

20950860109_026cca9525_o

6. Focus first

The large amount of light coming into your sensor will affect the autofocus on your camera if you’re using it. So, focus on your subject first by blocking the sun somehow, whether it be your hand, a reflector or a piece of cardboard. Then, once you’ve focused (and lock it or use back button focus), you can shoot normally knowing you are focused correctly for the given distance.

7. Don’t forget to light your subject

If you’re photographing a portrait, don’t forget the negative effect the flare can have on the proper lighting of the face and body. If you find the subject’s face, or other important areas, are washed out too much from the high light levels, use a reflector or other methods of fill light to compensate, and ensure your subject is well illuminated.

Alright, let’s get to shooting!

8. Method one:  In the frame

There are two primary methods of creating the flare effect. The first is by having the sun actually within the frame of the image. Naturally, just having it centered and completely uncovered will result in a washed out photo. You’ll want to have something to partially block the light, so that a flare can be achieved without washing out the subject of your photo. Trees, a distant treeline or building, and your subject can all provide enough cover to produce the desired effect.

16777527017_5540bf7379_b

Take care not to capture too much light. Sometimes the resulting flare can be so pronounced that your image is completely washed out. Shoot several frames, and check the amount of flare you’re getting. If it’s too much, compose the sun a little more out of frame (or more hidden) to reduce the effect.

9. Method two: out of the frame

For an even more pronounced and diffused flare, you can compose your image with the sun partially, or completely out of frame. Usually the best results come from having the sun just outside the camera’s view. Experiment with position to find the correct angle and amount of flare necessary for the shot you’re after.

This method produces more a diffused and smooth flare, especially in the early morning and late evening hours, when the sun is very low on the horizon.

16642785747_fd851ca392_k

That’s it! 

Adding a nice looking sun flare to your image really isn’t tough at all. Following a few rules is all you have to do, and like everything else in our wonderful world of photography, the result is always subjective. Add a little, add a lot, all that matters is that you’re happy with the final image! There’s no wrong way to do it.

So get out there and get your flare on! Of course, we’d love to see some examples of what you can do with this effect, let’s see your best shots!

googletag.cmd.push(function() {
tablet_slots.push( googletag.defineSlot( “/1005424/_dPSv4_tab-all-article-bottom_(300×250)”, [300, 250], “pb-ad-78623” ).addService( googletag.pubads() ) ); } );

googletag.cmd.push(function() {
mobile_slots.push( googletag.defineSlot( “/1005424/_dPSv4_mob-all-article-bottom_(300×250)”, [300, 250], “pb-ad-78158” ).addService( googletag.pubads() ) ); } );

The post 9 Tips for Adding a Warm Sun Flare to Your Image by Tim Gilbreath appeared first on Digital Photography School.


Digital Photography School

 
Comments Off on 9 Tips for Adding a Warm Sun Flare to Your Image

Posted in Photography


Lee Filters introduces updates to super-wide SW system to fit more lenses and reduce flare

28 Mar

A new version of the Lee Filters SW150 system holder has been introduced that allows compatibility with a broader range of extreme wide angle lenses, and which has been designed to reduce the impact of reflections from the rear surface of fitted filters. The Lee Filter SW150 Mark ll now allows the existing 150mm-wide filters that were developed for the original SW150 to be fitted to four lenses using model-specific adapter rings – with more on the way. Read more

Articles: Digital Photography Review (dpreview.com)

 
Comments Off on Lee Filters introduces updates to super-wide SW system to fit more lenses and reduce flare

Posted in Uncategorized


Nikon D750 flare investigated: Why we’re not worried

21 Jan

Much of the talk on the internet since the launch of the D750 has been about flare, or rather the appearance of dark bands when bright light sources are just outside of the frame. Not all models are affected, and Nikon will service cameras that are affected for free. Nonetheless we wanted to see for ourselves what the problem looks like and how much of a cause for concern it should be for D750 owners. Read more

Articles: Digital Photography Review (dpreview.com)

 
Comments Off on Nikon D750 flare investigated: Why we’re not worried

Posted in Uncategorized