RSS
 

Posts Tagged ‘FINISHED’

Using a Flat Picture Style for Better Finished Images

13 Aug

During my career in photography, I’ve continued to evolve, both my shooting and editing styles, to achieve the results I wanted. Several years ago, while working with film editors on a cinema project, I came across a concept that I decided to apply to my own photography, and I have to say, it has improved my final images a great deal. Let me explain about using flat picture styles.
Finished-Image

When Hollywood studios film a movie using a digital cinema camera, many times the camera will be set to record what is known as Log Gamma. This is similar to the picture styles that we DSLR and camera users have come to know and love. But while picture styles or picture controls are for the most part intended to provide a finished look, Log Gamma does just the opposite. A video file shot using Log Gamma will be very flat, with little contrast and color saturation. The purpose of shooting video this way, is so that it retains as much information as possible about the range of tones in the image, so the colorists who work on the video later can bring out that detail, and create a visual look to the film. This process is called color grading.

As I began to understand what the colorists were doing, I adjusted my workflow to allow me to take advantage of the same concepts. I find that by using a flat, low contrast, low saturation picture style, when I process the RAW file I can bring out better detail and contrast, and avoid clipping in the highlights and shadows.

Choosing a Flat Picture Style
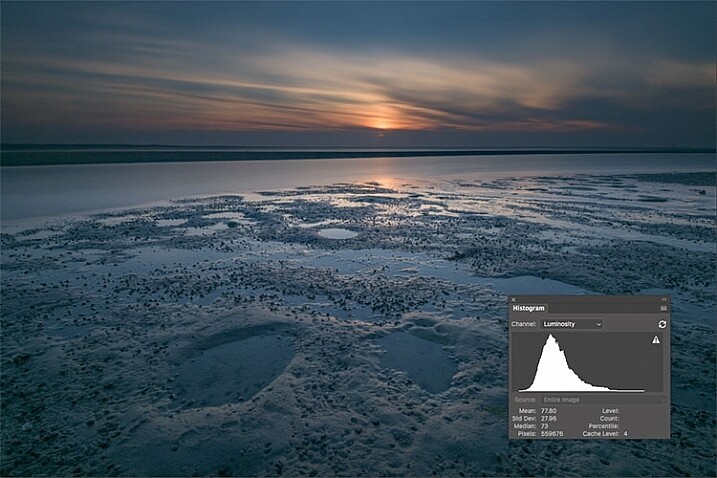
Before Image With Histogram

A flat or neutral picture style will give you an image with the least contrast, maintaining better highlight and shadow detail. This allows you to bring out those details in processing. The histogram on your camera, and later in Photoshop or Lightroom, allows you to see where your highlight and shadow tones fall, to avoid clipping.

I had been shooting RAW for some time, but have left the Picture Style set to Standard or Landscape, for the most part. Once I saw this technique, I decided to change my picture style on my camera to Neutral (for Canon cameras) or Flat (on newer Nikons).
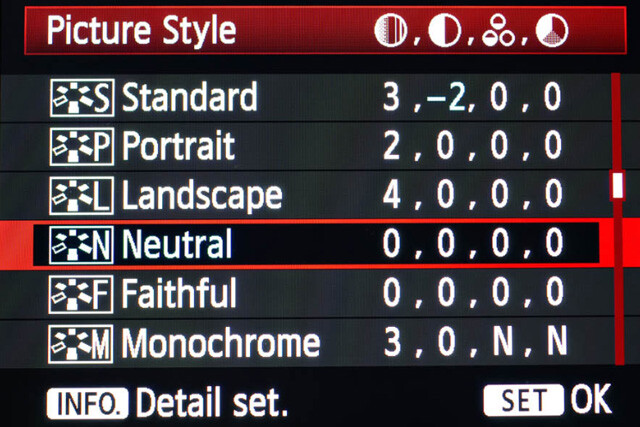
Canon Picture Style

Canon Picture Style

The reason is that the histogram shown on the back of the camera, as well as the image preview, reflect the selected picture style. The result is that if the picture style selected is a more contrasty one, such as Landscape, the histogram will reflect that, and may indicate clipping of highlights or shadows, especially in a contrasty scene.
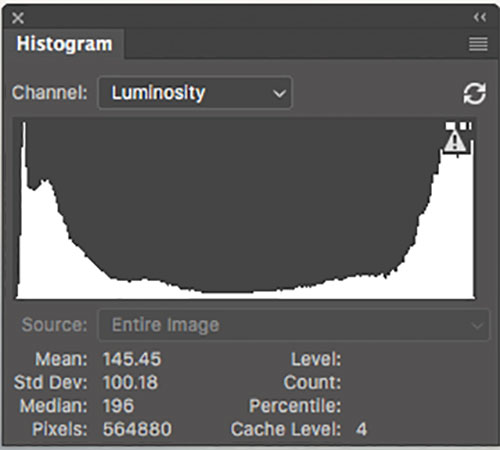
Clipped Histogram

This histogram shows clipped highlights, meaning detail is lost in the brightest areas of the image.

On my Nikon D810, I use the Flat picture control, because it is the best choice for capturing the full range of tones in the scene, and those tones are reflected on the histogram on the back of the camera when I review the shots. This is important because I need an accurate indication of where the highlights and shadows in a scene fall in my histogram.
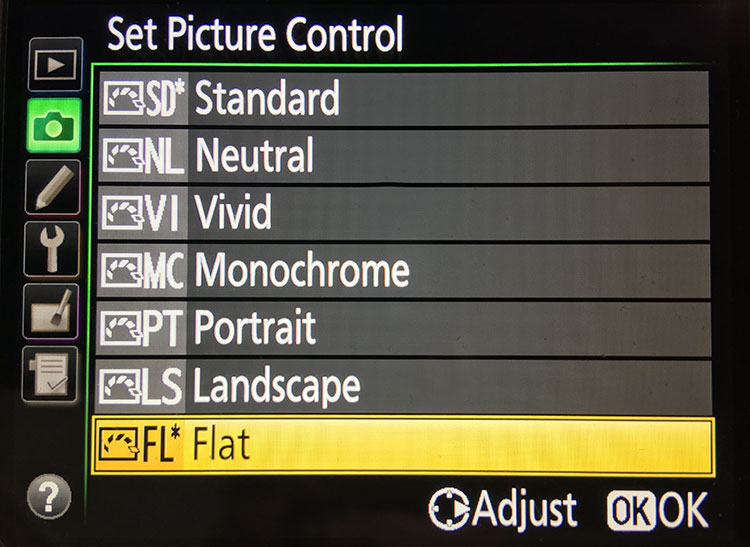
Nikon 810 Flat Picture Control
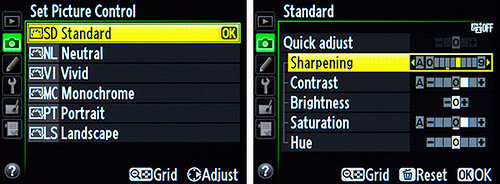
Nikon 810 Flat Picture Control

Nikon picture control

Nikon picture control – if you do not have Flat, choose Neutral or Faithful

The histogram on your camera is a graphed indication of where the pixels in your image fall in relation to highlights and shadows. The left edge represents blacks, the mid-left represents shadows, the middle is midtones, the mid-right is highlights, and the far right is whites. While not all cameras have a Flat picture control or style, most have a Neutral or Faithful picture style or control, that works similarly. Also, most cameras give you the ability to edit the picture styles, so you can turn down the contrast if you like, ensuring that you capture more highlight and shadow detail, and reducing the chances of clipping highlights or shadows.

When you clip highlights, objects in the scene that are clipped will show as pure white with no detail. When shadows are clipped, objects in those areas will show as pure black in the scene, also with no detail. When viewing the histogram, if the squiggly lines that make up the graph are pushed up against either the left or the right side, that is called clipping. When that happens, you are losing detail in the shadows if it’s pushed against the left, and in the highlights if the graph is pushed against the right. By reducing the contrast in the picture style, you’ll reduce the chances of losing detail in the scene.

Shooting RAW, and knowing I’ll be making adjustments in post, it doesn’t really matter what picture style I use, because I can change that when processing the RAW file. But it’s essential to be able to see an accurate histogram on my camera, to ensure I’ve captured as much tonal range as possible.

Processing the RAW File
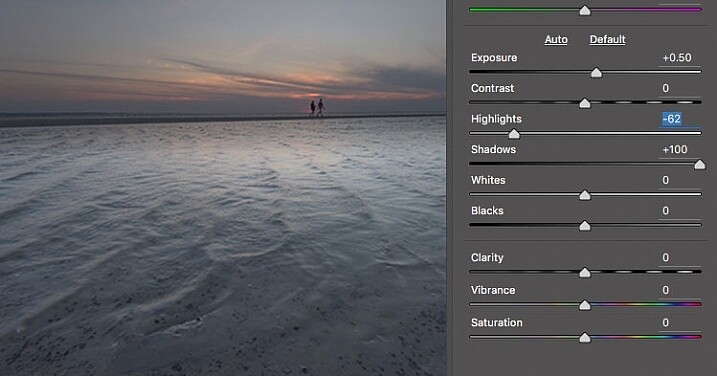
Image photographed using flat picture control

This image was shot using the Flat picture control, and then the highlight and shadow sliders in Adobe Camera RAW were adjusted to further reduce contrast.

Once I begin processing the RAW file, I’ll do even more, if necessary, to flatten the image and compress the range of tones within the histogram. This includes using the Highlights and Shadows sliders in Adobe Camera RAW to bring out details on both ends of the histogram.  You can watch the histogram change in Adobe Camera Raw or Lightroom as you do so, to be sure you don’t go too far. If the highlights begin to look muddy, you’ve gone too far. By the same token, if the shadows start to look washed out, that’s probably too far as well. You want to maintain detail in each, but not lose the depth of tone completely. It’s important to note that this adjustment will vary for different images, depending on where the highlights and shadows fall in the images.

In addition to adjusting the highlights, shadows, and contrast here, I will use the Dehaze slider, Lens Correction, and Spot Removal brush in Adobe Camera RAW. If you prefer, you can use the Vibrance, Saturation, and Adjustment Brush to complete the image in Adobe Camera RAW or Lightroom, but my preference is to work in Photoshop. There I can use a Layers workflow along with masking and Adjustment Layers and with various plugins, to achieve my final image.

Building Up Color and Contrast
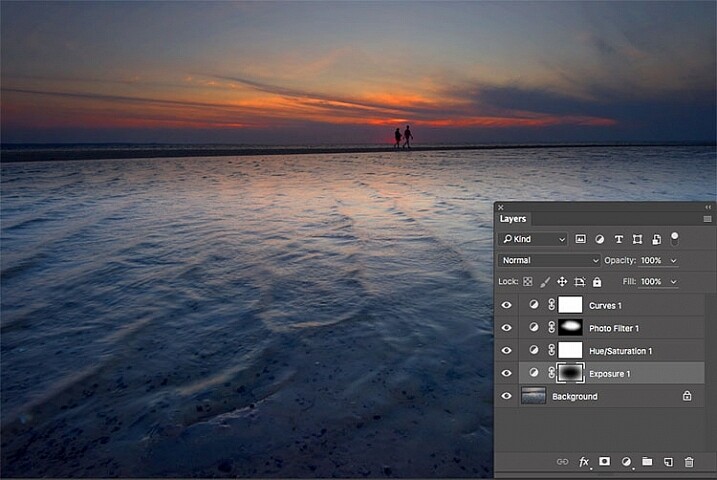
Using Adjustment Layers

Using Adjustment Layers in Photoshop, I built up the color saturation and contrast to achieve the final image.

Once I have the image at the desired level of flatness, I then go about building up color saturation and contrast, or in Hollywood terms, color grading my image. After bringing the image into Photoshop, there are a number of ways you can go about this. The first is to use adjustment layers so that you can continually adjust each layer as desired, until you flatten the image for your final output. In addition, if you’re making an adjustment that you only want to apply in certain areas, you can use layer masks to hide or reveal it as desired.

Many of these adjustments will be to personal taste. I personally prefer my images to have punchy color and contrast. So a set of adjustment layers I might use would be Vibrance, Exposure, Hue/Saturation, Curves, and Exposure.  The flexibility of using adjustment layers allows me to direct adjustments where I need them, rather than being forced to make them globally.
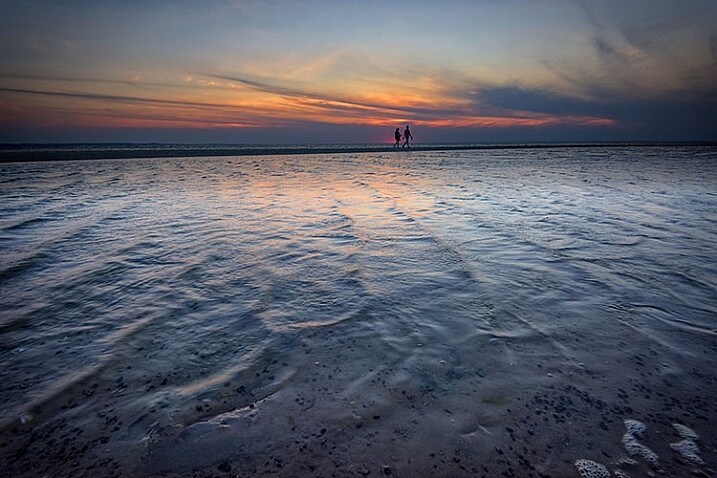
Image processed with Nik Color Efex Pro

This is the same image, but I used Nik Color Efex Pro to achieve the final image instead of adjustment layers.

If adjustment layers aren’t your thing, perhaps using a plugin such as Google’s Nik Efex Pro. It’s now available at no cost, and is a software package I highly recommend. I’ve created several presets in Color Efex Pro, and will also use Viveza and its control points to further adjust my image. For landscapes, in Color Efex I have created a preset using Brilliance/Warmth, Pro Contrast, Skylight Filter, Detail Extractor, and Vignette:Lens, that I find to be pleasing for a majority of my landscape images. Depending on the image, I will tweak these settings to meet my vision.

Summing Up
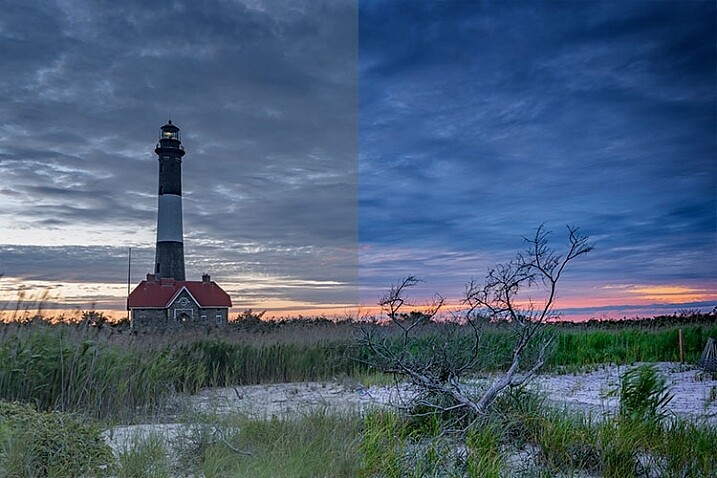
Before and After

On the left is the image with its tones flattened and desaturated, using a Flat picture control and adjusting highlights and shadows as needed. On the right is the image fully processed building contrast and color saturation.

By starting with a flattened file, you give yourself room in the range of tones to build contrast and saturation, without clipping highlights, shadows, or any of the color channels. While shooting with a more finished picture style may look more pleasing on the camera’s LCD screen, or upon import into Lightroom or Photoshop, the contrast has already been adjusted to give it a pleasing look. Any adjustments to Saturation or color may result in a file that at the very least looks overcooked, and at worst, shows evidence of clipping highlights, shadows, or color channels.
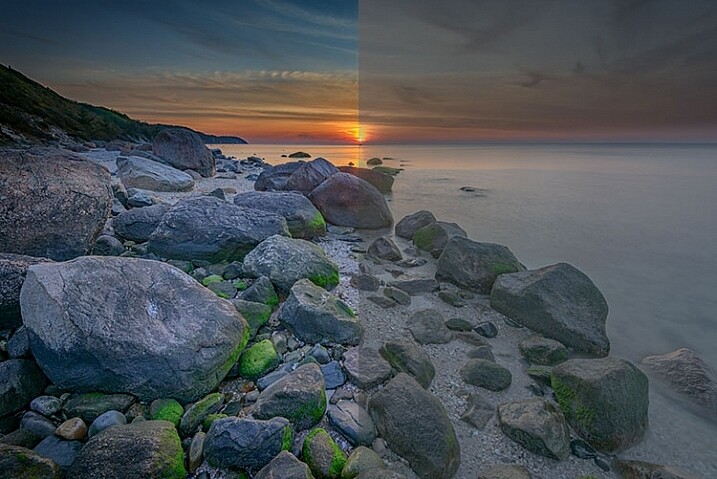
An image showing before and after color grading.

On the right is the image with the flat picture style, while the left has been “color graded” in Photoshop.
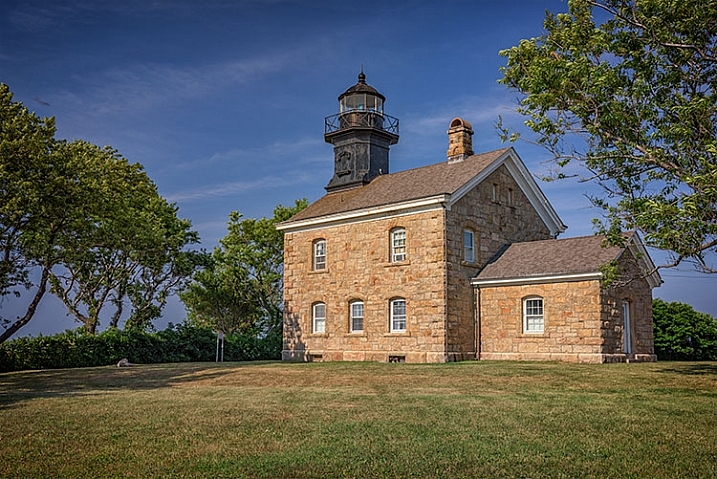
Building-contrast-2

googletag.cmd.push(function() {
tablet_slots.push( googletag.defineSlot( “/1005424/_dPSv4_tab-all-article-bottom_(300×250)”, [300, 250], “pb-ad-78623” ).addService( googletag.pubads() ) ); } );

googletag.cmd.push(function() {
mobile_slots.push( googletag.defineSlot( “/1005424/_dPSv4_mob-all-article-bottom_(300×250)”, [300, 250], “pb-ad-78158” ).addService( googletag.pubads() ) ); } );

The post Using a Flat Picture Style for Better Finished Images by Rick Berk appeared first on Digital Photography School.
Digital Photography School

 
Comments Off on Using a Flat Picture Style for Better Finished Images

Posted in Photography


Photo Finished: 12 Closed & Abandoned Camera Stores

22 Jun

[ By Steve in Abandoned Places & Architecture. ]

abandoned camera store 1c
Point, click, shut! Camera stores are rapidly fading into obsolescence as smartphones take the place of mass market cameras, film and paid photo processing.

abandoned camera store 1b

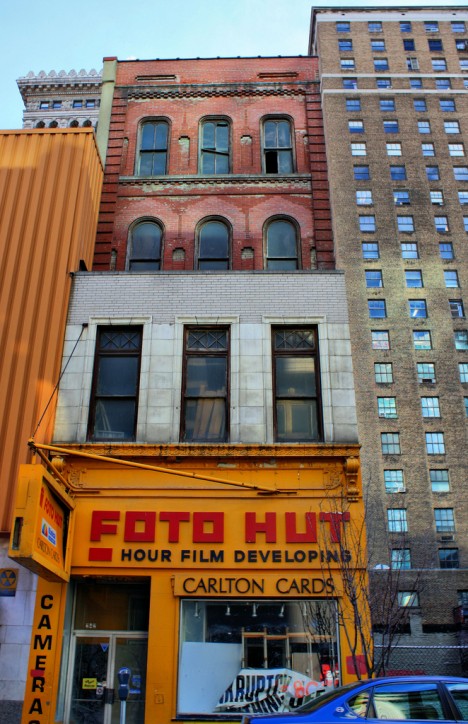
Now here’s a developing story… NOT! The long-abandoned Foto Hut on Forbes Avenue in downtown Pittsburgh sold cameras, film and greeting cards while promising to develop film in an unknown number of “hour” – well, either “one” or “24”, it’s hard to tell from the red rectangle on the Kodak Yellow sign. Kudos to Flickr users strawbrryff and john (J Blough) for capturing this frozen-in-time, eternally bankrupt abandoned camera store in November 2010 and February 2011 respectively.

Chick Clinic

abandoned camera store 0c

abandoned camera store 0a

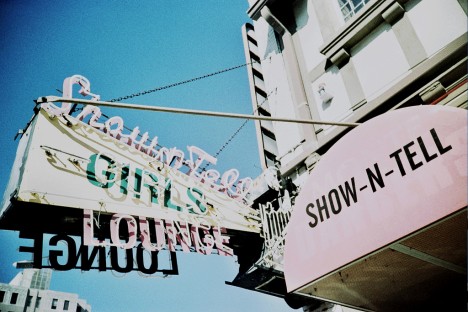
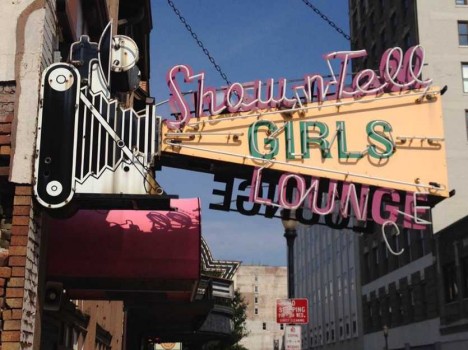
Once a one-stop-shop for Louisville, Kentucky’s photo fans, Schuhmann’s Click Clinic opened in 1946 and its eye-popping animated signage dates from the early 1950s. Schuhmann’s kicked the bucket in 2001, however, and the sign out front was modified to advertise the store’s new tenants: the Show-N-Tell Showgirls Lounge. No cameras allowed, we’re guessing.

abandoned camera store 0b

abandoned camera store 0d

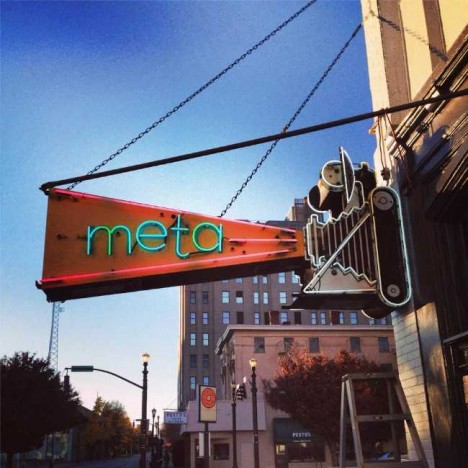
Takes a licking and keeps on clicking? Both the club and the subsequent owners, the circa-2013 Meta bar, cleverly modified the front signage while completely ignoring the former camera store’s other sign, mounted on the back of the building overlooking the parking lot.

Foto Finis

abandoned camera store 2

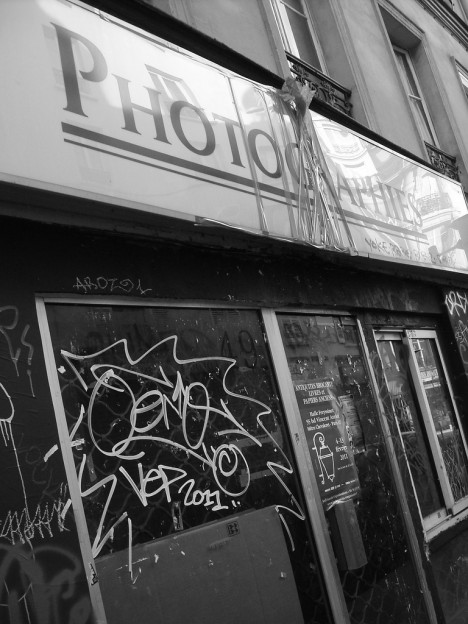
Flickr user Who Cares? (busy.pochi) snapped this abandoned Photographies camera and book store in February of 2011, and it didn’t take long for graffiti taggers and handbill posters to take advantage of the stores neglected status. One would think a city as photogenic as Paris could support at least a few camera stores.

Morgue & Camera

abandoned camera store 3a

abandoned camera store 3d

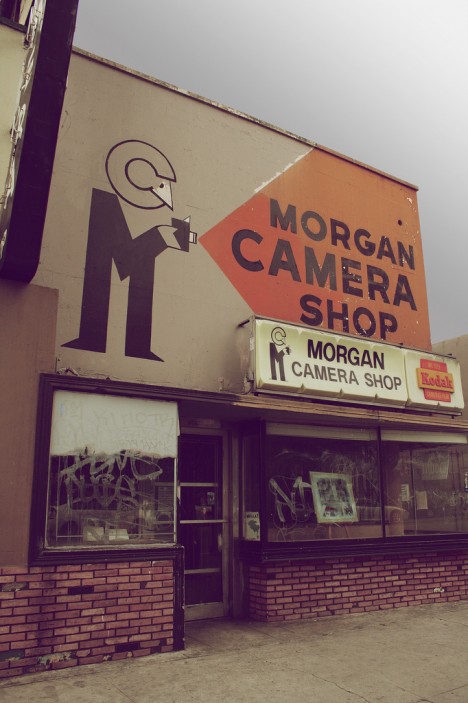
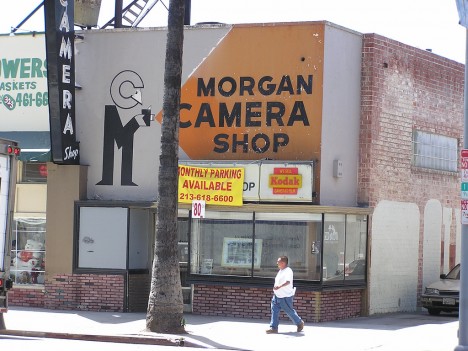
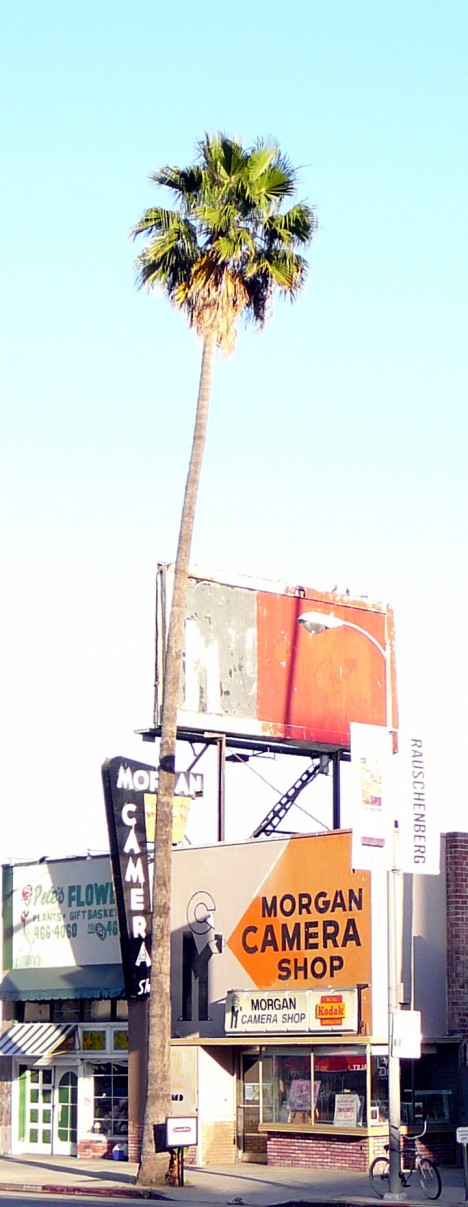
A Hollywood landmark since the 1930s, Morgan Camera Shop finally gave up the ghost a few years into the twenty-first century. Boasting an idyllic location amongst Hollywood’s iconic tall palms and a sign influenced by Bauhaus architecture, Morgan Camera played a large roll in introducing 35mm photography to the United States from Europe.

abandoned camera store 3c

abandoned camera store 3b

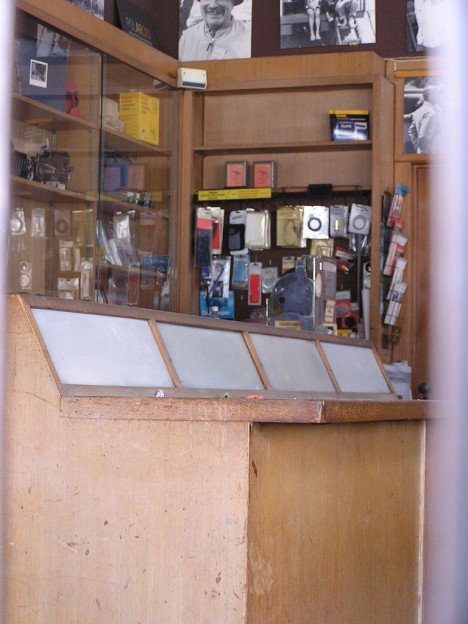
Morgan Camera exists in an odd sort of limbo – closed to be sure, but otherwise left pretty much alone inside and out thanks to the efforts of the Morgan family, members of whom who still own both the shop and the building.

Next Page – Click Below to Read More:
Photo Finished 12 Closed Abandoned Camera Stores

Share on Facebook


[ By Steve in Abandoned Places & Architecture. ]

[ WebUrbanist | Archives | Galleries | Privacy | TOS ]


WebUrbanist

 
Comments Off on Photo Finished: 12 Closed & Abandoned Camera Stores

Posted in Creativity


Photo Finished: 9 Snappy Camera-Shaped Buildings

28 Apr

[ By Steve in Architecture & Offices & Commercial. ]

camera-shaped buildings
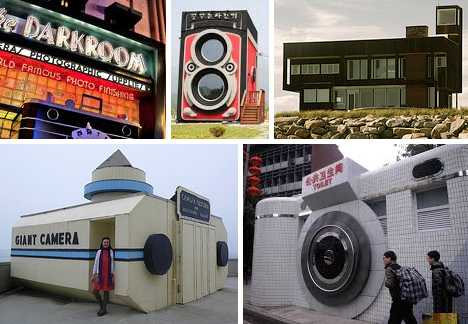
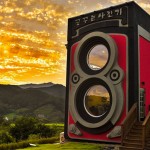
Yo dawg, these 9 camera-shaped buildings allow you to take selfies with your camera in front of buildings built to look like cameras. Now say “cheesy”!

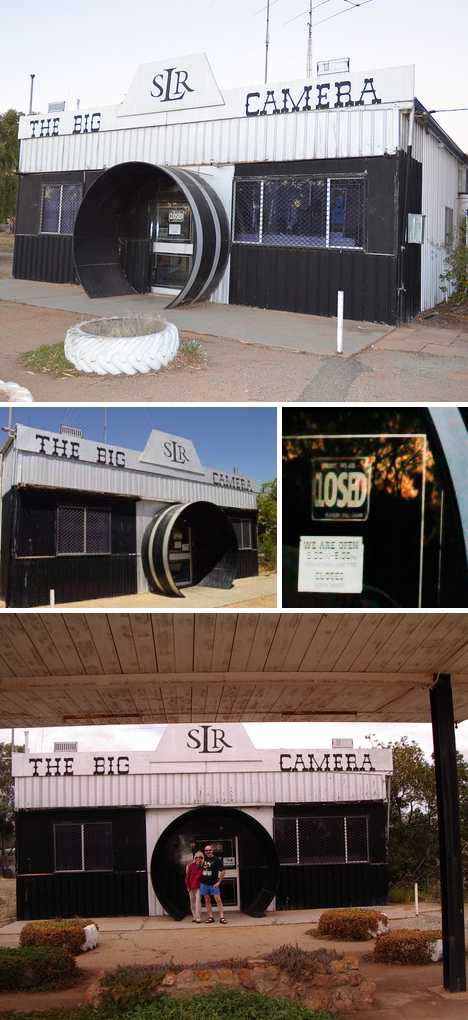
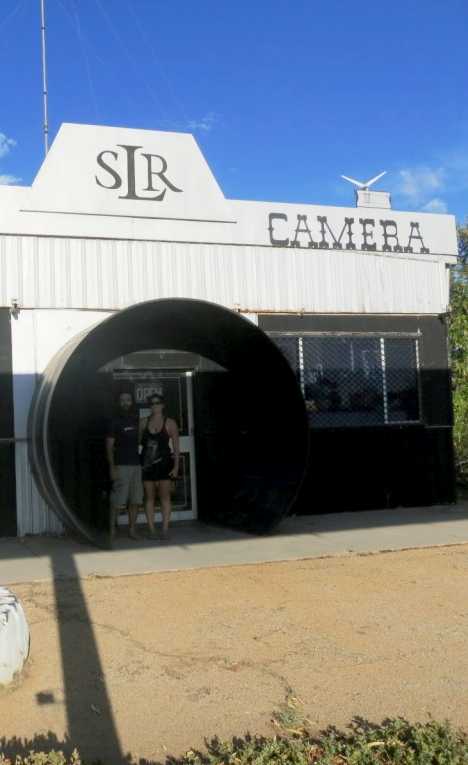
The Big Camera – Perth, Australia

The Big Camera Meckering Australia(images via: Sascha Grant, About Australia, Philip Gostelow and Crosby Family)

The Big Camera, located about 130km (80-odd miles) east of Perth in Meckering, claims to be “the only museum, totally dedicated to photography, open to the public anywhere in Western Australia.” Well, mostly open. A note to trivia fans: Meckering’s original name was Beebering, and Baby are we glad they changed it!

The Big Camera Meckering Australia (image via: Our Naked Australia)

In addition to displaying unique items of photographic memorabilia dating back to before the invention of photography itself, The Big Camera exhibits information relating to the 6.9 magnitude Meckering Earthquake of 1968 that destroyed most of the town’s buildings. We’re not sure if The Big Camera itself was built before the terrible tembor but if so, it must be shockproof.

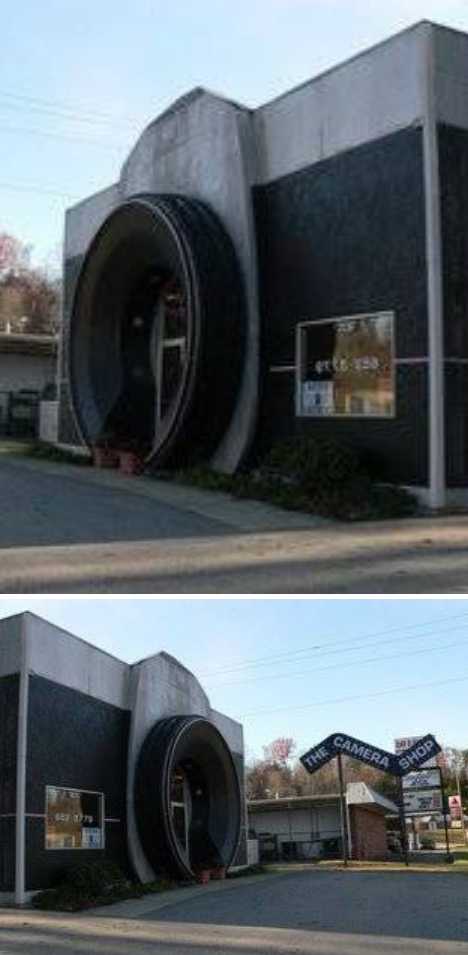
Picture Perfect Nail Salon – Marion, NC, USA

Picture Perfect Nail Salon Marion NC camera (images via: Topix)

Step 1: Design your camera store in Marion, North Carolina to look like a big ‘ol camera. Step 2: Spend too much money on construction and end up selling your nifty camera-shaped store before it even opens. Step 3: Profit? Well, two out of three ain’t bad. Hopefully the “Picture Perfect Nail Salon”, which moved into the nearly completed building just after the images above were taken, is looking after Step 3 by raking in dough hand over fist.

The Darkroom – Hollywood & More

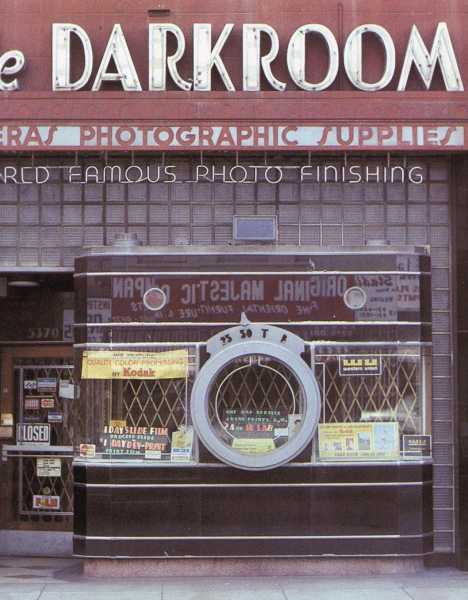
The Darkroom Los Angeles camera store(image via: Sheridan ATV Film Festival)

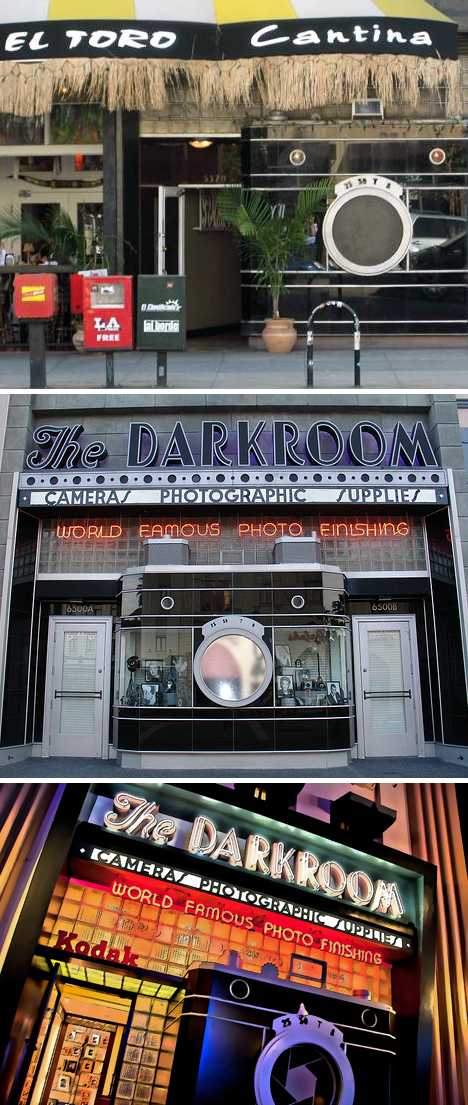
The Darkroom, located at 5370 Wilshire Boulevard on Los Angeles, California’s Miracle Mile, opened in the mid-to-late 1930s. The store featured a nine foot tall black glass facade and window that aped the look of a period Argus 35mm camera.

The Darkroom camera store Disney(images via: Yesterland, Topazladygem and AllEars.net)

After the store shut (or shuttered) its doors for good, the location re-opened as a Mexican restaurant whose cosmetic exterior refinements couldn’t hide The Darkroom’s original humungous camera lens. Fans of programmatic architecture shouldn’t shed too many tears, however. The Disney company has perpetuated The Darkroom’s unique look by incorporating extensive elements of the design into its wholly-owned camera & photography supply stores located in Disney theme parks around the world.

Diego Castillo Roa’s Art Decal

Diego Castillo Roa camera decal window(image via: PetaPixel)

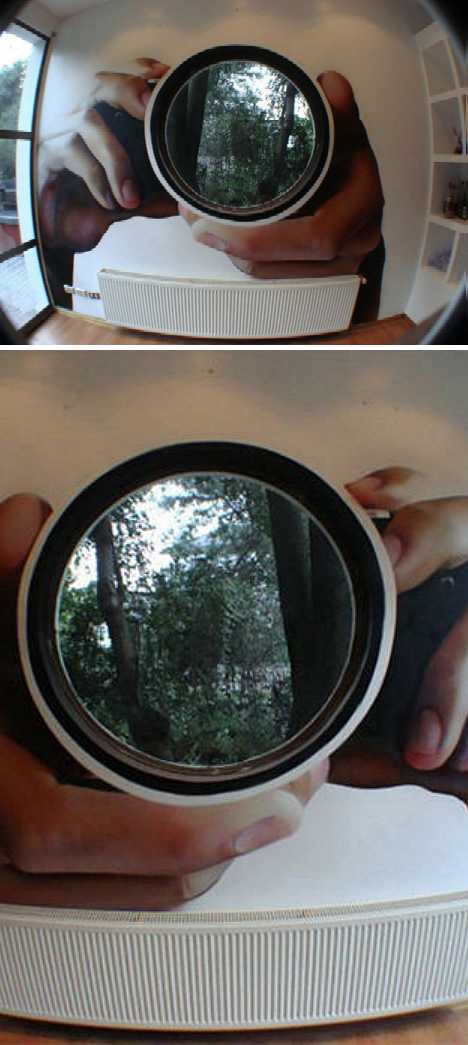
Ever wonder what would happen if you turned a camera-shaped building inside out? Us neither but Chilean artist Diego Castillo Roa has done the next best thing: turned a circular window into a jumbo camera lens that, in the words of the Boomtown Rats, is “always looking atcha ah-ah-ah-ah!” Roa’s purely decorative concept saves tons’o’bucks by not requiring your home to actually look like a camera, though at least one big round window is one firm requirement. Not being perturbed by living in a fishbowl is another.

Next Page – Click Below to Read More:
Photo Finished 9 Snappy Camera Shaped Buildings

Share on Facebook


[ By Steve in Architecture & Offices & Commercial. ]

[ WebUrbanist | Archives | Galleries | Privacy | TOS ]


WebUrbanist

 
Comments Off on Photo Finished: 9 Snappy Camera-Shaped Buildings

Posted in Creativity


Lightroom Workflow – from Setup to Finished Sunrise Photo

01 Dec

One of my favorite times of the day to photograph is sunrise. There’s just something about the peacefulness of being up before the sun, before most of the human world, that allows me to clear my head.

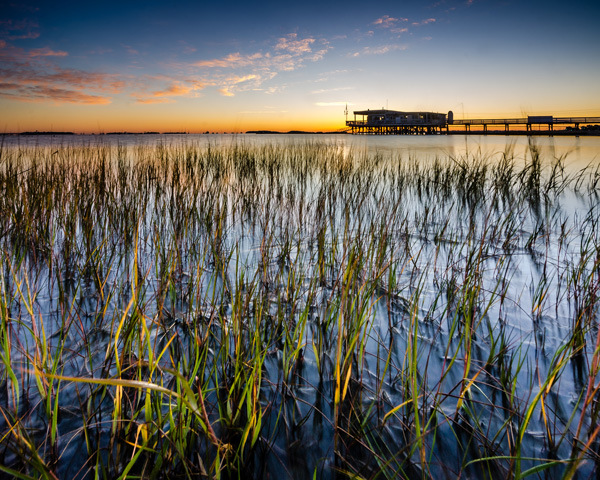
Sunrise photos have always been high on the list of fan favorites and I know that there are a great many DPS readers who love them as well, so I thought I’d share with you a little bit about how I made the shot above from finding the location to setting up the camera and then a step by step walk-through of my Lightroom workflow.

Lightroom Workflow Final Image

Determining a location

To begin a shoot you need a concept, and while photographing sunrise is always a great concept to start with, one of the most important things that you’ll need to do is find a location. This can be difficult to do sometimes, but if you’re struggling to find a new location, check out 5 Creative Ways to Find New Locations for Photography for some inspiration.

I can tell you that the inspiration for this photo came from my sister who saw this boat house while out on an afternoon jog. She sent me a text message demanding that I come spend a night so that I could photograph it at sunrise – and sure enough that’s exactly what I did. The key point to take away from this is, that inspiration can come from anyone and any where, so make sure that you are paying attention to your surroundings as well as what people are saying about their own.

As for getting to the location for a sunrise shoot you’re going to have to wake up early. Well before sunrise. For this reason I typically will either spend the night in a hotel or find a friend or family member who lives close enough to the location to allow me to crash for a few hours, otherwise there might not be any point of sleeping at all. Think of it like this… If you can still see stars – you’re doing it right!

Setting up the camera

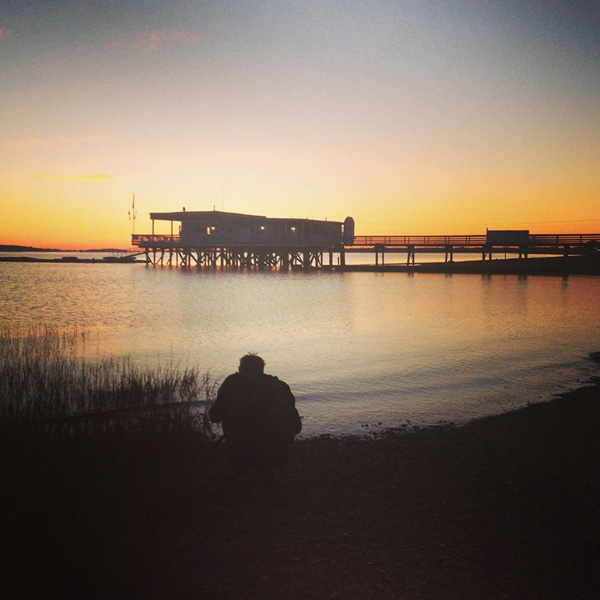
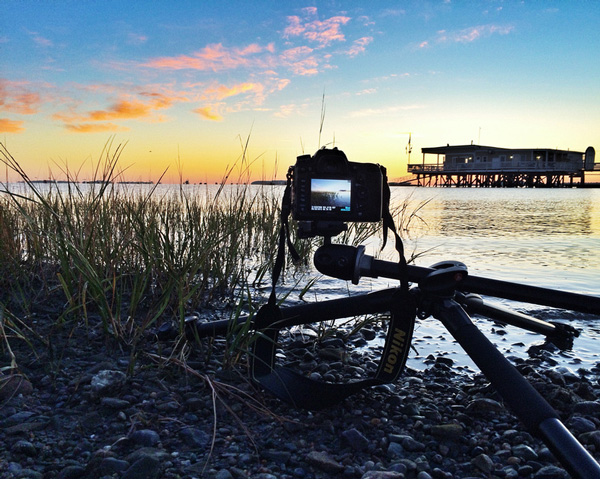
Since camera settings will vary depending on your scene I thought I’d share a couple behind the scenes shots. The first is one that my sister took of me while I was setting up my camera and tripod along the shore – notice how close to the water I get. The second shot is a close up that I took of my camera setup during the shoot, notice that for this particularity shot the tripod was nearly flat against the ground to allow me to get a very low perspective, and allow for the foreground sea grass to take up a good portion of the frame.

Lightroom Workflow - Setting up the shot

A behind the scenes shot of yours truly setting up the camera

Lightroom Workflow - Behind the Camera

A photo of the camera set up – notice how close to the water and how low to the ground I put the camera for this shot

It’s important to note that each shoot is going to be different and you must realize that with every sunrise and every location there will be challenges that you will have to overcome. While I can show you examples of how I set up the camera and my thought process behind it, when you get out to your own location it’s up to you to determine the best ways to photograph the scene.

Back home – it’s time to process the photos

Lightroom Workflow - Office

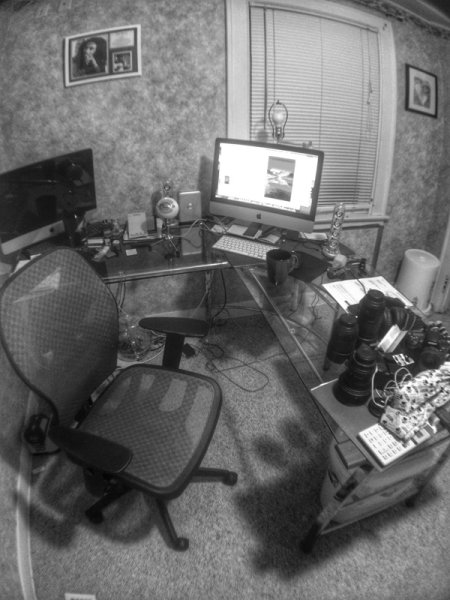
Just for fun I thought I’d throw in this snapshot of my office – What’s your desk look like?

Lightroom workflow – which frame to process?

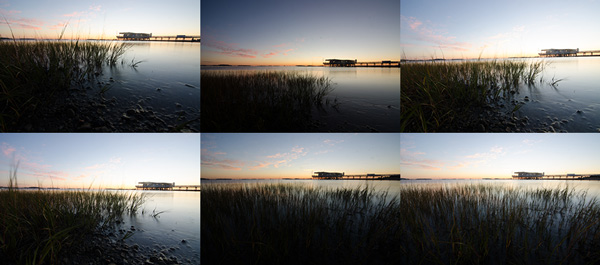
Before you can start processing you must determine which of the frames you want to use. There’s no “one-size-fits-all” way of doing this, it really comes down to the person behind the computer. Some people like to simply process everything from the start of their shoot to the end. Other people like to meticulously rate everything, fill in all the meta data and stay super organized. My own workflow usually consists of a quick browse through all the photos that I’ve captured in a particular shoot, rating each of the ones I want to edit with a 5-star rating, and leaving everything else untouched for the time being. I’ll usually come back to shoots from time to time, to see if anything I may have missed on my first go through jumps out at me on a second glance.

Lightroom-workflow-collage

Six different frames from the shoot – I chose the bottom right frame for today’s photo

Lightroom workflow – making adjustments

Now that you’ve chosen a photograph to edit, it’s time to dive into the develop panel and get started with the post production workflow.

Lightroom Workflow - Oriignal

Enter the develop panel and select the photo to be edited.

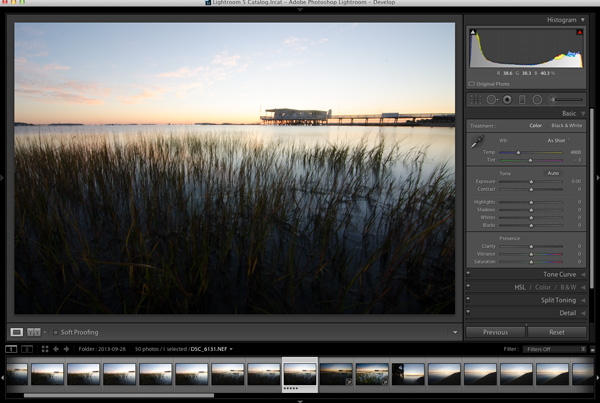
Since this photograph is all about the sunrise, the first step is to make sure that you get your sky exposure as close to perfect as possible. By making a small adjustment here to the exposure slider in the basic tab you can have a great effect on the sky which will set the foundation for the rest of the photograph. It might look a bit under exposed at first, but we will be fixing this and fine tuning everything throughout the tutorial.

Lightroom Workflow - Expose for the sky

Adjust the exposure for the sky

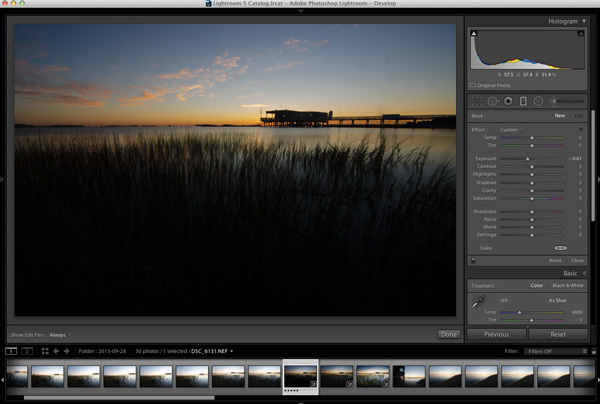
To bring the foreground back into the image you will want to add a graduated filter into the frame (assuming you didn’t use one in the field of course). To do this simply press the ‘M’ key on your keyboard to open that panel in Lightroom. To apply the graduated filter drag in from the bottom of the frame and place the filter on the horizon line. Remember the filter’s effect is greatest starting from the direction you initially dragged in from so here the effect will be greatest towards the bottom of the frame.

Next to bring the exposure back into the foreground by increasing the exposure and shadows sliders (moving them to the right) of the graduated filter until you’re satisfied with the look. You will be able to fine tune the image by using the basic tab a bit later. You can always go back to this graduated filter if you need to make a minor adjustment later on, as well, simply by revisiting the graduated slider panel and clicking on the button (dot) of the graduated slider to activate it for editing.

Lightroom workflow - graduated filter

Apply a graduated filter to adjust the exposure of the foreground without effecting the sky from the previous step

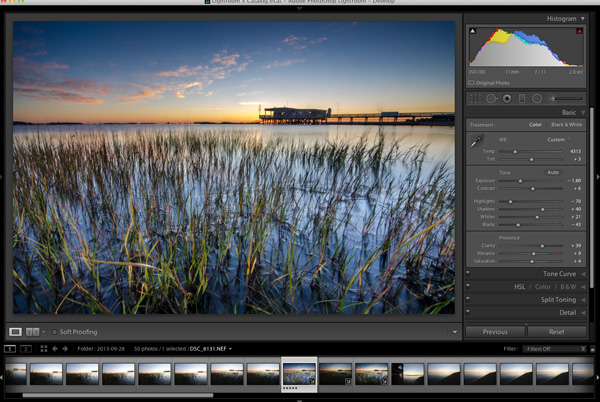
Now that you’ve exposed for the sky and brought back some foreground light, the next step is to add contrast, color, and clarity – all of which will help to make your image ‘pop’. This can be done by using the basic tab in Lightroom, which I’ve covered in Master These Five Lightroom Sliders and Your Photos Will Pop, if you’d like more information.

Lightroom workflow basic tab

After achieving a general evenness in the previous steps use the basic tab to add contrast, color and clarity

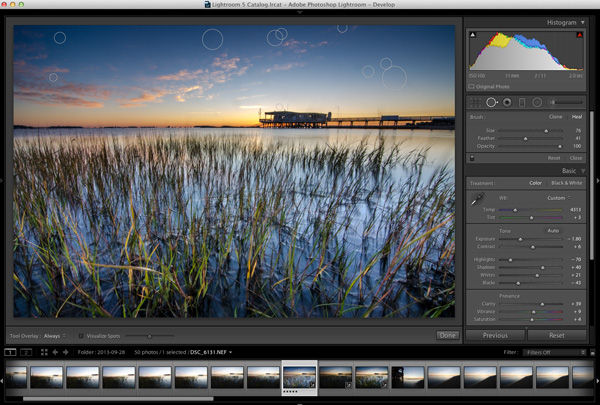
At some point you’ll want to clean up the dust spots or remove distracting pieces of litter or other unwanted items from your image so now’s a good time to jump into the clone/heal tool and do just that – as you can see I need to get my sensor cleaned.

Lightroom Workflow - Cloning

Here’s a good chance to clean up those pesky dust spots by using Lightroom’s clone/heal tool

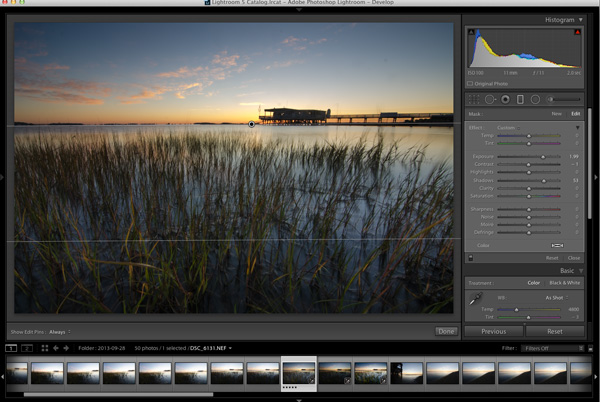
Final adjustments can be made by using a combination of different adjustment brushes. Usually you’ll want to use this tool to control specific areas of the photograph, or specific parts of the exposure. To open the adjustment brush panel press ‘K’ on the keyboard and click on your image to place a brush. If you’d like to use more than one brush you can click on ‘New’ and again click on your image which will allow you to adjust two different parts of your scene separately from one another.

In the photo below I’ve added an adjustment brush to affect the highlights, and contrast of the water at varying levels of intensity. You can control these levels of intensity by adjusting the “flow” slider of the adjustment brush which will determine how much of the effect is applied at each pass of the brush – a lower flow has less effect per pass than a higher flow.

Lightroom workflow - adjustment brush

Fine tune the highlights on the water with an adjustment brush. The red overlay can be turned on and off with the check box below the photo (or ‘O’ on your keyboard)

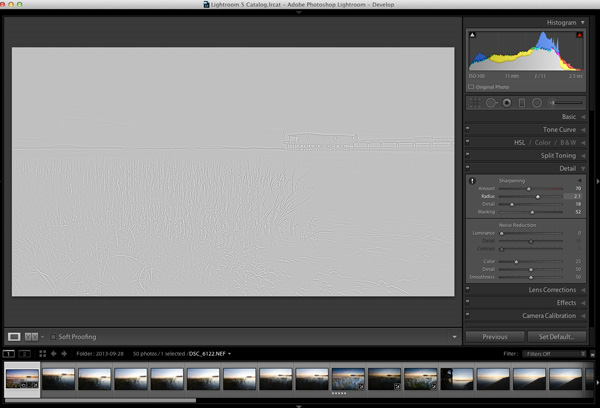
Before you call it a day – the last step is to dive into the detail panel in Lightroom and apply some sharpening. For some more information on Lightroom’s sharpening options you can watch this Youtube video A Look at Sharpening in LR4, which is part of a weekly series I run on my channel.

Lightroom workflow - sharpening

Apply any sharpening you wish using Lightroom’s sharpen panel.

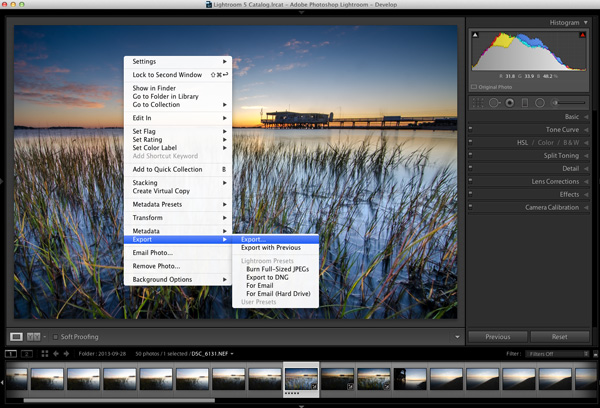
Lightroom Workflow Export

All that’s left to do now is export and share your work with the world.

Exporting and sharing

All that’s left now is to export the photo and share the results.

I hope this step by step Lightroom workflow helps you learn a bit about how to process your own photos. Share a before and after Lightroom edit in the comments below, and if you’ve got any behind the scenes shots, those are always fun to see as well. Don’t forget to let us know how you achieved the results.

Post originally from: Digital Photography Tips.

Check out our more Photography Tips at Photography Tips for Beginners, Portrait Photography Tips and Wedding Photography Tips.

Lightroom Workflow – from Setup to Finished Sunrise Photo

The post Lightroom Workflow – from Setup to Finished Sunrise Photo by John Davenport appeared first on Digital Photography School.


Digital Photography School

 
Comments Off on Lightroom Workflow – from Setup to Finished Sunrise Photo

Posted in Photography


Microsoft Word 2010 – Finished With Your 2,000 Word Book Report? And Other Counting Features

31 Jan

Quickly display the number of pages, words, characters, paragraphs, and lines in your Word 2010 document.
For various reasons you might need to know how many words or paragraphs are in your current Microsoft Word 2010 document (school report or essay being a couple).

While the word and page counts may appear in the status bar, here are two ways to get the more detailed information:…

Read more at MalekTips.
New Computer and Technology Help and Tips – MalekTips.Com

 
Comments Off on Microsoft Word 2010 – Finished With Your 2,000 Word Book Report? And Other Counting Features

Posted in Technology


Tutorial Part 10 – Post Enhancing screenshot IMVU – FINAL FINISHED VERSION (BEFORE AND AFTER)

29 Jan

TUTORIAL FOR THIS BEFORE PIC: i96.photobucket.com COMES IN SEVERAL PARTS, AFTER PIC: i96.photobucket.com