RSS
 

Posts Tagged ‘Finish’

Leica, Lenny Kravitz produce limited edition ‘Drifter’ M Monochrom with snakeskin finish

24 May

Rock star and keen photographer Lenny Kravitz has produced another limited edition camera in partnership with Leica Germany, this time with a rock ‘n’ roll feel—and a snakeskin covering.

The Drifter is a Leica M Monochrom kit that comes with Leica Summicron-M 28mm f/2 ASPH, and an APO-Summicron-M 75mm f/2 ASPH lenses and a case to carry them. All the items in the kit are finished with a sepia brown paint and the camera and strap use a synthetic snakeskin that is designed to reflect Kravitz’s wardrobe.

Leica says the result is an ‘attention-commanding and soulful Leica camera made for global touring,’ with Kravitz adding ‘I’m a drifter […] That has been my life since I was 15-years-old; I’m always on the road.’

Other than the finish the camera is a standard M Monochrom, but will also feature untreated brass on the hotshoe rails, the thumb wheel, the shutter button and the soft-release button to lend it a stylish vintage look over time.

$ (document).ready(function() { SampleGalleryV2({“containerId”:”embeddedSampleGallery_7140913613″,”galleryId”:”7140913613″,”isEmbeddedWidget”:true,”selectedImageIndex”:0,”isMobile”:false}) });

This is the second limited edition M camera Lenny Kravitz has been involved with, coming up with the design for the Correspondent version of the M-P in 2015 in memory of his reporter father. The Drifter kit will be limited to only 125 globally, and will cost $ 23,950 / £20,500. Kravitz’s accompanying “Drifter” photo exhibition is currently being showcased at the Leica Gallery in Wetzlar, Germany. For more information see the Leica website.

Press release:

One for the road: new limited-edition Leica M Monochrom ‘Drifter’ is Lenny Kravitz’s ode to touring

Leica Camera AG and Kravitz Design have collaborated on a camera built for rock n’ roll nomads who can be found on either side of the lens. The look of the Leica M Monochrom ‘Drifter’ has been created by Grammy-winning musician, actor and artist Lenny Kravitz, who is no stranger to bold style and individual expression. The result is an attention-commanding and soulful Leica camera made for global touring. The name is inspired by how Kravitz sees himself, “I’m a drifter. That has been my life since I was 15-years-old; I’m always on the road.”

This limited edition camera is designed with an eye-catching ‘synthetic python’ snakeskin covering, made from premium-quality vegan leather which looks straight out of the rockstar’s wardrobe. Kravitz was made aware of this synthetic material by his close friend, fashion designer and animal rights activist Stella McCartney, who uses it for many of her own creations. The matching carrying strap made of woven fabric is coated with the same vegan leather as the camera. The camera’s monochrom body is luxuriously retro in special sepia brown paint, and the hotshoe, thumb wheel, shutter and soft-release buttons are made from untreated brass, which will allow a stylish vintage look to develop over time.

Two state-of-the-art lenses are included, both finished in sepia brown; a Leica Summicron-M 28mm f/2 ASPH, and an APO-Summicron-M 75mm f/2 ASPH. In a departure from the standard production model, the Summicron-M 28mm f/2 features a built-in extendable lens hood to match the design of its 75mm counterpart.

This camera demands five-star accommodation; a smart brown leather-like ‘Drifter Traveller’ bag, two pouches and cases for both lenses are included, so your kit is always protected.

Lenny Kravitz was born in Brooklyn, New York in 1964 to an Afro-American mother and a Ukrainian-Jewish father. He is not only a world-famous musician, songwriter, producer and actor but also an accomplished photographer. As a musician, Kravitz is a multi-instrumentalist who uses analogue recording technology to underline the retro-character of his songs. As a visual artist, he has enjoyed success with his design studio, Kravitz Design, and has also become an accomplished photographer publishing ‘Flash’, a book of his black-and-white photographs in 2015. “I love the quality of the Leica’s monochrom system’ says Kravitz, “it’s exquisite. I tend to see things in black-and-white. It looks more real to me, and timeless.”

This is the second time Lenny and his design team have collaborated with Leica on a limited-edition masterpiece. In 2015, he was inspired by the life of his father, a Vietnam War reporter and TV news producer, to create the ‘Correspondent’, a vintage-look Leica M-P. This time, Lenny has looked within himself and authored a design which reflects the lifestyle of a cosmopolitan artist and travelling musician stopping to capture his or her unique experiences.

With production limited to 125 units globally, the Leica M Monochrom ‘Drifter’ is incredibly exclusive and highly collectable; RRP is £20,500.

Articles: Digital Photography Review (dpreview.com)

 
Comments Off on Leica, Lenny Kravitz produce limited edition ‘Drifter’ M Monochrom with snakeskin finish

Posted in Uncategorized


How to Shoot Engaging Travel Portraits from Start to Finish

19 Nov

I love travel portraits. Not only do they test your photography skills but also challenge you to interact with people in unfamiliar environments. The end result directly reflects your subject’s personality along with your ability to make them feel at ease, read the light, select optimal settings, and compose a great shot.

How to Shoot Engaging Travel Portraits from Start to Finish:

A boy named Ashim and his father at Dasaswamedh Ghat – Varanasi, India.

Every photographer has a slightly different approach, which evolves with every new person you meet and country you visit. Join me as I walk you through an encounter from start to finish and share tips on how to shoot engaging travel portraits.

1 – Approach the person and get permission

As a photographer, it’s up to you to develop your own code of ethics. However, I implore you to seek permission and not just stick a camera in someone’s face. The initial approach can often be the hardest part; taking the shot is comparatively easy.

Aim for a consensual, mutually enjoyable exchange from which you can both walk away with a happy story to tell. Be open, smile, and pay people compliments.

How to Shoot Engaging Travel Portraits from Start to Finish:

Boy monks at Rumtek Monastery – Sikkim, India. I kept my camera at my side, introduced myself, and asked their names. Their answers made me regret leaving my notebook in the car (Sikkimese names are notoriously long). They wanted to talk about soccer. When I asked for a photo, the boy on the right jumped and said “I know a good place. Follow me!” It was a fun encounter and their personalities shone through in the pictures because they’d had a chance to chat about their favorite topic.

If it’s a firm no, you can smile warmly, tell them it’s absolutely fine, and ask them if they would like to see photos you’ve taken of the local area. This way, you can both still walk away having had a pleasant experience, and sometimes, they even change their mind.

2 – Communicate for a meaningful experience

Your challenge now is to make your subject feel at ease. The best portraits come when people are relaxed and open to you. Most crucially, don’t rush the photo, say goodbye, and walk away. Show genuine interest in their lives.

Ask questions if you can speak a mutual language. If not, remember that much of your intentions and warmth can be communicated through body language, facial expressions, and gestures.

How to Shoot Engaging Travel Portraits from Start to Finish:

Ba-An, an 81-year-old lady, in front of the Banaue rice terraces – Luzon, Philippines. I will remember Ba-An because I had the longest and most interesting conversation I’ve had with anyone before taking their portrait. “These? They’re chicken feathers,” she said when I asked about her headdress. “Sometimes I tell people it is tradition, but really, we just started doing it a few years ago!”

3 – Read the light and use it to your advantage

With permission granted and your subject warming to you, the next step is reading the light. Whether it’s day or night, look at the lighting conditions around you. Consider asking your subject to turn their body or move completely to seek the best light.

How to Shoot Engaging Travel Portraits from Start to Finish:

While waiting for a Hindu ceremony to begin, this gentleman wobbled his head enthusiastically and motioned towards my camera – Varanasi, India. Sometimes, as in this situation, when people see you photographing others in a respectful manner, they may prompt you to take their portrait. I asked him to turn so that the light from a spotlight would be cast across his face at a less harsh angle.

4 – Select your settings

Ideally, you have a fixed focal length (prime) lens with a wide aperture attached to your camera body. However, if you’re traveling, you may have an all-purpose zoom lens attached. I like portraits that I’ve taken with both types.

With my fixed focal lens, I often shoot portraits at f/2.8 or slightly above. If you shoot any wider, the focal plane can be so thin that you risk your subject’s eyes being in focus but having their nose out of focus. For a zoom lens, I recommend selecting your widest aperture but standing further away from your subject. Zooming in on their face will accentuate the shallow depth of field effect that works so well for portraits.

How to Shoot Engaging Travel Portraits from Start to Finish

A Muslim traveler at Haji Ali Dargah, an Islamic shrine off the coast of Mumbai – India. My settings and lens for this portrait were f/2.8 | 1/1600th | ISO 160 | Sigma 35mm 1.4 Art lens. The fast shutter speed allowed by using f/2.8 picked out fine details on the man’s face. Such a fast shutter wasn’t necessary for this level of sharpness but it was an extremely bright day in Mumbai.

For engaging portraits, the most important element requiring sharp focus is the eyes. I suggest setting your camera to spot focus on the center AF point. Next, aim the center point at one of your subject’s eyes. Use the focus and recompose method or even better – the back button focus method to lock in on the eyes. This will ensure they’re in sharp focus in the finished photo.

5 – Choose a strong composition

Numerous compositions can work for portraits. The rule of thirds can work incredibly well but try not to wear it out or all your travel portraits will look the same.

Another one to try is placing one of your subject’s eyes directly in the center of the frame; a study proved that portraits composed this way appeal to viewers on a subconscious level. I promise I’m not making that up. This can be applied in portrait or landscape orientation.

A general rule exists in travel portraiture that you shouldn’t place your subject directly in the center of the frame; however, rules are made to be broken sometimes.

How to Shoot Engaging Travel Portraits from Start to Finish

As I stood taking pictures of the Banaue rice terraces, I heard a frail voice saying “Photo? Who is taking a photo?” It belonged to a 96-year-old woman named Bah Gu-An. She was completely blind. I wasn’t sure how to communicate as I normally would for a portrait so took her hands in mine to let her know I was there. Her friends translated back and forth for us. I decided on a rule of thirds composition because I felt the blue umbrella added extra visual interest and balance to the frame.

6 – Come down to their eye level

Try not to stand above your subject if they are sitting. This is intimidating and works against your goal to relax them. Positive psychological things happen when you come down to someone’s eye level. Take a look at the example below.

How to Shoot Engaging Travel Portraits from Start to Finish

A Hindu holy man on a tiny island in the Brahmaputra River – Assam, India. This is not a touristy location in India so he is the real deal. I sat down on the step to receive a blessing. Accompanied by mystical chanting, I drank some lukewarm tea of unknown provenance, had air blown all over my face, and ash spread across my forehead. We chatted after and I felt in no rush to suggest a portrait. It was a fascinating experience. What do you think when you look at his facial expression – Is the time spent together palpable?

7 – Shoot different styles of portrait

Posed versus candid portraits

Posed refers to approaching a person and asking them to sit for a portrait, whereas candid portraits refer to catching a person in an unguarded moment. This doesn’t have to mean without permission.

For the image below, I’d already gained this lady’s trust and permission but waited until she’d forgotten that I was there to continue shooting. Later, I showed her all of the photos, which she seemed happy with.

How to Shoot Engaging Travel Portraits from Start to Finish

A devotee watches the nightly Ganga Aarti ceremony – Varanasi, India. This image could be called a candid environmental portrait.

Headshot versus environmental portraits

A headshot refers to filling the frame with your subject’s face. The background is not important for setting the scene, although you might consider finding one of a complementary color to your subject’s clothing, skin tone, or eye color. Environmental portraits are zoomed out to allow your subject’s surroundings into the frame to add to their story.

8 – Shoot a series with the same subject

When you have someone’s permission and have bonded with them, consider staying with them a while and shooting a series of images. This is what I did when I met one man in the Philippines recently. I directed him gently for a series of shots after telling him how interested people would be to learn about his culture. He was happy to oblige.

How to Shoot Engaging Travel Portraits from Start to Finish

I would have kicked myself if I’d walked away without getting a side profile shot of this man and his headdress that featured the real heads of a long-dead bird and monkey.

How to Shoot Engaging Travel Portraits from Start to Finish

I decided to fill the frame here to draw attention to his excellent smile, patterned clothes, and monkey headdress.

9 – Always remember aftercare

Aftercare means bringing the encounter to a close in the best possible manner. I believe an extra layer exists as to why the verb is to “take” a portrait. You are taking something from them, but what are you giving in return?

Make sure you show the person their image on the back of your camera, pay them a compliment, and thank them sincerely. So much joy can come from this simple act.

How to Shoot Engaging Travel Portraits from Start to Finish

A man named Ibrahim at the Haji Ali Dargah, Mumbai. As we sat together cross-legged on the ground enthusiastically shaking hands at the side of a busy walkway, I could tell from his reaction and those of passersby that this wasn’t a common occurrence. The overall encounter lingered with me for the rest of the day, and I sincerely hope that Ibrahim remembers it fondly too.

Conclusion

I want to know your best advice for shooting travel portraits and see the images you’re most proud of. Be sure to share them in the comments section below.

The post How to Shoot Engaging Travel Portraits from Start to Finish by Ben McKechnie appeared first on Digital Photography School.


Digital Photography School

 
Comments Off on How to Shoot Engaging Travel Portraits from Start to Finish

Posted in Photography


How to Start and Finish a Photography Project

02 May

A comment I get a lot on my workshops is how hard it is staying motivated to take photos on a regular basis, especially when your time and attention is being dragged away by all of the other things in life – work, family, living! I find one of the best ways to remain motivated and to have a regular feeling of achievement, is to do a photography project.

photography project

Benefits of doing a photography project

What I love about a photography project is that I have a focus to my shooting. If I manage to grab a few hours on a Saturday afternoon to go out, I know what I’m looking for, I have an instant place to start. I am not faffing around thinking – where should I go today, what should I shoot?

I also find that a project encourages me to do more photography because I am thinking more about my images and the project itself. Even when I am not thinking consciously about it I know that it’s percolating in the back of my mind. I sometimes daydream about my photography project, ideas for it will suddenly pop into my head – all as I am going about my daily life.

How to Start and Finish a Photography Project

Motivation and a sense of accomplishment

Having the focus of a project is an easy way to get myself more involved with my creativity, and that to me is super exciting. The more creative I am, the more involved I am with creating and not just doing (doing is all the other stuff, mending the broken washing machine, writing emails, talking to my accountant), the happier I am. It’s simple.

I also love to have a sense of accomplishment that comes not from a bunch of nice images, but from a collection, a story, something that I can refine and develop. Photography projects also show me where the weak spots are in my work – because I am not just reacting to what’s around me, I am pulling my skills together to create something compelling. That drives me to work on the skills I need to develop.

How to Start and Finish a Photography Project

Now starting – and finishing – a photography project is not always a straightforward process. So here are my tips about how getting a project off the ground, and the ever important issue of getting it finished!

Let’s start with your subject

Picking a subject is, of course, the most important first step. There are endless choices, endless ways to shoot, and endless ideas. For me this is the toughest stage, nailing down the subject and the concept of the project.

I want my subject to be something that is new and exciting to me. I want to put my own stamp on the subject, to say something new and fresh.

How to Start and Finish a Photography Project

Here is what I consider when picking a subject:

1) Passion

Creativity is piercing the mundane to find the marvelous. Bill Moyers

This is the most important criteria for me in picking a project. I need to be super passionate about what I am shooting, not only because that will help me get great shots but also it will keep me motivated to create a good body of work, and finish it.

The world is littered with unfinished projects, don’t let yours be one! So ask yourself this – are you really passionate about your proposed subject? Does it really excite you?

How to Start and Finish a Photography Project

Sometimes it seems like a project idea is amazing, but once you get started you realize it is too difficult to execute or it’s not what you thought it was going to be. No problem, just move on and start again.

2) What do you love outside of photography?

My favorite projects are usually things connected to what I love to do outside of photography. When you combine two passions then there’s brilliant potential.

I love exploring cities – most specifically at dawn when the light is beautiful and the streets are usually quiet and empty. I love the urban landscape – but I don’t really like crowds! So this is why I can go out day after day, year after year, to the same places in my city, or in other cities around the world, and take photos. It’s combining two things I love.

How to Start and Finish a Photography Project

Being in nature and lying on beaches also inspires me – but not as much as the urban landscape. For me nature is all about relaxing – so your subject has to be something you love and you find compelling to photograph.

How will I shoot this project?

Once you have some ideas for a subject, start thinking about how you want to shoot it.

What is your vision? For example – will it be color or b&w, reportage or posed portraits, epic landscapes etc.? Will the photos have a similar look and feel? What do you want the photos to look like?

How to Start and Finish a Photography Project

Gear

Also thinking about your kit – what lenses will you be using? Do you need any special equipment? This kit and equipment issue can be a tricky thing because you can stall on a project forever if you get too focused on gear that you don’t have. I have delayed projects for months because I became fixated on getting certain special equipment together, or having too many challenging arrangements to make, so in the end they never came together.

If you are new to doing projects I advise you to only shoot something you can do with the equipment that you have already. Make it as simple as possible to just get started.

Choose a subject that is accessible

The photos in this article are from a new project I recently started in Cuba. This is not an accessible place for me as I live in London – and I’ll only be shooting there a couple of times a year until I’ve finished my book about Havana. So I also have a project that is closer to home. That way when I am not traveling I have something close by to keep me focused and inspired.

How to Start and Finish a Photography Project

I think a lot of people rely on taking photos when they are outside of their normal day to day life, when they feel more inspired because they are somewhere new and different. Ultimately, though, getting inspired by the world that is immediately around you is much better training for your photography. If you can make something interesting of a scene you see every day, then you can definitely take an interesting photo of anything.

Don’t have too many projects going at once, though. If you are new to doing projects I’d recommend you start with just one.

Consistency is crucial

The more regularly you take photos, the quicker seeing and thinking like a photographer will become part of you. It’s just like going to the gym – regular consistent work results in the biggest overall impact.

How to Start and Finish a Photography Project

Creativity is a habit, and the best creativity is a result of good work habits. That’s it in a nutshell. – Twyla Tharp

Will I realistically have time to shoot this?

All of the points so far have been about refining the possibilities so it makes it easier for you to pick a subject for your project.

Working out the time to do it is a very simple point, but it’s super relevant. Are you going to actually have time to shoot this on a regular basis? You need to keep that creative juice flowing and if you aren’t shooting regularly you will lose your ability to stay inspired and be in the flow with your project.

How to Start and Finish a Photography Project

Keep it realistic – if you only have three or four hours a month, then that’s it. Plan to fit it in easily with your life.

Move out of your comfort zone

Step out of your comfort zone. Comfort zones, where your unrealized dreams are buried, are the enemies of achievement. – Roy T. Bennett

It’s super easy to get in a rut with your photography – shooting similar subjects in similar ways. Telling yourself – this is what I’m good at shooting, or this is what I love doing. While I encourage you to really dive deep into a subject and develop your own style, make sure you are not using it to limit yourself.

How to Start and Finish a Photography Project

Staying where you are comfortable in your photography is not where you are going to find yourself taking stunning, amazing photos. What you’ll be taking are photos that are just like the ones you took yesterday, last week, last year. Photographers need to keep developing and that often means pushing yourself out of your comfort zone.

Don’t park… Arrival is the death of inspiration. Ernst Haas

If you want to do something new, something fresh, something unique – you have to move away from the safety of what you’ve always done, and move toward things you’ve never done before.

For me that’s been things like asking strangers if I can photograph their bellies (scary!), to travelling to new places or accepting commissions for big projects (weirdly it can often be more stressful getting paid to do a very creative job than doing it for yourself. After all, if you come back with a terrible personal project it just sucks for yourself.)

How to Start and Finish a Photography Project

Are you in your zone?

Photography doesn’t always have to be done outside of your comfort zone. Just keep an eye on the things you are choosing to photograph and making sure that you aren’t always playing it safe.

When you ask yourself what you really want to photograph and you come up with something that is both exciting and a little terrifying, that’s great! Then you definitely have something that is going to be interesting for you to explore. The line between being comfortable shooting and being on the edge of your comfort zone is a fine one.

Plan your project – but leave room for spontaneity

I couldn’t find the quote but I’m pretty sure that Napoleon said that you always want to go into battle with a plan, but that you’ll never follow the plan once you’re in battle. It’s the same with photography!

How to Start and Finish a Photography Project

You want and need a plan for how you are going to get this project going. Just don’t be afraid to adapt as the creative forces start working when you are out there shooting. I’ve sometimes had projects totally change shape, even the subject, while I am shooting.

Be open to change and adapt

For example, when I shot my first book, London at Dawn, I thought the book would be all about the workers who are up at 4 am and what they were doing. You know, the market traders, the cleaners, the bus drivers. It seemed like a really cool angle.

When I started shooting, though, not only are people really hard to find at dawn, and are usually inside buildings, and what I discovered was that the light of sunrise and the empty streets were way more interesting to me than tracking down people inside buildings working. I wanted to capture all this quiet and beauty.

How to Start and Finish a Photography Project

Make a project description

I like to have a basic description of my project before I get started which acts as my vision, the essence of my plan. To give you some ideas about how to do this, here are some descriptions of projects that I’ve done:

  • The Homeless World Cup: Create beautiful, colorful portraits of homeless football players that echo the powerful persona of the subjects in sports advertising. Pose subjects in strong and proud postures which, combined with the colorful backgrounds, promote a positive message about the homeless football players and the tournament.
  • Arboreal Dreams: An abstract exploration of trees inspired by my childhood memories of lying on the grass and staring up at trees for hours on end. The look of the photos will be dream-like and surreal, just as my childhood memories are, with the trees morphing into different shapes.
  • The Belly Project: The belly is an under-photographed part of the body (in my opinion) and rarely displayed (unless it’s in perfect condition). It’s often a source of personal dislike. I say free the belly! This project will be shot out on the street in a fun, spontaneous, and candid style. I will approach people with all kinds of bellies – and explore what lies hidden under people’s shirts.

How to Start and Finish a Photography Project

Can you see how in these short descriptions I covered what was interesting to me about the subject, how I wanted to shoot it and the style I would use? This is the kind of thing you want to end up with.

Is it a short term or long term project?

When starting out, I find many people aim to tackle these really big subjects that will take a year or two. That’s totally cool, but it’s really hard to sustain momentum for a two-year project. Even professionals find it difficult – well, I know I do! Life always gets in the way and distracts you from your project.

I think a short term project is the best place to start. Then as you build the skills for completing projects, you can extend yourself.

How to Start and Finish a Photography Project

What are you hoping to achieve with this project? What is the end result you hope to see? To give it to a friend, put it on social media, hang it on your wall, make a book? How many final images will you have?

These all sound quite specific but I find that when I ask these questions they help me to refine why I am doing a photography project, and the more refined I am the easier I find the project is to shoot.

Ultimately, I want to end up with such a good vision for my project that I can almost see the photos before I even step out the door. Of course, things will develop and change but working out these details really helps me when I am out there in the world faced with the actual – so where do I begin?

How to Start and Finish a Photography Project

The power of the deadline

Deadlines are the single best motivation for me to finish a project. To be honest, I rarely feel that I am totally finished. I could go on forever with most projects – there is always more to shoot, there are always more ways to make it better (even if that’s just in my mind). I do, though, like to get to the end and feel a sense of accomplishment, having something to tell the story of the subject I’ve been shooting.

The world is littered with unfinished creative projects of all types. Don’t let yours be one of them! A deadline is an amazing way to help you get it finished. You can pick a time frame – a year, a month, or 6 months. You can also create other deadlines by agreeing to do a project at the same time as a friend. Or by committing to creating a project before Christmas or for an exhibition.

Now – get started!

An idea that is developed and put into action is more important than an idea that exists only as an idea. – Edward de Bono

How to Start and Finish a Photography Project

This is where I get stuck all the time. I often have an amazing concept for a project, and I can see it in my mind. Then I try to get started, and… I procrastinate. This is often because I am waiting for perfect timing – be it the perfect light, perfect models, or a perfect day. All that thinking about perfect ends up feeling totally intimidating. So I have to say to myself – don’t wait for perfect conditions, they don’t exist! Don’t wait for more time, it won´t come.

It won’t be perfect straight out (or maybe even ever!) Perfectionism is the true enemy of creativity. Now think ahead to a few months from now with a finished photo project in your hands that you are showing people. It will feel awesome to know you created something from nothing, a photo project that is all about your passions and creativity. All you have to do now is get started.

Do whatever brings you to life, then. Follow your own fascinations, obsessions, and compulsions. Trust them. Create whatever causes a revolution in your heart. – Elizabeth Gilbert

I’d love to know what you think and if you plan to do a photography project this year, or may you are doing one now. Let me know in the comments below.

The post How to Start and Finish a Photography Project by Anthony Epes appeared first on Digital Photography School.


Digital Photography School

 
Comments Off on How to Start and Finish a Photography Project

Posted in Photography


13 Steps for Editing Street Photography in Lightroom from Start to Finish

20 Jan

Favorite editing tools for street photography

I admit it, I take too many photos. I know it, and I have too many images to deal with, and unless I am getting paid to finish them and send them out to a client, they may never get processed. Are you in the same boat? Do you too have some images that have just been sitting there in your digital desk drawer?

With digital photography, and especially because of how cheap memory is (don’t forget to include web hosting sights and the cloud), more and more photos are just there and never used.  The best solution is to be more decisive, and just take fewer photos. But we all get out of hand, and sometimes just come home with more images than we know what to do with.

image

Final product after the simple steps followed below—a workflow that you can adjust to your own tastes too!

So the best thing to do is get to the grind and produce something. But it doesn’t need to be so much of a grindstone as you might think. I love taking photos more than processing and unless I am flying solo, I think I’ve got lots of people onboard with me. As you know, photography is not about broad strokes, and details are important. This set of instructions is specifically designed for street photography. But, are most of your photos from your travels? Well, streets (along with the convenient airplane) is maybe how you got there. Much of what we do as photographers crosses over into different genres of style and art. So have a go at the following tutorial, and you may find that with your own adjustments this is a recipe for more than just the street.

image

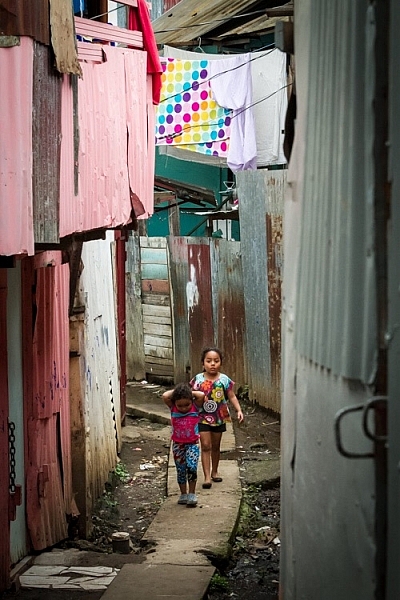
Final image of two young girls walking in the slums of San Jose Costa Rica, all editing was done following the steps below.

These instructions begin in the Library module of Lightroom, and then progress into the Develop module. There are countless modifications that can be made upon importing, categorizing them, giving them tags, etc. As the point of this tutorial is to streamline your workflow, the tips for editing will also be streamlined. So let’s get at it!

Library Module

Step 1 – Select images

Select a batch of images that are preferably in similar lighting conditions, and which have a similar theme. For example, choose a set of photos that were all shot outside over the course of a few hours, but not all night. Or a group of photos that were all shot in the rain. Lighting and theme conditions can vary, but greater variations will have potential greater variations in results.

Step 2 – White Balance

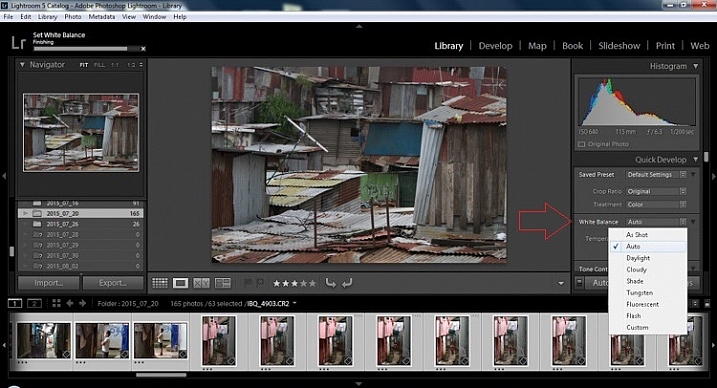
In the Quick Develop Panel (at the top of the right panel in the Library Module) Select White Balance and choose Auto. Before you turn away, let me assure you that there have been more Ph.D.s awarded, and dissertations given, in creating the algorithms behind this button. If you compound the interest in dollars that has been invested in this Auto algorithm it would sustain many third and fourth quarter GDP figures for entire nations.

image

Step 3 – Warm images

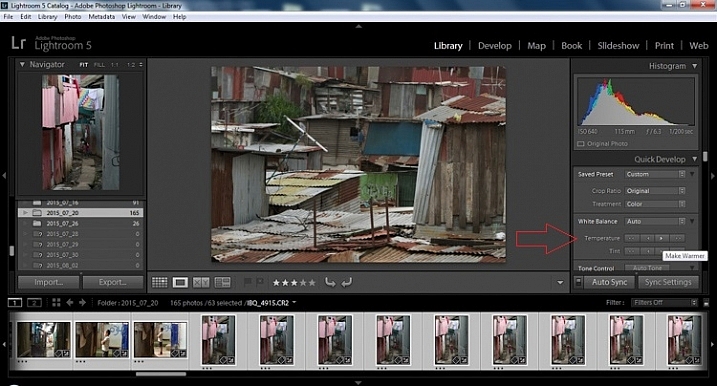
Next, push the single arrow pointing right under the temperature heading indicated by the Make Warmer hint that appears if you hover over it. The single arrow will increase your warmth tone by +5. If you want plus +10 push it twice, using the double arrow will increase it in increments of +15.

2015.09.25 Street Editing Tips Lightroom 002

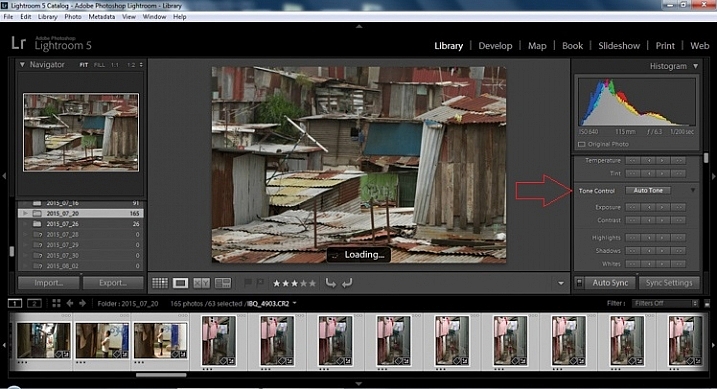
Step 4 – Auto Tone

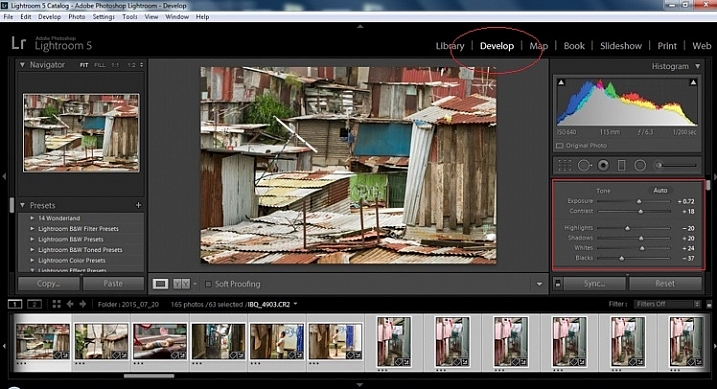
I know it is scary, and it does make me cringe sometimes too, but anything can be shifted, tweaked, and tuned later (and should be) to your liking. This will Auto Tone your exposure, highlights, shadows, whites, and blacks to each photo individually, so it is not the same as batch editing which will be covered later.

2015.09.25 Street Editing Tips Lightroom 003

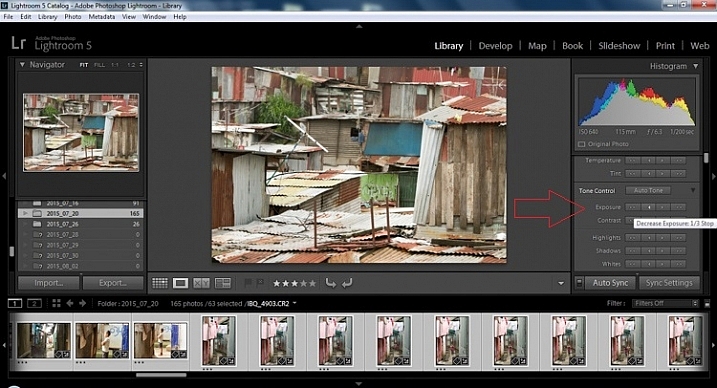
Step 5 – Decrease exposure

Select the single arrow to the left, decreasing the exposure by a 1/3 of a stop. It is minor, but keeps your darker tones (especially things like black asphalt) a little darker. Note: this is assuming you have a correct exposure to begin with – if it’s a bit out you can adjust later on a per image basis as needed.

2015.09.25 Street Editing Tips Lightroom 004

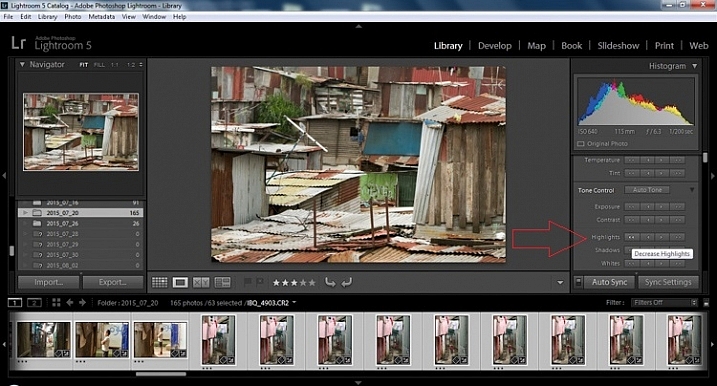
Step 6 – Decrease Highlights

For the Highlights, use the double arrow to the left, decreasing the highlights, and select it once. Be patient, as depending on how many pictures you select and your computer speed, it may take more than a few seconds. This can be monitored by looking in the top left of the screen above the Navigator window (progress bar).

2015.09.25 Street Editing Tips Lightroom 005

Step 7 – Shadows

For the shadows, use the double arrow on the right, decreasing the shadows, and click it once.

Step 8 – Whites and Blacks

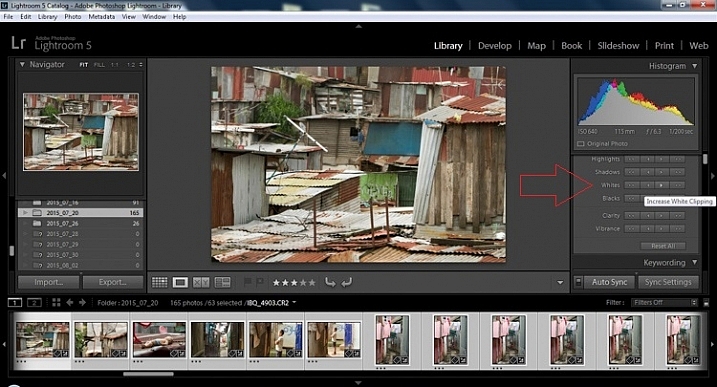
Increase the white clipping by +5, by clicking the single right arrow once. Decrease the black clipping by -5 by clicking the single left arrow once.

2015.09.25 Street Editing Tips Lightroom 007

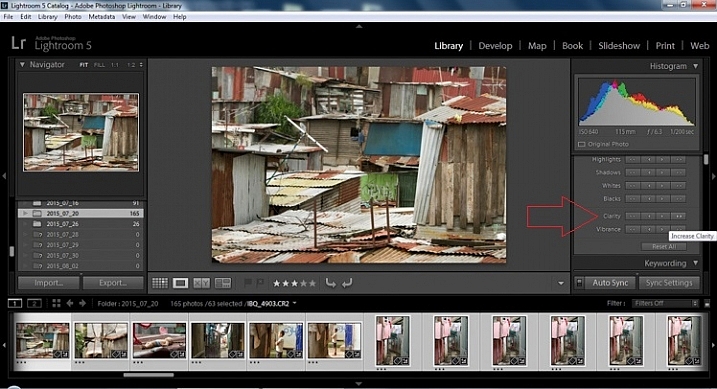
Step 9 – Clarity

Increase the clarity by +20, by pressing the double arrow to the right once (for more information about clarity please look near the end of the article which describes it in more detail).

2015.09.25 Street Editing Tips Lightroom 009

Step 10 – Vibrance

The final step in the Library module is to increase the vibrance by pressing the double arrow to the right (for more detailed information about vibrance please see below).

Develop Module

Now we will be moving into the Develop module. To this point, all the changes that you’ve made, have been applied to all the photos in the group, which you originally selected. Looking at the image below, you can see that despite the simple clicks made in the Library module, many delicate changes have been made. Again, all of these changes can be fine-tuned to your liking later. There are hundreds of modifications that can be made, but let’s keep those for later.

2015.09.25 Street Editing Tips Lightroom 011

Notice the sliders have moved based on the changes you made in the Library Module Quick Develop panel.

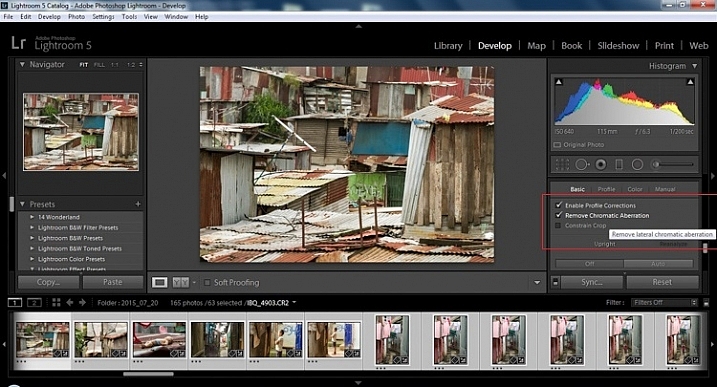
Step 11 – Lens Corrections

This step requires you to scroll down to the Lens Corrections Panel, and select two checkboxes. The first is Enable Profile Corrections, and the second is Remove Chromatic Aberrations. Both of these will allow Lightroom to make changes to the photo based on the lens used, and the inherent flaws that exist in that lens. A variety of corrections may or may not be included like, barrel distortion, vignetting, and as the second suggests, green and purple colors that result from diffraction in the lens.

2015.09.25 Street Editing Tips Lightroom 012

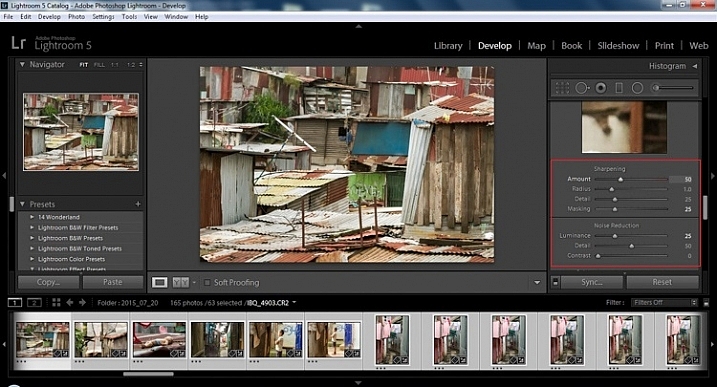
Step 12 – Detail Panel

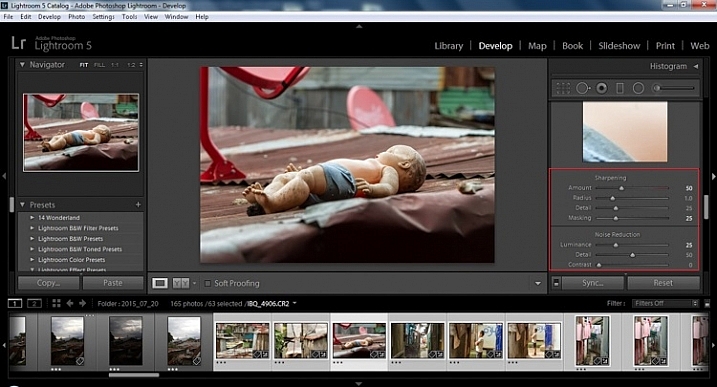
Next is to scroll up and go to sharpening, increase it to +50,  then increase your masking to +25. Finally you may or may not need to reduce noise. For this example, because the ISO was 640 the noise reduction was increased to +25. To understand, sharpening and masking in more detail and their relationship to noise reduction please read below.

2015.09.25 Street Editing Tips Lightroom 013

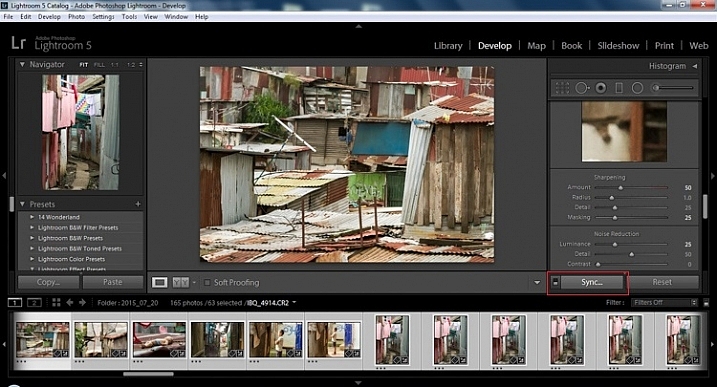
Are you still with me? Here is where you will thank some of those computer science majors for creating the AUTO button. This is why they get the big bucks, and it saves us large amounts of time. We don’t need to apply these changes individually.

Step 13 – Sync settings

At the bottom of the Develop module there is a rectangular button that says Sync. PUSH IT! Make sure all your images are still selected before you sync (highlighted in the thumbnail strip at the bottom).

2015.09.25 Street Editing Tips Lightroom 014 sync

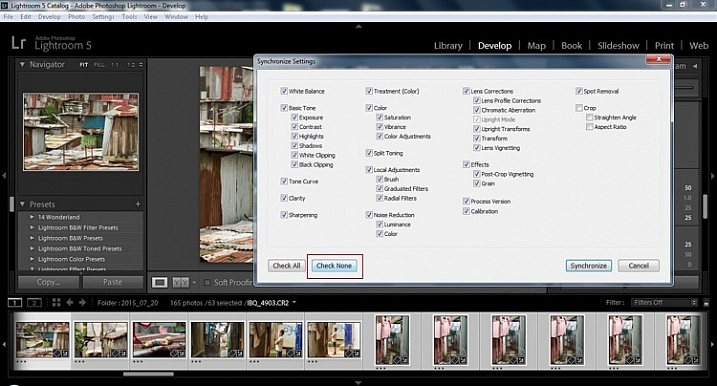
When the Synchronize Setting window pops up, select Check None. This will ensure that no unwanted changes will be made to your previous adjustments.

2015.09.25 Street Editing Tips Lightroom 015 sync check none

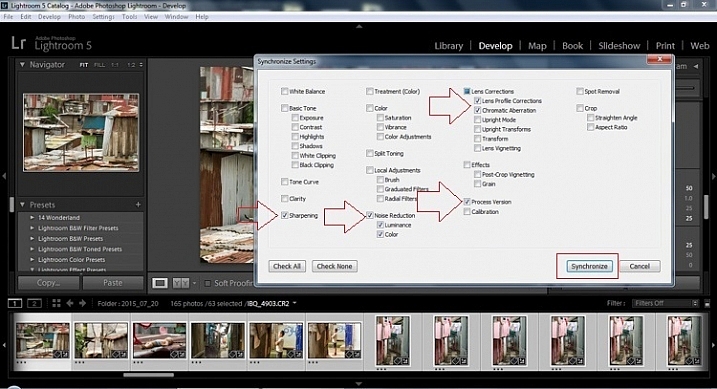
Now check the boxes labeled Sharpening, Noise reduction (which will subsequently select both boxes below it), Lens Profile Corrections, Chromatic Aberration, and finally Process Version. Notice these are the same adjustments that you had made in steps 12 and 13.

2015.09.25 Street Editing Tips Lightroom 016 sync check which apply

Finally, press the “Synchronize” button.

2015.09.25 Street Editing Tips Lightroom 017 verify sync

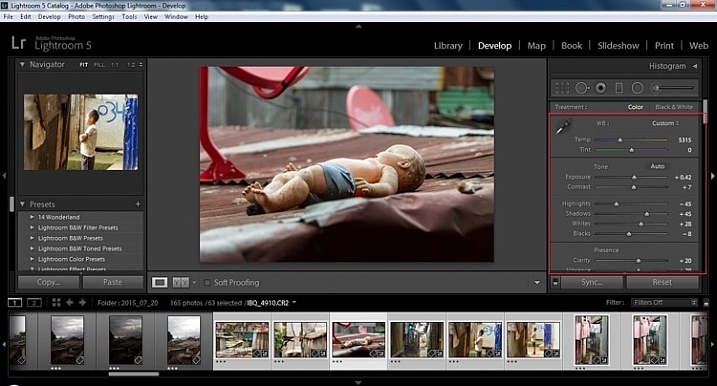
Looking at the screenshot above, you can see that the all of the selected photos have had the changes made to them.  If I were to go back and make all the individual changes to the potentially tens, hundreds, or even in bizarre cases thousands of photos, it would have taken me time that I don’t have, and neither do you. Looking at the image below you can see that the exposure, shadows, lights, whites and blacks have remained unique to the individual photo.

2015.09.25 Street Editing Tips Lightroom 018 verify sync basic settings

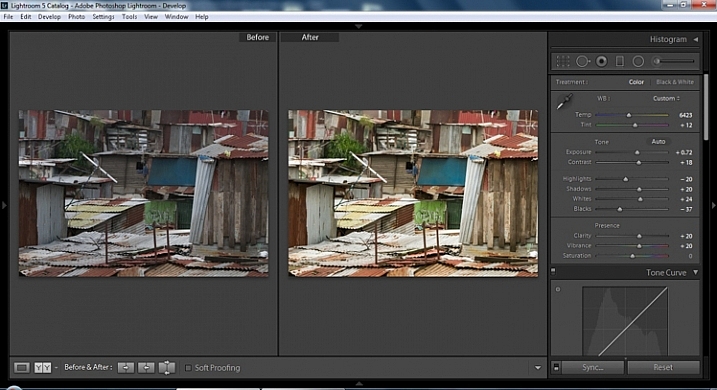
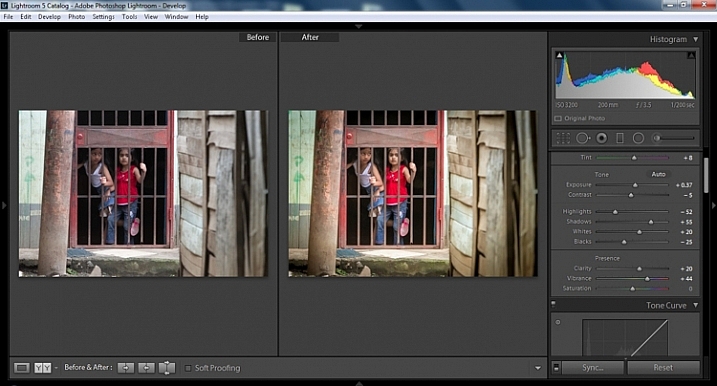
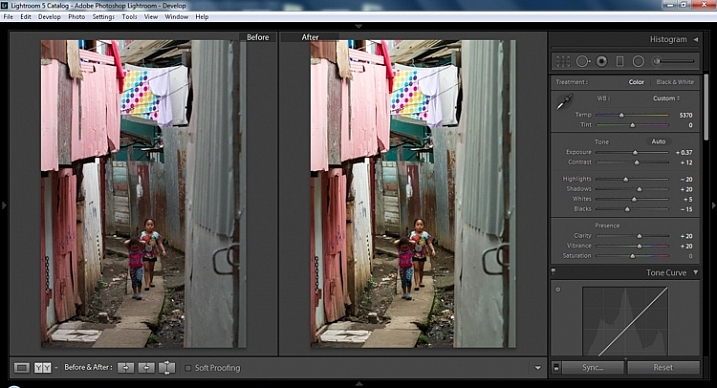
Below are simple side by side comparisons. In the last one I actually made a few additional small adjustments, and added a -10 vignette. Other than that, it is ready for export, along with almost all of the other photos that were just individually and batch adjusted. It is a bit of mix and match magic that keeps your photos natural, and true to the street.

2015.09.25 Street Editing Tips Lightroom 019 compare

2015.09.25 Street Editing Tips Lightroom 021 compare

2015.09.25 Street Editing Tips Lightroom 020 compare

Clarity

Clarity increases the contrast where two different tonal values meet. It is like contrast but on a micro scale, makes the image seem to be sharper. The lights will get lighter and the darks darker, but only where the different tone values meet, not broadly across the whole tonal range of the image.

Vibrance

Vibrance increases the tone of colors that are not already saturated. It is like a balancing scale for color. Saturation on the other hand, increases the intensity of all spectrums of light. Thus, vibrancy helps to bring out subtleties in the colors. For street photography, it brings out richness, without creating an over-saturated look. Sometimes I pull the vibrance up, and push the saturation down, to maintain an urban feel but doing so without making it look over-worked.

Sharpness

Just as I said, clarity is like contrast on the micro scale, sharpness is like clarity on a micro scale. Thus, it is like micro-micro scale. So we are still dealing with tonal values, but in even more detail. So be careful how much you increase your sharpness. Never try to rescue camera shake or blur in the photo using sharpness. “The devil is in the detail,” and this is no truer than in the sharpness slider. Because what you gain in sharpness you also increase the amount of noise (not desirable). If you have a high ISO, sharpness is more of an enemy than a friend.

EXTRA

Final image all adjustments applied

Masking

Textures will become more enhanced, but smooth surfaces will not be affected, resulting in less excess noise being introduced. This will help the street photography mood, without giving it an overly grainy feeling, or your shadows having too much noise. So how much of this movement left and right on the Masking slider is helping or hurting all your hard work? Thanks to those “AUTO guys” the Alt key on windows (Opt on Mac) will give you a grayscale impression of exactly where, and how the sharpening is impacting your photo. White indicates the area on the photo where sharpening is being applied, and black shows where it is not. You will notice that the contrasts and textures deserve most of the sharpening, alleviating your smooth tones and surfaces from the ill effects of sharpness.

Summary

So hopefully that will give you some things to try out with your images to process your street photography faster and consistently. Do you have any other tricks and tips you use? Please share in the comments below.

googletag.cmd.push(function() {
tablet_slots.push( googletag.defineSlot( “/1005424/_dPSv4_tab-all-article-bottom_(300×250)”, [300, 250], “pb-ad-78623” ).addService( googletag.pubads() ) ); } );

googletag.cmd.push(function() {
mobile_slots.push( googletag.defineSlot( “/1005424/_dPSv4_mob-all-article-bottom_(300×250)”, [300, 250], “pb-ad-78158” ).addService( googletag.pubads() ) ); } );

The post 13 Steps for Editing Street Photography in Lightroom from Start to Finish by Branson Quenzer appeared first on Digital Photography School.


Digital Photography School

 
Comments Off on 13 Steps for Editing Street Photography in Lightroom from Start to Finish

Posted in Photography


How To Finish the Photography Project You Started

28 May

It’s inevitable that, at some point, your motivation will lag on that photography project you started. Whether you’re working on a popular photography project, such as taking a photo every day for a year (the 365-day project), walking the streets shooting strangers (the 100-strangers project), or working on a custom project you dreamt up…no matter what, one day you can Continue Reading
The post How To Finish the Photography Project You Started appeared first on Photodoto.


Photodoto

 
Comments Off on How To Finish the Photography Project You Started

Posted in Photography


Finish Line

19 Oct

For More, visit jordan-carroll.com Client: Personal Production and Post Production: Jordan Carroll, Phill Mayer, Patrick Ross, Kai Wang, Alex Moed, Keith Anderson Credit: VFX Supervisor, Rotoscope Artist The concept for this project was to integrate a CG stereoscopic render with a stereoscopic HD plate shot on 2 Canon T2i’s. A custom rig was constructed to hold the two cameras side by side. The footage was taken into Nuke 6 (Nuke X) and converted to anaglyph stereo. An HDR was shot on set to provide lighting information. A CG mustang was rendered out of Maya using a stereo camera to produce left and right images. Everything was composited together and the 3D effect worked quite well for a custom camera rig. The movie “Finish Line” is viewable in 3D, just make sure to wear Red / Blue glasses.
Video Rating: 0 / 5

 
Comments Off on Finish Line

Posted in 3D Videos