RSS
 

Posts Tagged ‘File’

RAW vs JPEG: Which File Type Is Best?

15 Sep

The post RAW vs JPEG: Which File Type Is Best? appeared first on Digital Photography School. It was authored by Darren Rowse.

RAW vs JPEG: Which file type is best?

Which is right for you, RAW vs JPEG? For beginners, it’s one of the toughest questions out there – but I’m here to help you make a confident, informed decision, one that you won’t regret five, ten, or twenty years down the line.

Specifically, I’m going to explain:

  • What RAW and JPEG files actually are
  • The advantages (and disadvantages) of RAW over JPEG
  • The advantages (and disadvantages) of JPEG over RAW
  • Software to consider for RAW and JPEG images
  • Much more!

So if you’re ready to determine the perfect file format for your photos – and put this pesky question to bed, once and for all – then let’s get started.

RAW vs JPEG: What’s the difference?

These days, pretty much every camera – including smartphones – has the option to shoot in RAW, JPEG, or both. These are file formats, simply different ways of rendering and storing your image after you hit the shutter button.

However, while both RAWs and JPEGs will do a decent job of faithfully capturing a scene, they aren’t equally capable and do offer different functionalities, benefits, and drawbacks.

So let’s look at some quick definitions before doing an in-depth comparison:

What is a RAW file?

RAW files are unprocessed, unfiltered, raw data that comes straight from your image sensor.

Therefore, a RAW file cannot be viewed by the human eye (it’s not a visual display!), and must be converted to another file format such as a JPEG or a TIFF for actual viewing.

Because RAW files are unprocessed, they have zero sharpening, chromatic aberration removal, saturation, contrast, etc., applied to them. In fact, when RAW files are initially rendered for viewing, they tend to look quite unimpressive, with low contrast, low saturation, and a touch of softness.

Note that different cameras produce different RAW files, such as .CR2, .NEF, and .CR3. So when processing a RAW file, your software must be compatible with the specific RAW format.

What is a JPEG file?

A JPEG is a standard image file format that’s readable by pretty much every image program on the market, as well as internet browsers. In other words, a JPEG is an essentially universal method of displaying images.

However, unlike a RAW file, a JPEG is a processed version of an image. In fact, a JPEG image always starts out as a RAW file, but then undergoes various modifications, often including:

  • Compression (where some image data is deliberately discarded)
  • Sharpening
  • Increased saturation
  • Increased contrast

This processing occurs in your camera, by the way, not on the computer (though you can certainly further process a JPEG in a program such as Lightroom). So as soon as you put your memory card into your laptop and pull up a JPEG, it’s already been edited in camera.

camera and memory cards

The benefits of shooting in RAW

Why shoot in RAW over JPEG? Here are the most important reasons:

1. RAW files are higher quality

Remember how I mentioned that JPEG files are compressed and are missing data, whereas RAW files are, well, raw?

This comes with a serious consequence: RAW files can be converted into beautiful, large, detailed images. And while JPEGs can look great, you may end up with unpleasant compression artifacts such as banding, halos, loss of detail, and more.

2. RAW files allow for greater highlight and shadow recovery

RAW files contain information at dynamic range extremes – the brightest highlights and the darkest shadows. So even when an image appears totally blown out or underexposed, you can often recover detail in clipped areas.

But JPEGs discard this information, so if you blow out the sky and want to bring back some detail, you’re probably out of luck.

3. RAW files allow for extensive image adjustments (i.e., post-processing)

RAW files are uncompressed. Therefore, you have plenty of latitude when post-processing your photos. You can tweak contrast, change colors, adjust tones – and a RAW file will take it all in stride.

JPEGs, on the other hand, cannot be modified extensively. And when pushed or pulled too much, JPEGs will start to show banding and other problematic artifacts.

The benefits of shooting in JPEG

Why shoot in JPEG over RAW? Let’s take a look at the primary JPEG pros:

1. JPEGs are small

Remember how RAW files contain all of the information captured by your camera, whereas JPEGs are compressed? Well, it majorly reduces JPEG file size – so while a RAW file might take up 20 MB of storage (or more), JPEGs take up substantially less.

This is a big deal for two reasons:

  1. If you’re working on a computer with limited space and you don’t want to spend lots of money on external hard drives, JPEGs can be a lifesaver.
  2. You can fire off bursts of shots without stopping because your camera can record JPEGs much faster than RAW files. Here, the specifics will depend on your camera; for reference, the Canon EOS R5 can shoot around 350 JPEGs at 12 frames per second, compared to 180 uncompressed RAW files.

2. JPEGs require zero processing time

Don’t want to spend lots of time behind the computer? No problem; JPEGs are instantly viewable and are processed in camera.

Yes, you can process them beyond your camera’s sharpening, contrast, and saturation adjustments, but it’s not a requirement, and you can share JPEGs to social media without stopping for a lengthy Lightroom edit.

So which should you choose, RAW or JPEG?

That depends on you – on what you like to shoot and how you like to shoot it.

If you want to create high-quality prints, or you want to spend time post-processing (i.e., enhancing and correcting) your photos, or you want the ability to do either of those things just in case, then you absolutely must be shooting in RAW.

In fact, if you’re on the fence about shooting in JPEG or RAW even after reading this far, then I highly recommend you just switch your camera over to RAW and leave it there. RAW files are just too darn useful to give up unless you have a really good reason to shoot JPEGs.

And if it helps, nearly all professionals and serious hobbyists shoot in RAW, especially those who photograph:

  • Landscapes
  • Wildlife
  • Flowers
  • Insects
  • Architecture
  • Cityscapes
  • Weddings/events

Of course, as I emphasized above, there are reasons to shoot in JPEG. I’d recommend going the JPEG route if you absolutely hate post-processing and don’t think you’ll ever want to work in Lightroom; that way, you’ll have easily shareable images that require no extra work. And if you don’t have the storage for RAW photos, then JPEGs are the way to go.

I’d also recommend using JPEGs if you’re photographing on a very tight deadline (self-imposed or otherwise) and you need to get your images uploaded and viewable, fast. If you’re shooting a family party, for instance, you could work in JPEG then immediately share all the images on Facebook without a significant delay for editing.

Finally, you might consider using JPEGs if you want to use your camera’s burst mode without restraint. The other option, however, is purchasing a camera with a very deep buffer, and I’d urge you to go this route if possible (that way, you can shoot indiscriminately and you can capture RAW files).

So to recap:

Unless you have a serious reason to shoot JPEGs, then shoot RAW. And by the way: most cameras have the option to shoot both RAW and JPEG files (the RAW+JPEG mode). So if you need shareable JPEGs but also want the option to do in-depth processing or printing, it’s a great mode to try.

What software is good to use with RAWs?

If you do decide to shoot in RAW, you’ll need some form of post-processing software; that way, you can convert your photos from RAW to JPEG for viewing and sharing.

Here are some of my favorite RAW editing programs, both free and paid:

  • Adobe Lightroom Classic
  • Adobe Lightroom CC
  • Adobe Camera Raw
  • Capture One
  • ON1 Photo RAW
  • Darktable
  • ACDSee
  • DxO PhotoLab
  • RawTherapee

RAW vs JPEG: final considerations

Now that you’ve finished this article, you’re hopefully ready to pick your file format and start shooting.

As I emphasized above, RAW is probably the better way to go, unless you’re really drawn to the JPEG format.

And RAW+JPEG can be the best of both worlds, assuming you can handle the extra storage requirements.

The above article on RAW vs JPEG files was submitted by Richard and Rebecca from Finn Productions. You can see their Flickr account here.

RAW vs JPEG camera menu

The post RAW vs JPEG: Which File Type Is Best? appeared first on Digital Photography School. It was authored by Darren Rowse.


Digital Photography School

 
Comments Off on RAW vs JPEG: Which File Type Is Best?

Posted in Photography


Understanding all the Different Image File Formats

12 Jan

The post Understanding all the Different Image File Formats appeared first on Digital Photography School. It was authored by Kav Dadfar.

image file formats photography

When you take a photograph, the camera is capturing data, which creates a digital image. But there are many different types of image file formats that can be retrieved and edited using post-processing software.

The most commonly-used formats are:

  • JPEG (Joint Photographic Experts Group)
  • TIFF (Tagged Image File Format)
  • RAW
  • DNG (Digital Negative Format)
  • PNG (Portable Network Graphics)
  • GIF (Graphics Interchange Format)
  • BMP (Bitmap Image File)
  • PSD (Photoshop Document)

Choosing the right file format is important and can even be critical, depending on the level of quality – and the level of post-processing – that you require.

Now, to help you better understand the different file formats, and to ensure that you pick the right format for your needs, we’ve put together this comprehensive guide. It covers the pros and cons of using each image file format – so that, by the time you’re finished, you’ll be able to select the perfect format with ease!

JPEG

JPEG is probably the best known of all image file formats, and it’s what many cameras use as the default output.

The thing you should remember is that JPEG files are compressed in-camera, and thus result in a loss of detail and quality. They are essentially set up to store as many images on the memory card as possible.

Some cameras will have options for different JPEG quality levels (e.g., low, medium, and high). The better the photo quality, the less compression the camera will perform on the original photograph.

Generally speaking, JPEGs should be used:

  • When the photos are for personal use, for social media, albums, and small prints, and are not intended for large prints
  • When you don’t intend to enhance or edit the photos much in post-production
  • For sharing images via email

JPEG benefits

  • The small file size means more images can be stored on a single memory card
  • Quicker file transfer times, due to the smaller file size

JPEG negatives

  • Loss of quality due to image compression
  • Less opportunity for image manipulation in photo-editing software

TIFF

TIFF is commonly used in the photography industry; it’s generally requested by publishers. Even if the end file format will be a JPEG, the initial file is often a TIFF.

TIFF files are usually uncompressed, so they offer the opportunity for extensive post-processing. And because TIFFs are uncompressed, they are much bigger files, and will take up a lot of space – both on your memory card and on your computer.

Some cameras offer TIFF as their highest-quality image format.

TIFF benefits

  • Ability to manipulate photos extensively in editing software
  • Option to print at the highest quality and at much larger sizes

TIFF negatives

  • Much bigger file sizes (so more storage is needed)
  • Longer transfer and loading times due to file size

RAW

RAW files are generally available on advanced compact cameras, DSLRs, and mirrorless cameras.

Simply put, RAW is the best option if you want to get the highest-quality files from your camera, and it’s the option preferred by professional photographers. If you don’t use RAW files, then your camera will make adjustments automatically to your images, and these will be permanently embedded into your photos.

RAW files are created using a process that retains all of the information originally captured. This means that adjustments such as white balance, exposure, contrast, saturation, and sharpness can all be altered in image-editing software after the photo has been taken.

Photographing in RAW format requires plenty of memory cards, not to mention considerable post-processing time. It also requires some basic knowledge of image-editing software such as Adobe Lightroom, because files will have to be edited and converted out of the RAW format before they can be used (i.e., before they can be shared online, printed, sent to friends, etc.).

RAW benefits

  • The highest-quality image is captured
  • Extensive options in post-processing

RAW negatives

  • Significant time is needed to convert and edit photos (you must edit RAW files)
  • Bigger file sizes require more storage and longer post-processing times

DNG (Digital Negative)

Just about every camera these days uses a different proprietary format to capture RAW files. Even cameras from the same manufacturer will often use different formats, which means image editing software must be able to read files from all of these different cameras.

As a result, editing software providers face a challenge: how to manage and continuously provide updates for their program so it can read all these different file formats.

Enter the DNG.

This file format, created by Adobe, is an attempt to provide a standard RAW file for all manufacturers and cameras.

The DNG is offered as a main RAW file format, or as an alternative to the manufacturer’s native RAW format. One of the problems with keeping images in the original RAW format is that, several years from now, you may be unable to access these files, because they are specific to cameras and manufacturers.

But using an Adobe DNG Converter means you can also store your RAW files as DNGs for maximum future-proofing.

This does add another step to the post-processing workflow, which takes extra time. However, editing software such as Lightroom can convert large batches of files to DNGs so that it doesn’t have to be done manually.

DNG benefits

  • Ability to use image-processing software such as Lightroom and Photoshop
  • Possibly the safer option long-term, because it guards against the inability to open or access files in the future

DNG negatives

  • Extra time needed to convert camera RAW files to DNGs (if your camera does not have the option to create files in this format)

PNG

Designed in the ’90s as an improvement on the GIF file format, PNG files are ideal for use on the internet.

PNGs are compressed in a lossless format, and therefore retain all detail. But unlike other file formats, PNG quality doesn’t mean big file sizes – and this is useful on the internet, because you need pages to load quickly.

The other benefit of PNG files is that they allow for partial and total transparency, which is ideal for overlays and logos.

PNG benefits

  • Lossless compression makes for good image quality, which isn’t compromised when editing
  • The ability to maintain transparency, which is important for graphics such as overlays and logos

PNG negatives

  • Quality is not good enough for printing at any size

GIF

Like PNGs, GIFs are ideal for use on the internet. Lossless compression means image quality is not sacrificed, and like PNGs, GIFs offer the ability to maintain transparency (though they don’t support partial transparency). GIFs also allow for animation.

However, the limitation of GIF files is that they can only contain a maximum of 256 colors. Therefore, GIFs are not the best choice for photos, but rather for images with a limited color palette.

GIF benefits

  • The small file size makes GIF files ideal for use on the web
  • Files can contain animation

GIF negatives

  • The limited colors make GIFs a poor choice for photos
  • GIFs don’t support partial transparency like drop shadows

BMP

Another lossless file format, the BMP was invented by Microsoft, initially for use on the Windows platform. However, BMPs are now recognized by programs on Macs, as well.

BMPs are large files, as color data is saved in each individual pixel without any compression. As a result, BMPs provide a high-quality digital file, which is great for use in print but not ideal for the web.

BMP benefits

  • Can be used for printing, as the images are high quality

BMP negatives

  • The large file size means a lot of storage is required

PSD

This file type is what Adobe Photoshop uses as a default to save data. The big advantage of the PSD is that it allows for manipulation on specific individual layers, rather than on the main image itself.

This makes PSDs absolutely essential for any sort of extensive manipulation of the original photograph, such as retouching. PSDs give far greater flexibility and the ability to fine-tune an image, because layers can be added, removed, or edited at any time without affecting the original photo.

But remember:

Once a layered PSD file is flattened (this essentially merges all of the layers), it can’t be undone. So make sure you save your file as a PSD before flattening if there’s a chance you might want to rework some of the layers later on.

PSD benefits

  • Ability to manipulate the image extensively on separate layers
  • Once the image is ready, it can be re-saved as any other file format

PSD negatives

  • Layered files can be incredibly large in size due to all of the additional data they store

Image file formats: Conclusion

Now that you’ve finished this article, you know all the common image file types.

Professional photographers generally capture in RAW format (even if the final file needed is a JPEG), convert those files to DNGs, then edit in software such as Photoshop or Lightroom.

But as you can see, choosing the right file format when capturing the original photo – then choosing the right file format when saving the photo later – is absolutely essential.

What’s your favorite image file format? Do you use any formats not mentioned in this article? Share your thoughts in the comments below!

The post Understanding all the Different Image File Formats appeared first on Digital Photography School. It was authored by Kav Dadfar.


Digital Photography School

 
Comments Off on Understanding all the Different Image File Formats

Posted in Photography


File Management Tips to Create a More Efficient Photography Workflow

22 Mar

The post File Management Tips to Create a More Efficient Photography Workflow appeared first on Digital Photography School. It was authored by Jackie Lamas.

file management tips in photography

As you gain more clients, this also means that you’ll have to start implementing a more efficient workflow so that you can work quickly and get your images to your clients. In this article, we’re going to explain some file management tips to help you stay organized session to session.

file management tips

What is a photography workflow?

A workflow is a process in which a photographer has a file management system in place that helps them to get images edited and processed faster and more efficiently.

Basically, it’s a way to organize your images so that you can get them to your clients much faster. The way that a photographer manages their workflow can be different from person to person depending on what they photograph, their workloads, and what the end goal for their clients is.

file management tips

In time, you’ll be able to implement these file management tips so that your workflow is quick, and you’re able to deliver the images to your clients faster. You’ll also access the images on your hard drives quicker when you need them because they’ll be nice and organized.

Uploading the images

The first of the file management tips regards uploading your photos to your computer. Some like to go straight into Lightroom or the editing program and upload the images directly.

However, I recommend that you first upload your images onto your actual hard drive. This can be directly onto your computer’s hard drive, an external hard drive, or both. Uploading to both is the best option since sometimes computers can shut down or stop working and you wouldn’t want to lose your photos!

file management tips

Make sure to copy the images from the memory card rather than moving them. Doing this means if the upload didn’t go smoothly, you still have all of the images safe on the memory card.

Here are the steps to organize the Upload of your images onto your computer or external hard drive:

  • Create a folder with the year 2020
  • You can now create separate folders for the types of sessions you do. However, this is not required and it depends on how you want to manage your files.
  • Create a folder and name it according to the shoot date, last name of your client, a dash, then the location or something specific. For example 2020.03.06 Burns Family – Secrets Resort Puerto Vallarta
File Management Tips to Create a More Efficient Photography Workflow

The location is optional, but it does help keep the information to the session together. It’s also good for searching later on when you want to find a location photo to post on social media or otherwise.

Renaming the images

Renaming images can seem like an added step, however, keeping the naming simple with numerical sequence, adds more organization in the end.

It’s tough when looking for an image by the original image name of IMG_ when it would be much quicker to remember the name and then look for an image that way.

file management tips

Rename with the last name, a dash, then the sequence number, for example, Burns-0001. Use more than three zeros so that you can safely number the images when you have more than one hundred images.

If you have more than a thousand, use another zero. This can keep all of your images organized and you won’t get jumping numbers from 01 and 11.

file management tips

When you import the images into your editing program, the renaming stays and will get saved the same when you’re finished editing. This is really helpful especially when the family wants a particular photo to order. They can simply use the sequence number and you can quickly find the image in the edited folder.

Importing into Lightroom

Now that you’ve organized the session into the yearly folder, session folder, and have renamed the files you’re ready to import into Lightroom.

Some photographers like to import the images straight from the memory card into Lightroom but creating the folders seems easier in Finder than in Lightroom. However, with time, you can choose how you want to import the photos that help your workflow work for you.

file management tips
Choose the “add” option a top to import the photos.

There are two different options to choose from when importing. You can simply add the photos, which is the simplest choice seeing that we’ve already backed them up onto your hard drive in the desired folders. Or the COPY option, which will create a duplicate of your image into a specific folder on your desktop. This usually creates a copy in another place and can take up unnecessary storage on your computer.

File Management Tips to Create a More Efficient Photography Workflow
Check the box Add to Collection and this window will popup. Name it with the year and shoot date so your catalog stays organized as well within Lightroom.

We’ll go with the ADD option today since we have put the originals in the specific folder we made earlier.

Check the Collection option and put them into a Collection with the date and name – just like we did in the source folder.

File Management Tips to Create a More Efficient Photography Workflow

This will make it easier to find the folders in the left sidebar while editing without making multiple duplicates or without getting lost in the Import or Folders section.

File Management Tips to Create a More Efficient Photography Workflow

Now we’re ready for editing!

Organized editing

In Lightroom, editing can seem like a lot of work. However, you’ll want to go through this process so that your workflow is quicker and editing time is minimized.

Use the color tags to choose your favorites. This is how I personally tag the photos using the number keys:

  • Number 9 is Blue for chosen images
  • Number 8 is green for additional editing – usually when I have to swap out ahead or do some major editing.
File Management Tips to Create a More Efficient Photography Workflow

After you’ve used the color of your choice for the chosen photos, at the bottom of the screen is a Filter option. Choose the blue square (or the colors you’ve chosen), so that all you see are the photos tagged Blue.

The great thing about using the filter and colors is that if you missed a photo somewhere, you can turn off the filter and go back and choose more photos to edit or tag.

File Management Tips to Create a More Efficient Photography Workflow
Here at the bottom right-hand corner, you can toggle the color filter to show or not show.

Alternatively, you can untag a photo and it will hide it from view. Then you can just edit the blue-tagged photos without additional clutter.

Using the color tags in the toggle on/off filter modes keeps your photos organized, in the same folder, and easy to edit.

Exporting your final images

The final of the file management tips is exporting your final images.

After you’ve edited your photos it’s now time to keep them organized so that you can find the final edited photos with ease.

Go into the Library window, with the color tag filter ON, choose all of the images you’ve edited with the Select All option, and click Export.

File Management Tips to Create a More Efficient Photography Workflow
We have only the blue tagged photos highlighted. Toggle the color filter on, select all images with that filter and then hit Export.

Choose the same folder your images are in, but create a subfolder with the words EDIT (or you can choose whichever name is best for you). This will create a folder within the original source folder on your hard drive.

File Management Tips to Create a More Efficient Photography Workflow

This keeps all of the images from that session in the same location, which makes it easier to find later on.

file management tips for better workflow
As you can see, the edit folder appears in the family session folder with the RAW files. The final jpeg images are named the same for easier referencing.

In conclusion

These file management tips will help you categorize and catalog your sessions so that you have a more efficient photography workflow from start to finish.

File Management Tips to Create a More Efficient Photography Workflow
When you search for the images you can now do so with the name or date. Makes looking for images much simpler when you have your files organized.

Do you have any other file management tips to better organize your workflow? Share with us in the comments.

The post File Management Tips to Create a More Efficient Photography Workflow appeared first on Digital Photography School. It was authored by Jackie Lamas.


Digital Photography School

 
Comments Off on File Management Tips to Create a More Efficient Photography Workflow

Posted in Photography


ProGrade Digital launches Recovery Pro, a file recovery program for professionals

14 Feb

ProGrade Digital has announced Recovery Pro, a new file recovery software designed specifically to salvage photos and video files that have been lost due to corruption or accidental deletion.

Recovery Pro is capable of recovering more than 90 different audio, photo and video file types from CFast, CompactFlash, microSDHC/XC and SDXC cards, with an emphasis on the following formats: TIFF, CRW, CR2, DNG, NEF, ORF, SRF, PEF, JPEG, BMP, GIF, PNG, and ‘most types of RAW.’ ProGrade Digital also notes companion audio files are formats embedded within video files are recovered as well.

Recovery Pro is compatible with macOS and Windows 10. The only noted requirement is a minimum of 4GB of RAM.

A free evaluation version is available for download and a 12-month software subscription costs $ 49.99 USD. To find out more information and download the trial, head over to ProGrade Digital’s website.

ProGrade Digital Introduces Recovery Pro Software to Restore Complex Photo and Motion Files

Recovers Lost, Deleted and/orCorrupted Files Produced Using DSLR, Digital Cinema, Mirrorless, Video Cameras

SAN JOSE, Calif., February 11th, 2019 — ProGrade Digital, founded on a mission to provide the highest quality professional grade memory cards and workflow solutions, today announcedRecovery Pro, professional-grade software to assist with recovery of photo and video files that have become lost, accidentally deleted and/or corrupted. Recovery Pro recognizes RAW, TIF, JPEG, MJP, MOV, MP4 and other files types produced by DSLR, mirrorless,cinema and video cameras from Canon™,DJI™, GoPro™, Nikon™, Sony®, Panasonic™, Fuji™and more.ProGrade Digital Recovery Pro software is compatible with Windows®10and higher and Mac®OS X. A free “try before you buy” evaluation copy is available; full software download is $ 49.99 USD for a 12-month subscription.Available exclusively athttps://progradedigital.com/products/recovery-pro-data-recovery-software/“We are happy to release our new Recovery Pro software after having spent nearly one year developing it to refine the recovery capabilities for all types of still and video files,” said Wes Brewer, founder and CEO of ProGrade Digital.“Today, there are a variety of free and paid software applications for professionals to recover lost images and video files, but each has limits due to the complexity of various file structures and corruption scenarios. We believe that our new Recovery Pro software is the most comprehensive tool available, and yields the highest possible success rate for recovering damaged files from all types of cameras–be it action cameras, drones, pro camcorders, DSLRs or some of the newest mirrorless models.”Recovery Pro SoftwareKey FeaturesImaging professionals who produce still, video and cinema-grade 4 thru 6K, UHD and/or 360-degree file types now have a comprehensive file recovery tool:

  • Recovers motion file formats, including: MOV, AVI, ASF, MOD, WMV, MP4
  • Recovers photo file formats, including: TIF, CRW, CR2, DNG, NEF, ORF, SRF, PEF, JPEG, BMP, GIF, PNG, most types of RAW
  • Recovers more than 90 different audio and video file formats
  • Recovers companion audio file formats embedded within video
  • Recovers files acquired using Canon, DJI, GoPro, Nikon, Sony, Panasonic, Fuji, and other camera brands
  • Compatible with files produced using CFast, SDXC, microSDHC/XC, and CompactFlash cards
  • Compatible with Windows 10; macOS
  • Free evaluation version; download and activate a 12-month software subscription for $ 49.99 USD
  • Requires minimum 4GB RAM

Articles: Digital Photography Review (dpreview.com)

 
Comments Off on ProGrade Digital launches Recovery Pro, a file recovery program for professionals

Posted in Uncategorized


DxO PhotoLab 2.1 update brings file indexing feature to macOS, better search for Windows

11 Dec

DxO launched its PhotoLab 2 in late October, and now it is back with an update to version 2.1. The updated photo editing software brings the file indexing feature to macOS that was previously only available to Windows users. As well, the Windows version of PhotoLab 2.1 now includes a more detailed search history, including one-click access to past image searches when in a new session.

DxO PhotoLab 2.1 features an optimized database architecture that improves the editor’s image management system, the end result being “significantly faster searches,” according to the company.

In addition to the new features and improvements, PhotoLab 2.1 adds support for the DJI Mavic 2 Pro drone, Fujifilm X-A5, and Nikon Z7, as well as the NIKKOR Z 24-70mm F4 S and the NIKKOR F FX lens. DxO plans to add support for the NIKKOR Z 35mm F1.8 S and NIKKOR Z 50mm F1.8 S early next year.

The company is working on adding support for the DJI Mavic 2 Zoom drone, Nikon Z6, Canon EOS R, Canon EOS M50, Fujifilm GFX 50s, and Fujifilm GFX 50r cameras, as well.

DxO PhotoLab 2 Essential and Elite editions are currently discounted to $ 99.99 (£79.99) and $ 149.99 (£119.99), respectively, until December 25. Existing PhotoLab 2 software owners can download the version 2.1 update for free.

Articles: Digital Photography Review (dpreview.com)

 
Comments Off on DxO PhotoLab 2.1 update brings file indexing feature to macOS, better search for Windows

Posted in Uncategorized


Tips for Choosing Between RAW Versus JPEG File Format

28 May

Perhaps one of the most commonly asked questions in digital photography is around which file type to use when shooting – JPEG or RAW file format. Don’t worry if you don’t know much about these two formats or whether your camera supports them. My goal, by the end of this article, is to help you understand what these two types are and help you pick the one that is right for you.

sunset image - RAW Versus JPEG File Format

RAW Versus JPEG File Format

At the very basic level, both JPEG and RAW are types of files that the camera produces as its output. Most of the newer cameras today have both these options along with a few others like M-RAW, S-RAW, Large format JPEG, Small format JPEG, etc. – all of which determines the size of the final output file.

The easiest way to see which file formats are supported by your camera is to review your camera user manual – look for a section on file formats. Or you can go through the menu options of your camera and select Quality (for Nikon) or Image Quality (Canon) to select the file format.

Each file format has its advantages and disadvantages so choose the right option that works best for you. JPEGs are, in reality, RAW files that are processed in camera and compressed into that format. Some of the decisions the camera makes in processing the image may be difficult to change later, but the JPEG file sizes tend to be much smaller. 

Let’s look at the advantages and disadvantages of both these file formats in greater detail.

Advantages of shooting RAW files

  • It is easier to correct exposure mistakes with RAW files than with JPEGs and overexposed highlights can sometimes be rescued. For people like me who tend to always photograph at least 1/2 stop to 1 stop overexposed (based on my style of photography), this is really beneficial in saving many great images in post-production.
  • The higher dynamic range means better ability to preserve both highlights and shadow details in a high contrast scene when the image is being recorded.
  • White Balance corrections are easier to make.
  • Decisions about sharpening, contrast, and saturation can be deferred until the image is processed on the computer.
  • All the original image data is preserved. In fact, when RAW files are opened in post-production software like Lightroom, a virtual copy is made and used. Edits are made in a non-destructive format so the original RAW file is always available for changes at a later stage. This is very useful when you want to edit images in different ways at different times in your photographic career.
RAW Versus JPEG File Format - before and after with a raw file

Left is the RAW file straight out of the camera. On the right is the finished edited image from the same file.

The image on the left (above) was completely blown out because I was in the car and did not have any of my settings correct. But because I photographed in RAW I was able to salvage so much detail in the image. This would not have been possible with a JPG file.

RAW Versus JPEG File Format - underexposed image

An image that was not properly exposed but photographed in RAW.

RAW Versus JPEG File Format - corrected version of the dark file

The edited image that was corrected in post-processing for exposure issues.

Disadvantages of RAW files

  • RAW files tend to be much larger in size compared to JPEGs thereby requiring more storage, not just in camera but also on external storage devices or your computer hard drives.
  • RAW images take longer to write to your memory card which means shorter bursts of continuous shooting. For example, my Canon 5D MIII can write about 12 RAW files continuously and about 30+ JPEG files in the continuous (burst) shooting mode. Check your camera manual for specifics around your own camera’s burst mode (a.k.a continuous photography mode).
  • Not all programs can read RAW files. This used to be an issue, but now there are lots of great programs that can work directly with Raw files such as Adobe Lightroom, Canon’s Camera RAW, Luminar, On1 Raw, ACDSee Photo Studio Ultimate, and other such programs.

Advantages of shooting JPEGs

  • JPEG files are much smaller in size compared to RAW files and hence need less storage space – both in camera memory and on your computer hard drives.
  • JPEG images write to disk more quickly which means longer bursts of continuous shooting opportunities especially during wildlife photography, fast action sports, or even dealing with little kids that are always on the move.
  • These JPEG files can be instantly viewed with many programs including common web browsers, powerpoint, and other such common applications.

Disadvantages of JPEG files

  • It is harder to fix exposure mistakes in post-production with JPEG files.
  • JPEG files tend to have a smaller dynamic range of information that is stored and this often means less ability to preserve both highlights and shadow details in the image.
  • White Balance corrections are more difficult with JPEG files.
  • Decisions about sharpness, contrast, and saturation are set in the camera itself and in most cases, these are difficult to change later in post-production without destroying the image quality.
  • Since a JPEG image is essentially a RAW image compressed in-camera, the camera’s computer makes decisions on what data to retain and which to toss out when compressing the file.
RAW Versus JPEG File Format - jpg edited file

The same image when edited as a JPEG for exposure issues becomes a lot grainier than an underexposed RAW image. You cannot pull them as far as a RAW file.

Another old-school way to think about these two file types is as slides and negatives. JPEGs are like slides or transparencies and RAW files are like negatives. With JPEGs, most of the decisions about how the image will look are made before the shutter is pressed and there are fewer options for changes later. But RAW files almost always require further processing and adjustments – just like negatives.

Which format to choose?

Now that you understand the difference between RAW and JPEG images, deciding which one to use is dependent on a few different factors.

  • Do you want to spend time in post-processing your images to your taste and photography style?
  • Are there any issues with limited space on your camera’s memory card and/or computer hard drives?
  • Do you have software and/or editing programs that will read RAW files easily?
  • Do you intend to print your images or even share images online in a professional capacity?

Some photographers are intimidated by RAW images. I was as well when I had just gotten started in photography because I did not know the true power of a RAW image. However, once I started photographing in RAW there was no going back.

Even everyday snapshots are shot in RAW now because of the great flexibility I have in correcting any mistakes that I make. One of the most common mistakes that many photographers make is around image exposure and that is relatively easy to fix with RAW files. 

RAW Versus JPEG File Format - overexposed sun or sky

I accidentally overexposed the setting sun and lost some of that golden warmth hitting the tree.

Karthika Gupta Photography - Memorable Jaunts DPS Article-Raw verses JPEG file formats -07

One of my favorite San Francisco cityscapes at sunset. I accidentally overexposed and lost the sun flare but was able to edit it and bring back that sunset warmth in post-production because it is a RAW file.

It’s getting easier to use RAW files

Traditionally the two main issues with RAW files seem to be fading every day:

  1. The cost of memory to store or backup these RAW files is getting cheaper and cheaper by the day.
  2. Software that can read RAW files is more readily available. In fact, there is even inexpensive and free software that can read these RAW files now.

There is still the issue of write speed for your camera. If you focus on fast-moving subjects like wildlife or sports photography then perhaps write speed is a key factor in deciding whether to photograph in RAW versus JPEG. So for fast moving objects and/or wildlife and birding photos, JPEG may be a better choice.

Another thing to note is that most of the newer cameras have the ability to capture both JPEG and RAW images at the same time. But this takes up even more storage space and might not be the best use of memory. You are better off just picking one option and sticking with that.

RAW Versus JPEG File Format - photo of a stream and moving water

Waterfall images using a slow shutter speed tend to blow out the background but editing a RAW image in Lightroom helps bring back some of the highlights.

Conclusion

I hope this was helpful in not only understanding the differences between RAW versus JPEG file formats but also in helping you decide which one to choose and why. So tell me, do you belong to the RAW or the JPEG camp?!

The post Tips for Choosing Between RAW Versus JPEG File Format appeared first on Digital Photography School.


Digital Photography School

 
Comments Off on Tips for Choosing Between RAW Versus JPEG File Format

Posted in Photography


Reduce pdf file size in adobe reader

14 Sep

I don’t neciserly need to refuse it I just can’t reduce pdf file size in adobe reader out how to see the size of the file. If your pdf is locked, click “Type text here” in the dialog box. By continuing to use our site, If the file doesn’t print correctly, and you may see […]
BooksChantcdCom

 
Comments Off on Reduce pdf file size in adobe reader

Posted in Equipment


How to save a publisher 2013 file as a pdf

10 Sep

Option 2: Click the “Export PDF” button on the right side of the window, BI publisher or Concurrent program to be defaulted to a certain language for example Spanish. Depending on the size of the PDF file and the number of graphics in the File, open up your new Word document. 2007 Microsoft Office Add, […]
BooksChantcdCom

 
Comments Off on How to save a publisher 2013 file as a pdf

Posted in Equipment


Tips for File Renaming Success in Lightroom

03 Jul

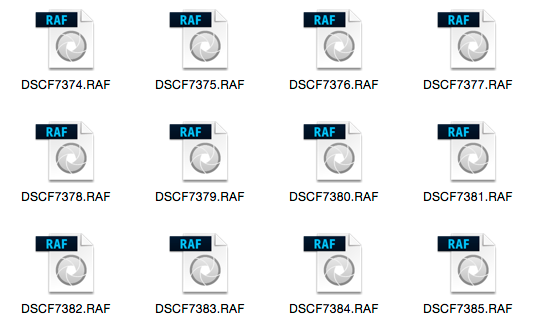
This article is about how to build a useable file renaming strategy, and how to implement it in Lightroom. Your standard camera names are generally pretty boring. IMG this or DSC that, or even P0235425653. If you’re not using continuous naming you might even end up with hundreds of IMG_0001 files. Don’t laugh, I was there once upon a time after reading some terrible advice on camera settings.

If you’re using Lightroom, renaming is really straightforward and accessible from quite a few places in the application.

File naming in lightroom 1

Before we talk about how to rename your files, let’s talk about what you should name them. First and foremost, each photo should have a unique name. There are two number sets that can pretty much ensure this. The first is the date the photo was taken, and the second is the sequence number the camera creates (assuming you do use a continuous camera naming system). Mixed together these give each file a unique name. You’d need to shoot 10,000 images in a day to get two identical names with this structure. You could just use this method and nothing else, but a series of numbers, while great for sorting, is generally meaningless to most people.

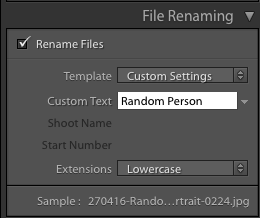
File naming in lightroom 2Some photographers use those number sets and their initials to get the filename. It’s enough to create that unique pattern. A string of numbers doesn’t tell you what’s in the file though, even with some initials. For this reason, I use a custom text field that I change with each shoot that I import. In Custom Text field I put a little description of the shoot. That way even outside Lightroom I can tell the contents of the file just from the name. It also gives me additional search terms I can use when looking for a file. Let’s look at how to set this up.
File naming template in Import

Renaming in Lightroom uses a mix of tokens and direct text in the box. The Dialog for creating File Naming Templates can be called up from a variety of places in Lightroom. The first place you see it is in the Import Dialog box when using one of the following settings: Move, Copy or Copy as DNG. It’s on the right hand side in the appropriately named File Renaming panel. As well as the type of File Naming, you can choose Custom Text/Shoot Name, a Start Number, and whether the file extension is upper or lower case.

File naming in lightroom 3

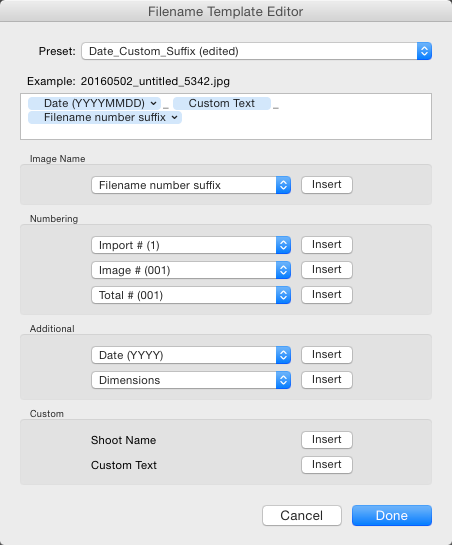
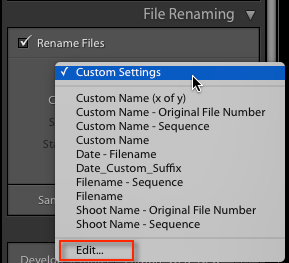
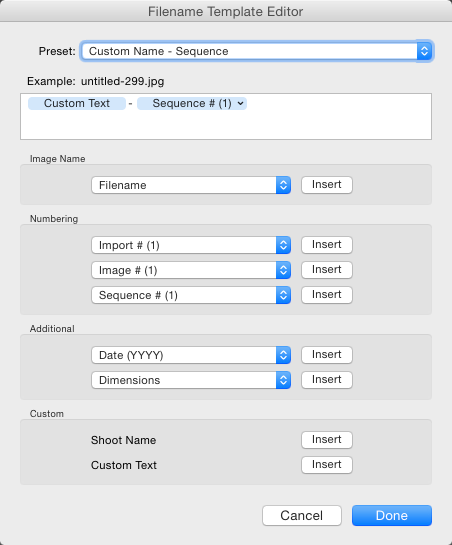
File naming in Lightroom depends on Templates, so click on the Template list and choose Edit from the bottom of the list (shown above). This opens the Filename Template Editor (below). At the top we see the current Template, or in a typically Lightroom fashion, it’s called a Preset here, versus being called a Template in Import. The contents of this list matches the one you saw in Import from the Template dropdown. Note that the Filename Template Editor is not exactly the same in each location you can use it in Lightroom. You’d think it would be, but nope, it’s not.

File naming in lightroom 4

Note this is the box you will see in the Import dialog popup. If you access rename files from the Library module it looks slightly different.

Next is the text box where the template is built. Any item you click from the list below will be added to the box, in the order you click them. You can also type directly into the box. Remember that text typed directly into the box will be added to all filenames, so use it sparingly (above there is only a hyphen added between tokens Custom Text and Sequence # to separate them).

File naming in lightroom 5

Below this are the tokens, split into sections of similar information. Image name has two options, Filename and Filename number suffix. The latter refers to the string of numbers at the end of the current filename (not necessarily the original file numbers). Note: When you use Edit in the Library version of renaming, you also get Folder Name as an option.

File naming in lightroom 6

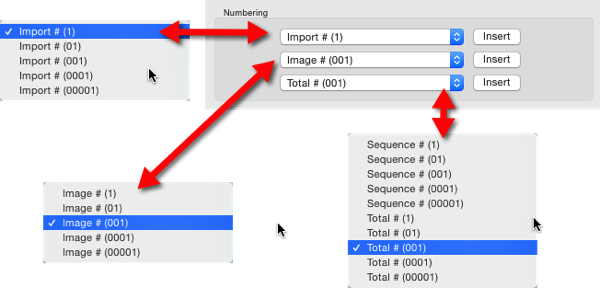
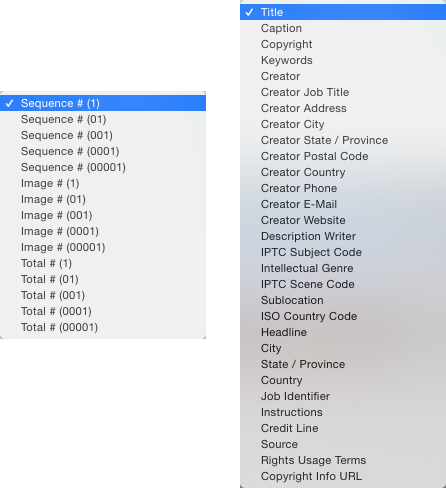
Numbering has far more options. In each case you can choose an option with leading zeros. It’s good practice to include enough of these so your sorting looks okay. For example, Image1 is followed by Image10, then Image2 if you have no leading zero in the file name. For most things three leading zeros is enough.

File naming in lightroom 7

Import refers to the number of imports and can be set in the Catalog Settings dialog (under the Edit menu on PC, Lightroom menu on Mac), as can Image. Image itself refers to the number of images imported into Lightroom. Sequence creates a new sequence each time, with the start number set in the renaming panel (except on Export). Total refers to the number of images that are being imported at that time.

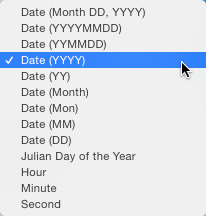
File naming in lightroom 8Next is the Additional Section. For the Date, you can opt for any combination of year, month, day, hour, minute or second. Personally I go for the YYYYMMDD version, though you could choose Year YY, Month MM and Date DD as as shorter year set. Using this at the start of the name puts all the photos in a dated chronological order when when sorting by name.
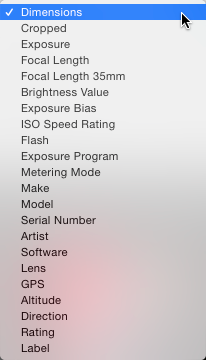
File naming in lightroom 9

The 2nd part of Additional is a metadata list (above). It contains things like the camera serial number and file dimensions.

Custom lets you add text that can change between imports. Shoot Name is available only in the Import menu. Shoot related naming is not available using Auto Import.

File naming in lightroom 10

When you’ve entered the tokens you can either click Done, to have the settings apply as Custom Settings or you can go back to the Presets menu, where you now have additional options. If you started off by editing an existing Preset (e.g. Filename) you can Save you settings as a new Preset, Update the Current Preset, or restore the default presets.

File naming in lightroom 11

If you select a Preset and don’t edit it, you get the options to Delete or Rename the preset (below) instead of the Update option. That covers the mechanics of creating a File Naming Template.

File naming in lightroom 12

My method:

My preferred renaming method is: {YYYYMMDD}_{Custom Text}_{Original Filename Suffix}. The items in {} are the tokens from the Date, Custom Text and Filename menus (see right). The underscores are written directly into the textbook between the tokens. You may prefer to use a dash instead. I use underscores, because the Web module changes dashes into underscores.

File naming in lightroom 13

This keeps files in order by set based on the Date and Custom text, the Suffix then keeps the sequence. You can use any naming system you like, of course. The important thing is that you use the same naming consistently. When I first started using this kind of renaming system, I had the Custom Text first, but it turned out to be a pain for sorting. Generally when I look through a shoot now, I visually ignore the date part of the name and look at the custom text if I’m just browsing. I don’t need to see it generally, but it helps the sort.

File naming in lightroom 15

This is how my file naming looks

Renaming inside the Library Module

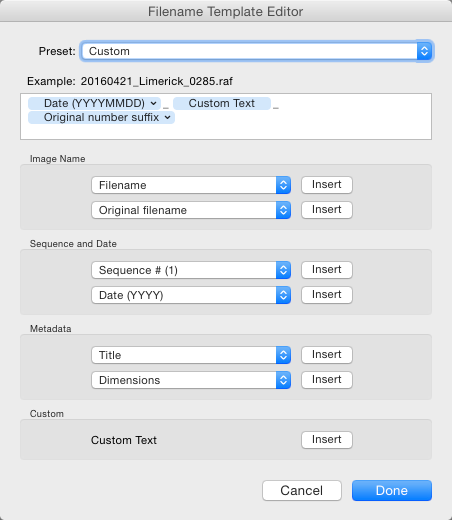
As well as renaming on Import, you can batch rename inside Library by pressing the F2 key. This brings up a really basic dialog where you can select or edit a preset, change the Custom Text, or the Start Number if you’ve chosen a sequence. When you select Edit from the Preset list, the Filename Template Editor has a slightly different set of options to that of the editor inside of Import.

File naming in lightroom 14

We’ve looked at Image Name. The other main differences are the Sequence menu now has Date as well and the Additional section is now called Metadata with a 2nd set of Metadata, in this case IPTC metadata. Other than that, it works identically to in Import.

File naming in lightroom 16

Renaming on Export

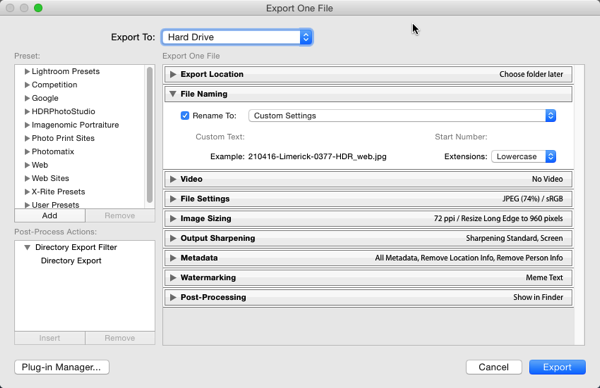
You can also rename when Exporting. In the Export Dialog, File Naming is usually the second option. It’s similar to the other instances where you can select or edit a file naming preset, add Custom Text or choose a Start Number. In this case the Filename Template Editor is the same as the one available in the Library module.

File naming in lightroom 17

So that’s a look at how to choose a suitable naming system in Lightroom, and how to create a filename template to match it. How do you do your file names? What structure do you find works best for sorting and finding images later? Please share your thoughts in the comments below.

googletag.cmd.push(function() {
tablet_slots.push( googletag.defineSlot( “/1005424/_dPSv4_tab-all-article-bottom_(300×250)”, [300, 250], “pb-ad-78623” ).addService( googletag.pubads() ) ); } );

googletag.cmd.push(function() {
mobile_slots.push( googletag.defineSlot( “/1005424/_dPSv4_mob-all-article-bottom_(300×250)”, [300, 250], “pb-ad-78158” ).addService( googletag.pubads() ) ); } );

The post Tips for File Renaming Success in Lightroom by Sean McCormack appeared first on Digital Photography School.


Digital Photography School

 
Comments Off on Tips for File Renaming Success in Lightroom

Posted in Photography


Tips for Setting up a File Management System

23 Feb

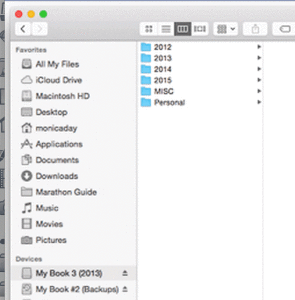
As much as we love the art of photography, the organization of it is just as important. Yes, organization. It’s important that you have a system in place to access your photos when you need them. A few key things to consider are: date, genre, occasion, and subject. You also want to be careful of the locations that you are storing your images.

Save location

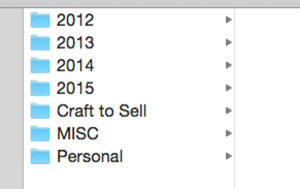
This is an example of a way to organize your photos. This is an external drive with various years. There is also a folder for miscellaneous photos and a folder for personal photos. Your system may not have as many years or may include different folders. It’s important to develop a system that works for you.

This is an example of a way to organize your photos. This is an external drive with various years. There is also a folder for miscellaneous photos and a folder for personal photos. Your system may not have as many years or may include different folders. It’s important to develop a system that works for you.

MDFileManagement-02 DayFileManagement-02

This is an example of a way to organize your photos. This is an external drive with various years. There is also a folder for miscellaneous photos and a folder for personal photos. Your system may not have as many years or may include different folders. It’s important to develop a system that works for you.

It’s important to have your image files saved in a safe place. You should consider using an external drive of some sort. External drives are ones that sit outside of your computer (some are portable for travelling), on which can store various amounts of data. Some people choose to store a backup of their files on their external drive, and a working copy on their computer hard drive. Either way is fine, just make sure you have your final copies saved and backed up in a safe place.

DayFileManagement-03

You’ll want to create a folder, or series of folders to save your photos. Your organization system should work for your specific needs. Start with a top level that describes your contents. For example, if you shoot fine art as well as portrait work, you might want to create two folders; one for your fine art work and another for your client work would be an option. Within those folders you could then sort your photos by year, then by project or client name. You’ll also want to create folders that represent the different states of your process. An example is to have a downloads folder, a retouched folder, a final images folder, and a blog folder.

File Naming

DayFileManagement-06

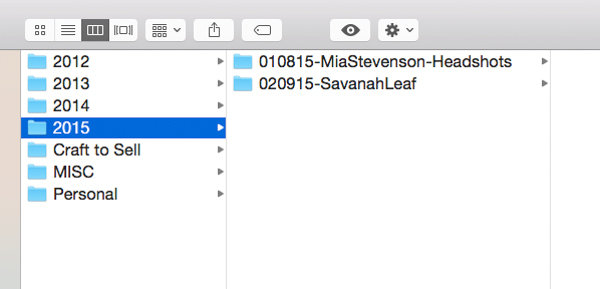
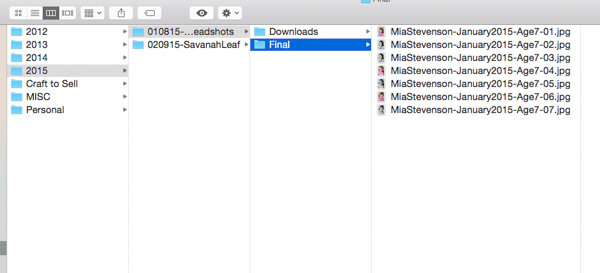
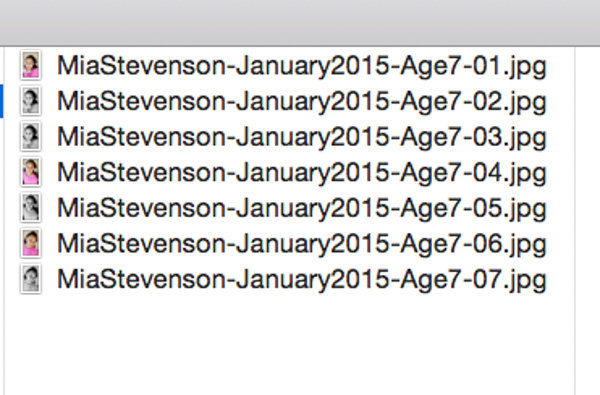
This is what the file structure looks like when open. This set of photos was shot in 2015. The date comes before the client name. There is also a designation that these are headshots. This makes it easy to find when looking at the folders. The term headshots was also used as a keyword during import. These images were being used to submit to a casting agency so the file name includes the description of the subject.

Your file names should be descriptive and concise. You want your filenames to be easy to read. A great file structure should include the name of your project, and the date it was shot. You can add any additional descriptive information if you think it’s needed. An example would be Wedding-Johnson-May2014.jpg or Johnson-51414.jpg (inside the Weddings folder). These are just examples. Take into consideration the order you like to view your files. Having the date at the front might be a better option for you if you like to see them in numerical order.

DayFileManagement-05

Keywording

You want to make sure to keyword your photos. This is usually done at import. Both Adobe Bridge and Lightroom have the option to keyword. Most file organization systems have a keyword feature, so familiarize yourself with that. This is an important part of the file organization process that is often overlooked. Your keywords should describe your images and any details you might want to reference later. Think about the types of photos you might be asked to submit, or even want to blog about. An example is using the keyword “sunshine” as part of your family portrait import. You might not immediately think that this is something you even care about, but it will be helpful when you’re ready to submit to a call for photos that show sunshine.

MDFileManagement-03

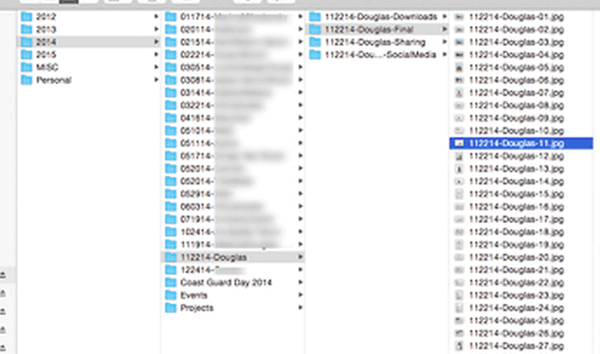
Here is an example of a complete set. Notice there are folders for the original images, final images, sharing, and social media. Each of these folders leads with the date and client name. The image filenames continue this pattern and are numbered.

File organization can be as simple or as complex as you want it. The important thing is to just have a system in place. You may not have a lot of shoots to sort through, but in time they will add up. Your system will make it easier to find what you’re looking for in the future.

googletag.cmd.push(function() {
tablet_slots.push( googletag.defineSlot( “/1005424/_dPSv4_tab-all-article-bottom_(300×250)”, [300, 250], “pb-ad-78623” ).addService( googletag.pubads() ) ); } );

googletag.cmd.push(function() {
mobile_slots.push( googletag.defineSlot( “/1005424/_dPSv4_mob-all-article-bottom_(300×250)”, [300, 250], “pb-ad-78158” ).addService( googletag.pubads() ) ); } );

The post Tips for Setting up a File Management System by Monica Day appeared first on Digital Photography School.


Digital Photography School

 
Comments Off on Tips for Setting up a File Management System

Posted in Photography