RSS
 

Posts Tagged ‘Fence’

How to Remove a Fence From Your Photo in Just 3 Steps in Photoshop (video)

18 Jan

The post How to Remove a Fence From Your Photo in Just 3 Steps in Photoshop (video) appeared first on Digital Photography School. It was authored by Caz Nowaczyk.

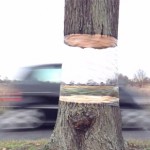
In this Photoshop video tutorial from Piximperfect, you’ll learn how you can remove a fence from your photo in Photoshop – you know, those annoying fences in front of your subject.

?

How to remove a fence from your photo in just 3 steps in Photoshop

Use the following steps to remove your fence:

Step one: Painting out the fence on a layer mask

  1. Make a layer mask.
  2. Zoom in close to your fence, then choose a hard-edged brush that is just slightly larger than the edge of your fence (be sure your paintbrush color is black).
  3. To paint the fence, simply click at the beginning of the fence, then hold the shift key, move the brush to the next section of fence and click. This will create a straight line.
  4. Continue this process over every section of the fence. While this can take some time, duplicating the pattern generally won’t work as no two sections will be the same).
  5. While zoomed in, to move around the image, press the space bar to bring up the Hand and then move the image to where you need it. Then continue painting in the fence lines.
  6. Be sure to paint over all the discrepancies in the fence. If some sections of the fence aren’t straight, simply paint in two or three points.
  7. Once you have painted in all the fence lines, you can move onto the next step.

Step two: Apply the Content-Aware fill

  1. Select the background layer and turn off the fence mask layer using the eye icon next to the layer.
  2. Now hold Ctrl (PC) or Cmd (Mac) and click on the thumbnail of the fence mask layer. This will select the fence layer.
  3. Go to Edit->Content-Aware Fill (If you are using an older version of Photoshop, for to Edit->Fill and then choose Content-Aware from the dropdown section).
  4. This will open up the Content-Aware Fill settings. Leave them at the default settings. Just change the Output To: setting to New Layer. Click OK.
  5. Press Ctrl+D (PC) or Cmd+D (Mac) to deselect the fence.
  6. To see how the Content-Aware Fill tool has worked, turn off your background layer momentarily. Then turn it back on.

Step three: Making minor adjustments

  1. The image may look great while zoomed out on the full image, but when zoomed in close, some areas may not look right. This is where the minor adjustments come into play.
  2. Create a new layer.
  3. You can use the Spot Healing Brush Tool. Paint over areas that need fixing with a soft brush. Be sure that the “Sample All Layers” box is checked too. That way, it samples all the layers below the layer you are working on.
  4. For trickier sections, like eyes, select the Clone Stamp Tool.
  5. Take a sample of a similar section by clicking the Alt Key and selecting. If you need to rotate your clone (for example, around an eye). Hold down Shift+Alt+Right or Left Arrows or > (Win) and Shift+Opt+Right or Left Arrows (Mac)
  6. You can also do that by going to Window->Clone Source and then manually entering in the angle of rotation.
  7. Then use the regular Healing Brush Tool. Click the Alt (Win) or Option Key (Mac) to take your sample then paint in the areas that need fixing.
  8. If you are having difficulty fixing areas such as the eyes, consider duplicating the other eye.
  9. To do this, make a new layer. Then use the Clone Tool and make your selection from the same eye. Then repaint it onto the new layer.
  10. Then press Ctrl or Cmd+D to select it and right-click and select Flip Vertical. This then brings up the corner anchors, and you can rotate the eye as you please.
  11. Next, move the rotated eye section over the top of the original eye.
  12. Click on the Mask icon on the Layers panel to create a mask. Select your brush tool. Remember, a black fill will hide your layer (paint it out).
  13. Start painting out the sections you don’t want. You can lower the opacity of your layer so that you can get it’s positioning just right too.
  14. Next, merge your clone layers (not the background or Content-Aware Fill layers). To do this, select the first layer, then press Ctrl or Cmd and click on the next layer. Then press Ctrl or Cmd+E to merge them.
  15. Continue to look for discrepancies and fix those using the same process.

Step Four: Further adjustments

  1. Now, you can make further adjustments to your image, including selective focus.
  2. Next, create a stamp visible layer.
  3. To do this, first, create a new layer and call it “Selective Focus.” Then select Ctl+Alt+Shift+E (win) or Cmd+Opt+Shift+E (Mac). This will bring your image into the layer.
  4. Then convert the layer to a smart object. Go to Filter->Convert for Smart Filters. Click OK.
  5. Then go to Filters->Blur Gallery and choose Tilt Blur. Next, rotate it. Keep in mind that the areas in the middles are focused – they have zero blur.
  6. Adjust the blur level to whatever you like. You can also adjust the width of the blur area by pulling the lines outward.
  7. Always have your eyes in focus.
  8. You can also add other blur types if you like.
  9. You can also add some sharpness to the eyes. Create another Stamp layer as above. Then desaturate it by clicking Ctrl+Shift+U (Win) or Cmd+Shift+U (Mac). Then go to Filter->Convert for Smart Filter. Click OK.
  10. Next, go to Filter->Other->High Pass. Zoom in so you can see the detail. Decrease the radius slowly and gradually increase it. Just when you begin to see the halos, stop.
  11. Change your layer blend mode to Overlay.
  12. You will see the sharpness on the overall image, but you really only want it on the face. So, hold down the Alt Key (win) or Opt Key (Mac) and then click on the mask. This will create a negative (black) Mask.
  13. First, name it “Sharpen.” Then click the mask, select your Brush Tool, then choose a soft brush and paint on the areas you want to sharpen (Be sure your white paint palette is selected).

And that’s it!

Share your before and after results with us in the comments section!


The post How to Remove a Fence From Your Photo in Just 3 Steps in Photoshop (video) appeared first on Digital Photography School. It was authored by Caz Nowaczyk.


Digital Photography School

 
Comments Off on How to Remove a Fence From Your Photo in Just 3 Steps in Photoshop (video)

Posted in Photography


Camera-friendly Canadian airport cuts holes in perimeter fence for aviation photographers

23 May

Québec City Jean Lesage International Airport, often shortened to Jean Lesage International Airport, has made camera holes in a range of locations around its perimeter fence to allow photographers an unhindered view of planes taking off, landing and moving along its runways and taxi areas.

The airport has propelled itself to the number one spot for aviation photographers with the project. Metal frames surround the holes to prevent wire scratching lenses and accompanying signs to clarify the area is reserved for photographers.

The airport got together with local plane-spotting group YQB Aviation to identify the best angles for photographers and then created a total of 10 sites all around the airport that provide views of exactly what photographers want to shoot, seen in the image below:

Jean Lesage International Airport which recently won awards for its environmental practices and as an outstanding workplace, and which carried almost 1.8 million passengers in 2018, also hosted a 5km run on its runways earlier this month to offer locals a different view of the airport.


Photo credit: Images by Jean-Lesage International airport, used with permission.

Articles: Digital Photography Review (dpreview.com)

 
Comments Off on Camera-friendly Canadian airport cuts holes in perimeter fence for aviation photographers

Posted in Uncategorized


Avert Your Canine Going Astray With a Wireless Pet Fence

08 Mar

Each canine owner requires a simple canine fence, wireless or not. These fences makes sure that their precious animals are secure though these are executing one thing else. For that motive,best fence for puppies and dogs these fences are perfect for pet entrepreneurs who generally locate them selves too fast paced to watch in excess of their canine.

Everyone who wants to own the most effective style of pet dog fence, wireless fences ought to be regarded. This kind of fence can safe all canines inside the residence though the proprietor is absent at get the job done or in school. Additionally they help save space and therefore are relatively straightforward to work. Nonetheless, a highly effective canine fence (wi-fi) might be really highly-priced. For that purpose, it truly is critical for each and every puppy owner to create positive that he/she buys just the most effective kind of wi-fi dog fence accessible on the market.

Ahead of picking a wireless dog fence, the puppy proprietor should initial get his/her dog’s breed into consideration. This allows him/her turn out to be more familiar with the character of his/her puppy. Some breeds are more restless than many others. Some breeds are also friendlier and will simply technique strangers or outsiders compared to other breeds that quickly get intimidated. This also helps the individual to determine how far his/her dog is probably going to stray.

The moment the dog’s purely natural habits is becoming acquainted on the owner, then the following thing for being deemed must be the house as well as the backyard’s format and framework. This allows produce a more powerful floor program. Making sure the fence is correctly mounted enhances its effectiveness. Organizing might also decrease the chances of it getting to be a nuisance to the homeowner’s each day existence. Normally, the fence must be installed appropriately to secure all animals in the home.

The options with the fence also really should be deemed. Plainly, many fences come with diverse functions. Some are simple and cheaper than most whilst some tend to be more sophisticated plus more high priced.

You furthermore mght should acquire more safety measures when selecting a wireless puppy fence, as there are actually various styles around that actually don’t give first-class protection for your pets. Some models could possibly be inaccurate and will answer slowly but surely. This suggests your puppy or pet that can cross the border-even prior to the unit reacts.

Provided that the person has adequate price range, then it’s all right to select the greater expensive form. Nevertheless, it’s not likely important to choose the greater expensive varieties especially if the capabilities are seemingly worthless to the consumer. It really is ok to choose the cheaper extra typical sort in the event the individual is just seeking for one thing that keeps his/her pet within when he/she is absent.

The post Avert Your Canine Going Astray With a Wireless Pet Fence appeared first on Photonovice.

Photonovice

 
Comments Off on Avert Your Canine Going Astray With a Wireless Pet Fence

Posted in Equipment


A Toddler Peers Over the US-Mexico Border Fence for JR’s Latest Installation

12 Sep

[ By SA Rogers in Drawing & Digital. ]

Set on scaffolding just across the rust-red fence marking the border between Tecate, California and Mexico, street artist JR’s latest installation is a towering statement on immigration issues in the United States. A one-year-old boy named Kikito peers over to the other side with all the innocence and naiveté of childhood, just days after the current U.S. administration announced its intention to end the DACA (Deferred Action for Childhood Arrivals) immigration program.

The site-specific work is precisely angled to create the illusion that the child is grasping the top of the fence, looking out onto the Californian terrain. Like most of JR’s works, the 70-foot-tall image is rendered in black and white; the child is from the local community on the Mexican side of the border. Curated by Pedro Alonzo, the work asks onlookers to consider the fate of the 800,000 ‘Dreamers’ whose parents wished them a better future.

“Some people dream about fantasy worlds, I dream about walls,” JR told The New York Times in a phone interview. “I wonder, is this kid worrying about what will happen? What does he think? At one year old, you don’t see the frontier or which side is better… people will always migrate. When we built walls, people built tunnels. When we closed places, they went by water. The history of humanity is the story of people migrating.”

“For this little kid, there are no walls and borders.”

The installation will remain in place through October 2nd, and you can pinpoint its exact location at JR’s website.

Share on Facebook


[ By SA Rogers in Drawing & Digital. ]

[ WebUrbanist | Archives | Galleries | Privacy | TOS ]


WebUrbanist

 
Comments Off on A Toddler Peers Over the US-Mexico Border Fence for JR’s Latest Installation

Posted in Creativity


Invisible Borders: Mirrored Picket Fence Blurs the Lines

06 Mar

[ By Steph in Art & Installation & Sound. ]

Mirrored Fence Illusion 1

Mirrors typically represent a way of facing reality, but depending on where they’re placed, they can bend it to the point of surreality instead. Take, for example, this invisible fence, a striking illusion installed at the Storm King Arts Center by artist Alyson Shotz. Driving past it, you likely wouldn’t even notice it was there, though your eye might be caught by unusual glimmers – tricks of the light.

Mirrored Fence Illusion 2

Mirrored Fence Illusion 3

‘Mirror Fence’ is exactly as the title suggests; a reflective barrier in the shape of a picket fence that’s almost perfectly camouflaged in its environment. The illusion is so effective that you could probably walk right up to it, only realizing that the barrier exists when the reflection of your own legs comes into view.

Mirrored Picket Fence Illusion 4

Mirrored Picket Fence Illusion 5

Though her portfolio reflects a diverse range of shapes and media, Shotz unifies her work with a common aim to “give form to the invisible forces of nature.” Many focus on light itself, such as a sculptural examination of the dual nature of light (as it bears characteristics of both a particle and a wave) entitled Geometry of Light, and a digital animation called ‘Fluid State’ that captures an ocean of reflective spheres over a dawn-to-dusk cycle.

Mirror House Illusion

The installation calls to mind another recent project, ‘Lucid Stead’ by Phillip K Smith III, wherein an abandoned home in the desert was fitted with mirrors that make up doors, windows and long horizontal siding to create the illusion of ghostly floating wood.

Share on Facebook


[ By Steph in Art & Installation & Sound. ]

[ WebUrbanist | Archives | Galleries | Privacy | TOS ]


WebUrbanist

 
Comments Off on Invisible Borders: Mirrored Picket Fence Blurs the Lines

Posted in Creativity