RSS
 

Posts Tagged ‘Facebook’

Facebook Moments app adds support for full-resolution photo storage

13 Sep

Facebook Moments, a private photo-sharing mobile app, has been updated with support for full-resolution images. Previously, Facebook Moments didn’t store the full-res version of users’ images, and makes it possible now when a user ‘favorites’ an image within 30 days of it being uploaded or shared.

In addition to adding full-res image support, Facebook also now makes it possible to share a Moments photo album with others (regardless of whether they’re on the platform) using a web link. Those who receive the link to the private album can then join it and, if they’d like, add their own images to the collection. The web link can be accessed via the album’s menu by choosing ‘Share link.’

Facebook Moments is available for both iOS and Android.

Via: TechCrunch

Articles: Digital Photography Review (dpreview.com)

 
Comments Off on Facebook Moments app adds support for full-resolution photo storage

Posted in Uncategorized


How to Size and Export Images from Lightroom for Facebook and Print

24 Aug

One of the most confusing features of Adobe Lightroom for many users, is how to get your final results out of the software, to show them to friends or to send to customers. Different from other programs, there is only one way to “save” thing out of Lightroom – that is to an Export Images. This article will walk you through some of the options to help you demystify this often confusing function, so you can post your images on Facebook, and get them printed, all using the right sizes.
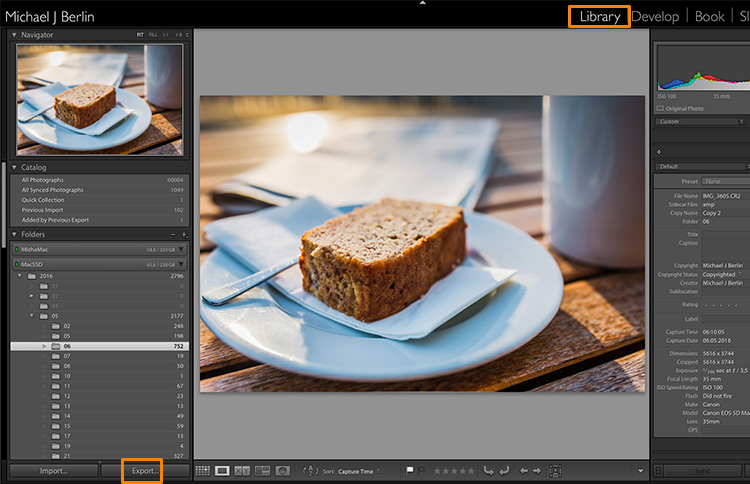
Lightroom export images

The reason is that Lightroom does not actually store your images, they are not really within its database. Lightroom merely keeps a list of locations where your original images are located, generates its own internal previews of those images to work with, and stores the changes you have chosen to make to the files. But until this stage all you are seeing in Lightroom is purely a visualization, there is no actual finished images created yet.

For this, you will have to learn to use the Export feature. While it is one of the essential features of Lightroom, it seems to confuse many people at the start. Part of the confusion certainly comes from the huge amount of options Lightroom offers when trying to save images:
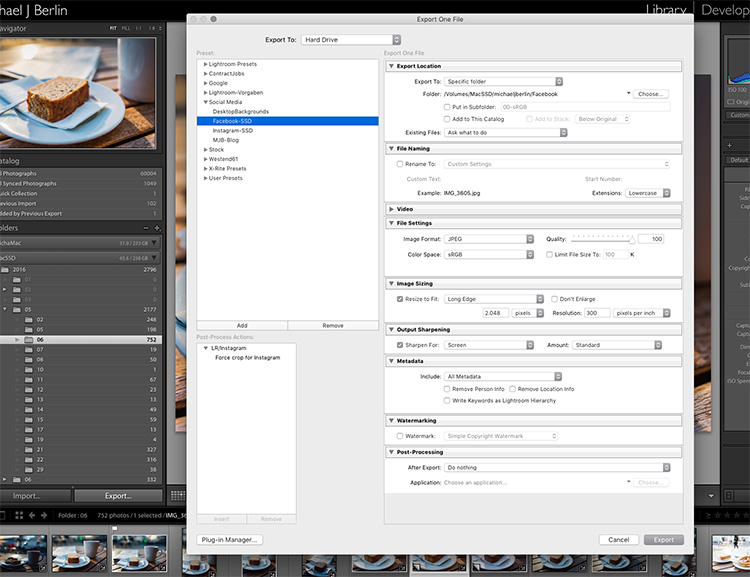
Lightroom export images

So let’s have a look at the most common cases for using the Export functionality to get the best results:

Export an image for Facebook

There are many discussions about how an image should be saved for Facebook. I trust Facebook’s own recommendations most and have had good experiences relying on that article. Typically I export images at the highest resolution Facebook will accept, the 2048 pixels mentioned in the help article.

So, first of all, you have to tell Lightroom where we want to save your image. Lightroom offers a lot of choices, one of them being to save the new resulting image into the same folder as the original. Remember, until now only the original image exists somewhere on your hard drive, no changes have been made to it.
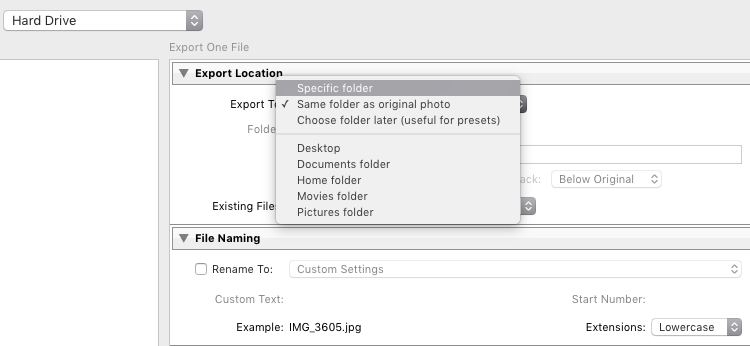
Lightroom export images

It can be a good idea to keep the original and your final copies in the same space. However, I typically save images into a subfolder to the original – named “For Facebook” for example – so when my original RAW image is in a folder structure by date “2016/05/06”, I would save my Facebook images into the sub folder “2016/05/06/For Facebook”.

Lightroom export images

Another option at this point that I regularly use, is to define a “Specific folder” for my outputs. This allows you to send all exported images to the same location on your hard drive, for example to keep a specific folder containing all the images you have uploaded to Facebook. This also works great to automatically save files into an online cloud storage such as into a Dropbox folder on your disk.

File format

Further down on the Export screen, you get to choose the file format you want to make the exported image. For internet purposes, you would mostly choose JPEG as the desired file format. JPG is a compressed format which allows faster transmission of images, so most internet based platforms use this format to store photos. PSD and TIFF will allow you to store images in full detail in with a wider range of colors (16 bit instead of 8 bit). Some printers (photo labs) will accept TIF files because of the additional details stored in the images, but you should make sure your printer does before trying to send files that can reach more than 100 MB.
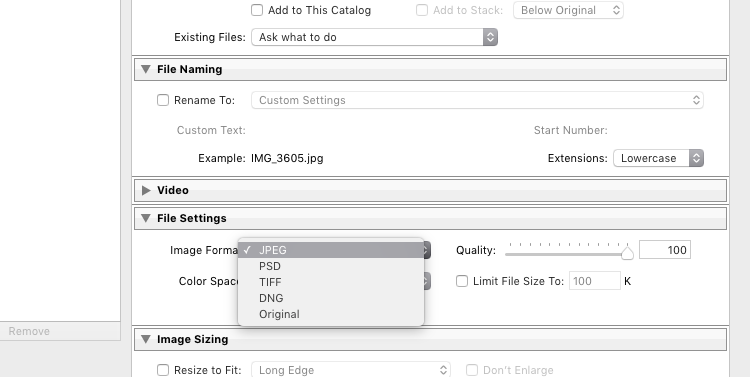
Lightroom Export 05 File Format

With the JPEG format, you also have to choose the Quality level. As JPEG tries to find areas of similar colors to make the file size smaller, the quality setting defines how “different” a color section needs to be before a compression is being applied. The lower the quality, the more compression artifacts you might see in the final image, in exchange for a lower file size. In most cases, values around 80-90% will not show critical changes over the full 100%, and only in rare occasions (when file size is very critical) you should go below 60%.

Color profile

Besides the format and quality settings, there is another drop down box in this section showing the color profile to be used. In simple terms, the color profile defines how many (and which) colors can be accurately stored. The smaller a color profile is, the less color information it contains, but also the smaller the file sizes will also be.
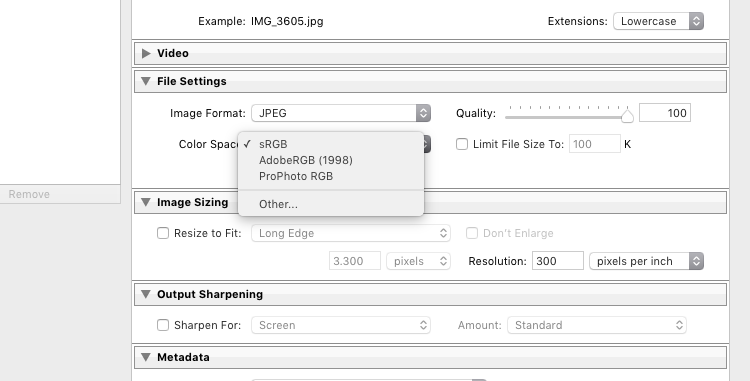
Lightroom Export 06 Color Space

In general, sRGB is the best choice for all images that are meant to be displayed on electronic screens, from large computer monitors, to smart phones, on your website, or on Facebook. The other options (AdobeRGB and ProPhoto RGB) both contain more color information, which can be advantageous if you want to apply further changes to the images at a later stage, for example in Photoshop or in the pre-print processing.

Just as with generating TIF or PSD files, you should only use these other color spaces when sending images when you know in advance that the recipient at the target location can work with them. Most online print services today are prepared to accept images in JPEG format and sRGB color space, as this is what most consumers produce with their cameras.

Sizing your images

The final section you need to address before exporting your images are the resizing options:
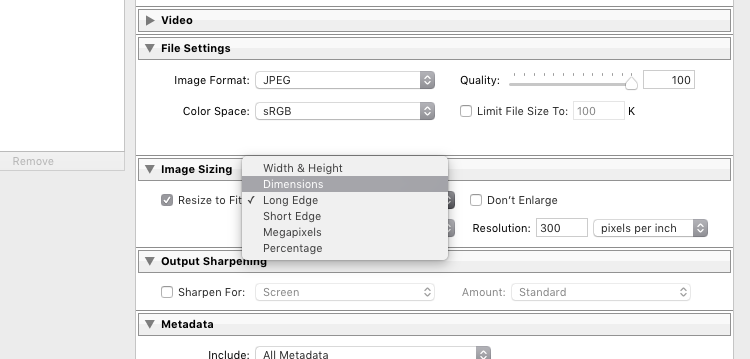
Lightroom Export 07 Resize

For images you plan to upload to the internet – be it your blog, to Facebook, or Instagram – you probably don’t want to upload the full resolution of 16 or 24 megapixels that your camera probably shoots. As mentioned in the linked help article above, Facebook only accepts up to 2048 pixels on the wide side, and if you upload larger images they will automatically be downscaled. So it is preferable to save the file in the recommended size, to save upload time.

With these settings, you could now export your image for sharing on Facebook. There are a few sections below like Output Sharpening (you can choose “Screen” and “Standard”, and compare the results to a version without output sharpening to see the difference) or adding a Watermark to your images automatically, but those are topics for a another article in the future. But just wait a second before you press the Export button right now, there is something else we should look at first.

Save your settings as an Export Preset in Lightroom

Now that you have taken the time to understand the settings on the Export screen and have come to a result you’re happy with, you want to be able to use the same settings in the future without having to think about getting them all right for every new image. This is why Lightroom allows you to save these settings as an Export Preset. Just press the “Add” button below the list of saved presets on the left half of the window, to add your personal preset – you can even have them sorted in Folders for different purposes:
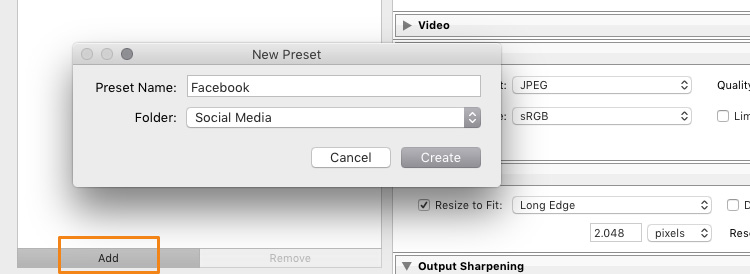
Lightroom Export 08 Add Export Preset

Once it is saved as an Export Preset, selecting the same settings is simply a matter of a single click. As you can see from the next screenshot, I have defined my personal Export Presets for different social media uses like my blog, Facebook, and Instagram, as well as usage as a new Desktop Background for my own computer.

Lightroom Export 09 Use Export Preset

Cropping images for desired format before the Export

With all the settings, we have looked at in the first part of this article, there is one important part that has to be done before entering the Export screen: Cropping your images when you want to use them into a format (proportion) that does not match your camera’s output.

Most modern cameras produce images in a 3:2 aspect ratio, so the long side of an image is 50 percent longer than the short side – in a 24 megapixel camera this translate to 6,000 x 4,000 pixels. However, traditionally there are different popular formats, especially when it comes to printing images:

  • From the age of large format cameras, the 5:4 format (or 8×10 prints) is still very popular in some regions.
  • Medium format cameras usually produced images in 6 x 4.5 (so a 4:3 ratio) or in 6×6 square format.
  • The square format has also been Instagram’s unique format until recently.
  • TV screens, and a growing number of computer monitors, come in the 16:9 standard defined by high definition TV.

To print a full image in one of those different formats would cause distortion, as the image information would have to be squeezed to fit to the shorter sides. In general, printers will not distort the image but instead cut them off at the side. To avoid a random crop in print, what you need to do is to crop your images to fit the desired output format.

Make Virtual Copies

Bonus Tip: If you want to keep the original format for easy access and/or offer your customers different print formats, I recommend to create a Virtual Copy (keyboard shortcut is: Command/Control+’ or right click the image and select Create Virtual Copy, see screenshot below) from your image before doing the cropping. This way, you will have two (or more) versions of your images, one in original aspect ratio and others in the cropped format. Within Lightroom this will only take a minimal amount of space, as Virtual Copies do not duplicate the original file but are just an additional set of data within the database.
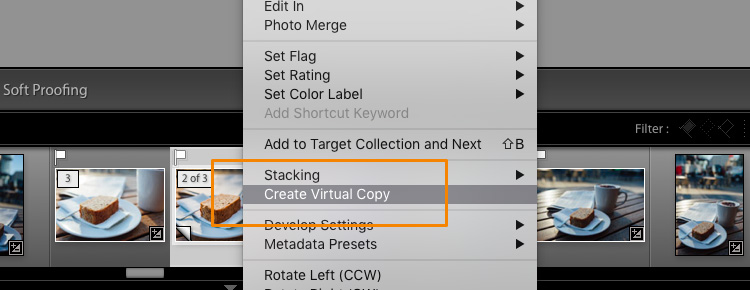
Lightroom Export 10 Virtual Copy

When you select the Crop tool in Lightroom’s Develop module, you will find a list of presets covering the most popular aspect ratios in a dropdown menu. Choose the desired format from the list, or choose a Custom Format if you don’t find the aspect ratio you are targeting.
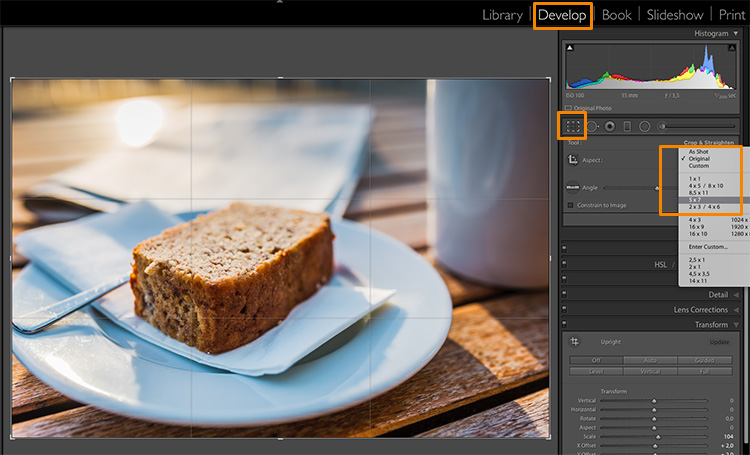
Lightroom Export 11 Crop Tool

If you select a 5×4 crop, you will see the crop guides highlighting the parts of your image that will remain in the final result, and the darkened parts on both sides of the photo that would be cropped off. You can now move the crop area to your liking to the right or left – or drag one of the corners in case you want to close in to your main subject a little more. Reminder: As everything in Lightroom, this is a non-destructive process, you can change the chosen crop at any stage and even return to the original size.
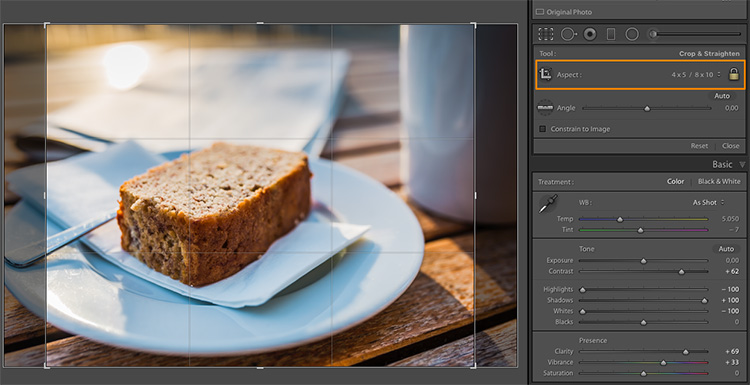
Lightroom Export 12 5x4 Crop

To give you an idea how the different crops can impact an image, I have created five virtaul copies, in addition to my original 3:2 format image, and have applied the five most popular aspect ratios as follows:
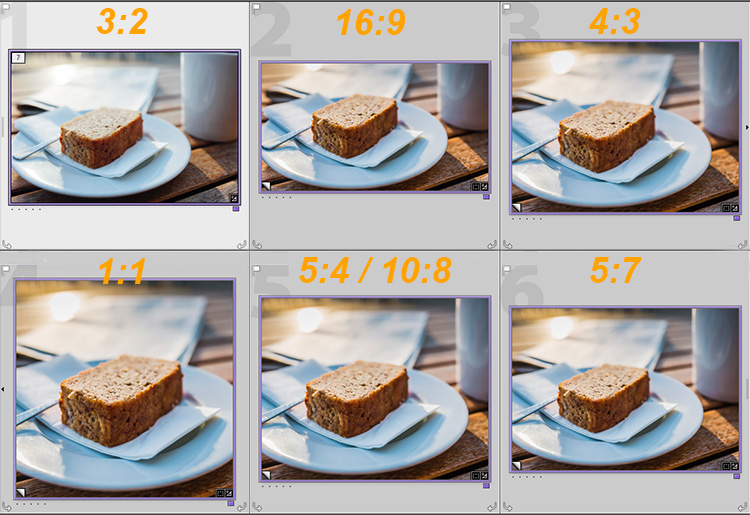
Lightroom export images Crop Comparison

Image size settings

Once you are happy with your crop, you can go back to the Export screen from the Library module. Now let’s have a look at the Image Sizing section again. As you can see, I have now chosen to make Lightroom fit the image to a 8 x 10 inch print format. Please note that I have changed the measure from “pixels” to “in” in the drop down box for this – if you prefer the metric system, there is a “cm” option for centimetres as well.
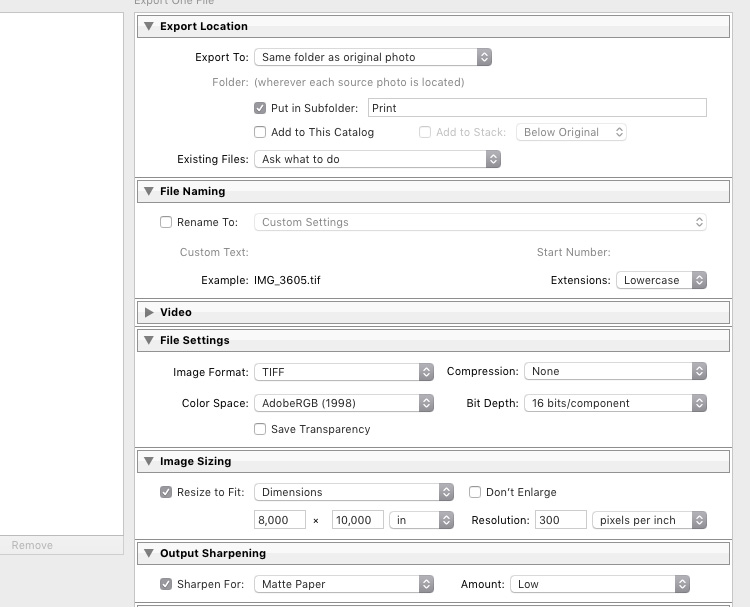
Lightroom export images Print

I have also set the Resolution to 300 pixels per inch which is the typical requirement for most printers. With these settings, Lightroom will now automatically save the image to the desired aspect ratio and file size. Remember to store these settings as another Export Preset if you are happy with the results, so you can use the same settings for future exports.

Also, please note that I have changed the File Settings in this case to TIFF, and AdobeRGB with 16-bit, to show the settings that will save the most information with the file. As discussed in the first part, this is only recommended if you know that the printer can handle the resulting large file size. If you want to deliver printable files to your clients, I would recommend you stick with JPEG and sRGB, as you can’t say in advance which printers they will use and most services will be able to handle those images as well.

Summary

I hope this article helped you to understand the basics of exporting images to different formats from Lightroom. In case you have questions, feel free to leave a comment below this article or join the Digital Photography School group on Facebook where I am available to answer questions as well.
lightroom-mastery.jpg


For more training using Lightroom check out our new course Lightroom Mastery!

googletag.cmd.push(function() {
tablet_slots.push( googletag.defineSlot( “/1005424/_dPSv4_tab-all-article-bottom_(300×250)”, [300, 250], “pb-ad-78623” ).addService( googletag.pubads() ) ); } );

googletag.cmd.push(function() {
mobile_slots.push( googletag.defineSlot( “/1005424/_dPSv4_mob-all-article-bottom_(300×250)”, [300, 250], “pb-ad-78158” ).addService( googletag.pubads() ) ); } );

The post How to Size and Export Images from Lightroom for Facebook and Print by Michael Zwahlen appeared first on Digital Photography School.


Digital Photography School

 
Comments Off on How to Size and Export Images from Lightroom for Facebook and Print

Posted in Photography


Facebook posts Surround 360 camera assembly instructions on GitHub

29 Jul

Facebook is pushing 360-degree VR content on its platform and in April announced its Surround 360 Open Source high-end VR camera. Now the company has posted detailed instructions on GitHub, which appear to be inspired by Ikea furniture assembly manuals, on how to source the parts, assemble the camera and install the software.

The Surround 360 combines 17 4MP cameras, 15 of them arranged in a circle and two fish-eye lenses on top and bottom, to capture 4K, 6K, or 8K 360-degree video. The cost of all the parts and components needed to build the device is approximately $ 30,000. This is a lot more than your average consumer VR camera but compares favorably to similar professional systems. Facebook also says it took a randomly selected engineer 4 hours to build the camera, so once all parts are available it seems you can be up and running in less than a day.

If you like the idea of building a Surround 360 for yourself you can download the instructions and software on GitHub. The video below shows you a time-lapse of the assembly process. 

Articles: Digital Photography Review (dpreview.com)

 
Comments Off on Facebook posts Surround 360 camera assembly instructions on GitHub

Posted in Uncategorized


Facebook adds 360 photo viewing to iOS and Android apps

10 Jun

Facebook has rolled out the ability to upload and view 360-degree images on its iOS and Android apps. These images can be taken via a phone’s panorama function or with a 360 capture device, such as the Samsung Gear 360.

Once uploaded, any user can click on the image and move through the scene by moving their phone in space or just scrolling with a finger. Owners of Samsung cameras which support the company’s Gear VR headset can view the 360s by tapping a button in the Facebook app.

The updated version of the Facebook app will be available for iOS and Android tomorrow, June 10th.

Articles: Digital Photography Review (dpreview.com)

 
Comments Off on Facebook adds 360 photo viewing to iOS and Android apps

Posted in Uncategorized


Facebook announces support for 360 degree photos

13 May

Only a few years ago capturing a 360 degree sphere was quite an involved and lengthy process, even more so when recording moving images. In 2016, 360 degree imaging has made it to the consumer level, with affordable 360 degree cameras such as the Ricoh Theta, Samsung Gear 360 or LG 360 Cam available in abundance. Clearly the web’s largest social network does not want to miss out on the trend – after integrating 360 degree videos in its news feed last year, Facebook will now the support of 360 degree photos on mobile and web.

The feature, called ‘360 Photos,’ is expected to arrive within the next few weeks and will allow users to upload and view 360 degree photos in their news feed. Users will be able to view the content by dragging the image with their finger on a mobile screen or by using the mouse on a desktop web browser. Of course there’s also the option to use a virtual reality headset, such as the Samsung Gear VR or Facebook’s own Oculus Rift, and get an even more immersive experience. 

Facebook supporting the new technology could be an important moment for 360 degree imaging. The ability to share spherical images and videos straight from capture should make this new type of imaging even more popular than it already is. Keep an eye on your news feeds; it’s only a matter of time before your friends and contacts will post the first 360 degree photos.

Via: The Verge

Articles: Digital Photography Review (dpreview.com)

 
Comments Off on Facebook announces support for 360 degree photos

Posted in Uncategorized


6 Powerful Reasons Why All Photographers Need Facebook Pages

04 Mar

Why Photographers Need A Facebook PageHi there everyone,


It’s Ed a.k.a Edrenalin here, editor of FashionPhotographyBlog.com, bringing you insights from the inside.


I’m constantly intrigued when I discover that out of the numerous photography businesses I’ve helped, the majority of them do not have a Facebook page for their business. Sure, these photographers had a personal Facebook profile, however, when it came to having a dedicated page for their photography, this was non-existent. I see this over and over again, and I can tell you that they are missing out on a great marketing tool in their business tool belts.


However, I have to insert a disclaimer here, in that not every business will benefit from having a Facebook page for their business. It really depends on what kind of clients you are after for your business. For those of you who are looking for clients to make contact with you to book you then a Facebook page would be an ideal platform for you. If not, you can still create a Facebook page but there may be other social media platforms that may be more relevant to your market.


Top 6 reasons why you need a Facebook Page for your business (even if you don’t have a photography business yet).


1. It’s free as long as you are connected on Facebook with a personal account. It won’t cost you anything to create a Facebook business page and it’s pretty quick and easy to set up so give it a go, you have nothing to lose.


2. Having a recognisable authority website such a Facebook, talking about your website provides bonus points for SEO. Not all social media accounts pass on “SEO link juice” these days (the reason for this is to prevent online scammers from abusing these social media platforms) however having a Facebook page is a great way to increase the visibility of your photography business, on Facebook and Google searches.


3. Not only can people see friends that they know like and interact with your page, they can read the reviews and the feedback that people leave in the comments, to work out if you are a reputable photography business or not. People trust what their friends say more than what what you say. It’s one thing for you to talk about how great you are with your photography business, but it’s another when they hear it (or read it) from people they know, trust or relate to.  


4. Potential clients who want to send a message to you on your website for an enquiry or booking might want to first know how quickly will you reply back to them (and whether you are still in business or on holiday). They may check out your Facebook page, since Facebook is one of the largest social media platforms in the world, and see what you are currently up to, and check up on your most recent posts.


5. It allows your target audience to discover your photography business outside your website. By having a Facebook page you have another web property with a sizeable audience that potential clients can find out about you and your photography, even if they don’t know what the web address of your photography website is (or even if you don’t have one yet).


6. And here is one of the most important reasons – If you don’t have a Facebook page yet, you can guarantee that your competitors already do and they are communicating with your potential clients before you get the chance to. This is the reality in today’s competitive marketplace and a lot of photographers are losing potential business because they haven’t jumped on board Facebook yet and join the conversation.


So if you are hesitating or been thinking about starting a Facebook page for a long time but haven’t done so yet, I recommend that you do so right away for the reasons stated in this article. Do not worry if it doesn’t look perfect the first time. Remember that progress is better than perfection, and you can always close the page down or make edits to it later if it’s not to your satisfaction.


Do you like this article? Want to read more articles like this? Then please SHARE this article on social media. If you have any comments or questions please feel free to put them in the comment section below. 


Fashion Photography Blog

 
Comments Off on 6 Powerful Reasons Why All Photographers Need Facebook Pages

Posted in Uncategorized


How to Get the Most out of Membership in Facebook Photography Groups

01 Dec

You can’t avoid them. Photography Facebook communities are everywhere now. Most photographers belong to at least one. You don’t even get a choice – people just add you to groups, and before you know it your newsfeed is just one long stream of photography chatter. And, let’s face it, the quality varies!

Becoming an active member of a great Facebook group can be a fantastic source of inspiration, support, motivation and friendship. It can be a wonderful, life-enhancing experience. I have met true, like-minded friends via these groups over the years.

04

I used to be a member of a zillion Facebook groups. I tried to engage with all of them before realizing that I was losing weeks of my life interacting with stuff that didn’t really add any value to my photography, or to my life in general. So, I made the decision to cull the groups that I didn’t get much from, and just removed myself without a second thought.

Out of the groups that remained, I chose just three in which to be active. These were the groups I felt strongly connected to. I had become a core member of each and truly enjoyed the people and the chats.

This left a small number of groups in which I decided to become a silent member. I didn’t feel a bond with the group, but I was still getting value from the content. Yes, in some groups, I am one of the lurkers.

I don’t contribute. I might click Like occasionally if I see something wonderful, but I don’t post, but I am not alone. In larger Facebook groups the majority of members are silent. However, you are looking and reading, this doesn’t make you any less important. In fact, nothing could be further from the truth. I am admin for a fabulous Facebook group of learning photographers, and I often get private messages of thanks from members who have never once contributed to a thread. These lurkers are actually very important to me. I know they are quietly consuming the content in the background.

01

But there is another type of member. They attempt to engage but others don’t respond. They post sporadically in different groups, get dejected, and sometimes even defensive when their posts do not get the engagement that other active members enjoy. No one commented. No one even pressed Like.

Some will grump in silence and decide never to post there again. Some are a little noisier about it…

It is human nature to feel this way. If we go to the effort of putting ourselves out there, then of course we hope for a positive response. When we don’t get one, we feel disappointed, or even rejected. They may think:

  • They are cliquey.
  • They are unfriendly.
  • They have not accepted me.

Sometimes stuff just gets missed. People are busy, posts get buried – that’s life. However, often the reason for the lack of response (or maybe the negative response) is much more to do with you than you might want to believe.

Let’s say you have found a photography Facebook group that you like. It just ‘fits’. You feel an affinity with the other members, the ethos of the group works for you and the content is pitched at your level. Maybe you have just joined or maybe you have been lurking for a while and now you would like to enter the fold.

How do you go about doing that? Especially in a well established group?

06

I have seen many newbies join Facebook groups and become much-loved members within a few weeks. However, I have also seen others try, only to crash and burn. Here is what I have learned from those who manage to succeed.

1. Take your time. Don’t ask for something straight away.

I see this all the time. A newbie’s first ever post is asking for something from the other members. It might be a request for critique, or a question about a challenge they are having.

Asking for something at this point is not ideal. The other members don’t know you. They don’t feel compelled to help you yet. Not because they don’t like you, but because you haven’t given them a reason to want to help you.

So how do you make people want to help you?

2. Introduce yourself (but your life story isn’t necessary).

Tell everyone who you are, that you are glad to be there, and that you’re looking forward to getting involved. Don’t post an image. Don’t ask for anything at all.

Keep it short and sweet. No one wants to read a random stranger’s autobiography on their newsfeed, however interesting you may think it is.

05

3. Give of yourself and watch it come back.

If you don’t take the time to respond to others, why would you expect them to respond to you?

Find images you genuinely like and compliment the photographer, or ask them a question about how they achieved it. Photographers love to be congratulated on their work and they enjoy talking about how it was created.

If there was a question posted that you know the answer to, then take some time to craft a response.

If you can identify with a challenge someone else is having, say so. Empathize. The person on the receiving end of your time will be grateful, and they will remember.

4. Engage selectively.

Don’t misinterpret number three above. I am not saying that you should hop onto every thread gushing about everyone’s images, answer every question, and agree with every statement. People-pleasers never win. Not only would other members see right through this, but you would also have no time left in the day for anything else.

Engage with posts which add value to the group and ignore the nonsense (there will be some). Be present in interesting discussions, and frame your responses with respect and intelligence.

You will be remembered.

02

5. Reach out to like-minded individuals.

We live in a new world. A world where it is actually possible to have good friends you have never met in person. Making friends online can be similar to making friends the traditional way, in that we gravitate towards those we have something in common with.

Look for those people in the group. Maybe they have a similar style to you, or they seem to get your dry sense of humour. Perhaps, like you, they love to geek out on equipment specifications, or they are struggling with the same issues that you are.

Connect with them within the group at first (in a non-stalker way) then later send them a friend request.

6. When posting or commenting, consider motive, wording and tone.

So let’s say you have done everything in numbers 1-6 above. Now your fellow members are much more likely to respond positively to you! They have seen your name pop up for some time now, alongside your considered comments. Maybe they have even been on the receiving end of some of your genuine praise.

They still have to feel inclined to engage with you though. Your motive, wording and tone will all contribute to whether other members interact positively with you.

That, however, is a whole other article…

03

Do you belong to a Facebook photography group? What makes you decide whether to become a part of that group, whether to remain a lurker or whether to leave?

googletag.cmd.push(function() {
tablet_slots.push( googletag.defineSlot( “/1005424/_dPSv4_tab-all-article-bottom_(300×250)”, [300, 250], “pb-ad-78623” ).addService( googletag.pubads() ) ); } );

googletag.cmd.push(function() {
mobile_slots.push( googletag.defineSlot( “/1005424/_dPSv4_mob-all-article-bottom_(300×250)”, [300, 250], “pb-ad-78158” ).addService( googletag.pubads() ) ); } );

The post How to Get the Most out of Membership in Facebook Photography Groups by Julie Christie appeared first on Digital Photography School.


Digital Photography School

 
Comments Off on How to Get the Most out of Membership in Facebook Photography Groups

Posted in Photography


Facebook launches 360-degree video

29 Sep

It seems 360-degree videos might be here to stay. In March, Youtube started to support the immersive video format, and now Facebook has introduced the technology as well. Soon, Facebook users will be able to share and view 360-degree videos in right from their News Feed. Read more

Articles: Digital Photography Review (dpreview.com)

 
Comments Off on Facebook launches 360-degree video

Posted in Uncategorized


Ello vs. Facebook for Photographers

21 Dec

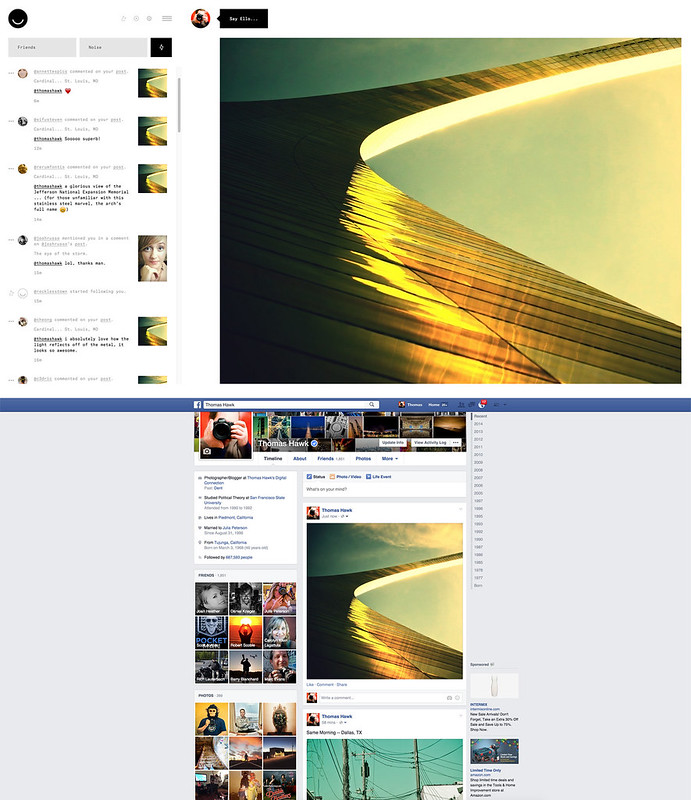
Ello vs. Facebook

Are you an artist or photographer? Do care about the integrity of your images? Do you dislike ads and sponsored posts shoved in your face? Do you dislike having 99% of your feed filtered out of view for those who follow you?

Look at the above and answer this question: where does my photograph of the St. Louis Arch look better, Ello or Facebook?

By the way, Ello is not just a social network for photographers. I’ve met some amazing creative writers, thinkers, and purveyors of all sorts of culture there.

There are communities there building on things like finance, tech, science, politics, etc. It’s an open inclusive community.

It’s also where I spend almost all of my online time these days. So, if you notice I’m quiet on Facebook and other networks, it’s not that I’m being quiet, per se, it’s just that I’m hanging out over there at Ello.

Like most new communities online or IRL, it takes some time and energy and effort to make Ello work for you, but it’s a far more rewarding experience and worth it and I’m happy about doing my own part to participate in something better.

If you are new to Ello here are some tips for you.

You can find me on Ello here.


Thomas Hawk Digital Connection

 
Comments Off on Ello vs. Facebook for Photographers

Posted in Photography


Follow our New Facebook Page & Find the Best Photography Tips from Around the Web

10 Sep

I started Digital Photography School as a simple blog in April 2006. My goal was to share the things I knew about photography with those just starting out in their journey – in a time where digital photography was really gaining momentum.

Since that time dPS has changed in many ways.

One of the changes since starting dPS in 2006 is the rise in social media. We’ve embraced this early on by creating an active dPS Facebook page and Twitter account.

These accounts are largely about highlighting new tutorials that we publish each day as well as highlighting some of the 4700+ posts in our archives that readers might have missed.

Many of our readers appreciate these accounts but we’ve always been really aware that there’s a lot of great photography content on the web beyond what we produce at dPS.

In response to this we started a dPS Pinterest page to curate the best content that we’re seeing around the web. This has been well received so we want to extend the idea further and just a few days ago started a new Facebook page which will largely about sharing content we like on other sites.

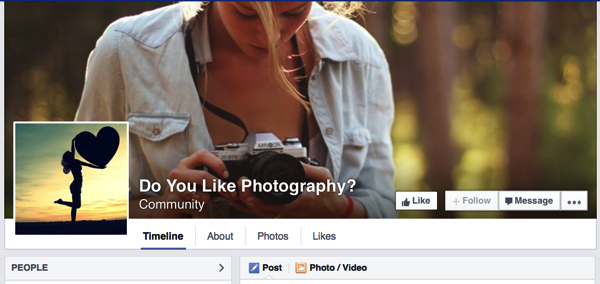
Do you like photography

The new Facebook page is at Do You Like Photography?

Each day on this page we’ll post a variety of tutorials, inspirational images and ideas to help you in different types of photography. We’ll also occasionally share a post or two from our archives that we think might be relevant but it’ll largely be content from other photography blogs and sites.

So if you’d like more photography tips and tutorials in your Facebook stream (in addition to the dPS page where we will continue to publish the same amount of posts each day as we’ve always done) follow our new page here and you’ll hopefully start seeing them in your feed shortly after.

PS: it’s only been five days since we started our new page but we’ve already had over 43,000 people like it – thanks everyone for your support!

The post Follow our New Facebook Page & Find the Best Photography Tips from Around the Web by Darren Rowse appeared first on Digital Photography School.


Digital Photography School

 
Comments Off on Follow our New Facebook Page & Find the Best Photography Tips from Around the Web

Posted in Photography