Each photographer has their own way of approaching a scene, choosing which settings on their camera will best reflect their vision, and then crafting the final image. You get to make this series of decisions each time you take a photo, and it’s a highly personal experience.
But you can still learn a lot by going behind the scenes of a photo, and hearing how the photographer made their own decisions. Whether you pick up a new tip for creating an interesting effect, a new way of looking at a scene, or simply the inspiration to go and shoot, it’s both informative, and a lot of fun too.
So here are six of my favourite photos, and details about how they were taken. Get out your notebook, have your camera handy, and let’s go.
1. Waterfall in the Woods
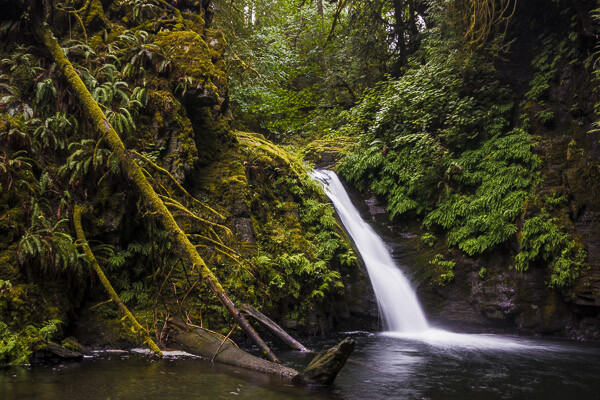
Vancouver Island, Canada – Settings: 14mm, f/10, 1.6 seconds, ISO 80
This shot is a great example of what happens when you pick a slow shutter speed. Moving water takes on this flowing look and adds a softer feel to the image.
If you want to get this effect, first set your shutter speed to a long value. Here the setting was 1.6 seconds – a value around there is a good place to start. Then you’ll need to adjust the rest of your settings to get a good exposure. This can be tricky sometimes, especially if it’s a really bright scene. A high (small) aperture, and low ISO can really help. But if that’s not enough, you may need to use a neutral density filter.
Then make sure you can keep your camera steady for the entire shot. The ideal would be to use a tripod, but it doesn’t even need to be a big, heavy one. This shot was taken with a point and shoot camera (the Sony RX100III) and the tripod was just a tiny tabletop tripod set up on the rocks.
Finally take the photo, and enjoy a beautiful waterfall image that really grabs your viewers’ attention.
2. The Bee and the Flower
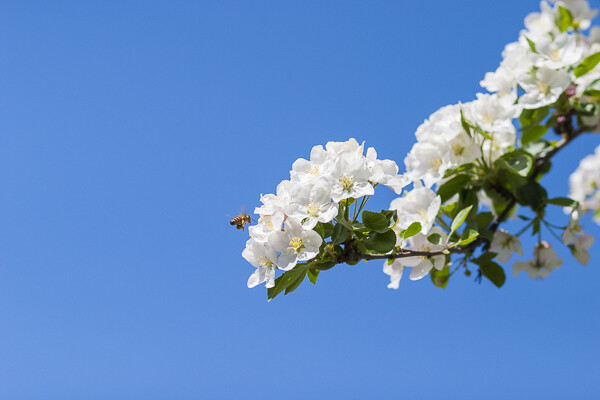
Edmonton, Canada – Settings: 85mm, f/4.0, 1/3000th, ISO 200
This photo has two elements to pay attention to, the first being the composition. The bee is very small, but you can still easily make it out. That’s thanks to negative space. All of the blue, empty sky is negative space that draws your eye towards the subject. One of the keys to finding negative space in a scene is to move your feet. Walk around, looking to see if you can find an angle that helps simplify your frame by incorporating negative space. Don’t stop there, though. Change your position even further by climbing up high, or, as in this case, lying on the ground. Yep, this photo was taken lying flat on the grass. Don’t be afraid to get messy in the pursuit of a great shot.
The second thing to note about this shot is the shutter speed. There’s a very fast setting chosen here (1/3000th of a second) and that allowed the bee to be in sharp focus, even when it was moving very fast. A slower shutter speed could have led to motion blur of the subject, losing that crisp, sharp detail. When shooting fast moving objects, make sure your shutter speed is set appropriately.
3. The Internet Man
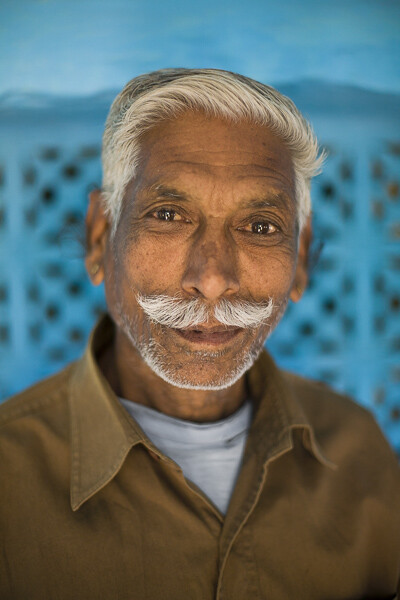
Jodhpur, India – Settings: 50mm, f/1.6, 1/320th, ISO 400
There’s a great story behind this image. On a trip through India we found ourselves in Jodhpur, known as the Blue City. The walls of many of the houses are painted a vibrant blue, and it made for some incredible images. But this portrait was not taken on a photo walk, but rather after we made our daily visit to the internet shop.
After we finished up on the computer, we got to chatting with the man who owned the shop. He was a wonderful guy, with a great face, so we asked for a portrait. He was happy to oblige, and by standing in the doorway of his shop we got both a beautiful blue background, and catchlights in his eyes from the light coming in the door (catchlights, those white specks in the eyes, are a great way to add life and sparkle to your subjects’ eyes).
One final note on the settings: using a low aperture value can help your subject stand out from the background, especially if you can’t bring them very far forward from the background. In this image f/1.6 was used, which is definitely very low, but it really helped create some background separation.
The best part of the story? After we took his photo (and gave him a copy of the file) he thanked us, and told us that he’d pray that we’d have a son before returning to India. Well, we did have a son. Now we just have to go back, don’t we?
4. Cows in the Field
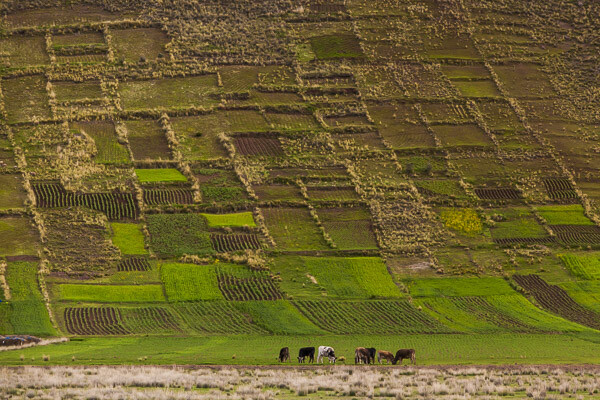
The Sacred Valley, Peru – Settings: 200mm, f/7.1, 1/1600th, ISO 800
Learning how to use lens compression to your advantage can make for some really impressive shots. This image is a great example of this technique.
Very simply, when you use a longer focal length (like the 200mm used in this photo) it makes the distance between objects in the frame appear to be less. It makes the background appear closer to the foreground, and in this example it makes the hills appear very close to cows. Essentially, it compresses the space in the image.
Here you can see how it makes the hills really fill the frame and create a strong, patterned background that contrasts nicely with the organic shapes of the cows.
In your own photography you can use a long lens to make clouds appear much larger and closer to your subject, or make your friends look like they’re stepping on top of a building, Godzilla-style. There’s no limit to the creative effects you can achieve when you use compression.
5. Down the Stairs
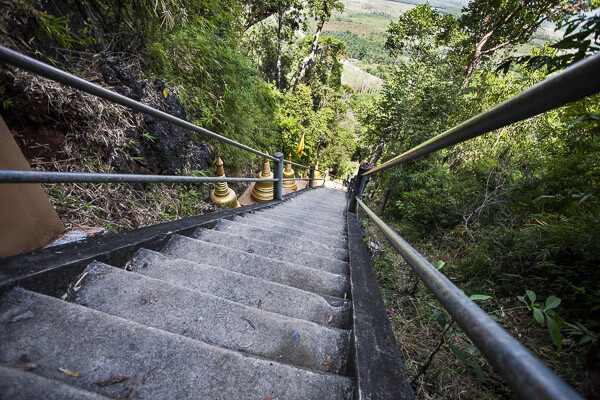
Krabi, Thailand – Settings: 17mm, f/5.0, 1/400th, ISO 400
If long lenses make objects appear closer to each other in your frame, what about wide angle lenses?
Here’s a great example. This shot, taken while looking down a few of the 1,272 treacherously steep steps of the Tiger Cave Temple, makes you feel like you may just fall down them, along with the photographer.
The wide angle lens (17mm) helps to create that feeling. The wide angle exaggerates the distance between objects, especially at the edges. Take a look at those hand rails at the edge of the frame. They look very far apart, especially compared to the distance between the hand rails further down the stairs. But this exaggeration at the edges helps to turn the rails into leading lines, drawing your eye down the stairs, and creating that falling feeling.
So if you want to add some drama to an image, or exaggerate perspective, grab a wide angle lens. Place objects near the edges and make use of the stretching it causes.
6. Camel at Sunset
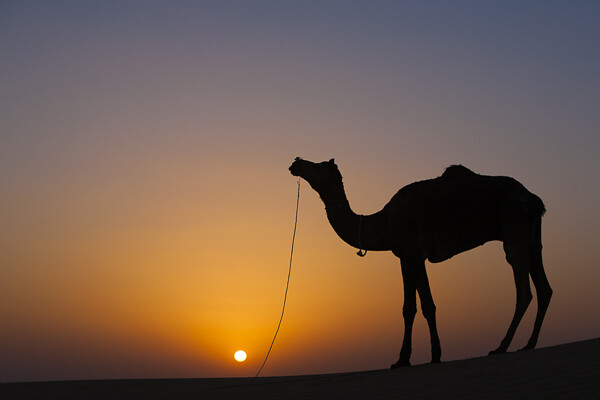
Jaisalmer, India – Settings: 70mm, f/7.1, 1/400th, ISO 125
Doesn’t a great silhouette image just grab your attention? It’s so different from how we normally see the world that it can add a big impact to your work.
But a silhouette is a prime example of how your camera can easily be fooled by light, and how you, the photographer, need to know how to control it.
In this example your camera might very well try to expose for the camel, or somewhere in between the camel and the sunset, and you’ll wind up with something really bright, or sort of dark, but it probably won’t look like a nice, crisp silhouette.
So what to do? Take control. When aiming for a silhouette you’ll want to expose for the sky, not the subject. Then you can either use exposure compensation to dial in the exposure you’re looking for, or better yet, jump into full manual control and choose your settings to get exactly the exposure and depth of field you want.
Hopefully this peek behind the decisions and settings of these photos gives you a few tips to take some great shots of your own. The more you learn about how all the settings on your camera affect the look and feel of your images, the better decisions you’ll be able to make. Best of all, this stuff doesn’t have to be hard to learn, and you’ll get to use the knowledge to create better images for the rest of your life.
googletag.cmd.push(function() {
tablet_slots.push( googletag.defineSlot( “/1005424/_dPSv4_tab-all-article-bottom_(300×250)”, [300, 250], “pb-ad-78623” ).addService( googletag.pubads() ) ); } );
googletag.cmd.push(function() {
mobile_slots.push( googletag.defineSlot( “/1005424/_dPSv4_mob-all-article-bottom_(300×250)”, [300, 250], “pb-ad-78158” ).addService( googletag.pubads() ) ); } );
The post 6 Eye-Catching Photos and How They Can Help You Improve Your Photography by Lauren Lim appeared first on Digital Photography School.

Digital Photography School



You must be logged in to post a comment.